


Installation and Care Guide Guide d’installation et d’entretien Guía de instalación y cuidado
Shower Drain
Drain de douche
Desagüe de ducha
K-9132
M product numbers are for Mexico (i.e. K-12345M) Los números de productos seguidos de M corresponden a México (Ej. K-12345M)
1114755-2-B
USA/Canada: 1-800-4KOHLER
México: 001-800-456-4537
kohler.com
©2011 Kohler Co.
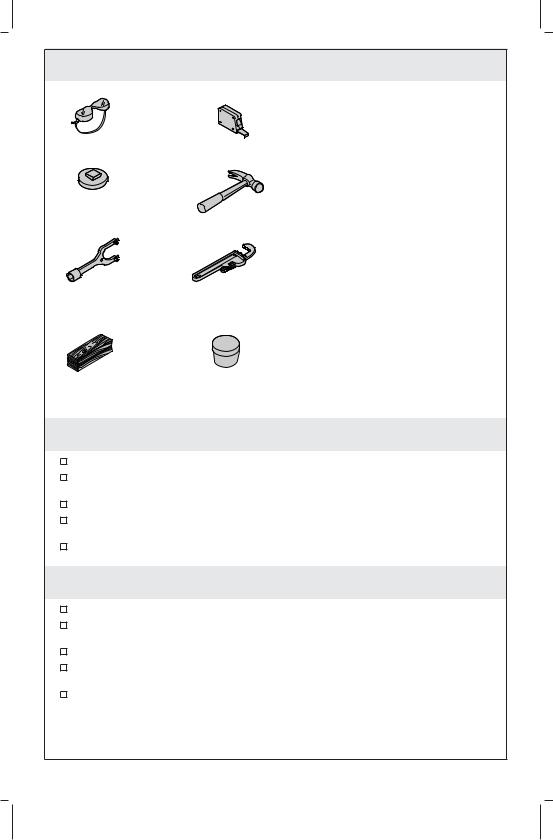
Tools/Outils/Herramientas
Drain Plug
Bouchon de drain
Tapón del desagüe
Basin Wrench
Clé pour bassin
Llave de lavabo
Support Blocks |
Plumbers Putty |
Blocs de support |
Mastic de plombier |
Bloques de soporte |
Masilla de plomería |
For Gasket/Connector:
Pour joint/connecteur:
Para empaque/conector:
•Hammer/Marteau/Martillo
•Soap Solution Solution savonneuse Solución jabonosa
For Traditional Caulking:
Pour calfeutrage conventionnel: Para un calafateo tradicional:
•Lead Furnace
Appareil de chauffage à plomb Horno para plomo
•Pot/Marmite/Crisol
•Caulking Mallet Maillet de garnissage Mazo para calafatear
•Caulking Iron - Inside and Outside Cordoir - Intérieur et extérieur Escoplo calafateador - Dentro y fuera
Before You Begin
Observe all local plumbing and building codes.
To ease the drain installation, it is recommended that the drain be installed to the fixture before installing the fixture.
Turn off the main water supply.
Locate the rough plumbing for the drain according to the roughing-in for the fixture and the drain.
Kohler Co. reserves the right to make revisions in the design of drains without notice, as specified in the Price Book.
Avant de commencer
Respecter tous les codes de plomberie et de bâtiment locaux.
Pour faciliter l’installation du drain, il est recommandé d’installer ce dernier sur l’appareil avant d’installer l’appareil.
Fermer l’alimentation d’eau principale.
Rechercher le plombage de raccordement pour le drain en fonction du plan de raccordement pour l’appareil et le drain.
Kohler Co. se réserve le droit d’apporter toutes modifications au design des drains et ceci sans préavis, comme spécifié dans le catalogue des prix.
1114755-2-B |
2 |
Kohler Co. |
Antes de comenzar
Cumpla con todos los códigos locales de plomería y construcción.
Para facilitar la instalación del desagüe, se recomienda que el desagüe se instale en la unidad antes de instalar la unidad.
Cierre el suministro de agua.
Sitúe las tuberías para el desagüe según el diagrama de instalación para la unidad y el desagüe.
Kohler Co. se reserva el derecho de modificar el diseño de los desagües sin previo aviso, tal como se especifica en la lista de precios.
Kohler Co. |
3 |
1114755-2-B |

Roughing-In/Plan de raccordement/Diagrama de instalación
Seal to meet local codes.
Sceller pour satisfaire les codes locaux.
Selle para cumplir con los códigos locales.
Ø 4-3/8" (111 mm)
1-1/4" (32 mm) Max/Max/Máx
1-15/16"
(49 mm)
Seal to meet local codes.
Sceller pour satisfaire les codes locaux.
Selle para cumplir con los códigos locales.
 2-1/2" (64 mm)
 2-7/8" (73 mm)
 3-1/16" (78 mm)
4-1/2" (114 mm)
K-9132
1114755-2-B |
4 |
Kohler Co. |

1. Install the Drain
Fixture |
Fixture/Appareil/Unidad |
|
|
Appareil |
|
|
|
Unidad Strainer Body Flange |
|
||
Bride de corps de la crépine |
|
||
Brida del cuerpo de la coladera |
|
||
Gasket/Joint/Empaque |
|
||
|
Washer |
|
|
|
Rondelle |
|
|
|
Arandela |
|
|
|
Nut |
|
|
Drain Pipe |
Écrou |
Washer |
|
Tuerca |
|||
Rondelle |
|||
Blocs de support |
|
||
Apply plumbers putty. Arandela |
|||
Bloques de soporte |
|||
Support Block |
Appliquer du mastic |
|
|
de plombier. |
|
||
Bloc de support |
|
||
Aplique masilla de |
|
||
Bloque de soporte |
|
||
plomería. |
|
||
|
|
||
Gasket
Joint
Empaque
Nut Écrou Tuerca
NOTE: To ease the drain installation, it is recommended that the drain be installed to the fixture before installing the fixture.
Installation Before Installing the Fixture (Recommended)
Add a support block to the shower fixture on each side of the drain hole.
Apply a bead of plumbers putty to the underside of the flange on the strainer body.
Insert the strainer body into the drain hole of the fixture.
From the underside of the fixture, place the gasket and washer onto the strainer body.
Using a pipe wrench, secure the drain to the fixture with the nut.
Properly seat the fixture into the pocket of the subfloor or slab and over the drain pipe.
NOTE: Refer to the instructions packed with the fixture for proper drain pipe height.
Verify the drain pipe extends the required height into the strainer body. Adjust as needed.
Verify the drain pipe is centered in the strainer body. Adjust as needed.
Installation After Installing the Fixture
From the underside of the fixture, place the gasket and washer around the drain hole.
Position the gasket, washer, and nut on the drain pipe.
Properly seat the fixture into the pocket of the subfloor or slab and over the drain pipe.
Apply a bead of plumbers putty to the underside of the flange on the strainer body.
Thread the strainer body into the nut of the fixture.
Kohler Co. |
5 |
1114755-2-B |
 Loading...