


Homeowners Guide
Thermostatic Mixing Valve
K-2972, K-2975 |
|
K-2973, K-2976 |
M product numbers are for Mexico (i.e. K-12345M) Los números de productos seguidos de
M corresponden a México (Ej. K-12345M)
Français, page “Français-1” Español, página “Español-1”
1145568-5-A

IMPORTANT INSTRUCTIONS
READ AND SAVE FOR THE
CONSUMER
WARNING: Risk of scalding or other severe injury.
CAUTION: Risk of scalding hazard. This device has been calibrated at the factory to ensure a safe maximum water temperature. Any variance in settings or water inlet conditions from those used during factory calibration may raise the discharge temperature above the safe limit, and may present a scalding hazard.
•Before completing installation, the installer must set the maximum water temperature setting of this valve to minimize the risks associated with scalding hazards according to ASTM F 444.
The installer is responsible for adjusting the maximum water temperature of this valve according to instructions.
This valve meets or exceeds ANSI A112.18.1 and ASSE 1016.
If you do not understand any of the temperature adjustment instructions in this document, in the United States please contact our Customer Care Center at 1-800-4KOHLER. Outside the U.S., please contact your distributor.
IMPORTANT NOTICE: Please fill in the blanks on the valve label and below, in the NOTICE TO HOMEOWNERS box. Retain this guide for future reference.
•The valve is calibrated to 104°F (40°C) at the first stop position, and the maximum temperature limit stop is positioned so the outlet water temperature does not exceed 120°F (49°C).
•Factory calibrated inlet conditions are:
Hot and cold water pressure = 43-1/2 psi (300 kPa) Hot water supply temperature = 149°F (65°C) Cold water supply temperature = 59°F (15°C)
•If inlet conditions differ from those used during factory calibration, it may be necessary to re-calibrate the valve after installation. The installer must check the mixed flow temperature after installation, and adjust the valve as needed according to the instructions.
1145568-5-A |
2 |
Kohler Co. |

IMPORTANT INSTRUCTIONS (cont.)
NOTICE TO HOMEOWNERS! This device has been preset by
_______________________ of _______________________________ to ensure a safe maximum temperature. Any change in the setting may raise the discharge temperature above the limit considered safe, and lead to scalds.
Date: ______________
Kohler Co. |
3 |
1145568-5-A |

Supplies Closed
Turn integral supply stops 90˚ for OPEN/CLOSE.
Locking Bar
Supplies Open
Integral
Supply Stops
Integral Supply Stop Operation
NOTE: Use a socket wrench with 1/2″ (13 mm) socket to adjust the stops.
Turn Off the Stops
Use a socket wrench to turn the integral stops 90° counterclockwise to close both the hot and cold water inlet supplies.
NOTE: If the inner body turns, but the outer ring does not turn, firmly tighten (clockwise) the integral stop. Then rotate counterclockwise. The outer ring should then turn with the integral stop.
NOTE: If the outer ring still does not turn, slide the locking bar up by loosening the screw. Free the integral stops by turning them clockwise and then turn them back to their original position. Slide the locking bar back in place and secure with the screw.
Confirm the stops are closed using the diagram above.
Turn the volume control counterclockwise to release excess water (not shown).
1145568-5-A |
4 |
Kohler Co. |

Integral Supply Stop Operation (cont.)
The cartridge or check valves may now be removed for servicing or replacement.
NOTE: Keep a rag handy to catch excess water that will gradually drain when the valve cartridge is removed.
Kohler Co. |
5 |
1145568-5-A |

Twist.
Remove screen.
Servicing the Filters
Remove the trim.
Close both stops following the directions in the previous section.
Use a socket wrench with 1/2″ (13 mm) socket to remove the stop assembly (hot is left side, cold is right side).
Remove the screen assembly by turning and pulling from the check valve body.
Clean or replace the screen assembly as needed.
Clean or replace the check valve body as needed.
Reinstall the screen assembly to the check valve body by pushing in and turning 90°.
Reinstall the check valve body by turning clockwise until it drives the stop body open.
Open the supply stops and check for leaks.
Reinstall the trim.
1145568-5-A |
6 |
Kohler Co. |

Increase Temperature
Spline
Adapter
Decrease Temperature
Check the Temperature Setting
NOTE: The thermostatic valve cartridge is calibrated at the factory for a shower temperature of approximately 104°F (40°C) to 105°F (41°C) and a maximum hot temperature of 120°F (49°C).
Turn the water on.
Attach a trim handle or plaster guard (found in volume control valve K-2974 or K-2977 or transfer valve K-728), onto the valve spline adapter.
Turn the valve spline adapter fully counterclockwise so the trim handle or plaster guard can no longer move. The valve spline adapter is now in the full hot position.
Allow the water to run for several minutes to stabilize the water supply temperatures.
Position a thermometer in the water stream to check the temperature of the hot water.
If the water temperature exceeds 120°F (49°C) or is less than desired, proceed to the ″Adjust the Hot Temperature Limit″ section.
Turn the trim handle or plaster guard clockwise until you hear a click. Do not turn any further. This is the shower temperature position.
Remove the trim handle or plaster guard from the valve spline adapter.
Kohler Co. |
7 |
1145568-5-A |

Check the Temperature Setting (cont.)
Position a thermometer in the water stream to check the shower temperature.
If the water temperature is less than 104°F (40°C) to 105°F (41°C) or is more than desired, proceed to the ″Adjust the Shower Temperature″ section.
If both settings are correct, fill out the ″Notice to Homeowners″ section of this Homeowners Guide.
1145568-5-A |
8 |
Kohler Co. |
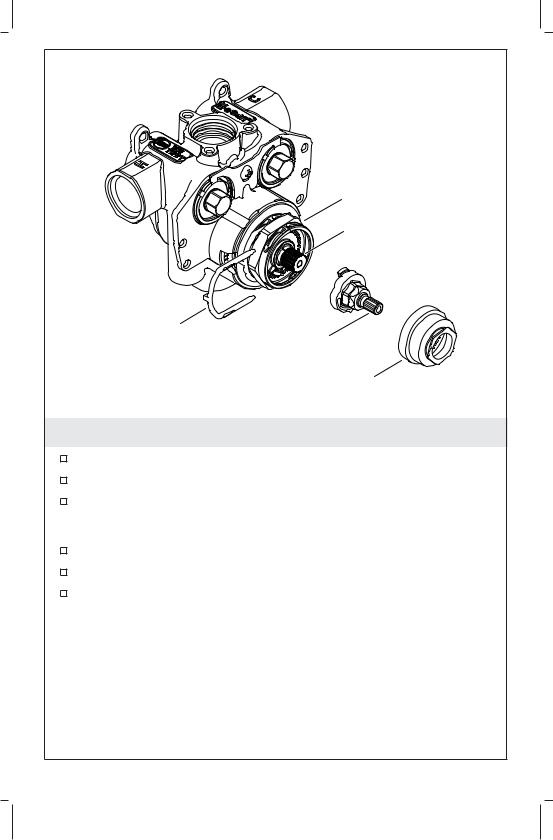
Nut
Valve Stem
Outer Clip
Spline Adapter
Detent Collar
Adjust the Hot Temperature Limit
Remove the outer clip from the head nut.
Remove the detent collar.
Remove the spline adapter.
NOTE: Keep the detent collar off while making adjustments.
Turn the valve stem fully counterclockwise.
Using the volume control valve (not shown), turn on the water.
Allow the water to flow for several minutes until the water temperature stabilizes.
Kohler Co. |
9 |
1145568-5-A |

Adapter Tab
Hot Temperature
Limit Stop
Valve Stem
Spline Adapter
Hot Temperature
Limit Stop
Adapter Tab
Adjust the Hot Temperature Limit (cont.)
Using a thermometer, check the temperature of the water.
Turn the valve stem clockwise until the water temperature reaches 120°F (49°C).
Reinstall the spline adapter with the adapter tab positioned flush with the hot temperature limit stop on the cartridge.
Using the volume control valve (not shown), turn off the water.
1145568-5-A |
10 |
Kohler Co. |
Increase Temperature
Detent
Collar
Decrease Temperature
Outer Clip |
Spline |
|
Adapter |
Adjust the Shower Temperature
If the detent collar is installed: Remove the outer clip and disengage the detent collar from the teeth of the cartridge. Do not remove the collar; allow it to hang from the cartridge.
If the detent collar is not installed: Loosely position the detent collar over the cartridge, ensuring the collar does not engage the cartridge teeth.
Place the trim handle (not shown) or plaster guard (not shown) onto the valve spline adapter.
Turn the valve spline adapter fully counterclockwise so the trim handle or plaster guard can no longer move. The valve spline adapter is now in the full hot position.
Remove the trim handle or plaster guard from the valve spline adapter.
Using the volume control valve (not shown), turn on the water.
Allow the water to flow for several minutes until the water temperature stabilizes.
Hold a thermometer in the water stream to check the water temperature.
Once the water temperature reaches the set hot temperature limit (section ″Adjust Hot Temperature Limit″) begin slowly rotating the detent collar and spline adapter clockwise.
Kohler Co. |
11 |
1145568-5-A |

Adjust the Shower Temperature (cont.)
NOTE: While rotating the detent collar, small in-and-out adjustments will be required to ensure the collar does not engage the cartridge teeth. Use the detent collar to rotate the spline adapter.
While rotating the collar and spline adapter, monitor the water outlet temperature.
When the temperature reaches 104-105°F (40-40.5°C), push the detent collar in until it engages the teeth of the cartridge.
With the clip tab positioned toward the valve, reinstall the clip to the head nut.
Using the volume control valve (not shown), turn off the water.
1145568-5-A |
12 |
Kohler Co. |

Locking Bar
Seals
Service the Stops
NOTE: Keep a rag handy to catch excess water that will gradually drain when the stop cartridge is removed.
NOTE: Lubricate the seals of new assemblies with silicone.
Turn off both the hot and cold water at the nearest supply shut-off or water main.
Verify that the water is off before continuing.
Loosen the screw and slide the locking bar up until it is clear of the stops. Tighten the screw to keep the locking bar from sliding back down.
Use a socket wrench to remove the stop assemblies.
Apply silicone lubricant to the rubber seals on the new assemblies.
Thread the new stop assemblies into the valve. Do not overtighten.
Open the stops using a socket wrench.
Loosen the screw on the locking bar and slide it down.
Tighten the screw.
Turn on the hot and cold water supplies.
Check for leaks.
Kohler Co. |
13 |
1145568-5-A |

Troubleshooting
NOTICE: Turn off the water supply to the valve before performing any maintenance.
This troubleshooting guide is for general aid only. For service and installation issues or concerns, call 1-800-4KOHLER.
Symptoms |
Probable Cause/Recommended |
|
Action |
1.Only hot or cold water from A. Inlet supplies are reversed. See the water outlet. ″Reverse the Inlet Supplies″ section
in the Installation Guide.
|
B. Check filter screens for |
|
blockage. Clear if necessary. |
2. Fluctuating or reduced flow |
A. External condition variation |
rate. |
such as reduced pressure. |
|
B. Check filter screens for |
|
blockage. Clear if necessary. |
|
C. Make sure that the minimum |
|
flow rate is sufficient for supply |
|
conditions. |
|
D. Make sure that dynamic inlet |
|
pressures are nominally balanced |
|
and sufficient. |
|
E. Make sure that inlet |
|
temperature differentials are |
|
sufficient. |
|
F. Service stops are not fully |
|
opened. Rotate both service stops |
|
clockwise until fully open. |
|
G. Check thermostatic |
|
performance; replace the |
|
thermostatic cartridge, if necessary. |
3.No flow from shower control A. Filter screens are blocked. Clear
water outlet. |
filter screens. |
|
|
B. Hot or cold supply failure. |
|
|
Replace the supply valve. |
|
|
C. Flow control cartridge not |
|
|
working. Check and replace if |
|
|
necessary. |
|
|
D. Service stops are shut off. |
|
|
Rotate both service stops clockwise |
|
|
until fully open. |
|
4. Blend temperature drift. |
A. Indicates operating conditions |
|
|
have changed. No action is |
|
|
needed. |
|
|
B. Refer to symptom 2. |
|
|
|
|
|
|
|
1145568-5-A |
14 |
Kohler Co. |

Troubleshooting (cont.)
Symptoms |
Probable Cause/Recommended |
|
Action |
|
C. Hot supply temperature |
|
fluctuation. |
|
D. Supply pressure fluctuation. |
5. Hot water in cold supply or |
A. Indicates crossflow. Replace |
cold water in hot supply. |
check valve. |
6. Maximum blend temperature |
A. Indicates incorrect maximum |
setting too hot or too cold. |
temperature setting; refer to the |
|
″Adjust the Hot Temperature |
|
Limit″ section. |
|
B. Refer to symptom 4. |
|
C. Refer to symptom 5. |
7. Water leaking from the valve |
A. Seal(s) worn or damaged. |
body. |
Obtain service kit and replace |
|
seal(s). |
|
B. If leaking from around the |
|
temperature spindle, replace the |
|
thermostatic cartridge. |
8. Flow knob or temperature |
A. Impaired free movement of |
knob is stiff to operate. |
internal components. Replace the |
|
appropriate cartridge. |
|
B. Supply pressures are too high. |
|
Fit pressure reducing valve. |
|
|
Warranty
KOHLER® Faucet Lifetime Limited Warranty
Kohler Co. warrants its Faucets* manufactured after January 1, 1997, to be leak and drip free during normal residential use for as long as the original consumer purchaser owns his or her home. If the Faucet should leak or drip during normal use, Kohler Co. will, free of charge, mail to the purchaser the cartridge necessary to put the Faucet in good working condition. This warranty applies only to Kohler Faucets installed in the United States of America, Canada or Mexico (″North America″).
Kohler Co. also warrants all other aspects of the faucet or accessories (″Faucet″)*, (except gold, non-Vibrant®, non-chrome finishes) to be free of defects in material and workmanship during normal residential use for as long as the original consumer purchaser owns his or her home. This warranty applies only to Kohler Faucets installed in North America. If a defect is found in normal residential use, Kohler Co. will,
Kohler Co. |
15 |
1145568-5-A |

Warranty (cont.)
at its election, repair, provide a replacement part or product, or make appropriate adjustment. Damage to a product caused by accident, misuse, or abuse is not covered by this warranty. Improper care and cleaning will void the warranty**. Proof of purchase (original sales receipt) must be provided to Kohler Co. with all warranty claims. Kohler Co. is not responsible for labor charges, installation, or other incidental or consequential costs. In no event shall the liability of Kohler Co. exceed the purchase price of the Faucet.
If the Faucet is used commercially or is installed outside of North America, or if the finish is gold, non-Vibrant or a painted or powder coated color finish, Kohler Co. warrants the Faucet to be free from defects in material and workmanship for one (1) year from the date the product is installed, under Kohler Co.’s standard one-year limited warranty.
If you believe that you have a warranty claim, contact Kohler Co., either through your Dealer, Plumbing Contractor, Home Center or E-tailer, or by writing Kohler Co., Attn.: Customer Care Center, 444 Highland Drive, Kohler, WI 53044, USA. Please be sure to provide all pertinent information regarding your claim, including a complete description of the problem, the product, model number, color, finish, the date the product was purchased and from whom the product was purchased. Also include your original invoice. For other information, or to obtain the name and address of the service and repair facility nearest you, call 1-800-4-KOHLER (1-800-456-4537) from within the USA and Canada, and 001-800-456-4537 from within Mexico, or visit www.kohler.com within the USA, www.ca.kohler.com from within Canada, or www.mx.kohler.com in Mexico.
KOHLER CO. AND/OR SELLER ARE PROVIDING THESE WARRANTIES IN LIEU OF ALL OTHER WARRANTIES, EXPRESSED OR IMPLIED, INCLUDING BUT NOT LIMITED TO THE IMPLIED WARRANTIES OF MERCHANTABILITY AND FITNESS FOR A PARTICULAR PURPOSE. KOHLER CO. AND/OR SELLER DISCLAIM ALL LIABILITY FOR SPECIAL, INCIDENTAL OR CONSEQUENTIAL DAMAGES. Some states/provinces do not allow limitations of how long an implied warranty lasts or the exclusion or limitation of such damages, so these limitations and exclusions may not apply to you. This warranty gives the consumer specific legal rights. You may also have other rights that vary from state/province to state/province.
This is Kohler Co.’s exclusive written warranty.
*Trend® faucets, MasterShowerTM tower, BodySpaTM systems and components; WaterHavenTM tower, systems and components; TripointTM
1145568-5-A |
16 |
Kohler Co. |

Warranty (cont.)
faucets, Polished Gold, non-Vibrant and painted or powder coated finishes, fittings; all items within the ″Fixture Related″ section of the Kohler Faucets Price Book, drains, Duostrainer® sink strainers, soap/lotion dispensers; and faucets used in commercial settings, and outside North America, are covered by Kohler Co.’s one-year limited warranty.
**Never use cleaners containing abrasive cleansers, ammonia, bleach, acids, waxes, alcohol, solvents or other products not recommended for chrome. This will void the warranty.
Kohler Co. |
17 |
1145568-5-A |
 Loading...