


 Loading...
PCUSBVC3
USB VIDEO + STEREO SOUND CAPTURE UNIT
VIDEO + STEREOGELUID CAPTURE STICK MET USB-AANSLUITING CONVERTISSEUR VIDÉO + SON STÉRÉO SUR PORT USB
UNIDAD DE CAPTURA VÍDEO + SONIDO ESTÉREO CON CONEXIÓN USB VIDEO + SOUND CAPTURE STICK MIT USB-ANSCHLUSS
USER MANUAL |
2 |
GEBRUIKERSHANDLEIDING |
8 |
NOTICE D‟EMPLOI |
14 |
MANUAL DEL USUARIO |
20 |
BEDIENUNGSANLEITUNG |
26 |

PCUSBVC3
User manual
1. Introduction
To all residents of the European Union
Important environmental information about this product
This symbol on the device or the package indicates that disposal of the device after its lifecycle could harm the environment. Do not dispose of the unit (or batteries) as unsorted municipal waste; it should be taken to a specialized company for recycling. This device should be returned to your distributor or to a local recycling service. Respect the local environmental rules.
If in doubt, contact your local waste disposal authorities.
Thank you for choosing Velleman! Please read the manual thoroughly before bringing this device into service. If the device was damaged in transit, do not install or use it and contact your dealer.
Package contents:
USB 2.0 video adapter
USB 2.0 cable, length ± 70cm
Printed quick installation guide; full user manual on CD-ROM
DVD with drivers and Arcsoft ShowBiz 3.5
2. Safety Instructions
Keep the device away from children and unauthorised users.
DO NOT disassemble or open the cover. There are no user-serviceable parts inside the device. Refer to an authorized dealer for service and/or spare parts.
3. General Guidelines
Refer to the Velleman® Service and Quality Warranty on the last pages of this manual.
Indoor use only. Keep this device away form rain, moisture, splashing and dripping liquids.
Keep this device away from dust and extreme heat.
Protect this device from shocks and abuse. Avoid brute force when operating the device.
Familiarise yourself with the functions of the device before actually using it.
All modifications of the device are forbidden for safety reasons. Damage caused by user modifications to the device is not covered by the warranty.
Only use the device for its intended purpose. Using the device in an unauthorised way will void the warranty.
Damage caused by disregard of certain guidelines in this manual is not covered by the warranty and the dealer will not accept responsibility for any ensuing defects or problems.
Do not use the device to perform illegal activities.
4. Features
easy-to-use software included: Arcsoft ShowBiz 3.5
powered by USB 2.0 port, no additional power supply needed
brightness, contrast, hue and saturation control
very small size, easy to carry
snapshot button
plug-and-play
supports writing using most popular DVD formats (DVD+/-R/RW, DVD+/-VR, DVD-Video...)
full screen for previewing video programs
transfer video files to iPod, iPod touch, Apple TV, PSP, PS3, XBOX, Mobile phone
support HD video file input
supports almost all audio and image file formats
upload video to YouTube
V. 01 – 07/05/2013 |
2 |
©Velleman nv |
|
|
PCUSBVC3 |
|
|
5. System requirements |
||
|
|
|
|
|
CPU |
Pentium 4 CPU or higher |
|
|
|
|
|
|
Operating System |
Microsoft® Windows®2000/XP/Vista/Windows 7 |
|
|
|
|
|
|
memory |
RAM 512 MB or higher |
|
|
|
|
|
|
hard disk |
1Gb for software, minimum 4Gb for recording |
|
|
|
|
|
|
display resolution |
1024 x 768 or higher |
|
|
|
|
|
|
sound card |
Windows® compatible sound card (used for playback) |
|
|
|
|
|
|
graphics card |
DirectX 9.0C compatible |
|
|
|
|
|
|
USB |
USB 2.0 compliant port |
|
|
|
|
|
6. Driver installation
IMPORTANT NOTES:
Install the drivers and software prior to making any hardware connections!
Make sure you have administrator rights on your computer system when installing drivers and software.
Disable all antivirus software during software installation.
Refer to §5 for the minimum system requirements.
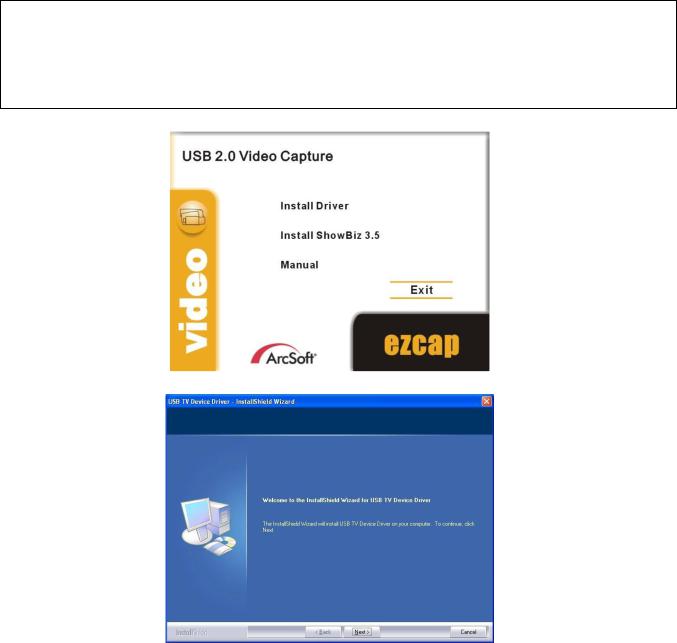
Insert the VELLEMAN© CD-ROM into your CD-ROM drive. A window will appear:
Click [Install Driver].
Click [Next >].
V. 01 – 07/05/2013 |
3 |
©Velleman nv |
PCUSBVC3
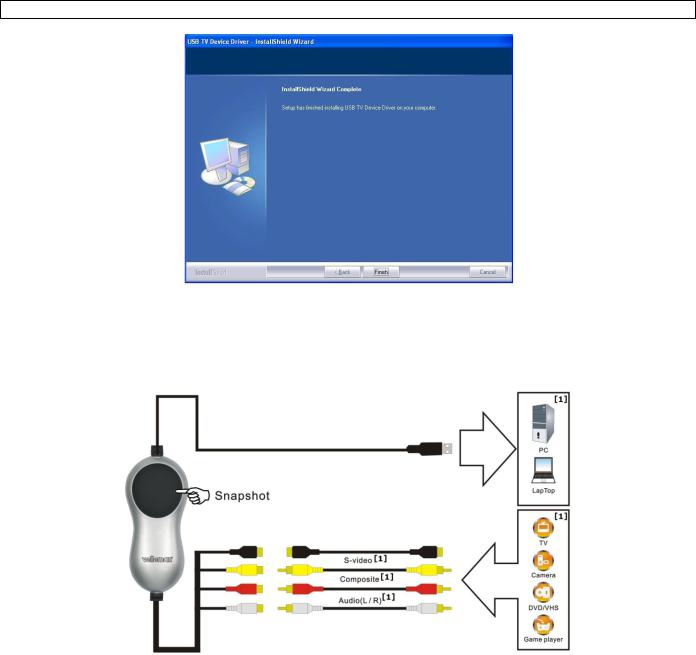
Click [Finish] to finalize driver installation.
The system will now ask to restart the computer. Select [Yes, I want to restart my computer now].
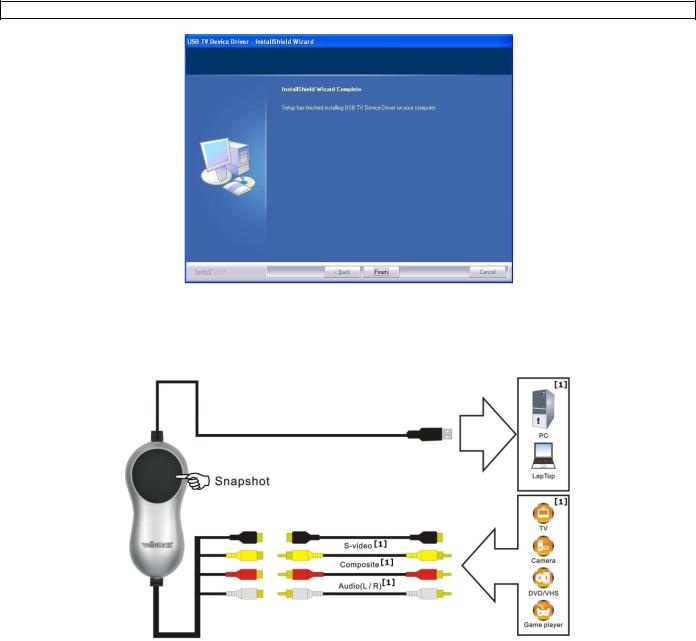
Connect the PCUSBVC3 to your video source (not incl., e.g. TV, camera, DVD...). Note that you must connect the device to an S-video or Composite/audio output! Refer to the user manual of your video source to locate signal output connectors.
[1] not included.
Connect the USB-connector of the PCUSBVC3 to a free USB port on your computer. Note: for signal integrity, it is not recommended to connect through a HUB.
The system detects the new hardware on the USB port and a message box pops up. Select [No, not this time] and click [Next >].
Select [Install software automatically] and click [Next >]. Follow the instructions on the screen.
A window might pop up stating that the SMI GRABBER Device did not pass Windows logo testing; select
[continue anyway].
Click [Finish] to complete driver installation.
If any other components are found, please repeat the above procedure until the [Found new hardware: Your hardware is installed and configured for use]-window appears.
Verify whether the drivers are installed correctly. Right click on [My computer] and click left to select
[Properties].
Go to the [Hardware] tab and select [Device manager].
Go to the [Sound, video and game controllers].
Locate the [SMI GRABBER Device]. If no exclamation marks (yellow triangles) are shown in front of the device names, the installation was successful. Otherwise, remove the driver, disconnect and reconnect the PCUSBVC3 to re-install the driver.
V. 01 – 07/05/2013 |
4 |
©Velleman nv |

PCUSBVC3
If you want to see the version of the driver, right click on it and select [properties]. Select the [Driver] tab.
7. Software installation and configuration
IMPORTANT NOTES:
Install the drivers and software prior to making any hardware connections!
Make sure you have administrator rights on your computer system when installing drivers and software.
Disable all antivirus software during software installation.
Refer to §5 for the minimum system requirements.
Insert the VELLEMAN© CD-ROM into your CD-ROM drive. A window will appear:
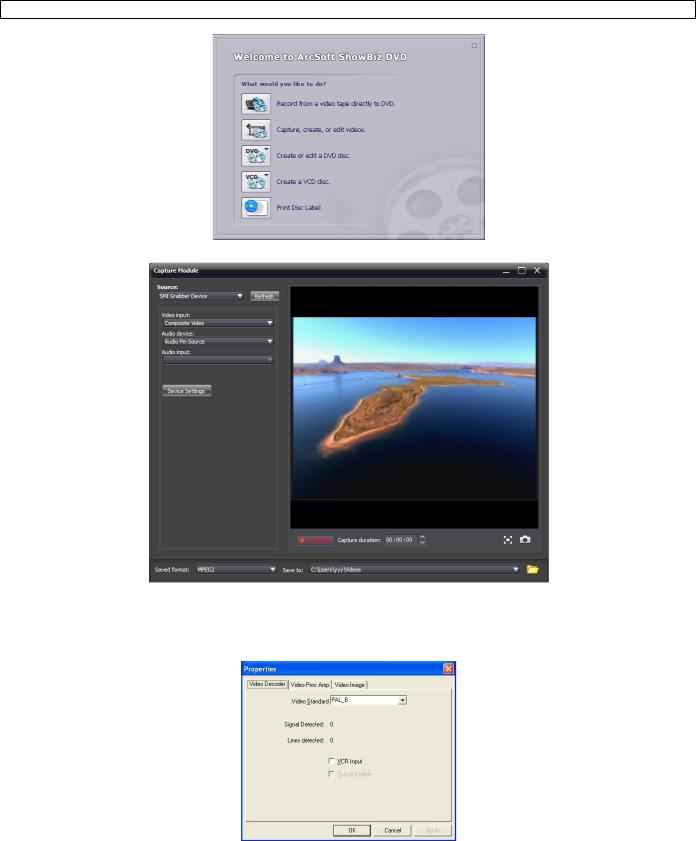
Click [Install ShowBiz 3.5] and follow the instructions on the screen. Select your preferred installation language. The licence key is printed on the CD-ROM sleeve. Make sure to keep the keys for future reference.
When installation is finished, start the software by double-clicking on the “Showbiz 3.5” icon on your desktop. The following screen is shown:
V. 01 – 07/05/2013 |
5 |
©Velleman nv |
PCUSBVC3
Make sure the PCUSBVC3 device is properly connected and select [Capture, create, or edit videos].
Set [Source] to SMI Grabber Device.
Set [Audio device] to USB Pin Source.
Set [Video input] to Composite or S-Video depending on the used connection.
Click on [Device setting] to set the applicable video standard (NTSC_M, PAL-B).
Explanation on how to use your software can be found on the included CD-ROM (under directory
\Document\Manual).
8. Troubleshooting
Hardware connection issues.
The PCUSBVC3 comes with and female S-video and 3 female RCA connectors. Most video sources will also have female connectors. Male-male RCA cables or a male-male S-Video cable is not included and must be purchased separately. Note however that these cables often are included when buying a new video source (e.g. TV, Video...).
In case your video source only comes with a SCART output, you must purchase an adaptor with a SCART connector on one end and three RCA connectors on the other.
V. 01 – 07/05/2013 |
6 |
©Velleman nv |

PCUSBVC3
Device did not pass Windows logo testing
This message can safely be ignored as it will not cause problems with other software. Basically it means that Microsoft did not test the software itself.
Duration of recording
The PCUSBVC3 is a real-time capture device. This means that e.g. it will take 3 hours to capture or transfer a 3-hour recording.
Size of recording
Recording size depends on the chosen format and image size. To decrease overall file size, select a different format or reduce the image size. Note that this will also decrease image quality.
E.g. in AVI format (no compression) 10 minutes of recording uses about 1GB. In MPEG format this is about 200MB; in WMV about 30MB.
Transferring audio only to PC
This is not possible with the PCUSBVC3.
9. Technical specifications
complies with USB 2.0
supports NTSC, PAL
video input |
1 x RCA composite, 1 x S-Video |
|
|
|
|
audio input |
stereo RCA |
|
|
|
|
resolution |
NTSC |
720 x 480 @ 30fps |
|
|
|
|
PAL |
720 x 576 @ 25fps |
|
|
|
system requirements |
USB 2.0 compliant port |
|
|
|
|
|
operating system |
Microsoft® Windows®2000/XP/Vista/Windows 7 |
|
|
|
|
CPU |
Pentium 4 or higher |
|
|
|
|
hard disk space |
1Gb for software, minimum 4Gb for recording |
|
|
|
|
DVD |
standard DVD player or recorder |
|
|
|
|
memory |
512Mb minimum |
|
|
|
|
display resolution |
1024 x 768 or higher |
|
|
|
|
sound card |
Windows® compatible sound card (used for playback) |
|
|
|
|
graphics card |
DirectX 9.0C compatible |
|
|
|
Use this device with original accessories only. Velleman nv cannot be held responsible in the event of damage or injury resulted from (incorrect) use of this device.
For more info concerning this product and the latest version of this user manual, please visit our website www.velleman.eu.
The information in this manual is subject to change without prior notice.
© COPYRIGHT NOTICE
The copyright to this manual is owned by Velleman nv. All worldwide rights reserved.
No part of this manual or may be copied, reproduced, translated or reduced to any electronic medium or otherwise without the prior written consent of the copyright holder.
The included software is copyright protected by the respective owners.
V. 01 – 07/05/2013 |
7 |
©Velleman nv |
PCUSBVC3
Gebruikershandleiding
1. Inleiding
Aan alle ingezetenen van de Europese Unie Belangrijke milieu-informatie betreffende dit product
Dit symbool op het toestel of de verpakking geeft aan dat, als het na zijn levenscyclus wordt weggeworpen, dit toestel schade kan toebrengen aan het milieu. Gooi dit toestel (en eventuele batterijen) niet bij het gewone huishoudelijke afval; het moet bij een gespecialiseerd bedrijf terechtkomen voor recyclage. U moet dit toestel naar uw verdeler of naar een lokaal recyclagepunt brengen. Respecteer de plaatselijke milieuwetgeving.
Hebt u vragen, contacteer dan de plaatselijke autoriteiten betreffende de verwijdering.
Dank u voor uw aankoop! Lees deze handleiding grondig voor u het toestel in gebruik neemt. Werd het toestel beschadigd tijdens het transport, installeer het dan niet en raadpleeg uw dealer.
Inhoud:
USB 2.0-videoadapter
USB 2.0-kabel, lengte ± 70 cm
gebruikershandleiding
dvd met drivers, Arcsoft ShowBiz 3.5
2. Veiligheidsinstructies
Houd buiten het bereik van kinderen en onbevoegden.
Er zijn geen door de gebruiker vervangbare onderdelen in dit toestel. Voor onderhoud of reserveonderdelen, contacteer uw dealer.
3. Algemene richtlijnen
Raadpleeg de Velleman® serviceen kwaliteitsgarantie achteraan deze handleiding.
Gebruik het toestel enkel binnenshuis. Bescherm tegen regen, vochtigheid en opspattende vloeistoffen.
Bescherm tegen stof en extreme hitte.
Bescherm tegen schokken en vermijd brute kracht tijdens de bediening.
Leer eerst de functies van het toestel kennen voor u het gaat gebruiken.
Om veiligheidsredenen mag u geen wijzigingen aanbrengen. Schade door wijzigingen die de gebruiker heeft aangebracht valt niet onder de garantie.
Gebruik het toestel enkel waarvoor het gemaakt is. Bij onoordeelkundig gebruik vervalt de garantie.
De garantie geldt niet voor schade door het negeren van bepaalde richtlijnen in deze handleiding en uw dealer zal de verantwoordelijkheid afwijzen voor defecten of problemen die hier rechtstreeks verband mee houden.
Gebruik dit toestel niet voor illegale opnames.
4. Eigenschappen
gebruikersvriendelijke software: Arcsoft ShowBiz 3.5
voeding via USB 2.0-poort, geen extra voeding vereist
regelbare helderheid, contrast, kleurschakering en intensiteit
zeer klein, overal meeneembaar
snapshotknop
plug-and-play
ondersteunt schrijffunctie (DVD+/-R/RW, DVD+/-VR, DVD-Video...)
scherm met voorvertoning van videoprogramma's
overdracht videobestanden naar iPod, iPod touch, Apple TV, PSP, PS3, XBOX, GSM
ondersteunt input HD video bestand
V. 01 – 07/05/2013 |
8 |
©Velleman nv |

PCUSBVC3
ondersteunt praktisch alle verscheidene audioen beeldformaten
opladen video naar YouTube
5. Systeemvereisten
CPU |
Pentium 4 of hoger |
|
|
besturingssysteem |
Microsoft® Windows® 2000/XP/Vista/Windows 7 |
|
|
geheugen |
512 MB RAM of hoger |
|
|
harddisk |
1 GB voor software, minimaal 4 GB voor opnames |
|
|
resolutie display |
1024 x 768 of hoger |
|
|
geluidskaart |
Windows®-compatibele geluidskaart (enkel voor weergave) |
|
|
grafische kaart |
DirectX 9.0C-compatibel |
|
|
USB |
USB 2.0 poort |
|
|
6. De driver installeren
BELANGRIJKE OPMERKINGEN
Installeer de drivers en de software voor u de hardware gaat aansluiten!
Zorg bij het installeren van drivers en software dat u administratieve rechten hebt op de te gebruiken computer.
Schakel alle antivirussoftware uit voor de software gaat installeren.
Raadpleeg §5 voor de minimale systeemvereisten.
Plaats de VELLEMAN© cd-rom in de cd-romdrive. Het volgende venster verschijnt:
Klik op [Install driver].
Klik op [Next >].
V. 01 – 07/05/2013 |
9 |
©Velleman nv |
PCUSBVC3
Klik op [Finish] om de installatie te voltooien.
Herstart uw computer door op [Yes, I want to restart my computer now] te klikken.
Sluit de PCUSBVC3 aan op de S-video- of composiet-/audio-uitgang van de videobron (bv. tv-toestel, camera, dvd-speler). Raadpleeg bij twijfel de handleiding van de videobron.
[1] niet meegeleverd
Steek de USB-stekker van de PCUSBVC3 in een vrije USB-poort van uw computer. Om signaalverlies te vermijden, is het niet aan te raden de PCUSBVC3 via een hub aan te sluiten.
Uw computer vindt nieuwe hardware op de USB-poort. Selecteer [No, not this time] en klik vervolgens op
[Next >].
Selecteer [Install software automatically] en klik op [Next >]. Volg de instructies op het scherm.
Klik op [continue anyway] wanneer een venster verschijnt met het bericht dat SMI GRABBER Device de Windows Logo-test niet heeft doorstaan.
Selecteer [Finish] om de installatie van de driver te voltooien.
Herhaal de bovenstaande procedure indien de computer verdere hardware vindt tot het venster [Found new hardware: Your hardware is installed and configured for use] verschijnt.
Ga na of alle drivers correct werden geïnstalleerd. Klik met de rechtermuisknop op [My computer] en klik vervolgens op [Properties].
Ga naar [Hardware] en selecteer [Device manager].
Ga naar [Sound, video and game controllers].
Controleer of er voor [SMI GRABBER Device] een gele driehoek met uitroepteken staat. Indien niet, dan werd de driver correct geïnstalleerd. Indien wel, verwijder de driver, ontkoppel de PCUSBVC3 van de computer en installeer de driver opnieuw.
V. 01 – 07/05/2013 |
10 |
©Velleman nv |
Loading...