Velleman GZB5PRO User Manual [en, de, es, fr]

GZB5PRO
GAZEBO - 3m x 3m TONNELLE - 3 m x 3 m ZONNETENT - 3 m x 3 m GARTENPAVILLION - 3 x 3m CENADOR - 3 x 3m
TOLDO – 3 X 3m
USER MANUAL |
3 |
NOTICE D’EMPLOI |
5 |
GEBRUIKERSHANDLEIDING |
7 |
MANUAL DEL USUARIO |
9 |
BEDIENUNGSANLEITUNG |
11 |
MANUAL DO UTILIZADOR |
13 |

GZB5PRO
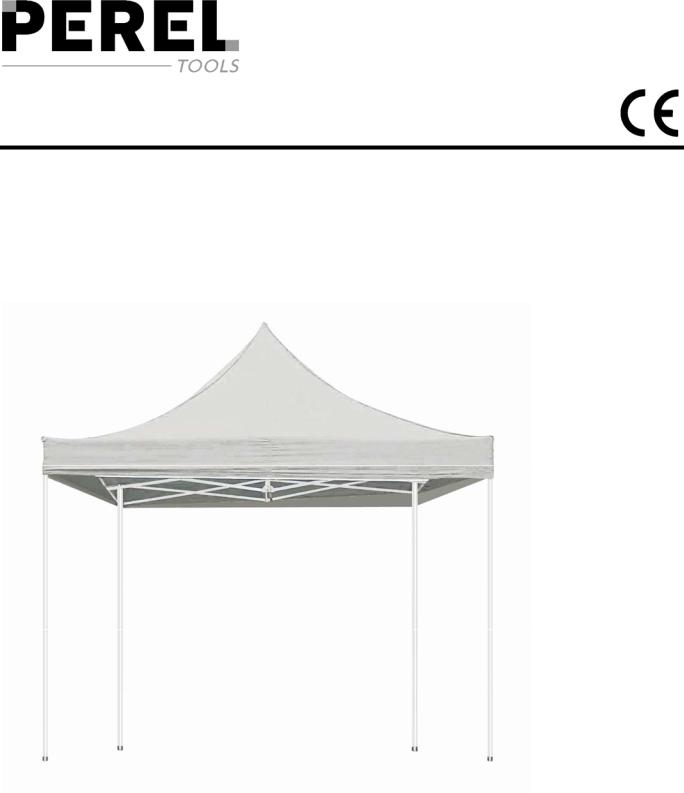
Figure 1
00 (13/01/2012) |
2 |
©Velleman nv |

GZB5PRO
User manual
1. Introduction
Thank you for choosing Perel! If the package was damaged in transit, do not install or use it and contact your dealer.
2. Safety Instructions
Follow these instructions carefully to avoid hands/fingers injury due to moving parts. Set up and break down requires two adult persons.
Make sure the weather conditions are suitable (e.g. not too windy) for setting up or breaking down the gazebo.
The cover material of this gazebo is flammable. DO not make open fires (e.g. barbeque) under or near the gazebo.
Damage caused by disregard of certain guidelines in this manual is not covered by the warranty and the dealer will not accept responsibility for any ensuing defects or problems.
3. General guidelines
Protect the gazebo from shocks and abuse. Avoid brute force when deploying, folding up or during usage.
Only use the gazebo for its intended purpose. Using the gazebo in an unauthorised way will void the warranty.
NEVER store the gazebo unless it is completely dry. Storing when damped allows the formation of mold and mildew, which will rot natural fibers, damage the coating to the fabric and leave indelible stains.
4. Features
foldable and easy to set upcover in waterproof nylon
5. Setting up
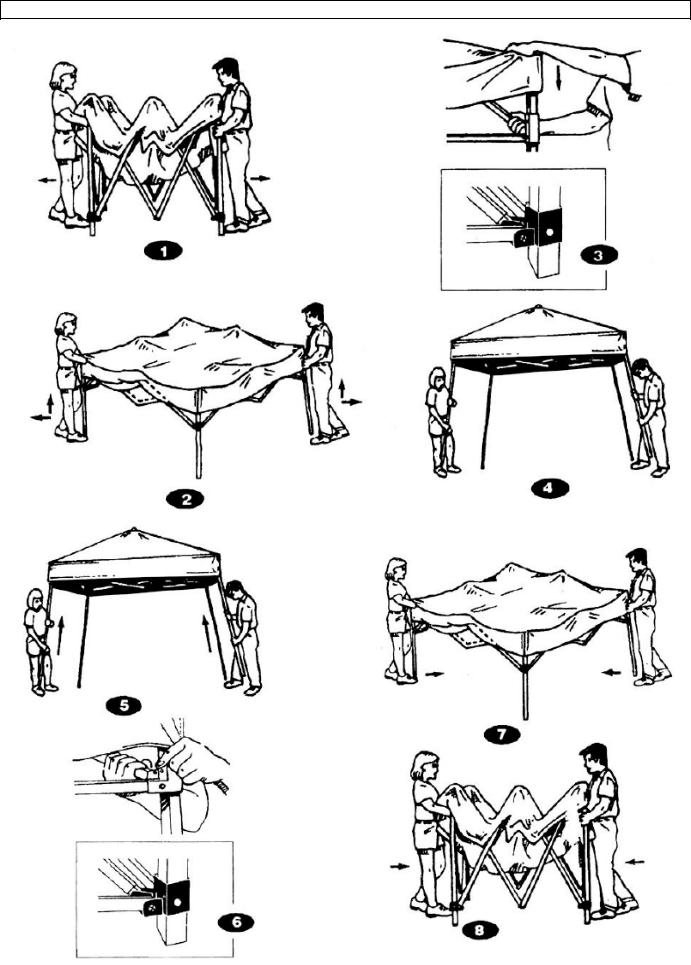
Refer to the illustrations on page 2 of this manual.
1.Place the gazebo at the centre of the chosen location. Rest the gazebo on its feet and remove the carry bag.
Lift the gazebo by the four legs and move the legs as far as possible apart.
2.Hold the gazebo at opposite legs, lift and slowly step backwards until fully opened. A yoke slides up over the leg; be careful not to get hands or fingers injured by this yoke or any other hinging joints.
3.Secure the sliding yoke at each corner. Place one hand on top of the leg to hold it down and push the yoke up with the other hand until the spring-loaded button snaps into place. Do this for all 4 corners.
4.Hold two adjacent legs of the gazebo. Simultaneously place a foot on the foot plate to hold the inner leg down and gently lift the gazebo until the spring-loaded button snaps into place. Repeat this step for the other two legs.
Make sure the legs of the gazebo form a square and fold the Velcro tabs located at the bottom side of the top cover around the frame.
Depending on the environmental conditions, secure the gazebo to the ground by putting stakes (not incl.) through the bases of the legs. Drive a stake (incl.) into the ground at every corner, tie guy-ropes (incl.) to the top of each of the 4 corners and connect the other end tightly to the stakes.
00 (13/01/2012) |
3 |
©Velleman nv |

GZB5PRO
6. Breaking down
Refer to the illustrations on page 2 of this manual.
Remove any guy-ropes and stakes that were used to hold the gazebo in place.
5.Hold two adjacent legs of the gazebo. Simultaneously press on the spring-loaded buttons and slide the inner legs into the outer legs. Repeat this step for the other two legs.
6.Release the sliding yoke at each corner. Push the sliding yoke slightly upwards and press on the spring-loaded button. Slide the yoke down past the spring-loaded button. Do this for all 4 corners.
7.Hold the gazebo at opposite legs, lift and slowly step forwards until nearly closed. Shake the canopy gently to facilitate folding. The yoke slides down over the leg; be careful not to get hands or fingers injured by this yoke or any other hinging joints.
8.Close the gazebo completely by lifting and pulling the adjacent legs together.
Make sure the gazebo is completely dry before placing it inside the storage bag!
7. Technical specifications
|
GZB5PRO |
|
|
|
|
|
|
|
|
aluminium legs |
32 |
x |
32/28 |
x 28mm |
thickness 1mm |
|
|||
|
|
|||
|
|
|
|
|
aluminium roof frame |
23 |
|
x |
14mm |
thickness 0.9mm |
|
|||
|
|
|||
|
|
|
|
|
peak height |
3.50m |
|
|
|
|
|
|
||
cover |
waterproof nylon |
|
||
|
|
|
|
|
Use this device with original accessories only. Velleman nv cannot be held responsible in the event of damage or injury resulted from (incorrect) use of this device.
For more info concerning this product, please visit our website www.perel.eu. The information in this manual is subject to change without prior notice.
© COPYRIGHT NOTICE
The copyright to this manual is owned by Velleman nv.
All worldwide rights reserved.
No part of this manual or may be copied, reproduced, translated or reduced to any electronic medium or otherwise without the prior written consent of the copyright holder.
00 (13/01/2012) |
4 |
©Velleman nv |

GZB5PRO
NOTICE D’EMPLOI
1. Introduction
Nous vous remercions de votre achat ! Lire la présente notice attentivement avant la mise en service de l’appareil. Si l’appareil a été endommagé pendant le transport, ne pas l’installer et consulter votre revendeur.
2. Consignes de sécurité
Suivre les instructions dans cette notice pour éviter les blessures causées par des pièces mobiles. Il est conseillé de monter et de démonter la tonnelle à deux.
Monter et de démonter la tonnelle dans des conditions météorologiques favorables. Ne jamais utiliser la tonnelle par grand vent.
La bâche n’est pas ignifuge. Ne jamais faire de feu ni de barbecue sous ou à proximité de la tonnelle.
La garantie ne s’applique pas aux dommages survenus en négligeant certaines directives de cette notice et votre revendeur déclinera toute responsabilité pour les problèmes et les défauts qui en résultent.
3. Directives générales
Protéger la tonnelle les chocs et la traiter avec circonspection pendant l’installation et l’opération.N’utiliser la tonnelle qu’à sa fonction prévue. Un usage impropre annule d'office la garantie.
Ne jamais ranger la tonnelle avec une bâche humide. Une bâche humide favorise la formation de moisissures qui pourront endommager les fibres et former des taches.
4. Caractéristiques
repliable, facile à monterbâche en nylon hydrofuge
5. Montage de la tonnelle
Consulter les illustrations à la page 2 de cette notice.
1.Choisir un endroit approprié pour la tonnelle. Sortir la tonnelle du sac de rangement et la placer sur les pieds. Soulever légèrement la tonnelle et déplier au maximum sans forcer.
2.Maintenir la tonnelle par deux pieds opposés. Soulever légèrement la tonnelle et ouvrir entièrement la tonnelle. L’étrier de verrouillage glisse sur le pied. Procéder prudemment afin d’éviter de coincer les doigts entre l’étrier et le pied.
3.Verrouiller l’étrier au haut de chaque pied : maintenir en place le haut du pied avec la main et faire coulisser l’étrier vers le haut jusqu’à à ce qu’il soit verrouillé. Procéder pour les quatre pieds.
4.Maintenir la tonnelle par deux pieds d’un même côté. Bloquer la partie inférieure du pied avec votre pied et soulever la tonnelle afin de glisser cette partie inférieure hors du pied. Verrouiller l’ensemble. Procéder pour les quatre pieds.
Placer les pieds de manière à ce qu’ils forment un carré. Replier les bandes scratch autour de l’armature afin de fixer la bâche.
Si nécessaire, fixer la tonnelle en sécurisant chaque pied utilisant un hauban (incl.) ancré à un piquet (incl.) enfoncé dans le sol.
00 (13/01/2012) |
5 |
©Velleman nv |
 Loading...