


 Loading...
VTLD100
HIGH PRECISION LASER DISTANCE METER
LASER-AFSTANDSMETER / HOGE PRECISIE TÉLÉMÈTRE À LASER HAUTE PRÉCISION
MEDIDOR DE DISTANCIA CON LÁSER DE ALTA PRECISIÓN LASER-ABSTANDSMESSGERÄT MIT HOHER PRÄZISION
USER MANUAL |
4 |
GEBRUIKERSHANDLEIDING |
12 |
MODE D'EMPLOI |
20 |
MANUAL DEL USUARIO |
28 |
BEDIENUNGSANLEITUNG |
36 |

VTLD100
V. 02 – 26/11/2013 |
2 |
©Velleman nv |

VTLD100
A
B C
D E
V. 02 – 26/11/2013 |
3 |
©Velleman nv |

VTLD100
USER MANUAL
1. Introduction
To all residents of the European Union
Important environmental information about this product
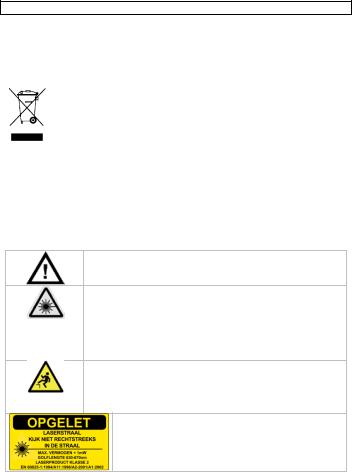
This symbol on the device or the package indicates that disposal of the device after its lifecycle could harm the environment. Do not
dispose of the unit (or batteries) as unsorted municipal waste; it should be taken to a specialized company for recycling. This device
should be returned to your distributor or to a local recycling service. Respect the local environmental rules.
If in doubt, contact your local waste disposal authorities.
Thank you for choosing Velleman! Please read the manual thoroughly before bringing this device into service. If the device was damaged in transit, don't
install or use it and contact your dealer.
2. Safety Instructions
Keep this device away from children and unauthorized users.
Use extreme caution when the laser beam is turned on.
When device is in use, do NOT look directly or indirectly
(reflectance) into the laser beam. NEVER point the laser beam directly or via a reflecting surface towards other people’s or animals’ eyes. Permanent eye damage will
result.
Do not point the laser beam towards highly explosive gasses.
Be careful when using the device while standing on a
scaffold, ladder… Keep your balance at all times.
Follow all safety precautions applicable at the site where the device is used (e.g. road works, construction site …).
Visible laser radiation. Do not stare into the beam as eye damage may occur. This device contains a
class 2 laser.
Output power does not exceed 1 mW, wavelength 630 - 670nm.
V. 02 – 26/11/2013 |
4 |
©Velleman nv |

VTLD100
3. General Guidelines
Refer to the Velleman® Service and Quality Warranty on the last pages of this manual.
Indoor use only. Keep this device away form rain, moisture, splashing and dripping liquids.
Keep this device away from dust and extreme temperatures.
Protect this device from shocks and abuse. Avoid brute force when operating the device.
•Familiarise yourself with the functions of the device before actually using it.
•All modifications of the device are forbidden for safety reasons. Damage
caused by user modifications to the device is not covered by the warranty.
•Only use the device for its intended purpose. Using the device in an unauthorised way will void the warranty.
•Damage caused by disregard of certain guidelines in this manual is not
covered by the warranty and the dealer will not accept responsibility for any ensuing defects or problems.
•Keep this manual for future reference.
4. Features
• large LCD with backlight
• choose between metric and imperial units
• calculate surface and volume
• indirect measurements using 2 or 3 measuring points
• add up and subtract functions
• last 20 measurements are retained in memory
• very large measuring range (50m) and very high precision (±1.5mm)
• automatic / manual switch-off
5. Overview
Refer to the illustrations on page 2 of this manual.
Control panel
a |
ON/measuring button |
f |
decrease/subtract button |
b |
area/volume button |
g |
memory button |
c |
indirect measurement button |
h |
reference button |
d |
measuring mode (single/continuous) |
i |
backlight/unit button |
V. 02 – 26/11/2013 |
5 |
©Velleman nv |

VTLD100
e |
|
increase/add button |
j |
clear/OFF button |
LCD |
|
|
|
|
1 |
|
laser ON |
5 |
single mode |
2 |
|
reference level top |
6 |
battery status |
3 |
|
reference level bottom |
7 |
memory address |
4 |
|
measuring function |
8 |
device error |
|
|
area |
9 |
max./min. indication |
|
|
volume |
10 |
first value + unit |
|
|
1st indirect measurement |
11 |
second value + unit |
|
|
2nd indirect measurement |
12 |
last measurement or |
|
|
|
|
calculation result |
6. First use
Before using the device, you need to stick the laser warning (included in the package) on the device:
•Refer to the safety instructions above before using the device.
•Make sure the device does not contain any batteries.
•The sticker is available in various languages. Put the sticker in your language on the device.
•When done, insert batteries (see section Battery below).
7. Measuring conditions
Measuring range
•The measuring range is limited to 50m.
•In dark environments or at night this range may increase.
•In very light environments or when a surface has very poor reflective properties, use a target plate.
Target surfaces
•Measuring errors will occur when pointing at colourless liquids (e.g. water) or glass, Styrofoam or similar semi-transparent surfaces.
•Aiming at very shiny objects will deflect the laser beam which will lead to errors.
•Measuring towards non-reflective dark surfaces may increase the measuring time.
•Do not aim the meter directly into the sun or other bright light source.
8. General functions
Refer to the illustrations on pages 2 and 3 of this manual.
•Make sure batteries are present inside the device (see section Battery below).
V. 02 – 26/11/2013 |
6 |
©Velleman nv |

VTLD100
Switching ON/OFF
•Press the ON/measuring button [a] to switch the device and laser on.
•Press and hold the clear/OFF button [j] to switch the device off.
•Note: the laser will automatically switch of after 30s, the device will switch off after 3 minutes of inactivity.
Clear button
Press the clear/OFF button [j] to cancel the last action.
Reference level
•Press the reference button [h] to switch the reference level between top
[2] and bottom [3] (refer to illustration B). The device produces a warning beep when the setting is changed.
o [2] measuring starts at the top of the meter
o [3] measurement includes length of meter (default)
Backlight
•Shortly press the backlight/unit button [i] to switch the backlight on or off.
Units of measurement
•Press and hold the backlight/unit button [i] to change the units between m (meter), inch (in), feet (ft) and fractional ft+in (x/16).
Addition/subtraction
•Press the increase/add button [e] to add the next measurement to the previous.
•Press the decrease/subtract button [f] to subtract the next measurement from the last.
Memory recall
•Press the memory button [g] to display memory content (reverse order, last stored value is shown first.
•Press the increase/add button [e] to display the next memory location,
press the decrease/subtract button [f] to display the previous memory location.
•Press the clear/OFF [j] and store [g] buttons simultaneously to clear all data stored in memory.
9. Measuring
Refer to the illustrations on pages 2 and 3 of this manual.
Single direct measurement
•Press the ON/measuring button [a] to switch the laser on.
•Point the laser, hold the meter still and press the ON/measuring button [a] again. The distance is shown on the display
V. 02 – 26/11/2013 |
7 |
©Velleman nv |

VTLD100
Continuous measurement/max. & min. measurement [C]
•In continuous mode the meter will measure the distance every 0.5s while displaying minimum and maximum measured values [9].
•The minimum measured value is shown on the first line of the display
[10], the maximum value on the second line [11]. The last measured value is indicated on the bottom line [12].
•To start continuous measurement, press the measuring mode button
[d]until the max./min. indications [9] are shown. Measurement starts
immediately.
•Slowly move the laser beam over the surface tor determine the minimum and maximum distance towards it (see illustration C).
•To stop measuring, press the ON/measuring button [a] or clear/OFF
button [j]. Note: measuring will automatically stop after 100 measurements.
Area measurement
•Press the area/volume button [b]. The area icon  appears [4].
•Press the ON/measuring button [a] to measure the first side of the surface. The value appears in the first line [10].
•Press the ON/measuring button [a] again to switch on the laser. Press again to measure the second side of the surface. The value appears in the second line [11].
•The resulting area is calculated and displayed on the third line [12].
Volume measurement
•Press the area/volume button [b] two times. The volume icon  appears [4].
•Press the ON/measuring button [a] to measure the first side. The value appears in the first line [10].
•Press the ON/measuring button [a] again to switch on the laser. Press
again to measure the second side. The value appears in the second line [11].
•The area is calculated and displayed on the third line [12].
•Press the ON/measuring button [a] again to switch on the laser. Press again to measure the third side. The value appears in the second line [11], the previous value moves to the first line [10].
•The volume is calculated and displayed on the third line [12].
Indirect measurement – 2 measurements [D]
•Press the indirect measurement button [c]. The 1st indirect measurement icon  appears [4].
•Press the ON/measuring button [a] to measure the first distance (highest point, see illustration D). The value appears in the first line [10].
•Press the ON/measuring button [a] again to switch on the laser. Press again to measure the second distance. The value appears in the second
V. 02 – 26/11/2013 |
8 |
©Velleman nv |

VTLD100
line [11]. Keep the reference point (top or bottom of the meter) as close as possible to the original position.
•The distance between the 2 measuring points is calculated and displayed on the third line [12].
Indirect measurement – 3 measurements [E]
•Press the indirect measurement button [c] 2 times. The 2nd indirect measurement icon  appears [4].
•Press the ON/measuring button [a] to measure the first distance (bottom, see illustration E). The value appears in the first line [10].
•Press the ON/measuring button [a] again to switch on the laser. Press again to measure the second distance. The value appears in the second line [11]. Keep the meter horizontally and the reference point (top or bottom of the meter) as close as possible to the original position.
•Press the ON/measuring button [a] again to switch on the laser. Press
again to measure the third distance. The value appears in the second line [11], the previous value moves to the first line [10].
•The distance between the bottom and top measuring points is calculated and displayed on the third line [12].
10.Troubleshooting
When an error occurs, an error code is displayed on the LCD. Refer to the table below for an overview of these codes.
code |
cause |
solution |
204 |
calculation error |
repeat procedure |
208 |
received signal too weak |
use target plate |
|
measurement time too long |
split up and add measurements |
|
distance > 50m |
|
209 |
received signal too strong |
use target plate |
|
(target too reflective) |
|
252 |
temperature too high |
let the device cool down |
253 |
temperature too low |
(gently) heat up the device |
255 |
hardware error |
Switch the device ON/OFF a couple of |
|
|
times, remove and re-insert the |
|
|
batteries. |
|
|
Contact your local dealer if the error |
|
|
remains. |
11. Maintenance
•Do not immerse the device in any liquid.
•Wipe the device regularly with a moist, lint-free cloth. Do not use alcohol or solvents.
•Keep the lens clean at all times to obtain best performance.
V. 02 – 26/11/2013 |
9 |
©Velleman nv |

VTLD100
•Contact your dealer for spare parts if necessary.
12. Battery
WARNING
•Malfunction may occur if the power is on when the battery is replaced.
•Keep batteries away from children.
•Do not puncture batteries or throw them in fire as they may explode.
•Do not attempt to recharge non-rechargeable batteries (alkaline).
•Dispose of batteries in accordance with local regulations.
A flashing battery indicator [6] indicates that battery power is low and batteries must be replaced.
1.Switch the device off [10].
2.Open the battery cover at the back of the meter (see illustration A) and take out the old batteries.
3.Insert two new 1.5V AAA batteries (LR03C) in accordance with the polarity markings inside the battery compartment.
4.Close the battery compartment.
5.If the device is not used for a longer period of time, remove the batteries to avoid leakage and risk of corrosion.
13. Technical Specifications
range |
0.05 - 50m (0.16 ft - 164 ft) |
accuracy |
± 1.5 mm (± 0.06") |
laser |
<1 mW class 2 |
|
wavelength: 635 nm |
operating temperature |
0°C - 40°C (32°F - 104°F) |
IP rating |
54 |
power supply |
2 x 1.5V AAA batteries LR03C (incl.) |
dimensions |
115 x 48 x 28 mm |
weight |
135 g |
Use this device with original accessories only. Velleman nv cannot be held responsible in the event of damage or injury resulting from
(incorrect) use of this device.
For more info concerning this product and the latest version of this
manual, please visit our website www.velleman.eu.
The information in this manual is subject to change without prior notice.
V. 02 – 26/11/2013 10 ©Velleman nv
VTLD100
© COPYRIGHT NOTICE
The copyright to this manual is owned by Velleman nv. All worldwide rights reserved. No part of this manual may be copied, reproduced, translated or reduced to any electronic medium or otherwise
without the prior written consent of the copyright holder.
V. 02 – 26/11/2013 |
11 |
©Velleman nv |
VTLD100
GEBRUIKERSHANDLEIDING
1. Inleiding
Aan alle ingezetenen van de Europese Unie Belangrijke milieu-informatie betreffende dit product
Dit symbool op het toestel of de verpakking geeft aan dat, als het na zijn levenscyclus wordt weggeworpen, dit toestel schade kan
toebrengen aan het milieu. Gooi dit toestel (en eventuele batterijen) niet bij het gewone huishoudelijke afval; het moet bij
een gespecialiseerd bedrijf terechtkomen voor recyclage. U moet dit toestel naar uw verdeler of naar een lokaal recyclagepunt
brengen. Respecteer de plaatselijke milieuwetgeving.
Hebt u vragen, contacteer dan de plaatselijke autoriteiten betreffende de verwijdering.
Dank u voor uw aankoop! Lees deze handleiding grondig voor u het toestel in gebruik neemt. Werd het toestel beschadigd tijdens het transport,
installeer het dan niet en raadpleeg uw dealer.
2. Veiligheidsinstructies
Houd dit toestel buiten het bereik van kinderen en onbevoegden.
Gebruik een ingeschakelde laserprojector met de grootste voorzichtigheid.
Kijk niet rechtstreeks in de laserstraal tijdens het gebruik
van dit toestel. Richt de laserstraal NOOIT rechtstreeks of via een reflecterend oppervlak op mensen of dieren. Dit
kan leiden tot permanente oogletsels.
Richt de laserstraal nooit naar explosieve gassen.
Wees voorzichtig wanneer u deze afstandsmeter gebruikt terwijl u staat op een stelling, lader, ...Behoud uw
evenwicht.
Volg alle veiligheidsinstructies, die op de bouwwerf van toepassing zijn (bijv. wegenwerken, bouwterrein, ...).
Zichtbare laserstraal. Kijk niet in de laserstraal om
oogletsels te voorkomen. Dit toestel is een laserproduct klasse 2.
Het uitgangsvermogen mag niet hoger zijn dan 1 mW, golflengte 630 - 670 nm.
V. 02 – 26/11/2013 |
12 |
©Velleman nv |
VTLD100
3. Algemene richtlijnen
Raadpleeg de Velleman® serviceen kwaliteitsgarantie achteraan deze handleiding.
Gebruik het toestel enkel binnenshuis. Bescherm het
toestel tegen regen, vochtigheid en opspattende vloeistoffen.
Bescherm dit toestel tegen stof en extreme temperaturen.
Bescherm tegen schokken. Vermijd brute kracht tijdens de bediening.
•Leer eerst de functies van het toestel kennen voor u het gaat gebruiken.
•Om veiligheidsredenen mag u geen wijzigingen aanbrengen. Schade
door wijzigingen die de gebruiker heeft aangebracht aan het toestel valt niet onder de garantie.
•Gebruik het toestel enkel waarvoor het gemaakt is. De garantie vervalt automatisch bij ongeoorloofd gebruik.
•De garantie geldt niet voor schade door het negeren van bepaalde richtlijnen in deze handleiding en uw dealer zal de verantwoordelijkheid afwijzen voor defecten of problemen die hier rechtstreeks verband mee houden.
•Bewaar deze handleiding voor verdere raadpleging.
4. Eigenschappen
• zeer groot lcd-scherm met achtergrondverlichting
• keuze tussen metrische / Brits-Amerikaanse maateenheden
• berekenen van oppervlakte, volume
• indirecte metingen aan de hand van 2 of 3 meetpunten
• optelen aftrekfuncties
• de laatste 20 metingen blijven bewaard in het geheugen
• zeer groot bereik (50 m) en zeer grote precisie (± 1,5 mm)
• automatische / manuele uitschakeling
5. Omschrijving
Raadpleeg de afbeeldingen op pagina 2 van deze handleiding.
Controlepaneel
a |
inschakeling/meting |
f |
verminderen/aftrekken |
b |
meting oppervlakte/volume |
g |
geheugenknop |
c |
indirecte meting |
h |
referentie |
V. 02 – 26/11/2013 |
13 |
©Velleman nv |

VTLD100
d |
meetfunctie (enkel/continu) |
i |
verlichting/eenheid |
e |
vermeerderen/optellen |
j |
wissen/uitschakeling |
lcd-scherm |
|
|
|
1 |
inschakeling laser |
5 |
single mode |
2 |
bovenste referentieniveau |
6 |
batterijniveau |
3 |
onderste referentieniveau |
7 |
geheugenadres |
4 |
meetfunctie |
8 |
foutmelding |
|
oppervlakte |
9 |
max./min. aanduiding |
|
volume |
10 |
eerste waarde + eenheid |
|
1ste indirecte meting |
11 |
tweede waarde + eenheid |
|
2de indirecte meting |
12 |
laatste meting of resultaat |
6. Eerste gebruik
Breng een waarschuwingssticker voor de laser (meegelev.) aan, voor u het toestel gebruikt:
•Raadpleeg de veiligheidsinstructies voor u het toestel gebruikt.
•Controleer of er geen batterijen in het toestel zitten.
•De sticker is beschikbaar in meerdere talen. Breng de sticker in uw taal aan op het toestel.
•Wanneer u klaar bent, plaats dan de batterijen (zie 'Batterij').
7. Meetvoorwaarden
Meetbereik
•Het meetbereik bedraagt maximaal 50 m.
•Dit bereik kan vermeerderen in een donkere omgeving.
•Gebruik een richtmerk in een sterk belichte omgeving of bij een oppervlak met weinig reflecterende eigenschappen.
Doeloppervlakken
•Bij gebruik op een kleurloze vloeistof zoals water, glas, polystyreen of gelijkaardige halftransparante oppervlakken kunnen meetfouten ontstaan.
•Bij gebruik op hoogreflecterende oppervlakken zal de laserstraal afwijken en kunnen er meetfouten ontstaan.
•Bij gebruik op donkere, niet-reflecterende oppervlakken kan de berekeningstijd verhogen.
•Richt de meter niet naar de zon of een andere lichtbron.
8. Algemene functies
Raadpleeg de afbeeldingen op pagina 2 en 3 van deze handleiding.
• Plaats de batterijen in het toestel (zie 'Batterij').
V. 02 – 26/11/2013 |
14 |
©Velleman nv |

VTLD100
Inen uitschakeling
•Druk op MEAS [a] om het toestel en de laser in te schakelen.
•Houd CLR [j] ingedrukt om het toestel uit te schakelen.
•Opmerking: De laser schakelt automatisch uit na 30 seconden; het toestel schakelt automatisch uit na 3 minuten inactiviteit.
De wisknop
Druk op CLR [j] om de laatste handeling te wissen.
Het referentieniveau
•Druk op de referentieknop [h] om te schakelen tussen bovenste [2] en
het onderste [3] referentieniveau (zie afbeelding B). Het toestel piept wanneer u de instelling wijzigt.
o [2] de meting start bovenaan de meter
o [3] de meting start onderaan de meter (standaard)
Achtergrondverlichting
•Druk kort op UNIT [i] om de achtergrondverlichting in of uit te schakelen.
Meeteenheden
•Houd UNIT [i] ingedrukt om te schakelen tussen m (meter), inch (in), feet (ft) en gebroken ft+in (x/16).
Optellen/aftrekken
•Druk op + [e] om de volgende metingen aan de vorige toe te voegen.
•Druk op ? [f] om de volgende metingen van de laatste af te trekken.
Geheugen
•Druk op de geheugenknop [g] om de opgeslagen inhoud weer te geven (omgekeerde volgorde, laatst opgeslagen waarde wordt eerst weergegeven).
•Druk op + [e] / ? [f] om de volgende/vorige waarde weer te geven.
•Druk gelijktijdig CLR [j] en de geheugenknop [g] in om alle opgeslagen gegevens te wissen.
9. Meting
Raadpleeg de afbeeldingen op pagina 2 en 3 van deze handleiding.
Enkele, directe meting
•Druk op MEAS [a] om het toestel in te schakelen.
•Richt de laser, houd de meter stil en druk opnieuw op MEAS [a]. De afstand wordt op het lcd-scherm weergegeven.
Continue meting/meting van maximumen minimumafstand [C]
•In continue meetmodus wordt de afstand elke 0,5 s gemeten en de minimumen maximumafstand [9] weergegeven.
V. 02 – 26/11/2013 |
15 |
©Velleman nv |
Loading...