


 Loading...
WC30D - Ø 30CM
DCF WALL CLOCK
DCF-WANDKLOK HORLOGE MURALE DCF RELOJ DE PARED DCF DCF-WANDUHR
RELÓGIO DE PAREDE DCF
ZEGAR ŚCIENNY DCF
USER MANUAL |
3 |
GEBRUIKERSHANDLEIDING |
6 |
MODE D’EMPLOI |
9 |
MANUAL DEL USUARIO |
12 |
BEDIENUNGSANLEITUNG |
15 |
MANUAL DO UTILIZADOR |
18 |
INSTRUKCJA OBSŁUGI |
21 |
WC30D
V. 01 – 12/03/2013 |
2 |
©Velleman nv |
|
|
|

WC30D
USER MANUAL
1.Introduction
To all residents of the European Union
Important environmental information about this product
This symbol on the device or the package indicates that disposal of the device after its lifecycle could harm the environment. Do not dispose of the unit (or batteries) as unsorted municipal waste; it should be taken to a specialized company for recycling. This device should be returned to your distributor or to a local recycling service. Respect the local environmental rules.
If in doubt, contact your local waste disposal authorities.
Thank you for choosing Velleman! Please read the manual thoroughly before bringing this device into service. If the device was damaged in transit, don't install or use it and contact your dealer.
2.Safety Instructions
Keep this device away from children and unauthorized users.
Keep this device away from rain, moisture, splashing and dripping liquids.
3.General Guidelines
Refer to the Velleman® Service and Quality Warranty on the last pages of this manual.
Protect this device from shocks and abuse. Avoid brute force when operating the device.
Protect the device against extreme heat and dust.
Familiarise yourself with the functions of the device before actually using it.
All modifications of the device are forbidden for safety reasons.
Only use the device for its intended purpose. Using the device in an unauthorised way will void the warranty.
Damage caused by disregard of certain guidelines in this manual is not covered by the warranty and the dealer will not accept responsibility for any ensuing defects or problems.
Note that damage caused by user modifications to the device is not covered by the warranty.
4. |
Features |
|
DCF controlled clock |
|
clearly legible dial |
automatically switches between standard (winter) and daylight saving (summer) time
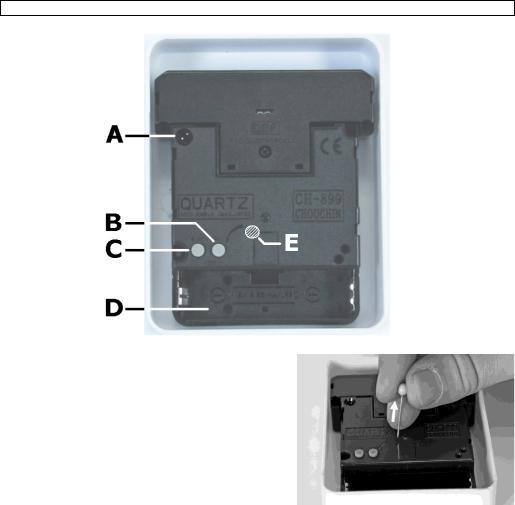
5. Overview
Refer to the illustrations on page 2 of this manual.
A |
reset pins |
D |
battery compartment |
|
|
|
|
B |
forced receiving |
E |
protection pin |
|
|
|
|
C |
manual set |
|
|
|
|
|
|
6.Working principle
The clock contains a receiver which receives a radio-signal from a radio station located near Frankfurt, Germany. This long-wave radio-signal (DCF77) is based on atomic clocks and contains time and date information. The clock automatically synchronizes with this master clock radiosignal and when necessary adjusts the positions of second, minute or hour hands of the clock.
Due to its nature, the radio-signal can be received indoors. However, it should be noted that the signal is weakened by the presence of concrete and metal. Therefore the clock must not be
V. 01 – 12/03/2013 |
3 |
©Velleman nv |
|
|
|

WC30D
installed in concrete basements or inside metal cages. In large concrete office buildings or apartments, the clock should be located near a window for better reception.
Also avoid installing the clock near strong magnetic fields or other devices that generate a lot of electrical noise (e.g. engines)
7.Operation
Important:
Remove the protection pin before first use! Dispose of it in a safe way.
Do not attempt to reinsert the pin afterwards as this will surely damage the clock.
1.Insert a battery in the battery compartment (see below). All hands will move forward towards 12:00. Note: when the original position of the second hand is between 11:55 and 12:00, the second hand will make a full turn before stopping at 12:00. The same happens with the minute hand when the original position is between 11:52 and 12:00.
2.Choose a location for the clock (see section Working principle).
3.Wait until the clock receives the synchronization signal from the master clock. This might take up to 15 minutes. Note that the received signal is usually stronger at night time.
4.Once synchronized, the hands will start moving towards the correct time.
5.When the clock doesn’t receive the radio-signal, it will start running showing the wrong time. However, it will keep attempting to synchronize.
Manual setting
It is possible to set the time manually, e.g. for use in places where no radio-signal is received.
Press and hold the manual set button [C]. After ±3 seconds the minutes and hour hands start moving. Hold down the manual set button [C] and release a couple of minutes before desired time setting. Press the manual set button [C] repeatedly until the desired time indication is reached. When no press is detected within 7 seconds, the clock starts running.
Forced receiving
To force the clock to synchronize, press and hold the forced receiving button [B] for ±3 seconds. The current time is stored in memory and all hands will start moving towards 12:00. The clock attempts to synchronize with the master clock.
When synchronization is successful, the hands will move towards the correct time. If it fails however, the hands will move towards the time that was memorized.
Reset
To reset the time and memory, use a piece of metal (e.g. a blank paperclip) to short circuit the two metal reset pins [A].
All hands will move to the 12:00 position and the memory is cleared. The clock will attempt to synchronize to the master clock
8.Cleaning and maintenance
Wipe the device regularly with a moist, lint-free cloth.
Do not use alcohol or solvents.
9. Battery
Insert a new 1.5V AA battery in the battery compartment [D] in accordance with the polarity markings inside the battery compartment.
10. Technical Specifications
power supply |
1 x1.5V AA-battery LR6C (not incl.) |
dimensions |
Ø30x4cm |
|
|
weight |
±750g |
Use this device with original accessories only. Velleman nv cannot be held responsible in the event of damage or injury resulting from (incorrect) use of this device.
V. 01 – 12/03/2013 |
4 |
©Velleman nv |
|
|
|

WC30D
For more info concerning this product and the latest version of this manual, please visit our website www.velleman.eu.
The information in this manual is subject to change without prior notice.
© COPYRIGHT NOTICE
The copyright to this manual is owned by Velleman nv. All worldwide rights reserved. No part of this manual may be copied, reproduced, translated or reduced to any electronic medium or otherwise without the prior written consent of the copyright holder.
V. 01 – 12/03/2013 |
5 |
©Velleman nv |
|
|
|

WC30D
GEBRUIKERSHANDLEIDING
1.Inleiding
Aan alle ingezetenen van de Europese Unie Belangrijke milieu-informatie betreffende dit product
Dit symbool op het toestel of de verpakking geeft aan dat, als het na zijn levenscyclus wordt weggeworpen, dit toestel schade kan toebrengen aan het milieu. Gooi dit toestel (en eventuele batterijen) niet bij het gewone huishoudelijke afval; het moet bij een gespecialiseerd bedrijf terechtkomen voor recyclage. U moet dit toestel naar uw verdeler of naar een lokaal recyclagepunt brengen. Respecteer de plaatselijke milieuwetgeving.
Hebt u vragen, contacteer dan de plaatselijke autoriteiten betreffend de verwijdering.
Dank u voor uw aankoop! Lees deze handleiding grondig voor u het toestel in gebruik neemt. Werd het toestel beschadigd tijdens het transport, installeer het dan niet en raadpleeg uw dealer.
2.Veiligheidsinstructies
Houd buiten het bereik van kinderen en onbevoegden.
Bescherm tegen regen, vochtigheid, stof, extreme temperaturen en opspattende vloeistoffen.
3.Algemene richtlijnen
Raadpleeg de Velleman® serviceen kwaliteitsgarantie achteraan deze handleiding.
Bescherm de klok tegen schokken. Vermijd brute kracht tijdens de bediening.
Leer eerst de functies van het toestel kennen voor u het gaat gebruiken.
Om veiligheidsredenen mag u geen wijzigingen aanbrengen.
Gebruik het toestel enkel waarvoor het gemaakt is. Bij onoordeelkundig gebruik vervalt de garantie.
De garantie geldt niet voor schade door het negeren van bepaalde richtlijnen in deze handleiding en uw dealer zal de verantwoordelijkheid afwijzen voor defecten of problemen die hier rechtstreeks verband mee houden.
Schade door wijzigingen die de gebruiker heeft aangebracht valt niet onder de garantie.
4.Eigenschappen
wandklok met DCF-sturing
grote en duidelijk leesbare wijzerplaat
automatische overschakeling naar zomer-/wintertijd
5.Over het DCF-signaal
De WC30D bevat een ontvanger die de radiografische signalen (DCF77) door de tijdseinzender in Frankfurt uitgezonden kan ontvangen. De tijdseinzender is gekoppeld aan een atoomklok die de tijden datuminformatie bevat. Uw WC30D zal bij ontvangst van het DCF-signaal de wijzers automatisch met de atoomklok synchroniseren.
Het radiosignaal is gemakkelijk binnenshuis te ontvangen. De ontvangst kan echter verzwakken indien er beton en metaal aanwezig is. Het is daarom niet aan te raden om de klok te installeren in kelders en binnenin een metalen kooi. De beste locatie om de klok op kantoor of op een flat te installeren, is naast een raam.
Vermijd ook installatie in de buurt van magnetische velden of apparaten die elektrische ruis voortbrengen (bv. een motor)
6.Omschrijving
Raadpleeg de afbeeldingen op pagina 2 van deze handleiding.
V. 01 – 12/03/2013 |
6 |
©Velleman nv |
|
|
|
|
|
|
|
WC30D |
|
|
|
|
|
|
|
|
|
|
|
|
|
|
A |
resetpinnen |
D |
batterijvak |
|
|
|
|
|
|
|
|
B |
gedwongen ontvangst |
E |
veiligheidspin |
|
|
|
|
|
|
|
|
C |
handmatige instelling |
|
|
|
|
|
|
|
|
|
7.Gebruik
Raadpleeg de figuur op pagina 2 van deze handleiding.
Belangrijk: Verwijder de veiligheidspin voor de eerste ingebruikname! Steek deze pin nooit terug in het gaatje om onherroepelijke schade te vermijden.
Plaats een batterij in het batterijvak (zie §7). Alle wijzers plaatsen zich automatisch op 12:00. Opmerking: wanneer de secondeof de minutenwijzer tussen 11:52 en 12:00 staat, zal hij eerst een volledige omwenteling maken alvorens zich op 12:00 te plaatsen.
Kies een geschikte installatieplaats (zie §5).
Wacht tot de klok het DCF-signaal ontvangt. Dit kan tot 15 minuten duren. Het DCF-signaal is meestal sterker ’s nachts.
Eenmaal de klok is gesynchroniseerd, zullen de wijzers zich op het correcte uur plaatsen.
Indien de klok het signaal niet kan ontvangen, zal deze toch lopen. De klok blijft het DCF-signaal proberen te ontvangen.
Handmatige instelling
Stel de klok handmatig in indien er geen DCF-signaal kan ontvangen worden.
Houd de instelknop [C] ingedrukt. Na ± 3 seconden verplaatsen de wijzers zich. Laat de instelknop
[C]los enkele minuten vóór de juiste tijd. Druk nu de instelknop [C] herhaaldelijk in tot de klok de
juiste tijd weergeeft. De klok loopt 7 seconden na de laatste druk op een knop.
Gedwongen ontvangst
Houd de ontvangstknop [B] gedurende ± 3 seconden ingedrukt om de klok te dwingen om zich te synchroniseren. De aangeduide tijd wordt in het geheugen opgeslagen en de wijzers verplaatsen zich naar 12:00. De klok probeert zich nu te synchroniseren.
Na de synchronisatie verplaatsen de wijzers zich naar de correcte tijd. Bij niet-synchronisatie verplaatsen de wijzers zich naar het eerder opgeslagen uur.
De klok resetten
Veroorzaak een kortsluiting tussen de twee metalen pinnetjes [A] met behulp van een metalen object, bv. een paperclip.
De wijzers verplaatsen zich naar 12:00 en het geheugen wordt gewist. De klok zal zich daarna opnieuw met het DCF-signaal proberen te synchroniseren
8. Reiniging en onderhoud
Maak de wandklok regelmatig schoon met een vochtige, niet-pluizende doek. Gebruik geen alcohol of solventen.
9. Batterij
Plaats een 1,5 V AA-batterij in het batterijvak [D] volgens de polariteitaanduidingen.
10. Technische specificaties
voeding |
1 x 1,5 V AA-batterij LR6C (niet meegelev.) |
afmetingen |
Ø 30 x 4 cm |
|
|
gewicht |
± 750 g |
Gebruik dit toestel enkel met originele accessoires. Velleman nv is niet aansprakelijk voor schade of kwetsuren bij (verkeerd) gebruik van dit toestel.
Voor meer informatie over dit product en de laatste versie van deze handleiding, zie www.velleman.eu.
De informatie in deze handleiding kan te allen tijde worden gewijzigd zonder voorafgaande kennisgeving.
V. 01 – 12/03/2013 |
7 |
©Velleman nv |
|
|
|

WC30D
© AUTEURSRECHT
Velleman nv heeft het auteursrecht voor deze handleiding. Alle wereldwijde rechten voorbehouden. Het is niet toegestaan om deze handleiding of gedeelten ervan over te nemen, te kopiëren, te vertalen, te bewerken en op te slaan op een elektronisch medium zonder voorafgaande schriftelijke toestemming van de rechthebbende.
V. 01 – 12/03/2013 |
8 |
©Velleman nv |
|
|
|
Loading...