


HAND BLENDER SET SSMS 600 C3
HAND BLENDER SET
Operating instructions
BOTMIXER KÉSZLET
Használati utasítás
TYČOVÝ MIXÉR
Návod k obsluze
STABMIXER-SET
Bedienungsanleitung
BLENDER RĘCZNY - ZESTAW
Instrukcja obsługi
PALIČNI MEŠALNIK Z DODATNIM PRIBOROM
Navodila za uporabo
TYČOVÝ MIXÉR
Návod na obsluhu
IAN 102804

Before reading, unfold the page containing the illustrations and familiarise yourself with all functions of the device.
Przed przeczytaniem proszę rozłożyć stronę z ilustracjami, a następnie proszę zapoznać się z wszystkimi funkcjami urządzenia.
Olvasás előtt kattintson az ábrát tartalmazó oldalra és végezetül ismerje meg a készülék mindegyik funkcióját.
Pred branjem odprite stran s slikami in se nato seznanite z vsemi funkcijami naprave.
Před čtením si otevřete stranu s obrázky a potom se seznamte se všemi funkcemi přístroje.
Pred čítaním si odklopte stranu s obrázkami a potom sa oboznámte so všetkými funkciami prístroja.
Klappen Sie vor dem Lesen die Seite mit den Abbildungen aus und machen Sie sich anschließend mit allen Funktionen des Gerätes vertraut.
GB |
Operating instructions |
Page |
1 |
PL |
Instrukcja obsługi |
Strona |
19 |
HU |
Használati utasítás |
Oldal |
37 |
SI |
Navodila za uporabo |
Stran |
55 |
CZ |
Návod k obsluze |
Strana |
73 |
SK |
Návod na obsluhu |
Strana |
91 |
DE / AT / CH |
Bedienungsanleitung |
Seite |
109 |
A
C
1 |
B |
2 |
|
3 |
6 |
4 |
|
|
7 |
8
5
D
9
q
0

Index
GB
Introduction . . . . . . . . . . . . . . . . . . . . . . . . . . . . . . . . . . . . . . . . . . . . . . . . . . . 2
Copyright. . . . . . . . . . . . . . . . . . . . . . . . . . . . . . . . . . . . . . . . . . . . . . . . . . . . . . . . . . . . . . . 2
Intended use . . . . . . . . . . . . . . . . . . . . . . . . . . . . . . . . . . . . . . . . . . . . . . . . . . 2
Items supplied . . . . . . . . . . . . . . . . . . . . . . . . . . . . . . . . . . . . . . . . . . . . . . . . . 3
Disposal of the packaging . . . . . . . . . . . . . . . . . . . . . . . . . . . . . . . . . . . . . . . . . . . . . . . . . . 3
Description of appliance / Accessories . . . . . . . . . . . . . . . . . . . . . . . . . . . . . 4
Technical data . . . . . . . . . . . . . . . . . . . . . . . . . . . . . . . . . . . . . . . . . . . . . . . . . 4
Safety instructions . . . . . . . . . . . . . . . . . . . . . . . . . . . . . . . . . . . . . . . . . . . . . 5
Utilisation. . . . . . . . . . . . . . . . . . . . . . . . . . . . . . . . . . . . . . . . . . . . . . . . . . . . . 7
Assembling . . . . . . . . . . . . . . . . . . . . . . . . . . . . . . . . . . . . . . . . . . . . . . . . . . . 8
To assemble the hand blender. . . . . . . . . . . . . . . . . . . . . . . . . . . . . . . . . . . . . . . . . . . . . . . 8 Assembling the wire whisk . . . . . . . . . . . . . . . . . . . . . . . . . . . . . . . . . . . . . . . . . . . . . . . . . . 8 Assembling the liquidiser . . . . . . . . . . . . . . . . . . . . . . . . . . . . . . . . . . . . . . . . . . . . . . . . . . . 8
Holding the appliance . . . . . . . . . . . . . . . . . . . . . . . . . . . . . . . . . . . . . . . . . . 9
Operation . . . . . . . . . . . . . . . . . . . . . . . . . . . . . . . . . . . . . . . . . . . . . . . . . . . 10
Cleaning. . . . . . . . . . . . . . . . . . . . . . . . . . . . . . . . . . . . . . . . . . . . . . . . . . . . . 12
Disposal of the appliance . . . . . . . . . . . . . . . . . . . . . . . . . . . . . . . . . . . . . . . 13
Notes on the EC Declaration of Conformity . . . . . . . . . . . . . . . . . . . . . . . . 13
Importer. . . . . . . . . . . . . . . . . . . . . . . . . . . . . . . . . . . . . . . . . . . . . . . . . . . . . 13
Warranty . . . . . . . . . . . . . . . . . . . . . . . . . . . . . . . . . . . . . . . . . . . . . . . . . . . . 14
Service . . . . . . . . . . . . . . . . . . . . . . . . . . . . . . . . . . . . . . . . . . . . . . . . . . . . . . 14
Recipes . . . . . . . . . . . . . . . . . . . . . . . . . . . . . . . . . . . . . . . . . . . . . . . . . . . . . . 15
Cream of Vegetable Soup . . . . . . . . . . . . . . . . . . . . . . . . . . . . . . . . . . . . . . . . . . . . . . . . . 15
Pumpkin Soup . . . . . . . . . . . . . . . . . . . . . . . . . . . . . . . . . . . . . . . . . . . . . . . . . . . . . . . . . . 16
Sweet Fruit Spread. . . . . . . . . . . . . . . . . . . . . . . . . . . . . . . . . . . . . . . . . . . . . . . . . . . . . . . 17
Chocolate Cream . . . . . . . . . . . . . . . . . . . . . . . . . . . . . . . . . . . . . . . . . . . . . . . . . . . . . . . 18
Mayonnaise. . . . . . . . . . . . . . . . . . . . . . . . . . . . . . . . . . . . . . . . . . . . . . . . . . . . . . . . . . . . 18
SSMS 600 C3 |
1 |

Introduction
GB |
Congratulations on the purchase of your new appliance. |
|
|
|
You have clearly decided in favour of a quality product. These operating instruc- |
|
tions are a part of this product. They contain important information in regard to |
|
safety, use and disposal. Before using the product, familiarise yourself with all of |
|
these operating and safety instructions. Use the product only as described and |
|
only for the specified areas of application. In addition, pass these documents on, |
|
together with the product, to any future owner. |
Copyright
This documentation is copyright protected.
Any copying or reproduction, including as extracts, as well as the reproduction of images, also in an altered state, is only permitted with the written authorisation of the manufacturer.
Intended use
This hand blender is intended exclusively for processing foodstu s in small quantities. It is intended exclusively for use in domestic households. This hand blender set is not intended for commercial applications.
 WARNING
Danger from unintended use!
Danger can come from the appliance if used for unintended purposes and/or other types of use.
► Use the appliance exclusively for intended purposes.
► Observe the procedures described in these operating instructions.
NOTICE
►Risks can can be engendered if the appliance if used for unintended purposes and/or other types of use. Use the appliance exclusively for its intended purposes. Observe the procedures described in these operating instructions. Claims of any kind resulting from damage caused by improper use, incompetent repairs, unauthorized modifications or the use of non-approved spare parts will not be acknowledged. The operator alone bears liability.
2 |
SSMS 600 C3 |

Items supplied
The appliance is delivered with the following components as standard: |
GB |
|
|
||
|
Hand Blender Set |
|
|
Measuring beaker with combined lid/base |
|
|
Whisk |
|
Liquidiser (Blade and bowl with combined lid/base) |
|
|
|
Operating instructions |
|
1)Remove all parts of the appliance and these operating instructions from the box.
2)Remove all packing material.
3)Clean all parts of the appliance as described in the chapter “Cleaning”.
NOTICE
►Check the contents to make sure everything is there and for visible damage.
►If the contents are incomplete, or have been damaged due to defective packaging or transportation, contact the Service Hotline (see chapter
Service).
Disposal of the packaging
The packaging protects the appliance from transport damage. The packaging materials are selected from the point of view of their environmental friendliness and disposal technology and are therefore recyclable.
The recirculation of packaging into the material circuit saves on raw material and reduces generated waste. Dispose of packaging material that is no longer  needed according to the regionally established regulations.
NOTICE
►If possible preserve the appliance's original packaging during the warranty period so that in the case of a warranty claim you can package the appliance properly for return.
SSMS 600 C3 |
3 |

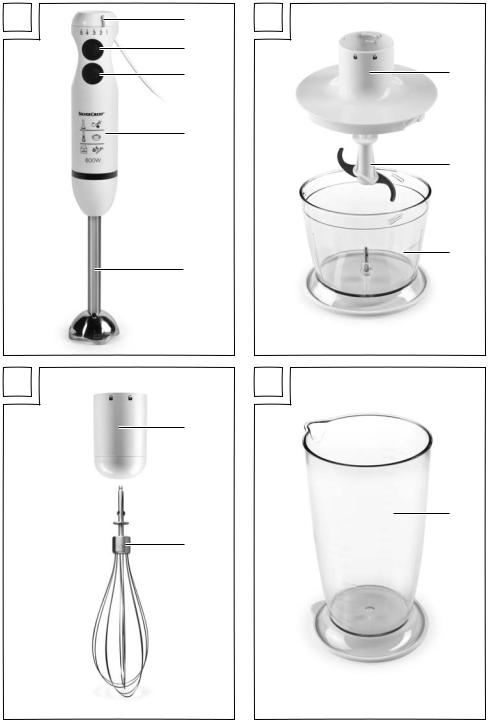
Description of appliance / Accessories
GB
Illustration A (hand blender):
1Speed regulator
2Switch (Standard Speed)
3Turbo-Switch (High Speed)
4Motor unit
5Hand blender
Illustration B (liquidiser):
6Bowl lid
7Blade
8Bowl (with combined lid/base)
Illustration C (whisk):
9 Whisk holder
0 Whisk
Illustration D (accessories):
q Measuring beaker (with combined lid/base) w Wall bracket, incl. screws & plugs
Technical data
Voltage |
220 |
- 240 V ~, 50 Hz |
Nominal Power Rating |
600 |
W |
Protection Class |
II |
|
Capacity: |
|
|
Measuring beaker |
700 ml |
|
Max. fill volume for fluids |
300 ml |
|
We recommend the following operating times:
Let the hand blender cool down for around 2 minutes after 1 minute of operation. Let the liquidiser cool down for around 2 minutes after 1 minute of operation. Let the whisk cool down for around 2 minutes after 2 minutes of operation.
If these operating times are exceeded the device can be damaged by overheating!
4 |
SSMS 600 C3 |

Safety instructions
GB
 RISK OF ELECTRIC SHOCK
►Connect the appliance only to mains power sockets supplying a mains power voltage of 220–240 V ~ / 50 Hz.
►Remove the plug from the mains power socket in event of operating malfunctions and before cleaning the appliance .
►Do not expose the appliance to moisture and do not use it outdoors.
►If liquid gets into the housing, disconnect the appliance from the mains power socket immediately and have it repaired by a qualified technician.
►Always pull on the plug to disconnect the appliance from the mains; never pull on the power cable itself.
►Do not kink or crush the power cable, and route the cable so that it cannot be stepped on or tripped over.
►To avoid risks, arrange for defective plugs and/or power cables to be replaced at once by qualified technicians or our Customer Service Department.
►This appliance may be used by people with reduced physical, sensory or mental capabilities or lack of experience and/or knowledge if they are supervised and have been instructed in how to use the appliance safely and have understood the potential risks.
►The appliance and its connecting cable must be kept away from children.
►Do not attempt to open the hand blender’s motor casing. If you do so, the safety of the appliance is no longer assured and the warranty will become void.
Never immerse the blender’s motor unit in liquids, or allow liquids to get into the motor unit housing.
SSMS 600 C3 |
5 |

WARNING! RISK OF INJURY!
GB
►Before changing accessories or additional parts that are in motion during operation, the appliance must be switched o and disconnected from mains power.
►Disconnect the appliance from the mains power supply
–when the appliance is unsupervised,
–when you are cleaning the appliance,
–when you are assembling or dismantling it.
►This appliance may not be used by children.
►Children must not play with the appliance.
►The appliance and its connecting cable must be kept away from children.
►The blade is extremely sharp! Handle it with great care.
►Handle the extremely sharp blade with caution as it can cause injuries.
►Clean the appliance very carefully. The blades are extremely sharp!
►Always be careful when emptying the bowl! The blades are extremely sharp!
►The appliance should always be disconnected from the mains when unattended and before assembly, disassembly or cleaning.
6 |
SSMS 600 C3 |

Utilisation
GB
NOTICE
►With the measuring beaker q you can measure volumes of fluids up to 700 ml. For food processing, fill it to a maximun of 300 ml, otherwise fluids could overflow from the measuring beaker q.
►Should you wish to keep liquids/foods in the measuring beaker q, you can remove the base of the measuring beaker q and use it as a lid. Ensure that the spout of the measuring beaker q is also closed.
■With this hand blender 5 you can prepare dips, sauces, soups or baby food. We recommend using the hand blender 5 for a maximum of 1 minute at a time and then letting it cool down.
WARNING - PROPERTY DAMAGE!
►Do not use this hand blender 5 for the preparation of solid foods. This would lead to irreparable damage to the appliance!
■With the whisk 0 you can whip cream, beat egg whites and mix pastry, desserts or mayonnaise. We recommend using the whisk 0 for a maximum of 2 minutes at a time and then letting it cool down.
■With the liquidiser, comprising of the blade 7, bowl 8 and bowl lid 6, you can also liquidise solid foods. We recommend using the liquidiser for a maximum of 1 minute at a time and then letting it cool down.
WARNING - PROPERTY DAMAGE!
►Do not use the liquidiser to process liquids. This would lead to irreparable damage to the appliance!
SSMS 600 C3 |
7 |
Assembling
GB
 WARNING! RISK OF INJURY!
►Only insert the plug into the power socket after you have assembled the appliance for use.
NOTICE
► Before the first use, clean all parts as described in the chapter “Cleaning”.
To assemble the hand blender
 WARNING! RISK OF INJURY!
►The blade is extremely sharp! Handle it with great care.
■Place the hand blender 5 on the motor unit 4 so that the arrow points to the symbol  . Turn the hand blender 5 until the arrow on the motor unit 4 points to the symbol
  .
.
Assembling the wire whisk
■Insert the whisk 0 into the whisk holder 9.
■Place the so assembled whisk 0 onto the motor block 4 so that the arrow points to the symbol  Turn the motor block 4 until the arrow points at the symbol
  .
.
Assembling the liquidiser
 WARNING! RISK OF INJURY!
►The blade 7 is extremely sharp! Handle it with great care.
■Carefully place the blade 7 onto its retainer in the bowl 8. Turn the blade 7 a little until it slides onto the holder.
NOTICE
►The blade 7 is not fixed firmly in the holder. This is normal. The blade 7 is only sits firmly when the bowl lid 6 is put on.
■Fill the bowl with the foodstu s you wish to liquidise 8.
8 |
SSMS 600 C3 |
NOTICE
|
GB |
|
► NEVER fill the bowl 8 BEYOND the MAX marking. Otherwise, the |
||
|
||
appliance does not function optimally. |
|
|
■ Place the bowl lid 6 onto the bowl 8 and turn it until tight. Thereby, the |
|
|
lugs on the edge of the bowl 8 must be guided into the rail on the bowl |
|
|
lid 6. Please ensure that the blade 7 is correctly engaged in the bowl lid |
|
|
6. |
|
|
■ Place the motor unit 4 on the bowl lid 6 so that the arrow points to the |
|
|
symbol . Turn the motor unit 4 until the arrow points to the symbol . |
|
NOTICE
►Should you wish to keep foodstu s in the bowl 8 you can remove the base of the bowl 8 and use it as a lid. For this, carefully remove the bowl lid 6 and motor unit 4 and, if needs be, the blade 7. Loosen the base of the bowl 8 and then place it onto the bowl 8.
Holding the appliance
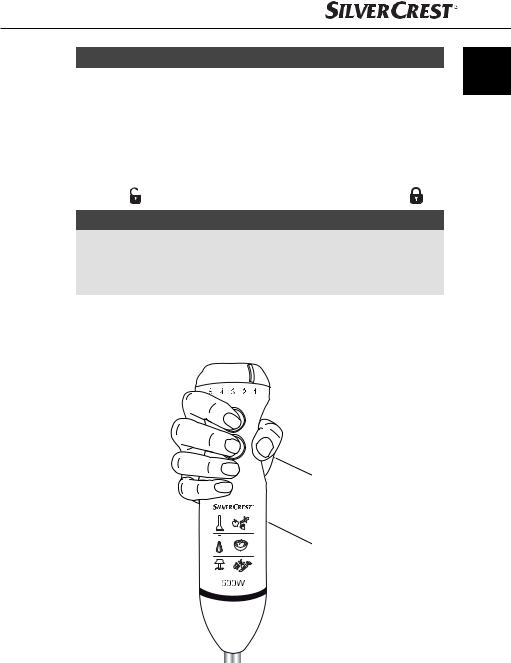
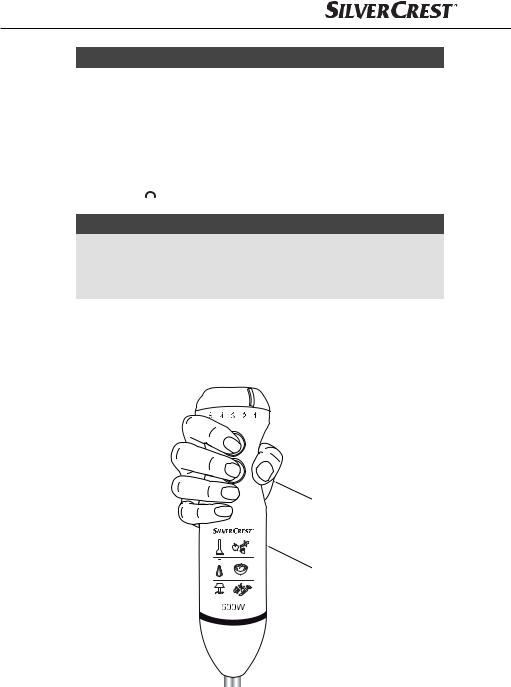
To operate the appliance, hold it as follows:
|
|
|
|
|
|
|
|
|
|
|
|
|
|
|
|
|
|
|
|
|
|
|
|
|
|
|
|
|
|
|
|
|
|
|
|
|
|
|
|
|
|
|
|
|
|
|
|
|
SSMS 600 C3 |
9 |
|||||

Operation
GB
 WARNING! RISK OF INJURY!
► Foodstu s should not be too hot. Squirting contents may cause scalding.
NOTICE
►When you beat cream with the whisk 0 hold the container at a slant during the beating. In this way the cream will be thicker quicker. Ensure that cream cannot be sprayed out of the container while it is being beaten. When whipping cream, slide the speed regulator 1 to position "5".
When you have assembled the blender set as you wish to use it:
1)Insert the plug into a mains power socket.
2)Press and hold the switch 2 to process foodstu s at the standard speed. Slide the speed regulator 1 in the direction of “5” to increase the speed. Slide the speed regulator 1 in the direction of “1” to reduce the speed.
3)Press and hold the turbo-switch 3 to process foodstu s at a higher speed. By pressing the turbo-switch 3 the maximum processing speed is available immediately.
4)When you have completed the processing of the foodstu s, simply release the switch.
NOTICE
►Should unusual noises be heard during operation, such as squeaks or similar, lubricate the drive shaft of the blender with a few drops of neutral cooking oil:
10 |
SSMS 600 C3 |
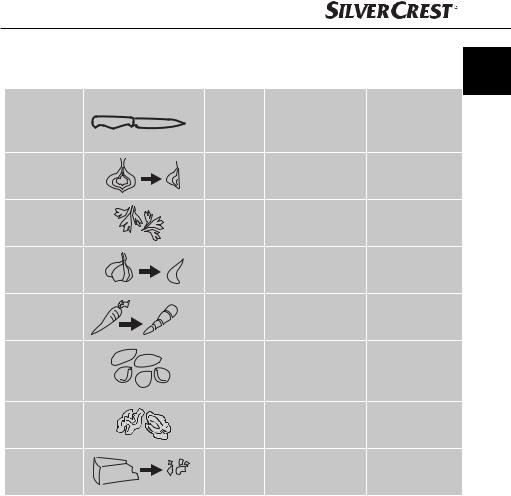
Examples for the chopping and liquiding of various foods with the liquidiser:
GB
Ingredients |
max. |
Processing time |
SPEED |
|
amount |
||||
|
|
|
||
Onions |
200 g |
approx. 20 Sec. |
Level 1 - 3 |
|
Parsley |
30 g |
approx. 20 Sec. |
Turbo |
|
Garlic |
20 cloves |
approx. 20 Sec. |
Level 1 - 5 |
|
Baby-carrots |
200 g |
approx. 15 Sec. |
Level 1 - 5 |
|
Hazelnuts/ |
200 g |
approx. 30 Sec. |
Turbo |
|
Almonds |
||||
|
|
|
||
Walnuts |
200 g |
approx. 25 Sec. |
Level 3 - 4 |
|
Parmesan |
250 g |
approx. 30 Sec. |
Turbo |
|
|
1 cm |
|
|
SSMS 600 C3 |
11 |

Cleaning
GB
 WARNING - RISK OF ELECTRIC SHOCK!
►Before you start to clean the hand blender, ALWAYS unplug the appliance from the mains power socket.
► Under no circumstances may the motor unit 4 be cleaned by immersing it in water or holding it under running water.
 WARNING - RISK OF PHYSICAL INJURY!
►To avoid injuries, exercise caution when handling the extremely sharp blade 7. Reassemble the liquidiser after use and cleaning to prevent injury from the exposed blade. Keep the blade out of the reach of children.
WARNING - PROPERTY DAMAGE!
►DO NOT clean the accessories of your hand blender in the dishwasher as it may cause damage to them.
►Do not use aggressive, chemical or abrasive cleaning agents! They could irreparably damage the upper surfaces!
1)Disconnect the power cable.
2)Clean the motor block 4 and the whisk holder 9 with a moist cloth. Ensure that water cannot permeate through the openings on the motor block 4. For stubborn stains, put some mild detergent on the cloth. Wipe detergent residues o with a damp cloth.
3)Clean the blender 5, the bowl lid 6, the bowl 8, the whisk 0, the measuring beaker q and the blade 7 thoroughly in washing-up water and then remove the detergent residues by rinsing them with clean water.
4)Dry everything well with a dish towel and ensure that the appliance is completely dry before re-use.
12 |
SSMS 600 C3 |

Disposal of the appliance
|
|
|
|
|
Do not dispose of the appliance in your normal domestic waste. |
GB |
|
|
|
|
|
|
|
|
|
|
|
|
This product is subject to the provisions of European Directive |
|
|
|
|
|
|
||
|
|
|
|
|
2012/19/EU. |
|
Dispose of this appliance through an approved disposal centre or at your community waste facility. Observe the currently applicable regulations. In case of doubt, please contact your waste disposal centre.
Notes on the EC Declaration of Conformity
In regard to compliance with fundamental requirements and other relevant provisions, this appliance fulfills the relevant regulations of the Electromagnetic Compatibility Directive 2004/108/EC, the ErP Directive 2009/125/EC and the Low Voltage Directive 2006/95/EC.
The complete original declaration of conformity can be obtained from the importer.
Importer
KOMPERNASS HANDELS GMBH
BURGSTRASSE 21
44867 BOCHUM
GERMANY
www.kompernass.com
SSMS 600 C3 |
13 |

Warranty
GB |
The warranty for this appliance is for 3 years from the date of purchase. The |
|
|
|
appliance has been manufactured with care and meticulously examined before |
|
delivery. |
|
Please retain your receipt as proof of purchase. In the event of a warranty claim, |
|
please make contact by telephone with our service department. Only in this way |
|
can a post-free despatch for your goods be assured. |
NOTICE
►The warranty covers only claims for material and manufacturing defects, not for transport damages, wearing parts or for damage to fragile components, e.g. switches.
This product is for domestic use only and is not intended for commercial use.
In the event of misuse and improper handling, use of force and modifications not carried out by our authorized service branch, the warranty will become void.
Your statutory rights are not restricted in any way by this warranty.
The warranty period is not extended by repairs made under the warranty. This applies also to replaced and repaired parts.
Damages and defects extant at the time of purchase must be reported immediately after unpacking, resp. no later than two days after the date of purchase.
Repairs made after the lapse of the warranty period are subject to charge.
Service
 Service Great Britain
Tel.: 0871 5000 720 (£ 0.10/Min.)
E-Mail: kompernass@lidl.co.uk
IAN 102804
Hotline availability: Monday to Friday 08:00 - 20:00 (CET)
14 |
SSMS 600 C3 |

Recipes
GB
Cream of Vegetable Soup
2 - 4 People
Ingredients
■2 - 3 tbsp Cooking oil
■200 g Onions
■200 g Potatoes (specially suitable are floury varieties)
■200 g Carrots
■350 - 400 ml Vegetable stock (fresh or instant)
■Salt, Pepper, Nutmeg
■5 g Parsley
Preparation
1)Peel and finely chop the onions. Wash, peel and cut the carrots into slices. Peel and rinse the potatoes, then cut them into approx. 2 cm cubes.
2)Heat the oil in a pan, sauté the onions until glassy. Add the carrots and potatoes and sauté them also. Pour in su cient broth so that the vegetables are well covered and then boil everything for 10-15 minutes until soft. If necessary, add more broth if the vegetables are no longer completely covered.
3)Wash the parsley, shake it dry and remove the stems. Break the parsley into large pieces and add them to the soup. Puree everything with the hand
blender 5 for about 1 minute. Season with salt, pepper and grated nutmeg.
SSMS 600 C3 |
15 |

Pumpkin Soup
GB |
4 People |
|
|
||
|
Ingredients |
|
|
■ |
1 medium-sized Onion |
|
■ |
2 Garlic cloves |
|
■ 10 - 20 g fresh Ginger |
|
|
■ |
3 tbsp Rapeseed oil |
|
■ 400 g Pumpkin (ideally suited is Hokkaido pumpkin, because the shell |
|
|
|
becomes soft when cooked and it does not need to be peeled) |
|
■ 250 - 300 ml Coconut milk |
|
|
■ 250 - 500 ml Vegetable stock |
|
|
■ |
Juice of ½ of an Orange |
|
■ |
some dry white wine |
|
■ |
1 tsp. Sugar |
|
■ |
Salt, Pepper |
Preparation
1)Peel and chop the onion, the garlic also. Peel and finely chop the ginger. Firstly, sauté the onion and ginger in hot oil. After 2 minutes add the garlic and sauté this also.
2)Thoroughly clean the pumpkin under warm water with a vegetable brush, then cut it into 2-3 cm cubes. (If a pumpkin other than Hokkaido pumpkin is being used, it must be peeled in addition). Add the diced pumpkin to the onions and ginger and sauté them also. Fill with half the amount of coconut milk and su cient vegetable broth to cover the pumpkin well. Cook for
approx. 20-25 minutes with the lid on until soft. Mix everything with a hand blender 5 until smooth. Thereby, add additional coconut milk until the soup has the correct soft and creamy consistency.
3)Season the soup with orange juice, white wine, sugar, salt and pepper so that it has both a sweet and a balanced sour-salty note in addition to the sharp flavour.
16 |
SSMS 600 C3 |

Sweet Fruit Spread
Ingredients |
GB |
|
|
||
■ |
250 g Strawberries or other fruit (fresh or frozen) |
|
■ |
1 packet (about 125 g) Preserving sugar without cooking |
|
■ |
1 dash of Lemon juice |
|
■ |
1 pinch of the pulp of a Vanilla pod |
|
Preparation |
|
|
1) |
Wash and clean the strawberries, at the same time removing the green |
|
|
stems. Drain well in a colander, so that you are rid of excess water and the |
|
|
spread is not too watery. Slice larger strawberries into small pieces. |
|
2) |
Weigh 250 g of strawberries and place in a suitable blender jug. |
|
3) |
Add a dash of lemon juice. |
|
4) |
If desired, scrape out and add the pulp of a vanilla pod. |
|
5) |
Add the contents of the packet of preserving sugar without cooking and |
|
|
mix thoroughly with a hand blender 5 for 45-60 seconds. If there are still |
|
|
large pieces in it, allow it to stand for 1 minute and then purée it again for |
|
|
60 seconds. |
|
6) |
Enjoy the fruit spread straight away or pour it into a glass jar with a screw |
|
|
cap and firmly seal it. |
|
SSMS 600 C3 |
17 |
Chocolate Cream
GB |
For 4 people |
|
|
|
Ingredients |
|
■ 350 g Whipping cream |
|
■ 200 g Dark chocolate (> 60% Cocoa) |
|
■ ½ Vanilla pod (Pulp) |
|
Preparation |
1)Bring the cream to a boil, crumble the chocolate and melt it slowly over low heat. Scrape out the pulp of half a vanilla pod and blend it into the mixture.
2)Allow it to cool and set completely in the refrigerator.
3)Before serving, stir with the whisk 0 until creamy.
Tip: This tastes good with fresh fruit.
Mayonnaise
■200 ml neutral vegetable oil, e.g. Rapeseed oil
■1 Egg (yolk and egg white)
■10 g mild Vinegar or Lemon juice
■Salt and Pepper to taste
Preparation
1)Place the egg and lemon juice in the mixing jug, hold the whisk 0 perpendicular to the jug and press and hold the turbo switch 3.
2)Slowly add the cooking oil in a thin uniform stream (within 1:30 minutes), so that the oil combines with the other ingredients.
3)Finally, season to taste with salt and pepper.
18 |
SSMS 600 C3 |

Spis treści
. . . . . . . . . . . . . . . . . . . . . . . . . . . . . . . . . . . . . . . . . . . . . . .Wprowadzenie |
20 |
|
Prawo autorskie . . . . . . . . . . . . . . . . . . . . . . . . . . . . . . . . . . . . . . . . . . . . . . . . . . . . . . . . . |
20 |
PL |
|
|
Użycie zgodne z przeznaczeniem . . . . . . . . . . . . . . . . . . . . . . . . . . . . . . . . 20
Zakres dostawy . . . . . . . . . . . . . . . . . . . . . . . . . . . . . . . . . . . . . . . . . . . . . . 21
Utylizacja opakowania . . . . . . . . . . . . . . . . . . . . . . . . . . . . . . . . . . . . . . . . . . . . . . . . . . . 21
Opis urządzenia / Oprzyrządowanie. . . . . . . . . . . . . . . . . . . . . . . . . . . . . 22
Dane techniczne . . . . . . . . . . . . . . . . . . . . . . . . . . . . . . . . . . . . . . . . . . . . . . 22
Wskazówki dotyczące bezpieczeństwa . . . . . . . . . . . . . . . . . . . . . . . . . . . 23
Przeznaczenie . . . . . . . . . . . . . . . . . . . . . . . . . . . . . . . . . . . . . . . . . . . . . . . . 25
Składanie urządzenia . . . . . . . . . . . . . . . . . . . . . . . . . . . . . . . . . . . . . . . . . 26
Zamocowanie blendera. . . . . . . . . . . . . . . . . . . . . . . . . . . . . . . . . . . . . . . . . . . . . . . . . . . 26 Zamocowanie trzepaczki . . . . . . . . . . . . . . . . . . . . . . . . . . . . . . . . . . . . . . . . . . . . . . . . . 26 Zamocowanie rozdrabniacza . . . . . . . . . . . . . . . . . . . . . . . . . . . . . . . . . . . . . . . . . . . . . . 26
Trzymanie urządzenia . . . . . . . . . . . . . . . . . . . . . . . . . . . . . . . . . . . . . . . . . 27
Obsługa . . . . . . . . . . . . . . . . . . . . . . . . . . . . . . . . . . . . . . . . . . . . . . . . . . . . . 28
Czyszczenie . . . . . . . . . . . . . . . . . . . . . . . . . . . . . . . . . . . . . . . . . . . . . . . . . . 30
Utylizacja urządzenia . . . . . . . . . . . . . . . . . . . . . . . . . . . . . . . . . . . . . . . . . 31
Wskazówki dotyczące deklaracji zgodności WE . . . . . . . . . . . . . . . . . . . . 31
Importer. . . . . . . . . . . . . . . . . . . . . . . . . . . . . . . . . . . . . . . . . . . . . . . . . . . . . 31
Gwarancja. . . . . . . . . . . . . . . . . . . . . . . . . . . . . . . . . . . . . . . . . . . . . . . . . . . 32
Serwis . . . . . . . . . . . . . . . . . . . . . . . . . . . . . . . . . . . . . . . . . . . . . . . . . . . . . . 32
Przepisy . . . . . . . . . . . . . . . . . . . . . . . . . . . . . . . . . . . . . . . . . . . . . . . . . . . . . 33
Zupa krem z warzyw. . . . . . . . . . . . . . . . . . . . . . . . . . . . . . . . . . . . . . . . . . . . . . . . . . . . . 33 Zupa dyniowa . . . . . . . . . . . . . . . . . . . . . . . . . . . . . . . . . . . . . . . . . . . . . . . . . . . . . . . . . . 34 Słodki przecier owocowy . . . . . . . . . . . . . . . . . . . . . . . . . . . . . . . . . . . . . . . . . . . . . . . . . 35 Krem czekoladowy . . . . . . . . . . . . . . . . . . . . . . . . . . . . . . . . . . . . . . . . . . . . . . . . . . . . . . 36 Majonez . . . . . . . . . . . . . . . . . . . . . . . . . . . . . . . . . . . . . . . . . . . . . . . . . . . . . . . . . . . . . . 36
SSMS 600 C3 |
19 |

Wprowadzenie
Gratulujemy Ci zakupu naszego urządzenia.
Jest to produkt wysokiej jakości. Instrukcja obsługi stanowi część tego produktu. PL Zawiera ona ważne wskazówki dotyczące bezpieczeństwa, użytkowania i utylizacji urządzenia. Przed przystąpieniem do użytkowania produktu zapoznaj się
z wszystkimi wskazówkami obsługi i bezpieczeństwa. Używaj produkt zgodnie z opisem i w podanych obszarach użytkowania. W razie przekazania produktu następnej osobie, nie zapomnij dołączyć również instrukcji obsługi.
Prawo autorskie
Niniejsza dokumentacja jest prawnie chroniona.
Wszelkie powielanie lub przedruk, także we fragmentach, oraz przekazywanie ilustracji, również po ich modyfikacji, jest dozwolone wyłącznie po uzyskaniu pisemnej zgody producenta.
Użycie zgodne z przeznaczeniem
Zestaw z blenderem służy wyłącznie do rozdrabniania środków spożywczych w niewielkich ilościach. Można go używać wyłącznie do celów domowych. Zestaw z blenderem nie jest przewidziany do zastosowań przemysłowych.
 OSTRZEŻENIE
Niebezpieczeństwo spowodowane użytkowaniem niezgodnie z przeznaczeniem!
Użytkowanie urządzenia niezgodnie z jego przeznaczeniem i/lub inne wykorzystanie urządzenia może wiązać się z różnymi zagrożeniami.
►Urządzenie należy użytkować wyłącznie zgodnie z jego przeznaczeniem.
►Należy przestrzegać opisanych w niniejszej instrukcji obsługi metod postępowania.
WSKAZÓWKA
►Użytkowanie urządzenia niezgodnie z jego przeznaczeniem i/lub inne wykorzystanie urządzenia może wiązać się z różnymi zagrożeniami. Urządzenie należy użytkować wyłącznie zgodnie z jego przeznaczeniem. Należy przestrzegać opisanych w niniejszej instrukcji obsługi metod postępowania. Wyklucza się możliwość wnoszenia jakichkolwiek roszczeń z tytułu uszkodzeń spowodowanych zastosowaniem niezgodnie z przeznaczeniem, nieprawidłowymi naprawami, niedozwolonymi zmianami lub użyciem niedopuszczalnych części zamiennych. Wszelkie ryzyko ponosi wyłącznie użytkownik.
20 |
SSMS 600 C3 |

Zakres dostawy
Urządzenie jest wyposażone standardowo w następujące elementy:
|
Blender ręczny - zestaw |
|
|
miarka z pokrywką/podstawką |
PL |
trzepaczka do piany
rozdrabniacz (nóż i naczynie z pokrywką/podstawką)
instrukcja obsługi
1)Wyjmij z kartonu wszystkie elementy urządzenia oraz instrukcję obsługi.
2)Usuń wszystkie materiały opakowaniowe.
3)Wszystkie elementy urządzenia czyść, jak podano w rozdziale „Czyszczenie”.
WSKAZÓWKA
►Po rozpakowaniu nowego urządzenia sprawdź, czy w środku są wszystkie części.
►W przypadku stwierdzenia niekompletnej zawartości opakowania lub uszkodzeń spowodowanych nieprawidłowym opakowaniem lub transportem, skontaktuj się z infolinią obsługi klienta (zobacz rozdział Serwis).
Utylizacja opakowania
Opakowanie chroni urządzenie przed uszkodzeniami podczas transportu.
W trosce o ochronę środowiska, wszystkie zastosowane elementy opakowania nadają się do ponownego przetworzenia.
Zwracanie opakowania do obiegu materiałów oszczędza surowce naturalne i zmniejsza zanieczyszczenie odpadami. Zbędne materiały opakowania utylizuj  zgodnie z obowiązującymi przepisami.
WSKAZÓWKA
►W miarę możliwości zachowaj oryginalne opakowanie na czas trwania gwarancji, by w razie odsyłania urządzenia móc je prawidłowo zapakować.
SSMS 600 C3 |
21 |

Opis urządzenia / Oprzyrządowanie
|
|
|
Ilustracja A (blender ręczny): |
|
|
PL |
|
1 |
Regulator prędkości |
|
|
2 |
Przełącznik (normalna prędkość) |
|
|
|
|
||
|
|
|
3 |
Przełącznik Turbo (duża prędkość) |
|
|
|
||
|
|
|
4 |
Blok silnika |
|
|
|
5 |
Blender |
|
|
|
Ilustracja B (rozdrabniacz): |
|
|
|
|
6 |
Pokrywa miski |
|
|
|
7 |
Nóż |
|
|
|
8 |
Miska (z pokrywą/podstawką) |
|
|
|
Ilustracja C (trzepaczka): |
|
|
|
|
9 |
Uchwyt trzepaczki do piany |
|
|
|
0 |
Trzepaczka do piany |
|
|
|
Ilustracja D (akcesoria): |
|
|
|
|
q Miarka (z pokrywką/podstawką) |
|
Dane techniczne
Napięcie sieciowe |
220 - 240 V ~, 50 Hz |
Moc znamionowa |
600 W |
Klasa ochrony |
II |
Pojemność: |
|
miarka |
700 ml |
Maks. ilość płynów |
300 ml |
Zalecamy zachowanie następujących czasów pracy urządzenia:
Po 1 minucie pracy pozostawić blender, by ostygł przez 2 minuty.
Po 1 minucie pracy pozostawić rozdrabniacz, by ostygł przez 2 minuty.
Po 2 minutach pracy pozostawić trzepaczkę, by ostygła przez 2 minuty.
Jeśli te czasy pracy zostaną przekroczone, może dojść do przegrzania i związanego z tym uszkodzenia urządzenia!
22 |
SSMS 600 C3 |

Wskazówki dotyczące bezpieczeństwa
 NIEBEZPIECZEŃSTWO PORAŻENIA PRĄDEM
ELEKTRYCZNYM
PL
► Urządzenie podłączać wyłącznie do prawidłowo zainstalowanego gniazda sieciowego o napięciu 220-240 V ~ / 50 Hz.
► W razie pojawienia się jakichkolwiek zakłóceń w działaniu oraz przed czyszczeniem urządzenia należy wyciągnąć wtyk z gniazda sieciowego.
► Nie należy narażać urządzenia na wilgoć ani użytkować na otwartej przestrzeni.
► Jeśli już ciecz dostanie się do wnętrza obudowy urządzenia, należy natychmiast wyciągnąć wtyk z gniazda sieciowego i oddać urządzenie do naprawy przez specjalistę.
► Odłączać kabel zasilania wyłącznie poprzez wyciągnięcie wtyku z gniazda sieciowego – nigdy nie należy ciągnąć za sam kabel.
► Kabla zasilającego nie zaginać ani zgniatać. Należy go ułożyć w taki sposób, aby nikt nie mógł na niego nadepnąć ani się o niego potknąć.
► Naprawę uszkodzonego wtyku lub kabla sieciowego zlecać niezwłocznie wykwalifikowanemu specjaliście lub serwisowi, aby uniknąć wszelkich zagrożeń.
► To urządzenie może być używane przez osoby o zmniejszonych zdolnościach fizycznych, sensorycznych lub umysłowych lub też osoby nieposiadające odpowiedniego doświadczenia i/lub wiedzy, wyłącznie pod nadzorem lub po przeszkoleniu w zakresie bezpiecznego używania urządzenia oraz wynikających z niego zagrożeń.
► Urządzenie oraz jego kabel zasilający należy trzymać poza zasięgiem dzieci w wieku poniżej 8 lat.
► Nie wolno otwierać obudowy bloku silnika blendera ręcznego. Stanowi to poważne zagrożenie i powoduje wygaśnięcie gwarancji.
Bloku silnika nigdy nie zanurzać w wodzie oraz unikać przedostania się płynu do wnętrza obudowy silnika.
SSMS 600 C3 |
23 |

 OSTRZEŻENIE! ZAGROŻENIE ODNIESIENIEM
OBRAŻEŃ!
► Przed wymianą osprzętu lub elementów dodatkowych, które pod- PL czas pracy są w ruchu, należy wyłączyć urządzenie i odłączyć
je od sieci elektrycznej.
►Z zasady należy zawsze odłączać urządzenie od zasilania...
–gdy jest bez nadzoru,
–przed przystąpieniem do czyszczenia urządzenia,
–podczas jego montażu lub demontażu.
►Dzieci nie mogą używać tego urządzenia.
►Dzieci nie mogą bawić się urządzeniem.
►Urządzenie oraz jego kabel zasilający należy trzymać poza zasięgiem dzieci w wieku poniżej 8 lat.
►Nóż jest bardzo ostry! Prosimy obchodzić się z nim niezwykle ostrożne.
►Przy obchodzeniu się z niezwykle ostrymi nożami istnieje zagrożenie skaleczeniem.
►Mikser należy czyścić bardzo ostrożnie. Noże są bardzo ostre!
►Podczas opróżniania misy należy zawsze zachowywać ostrożność! Noże są bardzo ostre!
►Przy braku nadzoru oraz przed montażem, złożeniem, rozłożeniem lub czyszczeniem należy zawsze odłączać urządzenie od zasilania sieciowego.
24 |
SSMS 600 C3 |

Przeznaczenie
WSKAZÓWKA |
|
|
|
|
► W miarce q możesz odmierzyć maks. 700 ml płynu. Blenderem można |
|
|
|
|
|
PL |
|
||
przetwarzać jednocześnie maks. 300 ml płynu. Większa ilość może spo- |
|
|
||
wodować wylanie się płynu z miarki q. |
|
|
|
|
►Do przechowywania płynów/produktów spożywczych w miarce q możesz zdjąć podstawę miarki q i użyć jej jako pokrywy. Zwróć uwagę na to, by dzióbek w miarce q był również zamknięty.
■Blenderem 5 można przygotować różnego rodzaju kremy, sosy, zupy lub obiadki dla dzieci. Zalecamy po upływie maks. 1 minuty pracy blendera 5 wyłączyć urządzenie i zaczekać, aż silnik ostygnie.
UWAGA – SZKODY MATERIALNE!
►Nie używaj blendera 5 do obróbki stałych produktów. Następstwem jest nieodwracalne uszkodzenie urządzenia!
■Za pomocą trzepaczki 0 można ubić śmietanę lub białka i zamieszać ciasto lub deser. Zalecamy po upływie maks. 2 minut pracy trzepaczki 0 wyłączyć urządzenie i zaczekać, aż silnik ostygnie.
■Za pomocą rozdrabniacza, składającego się z noża 7, miski 8 i przykrywki 6, można również rozdrabniać twardsze produkty spożywcze. Zalecamy po upływie maks. 1 minuty pracy rozdrabniacza wyłączyć urządzenie i zaczekać, aż silnik ostygnie.
UWAGA – SZKODY MATERIALNE!
►Nie stosować rozdrabniacza w przypadku płynnych artykułów spożywczych. Następstwem jest nieodwracalne uszkodzenie urządzenia!
SSMS 600 C3 |
25 |

|
|
|
Składanie urządzenia |
|
|
|
|
|
|
|
|
|
|
OSTRZEŻENIE! |
|
|
|
|
NIEBEZPIECZEŃSTWO ODNIESIENIA OBRAŻEŃ! |
|
PL |
|
|
► wtyczkę należy włożyć do gniazdka sieciowego dopiero po złożeniu |
|
|
|
|
urządzenia. |
|
|
|
|
|
WSKAZÓWKA
►Przed pierwszym uruchomieniem wyczyść wszystkie części, jak opisano w rozdziale „Czyszczenie”.
Zamocowanie blendera
 OSTRZEŻENIE!
NIEBEZPIECZEŃSTWO ODNIESIENIA OBRAŻEŃ!
►Nóż jest bardzo ostry! Prosimy obchodzić się z nim niezwykle ostrożne.
■Załóż blender 5 na blok silnika 4 tak, by strzałka była skierowana na symbol  . Obracaj blenderem 5 dotąd, aż strzałka na bloku silnika 4 będzie skierowana na symbol
  .
.
Zamocowanie trzepaczki
■Zamocuj trzepaczkę 0 w uchwycie na trzepaczkę 9.
■Tak zmontowaną trzebaczkę do ubijania piany 0 załóż na blok silnika 4, strzałką skierowaną na symbol  . Obróć blokiem silnika 4, aż strzałka będzie skierowana na symbol
  .
.
Zamocowanie rozdrabniacza
 OSTRZEŻENIE!
NIEBEZPIECZEŃSTWO ODNIESIENIA OBRAŻEŃ!
►Nóż 7 jest bardzo ostry! Prosimy obchodzić się z nim niezwykle ostrożne.
■Ostrożnie założyć nóż 7 na uchwyt na pojemniku do miksowania 8. Obrócić przy tym nieco nóż 7 tak, by ześlizgnął się na uchwyt.
WSKAZÓWKA
►Nóż 7 nie jest przy tym sztywno osadzony w uchwycie. Jest to normalne. Nóż 7 jest sztywno osadzony dopiero po założeniu pokrywy miski 6.
■Napełnij pojemnik 8 artykułami spożywczymi przeznaczonymi do rozdrobnienia.
26 |
SSMS 600 C3 |
WSKAZÓWKA
► |
Pojemnik 8 napełniaj zawsze tylko do zaznaczenia MAX. W przeciwnym |
|
|
|
wypadku urządzenie nie będzie działało optymalnie. |
|
|
|
|
||
■ |
Załóż pokrywkę 6 na pojemnik 8 i dokręć. Noski w pojemniku 8 muszą |
PL |
|
|
przy tym wejść w szynę na pokrywce 6. Upewnić się przy tym, że nóż 7 |
|
|
|
jest poprawnie osadzony w pokrywie misy 6. |
|
|
|
|
||
■Załóż blok silnika 4 na pokrywkę 6 tak, by strzałka była skierowana na symbol  . Obracaj blokiem silnika 4 dotąd, aż strzałka będzie skierowana na symbol
  .
.
WSKAZÓWKA
►Do przechowywania płynów/produktów spożywczych w pojemniku 8 możesz zdjąć podstawę pojemnika 8 i użyć jej jako pokrywki. W tym celu zdejmij pokrywkę 6 i blok silnika 4, a także ostrożnie ewentualnie nóż 7. Zdejmij podstawę pod pojemnikiem 8 i załóż ją na pojemnik 8.
Trzymanie urządzenia
Urządzenie trzymaj w następujący sposób:
|
|
|
|
|
|
|
|
|
|
|
|
|
|
|
|
|
|
|
|
|
|
|
|
|
|
|
|
|
|
|
|
|
|
|
|
|
|
|
|
|
|
|
|
|
|
|
|
|
SSMS 600 C3 |
27 |
|||||
 Loading...