


SSRM 10 A1


SilverCrest SSRM 10 A1
English - 1
Content
Introduction ............................................................. 2
Intended use ............................................................ 2
Supplied items ......................................................... 3
Controls and button functions .................................. 4
Visual display .......................................................... 5
Technical data.......................................................... 6
Safety instructions ................................................... 7
Prior to use ............................................................ 13
Inserting the batteries ................................................................ 13
Connecting the earphones ....................................................... 13
First use ................................................................. 14
Setting the time .......................................................................... 14
Switching on / off ..................................................................... 15
Setting the volume ..................................................................... 15
Automatic station scan with auto store function ..................... 16
Manual station scan ................................................................. 17
Manual station tuning ............................................................... 17
Manually saving stations .......................................................... 18
Select saved stations ................................................................. 19
SLEEP timer ................................................................................ 19
Setting the alarm time (Alarm 1 / Alarm 2) ........................... 20
Activating / deactivating the alarm function .......................... 21
SNOOZE function .................................................................... 21
Storage when not in use ........................................................... 22
Troubleshooting .................................................... 22
Environmental and disposal information ............... 23
Conformity information ......................................... 24
Warranty information ........................................... 24

SilverCrest SSRM 10 A1
2 - English
Introduction
Thank you for purchasing a SilverCrest product.
The SilverCrest scan radio SSRM 10 A1, hereinafter referred to
as scan radio, has a digital tuner and provides radio reception in
stereo quality in an easy manner. The next available station is
automatically played at the touch of a button. Important
information such as frequency or time is displayed on the easy-to-
read display. You have the option of saving 20 stations.
Intended use
This is a consumer electronics device which is used to receive
radio stations and as an alarm. It is only designed for private use
and not for industrial or commercial purposes. Furthermore, the
device may not be used in tropical climates. Only connection
cables and external devices that are designed for this product in
terms of safety, electromagnetic compatibility and shielding
quality may be used in conjunction with the device. This device
complies with all standards and directives specified in the
Declaration of Conformity. In the event of any modification to the
device that was not approved by the manufacturer, compliance
with these standards is no longer guaranteed. The manufacturer
does not accept any liability for any resulting damage or faults in
such cases. Only use accessories specified by the manufacturer.
Please observe the regulations and laws in the country of use.
SilverCrest SSRM 10 A1
English - 3
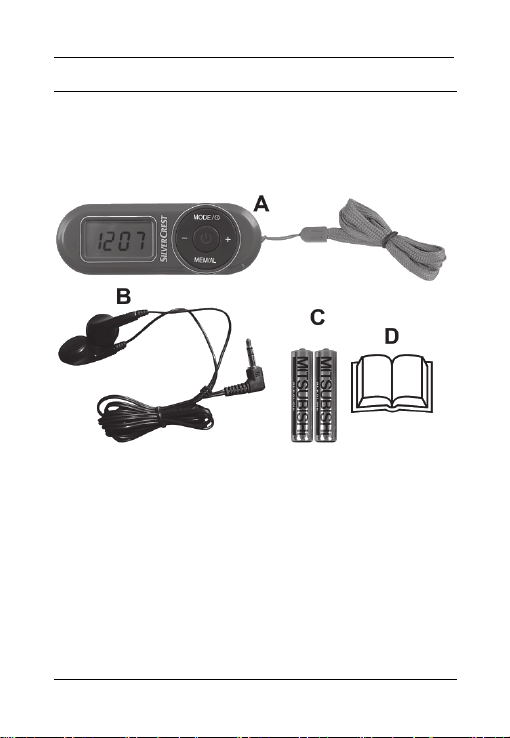
Supplied items
Take the device and all accessories from the packaging. Remove
all packaging material and check that all parts are complete and
undamaged. In the event of an incomplete or damaged delivery,
please contact the manufacturer.
A Scan radio SSRM 10 A1 with strap
B Earphone type: SSRM 10 A1
C 2 batteries of type AAA, 1.5V (micro, LR3)
D These operating instructions (symbolic representation)
SilverCrest SSRM 10 A1
4 - English
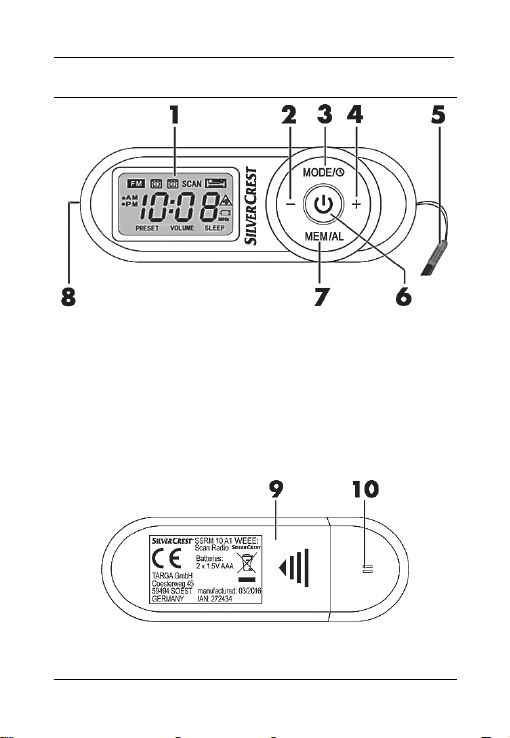
Controls and button functions
1 Display
2 "-" button
3 "MODE" button
4
"+" button
5 Strap
6 "On/Standby" button
7 "MEM/AL" button
8 Earphone jack (at the side)
9 Battery compartment cover
10 Opening for buzzer
SilverCrest SSRM 10 A1
English - 5
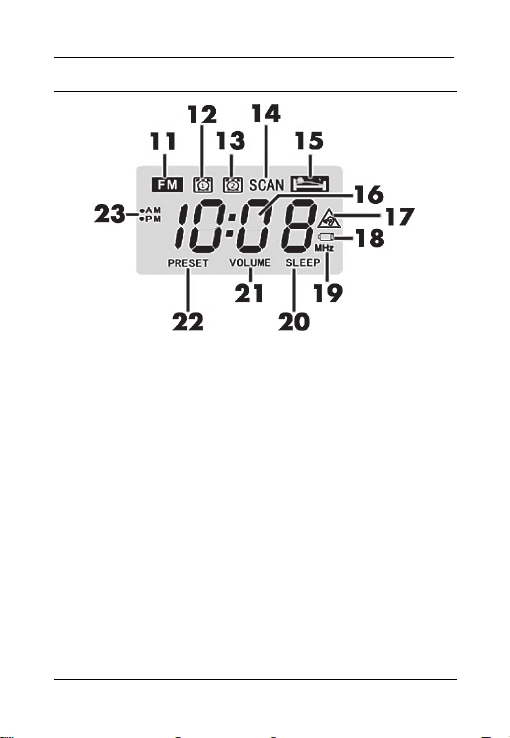
Visual display
11 FM (radio mode)
12 Alarm 1
13 Alarm 2
14 SCAN
15 SNOOZE function
16 Frequency, time or alarm time
17 Volume warning symbol
18 Low battery power
19 Unit of frequency for radio mode
20 SLEEP timer
21 VOLUME
22 PRESET
23 AM / PM (only for 12-hour display)

SilverCrest SSRM 10 A1
6 - English
Technical data
Operating environment
5°C to 35°C, max. 85%
rel. humidity
Permissible storage
conditions
-10°C to 50°C,
Note: The device must not
be stored in hot places, for
example, in a car in summer.
Operating voltage 3V
Battery type AAA 1.5V (micro, LR3)
Power consumption 45mW
Operating time
approx. 65 hours
at 75% volume
Frequency range of radio 87.5 to 108MHz
Dimensions (W x H x D)
approx. 80 x 28 x 19.3mm
Weight 25g (without batteries)
Earphones type SSRM 10 A1
Maximum output voltage at
the headphone jack
approx. 91mV
Maximum sound pressure
with supplied earphones (B)
approx. 92dB(A)
Broadband characteristic
voltage of the supplied
earphones (B)
approx. 99mV
The technical data and design may be changed without
notification.

SilverCrest SSRM 10 A1
English - 7
The specifications for the frequency range describe only the
technical features of the device.
Note that different legal regulations may apply in different
countries to the free-to-air frequency range. Information received
outside of the permitted frequency ranges must not be exploited
nor its content or the fact of its reception forwarded to third
parties.
Please note that reception outside of these regulations may then
be illegal and subject to punishment.
Safety instructions
Before using this device for the first time, please read the
following instructions carefully and take note of the safety
warnings, even if you are familiar with the use of electronic
devices. Please keep these instructions safe for future reference.
Please ensure that you also hand over these instructions if you
resell or pass on this device. They are an integral part of the
product.
Symbols used and their meaning
DANGER! This symbol in conjunction with the
"DANGER" note indicates an imminent dangerous
situation which, if not prevented, could result in
serious injury or even death.
WARNING! This symbol in conjunction with the
"WARNING" note indicates important information
for safe operation of the device and the safety of
the user.
SilverCrest SSRM 10 A1
8 - English
This symbol indicates other important information on
the topic.
DANGER! Batteries
Always ensure correct polarity of the batteries. Please note the
markings on the batteries and in the battery compartment. Never
try to recharge batteries and never throw them into an open fire.
Never use different batteries (old and new, alkaline and carbon,
etc.) at the same time. Remove the batteries if you will not be
using the device for an extended period of time. In the event of
improper use, there is a risk of explosion and leakage. Batteries
are not toys. Consult a doctor immediately if someone swallows
batteries. Batteries may not be deformed or opened as leaking
chemicals can cause injuries. In the event of skin or eye contact
with chemicals, they must be immediately rinsed with generous
amounts of water and a doctor must be consulted.
DANGER! Ensure that
no direct heat sources (e.g. heating) can affect the device
no direct sunlight or bright artificial light reaches the device
any contact with splashed and dripping water and corrosive
liquids is avoided and the device is not operated in the vicinity
of water. In particular, the device should never be submerged

SilverCrest SSRM 10 A1
English - 9
in liquid (do not place any items filled with liquid, e.g. vases or
drinks, on or near the device)
the device is not in the immediate vicinity of magnetic fields
(e.g. speakers)
no fire sources (e.g. burning candles) are placed on or near
the device
no foreign objects penetrate the device
the device is never subjected to extreme temperature
fluctuations as this could result in condensation and electrical
short circuits. If the device was subjected to extreme
temperature fluctuations, however, wait (approx. 2 hours) until
the device has reached ambient temperature before use
the device is never subjected to excessive shocks and
vibrations
DANGER! Children and persons
with disabilities
Electrical devices do not belong in the hands of children.
Children may not recognise potential risks. Persons with limited
physical, mental or sensory abilities should also only use
electrical devices appropriately. Never allow children to use
electrical devices unsupervised unless they have been instructed
accordingly or are supervised by a person responsible for their
safety. Children should always be supervised to ensure that they

SilverCrest SSRM 10 A1
10 - English
do not play with this device. Small parts can be fatal if
swallowed.
Always keep plastic packaging out of reach also.
It poses a suffocation risk!
DANGER!
Display
Do not exert any pressure on the display and keep sharp objects
away from the display. There is a risk of injury if the display is
broken. Wear gloves if you are gathering broken parts and
contact the manufacturer if necessary. If the display becomes
scratched or damaged in any way, take special care to ensure
that no liquid leaks from the display.
If liquid has leaked, follow the instructions below:
If the liquid comes into contact with your skin, wipe it off
with a clean cloth and rinse the area of contact with a
large amount of water. Consult a doctor if necessary.
If the liquid comes into contact with your eyes, rinse them
with running water for at least 15 minutes. Then go to a
doctor immediately.
If you swallow the liquid, first rinse your mouth with water
and then drink a large amount of water. Consult a doctor
immediately!
SilverCrest SSRM 10 A1
English - 11
Operating environment
The device is not designed for use in environments with a high
temperature or humidity (e.g. bathrooms) or in extremely dusty
conditions. Operating temperatures and operating air humidity:
5°C to 35°C, max. 85% rel. humidity.
Health risks due to excessive volume
levels
WARNING! Take care when using earphones.
Listening at high volume for prolonged periods of
time can impair your hearing.
DANGER!
1. Only use the earphones (B) that are supplied with
the device, type: SSRM 10 A1. Other earphones
may create harmful sound pressure.
2. Do not use the supplied earphones (B), type:
SSRM 10 A1, with other playback devices.
Do not use the earphones (B) at high volumes. This impairs your
hearing and may disrupt your environment. Note that ambient
noise may sound unusual if you are using earphones. Even if the
device is designed to ensure that ambient noise can still be
heard, adjust the volume so that you can continue to hear the
ambient noise.
In dangerous situations, for example, driving in traffic, working
with machinery or other situations that require your full attention,
the sound can distract you or cause you to fail to perceive what

SilverCrest SSRM 10 A1
12 - English
is happening around you. Thus do not use the device in such
situations.
Maintenance / cleaning
It is necessary to repair or service the device if it has been
damaged in any way, for example, if the housing is damaged, if
liquid or objects have penetrated the device or if the product has
been exposed to rain or moisture. Servicing is also required if the
device is not working properly or has been dropped. If smoke is
produced, or there are any unusual sounds or smells, turn the
device off immediately and remove the batteries. In such cases,
the device should not be used until it has been inspected by
authorised service personnel. Only have qualified personnel
carry out the servicing on the device. Never open the housing of
the device. Only use a clean, dry cloth for cleaning and never
use any corrosive liquids. Never try to open the housing of the
device This would void your warranty.
Copyright
All information contained in these instructions is subject to
copyright and is provided for information purposes only.
It is only permitted to copy or duplicate data and information
with the express and written consent of the author. This also
includes commercial use of the content and data.
The text and illustrations are based on the state of the art at the
time of printing.
SilverCrest SSRM 10 A1
English - 13
Prior to use
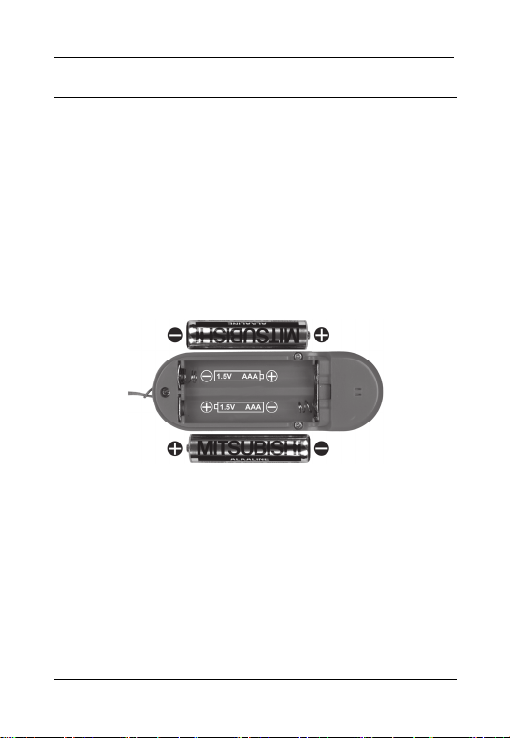
Inserting the batteries
First, insert the supplied batteries (C). To do this, open the battery
compartment at the back of the device by sliding the battery
compartment cover (9) to the side in the direction of the
imprinted arrow and removing it. Insert the batteries (C) with the
correct polarity (pay attention to the + and - marks). The polarity
is illustrated on the batteries and in the battery compartment.
Then slide the battery compartment cover (9) back on the device
housing until it snaps into place.
If the volume decreases or if the device is not working, replace
the batteries (C) with new batteries of the same type. By flashing
"Low battery power" (18) on the display (1), the device indicates
when the battery capacity is exhausted. Please note that all data
(clock settings, alarm times and station presets) is lost when the
batteries are changed.
Connecting the earphones
Insert the jack plug of the supplied earphones (B) as far as
possible into the earphone jack (8) on the side of the device.
SilverCrest SSRM 10 A1
14 - English
First use
Setting the time
If a timer has already been programmed and is
active, the time cannot be set.
If no button is pressed for approx. 5 seconds, the
scan radio exits the setting mode. All previously
made settings are saved.
Press the "MODE" button (3) when the device is switched off. The
display (1) indicates the current hour format: "12HR" or "24HR".
Set your desired hour format by pressing the "-" button (2) or "+"
button (4). Press the "MODE" button (3) again. The hour display
flashes and you can then set it by pressing the "-" button (2) or
"+" button (4). Then press the "MODE" button (3) again. The
minute display then flashes and you can set it by pressing the "-"
button (2) or "+" button (4).
You can also keep the "-" button (2) or "+" button (4)
pressed to fast forward or reverse the numbers.
Finally, press the "MODE" button (3) again. The set time is now
indicated on the display (1).
If you have selected the 12-hour format, the hours before noon
(AM) or hours after noon (PM) are indicated on the display (1).

SilverCrest SSRM 10 A1
English - 15
Switching on / off
Briefly press the "On/Standby" button (6) to switch on the scan
radio. "ON" is indicated briefly on the display (1), followed by
the frequency currently set.
Briefly press the "On/Standby" button (6) again to switch off the
scan radio. "OFF" is indicated briefly on the display (1), followed
by the time currently set.
Setting the volume
You can set the device volume to a value between "00" (mute)
and "15" (maximum volume). The setting upon delivery is "03".
Proceed as follows:
Press the "-" button (2) or "+" button (4) in radio mode to
decrease or increase the volume. The "VOLUME" indicator (21)
also appears on the display.
If the volume reaches level "04", the volume warning symbol
(17) starts to flash on the display. Now you can continue to
increase the volume only if you have confirmed the volume
warning in advance by briefly pressing the "MODE" button (3).
The display indicates the volume level currently set. If no button is
pressed for approx. 3 seconds, the currently tuned frequency
appears on the display again. If the device is set to a value
between "5" and "15" when it is switched off, the scan radio
starts at volume "03" when it is switched on again.

SilverCrest SSRM 10 A1
16 - English
The setting has no effect on the volume of the buzzer
for the alarm clock function. The buzzer volume is
always the same.
Automatic station scan with auto store function
To receive radio stations, it is necessary for the
supplied earphones (B) to be connected to the
earphone jack. The earphone cable serves as a
receiving aerial.
The most convenient way to search for stations and save them is
the automatic station scan with automatic saving of stations (auto
store function).
Switch on the scan radio with the "On/Standby" button (6).
Press the "MODE" button (3) for approx. 2 seconds to start the
automatic station scan. The automatic station scan always
starts at the lowest frequency (87.5MHz).
The scan radio now searches the entire frequency range for
stations with strong signals. "SCAN" (14) flashes on the
display (1). The "FM" symbol (11) lights up and goes out
briefly once a station has been found and the station preset
that was used is shown. "PRESET" (22) is displayed
permanently after the first station found has been saved.
The first 20 stations found are stored directly in the presets 01
to 20 and saved. If all station presets are occupied, the scan is
cancelled and the preset station "01" is played.
The scan can be cancelled at any time by pressing any button.

SilverCrest SSRM 10 A1
English - 17
Please note that already occupied presets are
overwritten.
Manual station scan
Switch on the scan radio with the "On/Standby" button (6).
Press the "MODE" button (3). The "FM" symbol (11) flashes on
the display.
Press the "-" button (2) or "+" button (4) for approx. 2 seconds
to start the manual station scan downwards or upwards. As
soon as the device finds a station with a strong signal, the scan
stops and the station is played.
If you want to switch to another station, press the "-" button (2)
or "+" button (4) again for approx. 2 seconds to restart the
manual station scan downwards or upwards. The device
searches for the next station with a strong signal.
To exit scan mode, press the "MODE" button (3) again. The
"FM" symbol (11) now lights up again permanently.
Manual station tuning
As an alternative to the automatic or manual station scan, you
can also tune in stations manually. This enables you to find
stations with weaker signals also. Proceed as follows:
Switch on the scan radio with the "On/Standby" button (6).
Press the "MODE" button (3). The "FM" symbol (11) flashes on
the display.
Briefly press the "-" button (2) or "+" button (4).

SilverCrest SSRM 10 A1
18 - English
You thus move 0.1MHz downwards or upwards in the
frequency band each time you press the "-" button (2) or "+"
button (4) respectively.
Proceed in this manner until you find the desired station.
Press the "MODE" button (3) to return to volume mode. The
"FM" symbol (11) is displayed permanently on the display.
Manually saving stations
You have the option of saving 20 stations or frequencies.
Proceed as follows:
Press the "MODE" button (3). The "FM" symbol (11) flashes on
the display.
Search for a station which you want to save.
Press the "MEM/AL" button (7) for approx. 1 second until
"PRESET" (22) flashes on the display (1).
Use the "-" button (2) or "+" button (4) to select a preset
between 01 and 20.
Then briefly press the "MEM/AL " button (7). As soon as the
display (1) reverts to the frequency display, the station is saved
in the selected preset.
Please note that already occupied presets are
overwritten.
Press the "MODE" button (3) to return to volume mode. The
"FM" symbol (11) is displayed permanently on the display.

SilverCrest SSRM 10 A1
English - 19
Select saved stations
To select a previously saved station, briefly press the
"MEM/AL" button (7) and use the "-" button (2) or "+" button
(4) to select a preset between 01 and 20.
After approx. 3 seconds, the station that is saved in the
selected preset is played automatically.
Preset stations are lost when batteries are changed.
SLEEP timer
With the SLEEP timer, you can set a time between 10 and 90
minutes after which your scan radio automatically switches off.
The setting is made in intervals of 10 minutes. Proceed as follows:
Switch off the scan radio with the "On/Standby" button (6).
Keep the "On/Standby" button (6) pressed until the display
(1) indicates the number 90 (for 90 minutes).
Then press the "On/Standby" button (6) repeatedly until you
reach the desired number of minutes (for example, 40). Each
time you press the "On/Standby" button (6), the number of
minutes to switching off is reduced by 10 minutes.
The scan radio then switches itself on and, after the previously
selected minutes (for example, 40), it switches itself off
automatically.
The display (1) indicates "SLEEP" (20) when the SLEEP timer is
activated.

SilverCrest SSRM 10 A1
20 - English
You can start the station scan or access saved stations even
when the SLEEP timer is activated.
You can delete the activated SLEEP timer by switching off the
scan radio.
Setting the alarm time (Alarm 1 / Alarm 2)
You can set 2 alarm times. Make sure that the time is set
correctly. You can set the alarm time only when the device is
switched off. Switch off the device with the "On/Standby" button
(6) if it is switched on.
Briefly press the "MEM/AL" button (7). The display (1)
indicates the "Alarm 1" symbol (12), and when you briefly
press the "MEM/AL" button (7) again, the display (1) indicates
the "Alarm 2" symbol (13).
Select Alarm 1 or Alarm 2 and briefly press the "MODE"
button (3).
The hour display flashes and you can then set it by pressing
the "-" button (2) or "+" button (4). Then press the "MODE"
button (3) again. The minute display then flashes and you can
set it by pressing the "-" button (2) or "+" button (4).
Finally, press the "MODE" button (3) again. The display (1)
then indicates the current time and the alarm you just set is
active. This is indicated by the respective alarm symbol
(12,13) on the display (1).
Proceed in the same manner to set the second alarm.

SilverCrest SSRM 10 A1
English - 21
Activating / deactivating the alarm function
When you have set the desired alarm time, you can activate the
alarm function as follows:
Briefly press the "MEM/AL" button (7) repeatedly when the
device is switched off until the desired alarm symbol (12,13) is
indicated with the corresponding alarm time on the display (1).
Both alarm times can also be activated together.
To deactivate the alarm function, briefly press the "MEM/AL"
button (7) until no alarm symbol (12,13) is indicated on the
display (1). The alarm function is then deactivated.
The device wakes you at the set alarm time with a signal tone.
The alarm tone then sounds for approx. 60 seconds, followed
by a snooze period of approx. 60 seconds. On the display
(1), the corresponding alarm symbol (12,13) flashes during
the snooze period. This sequence is repeated until the alarm
tone is switched off. To switch off the alarm tone, briefly press
the "On/Standby" button (6). The alarm is then deactivated
until the next day.
Please note that the signal tone is played via the built-
in buzzer of the scan radio and not via the
earphones.
SNOOZE function
To pause the alarm tone for approx. 5 minutes, briefly press
the "MODE" button (3) during the signal tone. During these 5
minutes, the corresponding alarm symbol (12,13) flashes on
the display (1) and the "SNOOZE" symbol (15) is indicated.

SilverCrest SSRM 10 A1
22 - English
After approx. 5 minutes, the alarm tone starts again. To switch
off the alarm tone, briefly press the "On/Standby" button (6).
Storage when not in use
If you will not be using the scan radio for an
extended period of time, remove the batteries to
avoid leakage.
Store the clean device in a dry, cool location.
Troubleshooting
No sound / no reception
Check whether the earphones (B) are inserted correctly into
the earphone jack (8).
Check whether the volume is set too low.
Change your location to check whether the reception
improves.
Check the capacity of the batteries (C), and replace them if
necessary with new batteries of the same type. Please pay
particular attention to the section "Inserting the batteries".
Nothing indicated on the display
Check whether the batteries are empty or inserted incorrectly.
Insert the batteries correctly or replace them if necessary with
new batteries of the same type. Please pay particular attention
to the section "Inserting the batteries".
 Loading...