


HOME TECH
$IGITALI($ 3AT 2ECEIVER
WITH ($-) CONNECTOR ANDO#) BAY
GB $IGITALI($ 3AT 2ECEIVER
IE WITH ($-) CONNECTOR ANDO#) BAY
5SER MANUALMANDNSERVICE INFORMATION
SSR 1080 A1


Digital HD Satellite Receiver SSR 1080 A1 |
||
Table of Contents |
|
|
|
|
|
Safety Instructions.................................................................................................................. |
4 |
|
Operating Environment ....................................................................................................... |
4 |
|
Notice on Mains Separation................................................................................................ |
5 |
|
Batteries.............................................................................................................................. |
5 |
|
Cables................................................................................................................................. |
5 |
|
Children and Persons with Disabilities................................................................................ |
5 |
|
Repair and Maintenance..................................................................................................... |
6 |
|
Intended Use....................................................................................................................... |
6 |
|
Copyright............................................................................................................................. |
6 |
|
Storing When Not Using the Product .................................................................................. |
6 |
|
Conformity Notice ............................................................................................................... |
7 |
|
Disposal of Old Devices...................................................................................................... |
7 |
|
Introduction............................................................................................................................. |
7 |
|
Package Contents .................................................................................................................. |
7 |
|
Overview................................................................................................................................. |
8 |
|
Controls and buttons........................................................................................................... |
8 |
|
Connectors and sockets ..................................................................................................... |
8 |
|
Remote control.................................................................................................................... |
9 |
|
Getting Started ..................................................................................................................... |
10 |
|
Inserting the Batteries into the Remote Control ................................................................ |
10 |
|
Connecting the Satellite Receiver..................................................................................... |
11 |
|
USB Connection............................................................................................................ |
11 |
|
HDMI Connection.......................................................................................................... |
12 |
|
OSD Menu............................................................................................................................ |
13 |
|
OSD Menu - Simple Mode.................................................................................................... |
14 |
|
Edit Channel ..................................................................................................................... |
14 |
|
Favourite ....................................................................................................................... |
14 |
|
System Setup.................................................................................................................... |
14 |
|
Local Time Setting......................................................................................................... |
14 |
|
Timer Setting................................................................................................................. |
14 |
|
Other ............................................................................................................................. |
14 |
|
Tools ................................................................................................................................. |
15 |
|
Information .................................................................................................................... |
15 |
|
USB............................................................................................................................... |
15 |
|
Remove USB device safely........................................................................................... |
15 |
|
Game ................................................................................................................................ |
15 |
|
Tetris ............................................................................................................................. |
15 |
|
Othello........................................................................................................................... |
15 |
|
English - 1

Digital HD Satellite Receiver SSR 1080 A1
Sudoku .......................................................................................................................... |
15 |
Media ................................................................................................................................ |
15 |
OSD Menu - Expert Mode .................................................................................................... |
16 |
Edit Channel ..................................................................................................................... |
16 |
TV Channel List............................................................................................................. |
16 |
Radio Channel List........................................................................................................ |
18 |
Delete all ....................................................................................................................... |
18 |
Save as Default............................................................................................................. |
18 |
Installation......................................................................................................................... |
18 |
Antenna Connection...................................................................................................... |
19 |
Satellite List................................................................................................................... |
19 |
Antenna Setup (Fixed Antenna).................................................................................... |
20 |
Antenna Setup (Motor Antenna) ................................................................................... |
21 |
Single Satellite Search .................................................................................................. |
23 |
Multi Satellite Search .................................................................................................... |
24 |
TP List ........................................................................................................................... |
24 |
System Setup ................................................................................................................... |
25 |
Language ...................................................................................................................... |
25 |
TV System..................................................................................................................... |
26 |
Display Setting .............................................................................................................. |
27 |
Local Time Setting ........................................................................................................ |
27 |
Timer Setting................................................................................................................. |
27 |
Parental Lock ................................................................................................................ |
28 |
OSD Setting .................................................................................................................. |
29 |
Favourite ....................................................................................................................... |
29 |
Other ............................................................................................................................. |
29 |
Tools ................................................................................................................................. |
30 |
Information .................................................................................................................... |
30 |
Factory Setting .............................................................................................................. |
30 |
S/W Upgrade by OTA ................................................................................................... |
30 |
Common Interface......................................................................................................... |
31 |
Upgrade By USB........................................................................................................... |
31 |
Save to USB.................................................................................................................. |
32 |
USB............................................................................................................................... |
33 |
Remove USB device safely........................................................................................... |
36 |
Game ................................................................................................................................ |
37 |
Tetris ............................................................................................................................. |
37 |
Othello........................................................................................................................... |
37 |
Sudoko .......................................................................................................................... |
37 |
Media ................................................................................................................................ |
38 |
English - 2

|
Digital HD Satellite Receiver SSR 1080 A1 |
|
Record Manager............................................................................................................ |
38 |
|
HDD Information............................................................................................................ |
39 |
|
HDD Format .................................................................................................................. |
39 |
|
DVR Configuration ........................................................................................................ |
39 |
|
Jump.............................................................................................................................. |
40 |
|
Daily Use .............................................................................................................................. |
41 |
|
Operation.............................................................................................................................. |
42 |
|
EPG - Electronic Program Guide ...................................................................................... |
42 |
|
EPG Info........................................................................................................................ |
42 |
|
Schedule ....................................................................................................................... |
42 |
|
EPG Timer..................................................................................................................... |
43 |
|
Programme Information .................................................................................................... |
44 |
|
Selecting Audio Channels................................................................................................. |
44 |
|
Adjusting the Volume ........................................................................................................ |
44 |
|
Selecting Channels ........................................................................................................... |
44 |
|
Using the Numeric Buttons............................................................................................ |
45 |
|
Using the Program List.................................................................................................. |
45 |
|
Displaying Subtitles........................................................................................................... |
45 |
|
Teletext ............................................................................................................................. |
45 |
|
Enlarging the TV Picture ................................................................................................... |
45 |
|
Appendix............................................................................................................................... |
46 |
|
Troubleshooting ................................................................................................................ |
46 |
|
Technical Specifications ................................................................................................... |
47 |
|
Warranty Information ............................................................................................................ |
48 |
|
English - 3
Digital HD Satellite Receiver SSR 1080 A1
Safety Instructions
Before you use this device for the first time, please read the following notes in this manual and heed all warnings, even if you are familiar with handling electronic devices. Keep this manual safe for future reference. If you sell the device or pass it on, it is essential that you also hand over this manual.
This icon denotes important information for safe operation of the product and for the user’s safety.
This icon denotes further information on the topic.
Operating Environment
Position the device on a stable, even surface and do not place any heavy objects on the device. The device is not designed for use in environments with high temperatures or humidity (e.g. bathrooms), and must be kept free of dust. Operating temperature and operating humidity: 5ºC to 35ºC, max. 85 % RH.
Always make sure that
•there is free circulation of air (do not place the device on shelves, on a thick carpet, on a bed, or anywhere that obstructs the ventilation slots, and leave at least 10cm clearance on all sides);
•no direct heat sources (e.g. radiators) can affect the device;
•no direct sunlight or bright artificial light reaches the device;
•contact with spray, dripping water and corrosive liquids is avoided and the device is never operated near water; in particular the device may never be immersed in liquids (do not place any objects containing liquids, such as vases or drinks, near the device);
•the device is never placed in the immediate vicinity of magnetic fields (e.g. loudspeakers);
•no fire hazards (e.g. burning candles) are placed on or near the device;
•no foreign bodies enter the device;
•the device is not subject to any great temperature changes as this may cause moisture through condensation and short-circuit;
•the device should not be subject to excessive shocks and vibrations.
English - 4
Digital HD Satellite Receiver SSR 1080 A1
Notice on Mains Separation
The On/Standby button (18) does not fully disconnect the device from the mains. The device consumes electricity in the Standby mode. In order to completely disconnect the device from the mains, the power plug must be pulled out from the wall outlet. The device should be positioned in such a way that ensures direct and unobstructed access to the wall outlet so that the power plug can be immediately pulled out in an emergency situation. To avoid the risk of fire if the device is not going to be used for a long while (e.g. during holidays), it should always be disconnected from the power socket. Before stormy weather when there is the danger of lightning, disconnect the device from the power supply.
Batteries
Insert the batteries with the correct polarity. Do not try to recharge any non-rechargeable batteries and do not throw batteries into the fire. Do not mix batteries (old and new or carbon and alkaline, etc.). Remove the batteries when the device is not to be used for a long time. Non-intended use may cause explosion and danger to life. Respect the environment! Old batteries do not belong in with domestic waste! They must be handed in to a collection point for waste batteries.
Cables
Unplug all cables by holding the plugs and never pull on the cables themselves. Never place the appliance, pieces of furniture or other heavy objects on the cables and take care that these do not become trapped, especially at the plugs and sockets. Never tie knots in the cable and do not tie it together with other cables. All cables should be positioned so that nobody can trip over them or be obstructed by them. A damaged power cord can cause a fire or an electric shock. Inspect the power cord from time to time. Never use adapter plugs or extension cables that do not comply with the current safety regulations in your country, and do not modify any of the power cords or electrical installations yourself!
Children and Persons with Disabilities
Electrical devices do not belong in the hands of children. People with disabilities should only use electrical devices in appropriate circumstances. Do not allow children or persons with disabilities to use electrical devices when not under supervision. They may not comprehend the presence of potential risks. Batteries and small parts represent potential choking hazards. Keep the batteries in a safe place. If a battery is swallowed, seek medical help immediately. Keep the packaging away from children and persons with disabilities too as there is danger of suffocation.
English - 5

Digital HD Satellite Receiver SSR 1080 A1
Repair and Maintenance
Repairs are required when this device has been damaged in any way, for example, when the power plug, power cord or housing is damaged, when liquid or objects have entered the device, when the product has been exposed to rain or moisture, when the product does not work normally or if the product has been dropped. If you notice any smoke, unusual noise or strange smells, switch off the device immediately and pull the plug from the wall outlet. In these cases the device should no longer be used and should be inspected by authorized service personnel. Please contact qualified personnel when servicing is needed. Never open the housing of the device. Opening the housing exposes you to lethal electric shocks. Only use a clean, dry cloth for cleaning. Never use any corrosive liquids. Do not attempt to open the housing of the device, otherwise you will void your warranty.
Intended Use
This is a consumer electronics device. The SilverCrest SSR 1080 A1 is a pure digital receiver for receiving unscrambled satellite programmes. It requires a digital-enabled satellite antenna. It may only be used for private use, not industrial or commercial purposes. Furthermore, the device may not be used outdoors or in tropical climates. Only cables and external devices that comply with safety standards and the electromagnetic compatibility and shielding quality of this device may be used. This device fulfils all that relates to CE Conformity, relevant norms and standards. Any modifications to the device may result in these directives no longer being met. The manufacturer is not liable for any damage or interference resulting from non-compliance with the above instructions. Only use the accessories recommended by the manufacturer. Any use other than that mentioned above does not correspond to the intended use.
If you are not using the device within the Republic of Germany, you must observe the regulations and laws in the country of use.
Copyright
The entire content of this User’s Manual is copyrighted and is provided to the reader for information purposes only. Copying data and information without prior explicit written approval by the author is strictly forbidden. This also applies to any commercial use of the contents and information. All texts and diagrams are up-to-date as per the date of print release.
Storing When Not Using the Product
When left unused for a long period of time, unplug the power cord from the mains and remove the batteries from the remote control. Also make sure that the storage temperature is maintained between 5 C and 40 C. The humidity must not exceed 90% RH.
English - 6

Digital HD Satellite Receiver SSR 1080 A1
Conformity Notice
This device complies with the basic and other relevant requirements of the EMC Directive 2004/108/EC, the Low-voltage Directive 2006/95/EC and the ErP Directive 2009/125/EC. The corresponding Declaration of Conformity can be found at the end of this User's Manual.
Disposal of Old Devices
Devices marked with this symbol are subject to the European Directive 2002/96/EC. All electric and electronic devices must be disposed of separately from household waste at official disposal centres. With proper disposal of old devices you avoid damage to the environment and your personal health. For further information about proper disposal, contact your local government, disposal bodies or the shop where you bought the device.
Respect the environment. Old batteries do not belong in with domestic waste. They must be handed in to a collection point for waste batteries.
Recycle the packaging material properly too. Cardboard packaging can be taken to paper recycling containers or public collection points for recycling. Any film or plastic contained in the packaging should be taken to your public collection points for disposal.
Introduction
Thank you for purchasing this satellite receiver SilverCrest SSR 1080 A1. The SilverCrest SSR 1080 A1 is a pure digital receiver for receiving unscrambled satellite programmes. It requires a digitalenabled satellite antenna. This satellite receiver features a high-end HDMI output for connecting to plasma, LCD or LED TV sets. The digital video signal offers optimum picture quality. You will clearly notice an enhanced sharpness and deepness compared to signals transferred via a conventional SCART (Euro AV) connection. Thanks to the USB port you can connect any USB storage devices for recording and playing back any TV and radio programmes. Furthermore the device features a PCMCIA standard CI slot and supports the Viaccess, AlphaCrypt, Conax, Crypto Works, Irdeto, Aston/Seca encryptions and any compatible systems.
Package Contents
Please check that delivery contents are complete using this list:
-Digital HD Satellite Receiver SilverCrest SSR 1080 A1
-Remote control
-2 brand-name batteries type AAA, 1.5V (Micro)
-This User's Manual
If you find any items missing or damaged, please phone our hotline. You will find the corresponding phone number in the last chapter “Warranty Information”.
English - 7
Digital HD Satellite Receiver SSR 1080 A1
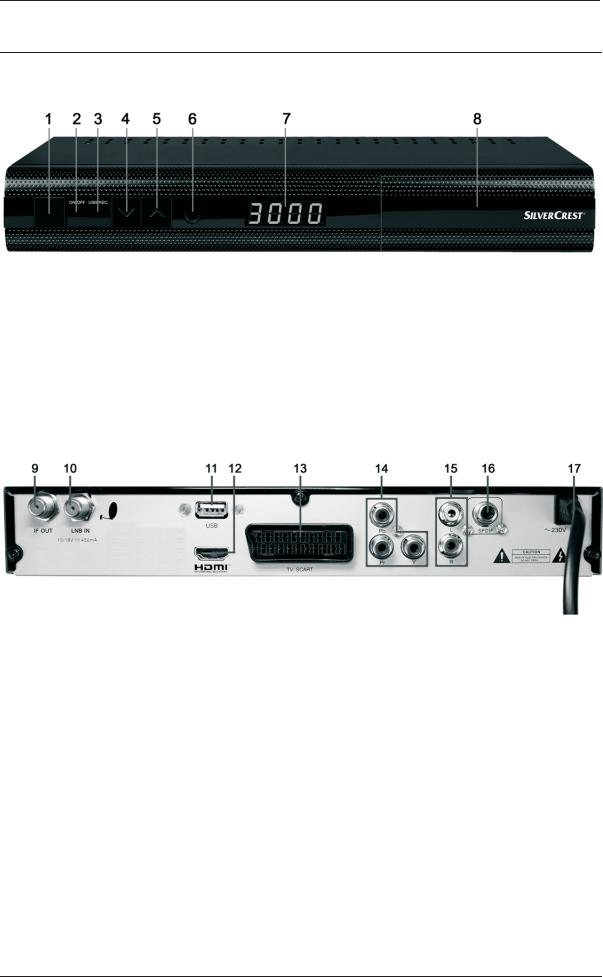
Overview
Controls and buttons
1Power switch
2Power LED
3USB/REC LED
4Previous channel / menu navigation
5Next channel / menu navigation
6Infrared sensor
74-digit display
8CI slot (behind the cover)
Connectors and sockets
9 |
IF OUT |
To connect another satellite receiver* |
10 |
LNB IN |
LNB input of the satellite system |
11 |
USB |
USB port, max. 500 mA |
12 |
HDMI |
HDMI connector to connect a TV set |
13 |
TV SCART |
SCART connector to connect a TV set |
14 |
YPbPr |
Component video output for connecting a TV set or beamer |
15 |
L/R |
Stereo audio output for connecting a Hifi system |
16 |
SPDIF |
Digital audio output (coaxial) |
17~230V 50Hz Power cord 230VAC/50Hz
*Please note than when connecting your SilverCrest SSR 1080 A1 satellite receiver and another external satellite receiver to the IF OUT (9), your SilverCrest SSR 1080 A1 will be the device defining the (horizontal or vertical) polarisation. This means that the satellite receiver connected to the IF OUT
(9) will only be able to receive channels broadcast with the corresponding polarisation.
English - 8
Digital HD Satellite Receiver SSR 1080 A1
Remote control
18On/Standby
19Numeric buttons 0 - 9: To switch to a specific channel and to enter numeric values or passwords, or to edit any channel names or favourite lists.
20TV/Radio: Toggles between TV and radio mode.
21SUB-T: Displays the subtitles (if available).
22MENU: Opens the menu.
23Navigation buttons in a menu: ST,WX.
To switch channels up or down: ST. Or to adjust the sound volume: WX.
24EPG: Electronic Program Guide
25INFO: To display information.
26M/P: Thumbnail preview: Displays 9 preview images of the USB storage device contents. Navigation via the ST navigation buttons and PG+/PG-.
27LAST: Toggles between the two last viewed channels.
28FIND: To search for a specific channel from the Program List via the 0-9/A-Z buttons.
29MUTE: To mute or to restore the audio volume.
30AUDIO: Displays all available audio channels.
31FAVOR: Shows a list of your favourite channels.
32TEXT: Launches the Teletext display.
33EXIT: Quits the menu.
34OK: To confirm a menu selection.
35PG-/PG+: Up or down navigation through the Program List. For page-by-page scrolling whenever programme information, favourite or any other list is shown on screen.
36ZOOM: To zoom the picture. Press the navigation buttons to move the enlarged screen area.
37MODE: To change the HDMI resolution from 480i up to 1080i.
38 For use as a PVR when used together with a USB storage device:
PVR Opens a list containing all recordings stored on the connected USB storage device. USB Opens a list containing all picture and music files stored on the connected USB storage
device.
SLOW Slow-motion playback of recordings.
SKIP- Skips backwards in adjustable time intervals or skips to the previous bookmark. SKIP+ Skips forward in adjustable time intervals or skips to the next bookmark. F.RWD Press this button multiple times to rewind playback at different speeds.
F.FWD Press this button multiple times to fast forward playback at different speeds. PLAY Playback of multimedia files and recorded contents.
PAUSE Pauses the TV programme, the multimedia file or recorded contents playback. For more information, see "Timeshift". Frame-by-frame playback of recordings.
STOP To stop playback or recording.
REC Press to start recording a TV or radio programme immediately.
English - 9
Digital HD Satellite Receiver SSR 1080 A1
Getting Started
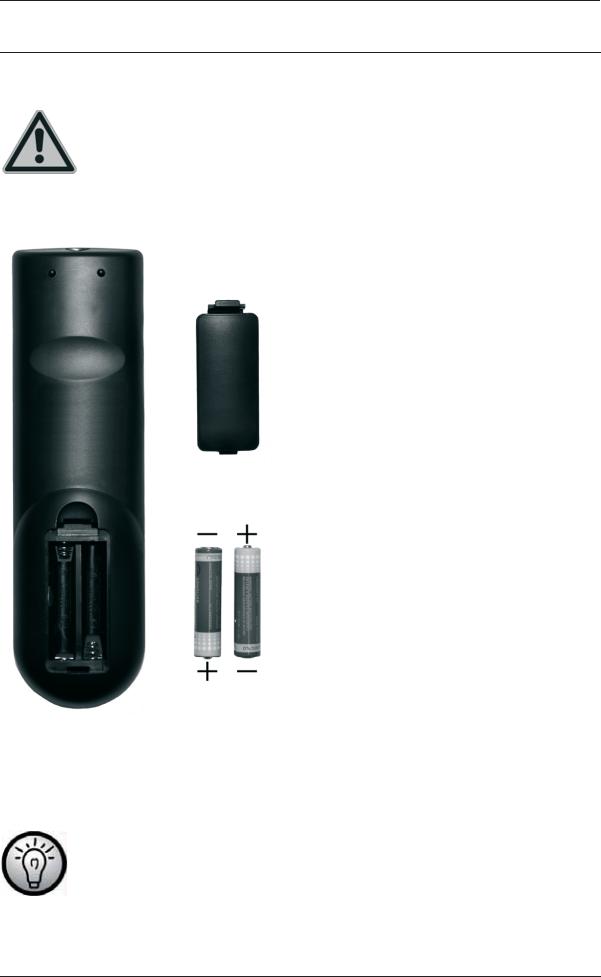
Inserting the Batteries into the Remote Control
WARNING! Do not use rechargeable batteries to power the remote control. The higher power supplied by rechargeable batteries may cause fire.
Insert the supplied batteries into the remote control, as shown in the figure below. Take care to insert the batteries into the remote control observing the correct polarity (+ and – ).
xOpen the battery compartment on the underside of the remote control.
xInsert the supplied batteries (size AAA) into the remote control with the correct polarity (see the illustration).
xClose the battery compartment.
Remove the batteries from the remote control when you are not going to use the device for a long period of time otherwise the remote control may become damaged by leaking batteries.
English - 10

Digital HD Satellite Receiver SSR 1080 A1
Connecting the Satellite Receiver
You should only connect your satellite receiver to the mains once all other cable connections have been made. This will avoid any accidental damage to the satellite receiver or any external devices.
AConnect the LNB of the satellite antenna to the LNB IN (10) of your satellite receiver.*
BConnect the TV set (or beamer) to the HDMI connector (12) of your satellite receiver (see page 12 – HDMI Connection).
CIf your TV set (or beamer) does not feature any HDMI port, you can use the TV SCART (13) terminal to connect it to the satellite receiver.
DFurthermore, you can connect your TV set (or beamer) to the Component Video output YPbPr (14) of your satellite receiver.
EYou can use the IF OUT (9) output of your satellite receiver to connect another satellite receiver.
FThanks to the USB port (11) you can connect any USB storage devices for recording and playing back TV and radio programmes.
GIn order to obtain good sound quality, you can use the L/R stereo outputs (15) of your satellite receiver to connect an external Hifi amplifier.
HIf your amplifier features a coaxial SPDIF connector, you can use the SPDIF (16) terminal to connect it to the satellite receiver.
IConnect the power cord (17) to a wall outlet after you have finished connecting all cables.
*If you want to use the device with satellite systems capable of receiving more than one satellite, a DiSEqC® LNB must be used instead of a universal LNB.
USB Connection
When connecting a device that has no external power supply, make sure that the total current consumption for the USB power supply does not exceed 500mA otherwise the USB devices may fail or even cause damage to occur to the satellite receiver. USB storage devices requiring more than 500mA of current such as hard disks with a USB Y cable or hard disks with an external power adapter should be connected to an external power source in order to avoid any damage to the satellite receiver or the USB storage device.
You can connect devices such as an external USB hard disk to the USB port, allowing recording and playback of TV and radio programmes when properly connected.
Please note that compatibility issues may occur, as there are many different computer hard disks and a variety of IDE/SATA-to-USB adapters on the market. Should you experience any compatibility problems, we recommend that you try replacing the hard disk with a different one.
The USB interface of your satellite receiver remains idle when the satellite receiver is in Standby mode, so that timer recording from Standby mode is possible at all times. This means that the hard disk is still powered from the USB port. If you are planning not to use the satellite receiver for a long time we recommend that you disconnect the satellite receiver and the hard disk from the power supply.
First-Time Setup:
If it is still powered on, power the device off by using the power button (1) on the front panel. Connect the USB hard disk to the USB port (11) located on the back panel of the satellite receiver and power the satellite receiver back on. Shortly after the satellite receiver powers on, the message "USB device is connected!" will appear on the screen.
If this does not happen, please first double-check in Menu (Simple Mode or Expert Mode) | Media | HDD Information if the satellite receiver has detected the hard disk.
English - 11

Digital HD Satellite Receiver SSR 1080 A1
In order to open the advanced menu you may need a password. The factory-default password is: 0000.
If no hard disk information is shown, you will need to format the hard disk with a compatible file system for your satellite receiver. To do this, press the Menu button (22) and then press the S or T navigation buttons (23) to select the "Expert Mode" item and finally select "Media". Select the "HDD Format" item. Next press OK (34) to confirm and another window opens. If the hard disk is divided into multiple partitions, you can choose which partition should be formatted. Select the option “HDD Format” and press OK (34) to confirm the start of formatting. A safety prompt will appear. Select whether you want to format your hard disk using the "FAT" or the "NTFS" file system, or select "Cancel" to cancel.
CAUTION! Formatting the hard disk will erase all data stored on it. After the hard disk has been formatted, press the EXIT button (33) to quit the menu and then select "HDD Information". Here you can display the available storage on the hard disk. To avoid any loss of data, you should never disconnect the hard disk from the satellite receiver while the devices are on. First switch the satellite receiver to Standby mode before disconnecting the hard disk.
Targa does not assume any liability for loss of data or damage resulting from the use of the USB interface.
The total recording time depends on the size of the hard disk but also on the recorded programmes.
HDMI Connection
Use an HDMI cable to connect your satellite receiver to the TV set. This connection type guarantees an optimum and loss-free transmission of the video and audio signals to the TV Set. As soon as a TV set is connected to the satellite receiver using an HDMI cable, your satellite receiver will toggle automatically to the HDMI signal output.
You can press the MODE button (37) to optimise the screen resolution for HDMI mode. Please note that the picture may disappear when switching the resolution. So that you are aware of the current resolution setting, the resolution will be shown briefly on the display (7) of the device (e.g. 480i, 720P, 1080). For optimum resolution on a modern flat-screen display we recommend using the 1080i_50 or 720p_50 setting.
When establishing this connection type, we recommend that you use both a SCART (Euro AV) as well as an HDMI cable, as many TV sets do not have the HDMI input enabled by default. Via the conventional SCART cable you will always be able to access the setup menus and customise settings if no picture appears on the display.
Video and Audio Signal Connection:
All required settings can be found in the section "System Setup" (see page 25).
English - 12

Digital HD Satellite Receiver SSR 1080 A1
The following video signals are supported:
HDMI: The HDMI output guarantees optimum video and audio quality. Note: This device has a standardised HDMI output. However, it is possible that picture or sound distortion may occur when connecting devices of first-generation HDMI input interfaces.
In such cases you can select one of the following connection options:
RGB: Very good picture and sound quality via a common (21-pin) SCART (Euro AV) cable.
YUV: High-end picture output via the 3 "YPbPr" Cinch-type connectors for connecting a TV set or beamer.
Dolby Digital Sound (AC3)
Please note that Dolby Digital sound, if broadcast by the tuned-in channel, will only be available on the digital audio output and HDMI output whenever these are connected to an external AV receiver.
OSD Menu
Once you have fully read the Safety Instructions and have finished connecting the devices as described, you can power it on. The satellite receiver has already been configured in factory so that no or only a few changes need to be made.
You can use the OSD (On Screen Display) menu to customise your satellite receiver according to your needs. To open it, press the MENU button (22). To quit the OSD menu, press the MENU button (22) or the EXIT button (33) as many times as necessary to hide all menus. The OSD menu is clearly structured and any buttons that you may need to press to adjust a setting will be shown on screen. Navigating the OSD menu is controlled via the navigation buttons (23).
For greater user-friendliness, the OSD menu has been subdivided into the Simple Mode and Expert Mode sections. The basic functions of your satellite receiver can be found in Simple Mode while all functions can be found in Expert Mode. These are explained in more detail in the following pages. Press the MENU button (22) and select Expert Mode to display the main menu. From this menu you can open different submenus allowing you to adjust some of your satellite receiver's settings. You can customise the OSD menu appearance, add or remove channels, customise the satellite receiver for your satellite system, install new software via satellite antenna and much more. However, it is also possible to miss-set some parameters and obtain a blank screen. Therefore you should read the following instructions carefully.
In order to open the advanced menu you may need a password. The factory-default password is: 0000.
Opening and Navigating the Submenus
After opening the main menu, the last-selected menu will still be highlighted. Press the W or X (23) navigation buttons to toggle between the main menu and the submenu items. Press the OK button (34) to open the submenus. Press the S or T (23) navigation buttons to highlight the desired submenu item and then press OK (34) to open it.
Closing the Menus
The menus either close automatically after confirming your settings with OK (34) or you can close all opened submenus sequentially by pressing EXIT (33) or MENU (22) multiple times.
English - 13
Digital HD Satellite Receiver SSR 1080 A1
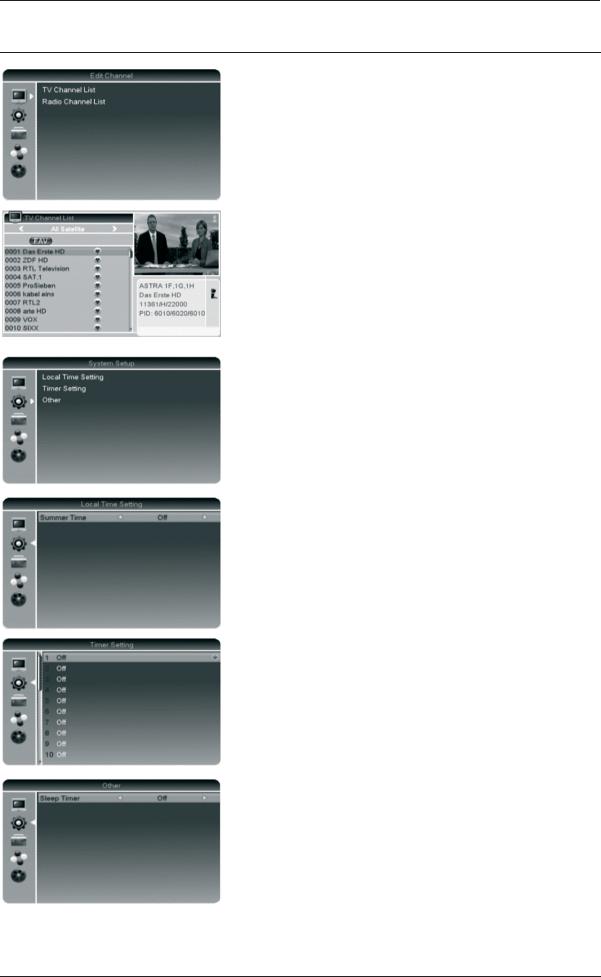
OSD Menu - Simple Mode
Edit Channel
To edit any existing TV and radio channels. The procedure will be the same for both TV and radio channels. Editing the Program Lists is possible in Expert Mode only. A description of how to edit the TV or Radio Channel List can be found on page 16.
Favourite
You can add your favourite channels to a separate list. Pressing the FAVOR button (31) gives you quick access to your favourite channels. Select the desired channel and then press the FAVOR button (31). Press the OK button (34) to add the selected channel to one or more favourite lists. Deleting is performed in the same way.
System Setup
Local Time Setting
In order for the time to be displayed correctly and for any timer recording to start at the desired time, it is necessary to double-check and edit the Local Time Setting if necessary. In Simple Mode, only the Summer Time edit function is available.
Timer Setting
You can program up to 30 timer events: for example, any programmes you don't want to miss or you want to record to a connected USB storage device. A description of the timer setting can be found on page 27.
Other
Sleep Timer
The device goes into standby automatically after the set time. The following settings are available:
Off • 10 Min • 30 Min • 60 Min • 90 Min • 120 Min.
English - 14
 Loading...