


|
|
|
|
|
KITCHEN TOOLS |
||
4 |
Hand Blender Set SSMS 600 A1 |
||
|
|
|
|
|
|
|
|
|
|
|
|
Hand Blender Set |
Blender ręczny - zestaw |
Operating instructions |
Instrukcja obsługi |
Botmixer készlet |
Palični mešalnik - komplet |
Használati utasítás |
Navodila za uporabo |
Tyčový mixér s |
Tyčový mixér |
příslušenstvím |
Návod na obsluhu |
Návod k obsluze |
|
KOMPERNASS GMBH
BURGSTRASSE 21 · D-44867 BOCHUM
www.kompernass.com
ID-Nr.: SSMS 600 A1-07/10-V1
SSMS 600 A1
5
1
2
3
6
7
4
8
0
9
q

Content |
Page |
|
|
Intendend Use |
2 |
|
|
Technical data |
2 |
|
|
Items supplied |
2 |
|
|
Safety instructions |
2 |
|
|
Description of appliance / attachments |
3 |
|
|
Utilisation |
3 |
|
|
Assembly |
3 |
To assemble the hand blender . . . . . . . . . . . . . . . . . . . . . . . . . . . . . . . . . . . . . . . . . . . . . . . . .3 Assembling the wire whisk . . . . . . . . . . . . . . . . . . . . . . . . . . . . . . . . . . . . . . . . . . . . . . . . . . . .3 Assembling the liquidiser . . . . . . . . . . . . . . . . . . . . . . . . . . . . . . . . . . . . . . . . . . . . . . . . . . . . . .3
Operation |
4 |
|
|
Wall mounting |
4 |
|
|
Cleaning |
4 |
|
|
Disposal |
5 |
|
|
Importer |
5 |
|
|
Warranty and Service |
5 |
Read the operating instructions carefully before using the appliance for the first time and preserve this booklet for later reference. Pass the manual on to whomsoever might acquire the appliance at a later date.
- 1 -

Hand Blender Set
Intendend Use
This hand blender set is intended exclusively for processing foodstuffs in small quantities. It is intendend for domestic use only. This hand blender is not intended for commercial use.
Technical data
Mains voltage: |
220-240V ~ /50Hz |
Rated output: |
600 W |
Protection class: |
II |
CO time: |
1 Minute |
CO Time
The C.O. Time (Continuous Operation) details how long an appliance may be used without the motor overheating and being damaged. Allow the appliance to cool down for 2 minutes before switching it on again.
Capacity |
|
Measuring cup: |
700 ml |
Max. fill volume for fluids: |
300 ml |
Items supplied
Hand Blender Set
Measuring beaker with combined lid/base Whisk
Chopper (Blade and bowl with combined lid/base) Wall bracket
2 x Plugs
2 x Screws Operating instructions
Safety instructions
 Risk of electic shock!
•Connect the blender only to correctly installed mains power sockets supplying a power voltage of 220 - 240 V ~ /50 Hz.
•Unplug the hand blender from the socket if you notice any faulty operation and before cleaning it.
Under no circumstances may the motor unit be immersed in liquids, or liquids be permitted to permeate into the motor unit housing.
•Never subject the appliance to moisture and do not use it outdoors.
•Should liquids nonetheless gain entry into the appliance housing, immediately unplug the appliance and arrange for it to be repaired by qualified specialists.
•Never touch the hand blender, power cable or plug with wet hands.
•To unplug the power cable, always grasp andpull the plug and do not pull the cable itself.
•Do not crease or crimp the power cable and place the power cable in such a way as to prevent anyone from stepping on or tripping over it.
•Arrange for defective power plugs and/or cables to be replaced at once by qualified technicians or our Customer Service Department.
•You may not open the motor unit housing of the hand blender. Should you do so, appliance safety can no longer be assured and the warranty becomes void.
- 2 -

•This appliance is not intended for use by individuals (including children) with restricted physical, physiological or intellectual abilities or deficiences in experience and/or knowledge unless they are supervised by a person responsible for their safety or receive from this person instruction in how the appliance is to be used.
•Children should be supervised to ensure that they do not play with the appliance.
Warning:
Do not use the hand blender 4 for the preparation of solid foods. This would lead to irreparable damage to the appliance!
•With the whisk 9 you can make mayonnaise, beat egg whites and cream or mix desserts.
•Using the chopper, comprising the blade 6 and the bowl 7, you can also chop semi-solid foodstuffs.
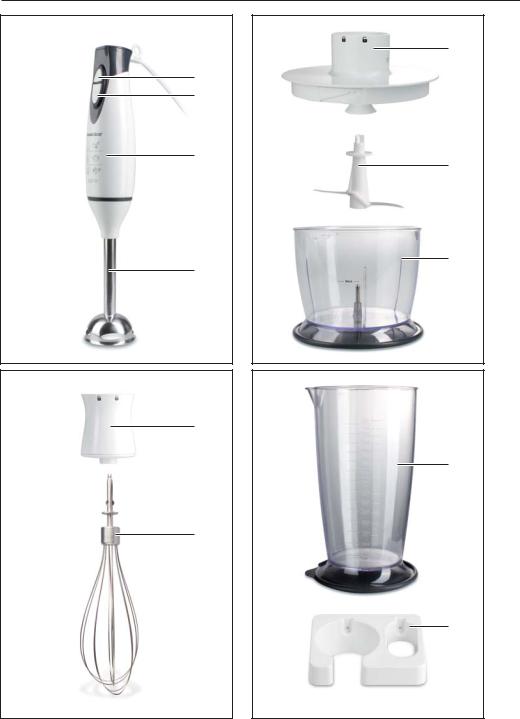
Description of appliance / attachments
1 Switch (I) (normal speed)
2 Turbo-switch (II) (faster speed)
3 Motor unit
4 Hand blender
5 Bowl lid
6 Blade
7 Bowl (with combined lid/base)
8 Whisk holder
9 Whisk
0 Measuring beaker (with combined lid/base) q Wall bracket, incl. screws & plugs
Utilisation
Note: With the measuring cup 0 you can measure amounts of fluids up to 700 ml. For food processing, fill it to a maximun of 300 ml, otherwise fluids could overflow from the measuring cup 0.
Should you wish to keep liquids/foods in the measuring beaker 0, you can remove the base of the measuring beaker 0 and use it as a lid. Ensure that the spout of the measuring beaker 0 is also closed.
•With the hand blender 4 you can prepare dips, sauces, soups or baby food.
Warning:
Do not use the chopper to process liquids. This would lead to irreparable damage to the appliance!
Assembly
 Risk of Injuries:
Insert the plug into the power socket only after you have completely assembled the appliance for use.
To assemble the hand blender
Place the hand blender 4 on the motor unit 3
so that the arrow points to the symbol  . Turn the hand blender 4 until the arrow on the motor unit 3 points to the symbol
  .
.
Assembling the wire whisk
Insert the whisk 9 into the whisk holder 8.
Place the assembled whisk on the motor unit 3 so that the arrow points to the symbol  . Turn the whisk until the arrow on the motor unit 3 points to the symbol
  .
.
Assembling the liquidiser
 Warning:
The blade is very sharp! Handle it with great care. Injury hazard!
Carefully place the blade 6 onto its retainer in the bowl 7.
- 3 -

Fill the bowl with the foodstuffs you wish to liquidise.
Place the lid 5 on the bowl and turn it until it is secure. Ensure that the lugs on the edge of the bowl are guided into the recess on the lid.
Place the motor unit 3 on the lid 5 so that the arrow points to the symbol  . Turn the motor unit 3 until the arrow points to the symbol
  .
.
Note: Should you wish to keep liquids/foods in the chopper, you can remove the base of the measuring beaker and use it as a lid. For this, carefully remove the lid 5 and motor block 3 and, if needs be, the blade 6. Loosen the bottom of the chopper and put it on the chopper.
Operation
 Warning:
Foodstuffs should not be too hot. Contents squirted out may cause scalding.
 Risk of fire:
Never exceed the maximum operating duration of 1 minute. Allow the appliance to cool down for 2 minutes before switching it on again.
Note: When you beat cream with the whisk 9, hold the container at a slant during the beating. In this way the cream will be thicker quikker. Ensure that cream cannot be sprayed out of the container while it is being beaten.
When you have assembled the hand blender for
your particular purpose, insert...
The plug into the mains power socket.
Hold down the switch 1 to process the foodstuffs at the standard speed.
Hold down the turbo-switch 2 to process the foodstuffs at the higher speed.
When you have completed processing the foodstuffs, simply release the switch.
Wall mounting
Included are 2 dowels and 2 screws to enable the wall bracket q to be installed.
Mark the positions of the drill holes using the wall bracket q.
Bore the holes with a 6 mm drill.
Insert the dowels into the drill holes.
Position the openings of the wall-holder q over the drill holes and then secure it using both of the screws.
Cleaning
 Risk of electric shock!
Before you clean the hand blender, unplug the appliance from the power socket. Under no circumstances may the motor unit 3 be cleaned by immersing it in water or holding it under running water.
 Risk of personal injury!
To prevent injuries, exercise caution when handling the extremely sharp blade 6. Reassemble the liquidiser after use and cleaning to prevent injury from the exposed knife blade. Keep the blade out of the reach of children.
 Attention!
Do not clean the attachments of your hand blender in the dishwasher as it may cause damage to them.
Unplug the power cable from the wall socket.
Clean the motor unit 3, the hand blender 4, the lid 5 and the whisk-holder 8 with a moist cloth.
Ensure that water cannot permeate through the openings of the hand mixer 4. For stubborn soiling use a mild detergent on the cloth.
- 4 -
Clean the rest of the attachment components under running water and dry them off well with a dishtowel.
Disposal
Do not dispose of the appliance in your normal domestic waste. This product is subject to the European guideline 2002/96/EC.
Dispose of the appliance through an approved disposal centre or at your community waste facility. Observe the currently applicable regulations.
In case of doubt, please contact your waste disposal centre.
 Dispose of all packaging materials in an environmentally friendly manner.
Importer
KOMPERNASS GMBH BURGSTRASSE 21
44867 BOCHUM, GERMANY
www.kompernass.com
Warranty and Service
The warranty for this appliance is for 3 years from the date of purchase. The appliance has been manufactured with care and meticulously examined before delivery. Please retain your receipt as proof of purchase. In the event of a warranty claim, please make contact by telephone with our Service Department. Only in this way can a post-free despatch for your goods be assured.
The warranty covers only claims for material and maufacturing defects, but not for transport damage, for wearing parts or for damage to fragile components, e.g. buttons or batteries. This product is for private use only and is not intended for commercial use. The warranty is void in the case of abusive and improper handling, use of force and internal tampering not carried out by our authorized service branch. Your statutory rights are not restricted in any way by this warranty.
The warranty period will not be extended by repairs made under warranty. This applies also to replaced and repaired parts. Any damage and defects extant on purchase must be reported immediately after unpacking the appliance, at the latest, two days after the purchase date. Repairs made after the expiration of the warranty period are subject to payment.
DES UK LTD
Tel.: 0871 5000 700 (£ 0.10 / minute) e-mail: support.uk@kompernass.com
Kompernass Service Ireland
Tel: 1850 930 412 (0,082 EUR/Min.)
Standard call rates apply. Mobile operators may vary.
e-mail: support.ie@kompernass.com
- 5 -

- 6 -

Spis treści |
Strona |
|
|
Zastosowanie zgodnie z przeznaczeniem |
8 |
|
|
Dane techniczne |
8 |
|
|
Zakres dostawy |
8 |
|
|
Wskazówki dotyczące bezpieczeństwa |
8 |
|
|
Opis urządzenia / Oprzyrządowanie |
9 |
|
|
Przeznaczenie |
9 |
|
|
Składanie urządzenia. |
9 |
Zamocowanie blendera . . . . . . . . . . . . . . . . . . . . . . . . . . . . . . . . . . . . . . . . . . . . . . . . . . . . . .9 Zamocowanie trzepaczki . . . . . . . . . . . . . . . . . . . . . . . . . . . . . . . . . . . . . . . . . . . . . . . . . . . . .9 Zamocowanie rozdrabniacza . . . . . . . . . . . . . . . . . . . . . . . . . . . . . . . . . . . . . . . . . . . . . . . .10
Obsługa |
10 |
|
|
Montaż na ścianie |
10 |
|
|
Czyszczenie |
10 |
|
|
Utylizacja |
11 |
|
|
Importer |
11 |
|
|
Gwarancja i serwis |
11 |
Przed pierwszym użyciem zapoznaj się z instrukcją obsługi i zachowaj ją w celu późniejszego wykorzystania. W przypadku przekazania urządzenia osobom trzecim należy przekazać im także instrukcję.
- 7 -

Blender ręczny - zestaw
Zastosowanie zgodnie z przeznaczeniem
Zestaw z blenderem służy wyłącznie do rozdrabniania środków spożywczych w niewielkich ilościach. Można go używać wyłącznie do celów domowych. Zestaw z blenderem nie jest przewidziany do zastosowań przemysłowych.
Dane techniczne
Napięcie sieciowe : |
220 - 240 V ~ / 50 Hz |
Moc znamionowa: |
600 W |
Klasa ochrony: |
II |
Czas pracy: |
1 minuta |
Czas pracy
Czas pracy określa, jak długo można używać urządzenie bez zagrożenia przegrzaniem silnika i tym samym jego uszkodzenia. Pozwolić urządzeniu przez 2 minuty ostygnąć przed ponownym włączeniem.
Objętość |
|
Miarka: |
700 ml |
Maks. ilość płynów: |
300 ml |
Zakres dostawy
Blender ręczny - zestaw
miarka z pokrywką/podstawką trzepaczka do piany
rozdrabniacz (nóż i naczynie z pokrywką/ podstawką)
uchwyt naścienny 2 x kołki
2 x śruby Instrukcja obsługi
Wskazówki dotyczące bezpieczeństwa
Niebezpieczeństwo porażenia p rądem elektrycznym!
•Zestaw z blenderem przyłączaj wyłącznie do prawidłowo zainstalowanego gniazdka sieciowego o napięciu 220–240 V ~ / 50 Hz.
•W razie jakichkolwiek problemów eksploatacyjnych oraz przed wyczyszczeniem zestawu z blenderem, wyciągnij wtyczkę z gniazdka sieciowego.
Bloku silnika nigdy nie zanurzaj pod wodą, a także unikaj przedostania się płynu do wnętrza obudowy silnika.
•Nie wolno wystawiać urządzenia na działanie wilgoci ani użytkować go na wolnym powietrzu.
•Jeśli jednak zdarzy się, że ciecz dostanie się do obudowy urządzenia, wyciągnij natychmiast wtyczkę urządzenia z gniazdka sieciowego, a następnie oddaj urządzenie do naprawy w wykwalifikowanym punkcie serwisowym.
•Nie chwytaj za blok silnika, kabel sieciowy ani wtyczkę mokrymi rękoma.
•Odłączenie zasilania następuje wyłącznie poprzez wyciągnięcie wtyczki z gniazdka sieciowego – nigdy nie należy ciągnąć za sam kabel.
•Kabla zasilającego nie należy zaginać ani załamywać. Należy go zabezpieczyć w taki sposób, by nikt nie mógł na niego nadepnąć ani się o niego potknąć.
•Naprawę uszkodzonej wtyczki lub kabla sieciowego zleć niezwłocznie wykwalifikowanemu personelowi lub serwisowi klienta.
•Nigdy nie próbuj otwierać obudowy bloku silnika. Stanowi to poważne zagrożenie i powoduje wygaśnięcie gwarancji.
- 8 -
•Urządzenie nie jest przeznaczone do użytkowania przez osoby (w tym dzieci) z ograniczoną sprawnością fizyczną, ruchową bądź umysłową lub nieposiadające doświadczenia i / lub wiedzy, chyba że będą one przebywały pod opieką osoby odpowiedzialnej za ich bezpieczeństwo lub uzyskają od niej wskazówki dotyczące właściwego używania urządzenia.
•Nie można pozwolić dzieciom na zabawę urządzeniem.
Opis urządzenia / Oprzyrządowanie
1 Przełącznik (I) (normalna prędkość)
2 Przełącznik Turbo (II) (duża prędkość)
3 Blok silnika
4 Blender
5 Pokrywa miski
6 Nóż
7 Miska (z pokrywą/podstawką)
8 Uchwyt trzepaczki do piany
9 Trzepaczka do piany
0 Miarka(z pokrywą/podstawką)
q Uchwyt naścienny ze śrubami i kołkami
Przeznaczenie
Wskazówka: Za pomocą miarki 0 możesz odmierzyć płynne składniki o pojemności do 700 ml. Blenderem można przetwarzać jednocześnie maks. 300 ml płynu. Większa ilość może spowodować wylanie się płynu z miarki 0. Do przechowywania płynów/produktów spożywczych w miarce 0 możesz zdjąć podstawę miarki 0 i użyć jej jako pokrywy. Zwróć uwagę na to, by dzióbek w miarce 0 był również zamknięty.
•Za pomocą blendera 4 możesz przygotowywać dipy, sosy, zupy i posiłki dla niemowląt.
Uwaga:
Nie używaj blendera 4 do obróbki stałych produktów. Następstwem jest nieodwracalne uszkodzenie urządzenia!
•Za pomocą trzepaczki 9 możesz przygotowywać majonezy, ubijać śmietanę i białka lub przyrządzać desery.
•Za pomocą rozdrabniacza składającego się
z noża 6 i pojemnika do miksowania 7, możesz rozdrabniać również twardsze produkty spożywcze.
Uwaga:
Nie stosować rozdrabniacza w przypadku płynnych artykułów spożywczych. Następstwem jest nieodwracalne uszkodzenie urządzenia!
Składanie urządzenia
 Zagrożenie odniesienia obrażeń: wtyczkę należy włożyć do gniazdka sieciowego dopiero po złożeniu urządzenia.
Zamocowanie blendera
Załóż blender 4 na blok silnika 3 w takim położeniu, by strzałka była skierowana w stronę
symbolu  . Obracaj blenderem 4 dotąd, aż strzałka na bloku silnika 3 będzie skierowana na symbol
  .
.
Zamocowanie trzepaczki
Zamocuj trzepaczkę 9 w uchwycie na trzepaczkę 8.
Założoną w ten sposób trzepaczkę zamocuj na
bloku silnika 3 tak, by strzałka była skierowana w stronę symbolu  . Obracaj trzepaczką dotąd, aż strzałka na bloku silnika 3 będzie skierowana na symbol
  .
.
- 9 -

Zamocowanie rozdrabniacza
Ostrzeżenie:
Nóż jest bardzo ostry! Prosimy obchodzić się z nim niezwykle ostrożne. Niebezpieczeństwo odniesienia obrażeń!
Ostrożnie założyć nóż 6 na uchwyt na pojemniku do miksowania 7.
Napełnić pojemnik artykułami spożywczymi przeznaczonymi do rozdrobnienia.
Nakryć pojemnik pokrywą 5 i ją dokręcić. Wypustki na krawędzi pojemnika muszą wejść w odpowiednią szczelinę w pokrywie.
Załóż blender 3 na pokrywę 5 w takim poło-
żeniu, by strzałka była skierowana w stronę symbolu  . Obracaj blokiem silnika 3 dotąd, aż strzałka będzie skierowana na symbol
  .
.
Wskazówka: Do przechowywania płynów/ produktów spożywczych w rozdrabniaczu możesz zdjąć podstawę rozdrabniacza i użyć jej jako pokrywy. W tym celu zdejmij pokrywę 5 i blok silnika 3, jak również ewentualnie ostrożnie wyjmij nóż 6. Od rozdrabniacza odkręć dno i załóż je na rozdrabniacz.
Obsługa
Ostrzeżenie:
Ostrzeżenie: artykuły spożywcze nie mogą być zbyt gorące! Wychlapanie zawartości może prowadzić w takim przypadku do poparzeń.
Zagrożenie pożarowe:
Nie wolno przekraczać maksymalnego czasu pracy wynoszącego 1 minutę. Pozwolić urządzeniu przez 2 minuty ostygnąć przed ponownym włączeniem.
Wskazówka: Podczas ubijania śmietany za pomocą trzepaczki do piany 9, trzymaj naczynie ukośnie. W ten sposób śmietana szybciej się ubije. Uważaj, by śmietana nie wylatywała z naczynia podczas ubijania.
Po złożeniu zestawu z blenderem, ...
podłącz wtyczkę do gniazdka zasilania.
naciśnij i przytrzymaj przełącznik 1, aby przygotować produkty spożywcze z normalną prędkością obrotową.
naciśnij i przytrzymaj przełącznik Turbo 2, aby przygotować produkty spożywcze ze zwiększoną prędkością.
Po zakończeniu obróbki po prostu puść wciśnięty włącznik.
Montaż na ścianie
W zestawie z blenderem znajdują się 2 kołki i w śruby do zamontowania uchwytu q na ścianie.
Zaznacz punkty nawiercenia otworów, w których zostanie przymocowany uchwyt q.
Wykonaj otwory za pomocą wiertła o średnicy 6 mm.
Włóż kołki do wywierconych otworów.
Przyłóż uchwyt q dwoma otworami przy otworach w ścianie i przykręć uchwyt za pomocą dwóch śrub.
Czyszczenie
Niebezpieczeństwo porażenia elektrycznego!
Przed przystąpieniem do czyszczenia zestawu z blenderem, należy wyciągnąć wtyczkę z gniazdka sieciowego. Bloku silnika 3 w czasie czyszczenia nie wolno zanurzać pod wodą ani myć pod bieżącą wodą z kranu.
- 10 -
 Loading...