Silvercrest SRR 3.7 A1 User Manual [en, de, pl]

ROTARY SHAVER SRR 3.7 A1
ROTARY SHAVER |
ROTACYJNA MASZYNKA |
Operating instructions |
DO GOLENIA |
|
Instrukcja obsługi |
KÖRKÉSES BOROTVA |
ROTACIJSKI BRIVNIK |
Használati utasítás |
Navodila za uporabo |
HOLIACI STROJČEK |
ROTATIONSRASIERER |
Návod na obsluhu |
Bedienungsanleitung |
IAN 102881

Before reading, unfold the page containing the illustrations and familiarise yourself with all functions of the device.
Przed przeczytaniem proszę rozłożyć stronę z ilustracjami, a następnie proszę zapoznać się z wszystkimi funkcjami urządzenia.
Olvasás előtt kattintson az ábrát tartalmazó oldalra és végezetül ismerje meg a készülék mindegyik funkcióját.
Pred branjem odprite stran s slikami in se nato seznanite z vsemi funkcijami naprave.
Pred čítaním si odklopte stranu s obrázkami a potom sa oboznámte so všetkými funkciami prístroja.
Klappen Sie vor dem Lesen die Seite mit den Abbildungen aus und machen Sie sich anschließend mit allen Funktionen des Gerätes vertraut.
GB |
Operating instructions |
Page |
1 |
PL |
Instrukcja obsługi |
Strona |
21 |
HU |
Használati utasítás |
Oldal |
41 |
SI |
Navodila za uporabo |
Stran |
61 |
SK |
Návod na obsluhu |
Strana |
81 |
DE / AT / CH |
Bedienungsanleitung |
Seite |
101 |
A

B

Contents
GB
Introduction . . . . . . . . . . . . . . . . . . . . . . . . . . . . . . . . . . . 2 Intended use . . . . . . . . . . . . . . . . . . . . . . . . . . . . . . . . . . 2 Package contents . . . . . . . . . . . . . . . . . . . . . . . . . . . . . . 2 Description of the appliance. . . . . . . . . . . . . . . . . . . . . . 3 Technical data . . . . . . . . . . . . . . . . . . . . . . . . . . . . . . . . . 4 Safety guidelines . . . . . . . . . . . . . . . . . . . . . . . . . . . . . . 5 Charging the batteries . . . . . . . . . . . . . . . . . . . . . . . . . . 9 Cordless shaving . . . . . . . . . . . . . . . . . . . . . . . . . . . . . . 10 Shaving using the mains adapter . . . . . . . . . . . . . . . . 11 Trimmer/long hair trimmer . . . . . . . . . . . . . . . . . . . . . 11 Travel lock . . . . . . . . . . . . . . . . . . . . . . . . . . . . . . . . . . . 12
Cleaning and care . . . . . . . . . . . . . . . . . . . . . . . . . . . . . 13
Cleaning with the brush . . . . . . . . . . . . . . . . . . . . . . . . . . . . . . . . .13 Cleaning under running water . . . . . . . . . . . . . . . . . . . . . . . . . . . .14 Thorough cleaning . . . . . . . . . . . . . . . . . . . . . . . . . . . . . . . . . . . . .15
Storage . . . . . . . . . . . . . . . . . . . . . . . . . . . . . . . . . . . . . 16 Warranty and service . . . . . . . . . . . . . . . . . . . . . . . . . . 17 Disposal . . . . . . . . . . . . . . . . . . . . . . . . . . . . . . . . . . . . . 18 Importer. . . . . . . . . . . . . . . . . . . . . . . . . . . . . . . . . . . . . 19
SRR 3.7 A1 |
1 |

Introduction
GB |
Congratulations on the purchase of your new appliance. |
|
|
|
You have selected a high-quality product. The operating instructions |
|
are part of this product. They contain important information on safety, |
|
usage and disposal. Before using the product, familiarise yourself |
|
with all handling and safety guidelines. Use the product only as |
|
described and for the range of applications specified. Please also |
|
pass these operating instructions on to any future owner(s). |
Intended use
This appliance is intended exclusively for shaving and trimming human hair.
This appliance is intended solely for use in private households. Do not use it for commercial applications.
All other uses are deemed to be improper and may result in property damage or even in personal injury.
Package contents
♦Shaver with shaver unit
♦Power adapter
♦Trimmer unit
♦Protective cap
♦Brush
♦Case
♦Order card
♦Operating instructions
2 |
SRR 3.7 A1 |
NOTE
GB
Check contents for completeness and damage immediately after unpacking. Contact Customer Services if necessary.
Description of the appliance
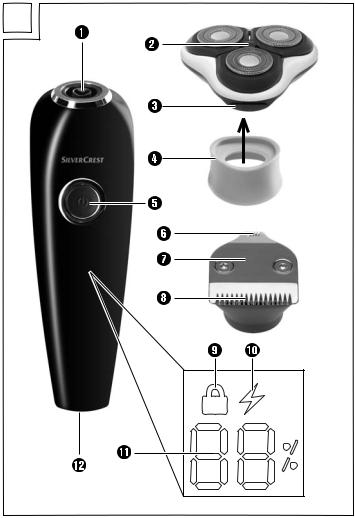
Figure A (front fold-out page):
1Drive shaft
2Shaver unit
3Release button
4Protective collar
5On/o button
6Narrow long-hair trimmer
7Trimmer unit
8Broad long-hair trimmer
9 symbol (lock)
0 |
symbol (charge) |
q |
Battery charge level indicator |
w |
Charging socket |
Figure B (rear fold-out page): |
|
e |
Connection plug |
r |
Mains adapter |
t |
Brush |
z |
Protective cap |
u |
Case |
SRR 3.7 A1 |
3 |
Technical data
GB
Appliance |
|
|
|
|
|
|
|
|
|
|
|
Input voltage: |
5 V |
|
|
|
|
|
|
|
|
|
|
|
|
|
|
|
|
|
|
|
|||
|
|
|
|
|
|
|
|
|
|
||
Input current: |
1000 mA |
||||||||||
Battery: |
3.7 V / 700 mAh Li-ion battery |
||||||||||
Environmental temperature: |
5°C up to 35°C |
||||||||||
Protection class: |
III/ |
|
|
|
|
|
|
||||
|
|
|
|||||||||
|
|
|
|||||||||
Charging time: |
approx. 90 minutes |
||||||||||
Operating time with fully |
|
|
|
|
|
|
|
|
|
|
|
charged battery: |
approx. 60 minutes |
||||||||||
Protection rating: |
IPX 4 |
||||||||||
Power adapter (type PTB-050100EU) |
|||||||||||
Input voltage: |
100 - 240 V |
||||||||||
|
50/60 Hz |
||||||||||
Output voltage: |
5 V |
|
|
||||||||
|
|||||||||||
|
|
|
|
|
|
|
|
|
|
||
Output power: |
1000 mA |
||||||||||
Protection class: |
II / |
||||||||||
4 |
SRR 3.7 A1 |

Safety guidelines
GB
 DANGER – RISK OF ELECTRIC SHOCK!
►Prior to use, check the appliance for visible external damage. Never operate an appliance that is damaged. There is a risk of electrocution.
►The appliance may no longer be used if there is any damage to the cable, to the mains power adapter, the housing or any other components.
►Remove the mains adapter from the power socket
—if a defect occurs,
—before cleaning the appliance,
—if you do not intend using the appliance for long periods,
—after every use.
Pull the mains power adapter itself and not the cable.
►Never submerge the appliance or the cable with mains adapter in water or other liquids.
SRR 3.7 A1 |
5 |

GB |
DANGER – RISK OF ELECTRIC SHOCK! |
►If the appliance falls into water, it is imperative that you pull the mains adapter out of the power socket before you reach into the water.
►Never touch the mains adapter with wet hands, especially when plugging it in or unplugging it. Risk of electrocution!
►Check mains adapter and appliance regularly for possible mechanical damage.
►Ensure that the cable does not get jammed in cupboard doors or pulled over hot surfaces. If this occurs, the cable insulation may be damaged.
►The installation of a residual current circuit breaker with a rated tripping current of no more than 30 mA o ers further protection from electric shocks. Have the installation carried out only by a qualified electrician.
6 |
SRR 3.7 A1 |

 DANGER – RISK OF ELECTRIC SHOCK!
GB
►WARNING! Keep the appliance dry.
►WARNING! Disconnect the mains adapter from the handset when you clean it with water.
 WARNING – RISK OF INJURY!
►This appliance may be used by children aged 8 years and above and by persons with limited physical, sensory or mental capabilities or lack of experience and knowledge, provided that they are under supervision or have been told how to use the appliance safely and are aware of the potential risks.
►Children must not use the appliance as a plaything.
►Cleaning and user maintenance tasks may not be carried out by children unless they are supervised.
SRR 3.7 A1 |
7 |

GB |
WARNING – RISK OF INJURY! |
►All repairs must be carried out by authorised specialist companies or by the Customer Service department. Improper repairs can pose significant risks to the user. They will also invalidate any warranty claim.
►Do not use the appliance with a defective cutter attachment or cutting length attachment, since these may have sharp edges. There is a risk of personal injury!
►Defective components must always be replaced with original replacement parts. Compliance with safety requirements can only be guaranteed if original replacement parts are used.
►Only plug the mains adapter into an easily reachable power socket so that you can pull the mains adapter out of the power socket quickly in an emergency.
8 |
SRR 3.7 A1 |

CAUTION – PROPERTY DAMAGE!
GB
►Never operate the appliance unsupervised, and only in accordance with the information on the nameplate.
►Use only the supplied mains adapter (type PTB-050100EU) to power your appliance.
►To avoid damage caused by overheating, do not cover the mains power adapter.
Charging the batteries
The battery should be charged for at least 90 minutes before first use.
NOTE
►Ensure that the appliance is switched o before charging the battery.
1)Plug the connection plug e into the charging socket w on the shaver.
Ensure the +/- terminals are correctly aligned: the guide rod in the charging socket w must be in the guide groove on the connection plug e. Otherwise the connection plug e cannot be plugged in.
2)Plug the mains adapter r into a mains socket that complies with the appliance specifications.
The battery charge level is shown in percent (%) on the display
(battery charge level indicator q). The  symbol 0 appears on the display.
SRR 3.7 A1 |
9 |

♦ As soon as the battery is fully charged, the  symbol 0 appears GB permanently on the display and the battery charge level indica-
tor q shows 99%.
♦Once the battery is fully charged, you can use the appliance for around 60 minutes without connecting it to the power supply.
Cordless shaving
CAUTION! MATERIAL DAMAGE!
► This appliance is not suitable for wet shaving!
You can use the shaver without the cable. In this case, you must charge the appliance before first use (see section "Charging the batteries").
1)If it is not already attached, push the protective collar 4 from below onto the shaver unit 2 (see fold-out page).
2)Attach the shaver unit 2 with the fitted protective collar 4 onto the drive shaft 1. Ensure that the protective collar 4 is sitting correctly on the handset.
3)Remove the protective cap z.
4)Press the on/o button 5. The battery charge level indicator q shows the current charge level and the shaver starts.
NOTE
►The best results are achieved if used on dry skin.
►It can take 2 to 3 weeks until the skin is accustomed to the dry shaving system.
5)Move the shaving heads with straight and circular motions over the skin.
6)When you have covered all the areas that you want to shave, press the on/o button 5. The appliance stops. After approx. 3 seconds, the display will switch o .
10 |
SRR 3.7 A1 |
7) Clean the shaver after every use with the supplied brush t.
For a more thorough cleaning, read the section "Cleaning and GB care".
Shaving using the mains adapter
CAUTION! MATERIAL DAMAGE!
► This appliance is not suitable for wet shaving!
If you want to use the shaver to load without charging it, you can also use it directly with the mains adapter r:
1)Plug the connection plug e into the charging socket w on the shaver.
Ensure the +/- terminals are correctly aligned. The guide rod in the charging socket w must be in the guide groove on the connection plug e. Otherwise the connection plug e cannot be plugged in.
2)Insert the plug into a mains power socket.
Now you can use the shaver.
Trimmer/long hair trimmer
To shape your beard, form sideburns or shave eyebrows, use the trimmer unit 7.
1)Pull the shaver unit 2 o the handset (if attached).
2)Attach the trimmer unit 7 to the drive shaft 1. Depending on whether you want to use the broad 8 or narrow long hair trimmer 6, change the direction of attachment.
SRR 3.7 A1 |
11 |

– If you want to use the broad long hair trimmer 8, attach the GB trimmer unit 7 so that the broad long hair trimmer 8 is facing
towards you.
–If you want to use the narrow long hair trimmer 6, attach the trimmer unit 7 so that the narrow long hair trimmer 6 is facing towards you.
3)Press the on/o button 5. The battery charge level indicator q shows the current charge level and the appliance starts.
4)When you are finished trimming, press the on/o switch 5 again.
5)Clean the trimmer unit 7 with the supplied brush t. For a more thorough cleaning, read the section "Cleaning and care".
Travel lock
To ensure that the appliance cannot switch on accidentally, you can lock the on/o button 5.
■Press and hold the on/o button 5 until the  symbol 9 appears on the display.
If you now press the on/o button 5, the  symbol 9 and the battery charge level indicator q appear. The appliance will, however, not switch on.
■If you want to release the lock, press and hold the on/o button 5:
– the  symbol 9 appears and starts to flash. The appliance can now be switched on.
12 |
SRR 3.7 A1 |

Cleaning and care
GB
 DANGER – ELECTRIC SHOCK!
►Before cleaning the appliance, disconnect the power plug from the mains power socket! There is a risk of electric shock!
CAUTION! MATERIAL DAMAGE!
►Do not use abrasive, chemical or caustic cleaning agents to clean this appliance. This will irreparably damage the appliance.
Cleaning with the brush
Shaver unit
Clean the 3 shaving heads in the shaver unit 2 after every shave using the brush t.
1)Press the release button 3 so that the shaver unit 2 pops open.
2)Tap the shaver unit 2 on a flat surface or blow o the hair cuttings.
3)Use the brush t to remove any remaining hair cuttings.
Trimmer unit
■Clean the trimmer unit after every use with the supplied brush t.
■Oil the long hair trimmers 6/8 around every 6 months with a drop of sewing machine oil.
SRR 3.7 A1 |
13 |

Cleaning under running water
GB
The shaver unit 2 is suitable for cleaning under running  water.
1)Press the release button 3 so that the shaver unit 2 pops open.
2)Hold the shaver unit 2 under the running water so that the water flows through the shaving heads from the inside to the outside.
CAUTION! MATERIAL DAMAGE!
Ensure that only the shaver unit 2 is under the stream of water! The shaver handset is only protected against water splashes and can be irreparably damaged if it is held under running water.
3) Allow the shaver unit 2 to dry before you use the shaver again.
14 |
SRR 3.7 A1 |

Thorough cleaning
For a more thorough cleaning, remove the shaving heads: |
GB |
|
1)Press the release button 3. The shaver unit 2 pops up.
2)Overstretch the shaver unit 2 a little so it can be pulled upwards and o .
3)Carefully turn the catch marked with arrows in the direction of the arrows until the mounting of the shaving heads can be lifted of (see figure).
4)Clean all parts under running water and then allow them to dry fully.
SRR 3.7 A1 |
15 |

GB |
5) |
Replace the shaver unit 2. |
|
6) |
To attach it, turn the catch marked with arrows in the opposite |
||
|
|||
|
|
direction to the arrow markings so that the shaving head mount- |
|
|
|
||
|
|
ing can no longer be removed. |
|
|
7) |
Remove loose hairs from the shaver with the brush t. |
|
|
8) |
Replace the shaver unit 2 on the shaver. Ensure that it snaps |
|
|
|
into place and is seated firmly. |
|
|
■ |
Clean the housing and the mains adapter r with a damp cloth. |
NOTE
If ...
–... the shaving result is noticeably poorer, ...
–... you have to the shave the same spot repeatedly to achieve a good result, ...
–... the shave takes much longer than usual, ...
–... there is visible damage to the shaving heads, ...
... the shaving heads should be changed.
Please contact the Service Centre if you want to order shaving heads.
Storage
CAUTION! MATERIAL DAMAGE!
Never store the shaver in the case u while the appliance is charging. Risk of overheating!
■Always replace the protective cap z on the shaver unit 2 when you are not using the appliance.
■Store the cleaned and dried appliance and its accessories in the supplied case u.
■Store everything in a clean, dust-free and dry place.
16 |
SRR 3.7 A1 |

Warranty and service
You are provided a 3-year warranty on this appliance, valid from |
GB |
|
|
the date of purchase. This appliance has been manufactured with |
|
care and inspected meticulously prior to delivery. Please retain |
|
your receipt as proof of purchase. In the event of a warranty claim, |
|
please contact your Customer Service unit by telephone. |
|
This is the only way to guarantee free return of your goods. |
|
The warranty only covers claims for material and manufacturing defects, |
|
not for damage sustained during carriage, components subject to wear |
|
and tear or damage to fragile components such as switches or bat- |
|
teries. This appliance is intended solely for private use and not for |
|
commercial purposes.
The warranty shall be deemed void in cases of misuse or improper handling, use of force and modification which have not been carried out by one of our authorised Service centres.
Your statutory rights are not restricted by this warranty.
The warranty period is not prolonged by repairs e ected under the warranty. This also applies to replaced and repaired components. Any damage and defects present at the time of purchase must be reported immediately after unpacking, but no later than two days after the date of purchase. Repairs carried out after expiry of the warranty period shall be subject to charge.
 Service Great Britain
Tel.: 0871 5000 720 (£ 0.10/Min.) E-Mail: kompernass@lidl.co.uk
IAN 102881
 Service Ireland
Tel.: 1890 930 034
(0,08 |
EUR/Min., (peak)) |
||
(0,06 |
EUR/Min., (o peak)) |
||
|
E-Mail: kompernass@lidl.ie |
||
|
|
|
|
|
IAN 102881 |
|
|
Hotline availability: Monday to Friday 08:00 - 20:00 (CET) |
|||
SRR 3.7 A1 |
17 |
||
Disposal
GB |
|
|
|
|
|
Never dispose of the appliance in the |
|
|
|
|
|
|
normal domestic waste. This product is |
|
|
|
|
|
|
|
|
|
|
|
|
|
subject to the provisions of European |
|
|
|
|
|
|
Directive 2012/19/EU. |
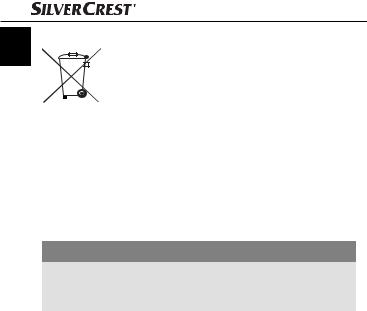
Dispose of the appliance via an approved waste disposal company or your municipal waste disposal facility. Please observe applicable regulations. Please contact your waste disposal facility if you are in any doubt.
Disposal of (rechargeable) batteries
To dispose of the appliance in an environmentally friendly way, you must remove the battery from the appliance:
CAUTION – PROPERTY DAMAGE!
►Remove the battery from the appliance only if you want to scrap/dispose of the appliance! The appliance is permanently defective after you have removed the battery!
1)To remove the battery from the handset, remove the small screw from the rear of the handset with a Phillips screwdriver.
2)Remove the rear cover of the handset.
3)Lever out the black inner housing, for instance with a screwdriver. Before you remove the inner housing, you may need to break o the side and bottom brackets or bend them outwards. Preferably, use a flat-blade screwdriver to do this.
4)Once you have removed the inner housing:
Break the brackets on the transparent plastic cover on the sides. Press the lower lock slightly inwards so that the clear plastic cover can be folded upwards.
18 |
SRR 3.7 A1 |

5) Lift the board slightly so you can get under the battery with a |
|
flat-blade screwdriver. |
GB |
6)Lever the batteries out.
7)Dispose of the battery in an environmentally friendly manner.
Used batteries may not be disposed of in household waste. Consumers are legally obliged to dispose of (rechargeable) batteries at a collection point in their community/city district or at a retail store. The purpose of this obligation is to ensure that batteries are disposed of in an environmentally congruent manner. Only dispose of batteries when they are fully discharged.
The packaging is made of environmentally friendly materials which you can dispose of at your local recycling centre.
Importer
KOMPERNASS HANDELS GMBH BURGSTRASSE 21
44867 BOCHUM GERMANY www.kompernass.com
SRR 3.7 A1 |
19 |

20 |
SRR 3.7 A1 |
Spis treści
Wstęp . . . . . . . . . . . . . . . . . . . . . . . . . . . . . . . . . . . . . . . 22 Użytkowanie zgodne z przeznaczeniem . . . . . . . . . . 22 PL
Zakres dostawy . . . . . . . . . . . . . . . . . . . . . . . . . . . . . . 22 Opis urządzania . . . . . . . . . . . . . . . . . . . . . . . . . . . . . . 23 Dane techniczne . . . . . . . . . . . . . . . . . . . . . . . . . . . . . . 24 Wskazówki bezpieczeństwa . . . . . . . . . . . . . . . . . . . . 25 Ładowanie akumulatora . . . . . . . . . . . . . . . . . . . . . . . 29 Bezprzewodowe golenie . . . . . . . . . . . . . . . . . . . . . . . 30 Golenie z użyciem zasilacza sieciowego. . . . . . . . . . . 31 Trymer/końcówka do długich włosów. . . . . . . . . . . . 31 Zabezpieczenie na czas podróży . . . . . . . . . . . . . . . . 32
Czyszczenie i pielęgnacja . . . . . . . . . . . . . . . . . . . . . . . 33
Czyszczenie za pomocą pędzelka . . . . . . . . . . . . . . . . . . . . . . . .33 Czyszczenie pod bieżącą wodą . . . . . . . . . . . . . . . . . . . . . . . . . .34 Dokładne czyszczenie . . . . . . . . . . . . . . . . . . . . . . . . . . . . . . . . . .35
Przechowywanie . . . . . . . . . . . . . . . . . . . . . . . . . . . . . 36 Gwarancja i serwis . . . . . . . . . . . . . . . . . . . . . . . . . . . . 37 Utylizacja . . . . . . . . . . . . . . . . . . . . . . . . . . . . . . . . . . . . 38 Importer. . . . . . . . . . . . . . . . . . . . . . . . . . . . . . . . . . . . . 39
SRR 3.7 A1 |
21 |

Wstęp
Serdecznie gratulujemy zakupu nowego urządzenia.
Wybrany produkt charakteryzuje się wysoką jakością. Instrukcja obsługi PL jest częścią składową produktu. Zawiera ona ważne informacje na
temat bezpieczeństwa, użytkowania i utylizacji. Przed rozpoczęciem użytkowania produktu należy zapoznać się ze wszystkimi informacjami dotyczącymi obsługi i bezpieczeństwa. Produkt należy użytkować wyłącznie zgodnie z zamieszczonym tu opisem oraz w podanym zakresie zastosowań. W przypadku przekazania urządzenia osobie trzeciej należy dołączyć również całą dokumentację.
Użytkowanie zgodne z przeznaczeniem
To urządzenie jest przeznaczone wyłącznie do golenia i przycinania włosów ludzkich.
Urządzenie przeznaczone jest wyłącznie do stosowania w gospodarstwie domowym. Nie należy używać go w celach komercyjnych.
Każde inne użycie jest uważane za niezgodne z przeznaczeniem
i może spowodować szkody rzeczowe lub nawet uszkodzenia ciała.
Zakres dostawy
♦Golarka z zespołem tnącym
♦Zasilacz sieciowy
♦Zespół trymera
♦Pokrywka ochronna
♦Pędzelek
♦Pokrowiec
♦Karta zamówienia
♦Instrukcja obsługi
22 |
SRR 3.7 A1 |

WSKAZÓWKA |
|
Bezpośrednio po rozpakowaniu sprawdź, czy dostarczony |
|
produkt jest kompletny oraz czy nie wykazuje on żadnych |
PL |
uszkodzeń. Jeśli będzie taka potrzeba, zwróć się do serwisu. |
Opis urządzania
Rysunek A (przednia strona rozkładana):
1 |
Wałek napędowy |
|
2 |
Zespół tnący |
|
3 |
Przycisk odblokowujący |
|
4 |
Kołnierz ochronny |
|
5 |
Przycisk wł./wył. |
|
6 |
Wąska końcówka do długich włosów |
|
7 |
Zespół trymera |
|
8 |
Szeroka końcówka do długich włosów |
|
9 |
Symbol |
(blokada) |
0 |
Symbol |
(ładowanie) |
q |
Wskaźnik poziomu naładowania |
|
w |
Gniazdo ładowania |
|
Rysunek B (tylna strona rozkładana): e Wtyczka połączeniowa
r Zasilacz sieciowy t Pędzelek
z Pokrywka ochronna u Pokrowiec
SRR 3.7 A1 |
23 |

Dane techniczne
|
Urządzenie |
|
|
|
|
|
|
|
|
|
|
|
|
PL |
Napięcie wejściowe: |
5 V |
|
|
|
|
|
|
|
|
|
|
|
|
|
|
|
|
|
|
|
|
|||||
|
|
|
|
|
|
|
|
|
|
||||
Prąd wejściowy: |
1000 mA |
||||||||||||
|
|||||||||||||
|
Akumulator: |
Akumulator Li-Ion 3,7 V, 700 mAh |
|||||||||||
|
Temperatura otoczenia: |
5°C do 35°C |
|||||||||||
|
Klasa ochrony: |
III/ |
|
|
|
|
|
|
|||||
|
|
|
|
||||||||||
|
|
|
|
||||||||||
|
Czas ładowania: |
ok. 90 minut |
|||||||||||
|
Czas pracy przy |
|
|
|
|
|
|
|
|
|
|
|
|
|
w pełni naładowanym |
|
|
|
|
|
|
|
|
|
|
|
|
|
akumulatorze: |
ok. 60 minut |
|||||||||||
|
Stopień ochrony: |
IPX 4 |
|||||||||||
|
Zasilacz sieciowy (typ PTB-050100EU) |
||||||||||||
|
Napięcie wejściowe: |
100 - 240 V |
|||||||||||
|
|
50/60 Hz |
|||||||||||
|
Napięcie wyjściowe: |
5 V |
|
|
|||||||||
|
|
||||||||||||
|
|
|
|
|
|
|
|
|
|
|
|||
|
Prąd wyjściowy: |
1000 mA |
|||||||||||
|
Klasa ochrony: |
II / |
|||||||||||
24 |
SRR 3.7 A1 |

Wskazówki bezpieczeństwa |
|
NIEBEZPIECZEŃSTWO PORAŻENIA |
|
PRĄDEM ELEKTRYCZNYM! |
PL |
►Przed przystąpieniem do użytkowania sprawdź, czy urządzenie nie ma widocznych z zewnątrz uszkodzeń. Nie uruchamiaj uszkodzonego urządzenia. Istnieje niebezpieczeństwo porażenia prądem elektrycznym.
►W przypadku stwierdzenia uszkodzeń kabla, zasilacza sieciowego, obudowy lub innych elementów, dalsze korzystanie z urządzenia jest zabronione.
►Wyciągnąć zasilacz z gniazda zasilania
—kiedy wystąpi usterka,
—przed przystąpieniem do czyszczenia urządzenia,
—gdy urządzenie przez dłuższy czas nie jest używane,
—po każdym użyciu.
Należy przy tym chwytać bezpośrednio za zasilacz sieciowy, a nie za kabel.
►Nie zanurzać urządzenia ani kabla wraz zasilaczem sieciowym w wodzie ani w żadnej innej cieczy.
SRR 3.7 A1 |
25 |

|
|
NIEBEZPIECZEŃSTWO PORAŻENIA |
|
|
PRĄDEM ELEKTRYCZNYM! |
|
||
PL |
|
► Gdyby urządzenie wpadło do wody, najpierw |
|
|
bezwzględnie wyciągnij zasilacz sieciowy z |
|
||
|
|
gniazda, zanim sięgniesz po urządzenie do |
|
|
wody. |
|
|
► Nigdy nie dotykaj zasilacza sieciowego mokrymi |
|
|
rękoma, w szczególności podczas wkładania go |
|
|
do gniazda lub wyjmowania z gniazda. Niebez- |
|
|
pieczeństwo porażenia prądem elektrycznym! |
|
|
► Regularnie sprawdzaj zasilacz sieciowy i urzą- |
|
|
dzenie pod kątem uszkodzeń mechanicznych. |
|
|
► Dopilnuj, aby kabel nie został przycięty między |
|
|
drzwiczkami szafek ani nie był przeciągany po |
|
|
gorących powierzchniach. Mogłoby w ten |
|
|
sposób dojść do uszkodzenia izolacji kabla. |
|
|
► Zamontowanie wyłącznika różnicowo-prądo- |
|
|
wego o znamionowym prądzie wyłączającym |
|
|
o wartości nie większej niż 30 mA zapewnia |
|
|
lepszą ochronę przed porażeniem prądem |
|
|
elektrycznym. Montaż należy zlecić wyłącznie |
|
|
elektrykowi. |
|
|
|
26 |
SRR 3.7 A1 |
 Loading...