


Operating instructions
Ovens |
H 373 B |
To prevent accidents and machine damage,
read the Operating Manual before installing or using the machine.
ö]
M.-Nr. 05 121 710

Contents
Description of the appliance . . . . . . . . . . . . . . . . . . . . . . . . . . . . . . . . . . . . . . . . . 4 Accessories . . . . . . . . . . . . . . . . . . . . . . . . . . . . . . . . . . . . . . . . . . . . . . . . . . . . . . . 5
Caring for the environment . . . . . . . . . . . . . . . . . . . . . . . . . . . . . . . . . . . . . . . . . . 6
Warning and Safety instructions . . . . . . . . . . . . . . . . . . . . . . . . . . . . . . . . . . . . . 7
Safety feature . . . . . . . . . . . . . . . . . . . . . . . . . . . . . . . . . . . . . . . . . . . . . . . . . . . . 11
Before using for the first time. . . . . . . . . . . . . . . . . . . . . . . . . . . . . . . . . . . . . . . 12
Description of the oven programs . . . . . . . . . . . . . . . . . . . . . . . . . . . . . . . . . . . 13
Operation . . . . . . . . . . . . . . . . . . . . . . . . . . . . . . . . . . . . . . . . . . . . . . . . . . . . . . . 15 Controls . . . . . . . . . . . . . . . . . . . . . . . . . . . . . . . . . . . . . . . . . . . . . . . . . . . . . . . . . 15 Program selector . . . . . . . . . . . . . . . . . . . . . . . . . . . . . . . . . . . . . . . . . . . . . . . 15 Push buttons . . . . . . . . . . . . . . . . . . . . . . . . . . . . . . . . . . . . . . . . . . . . . . . . . . 15 Selecting an oven setting. . . . . . . . . . . . . . . . . . . . . . . . . . . . . . . . . . . . . . . . . . . . 16 Selecting a temperature. . . . . . . . . . . . . . . . . . . . . . . . . . . . . . . . . . . . . . . . . . . . . 17 Recommended temperature. . . . . . . . . . . . . . . . . . . . . . . . . . . . . . . . . . . . . . . 17 Adjusting the temperature . . . . . . . . . . . . . . . . . . . . . . . . . . . . . . . . . . . . . . . . 18 Entering the desired temperature . . . . . . . . . . . . . . . . . . . . . . . . . . . . . . . . . . . 18 Using the oven . . . . . . . . . . . . . . . . . . . . . . . . . . . . . . . . . . . . . . . . . . . . . . . . . . . . 19 Pre-heating the oven . . . . . . . . . . . . . . . . . . . . . . . . . . . . . . . . . . . . . . . . . . . . . . . 19 Interrupting the process / Turning off the oven . . . . . . . . . . . . . . . . . . . . . . . . . . . 19 Rapid heat . . . . . . . . . . . . . . . . . . . . . . . . . . . . . . . . . . . . . . . . . . . . . . . . . . . . . . . 20 To turn off "rapid heat". . . . . . . . . . . . . . . . . . . . . . . . . . . . . . . . . . . . . . . . . . . . 20 Energy-save feature. . . . . . . . . . . . . . . . . . . . . . . . . . . . . . . . . . . . . . . . . . . . . . . . 21 Oven lighting . . . . . . . . . . . . . . . . . . . . . . . . . . . . . . . . . . . . . . . . . . . . . . . . . . . . . 21 Night dimming . . . . . . . . . . . . . . . . . . . . . . . . . . . . . . . . . . . . . . . . . . . . . . . . . . . . 21
Setting the minute minder. . . . . . . . . . . . . . . . . . . . . . . . . . . . . . . . . . . . . . . . . . 22
Adjusting oven settings. . . . . . . . . . . . . . . . . . . . . . . . . . . . . . . . . . . . . . . . . . . . 23
Accessories . . . . . . . . . . . . . . . . . . . . . . . . . . . . . . . . . . . . . . . . . . . . . . . . . . . . . 25 Baking tray, roasting / grill pan and rack, Grease filter . . . . . . . . . . . . . . . . . . . . . 25
Timer operation . . . . . . . . . . . . . . . . . . . . . . . . . . . . . . . . . . . . . . . . . . . . . . . . . . 26 Push buttons . . . . . . . . . . . . . . . . . . . . . . . . . . . . . . . . . . . . . . . . . . . . . . . . . . . 26 Programming cooking time in the oven . . . . . . . . . . . . . . . . . . . . . . . . . . . . . . . . . 28 To end a cooking time automatically . . . . . . . . . . . . . . . . . . . . . . . . . . . . . . . . . . . 29

Contents
Delaying the start of a cooking process . . . . . . . . . . . . . . . . . . . . . . . . . . . . . . . . 29 To enter a length of cooking and an actual time for the oven to shut off . . . . . 29 Enter the actual start time and the length of cooking . . . . . . . . . . . . . . . . . . . . 30 Checking, changing and cancelling times entered . . . . . . . . . . . . . . . . . . . . . . . . 30 To cancel programmed processes . . . . . . . . . . . . . . . . . . . . . . . . . . . . . . . . . . . . 31
Baking . . . . . . . . . . . . . . . . . . . . . . . . . . . . . . . . . . . . . . . . . . . . . . . . . . . . . . . . . . 32
Baking Recommendations . . . . . . . . . . . . . . . . . . . . . . . . . . . . . . . . . . . . . . . . . 34
Roasting . . . . . . . . . . . . . . . . . . . . . . . . . . . . . . . . . . . . . . . . . . . . . . . . . . . . . . . . 36
Roasting with the Roast Probe . . . . . . . . . . . . . . . . . . . . . . . . . . . . . . . . . . . . . . 38
Oven roasting chart . . . . . . . . . . . . . . . . . . . . . . . . . . . . . . . . . . . . . . . . . . . . . . . 42
Defrosting . . . . . . . . . . . . . . . . . . . . . . . . . . . . . . . . . . . . . . . . . . . . . . . . . . . . . . . 43
Casseroles . . . . . . . . . . . . . . . . . . . . . . . . . . . . . . . . . . . . . . . . . . . . . . . . . . . . . . 44
Broiling . . . . . . . . . . . . . . . . . . . . . . . . . . . . . . . . . . . . . . . . . . . . . . . . . . . . . . . . . 45
Broiling chart . . . . . . . . . . . . . . . . . . . . . . . . . . . . . . . . . . . . . . . . . . . . . . . . . . . . 48
Cleaning and care . . . . . . . . . . . . . . . . . . . . . . . . . . . . . . . . . . . . . . . . . . . . . . . . 49 Oven door and control panel . . . . . . . . . . . . . . . . . . . . . . . . . . . . . . . . . . . . . . . . . 49 Accessories . . . . . . . . . . . . . . . . . . . . . . . . . . . . . . . . . . . . . . . . . . . . . . . . . . . . . . 50 Oven interior. . . . . . . . . . . . . . . . . . . . . . . . . . . . . . . . . . . . . . . . . . . . . . . . . . . . . . 51 Cleaning catalytic enamel surfaces . . . . . . . . . . . . . . . . . . . . . . . . . . . . . . . . . 52 To remove the oven door . . . . . . . . . . . . . . . . . . . . . . . . . . . . . . . . . . . . . . . . . 53 To remove the runners . . . . . . . . . . . . . . . . . . . . . . . . . . . . . . . . . . . . . . . . . . . 54 To remove the catalytic side panels . . . . . . . . . . . . . . . . . . . . . . . . . . . . . . . . . 54 To remove the back panel . . . . . . . . . . . . . . . . . . . . . . . . . . . . . . . . . . . . . . . . 56 To lower the upper heating element . . . . . . . . . . . . . . . . . . . . . . . . . . . . . . . . . 56
Correcting minor problems. . . . . . . . . . . . . . . . . . . . . . . . . . . . . . . . . . . . . . . . . 58
After sales service . . . . . . . . . . . . . . . . . . . . . . . . . . . . . . . . . . . . . . . . . . . . . . . . 61
Optional accessories . . . . . . . . . . . . . . . . . . . . . . . . . . . . . . . . . . . . . . . . . . . . . . 62
Electrical connection USA . . . . . . . . . . . . . . . . . . . . . . . . . . . . . . . . . . . . . . . . . 64
Installing the oven USA . . . . . . . . . . . . . . . . . . . . . . . . . . . . . . . . . . . . . . . . . . . 65
Electrical connection CDN . . . . . . . . . . . . . . . . . . . . . . . . . . . . . . . . . . . . . . . . . 66
Installing the oven CDN. . . . . . . . . . . . . . . . . . . . . . . . . . . . . . . . . . . . . . . . . . . . 67
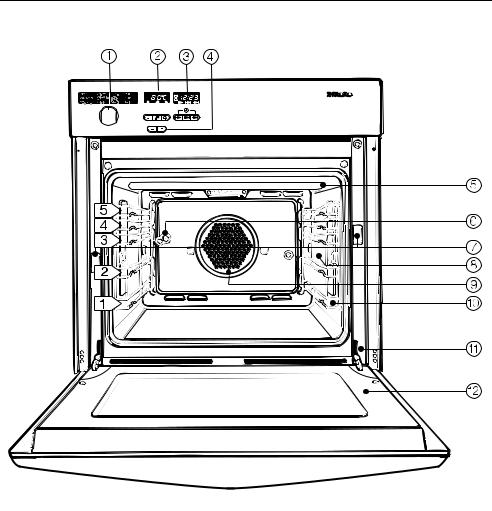
Description of the appliance
4

Description of the appliance
Control panel
b Program selector
c Oven: display and pushbuttons d Timer: display and pushbuttons e "+/–" button with indicator
Oven interior
f Top heating element and guard g Grill motor
h Access door for halogen lamp
i Connection socket for roast probe j Convection fan
k Non-tip, five level runners l Door safety switch
m Oven door
Accessories
The following accessories are supplied with all ovens:
–2 baking trays,
–dual purpose broiling pan / oven tray,
–non-tip rack,
–grease filter,
–grill motor and rotisserie,
–temperature controlled roast probe.
5

Caring for the environment
Disposal of the packing material
The transport and protective packing is made from materials that are environmentally friendly and can be recycled.
Please recycle these materials.
Disposal of an old machine
To ensure that the machine presents no danger to children while waiting for disposal, disconnect the power cord and remove the door to prevent it from becoming a hazard.
6

Warning and Safety instructions
This appliance complies with all legal safety requirements. Improper use can cause both personal injury and equipment damage.
Before installation and before using the oven for the first time, read the operating instructions carefully. They contain important information on safety, and the operation and care of the appliance.
Do not let children in, on or around the appliance or its controls.
Keep these instructions in a safe place and pass them on to any future users.
Proper Use
This appliance is intended for residential use only. Use for any
other purpose is at the owner’s risk and could be dangerous. The manufacturer cannot be held responsible for damage caused by improper use of this appliance.
Installation and Servicing
Before connecting the appliance to the power supply, make sure
that a sufficient electrical source is available, as specified on the data plate. Consult a licensed electrician if in doubt.
To guarantee the electrical safety of this appliance, continuity must exist between the appliance and an effective grounding system. It is impera-
tive that this basic safety requirement be met. If there is any doubt, have the electrical system of the residence checked by a qualified electrician. The manufacturer cannot be held responsible for damages caused by the lack or inadequacy of an effective grounding system.
The oven is not to be operated until it has been properly installed
within cabinetry. Please follow the Installation Instructions.
Only qualified personnel should perform installations and repairs
on electrical appliances. Do not repair or replace any part of the appliance unless specifically recommended in this manual.
Before servicing, disconnect the power supply by either removing the plug or manually "tripping" the cir-
cuit breaker.
If the oven is to be installed under a cooktop, a sealing strip must replace the stainless steel rail above the
control panel, to prevent liquids from entering the oven controls.
7
Warning and Safety instructions
Oven operation
Ovens can produce high temperatures.
Children should be prevented from touching the appliance when in use.
Heat-resistant oven gloves are recommended when placing items in the oven, turning them, or removing
them from the oven. The top heating element and oven racks can become very hot and cause burns.
Always open the door carefully. Allow hot air or steam to escape
before placing or removing food.
Allow the upper element to cool before cleaning. This will prevent
possible burns.
Use care when lowering the upper heating element. Damage to the
element is possible if extreme force is used.
Always place oven racks in their desired height while the oven is
cool. This will prevent burns.
Oven gloves are needed when adjusting hot racks. Do not allow the gloves to come in contact with the heating elements.
Caution: Heating elements may be hot even though they are not glowing. During and after use, do not
let clothing or other flammable materials come in contact with heating elements or interior surfaces of the oven until they have had sufficient time to cool. External parts of the oven such as the door glass, vents, and control panel can become hot.
 Keep oven vents unobstructed.
Do not let metal objects (aluminum foil, metal pans) or the meat probe
come in contact with the hot heating elements.
Do not slide pots or pans on the oven floor. This could scratch or
even damage the floor’s surface.
Do not lean, sit, or place heavy items on the open oven door. The
door can support a maximum weight of 22 lbs (10 kg).
Cover all cooked food that is left in the oven to be kept warm. This will prevent food from drying out and moisture from condensing on the interior of the oven. Long-term or excessive con-
densation could damage the oven.
Use only the Miele roast probe supplied with the oven. If a replacement is necessary, it can be purchased from the Miele Technical Ser-
vice Dept. or a Miele dealer.
8

Warning and Safety instructions
Remove the roasting probe from the oven when not using the
probe. High broiling temperatures could damage the probe.
Do not heat unopened containers of food in the oven, as pressure
may build up and cause them to explode.
To keep food warm after cooking, take advantage of the residual
heat or select the lowest temperature available.
Place frozen products (such as pizza or TV dinners) directly on the
rack. Do not place them on the baking tray or broiling pan. This could cause the metal to distort to such an extent that it may be difficult to remove the items from the oven.
Never use aluminum foil to line the oven floor or place pots, pans or baking sheets directly on the oven floor when using "Top & Bottom Heat", "Bottom Heat" or the "Intensive Bake". This could crack the enamel on the oven floor.
Flammable liquids and/or materials should never be stored in, above
or under an oven, or near cooking surfaces.
For ovens with a retrofitted catalytic converter:
This oven must only be used for cooking, baking or broiling food. Do not use it as a dryer, kiln, dehumidifier, etc.
Due to the heat generated in the catalytic converter of the oven, any fumes or vapors given off by glues, plastics or other non-food items could ignite and damage the oven and surrounding cabinetry.
General notes
Never use a steam cleaner to clean the oven. Pressurized steam
could cause a short circuit, or cause permanent damage to the oven surface and/or components. The manufacturer cannot accept responsibility for damage caused by steam cleaning.
Children should not be left alone or unattended in an area where an
oven is in use. They should never be allowed to sit or stand on any part of the oven.
Caution: Do not store items of interest to children in cabinets above an oven. Children climbing on the oven to reach these items could be seriously injured.
Do not leave the oven unattended when cooking with oils or fats, they can be a fire hazard if allowed to over-
heat.
Do not use water on grease fires! Smother the fire with a dry chemi-
cal or foam fire extinguisher.
Wear proper clothing. Loose-fitting or hanging garments should never
be worn while cooking.
9

Warning and Safety instructions
Do not use the oven to heat the room.
When using small kitchen appliances near the oven, make
certain that the power cords do not come in contact with or get caught in the oven door.
Use only dry, heat resistant potholders. Moist or damp potholders
used on hot surfaces may result in steam burns. Do not let potholders come in contact with oils. Do not substitute towels or other bulky items for potholders.
Always make sure food is sufficiently cooked or reheated. Many
factors affect the overall cooking time, including the size and amount of food, its temperature and the recipe. Some foods may contain microorganisms that are only destroyed by thorough cooking. If in doubt, select a longer cooking or heating time.
It is important that the heat be allowed to spread evenly throug-
hout the food. This can be achieved by stirring or turning the food, or by setting longer cooking times.
Disposal of an old machine
Before discarding an old appliance, disconnect the power
cord and remove the door to prevent it from becoming a hazard.
The manufacturer is not liable for damage caused by non-com- pliance with safety instructions.
10
Safety feature
Child Safety Lock
The Child Safety Lock can be activated to prevent the oven being turned on accidentally, or by children.
This feature can be activated as follows:
The program selector must be at the "0" (OFF) position.
Press the "p" (Temperature) button until the key symbol appears in the display.
Once this symbol appears, the oven can no longer be turned on. After five seconds, the symbol disappears.
To cancel the Child Safety Lock:
Select an oven program.
Press the "p" (Temperature) until the key symbol in the display disappears.
11

Before using for the first time
To set the time of day
When the appliance is first connected to the power supply, or after a power failure "12:00" and the symbols "f" and ")" flash in the display.
Press the buttons "f" and ")" at the same time.
The following light up
–"12:00" in the display,
–the "+/–" button indicator light.
Now immediately, while the indicator light for the "+/–" button is still on, enter the time in hours:minutes with the "+" or "–" buttons.
When the indicator light for the "+/–" button goes out, the time of day has been set and the display will change at oneminute intervals. The colon flashes.
Before using the oven for the first time be certain to remove all labels from the oven and accessories.
Use a soft cloth or sponge to wipe out the oven interior using a solution of warm water and a non abrasive detergent. Dry the interior with a soft cloth.
Do not close the oven door until the oven interior is dry.
Rinse the accessories.
Mount the runners in the sides of the oven.
New ovens may have a slight odor during their first use. Operating the oven at a high temperature for at least an hour will eliminate the odors quickly.
Turn the program selector to "Convection D".
Select the highest temperature, using the "+/–" button while the indicator light between the "+" and "–" buttons is lit.
The timer can also be used to set the finish time.
Make sure the room is well ventilated during this process.
12

Description of the oven programs
Convection cooking D
A fan mounted in the back wall of the oven draws in air over the heater element and disperses the heated air throughout the oven. Pre-heating the oven is not necessary, since the heated air instantly surrounds the food. Exception: Pre-heat the oven when roasting meat or baking bread made with dark flour.
When using the convection setting, it is possible to bake and roast on different levels at the same time. This is possible because the heated air is of a lower intensity than that used with "Conventional" heating programs.
When a temperature setting above 280°F/140°C is selected, the "rapid heat" feature (which incorporates the top heating element) is automatically activated.
Auto Roast E
This setting combines "convection" with "Auto Roast", which initially heats the oven to a high temperature to seal the meat, retaining moisture and tenderness.
Once the high temperature has been reached, the cooking temperature is automatically returned to the pre-se- lected setting.
When a temperature setting above 280°F/140°C is selected, the "rapid heat" feature (which incorporates the top heating element) is automatically activated.
Conventional heating A
In this setting, the heat is radiated directly on the food from above and below.
Below are several examples in which pre-heating the oven would be necessary:
–baking cookies or cakes with a short cooking time (up to approx. 30 minutes)
–baking some types of dough
–baking bread made with dark flour
–roasting meat
When a temperature setting above 300°F/150°C is selected, the "rapid heat" feature (which incorporates the appropriate heating element) is automatically activated.
13

Description of the oven programs
Defrost G
Defrost can be operated with heat up to 120°F/50°C, or without heat, using ambient air circulated by the fan.
Intensive bake F
This setting combines "convection" with heat from the lower heating element. It is particularly useful for food preparation that requires a moist topping and crisp base, such as pies, pizza and quiche.
Fan broiling N
The hot air from the upper heating element is distributed over the food by the fan. This enables a lower temperature than conventional broiling to be used.
Broiling 1 m
Broiling 1 is used to prepare small quantities of food. The inner part of the upper heating element cycles on and off to maintain a selected broiling temperature.
Broiling 2 n
Broiling 2 is used to prepare large quantities of food. The entire upper heating element cycles on and off to maintain a selected broiling temperature.
14

Operation
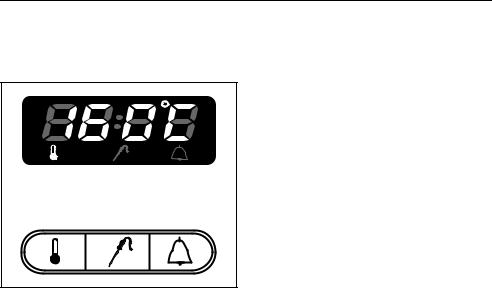
Controls
The oven controls consist of the program selector and pushbuttons.
Program selector
The program selector can be turned either clockwise or counter-clockwise to a program.
Push buttons
The push buttons control:
–oven temperature settings
–core temperature settings
–timer operations
Each push button has a matching symbol in the oven display.
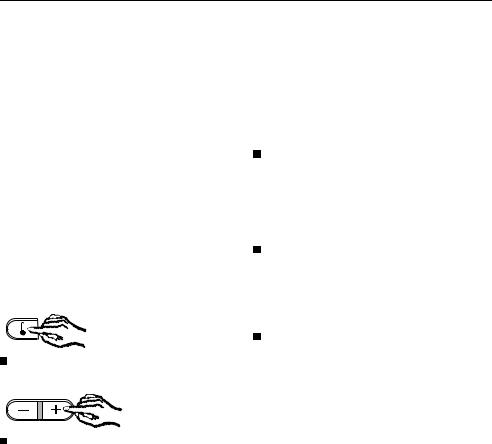
All temperature and time selections are made by using the "+" or "–" buttons.
Temperatures and times are adjusted in two speeds: slowly, one digit at a time (short pushes on the button); and rapid advancement (holding the button in).
In this way the following adjustments can be made
–oven temperature in 10°F/5°C increments
–core temperature in 2°F/1°C increments
–timer in 1 minute increments.
Upon touching any of the buttons (p,e, l) the indicator light between the "+" and "–" buttons lights up.
While this light is on, times and temperatures can be entered or changed.
Pressing any of the buttons while the indicator light is lit will extend the time for entering changes.
When the indicator light goes out any data input or adjustment is temporarily stored.
15

Operation
Selecting an oven setting
By using the program selector, the following settings can be chosen:
–Light H
Turns the oven light on and off.
–Convection D
For baking or roasting on several levels at the same time.
–Top heat C
For browning dishes, finishing dishes with a cheese topping.
–Conventional A
Top and bottom heat together, for baking / roasting traditional recipes and soufflés.
–Bottom heat B
Use this setting towards the end of baking, to brown the base of a cake.
–Auto Roast E
Seals in meat juices with an initial high temperature followed by a normal roasting temperature. Usually not suitable for baking, except for freshly prepared whole wheat or rye dough (not packet mixes).
–Defrost G
For gentle defrosting of deep frozen foods.
–Intensive Bake F
For recipes with a moist topping, and a crisp base, e.g. pizzas and quiche, German style open fruit cakes, pies and cheesecake. Not suitable for roasting or shallow baking, (the base will brown too much).
–Fan Broiling N
Ideal for grilling thicker items such as stuffed meat, kebabs and pieces of poultry etc. Grilling takes place with the oven door closed.
–Broiling 1 m
For grilling flat or thin items, small quantities, and for browning in small round dishes. Grilling takes place with the oven door closed.
–Broiling 2 n
For grilling thicker items, large quantities, and for browning larger oval dishes. Grilling takes place with the oven door closed.
16
Operation
Selecting a temperature
Recommended temperature
As soon as a program is selected, the recommended temperature for that program appears in the oven display and the oven starts heating.
The following temperatures are preset:
Convection . . . . . . . . . . . . 320°F/160°C Auto Roast* . . . . . . . . . . . . 320°F/160°C Top Heat . . . . . . . . . . . . . . 370°F/190°C Top & Bottom Heat . . . . . . 370°F/190°C Bottom Heat . . . . . . . . . . . 370°F/190°C Defrosting . . . . . . no temperature given Intensive Baking . . . . . . . . 340°F/170°C Fan Broiling . . . . . . . . . . . . 390°F/200°C Broiling 1 (small) . . . . . . . . 460°F/240°C Broiling 2 (large) . . . . . . . . 460°F/240°C
*the initial boosted temperature is approx. 440°F/230°C,
continuation temperature 320°F/160°C
The preset temperature will be displayed upon program selection, and will change to the actual temperature. The indicator light in the "+/–" button goes out, and the oven starts heating.
The increase in temperature can be monitored in the display. If the oven door is opened, or a lower temperature is set, the decrease is shown in 1° steps.
17
Operation
Adjusting the temperature |
Entering the desired temperature |
If the preset temperature is not suitable, it can be adjusted within the range of the selected “program”, as shown below:
Convection . . . . . . . 80-480°F/30-250°C Auto Roast . . . . . 210-440°F/100-230°C Top Heat . . . . . . . . 80-480°F/30-250°C Top & Bottom Heat . 80-530°F/30-280°C Bottom Heat . . . . 210-480°F/100-250°C Defrosting. . . . . . . . . 80-120°F/30-50°C Intensive baking . . 120-480°F/50-250°C Fan Broiling . . . . . 120-500°F/50-260°C Broiling 1 (small) 390-570°F/200-300°C Broiling 2 (large). 390-570°F/200-300°C
To change the temperature:
Press the "p" button.
Enter the desired temperature with the "+/–" button.
You can enter and save your own temperatures if you frequently work with temperatures that differ from the preset settings (except "Defrost").
To enter your own settings:
Use the program selector to choose the program that is to be given a different temperature.
The preset temperature will appear in the display.
Temperatures can now be changed as long as the indicator light in the "+/–" button is lit. Use the "+" or "–" button respectively to enter the desired temperatures.
To store the displayed temperature in memory, press the "p" button until the tone is heard.
Your temperature is now stored in memory, and will appear every time that program is selected.
In the event of a power failure, any customized temperatures will be lost and must be re-entered.
18

Operation
Using the oven
Place food to be cooked in the oven.
Turn program selector to the desired program.
The following will light up
–Oven temperature
–the indicator light for the "+/–" button.
The following procedure is needed only if a desired temperature differs from the preset temperature.
Press the "p" button.
Using the "+/–" button enter the desired temperature.
The oven will start to heat up as soon as the indicator light in the "+/–" button goes out.
Heating is automatically interrupted if the oven door is opened. The electronic system automatically switches off the heating system whenever the door contact switch opens. When "Convection" is being used, the fan is also switched off.
The oven can be programmed to cook at a future time; see "Programming cooking time".
Pre-heating the oven
Pre-heating the oven is only necessary in certain instances, such as:
–baking bread made with dark flour,
–roasting meat.
–for baking cookies and cakes with a short cooking time, (up to approx. 30 minutes),
To pre-heat
Turn program selector to the desired program.
Select the desired temperature, if needed.
When the desired temperature has been reached, place the food to be roasted or baked into the oven.
Interrupting the process / Turning off the oven
Turn the program selector to "0"
The oven will turn off, and all programs will be cancelled.
Exceptions:
–If the roast probe remains inserted into its receptacle, the "e" symbol will remain lit.
–If a minute minder time has been entered, the "l" symbol is lit and the display shows the time counting down.
19

Operation
Rapid heat
With the "Convection D", "Auto Roast E" and "Conventional A", "rapid heat" is switched on automatically if the temperature desired is:
–at least 280°F/140°C with "Fan Heat D" and "Auto Roast E".
or
–at least 300°F/150°C with "Conventional A".
The rotating "F" beside the required temperature shows that "rapid heat" is turned on.
During the rapid heat phase, the "Convection" and “Top” heating elements simultaneously heat the oven.
As soon as the desired temperature has been obtained, the additional heating element is automatically turned off, and will remain off even if the temperature setting is increased.
Exception: If the temperature setting is increased before the desired temperature is reached, "rapid heat" will remain active.
To turn off "rapid heat"
For some dishes it may be desirable to turn off "rapid heat" (cookies, small cakes).
Select the program and temperature for the cooking process.
As soon as the actual temperature appears in the display, "rapid heat" can be turned off.
Press the "–" button and hold until the "F" in the display stops rotating.
"Rapid heat" is now turned off for this particular cooking process.
After the program selector has been turned to "0" when finished cooking, "Rapid heat" will be available for the next use.
Additionally, three oven programs can be programmed for use without the “rapid heat” feature, (see "Adjusting oven settings, additional feature 06").
20
Operation
Energy-save feature
If you are programming a cooking process using the timer or the roasting probe, the residual heat of the oven is automatically used to finish the cooking process while conserving energy.
Shortly before the end of the cooking process, the oven shuts off the heat. The letters "EC" are displayed, indicating that the energy-saving feature is operating.
The cooling fan will continue to run in the “EC” mode, as does the convection fan if a "fan" function was chosen.
The residual heat in the oven is sufficient to complete the cooking process.
Oven lighting
The oven light is lit whenever the oven door is opened, and during programming. The light will go out when the door is closed, or approx. 15 seconds after a button has been pushed.
Any changes to oven lighting are programmable (see Additional features).
Night dimming
Between the hours of 22:00 and 6:00 the lighting in the clock / timer display is dimmed automatically to give a slight energy saving.
21
 Loading...