


 Loading...
HP StoreOnce
VSA Backup system
Abstract
This is the user guide for HP StoreOnce VSA Backup system and is intended for users who install, operate and maintain the HP StoreOnce Backup system.
Always check www.hp.com/go/storage/docs for the most current documentation, including localized versions (in PDF format) for your product. (Search on Product Name and select the Product Manuals option.)
Refer to the Quick Specs on http://www.hp.com/go/storeonce for supported features for your model and the current status.
HP Part Number: TC458-96025
Published: July 2014
Edition: 2

© Copyright 2011–2014 Hewlett-Packard Development Company, L.P.
Confidential computer software. Valid license from HP required for possession, use or copying. Consistent with FAR 12.211 and 12.212, Commercial Computer Software, Computer Software Documentation, and Technical Data for Commercial Items are licensed to the U.S. Government under vendor's standard commercial license.
The information contained herein is subject to change without notice. The only warranties for HP products and services are set forth in the express warranty statements accompanying such products and services. Nothing herein should be construed as constituting an additional warranty. HP shall not be liable for technical or editorial errors or omissions contained herein.
Warranty
WARRANTY STATEMENT: To obtain a copy of the warranty for this product, see the warranty information website: http://www.hp.com/go/storagewarranty
Acknowledgments
Linear Tape-Open, LTO, LTO Logo, Ultrium and Ultrium Logo are trademarks of Quantum Corp, HP and IBM in the US, other countries or both.
Microsoft, Windows, Windows NT, and Windows XP are U.S. registered trademarks of Microsoft Corporation. Intel and Itanium are trademarks or registered trademarks of Intel Corporation or its subsidiaries in the United States and other countries.
The HP StoreOnce Backup system product firmware includes software developed by the OpenSSL Project for use in the OpenSSL Toolkit. (http:// www.openssl.org/).
Revision History |
|
Revision 1 |
June 2013 |
First edition. |
|
Revision 2 |
July 2014 |
Second edition, issued with the 3.11.0 version of HP StoreOnce software.

Contents |
|
1 Getting started........................................................................................... |
7 |
This guide................................................................................................................................ |
7 |
Overview of The HP StoreOnce Backup system............................................................................. |
7 |
User types and user roles........................................................................................................... |
7 |
Powering off and on.................................................................................................................. |
8 |
Deployment of the Virtual Storage Appliance............................................................................... |
8 |
Navigating the HP StoreOnce Graphical User Interface (GUI)........................................................ |
9 |
Navigating the online help...................................................................................................... |
10 |
The StoreOnce CLI.................................................................................................................. |
12 |
Licensing............................................................................................................................... |
12 |
Security Features.................................................................................................................... |
12 |
2 StoreOnce functions.................................................................................. |
14 |
Overview of the HP StoreOnce page......................................................................................... |
14 |
System information and status................................................................................................... |
14 |
3 VTL (Virtual Tape Libraries) functions........................................................... |
16 |
VTL Configuration page........................................................................................................... |
16 |
iSCSI Settings tab.............................................................................................................. |
16 |
Libraries page........................................................................................................................ |
16 |
Device Details tab.............................................................................................................. |
17 |
To create a new library (administrators only)..................................................................... |
19 |
To edit library details (administrators only)........................................................................ |
20 |
To delete a library (administrators only)............................................................................ |
21 |
Emulation types for tape devices.......................................................................................... |
21 |
Interface Information tab..................................................................................................... |
22 |
Active Connections tab....................................................................................................... |
23 |
Cartridges tab................................................................................................................... |
23 |
To create a cartridge (administrators only)........................................................................ |
25 |
To delete a cartridge (administrators only)........................................................................ |
25 |
To delete all or a range of cartridges (administrators only).................................................. |
26 |
To write protect a cartridge (administrators only)............................................................... |
26 |
To edit maximum cartridge size (administrators only).......................................................... |
27 |
To move or unload cartridges......................................................................................... |
27 |
Make Replication Target libraries visible to the host..................................................................... |
28 |
4 NAS functions.......................................................................................... |
30 |
NAS Configuration page......................................................................................................... |
30 |
CIFS Server tab...................................................................................................................... |
30 |
Configuring user authentication............................................................................................ |
32 |
Configuring CIFS Server with AD and CIFS Share with AD domain users........................................ |
34 |
NFS Server tab....................................................................................................................... |
42 |
Shares (NAS)......................................................................................................................... |
43 |
Creating a CIFS share........................................................................................................ |
45 |
Creating an NFS share and setting permissions..................................................................... |
47 |
5 Replication functions................................................................................. |
50 |
What is an appliance?............................................................................................................ |
50 |
How do I identify the IP address of a Service Set?.................................................................. |
51 |
Status tab.............................................................................................................................. |
52 |
Partner Appliances (Replication)............................................................................................... |
52 |
Target Appliances tab........................................................................................................ |
53 |
Source Appliances tab....................................................................................................... |
55 |
Contents 3
Source Appliance Permissions tab........................................................................................ |
56 |
Local Settings (Replication) tab................................................................................................. |
57 |
General settings tab........................................................................................................... |
58 |
Bandwidth Limiting tab....................................................................................................... |
59 |
Blackout Windows tab........................................................................................................ |
60 |
Event History (Replication) tab.................................................................................................. |
60 |
VT Mappings (Replication)....................................................................................................... |
61 |
Source and target library mappings..................................................................................... |
62 |
Running the replication wizard (virtual tape devices)............................................................... |
64 |
Recovering a Source Appliance (Virtual Tape devices)............................................................ |
67 |
NAS Mappings (Replication).................................................................................................... |
70 |
Source and target share details............................................................................................ |
71 |
Running the replication wizard (NAS)................................................................................... |
72 |
Recovering a Source Appliance (NAS shares)........................................................................ |
76 |
Reverse replication using the wizard................................................................................ |
76 |
Promoting a Target Share over the WAN using NAS......................................................... |
79 |
6 HP StoreOnce Catalyst functions................................................................. |
80 |
What is HP StoreOnce Catalyst?.............................................................................................. |
80 |
StoreOnce Catalyst terminology................................................................................................ |
81 |
StoreOnce Catalyst page......................................................................................................... |
81 |
StoreOnce Catalyst Status tab.............................................................................................. |
82 |
StoreOnce Catalyst Settings tab........................................................................................... |
83 |
StoreOnce Catalyst Clients tab............................................................................................ |
84 |
StoreOnce Catalyst Blackout Windows tab............................................................................ |
85 |
StoreOnce Catalyst Bandwidth Limiting Windows tab............................................................. |
86 |
Catalyst Stores page............................................................................................................... |
87 |
Store details tab................................................................................................................ |
88 |
Permissions tab (administrators only)..................................................................................... |
90 |
Item summary tab.............................................................................................................. |
90 |
Data jobs tab.................................................................................................................... |
92 |
Outbound copy jobs tab..................................................................................................... |
95 |
Inbound copy jobs tab........................................................................................................ |
99 |
System information messages............................................................................................. |
103 |
7 Housekeeping function............................................................................ |
105 |
The Housekeeping page........................................................................................................ |
105 |
Configuring blackout windows................................................................................................ |
108 |
Pausing housekeeping........................................................................................................... |
108 |
8 StoreOnce reporting............................................................................... |
110 |
Activity report....................................................................................................................... |
110 |
Reporting page.................................................................................................................... |
111 |
9 Storage Reporting.................................................................................. |
113 |
Storage Report..................................................................................................................... |
113 |
10 Access and Device Configuration............................................................ |
114 |
Device Configuration page.................................................................................................... |
114 |
User Management................................................................................................................ |
114 |
To add a user (Admin only)............................................................................................... |
115 |
To add a group (Admin only)............................................................................................ |
116 |
To modify a user.............................................................................................................. |
117 |
To delete a user or group (Admin only)............................................................................... |
118 |
Email.................................................................................................................................. |
118 |
Test email....................................................................................................................... |
119 |
Events (Email).................................................................................................................. |
119 |
4Contents
To manage email notifications........................................................................................... |
120 |
|
Support |
Ticket...................................................................................................................... |
120 |
Data |
collection................................................................................................................ |
121 |
Collect Data............................................................................................................... |
122 |
|
Download data collection............................................................................................ |
122 |
|
Delete data collection.................................................................................................. |
123 |
|
11 Events.................................................................................................. |
|
124 |
To delete events from the log.................................................................................................. |
124 |
|
12 Basic troubleshooting............................................................................ |
126 |
|
Accessing the CLI................................................................................................................. |
126 |
|
Password problems............................................................................................................... |
126 |
|
Pulling a Support Ticket......................................................................................................... |
126 |
|
Licensing |
problems............................................................................................................... |
127 |
Multiple users....................................................................................................................... |
127 |
|
Connecting to the StoreOnce Backup system from the backup application.................................... |
127 |
|
Timeout problems with NAS CIFS shares.................................................................................. |
127 |
|
NFS State handle error.......................................................................................................... |
128 |
|
If backup or replication fails................................................................................................... |
128 |
|
Catalyst |
troubleshooting........................................................................................................ |
129 |
Performance......................................................................................................................... |
129 |
|
StoreOnce Backup system configuration problems..................................................................... |
129 |
|
Upgrade licenses.................................................................................................................. |
129 |
|
13 Advanced troubleshooting...................................................................... |
131 |
|
Software update process....................................................................................................... |
131 |
|
If the HP StoreOnce Backup system runs out of disk space.......................................................... |
131 |
|
Reduced performance using Data in Flight Encryption................................................................ |
131 |
|
14 SNMP................................................................................................. |
132 |
|
SNMP (Configuration)........................................................................................................... |
132 |
|
HP Systems Insight Manager............................................................................................. |
132 |
|
15 Key Parameters..................................................................................... |
137 |
|
StoreOnce VSA Backup......................................................................................................... |
137 |
|
16 Support and other resources................................................................... |
138 |
|
Contacting HP...................................................................................................................... |
138 |
|
Subscription service.......................................................................................................... |
138 |
|
Related information............................................................................................................... |
138 |
|
Websites........................................................................................................................ |
138 |
|
Typographic conventions....................................................................................................... |
139 |
|
Customer self repair.............................................................................................................. |
139 |
|
A Upgrading to StoreOnce software, version 3.11.x........................................ |
141 |
|
Previous networking models................................................................................................... |
141 |
|
Network model with StoreOnce software version 3.11.0 and later................................................ |
142 |
|
Bonding modes............................................................................................................... |
142 |
|
VLAN subnets with HP StoreOnce Backup................................................................................ |
143 |
|
VLAN guidelines.............................................................................................................. |
143 |
|
Example network environment........................................................................................... |
144 |
|
Updating to StoreOnce 3.11.0 software.................................................................................... |
144 |
|
Worked example ................................................................................................................. |
144 |
|
View current configuration................................................................................................. |
145 |
|
Modifying the current configuration.................................................................................... |
146 |
|
Best practise............................................................................................................... |
146 |
|
To add a third subnet ...................................................................................................... |
147 |
|
To add VLAN subnets....................................................................................................... |
147 |
|
Contents 5
To modify the existing 10GbE portset and add a VLAN subnet.......................................... |
147 |
To create a new portset that is VLAN enabled and add a VLAN subnet.............................. |
148 |
To add IP addresses to a subnet......................................................................................... |
148 |
To add Data in Flight Encryption........................................................................................ |
149 |
License requirements.................................................................................................... |
149 |
Configuring the client................................................................................................... |
149 |
Configuring the StoreOnce Backup system...................................................................... |
149 |
Configuring IPsec on the media server........................................................................... |
150 |
Encryption with replication........................................................................................... |
150 |
B Regulatory information............................................................................ |
151 |
Belarus Kazakhstan Russia marking......................................................................................... |
151 |
Turkey RoHS material content declaration................................................................................. |
151 |
Ukraine RoHS material content declaration.............................................................................. |
151 |
Warranty information............................................................................................................ |
151 |
Index....................................................................................................... |
153 |
6Contents

1 Getting started
The following topics are covered in this chapter:
•This guide (page 7)
•Overview of HP StoreOnce Backup products (page 7)
•User types and user roles (page 7)
•Navigating the StoreOnce Graphical User Interface (GUI) (page 9)
•Navigating the online help (page 10)
•The StoreOnce CLI (page 12)
•Licensing (page 12)
This guide
This guide contains detailed information on using the StoreOnce GUI and includes some Command Line Interface commands and troubleshooting information.
•Tasks available only in the StoreOnce GUI are described only in this guide.
•Tasks available in both the GUI and CLI are described in this guide. (The CLI command is described in greater detail in the HP StoreOnce Backup system CLI Reference Guide.)
•Tasks only available in the CLI are described fully in the HP StoreOnce Backup system CLI Reference Guide. Those tasks may not be described in this guide.
Overview of The HP StoreOnce Backup system
The HP StoreOnce VSA extends the StoreOnce portfolio with the agility and flexibility of StoreOnce as a virtual appliance. Install into an existing vSphere (v5.x) environment without the need for dedicated hardware. Once installed and powered on, StoreOnce VSA is used by backup and recovery applications as a backup target in the same way as physical StoreOnce appliances.
StoreOnce VSA can be deployed using either SEM or via a vSphere client specific hardware. The StoreOnce VSA is available to purchase by license, which includes HP StoreOnce Catalyst and Replication support.
The StoreOnce VSA model, TC458A and D4T77A:
•Description: A virtual machine with ten 1TB disks
•Ports: 2 x 1GBE ports
•Storage expansion: Up to ten virtual disks of 1TB
•Interfaces supported: iSCSI only
User types and user roles
User roles
Two roles define the permissions associated with a user; admin and user. Two default user accounts, one for each role, are created automatically when the system is installed:
•Administrator: Authorized users can create and edit management and StoreOnce functions via the GUI and CLI. The default login and password are Admin and admin. The permissions role of the Administrator is admin. You cannot delete this account, but you can and should modify its password. Note that once the Admin account password has been changed, its password cannot be changed back to admin as this password is not sufficiently complex. The
This guide |
7 |

only way to revert that password back to admin is via the HPresetpassword account which is only available on the local console of the device.
•Operator: This account limits access to the GUI and CLI to monitoring and viewing. The default login and password are Operator and operator. The permissions role of the Operator is user.
User types
After installation, an Administrator can configure additional user accounts and assign permissions roles (admin or user) and passwords to these users. See the HP StoreOnce Backup system user guide.
There are three types of user accounts:
•Local User (with an administrator or user permissions role): Local users log in locally.
•External User (with an administrator or user permissions role): User logs in as a domain user. An external user is a Microsoft Active Directory user.
•External Group (with an administrator or user permissions role): An external user is a Microsoft Active Directory group. Members of the group log in as domain users. If after creating a group you then set up a member of that group as an individual user (external user) and give them an administrator role, that user will be an administrator, even if the group role is set to user. This is because role permissions set through Add User take precedence over role permissions set through Add Group.
Any user with an admin role has the same permissions as the default Administrator. Any user with a user role will have the same permissions as the default Operator.
NOTE: To add external users or groups, first add the StoreOnce device to an AD domain. Connection to an AD Domain is configured through the NAS CIFS server tab on the StoreOnce GUI. See Configuring CIFS Server with AD and CIFS Share with AD domain users (page 34).
IMPORTANT: If Admin credentials are lost, the Admin password can be reset through the account “HPresetpassword”. This account is password protected and is only accessible from the StoreOnce console and CLI. HP recommends the end-user change the HPresetpassword password after installation and store it in an offline Password Security tool.
Tip
To identify current user rights view the title bar of the GUI. This shows your user Type, Name, and Role. See (page 10).
Powering off and on
HP recommends using the CLI commands to power off and on the system instead of using the “power off” and “power on” controls on the hypervisor. See the HP StoreOnce VSA Deployoment and Configuration guide for more information.
Deployment of the Virtual Storage Appliance
HP StoreOnce VSA is a software-only version of the HP StoreOnce Backup System. Packaged as a virtual appliance, it can be deployed and run on a vmware vSphere hypervisor (v5.x) or Hyper-V Manager installed by the customer. Once deployed, the customer has access to web management via the StoreOnce GUI or command line management via the CLI. The StoreOnce VSA Backup System supports 10 x 1 TB virtual disks.
8Getting started

The customer is able to create the following backup target devices on the HP StoreOnce VSA:
•Catalyst stores
•iSCSI VT libraries
•CIFS NAS shares
The virtual appliance is fully compatible with StoreOnce hardware products for replication and Catalyst Copy functions and is fully integrated within HP StoreOnce Enterprise Manager, both for ease of management and for ease of deployment.
There are two methods of deployment:
•Using Hyper-V Manager
•Using vSphere Client (v5.x)
Instructions for deployment are in the HP StoreOnce VSA Deployment and Configuration guide. Please consult the guide to deploy your StoreOnce VSA backup system.
Navigating the HP StoreOnce Graphical User Interface (GUI)
The HP StoreOnce GUI and CLI together make up the Management Console. While there is overlap in what operations you can perform, not all operations are available from both interfaces.
The HP StoreOnce GUI is the main interface for:
•Monitoring the status and health of the HP StoreOnce Backup system and all configured backup devices
•Creating and modifying VTL and NAS StoreOnce backup targets and Catalyst stores
•Managing replication relationships and housekeeping
To run the StoreOnce GUI
Log on to the StoreOnce GUI using a browser on any machine connected to the management network; see “User types and user roles” (page 7) for default login information. The HP StoreOnce Backup system uses a secure network connection.
Enter: https://<IP_address> .
NOTE: Entering http: in the URL path will automatically forward to the https: secure network connection.
The StoreOnce GUI displays the Login prompt.
NOTE: The web browser requires Active Scripting or JavaScript enabled. If both are disabled, some browser buttons may not be displayed.
Navigating the HP StoreOnce Graphical User Interface (GUI) |
9 |

GUI components
The GUI includes:
•Title bar: Displays the HP StoreOnce Backup system model, the user name and role, and contains the Logout and Help buttons.
NOTE: After 15 minutes of inactivity, the session times out and returns to the Login screen.
•System Status (top left side panel): Displays the last time the system was updated (the machine time) and a count of event status categories.
The three icons described below are used in the System Status area. They do not identify the event that has affected the status. To view the individual events for more detail, select Events from the Navigator, as described in Events (page 124).
Indicates standard information.
Indicates a warning state. Attention is needed but the error is not critical to the successful operation of the device. For example, a single disk failure occurs or disks are installed in an expansion shelf but not licensed.
Indicates a critical state. The system requires immediate attention. This icon may also appear in the Details area of the screen with a red square background (rather than a red circle).
•Navigator (left side panel): Displays available GUI topics and enables navigation to selected topic pages. A + sign next to a topic indicates additional options; click + to expand the selection and click — to contract the selection.
•Topic page (main window): Initially, the main window displays the top-level StoreOnce topic page. Select another topic from the Navigator to display the page for that selection. Some Topic pages require selection of an item, such as a library, NAS share, or Catalyst store in the top half of the page to display details specific to the selected item in the lower half of page. Some Topic pages include multiple tabs within the page, for example the VTL—Libraries page. Select a tab to display information and actions appropriate to that tab.
Navigating the online help
The Help link in the top right-hand corner of each page displays context-sensitive information for the current page.
10 Getting started

The following example displays the Help when selected from the NAS Mappings page.
•Click and drag on a side or a corner to expand or contract the Help window.
•The header displays the page where the help was called. Links navigate to the next or previous pages; the titles of the next and previous pages are beneath the respective links.
•The footer also provides navigation options. Select home to access the help Home page which provides access to the complete online help and Contents, Search, and Index options. Resize the page to view all of the content.
Navigating the online help |
11 |

The StoreOnce CLI
The StoreOnce Command Line Interface (CLI) provides an alternative way of administering and monitoring the system. Some tasks are only accessible from the StoreOnce CLI.
StoreOnce CLI commands require an SSH client application (freely available from the internet) and must be run from a SSH terminal session as described in Accessing the CLI (page 126).
See the HP StoreOnce Backup system CLI Reference Guide for more information about the StoreOnce CLI commands.
Licensing
HP StoreOnce VSA has a single license that enables StoreOnce Catalyst and Replication. The license also includes the security features of Data at Rest Encryption, Data in Flight Encryption, and Secure Erase.
Security Features
The security features of Data at Rest Encryption, Data in Flight Encryption, and Secure Erase are part of the VSA license.
NOTE: StoreOnce replication can be encrypted at the Network layer. This feature is included in the Security license. See the HP StoreOnce Backup system CLI Reference Guide for more details; review the networking configuration commands such as net add encryption.
Data at Rest Encryption
When enabled, the Data at Rest Encryption security feature protects data at rest on a stolen, discarded, or replaced disk from forensic attack.
Creation of a new VTL library, Catalyst store, or NAS share provides the option to enable encryption if the license was already applied. Once enabled, encryption will automatically be performed on the data before it is written to disk. Encryption cannot be disabled once it is configured for a library, Catalyst store, or NAS share.
When creating an encrypted library, Catalyst store, or NAS share, the key store is updated with the encryption key. This key store may be backed up and saved securely offsite in case the original key store is corrupted. However, keep only the latest version of the key store as a backup. The key store on the StoreOnce Backup system is updated each time you create a library, Catalyst store, or NAS share. The StoreOnce CLI command that backs up the key store also encrypts it, ensuring it can only be decrypted by the HP StoreOnce backup system.
NOTE: Each configured library, Catalyst store, or NAS share uses a different key. The StoreOnce software automatically tracks which key is relevant to which device in the Key Store File. Keys are automatically re-applied to the correct device if the key store file is restored.
IMPORTANT: Be very diligent about backing up your keystore if you are creating encrypted stores or libraries. See the HP StoreOnce Backup system CLI Reference Guide for more information about the StoreOnce CLI commands for backing up and restoring key stores.
Data in Flight Encryption
When enabled, the Data in Flight Encryption security feature protects data that is in transit from forensic attack using the IPsec protocol. The data can be moving between two StoreOnce Backup appliances or a StoreOnce Backup appliance and a backup server.
Data in Flight Encryption is configured using the net [add/modify/delete] encryption commands in the CLI; see the HP StoreOnce Backup system CLI Reference Guide for more information.
12 Getting started

Secure Erase
Secure Erase can be enabled for all store types. This feature enables allows secure erasure of data that was backed up as part of a regular backup job. The Secure Erase feature can only be enabled after store or library creation (edit the store or library to enable Secure Erase). All data written to disk once Secure Erase is enabled will be securely erased upon data deletion. For example, you may have unintentionally backed up confidential data and need to be sure that it has been securely erased. Work with the backup application to trigger the Secure Erase, for example by forcing the format of a cartridge. The backup application sends the request to delete the data and the deletion is carried out as part of the Housekeeping function.
WARNING! To immediately remove data, ensure the backup application is configured correctly. Rotation and retention policies may need to be revisited to ensure that the data is expired.
NOTE: The Secure Erase process may take some time depending on the Housekeeping workload.
Only chunks not referenced by any other items can be securely erased. If a chunk is referenced by another item which is not marked for Secure Erase, then the referenced chunk will not be erased, securely or otherwise. Use the backup application when performing a Secure Erase on stores, shares, or libraries that have Secure Erase enabled.
Security Features 13

2 StoreOnce functions
The following topics are covered in this chapter:
•Overview of the HP StoreOnce page (page 14)
•System information and status (page 14)
Overview of the HP StoreOnce page
The initial page at GUI logon provides important information about system status and processes that are running (see System information and status (page 14)).
It also provides access to individual StoreOnce functions, which are available as sub topics (click + to display them in the Navigator).
•VTL (Virtual Tape Libraries) functions (page 16)
•NAS functions (page 30)
•Replication functions (page 50)
•HP StoreOnce Catalyst functions (page 80)
•Housekeeping (page 105)
•StoreOnce reporting (page 110)
System information and status
System information
This section provides information unique to an individual HP StoreOnce Backup system.
Table 1 System information parameters
Parameter |
Description |
Type |
The model of StoreOnce Backup system. |
Name |
The name of the StoreOnce Backup system. |
Serial Number |
The serial number of the StoreOnce Backup system (use this number when contacting HP |
|
Support). |
Software Revision |
The software revision running on the StoreOnce Backup system. |
IP Address |
The IP addresses configured for the StoreOnce Backup system. This is the IP address that |
|
you should use when targeting backups and setting up replication mappings and Catalyst |
|
jobs. |
|
If vLAN tagging has been configured on your network, there is an option to expand the |
|
list so that you can see all the vLAN IP addresses that have been configured. For more |
|
information about vLAN tagging, see your product’s HP StoreOnce Backup system |
|
Installation and Configuration guide. |
14 StoreOnce functions

 Table 1 System information parameters (continued)
Parameter Description
HP StoreOnce VSA Backup systems may have up to two IP addresses depending on how the network is configured. See the HP StoreOnce VSA Deployment and Configuration guide for more information.
Status
This section provides details about the rolled-up system status of the system and the status of the services running.
Table 2 Status parameters
Parameter |
Description |
Overall Status |
The state of the system. |
StoreOnce Subsystem |
The status of the background support processes such as EventManager and |
|
ResourceManager. |
Virtual Tape |
The status of the VTL service. |
NAS |
The status of the NAS service. |
StoreOnce Catalyst |
The status of the StoreOnce Catalyst service. |
Replication |
The status of the Replication service. |
Housekeeping |
The status of the Housekeeping service. |
System information and status 15

3 VTL (Virtual Tape Libraries) functions
The following topics are covered in this chapter:
•VTL page (page 16)
•Libraries page (page 16)
•Make Replication Target libraries visible to the host (page 28)
VTL Configuration page
Select VTL from the HP StoreOnce menu to display the current VTL configuration.
The HP StoreOnce–VTL page includes the following tabs:
•iSCSI Settings tab (page 16)
NOTE: Equivalent StoreOnce CLI commands are available for the tasks described in this section. See the HP StoreOnce Backup system CLI Reference Guide.
iSCSI Settings tab
By default, a new library is automatically created whenever a new server first connects to the HP StoreOnce Backup system using the iSCSI initiator. Users with an Admin login may use this page to disable this feature.
Click Edit and make sure the Auto Creation Enabled box is unchecked.
Libraries page
Click VTL — Libraries in the Navigator panel to display existing libraries.
The top half of the Libraries page shows all libraries configured for the appliance. Click on a library to display its details in the lower half of the page. Users with an Admin login may edit these settings and delete or create libraries.
The lower half of the Libraries page contains tabs that display information relevant to the selected library:
•Device details tab (page 17)
•Interface information tab (page 22)
•Cartridges tab (page 23)
16 VTL (Virtual Tape Libraries) functions

Working with the Libraries list (top half of page)
The Libraries list in the top half of the page provides columns of details.
•To sort the list according to a column, click on the column heading and select Sort Ascending or Sort Descending.
•To hide or show columns, click on any column heading, select Columns and uncheck or check the preferred columns.
•Users with an Admin login may also create libraries. Click Create. See Create a library (page 19) for more information.
•Users with an Admin login may edit details on some of the tabs for individual libraries (not all tabs have editable information). The relevant GUI buttons are on the tab. For example, each Edit button shall trigger edit mode only for the current tab. When in edit mode, each tab shall have its own Update and Cancel buttons. If a user changes tab while in edit mode a warning dialog advises that any changes they have made will be lost.
The Delete button is on the Device Details tab only and will delete the entire library.
Table 3 Libraries parameters (top half of page)
Parameter |
Description |
Name |
Identifies the selected device (library). HP recommends usnig a name that identifies the |
|
host or backup job with which it is associated. |
Replication Role |
The role of the library, which may be non-replicating, replication source or replication |
|
target. |
Status |
The status of the library, which may be online, offline, notstarted, failed to start, stopping, |
|
creating, or deleting. |
Connection |
Indicates whether the library is connected. Possible values are: Connected – A client |
|
device is connected to any device (robotics or drive) within this library. Not Connected |
|
– No device is connected to this library. |
Device Type |
The emulation type used by the backup software. It is selected when you create a device. |
Cartridges / Slots |
The number of cartridges or slots available on the device, which is determined by the |
|
Emulation types for tape device selected when the device was created. You can reduce |
|
the number of slots in the Device Details tab for a library selected on this page, but this |
|
will only remove the highest empty slots. Once it reaches a slot number that contains |
|
data, it will not allow you to reduce the number further on this page, even if earlier slots |
|
are blank. You must first use the Cartridges tab to make the slot empty. |
Port |
Identifies the port to which the host is connected for backup and restore. The number of |
|
ports available in the drop-down menu depends upon the interfaces that your model |
|
supports and your network configuration. |
|
There is always one iSCSI port. |
User Data Stored |
The amount of user data stored on the library. |
Size On Disk |
The actual size used on disk (after deduplication). |
Dedupe Ratio |
The deduplication ratio achieved on the data on the library. If deduplication is disabled, |
|
the column displays “Dedupe Disabled.” |
Device Details tab
This tab displays device-specific information for the selected library.
Users with an Admin login may perform the following tasks from this tab:
•Create a library (page 19)
•Edit a library (page 20)
Libraries page 17

•Delete a library (page 21)
•Make Replication Target libraries visible to the host (page 28)
Table 4 Device Details tab
Field |
Description |
Library Name |
The name used to identify a particular library. Enter a name that identifies the host or backup |
|
job with which it is associated. |
Emulation Type |
The emulation type of the library. The HP StoreOnce Backup system supports a number of |
|
emulation types. . See also Emulation types for tape device (page 21). The emulation type |
|
determines the available embedded drives and cartridge slots. For example, if you select |
|
HP MSL G3 Series (2x24), the device emulates an MSL 2024 Library with two embedded |
|
tape drives and a possible total of 24 cartridge slots. Consult your backup application |
|
technical support information for information about device types they support. |
Drive emulation |
The drive emulation type, HP LTO–2, 3, 4, 5 or 6, determines the default capacity of the |
|
cartridges within the library device and the iSCSI inquiry string information provided to the |
|
backup application. Tape cartridge capacities can be increased at any time (but not |
|
decreased), as long as the cartridge is blank, regardless of the drive emulation generation |
|
number. |
|
If you selected D2DBS Generic for the Library Emulation Type, Ultrium VT is an option for |
|
drive emulation. This is a generic Ultrium device which is clearly identifiable as virtual. |
|
Where supported by the backup application, HP recommends that D2DBS Generic and |
|
Ultrium VT are used in preference to the other emulation types. |
|
All drives on a library configured with the IBM-TS3500 emulation type will use the IBM-LTO3 |
|
drive emulation type. If the library is then changed to a different emulation type, the drives |
|
will change to the new emulation type. |
|
If you edit this field, the new setting applies only to the next drives that are created within |
|
the library, it is not retrospectively applied to existing drives. |
Total Number of |
Define the number of cartridge slots in the library. The number of slots available depends |
Cartridge Slots |
upon the Emulation Type selected. Each slot is automatically populated with a new cartridge |
|
upon creation. The cartridge capacity corresponds to the Drive Emulation type. |
|
You can change the maximum size of the cartridge as long as it is blank. This means that |
|
the value can only be changed after the device is created and before it is accessed by the |
|
backup application. |
Number of Drives |
The default number of drives is determined by the Emulation Type selected. If increasing the |
|
number of drives, DO NOT exceed the maximum number of libraries and drives that a host |
|
can physically access: see StoreOnce key parameters (page 137). The number of drives can |
|
only be edited during library creation from this field. After library creation, there is a separate |
|
button to Add/Remove drives. |
Deduplication |
Enables deduplication if the check box is selected (default); unselect to create a |
|
non-deduplication library. Deduplication cannot be enabled or disabled once the library is |
|
created. |
Creation Time |
The date the library was created is generated automatically. |
Media Changer Port |
Identifies the port on the HP StoreOnce Backup system to which the device is connected. |
|
This will be the port used for the Library device as well as the default port for embedded |
|
tape drives. The number of ports available in the drop-down menu depends upon the |
|
interfaces that your model supports and your network configuration. |
|
There is always one iSCSI port. |
18 VTL (Virtual Tape Libraries) functions

 Table 4 Device Details tab (continued)
Field Description
Number of Barcode |
Enables configuration of the barcodes for the library to display six or eight characters. The |
Characters |
HP StoreOnce Backup system generates barcodes automatically for cartridges. When entering |
|
a barcode manually, 8 characters are required. If the 6–character barcode is selected, the |
|
StoreOnce Backup system will truncate to the top six characters, removing the top two |
|
characters of an 8–character barcode, i.e. barcode 1ABCDEFG will truncate to BCDEFG. |
|
The barcode is displayed with the truncated characters in brackets on the Cartridges tab, |
|
(1A)BCDEFG. |
Encryption Enabled |
Enables Data at Rest Encryption if you applied a Security license. Encryption cannot be |
|
enabled or disabled once a library is created; it can only be enabled at library creation. If |
|
enabled, encryption is performed prior to writing data to disk for this library. The correct |
|
license must be applied to enable encryption. |
Secure Erase Mode |
Enables Secure Erase if you have applied the Security license. “None” leaves it disabled |
|
(default). To enable, select the number of preferred Overwrite Passes (1, 3, 5, or 7). This is |
|
the number of times the data is written over after deletion. See “Secure Erase” (page 13) |
|
for information about the Secure Erase feature. |
Backup Application |
The backup application used on the system. This optional field is provided to assist with |
|
support troubleshooting and has no impact on performance or deduplication efficiency. |
Data Type |
The type of data being protected by the backups. This optional field is provided to assist |
|
with support troubleshooting and has no impact on performance or deduplication efficiency. |
iSCSI Initiator Name |
This is the Initiator Node Name of the host that will back up to this device. You must enter |
(iSCSI devices only) |
it manually when you are creating a new device. If you are using the Microsoft iSCSI Initiator, |
|
you can find the name by running the iSCSI Initiator on the host and copying the Initiator |
|
Node Name from the General tab. |
NOTE: iSCSI multi-initiator mode is not supported.
To create a new library (administrators only)
HP recommends:
•Only configure the libraries that you need
•Only configure the number of cartridges that you are likely to need
NOTE: Refer to the HP StoreOnce Backup system Concepts and Configuration Guidelines, available on the HP Support web site, for guidelines on setting up a backup policy/job within backup applications. This document is helpful in determining the required number of libraries and cartridges.
You can add cartridge slots at a later date to expand the system and remove individual blank cartridges from a library without deleting the whole library.
1.To create a new library device for the host, click Create in the upper left corner of the screen.
2.Enter the appropriate details in the Device details tab (page 17).
To enable Data at Rest Encryption for the new library, configure it at this time by checking the Encryption Enabled box. This feature requires a license. If the license is not installed, an information message is displayed next to the check box stating Not Licensed. See “Security Features” (page 12) and “Licensing” (page 12) for more information.
NOTE: The Replication Wizard does not allow creation of an encrypted target library. If a replication target library needs encryption enabled, you must create the library on the target appliance before replication mapping to it.
Libraries page 19

3.Click Create. The Cartridges tab is only generated after the library is created. The information on the Interface Information tab is generated automatically.
NOTE: Once the library has been created, you can enable Secure Erase. See “Edit a library” (page 20) for more information.
Guidelines on creating libraries
The table below illustrates maximum configurations for libraries and drives, but this number may be limited if you have already created NAS shares and Catalyst stores. For more detailed device configuration examples see the HP StoreOnce Concepts and Configuration Guidelines.
Table 5 Maximum number of libraries and drives/slots per library
|
StoreOnce VSA |
Maximum drives per library/appliance (D2DBS and ESL |
16 |
emulation) |
|
Maximum cartridges per library (D2DBS and ESL emulation) |
96 |
Maximum cartridge size (GB) |
3200 |
To edit library details (administrators only)
It is possible to edit some, but not all, device details after creating a library.
•Delete cartridges by reducing the number of slots on the Devices page. This will only remove the highest-numbered empty slots. Once the Delete operation reaches a slot number that contains a cartridge, it will not allow further reduction on the Details page, even if previous slots are empty. To open previous slots first use the Cartridges tab to delete the cartridge from the slot.
•Changing the cartridge size (by changing the emulation type) on this page will only change newly-added cartridges; it does not change the size of cartridges that were already created.
•You can reduce the number of drives but, if you go to 0, the port setting will change to "No Port".
The Number of Drives field can only be edited during library creation. After library creation, there is a separate button to Add/Remove drives.
•You cannot change the library type to a type that has a smaller set of maximum values (e.g. number of cartridges) than is currently set.
•You cannot enable or disable deduplication.
•Once the library is created and the correct license is applied, the Secure Erase Mode box appears on the Device Details tab. The selection box defaults to None, meaning Secure Erase is disabled. To enable Secure Erase, select the preferred number of Overwrite Passes (1, 3, 5, or 7). If enabled, this feature allows you to securely erase confidential data that may have
20 VTL (Virtual Tape Libraries) functions
unintentionally been backed up as part of a regular backup job. See “Security Features” (page 12) and “Licensing” (page 12) for more information.
1.Select the device in the list to display its details and then click on Edit.
2.Amend details as appropriate and click Update to apply them.
To add/remove drives
1.Click Add/Remove drive.
2.The maximum number of drives is shown, below which you can edit the Number of Drives.
3.Click OK. If you provide an invalid value the text box will be surrounded in a red border.
To delete a library (administrators only)
Select the required device and then click Delete on the Device Details tab to delete it. You will be prompted to confirm deletion.
WARNING! All data on the device will be deleted. The library's deduplication store is also deleted. It may take some time to delete all the files and free space on the HP StoreOnce Backup system. If Secure Erase is enabled for this store, this data will be deleted securely.
Emulation types for tape devices
HP StoreOnce Backup systems emulate a range of physical tape devices listed in Emulation types.
Table 6 Emulation types for tape devices
Emulation type |
Description |
D2DBS Generic |
If supported by your backup application, this is the preferred emulation type because it does |
|
not emulate any physical library types in existence and is, therefore, clearly identifiable as |
|
a StoreOnce device. It is the most flexible emulation type available; however, backup |
|
application support varies by software vendor. |
|
If you have selected D2DBS Generic for the Library Emulation Type, you will be able to |
|
select Ultrium VT for the drive emulation. This is a generic Ultrium device which is clearly |
|
identifiable as virtual. Backup application support for Ultrium VT is common, but not quite |
|
as complete as the D2DBS library type, so its not possible to use it with all backup software. |
|
NOTE: Symantec prefers their customers use this emulation type with BackupExec and |
|
Netbackup. |
EML E Series |
An enterprise tape library solution that allows you to configure up to 500 drives and up to |
|
4096 cartridges per library (HP 4900 = up to 16384 cartridges per library). |
ESL E Series |
An enterprise tape solution that allows you to configure up to 500 drives and up to 4096 |
|
cartridges per library (HP 4900 = up to 16384 cartridges per library). |
IBM-TS3500 |
A tape library device that appears as a native IBM TS3500 device in a TSM environment |
|
to allow use of standard IBM drivers. The emulation type is configured at the library level. |
|
Therefore, all drives on a library configured with the IBM-TS3500 emulation type will use |
|
the IBM-LTO3 drive emulation type. If the library is then changed to a different emulation |
|
type, the drives will change to the new emulation type. |
MSL G3 Series (2x24) |
A tape library device with a maximum of two embedded Ultrium tape drives and 24 cartridge |
|
slots. It should be used when implementing rotation schemes which involve simultaneous |
|
backup jobs to two devices. This emulation type is widely supported by backup applications. |
Libraries page 21

 Table 6 Emulation types for tape devices (continued)
Emulation type |
Description |
MSL G3 Series (4x48) A tape library device with a maximum of four embedded Ultrium tape drives and 48 cartridge slots. It should be used when implementing rotation schemes which involve simultaneous backup jobs to more than two devices or those that use a large number of cartridges devices. This emulation type is widely supported by backup applications.
MSL G3 Series (8x96) A tape library device with a maximum of eight embedded Ultrium tape drives and 96 cartridge slots.
Flexible emulation
The ESL, EML and D2DBS emulations are particularly flexible because they allow you to configure a large number of drives per library. The main benefits are that a large number of drives allows:
•more concurrent streams on backups which are throttled due to host application throughput, such as multi-streamed backups from a database.
•a single library (and therefore deduplication store) to contain similar data from backups that must run in parallel to increase deduplication ratio.
If using these flexible emulation types, the following factors should also be considered:
•An important consideration when configuring VTL devices is that the library and each drive that you configure for it counts as a separate device. There are practical limitations on the number of devices that each host and Fibre Channel switch or HBA can access. See StoreOnce key parameters (page 137).
For iSCSI VTL devices, a single Windows or Linux host can only access a maximum of 64 devices. A single library with 63 drives is the most that a single host can access. Configuring a single library with more than 63 drives will result in not all devices in the library being seen (which may include the library device). The same limitation could be hit with multiple libraries and fewer drives per library.
•The total device value also applies to NAS shares and Catalyst stores. If you configure the full value as VTL devices, you will not be able to configure any NAS shares or Catalyst stores for that .
•Refer to the HP StoreOnce Backup system Concepts and Configuration Guidelines for maximum and recommended values.
Interface Information tab
This tab shows interface information for the media changer and drives on the selected library.
The information for the Interface Information tab is generated automatically and manual configuration is discouraged.
The following information is provided for a device that is configured to use the Fibre Channel interface.
iSCSI interface
The following information is provided for a device that is configured to use the iSCSI interface.
22 VTL (Virtual Tape Libraries) functions

Table 7 iSCSI Interface Information
Field |
Description |
Device Name |
The device name lists all of the devices for the specific Library. There will be an entry for the |
|
Medium Changer, and for each of the drives configured. |
Port |
This defines the port to which each media changer or drive is connected. |
Device Serial Number |
This is a unique serial number for the device. It is generated automatically by the HP |
|
StoreOnce Backup system and cannot be edited. |
World Wide Node |
This is provided when the device is created. |
Name |
|
iSCSI Target Name |
This is generated automatically by the HP StoreOnce Backup system for iSCSI devices. |
iSCSI Alias |
This is generated automatically by the HP StoreOnce Backup system for iSCSI devices. |
Active Connections tab
This shows the Session information of any active connections to the library; it displays information about open iSCSI sessions. All details are generated automatically and cannot be edited.
If a device is showing as not connected, this indicates that the iSCSI Initiator on the host has not logged on. Log on using the iSCSI Initiator and set the device as a Persistent Target for that host to ensure that it will automatically log on again whenever the host is rebooted.
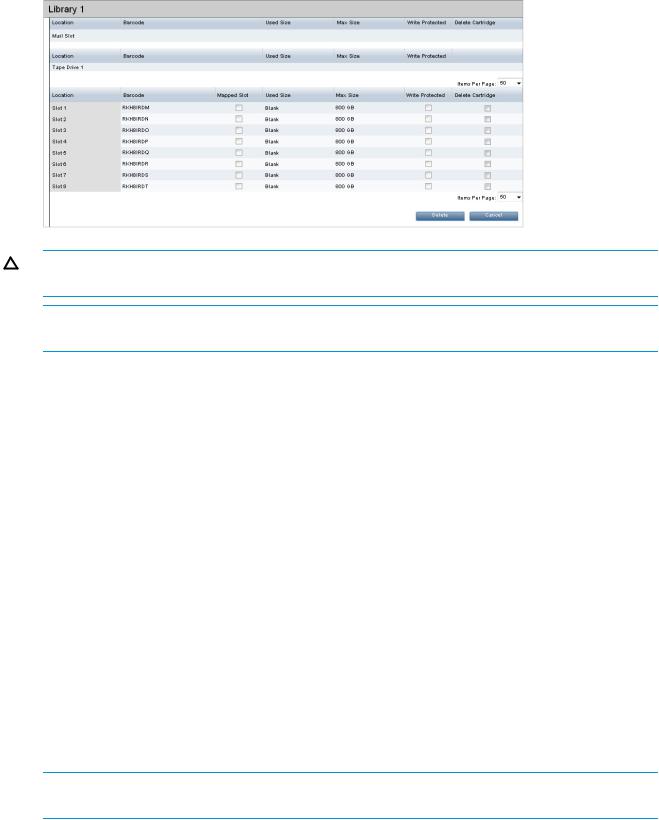
Cartridges tab
This tab shows cartridge information for the selected library.
Users with an Admin login can perform the following tasks from this tab:
•Create a cartridge (page 25)
•Delete a cartridge (page 25)
•Write protect a cartridge (page 26)
•Edit maximum cartridge size (page 27)
•Move or unload a cartridge (page 27)
Libraries page 23

Table 8 Cartridge tab parameters
Field |
Description |
Location |
Identifies each element of the library available to hold a cartridge. The types of elements |
|
are: |
|
• Mail slot: a dedicated slot used to hold a cartridge that is ready for exporting to or |
|
importing from physical tape. The Mail slot is not used with HP StoreOnce models. |
|
• Tape drive: populated when there is activity on a cartridge. You can move a cartridge |
|
into a tape drive by using the Move Cartridge drop-down menu in Edit mode. |
|
• Slot n: one of the standard library slots. |
Barcode |
A barcode is an 8– or 6–digit, alphanumeric, unique identifier for a cartridge within the HP |
|
StoreOnce Backup system. Barcodes are shared with the backup application upon request. |
|
The backup application can choose to assign its own internal identifier to the cartridge but, |
|
if it does so, the backup application cannot assign this identifier to the Cartridge barcode. |
|
Barcodes are generated automatically but may be edited by the user. When editing the |
|
barcode: |
|
• It must be unique and must not start with the letters “CLN” or “DG” because these are |
|
reserved designations for cleaning and diagnostic cartridges. |
|
• It should be a minimum of 6 characters. Valid ASCII characters are A-Z, a-z, 0–9. |
|
Barcodes are always displayed as 8 characters with letters in capitals on the StoreOnce |
|
GUI and CLI (padded with space characters) regardless of the size selected. However, |
|
if the Number of Barcode Characters is set to 6, only the rightmost 6 characters will be |
|
visible to the backup software, i.e. barcode 1ABCDEFG will truncate to BCDEFG. |
|
(Truncated barcode characters are shown in brackets in the Cartridges tab.) |
Mapped Slot |
Check box indicates whether the slot is included in a replication mapping configuration. It |
|
cannot be edited from this page. |
Used Size |
The actual used capacity in MB or GB. |
Max Size |
Defaults to the appropriate capacity for the drive emulation type selected on the Devices |
|
tab. This value may be changed if the Used Size is Blank, see below. The maximum value |
|
allowed is 3200 GB. |
Write Protected |
Check box that enables (checked) and disables (unchecked) write protection, see “Write |
|
protect a cartridge” (page 26). |
Last Written |
Identifies when the cartridge was last written to and is useful when identifying data for |
|
copying or exporting. |
NOTE: Additional columns appear when function buttons are selected below, such as Create, Move, and Delete.
24 VTL (Virtual Tape Libraries) functions

Empty slots
Empty slots are slots containing no cartridges and all the fields are empty.
•Tape drive row: A library consists of two devices: a tape drive and changer device. This location refers to the tape drive element of the library and is normally only populated when the backup application on the host is writing to or reading from the library.
•Mail slot row: This location is the slot used for importing and exporting cartridges from a library. It is provided by StoreOnce virtual libraries for compatibility with backup applications but is not used.
•Numbered slot row: This slot is empty after a Delete operation or after the backup application has moved data to the mail slot for export.
Once a numbered slot is empty, the Create button may be used to create a new blank cartridge.
To create a cartridge (administrators only)
NOTE: You can only create a cartridge in an empty slot.
Click the Create button. In the Add Cartridge column, empty slots are checked.
Select individual slots by clicking the appropriate check boxes. After selected the slots where cartridges should be added, click Create.
Alternatively, click Create all to create a blank cartridge of the size/emulation type selected when the library was first configured in all empty slots.
•If you create a cartridge in an empty slot, the backup application must inventory it (add it to its database or catalog) before the backup application can access the cartridge.
•If you create a cartridge in an empty mail slot, use the backup application to move the blank new cartridge to an empty cartridge slot without requiring an inventory. This saves processing time.
Restart the backup application services to see the new cartridges.
To delete a cartridge (administrators only)
To delete individual cartridges, select individual slots by clicking the appropriate check boxes in the Delete Cartridge column. Then click Delete.
Libraries page 25
CAUTION: A dialog is displayed, warning that all data will be lost and asking you to confirm the Delete action.
NOTE: You cannot delete cartridges that are currently in drives, that are mapped for replication, or that are in the delete pending, erase pending, or creating state.
If you click Cancel, the cartridges will not be deleted and you remain in delete mode. Click Delete to continue and the selected cartridges will be deleted. The GUI does not differentiate between cartridges with data and blank cartridges.
NOTE: You can also delete cartridges by reducing the number of slots on the Devices page, but this only removes the highest slots with no or blank cartridges. Once the Delete operation reaches a slot number that contains a cartridge with data, it will not reduce the number further on the Details page even if earlier slots are blank. First use the Cartridges tab to reconfigure the slots to a blank state.
To delete all or a range of cartridges (administrators only)
To delete all the cartridges in the library at once, click Delete All. This opens a window with several options:
•Delete — Remove cartridges (default): completely deletes the cartridges
•Erase — Erase cartridge data: deletes the data but leaves the cartridge configurations intact You can also determine which cartridges to delete or erase:
•All Cartridges
•Range: enter the first and last slot to be included in the delete or erase.
Finally, if you select the “Delete cartridges with data” check box, cartridges containing data will be deleted. If unselected, only blank cartridges are deleted. After all of the options are selected, click OK. A confirmation box appears; click OK.
NOTE: You cannot delete cartridges that are currently in drives, that are mapped for replication, or that are in the delete pending, erase pending, or create state.
To write protect a cartridge (administrators only)
1.Click Edit for the selected library.
2.Check the Write Protected check boxfor the cartridge(s).
26 VTL (Virtual Tape Libraries) functions

3.Click Update. Your backup application will not be able to write any more data to the cartridge(s).
To edit maximum cartridge size (administrators only)
The Max Size defaults to the appropriate capacity for the drive emulation type selected on the Devices tab, but this value is editable. The maximum value allowed is 3200 GB.
NOTE: The maximum size indicates the maximum amount of user data that can be written to that cartridge, assuming uncompressed data; it will only be committed when data is written to it. Changing the maximum space does not affect actual disk usage or save disk space but may be useful if you know you will be moving data to a physical tape with a smaller cartridge capacity.
1.Click Edit for the selected library.
2.Select a value from the drop-down menu, and click Update.
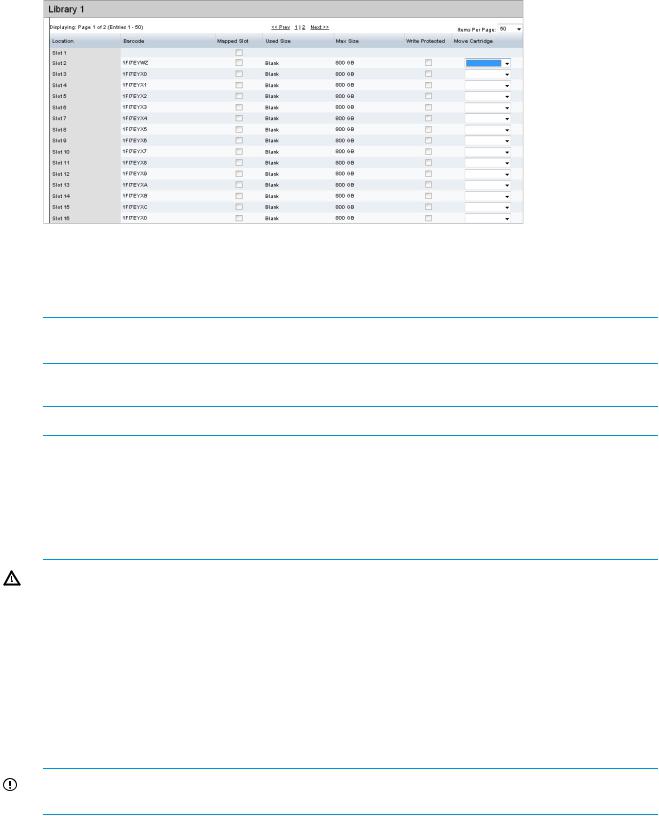
To move or unload cartridges
You can move cartridges, but only to an empty Location (tape drive or numbered slot).
•Click the Move button. The Move Cartridge drop-down menu lists available empty slots. (Empty numbered slots are created when a cartridge is deleted.)
•Use the Unload all Cartridges button to return all cartridges to default slots.
Libraries page 27
The move and unload options may be useful to re-align the library configuration against the backup application. For example, if the backup application has crashed or if the backup application does not support the Move Medium command, the library and the backup application can become out of sync.
NOTE: You cannot move or unload cartridges that are in the delete pending, erase pending, or create state.
Make Replication Target libraries visible to the host
NOTE: See Replication functions (page 50) for more details on replication configuration.
Replication Target libraries are not normally visible to the host, but you can configure devices to make them visible to backup applications. This allows the backup application to:
•Move cartridges from storage slots to drives in the library.
•Perform read and verify operations on the cartridge (but not write).
•Perform load/unload operations on the tape device.
WARNING! Use with care. If the backup application can see both source and target libraries, the application cannot distinguish between the source library and the target library because the barcodes are duplicated in the two locations.
Why make target libraries visible?
It may be useful to make a target library visible to the backup application on the host to:
•Confirm replication is working correctly and check the integrity of the replicated backup by doing a test restore.
•Perform manual tape copy jobs (sometimes called tape offload) to any tape device on the network using the backup application.
IMPORTANT: You cannot change data on a Target library cartridge; you may only load it temporarily into a physical tape device to read it.
28 VTL (Virtual Tape Libraries) functions

Best practices for using this feature
WARNING! Failure to follow best practices may cause instability and damage to your backup system and data. Cartridges can be marked as unusable or the backup application can attempt to write to target cartridges.
•Verify no replication jobs to the selected target cartridge are in progress.
•Verify no backup jobs to the mapped source cartridges are scheduled.
•Verify the backup application media server instance to be used is not within the same cell/domain that can access the source cartridge.
•Import the data on the target cartridge into the backup application (this operation must be repeated after each replicate operation to the cartridge).
•Perform the desired operation on the cartridge, which may be:
◦Verify the cartridge using the backup application either with a verify command or by performing a restore.
◦Copy the cartridge to a physical tape device connected to the media server.
How is a target device made visible?
1.Create the replication mapping as normal. See Running the replication wizard (virtual tape devices) (page 64), as appropriate.
2.From the host that has access to the target library on the VTL — Libraries page, select the target library in the Libraries list.
3.Click Edit.
4.The Port defaults to None. Select the appropriate iSCSI Port.
5.Click Update.
6.Make the target library visible from other hosts. Configure the Fibre Channel fabric to make the host visible. Target visibility persists even if the power fails or if the replication mapping is removed.
NOTE: To remove target visibility, reset the Port to None.
Make Replication Target libraries visible to the host 29

4 NAS functions
This page provides access to the following StoreOnce NAS functions:
•NAS Configuration (page 30), allows users to configure CIFS and NFS servers and permissions
•Shares (NAS) (page 43), allows users to view and manage NAS shares
NAS Configuration page
Select NAS from the StoreOnce menu item to display the NAS configuration page. Two tabs allow configuration of a CIFS Server or an NFS Server for the shares.
•The CIFS server provides CIFS interface shares that provide backup targets to Windows servers. See CIFS Server tab (page 30).
•The NFS server provides NFS interface shares that provide backup targets to UNIX and Linux servers. See NFS Server tab (page 42).
CIFS Server tab
There are two configuration stages when creating a backup target share that Windows users can access; both stages are implemented from the Web Management Interface:
•Configure authentication for the StoreOnce Backup system CIFS server. These settings then apply to the appliance and all NAS CIFS shares created on it.
•Create NAS CIFS shares on the HP StoreOnce Backup system. See Creating a CIFS share (page 45).
Configuring the CIFS server
1.Select NAS on the StoreOnce GUI.
2.Select the CIFS Server tab. It displays the authentication settings.
NOTE: The CIFS Server tab also shows the SMB Signing field. This feature improves security at the protocol level and will be available in an upcoming release.
3.Click Edit to modify the authentication settings.
Three authentication options provide different levels of security for CIFS NAS shares: None (default), User, and AD (Windows Active Directory). Before configuring the settings, determine the appropriate setting for the particular network and collect any additional information that may be required to complete the configuration.
NOTE: AD authentication joins the StoreOnce Backup system to an AD domain and is not unique to NAS shares. It is also required when adding external users or external groups from an AD domain to the StoreOnce Backup system, see User Management (page 114).
30 NAS functions
Loading...