


 Loading...
HP  800 Workstation
Maintenance and Service Guide
Copyright Information |
Warranty |
© Copyright 2009 Hewlett-Packard |
Hewlett-Packard Company shall not be liable |
Development Company, L.P. |
for technical or editorial errors or omissions |
|
contained herein or for incidental or |
|
consequential damages in connection with |
|
the furnishing, performance, or use of this |
|
material. The information in this document is |
|
provided “as is” without warranty of any kind, |
|
including, but not limited to, the implied |
|
warranties of merchantability and fitness for |
|
a particular purpose, and is subject to |
|
change without notice. The warranties for HP |
|
products are set forth in the express limited |
|
warranty statements accompanying such |
|
products. |
|
Nothing herein should be construed as |
|
constituting and additional warranty. |
|
This document contains proprietary |
|
information that is protected by copyright. No |
|
part of this document may be photocopied, |
|
reproduced, or translated to another |
|
language without the prior written consent of |
|
Hewlett-Packard Company. |
Trademark Credits
Microsoft, Windows, and XP are U.S. registered trademarks of Microsoft Corporation in the U.S. and other countries.
Intel is a trademark of Intel Corporation in the U.S. and other countries and are used under license.
ENERGY STAR is a U.S. registered mark of the United States Environmental Protection Agency.
504632-001
First Edition, March 2009

About this guide
This guide provides service and maintenance information for the HP  800 Workstation. It includes these topics:
Guide topics
Workstation overview on page 1
Setting up the operating system on page 18
Restoring the operating system on page 24
System management on page 30
Replacing components on page 62
Diagnostics and troubleshooting on page 164
Configuring RAID devices on page 202
Configuring password security and resetting CMOS on page 211
Connector pins on page 215
System board designators on page 225
Routine Care on page 227
Locating HP resources on page 229
ENWW |
iii |
iv About this guide |
ENWW |

Table of contents
1 Workstation overview |
|
Description ........................................................................................................................................... |
1 |
System board architecture ................................................................................................... |
1 |
Processor technology .......................................................................................... |
2 |
Memory technology ............................................................................................. |
2 |
Graphics .............................................................................................................. |
2 |
Expansion card slots ........................................................................................... |
2 |
Addition features ................................................................................................. |
2 |
Workstation components ..................................................................................................... |
3 |
Chassis components ........................................................................................... |
4 |
Front panel components ..................................................................................... |
5 |
Rear panel components ...................................................................................... |
6 |
Specifications ....................................................................................................................................... |
7 |
Physical characteristics ....................................................................................................... |
7 |
Environmental specifications ............................................................................................... |
8 |
Power supply description ..................................................................................................... |
9 |
Power supply voltages ........................................................................................ |
9 |
Power supply currents ....................................................................................... |
10 |
Power supply specifications .............................................................................. |
11 |
Power consumption and heat dissipation .......................................................... |
11 |
System fans ..................................................................................................... |
12 |
Resetting the power supply .............................................................................. |
12 |
Ensuring proper ventilation ................................................................................................ |
13 |
Features ............................................................................................................................................. |
13 |
ENERGY STAR Qualification ............................................................................................ |
15 |
EUP compliance mode ...................................................................................................... |
16 |
Enabling EUP compliance mode ....................................................................... |
16 |
Disabling EUP compliance mode ...................................................................... |
16 |
Accessibility ....................................................................................................................... |
16 |
Hyper-threading ................................................................................................................. |
17 |
Intel Turbo Boost Technology ............................................................................................ |
17 |
HP Cool Tools .................................................................................................................... |
17 |
2 Setting up the operating system |
|
Setting up the Microsoft operating system ......................................................................................... |
19 |
Installing or upgrading device drivers ................................................................................ |
19 |
Transferring files and settings to your Windows workstation ............................................. |
19 |
Setting up Red Hat Enterprise Linux .................................................................................................. |
20 |
ENWW |
v |
Installing with the HP driver CD ......................................................................................... |
20 |
Installing and customizing Red Hat-enabled workstations ................................................ |
21 |
Verifying hardware compatibility ....................................................................... |
21 |
Setting up Novell SLED ...................................................................................................................... |
21 |
Updating the workstation .................................................................................................................... |
21 |
Updating the workstation after first boot ............................................................................ |
21 |
Upgrading the BIOS ........................................................................................................... |
21 |
Determining current BIOS ................................................................................. |
22 |
Upgrading BIOS ................................................................................................ |
23 |
Upgrading device drivers ................................................................................................... |
23 |
3 Restoring the operating system |
|
Restore methods ................................................................................................................................ |
24 |
Ordering backup software .................................................................................................................. |
25 |
Restoring Windows Vista ................................................................................................................... |
25 |
Ordering the RestorePlus! media ...................................................................................... |
25 |
Restoring the operating system ......................................................................................... |
25 |
Restoring Windows XP Professional .................................................................................................. |
26 |
Creating RestorePlus! media ............................................................................................. |
26 |
Creating HP Backup and Recovery (HPBR) media ........................................................... |
27 |
Restoring the operating system ......................................................................................... |
28 |
Using RestorePlus! ........................................................................................... |
28 |
Using HPBR ..................................................................................................... |
28 |
Using the recovery partition .............................................................................. |
28 |
Restoring Novell SLED ....................................................................................................................... |
28 |
Creating restore media ...................................................................................................... |
28 |
4 System management |
|
BIOS ROM ......................................................................................................................................... |
30 |
The Computer Setup (F10) Utility ....................................................................................................... |
31 |
Computer Setup (F10) functionality ................................................................................... |
31 |
Accessing the Computer Setup (F10) Utility ..................................................................... |
33 |
The Computer Setup (F10) Utility menu ............................................................................ |
34 |
Workstation management .................................................................................................................. |
42 |
Initial workstation configuration and deployment ............................................................... |
43 |
Installing a remote system ................................................................................................. |
43 |
Replicating the setup ......................................................................................................... |
44 |
Copying a setup configuration to a single workstation ...................................... |
44 |
Copying a setup configuration to multiple workstations .................................... |
45 |
Updating and managing software ...................................................................................... |
46 |
HP Client Manager Software ............................................................................................. |
46 |
Altiris Client Management Solutions .................................................................................. |
46 |
System Software Manager ................................................................................................ |
47 |
vi |
ENWW |
Proactive Change Notification ........................................................................................... |
47 |
Subscriber's Choice ........................................................................................................... |
47 |
ROM Flash ......................................................................................................................... |
48 |
Remote ROM Flash .......................................................................................... |
48 |
HPQFlash .......................................................................................................... |
48 |
F10 Flash .......................................................................................................... |
48 |
FailSafe Boot Block ROM .................................................................................................. |
49 |
Recovering the workstation from Boot Block Recovery mode .......................... |
49 |
Workstation security .......................................................................................................... |
50 |
Asset tracking .................................................................................................... |
50 |
SATA hard disk drive security ........................................................................... |
51 |
DriveLock applications ...................................................................... |
52 |
Using DriveLock ............................................................................... |
52 |
Password security ............................................................................................. |
54 |
Establishing a setup password using Computer Setup (F10) |
|
Utility ................................................................................................. |
54 |
Establishing a power-on password using workstation setup ............ |
55 |
Entering a power-on password ........................................................ |
55 |
Entering a setup password ............................................................... |
56 |
Changing a power-on or setup password ......................................... |
56 |
Deleting a power-on or setup password ........................................... |
57 |
National keyboard delimiter characters ............................................ |
57 |
Clearing passwords .......................................................................... |
58 |
Chassis security ................................................................................................ |
58 |
Side access panel key lock .............................................................. |
58 |
Side access panel sensor (Smart Cover Sensor) (optional) ............. |
58 |
Cable lock (optional) ......................................................................... |
59 |
Fault notification and recovery ........................................................................................... |
60 |
Drive Protection System .................................................................................... |
60 |
ECC fault prediction .......................................................................................... |
60 |
Thermal sensors ............................................................................................... |
60 |
Dual-state power button ..................................................................................................... |
61 |
Changing the power button configuration ......................................................... |
61 |
5 Replacing components |
|
Warnings and cautions ....................................................................................................................... |
63 |
Service considerations ....................................................................................................................... |
64 |
Cautions, warnings and safety precautions ....................................................................... |
64 |
ESD information ................................................................................................................. |
64 |
Generating static ............................................................................................... |
64 |
Preventing ESD equipment damage ................................................................. |
65 |
Personal grounding methods and equipment ................................................... |
65 |
Grounding the work area ................................................................................................... |
66 |
Recommended ESD prevention materials and equipment ................................................ |
66 |
ENWW |
vii |
Tools and software requirements ...................................................................................... |
67 |
Special handling of components ........................................................................................ |
67 |
Cables and connectors ..................................................................................... |
67 |
Hard drives ........................................................................................................ |
68 |
Lithium coin cell battery ..................................................................................... |
68 |
Customer self-repair ........................................................................................................................... |
68 |
Removing and installing components ................................................................................................. |
69 |
Component locations ......................................................................................................... |
70 |
Disassembly order ............................................................................................................. |
72 |
Predisassembly procedures .............................................................................................. |
73 |
Cable lock (optional) .......................................................................................................... |
74 |
Side access panel .............................................................................................................. |
75 |
Removing the side access panel ...................................................................... |
75 |
Installing the side access panel ........................................................................ |
75 |
Airflow guide ...................................................................................................................... |
76 |
Removing the airflow guide ............................................................................... |
76 |
Installing the airflow guide ................................................................................. |
77 |
Expansion card support ..................................................................................................... |
77 |
Removing the expansion card support .............................................................. |
77 |
Installing the expansion card support ................................................................ |
79 |
Right side panel ................................................................................................................. |
80 |
Removing the right side panel ........................................................................... |
80 |
Installing the right side panel ............................................................................. |
80 |
Power supply ..................................................................................................................... |
80 |
Removing the power supply .............................................................................. |
80 |
Installing the power supply ................................................................................ |
81 |
Speaker ............................................................................................................................. |
81 |
Removing the speaker ...................................................................................... |
81 |
Installing the speaker ........................................................................................ |
82 |
Side access panel sensor (optional) .................................................................................. |
82 |
Removing the side access panel sensor ........................................................... |
82 |
Installing the side access panel sensor ............................................................. |
83 |
Power connections ............................................................................................................ |
84 |
Front bezel ......................................................................................................................... |
85 |
Removing the front bezel .................................................................................. |
85 |
Installing the front bezel .................................................................................... |
85 |
Front panel I/O cable assembly ......................................................................................... |
86 |
Removing the front panel I/O cable assembly .................................................. |
86 |
Installing the front panel I/O cable assembly .................................................... |
88 |
Power switch cable assembly ............................................................................................ |
90 |
Removing the power switch cable assembly .................................................... |
90 |
Installing the power switch cable assembly ...................................................... |
91 |
Optical bay filler tray .......................................................................................................... |
91 |
Removing a filler tray ........................................................................................ |
91 |
viii |
ENWW |
Installing a filler tray .......................................................................................... |
93 |
Optical disk drive ............................................................................................................... |
94 |
Removing an optical disk drive from the optical drive bay ................................ |
94 |
Installing an optical disk drive in the optical drive bay ....................................... |
96 |
Notice for Blu-ray optical drives ........................................................................ |
98 |
Blu-ray movie playback .................................................................... |
98 |
Blu-ray movie playback compatibility and update ............................. |
98 |
Slot load optical disk drive (optional) ................................................................................. |
99 |
Removing the slot load optical disk drive .......................................................... |
99 |
Installing the slot load optical disk drive .......................................................... |
102 |
Hard disk drive ................................................................................................................. |
105 |
Removing a hard disk drive from the hard drive bay ....................................... |
106 |
Installing a hard disk drive in the hard drive bay ............................................. |
107 |
Hard disk drive cable configuration ................................................ |
107 |
Installing a hard disk drive .............................................................. |
108 |
Removing a hard disk drive from the slot load optical bay .............................. |
111 |
Installing a hard disk drive in the slot load optical bay .................................... |
115 |
Removing a hard disk drive from the optical drive bay ................................... |
119 |
Installing a hard disk drive in the optical drive bay .......................................... |
121 |
Installing dual SFF hard drives in the optical drive bay .................................. |
123 |
Installing the hard drives ................................................................. |
123 |
Configuring the cabling ................................................................... |
125 |
Expansion card guide/front fan holder ............................................................................. |
126 |
Removing the expansion card guide/front fan holder ...................................... |
126 |
Installing the expansion card guide/front fan holder ........................................ |
129 |
System fans ..................................................................................................................... |
130 |
Removing the rear system fan assembly ........................................................ |
130 |
Installing the rear system fan assembly .......................................................... |
131 |
Installing a second front system fan ................................................................................ |
132 |
Memory fans .................................................................................................................... |
136 |
Removing the memory fans ............................................................................ |
136 |
Installing the memory fans .............................................................................. |
137 |
Memory ............................................................................................................................ |
138 |
DIMM installation guidelines ........................................................................... |
138 |
Supported DIMM configurations ...................................................................... |
138 |
BIOS errors and warnings ............................................................................... |
139 |
Removing a DIMM .......................................................................................... |
140 |
Installing a DIMM ............................................................................................ |
141 |
Required DIMM installation order ................................................... |
141 |
Installing the DIMM ......................................................................... |
142 |
Expansion card slot identification .................................................................................... |
144 |
Expansion card slot description ...................................................................... |
144 |
Expansion card configuration restrictions for power supplies ........................ |
145 |
Choosing an expansion card slot ..................................................................................... |
146 |
ENWW |
ix |
PCIe card ......................................................................................................................... |
147 |
Removing a PCIe card .................................................................................... |
147 |
Installing a PCIe card ...................................................................................... |
148 |
PCI card ........................................................................................................................... |
150 |
Removing a PCI card ...................................................................................... |
150 |
Installing a PCI card ........................................................................................ |
151 |
CPU heatsink ................................................................................................................... |
153 |
Removing the CPU heatsink ........................................................................... |
153 |
Installing the CPU heatsink ............................................................................. |
155 |
CPU ................................................................................................................................. |
157 |
Removing a CPU ............................................................................................ |
157 |
Installing a CPU .............................................................................................. |
158 |
System board ................................................................................................................... |
159 |
Removing the system board ........................................................................... |
159 |
Installing the system board ............................................................................. |
161 |
Battery ............................................................................................................................. |
161 |
Removing the battery ...................................................................................... |
161 |
Installing the battery ........................................................................................ |
163 |
Product recycling .............................................................................................................................. |
163 |
6 Diagnostics and troubleshooting |
|
Calling technical support .................................................................................................................. |
165 |
Locating ID labels ............................................................................................................................. |
165 |
Locating warranty information .......................................................................................................... |
166 |
Diagnosis guidelines ........................................................................................................................ |
167 |
Diagnosis at startup ......................................................................................................... |
167 |
Diagnosis during operation .............................................................................................. |
168 |
Troubleshooting checklist ................................................................................................................. |
168 |
HP troubleshooting resources and tools .......................................................................................... |
170 |
HP Help and Support Center ........................................................................................... |
170 |
E-support ......................................................................................................................... |
170 |
Troubleshooting a problem ............................................................................. |
170 |
Instant Support and Active Chat ..................................................................... |
170 |
Customer Advisories, Customer and Security Bulletins, and Customer |
|
Notices ............................................................................................................ |
171 |
Product Change Notifications .......................................................................... |
171 |
Helpful hints ..................................................................................................................... |
171 |
At startup ......................................................................................................... |
171 |
During operation .............................................................................................. |
172 |
Customizing the monitor display ..................................................................... |
172 |
Troubleshooting scenarios and solutions ......................................................................................... |
173 |
Solving minor problems ................................................................................................... |
173 |
Solving power supply problems ....................................................................................... |
174 |
Testing power supply ...................................................................................... |
174 |
x |
ENWW |
Solving diskette problems ............................................................................................... |
176 |
Solving hard drive problems ............................................................................................ |
177 |
Solving display problems ................................................................................................. |
179 |
Solving audio problems ................................................................................................... |
181 |
Solving printer problems .................................................................................................. |
182 |
Self-troubleshooting with HP Vision Field Diagnostics ..................................................................... |
183 |
Overview .......................................................................................................................... |
183 |
Downloading and accessing HP Vision Field Diagnostics ............................................... |
184 |
User interface .................................................................................................................. |
185 |
Survey tab ....................................................................................................... |
185 |
Test tab ........................................................................................................... |
187 |
Status tab ........................................................................................................ |
189 |
History tab ....................................................................................................... |
189 |
Errors tab ........................................................................................................ |
189 |
Help tab ........................................................................................................... |
190 |
Saving and printing information in HP Vision Field Diagnostics ...................................... |
191 |
Downloading the latest diagnostic utility .......................................................................... |
191 |
Diagnostic codes and errors ............................................................................................................. |
191 |
Diagnostic LED and audible (beep) codes ...................................................................... |
191 |
LED color definitions ........................................................................................................ |
195 |
POST error messages ..................................................................................................... |
196 |
7 Configuring RAID devices |
|
Maximum hard drive configurations ................................................................................................. |
202 |
Configuring SATA RAID devices ...................................................................................................... |
203 |
Attaching SATA HDDs .................................................................................................... |
203 |
Configuring system BIOS ............................................................................................... |
204 |
Creating RAID volumes ................................................................................................... |
205 |
Deleting RAID volumes .................................................................................................... |
206 |
Configuring SAS RAID devices ........................................................................................................ |
207 |
Supported configurations ................................................................................................. |
207 |
SAS RAID 0 configuration ............................................................................................... |
208 |
SAS RAID 1 configuration ............................................................................................... |
209 |
SAS RAID 1E configuration ............................................................................................. |
210 |
8 Configuring password security and resetting CMOS |
|
Preparing to configure passwords .................................................................................................... |
211 |
Resetting the password jumper ........................................................................................................ |
212 |
Clearing and Resetting the CMOS ................................................................................................... |
212 |
Using the CMOS Button .................................................................................................. |
212 |
Using the Computer Setup (F10) Utility to Reset CMOS ................................................. |
213 |
Appendix A Connector pins |
|
ENWW |
xi |
Appendix B System board designators |
|
Appendix C Routine Care |
|
General cleaning safety precautions ............................................................................................... |
227 |
Cleaning the workstation case ......................................................................................................... |
227 |
Cleaning the keyboard .................................................................................................................... |
227 |
Cleaning the monitor ....................................................................................................................... |
228 |
Cleaning the mouse ......................................................................................................................... |
228 |
Appendix D Locating HP resources |
|
Product information .......................................................................................................................... |
230 |
Product support ................................................................................................................................ |
231 |
Product documentation .................................................................................................................... |
232 |
Product diagnostics .......................................................................................................................... |
233 |
Product updates ............................................................................................................................... |
234 |
Index ................................................................................................................................................................. |
235 |
xii |
ENWW |

1 Workstation overview
This chapter presents an overview of workstation hardware components. It includes these topics:
Topics
Description on page 1
Specifications on page 7
Features on page 13
Description
The following sections describe workstation system board architecture and components, and includes these topics:
Topics
System board architecture on page 1
Workstation components on page 3
System board architecture
The following figure shows the system board block diagram.
Figure 1-1 System board block diagram
ENWW |
Description 1 |

 NOTE: The x1, x4, x8, and x16 designators describe the number of electrical PCIe lanes routed to an expansion slot. For example, x16(8) means that the expansion slot is mechanically a x16 length connector, with eight PCIe lanes connected.
Processor technology
This workstation uses the Intel® 5520 chipset to support the latest Quad Core Intel® Xeon™ processor 5500 Series, including processors up to 130W. These processors incorporate an integrated 3-channel memory controller, microarchitecture improvements, and large L3 cache to provide superior performance. The workstation uses the Intel QuickPath Interconnect (QPI) to connect the processors and I/O controllers with speeds up to 6.4 GT/s.
Memory technology
Workstation dual in-line memory modules (DIMMs) are based on DDR3 1333MHz technology, and are error checking and correcting (ECC)-protected. Six direct-attach memory channels—three per central processing unit (CPU)—enable low latency accesses and fast data transfer for improved performance. Configurations with one processor provide access to six DIMM slots, while the addition of a second processor provides access to six more DIMM slots, supporting a total system memory size up to 192GB (using 16GB DIMMs).
Graphics
This workstation supports PCIe Gen2 (PCIe2) bus speeds and can support dual PCIe Gen2 graphics cards in PCIe2 x16 slots. With the standard 850W power supply, the workstation an support up to two 150W graphics cards. A second graphics card may be supported in the second PCIe2 x16 slot, subject to overall system power limitations. With the optional 1110W power supply, the workstation can support up to two high power (~225W) graphics cards.
Expansion card slots
This workstation includes two Intel 5520 chips to provide a total of seven high-performance graphics and I/O slots. It eliminates the legacy PCI-X slot and implements a PCIe slot in its place. This implementation results in improved I/O bandwidth performance.
Addition features
Redundant array of independent disks (RAID) configurations for SATA support modes 0, 1, 5 and 10. eSATA (3.0 Gbps) is supported using an optional adapter. This workstation provides nine external and three internal USB 2.0 ports. The 850W power supply is 85% efficient, and the 1110W power supply is 89% efficient. Both power supplies enable Energy Star Version 5.0 system configurations. HP WattSaver technology enables support of the European Union EuP power limit of 1W in off mode. HP Quiet Fan Technology enables quiet system operation.
2 Chapter 1 Workstation overview |
ENWW |

Workstation components
This section describes workstation components, including front and , and includes these topics:
Topics
Chassis components on page 4
Front panel components on page 5
Rear panel components on page 6
For complete and current information on supported accessories and components, see http://partsurfer.hp.com.
ENWW |
Description 3 |
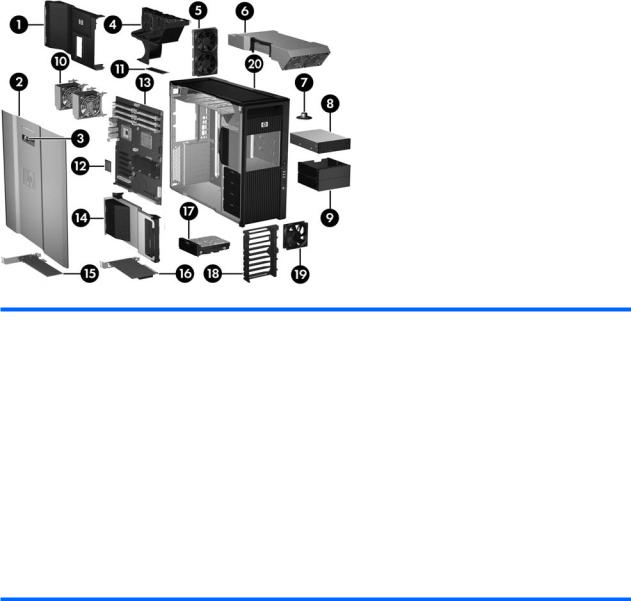
Chassis components
The following image shows a typical workstation configuration. Drive configurations can vary.
Figure 1-2 Workstation components
Table 1-1 Workstation component descriptions
Item |
Description |
Item |
Description |
|
|
|
|
1 |
Airflow guide |
11 |
Memory module (DIMM) |
|
|
|
|
2 |
Side access panel |
12 |
Processor (CPU) |
|
|
|
|
3 |
Side access panel key lock |
13 |
System board |
|
|
|
|
4 |
Memory fans |
14 |
Expansion card support |
|
|
|
|
5 |
Rear system fans |
15 |
PCIe/graphics card |
|
|
|
|
6 |
Power supply |
16 |
PCI card |
|
|
|
|
7 |
Speaker |
17 |
Hard disk drive |
|
|
|
|
8 |
Optical drive |
18 |
Expansion card guide/system board retainer/front system fan holder |
|
|
|
|
9 |
Optical bay fillers (optional or other |
19 |
Front system fan* |
|
devices) |
|
|
|
|
|
|
10 |
Processor (CPU) heatsinks |
20 |
Chassis |
*Two fans installed in 1110W power supply version.
4 Chapter 1 Workstation overview |
ENWW |
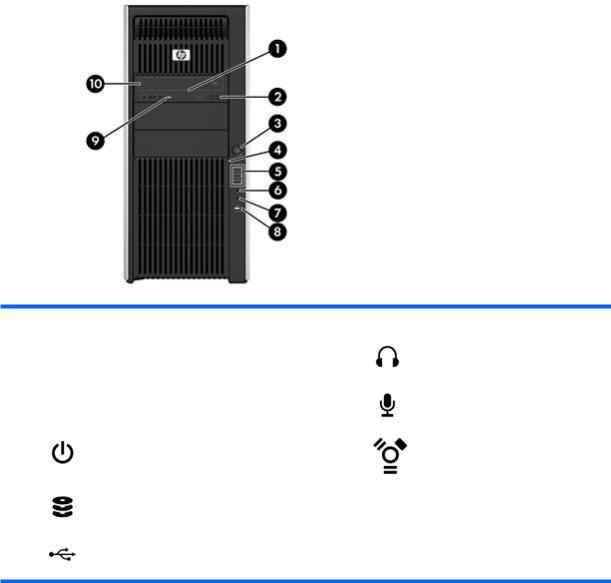
Front panel components
The following illustration shows the front panel components of a typical workstation configuration. Drive configurations can vary.
Figure 1-3 Front panel
Table 1-2 Front panel components*
Item Symbol |
Description |
Item Symbol |
Description |
|
|
|
|
1 |
5.25-inch drive bays (3) |
6 |
Headphone connector |
|
|
|
|
2 |
optical disk drive eject button |
7 |
Microphone connector |
|
|
|
|
3 |
Workstation power button/power on light |
8 |
IEEE-1394a connector |
|
|
|
|
4 |
Hard drive activity light |
9 |
Optical disk drive activity light |
|
|
|
|
5 |
USB 2.0 connectors (3) |
10 |
Optical disk drive |
*Refer to the Maintenance and Service Guide for the workstation for specific front panel connector information.
ENWW |
Description 5 |
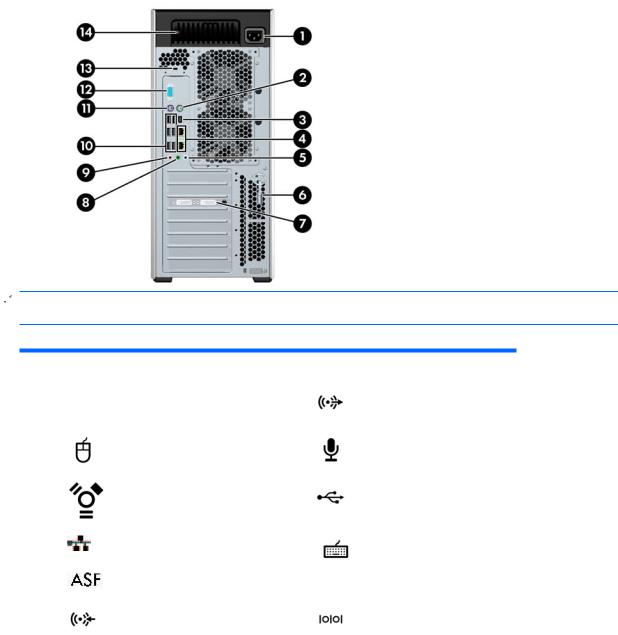
Rear panel components
The following illustration shows the rear panel of a typical workstation configuration. Drive configurations can vary.
Figure 1-4 Rear panel
 NOTE: The rear panel connectors are labeled with industry-standard icons and colors to assist in connecting peripheral devices.
Table 1-3 Rear panel components
Item Symbol |
Description |
Item Symbol |
Description |
|
|
|
|
1 |
Power cord connector |
8 |
Audio line-out connector |
|
|
|
(green) |
|
|
|
|
2 |
PS2/mouse connector (green) |
9 |
Microphone connector (pink) |
|
|
|
|
3 |
IEEE-1394 connector |
10 |
USB connectors (6) |
|
|
|
|
4 |
RJ-45 network connectors (2) |
11 |
PS/2 keyboard connector |
|
(Bottom connector is ASF.) |
|
(purple) |
|
|
|
|
|
|
|
|
5 |
Audio line-in connector (blue) |
12 |
Serial connector |
|
|
|
|
6 |
Side access panel keys |
13 |
Cable lock slot |
|
|
|
|
7 |
Graphics connector |
14 |
BIST LED |
|
|
|
|
6 Chapter 1 Workstation overview |
ENWW |

Specifications
This section provides workstation chassis, power supply, and environmental specifications, and includes these topics:
Topics
Physical characteristics on page 7
Environmental specifications on page 8
Power supply description on page 9
Ensuring proper ventilation on page 13
Physical characteristics
The following table lists the typical workstation physical characteristics.
Weight |
|
Minimum configuration |
19.5 kg (43 lb) |
Typical configuration |
21 kg (46 lb) |
Maximum configuration |
29 kg (64 lb) |
|
|
Chassis Dimensions |
Height: 44.4 cm (17.5 in.) |
|
Width: 20.3 cm (8.0 in.) |
|
Depth: 52.6 cm (20.7 in.) |
|
|
ENWW |
Specifications 7 |
Environmental specifications
The following table lists the environmental specifications of HP Workstations.
Table 1-4 HP Workstation environmental specifications
|
Operating: 5 to 35°C (40 to 95°F) |
|
Temperature |
Non-operating: -40 to 60°C (-40 to 140°F) |
|
|
||
|
NOTE: Derate by one degree C (1.8 degrees F) for every 305m (1,000 ft.) altitude over 1,524m |
|
|
(5,000 ft.). |
|
|
|
|
Humidity |
Operating: 8 to 85% Relative Humidity (RH), non-condensing |
|
Non-operating: 8 to 90% Relative Humidity, non-condensing |
||
|
||
|
|
|
Altitude |
Operating: 0 to 3,048m (10,000 ft.) |
|
Non-operating: 0 to 9,144m (30,000 ft.) |
||
|
||
|
|
|
|
Operating: ½-sine: 40g, 2-3ms |
|
|
Non-operating: |
|
Shock |
● ½-sine: 160 cm/s, 2-3ms (~100g) |
|
|
● square: 422 cm/s, 20g |
|
|
NOTE: Values represent individual shock events and do not indicate repetitive shock events. |
|
|
|
|
|
Operating Random: 0.5g (rms), 5-300 Hz |
|
Vibration |
Non-Operating: random: 2.0g (rms), 10-500 Hz |
|
|
NOTE: Values do not indicate continuous vibration. |
|
|
|
8 Chapter 1 Workstation overview |
ENWW |
Power supply description
This workstation offers an 850W power supply and an 1110W power supply to provide power for the workstation. The power supplies are compatible with ENERGY STAR requirements, and offer 85% efficient or better operation.
Power supply voltages
 NOTE: This workstation incorporates the blind-mate plug feature. You do not have to manipulate a cable harness when removing or installing the power supply.
Table 1-5 Power supply source voltages
Source voltage |
Description |
|
|
|
|
+12 |
V-CPU0 |
Input to onboard regulator that supplies power to CPU0 and CPU0 fan |
|
|
|
+12 |
V-CPU1 |
Input to onboard regulator that supplies power to CPU1 and CPU1 fan |
|
|
|
+12 |
V-M0 |
Input to onboard regulator that supplies power to memory on CPU0 |
|
|
|
+12 |
V-M1 |
Input to onboard regulator that supplies power to memory on CPU1 |
|
|
|
+12 |
V-B |
Input to onboard regulators that supply 3.3V and 5V, system fans |
|
|
|
+12 |
V-S |
PCI, PCIe, and system fans |
|
|
|
+12 |
V-D |
Storage (hard drive, optical disk drive, diskette drive), and input to |
|
|
miscellaneous onboard regulators |
|
|
|
+12 |
V-G1 |
PCIe auxillary connector for both connectors on 850W and one for 1110W |
|
|
|
+12 |
V-G2 |
Second PCIe auxiliary connector on 1110W power supply |
|
|
|
V12N |
PCI and serial ports |
|
|
|
|
+5 V-SB |
Sleep circuitry |
|
|
|
|
ENWW |
Specifications 9 |

Power supply currents
Table 1-6 Maximum current per rail
Voltage rail |
850W maximum |
1110W maximum |
|
|
|
continuous current |
continuous current |
|
|
|
|
+12 V-CPU0 |
18.0A |
18.0A |
|
|
|
|
|
+12 V-CPU1 |
18.0A |
18.0A |
|
|
|
|
|
+12 V-MO |
18.0A |
18.0A |
|
|
|
|
|
+12 |
V-M1 |
18.0A |
18.0A |
|
|
|
|
+12 |
V-B |
18.0A |
18.0A |
|
|
|
|
+12 |
V-S |
18.0A |
18.0A |
|
|
|
|
+12 |
V-D |
18.0A |
18.0A |
|
|
|
|
+12 |
V-G/G1 |
18.0A |
18.0A |
|
|
|
|
+12 |
V-G2 |
N/A |
18.0A |
|
|
|
|
V12N |
0.15A |
0.15A |
|
|
|
|
|
+5 V-SB |
5.00A |
9.0A |
|
|
|
|
|
 CAUTION: Do not exceed 70.0 amps (840 watts) of 12-volt (CPU0/CPU1/M0/M1/B/D/S/G) power combination for the 850W power supply.
Do not exceed 92.5A amps (1110 watts) of 12-volt (CPU0/CPU1/M0/M1/B/D/S/G1/G2) power combination for the 1110W power supply.
Do not exceed 104.2A amps (1250 watts) of 12-volt (CPU0/CPU1/M0/M1/B/D/S/G1/G2) power combination for the 1250W power supply.
Do not exceed 850 watts (for the 850-W power supply), or 1110 watts (for the 1110-W power supply) of total continuous output power.
10 Chapter 1 Workstation overview |
ENWW |
Power supply specifications
Table 1-7 Power supply specifications
Item |
|
Description |
|
|
|
|
|
|
|
Power supply |
850W Wide Ranging, Active PFC |
1110W Wide Ranging, Active PFC* |
||
Operating voltage range |
90-269 VAC |
|
90-269 VAC |
|
|
|
|
|
|
Rated voltage range |
100-240 VAC |
118 VAC |
100-240 VAC |
118 VAC |
|
|
|
|
|
Rated line frequency |
50-60 Hz |
400 Hz |
50-60 Hz |
400 Hz |
|
|
|
|
|
Operating line frequency range |
47-66 Hz |
393-407 Hz |
47-66 Hz |
393-407 Hz |
|
|
|
|
|
Rated input current |
11A@100-127 VAC |
11.0A@118 VAC |
12.0A@100 VAC, |
12.0A@118 VAC , |
|
5.5A@200-240 VAC |
|
1110W |
1250W |
|
|
12.0A@115 VAC, |
|
|
|
|
|
|
|
|
|
|
1250W |
|
|
|
|
10.0A@200-240VA |
|
|
|
|
C, 1250W |
|
|
|
|
|
|
Heat dissipation |
Typical: 1707 Btu/hr = (430 kg-cal/hr) |
Typical: 2128 Btu/hr = (536 kg-cal/hr) |
||
(Configuration and software |
Max: 3538 Btu/hr = (892 kg-cal/hr) |
Max: 4457 Btu/hr = (1123 kg-cal/hr) |
||
dependent) |
|
|
Max2: 5019 Btu/hr = (1265 kg-cal/hr) |
|
|
|
|
||
|
|
|
||
Power supply fan |
2x80x25 mm variable speed |
2x80x25 mm variable speed |
||
|
|
|
|
|
ENERGY STAR Qualified (config |
Yes |
|
Yes |
|
dependent) |
|
|
|
|
|
|
|
||
80 PLUS compliant |
80 PLUS BRONZE compliant |
80 PLUS SILVER compliant |
||
|
|
|
|
|
FEMP Standby Power compliant |
Yes |
|
Yes |
|
@115V (<2W in S5 – Power Off) |
|
|
|
|
|
|
|
|
|
EuP compliant @ 230V (<1w in S5 -- |
Yes |
|
Yes |
|
Power Off) |
|
|
|
|
|
|
|
|
|
Power Consumption in sleep mode (as |
<20 watts |
|
<20 watts |
|
defined by ENERGY STAR) - Suspend |
|
|
|
|
to RAM (S3) (Instantly Available PC) |
|
|
|
|
measured at 115V. |
|
|
|
|
|
|
|
|
|
Built-in Self Test LED |
Yes |
|
Yes |
|
|
|
|
|
|
Surge Tolerant Full Ranging Power |
Yes |
|
Yes |
|
Supply (withstands power surges up to |
|
|
|
|
2000V) |
|
|
|
|
|
|
|
|
|
*See the Site Prep Guide for additional information on input voltage restrictions and how to obtain 1250W output.
Power consumption and heat dissipation
Power consumption and heat dissipation specifications are available for multiple 850W and 1110W power supply configurations. To review available specifications, see http://www.hp.com/go/ quickspecs.
To reach zero power consumption, unplug the workstation from the power outlet or use a power strip with an on/off switch. For additional information about power-saving features, see the operating system documentation.
ENWW |
Specifications 11 |
See the Site preparation guide for the HP  800 workstation at http://hp.com/support/ workstation_manuals for further power consumption information.
This product is in compliance with U.S. Executive Order 13221.
System fans
This workstation includes:
●Two rear system fans
●One CPU0 fan
●One CPU1 fan (optional)
●Two power supply fans
●Two memory fans
●One upper front system fan
●One lower front system fan (optional)
In addition, some graphics cards include onboard fans.
Resetting the power supply
If an overload triggers the power supply overload protection, power is immediately disconnected.
To reset the power supply:
1.Disconnect the power cord from the workstation.
2.Determine what caused the overload and fix the problem. For troubleshooting information, see Diagnostics and troubleshooting on page 164.
3.Reconnect the power cord and restart the workstation.
When you power off the workstation through the operating system, power consumption falls below what is considered low power consumption but does not reach zero. This low power consumption feature extends the life of the power supply.
12 Chapter 1 Workstation overview |
ENWW |
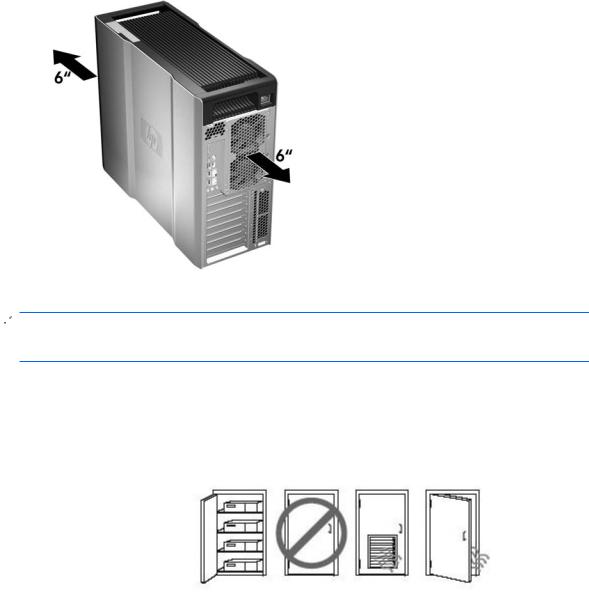
Ensuring proper ventilation
Proper ventilation for the system is important for workstation operation. Follow these guidelines to ensure adequate ventilation:
●Operate the workstation on a sturdy, level surface.
●Place the workstation in an area with adequate ventilation. Provide at least 6 inches of clearance at the front and back of the workstation as shown in the following figure.
Your workstation might look different than the one shown.
Figure 1-5 Proper workstation ventilation
●Ensure that the ambient air temperature surrounding the workstation falls within the published limit.
 NOTE: The ambient upper limit of 35°C is only good up to 5000 feet elevation. There is a 1°C per 1000 feet derating above 5000 feet. So at 10,000 feet the upper ambient air temperature limit is 30°C.
●For cabinet installation, ensure adequate cabinet ventilation and ensure that the ambient temperature within the cabinet does not exceed published limits.
●Never restrict the incoming or outgoing airflow of the workstation by blocking any vents or air intakes as shown in the following figure.
Figure 1-6 Proper workstation placement
Features
This section describes several features that improve workstation performance and usability. It presents these topics:
ENWW |
Features 13 |

|
Topics |
|
|
ENERGY STAR Qualification on page 15 |
Hyper-threading on page 17 |
|
|
EUP compliance mode on page 16 |
Intel Turbo Boost Technology on page 17 |
|
|
Accessibility on page 16 |
HP Cool Tools on page 17 |
|
|
14 Chapter 1 Workstation overview |
ENWW |

ENERGY STAR Qualification
HP computers marked with the ENERGY STAR logo are compliant with the applicable U.S. Environmental Protection Agency (EPA) ENERGY STAR specifications for computers. The EPA ENERGY STAR logo does not imply endorsement by the EPA. As an ENERGY STAR Partner, HewlettPackard Company has determined the products marked with the ENERGY STAR logo are ENERGY STAR qualified per the applicable ENERGY STAR guidelines for energy efficiency. The following logo appears on all ENERGY STAR qualified computers.
The ENERGY STAR Computers Program was created by the EPA to promote energy efficiency and reduce air pollution through more energy-efficient equipment in homes, offices, and factories. One way products achieve this energy efficiency is by reducing power consumption when not being used through the Microsoft Windows Power Management feature.
The Power Management feature enables the workstation to enter a low-power (or “sleep”) mode after a period of inactivity. When used with an external monitor that is ENERGY STAR qualified, this feature also supports the similar power management features of the external monitor.
To take advantage of this energy savings:
●The Power Management feature has been preset to suspend the workstation to a sleep state after 30 minutes of inactivity.
●The Power Management feature has been preset to suspend the monitor to a sleep state after 15 minutes of inactivity.
Both the computer and monitor can be woken from sleep mode through user interaction with any of the computer input devices (mouse, keyboard, and so on). when configured with Wake On LAN (WOL) enabled, the workstation can also be woken by a network signal.
See the EPA ENERGY STAR Power Management Web site for more information about the energy and financial savings potential of the Power Management Feature: http://www.energystar.gov/ powermanagement.
See the EPA ENERGY STAR Web site for more information about the ENERGY STAR program and its environmental benefits: http://www.energystar.gov.
 CAUTION: Using the Energy Save Monitor feature with monitors that are not ENERGY STAR qualified can cause video distortion when an Energy Save timeout occurs.
 NOTE: ENERGY STAR is not supported on Linux workstations.
If it is necessary to restore the operating system, you must also reset the ENERGY STAR settings (if applicable) after the restore.
To verify the factory default power settings for your workstation, select Start>Control Panel, and then double-click Power Options.
ENWW |
Features 15 |
EUP compliance mode
This workstation provides EUP compliance mode capability.
When enabled, this feature enables the workstation to shut down to the lowest possible power state by removing all power to the system board.
When disabled, the workstation powers down conventionally.
When the workstation is shutdown in EUP compliance mode, you must power it up with the workstation power button.
Enabling EUP compliance mode
To enable EUP compliance mode:
1.Press F10 during start up.
2.Using the arrow keys, select the Power>Hardware Power Management>EuP Compliance Mode, and then select Enable.
3.Press F10 to accept the change.
4.Select File>Save Change and Exit, and then press F10 to accept the change.
Disabling EUP compliance mode
To disable the EUP compliance mode:
1.Press F10 during start up.
2.Select Power>Hardware Power Management>EuP Compliance Mode, and then select Disable.
3.Press F10 to accept the change.
4.Select File>Save Change and Exit, and then press F10 to accept the change.
Accessibility
HP is committed to developing products, services, and information that is easier to access for all customers, including customers with disabilities and age-related limitations. HP products with Windows Vista® Business and Microsoft® Windows® XP Professional preinstalled are designed for accessibility, and these products are tested with industry-leading Assistive Technology products. For more information see http://www.hp.com/accessibility.
16 Chapter 1 Workstation overview |
ENWW |

Hyper-threading
This workstation supports Hyper-Threading Technology (HTT) which is an Intel-proprietary technology used to provide process parallelization. The technology improves processor performance under certain workloads by providing useful work for execution units that would otherwise be idle. A processor with Hyper-Threading enabled is treated by the operating system as two processors instead of one. Hyperthreading relies on support in the operating system as well as the CPU.
To implement hyper-threading, see The Computer Setup (F10) Utility on page 31.
Intel Turbo Boost Technology
This workstation supports Intel® Turbo Boost technology which enables the CPU to run at a higher than normal rate. When all CPU cores are not necessary for the workload, inactive cores are turned off and power is diverted to the active cores to increase their efficiency.
You can enable and disable Turbo Boost in the workstation BIOS menu. For instructions on setting BIOS features, see The Computer Setup (F10) Utility on page 31.
HP Cool Tools
An HP Workstation with Windows XP Professional includes additional software that is not installed when you first start the workstation. Additionally, a number of preinstalled tools on the workstation can enhance the workstation experience. To access or learn more about these applications:
1.Open the HP Cool Tools folder by selecting Start>All Programs>HP Cool Tools.
2.Select the HP Cool Tools icon on the desktop.
3.To learn more about these applications, select HP Cool Tools—Learn More.
4.To install or launch the applications, select the appropriate application.
 NOTE: A preinstalled Windows Vista Business operating system does not contain an HP Cool Tools icon, shortcut, or folder, but several of the tool programs are included, such as Performance Tuning Framework.
ENWW |
Features 17 |

2 Setting up the operating system
This chapter provides setup and update information for the workstation operating system. It includes these topics:
Topics
Setting up the Microsoft operating system on page 19
Setting up Red Hat Enterprise Linux on page 20
Setting up Novell SLED on page 21
Updating the workstation on page 21
This chapter also includes information on how to determine that you have the latest BIOS, drivers, and software updates installed on the workstation.
 CAUTION: Do not add optional hardware or third-party devices to the HP workstation until the operating system is successfully installed. Adding hardware might cause errors and prevent the operating system from installing correctly.
18 Chapter 2 Setting up the operating system |
ENWW |
Loading...