


 Loading...
HP StorageWorks MSL Library Extender user guide
This document provides information about installing, configuring, operating, troubleshooting, and servicing an HP StorageWorks MSL Library Extender. This document is intended for system administrators who plan to install, operate, or service a Library Extender. It is helpful to have experience administering an HP StorageWorks MSL2024, MSL4048, or MSL8096 Tape Library. This document is a supplement to the HP StorageWorks MSL2024, MSL4048, and MSL8096 Tape Libraries user and service guide.
Part number: AQ746-96005 Second edition: September 2009
Legal and notice information
© Copyright 2009 Hewlett-Packard Development Company, L.P.
The information contained herein is subject to change without notice. The only warranties for HP products and services are set forth in the express warranty statements accompanying such products and services. Nothing herein should be construed as constituting an additional warranty. HP shall not be liable for technical or editorial errors or omissions contained herein.
WARRANTY STATEMENT: To obtain a copy of the warranty for this product, see the warranty information website:
http://www.hp.com/go/storagewarranty
Intel, Itanium, Pentium, Intel Inside, and the Intel Inside logo are trademarks or registered trademarks of Intel Corporation or its subsidiaries in the United States and other countries.
Microsoft, Windows, Windows XP, and Windows NT are U.S. registered trademarks of Microsoft Corporation.

Contents
1 Features and overview ...................................................................... |
11 |
Slot numbering and mailslot configurations .................................................................................. |
12 |
Tape drives .............................................................................................................................. |
12 |
Power supply redundancy .......................................................................................................... |
12 |
Using the Extender with the Encryption Kit .................................................................................... |
13 |
Extended libraries and logical libraries ........................................................................................ |
13 |
Installation overview .................................................................................................................. |
13 |
Rack stability ............................................................................................................................ |
14 |
2 Configuring and operating an extended library ................................... |
15 |
Powering on the extended library ................................................................................................ |
15 |
Powering off the extended library ................................................................................................ |
16 |
Viewing identity information ....................................................................................................... |
17 |
Viewing Library status ................................................................................................................ |
18 |
Configuring the extended library ................................................................................................ |
21 |
Default settings for the extended library ................................................................................. |
25 |
Updating firmware .................................................................................................................... |
25 |
Running diagnostic tests ............................................................................................................. |
26 |
3 Installing the Library Extender ............................................................ |
27 |
Identifying product components .................................................................................................. |
28 |
Downloading product documentation .......................................................................................... |
28 |
Determining the master and lower Library .................................................................................... |
29 |
Saving the Library configurations ................................................................................................ |
29 |
Upgrading the Library firmware .................................................................................................. |
29 |
Enabling extended mode ........................................................................................................... |
30 |
Removing the cartridges from the Libraries .................................................................................... |
30 |
Powering off the Libraries ........................................................................................................... |
31 |
Positioning the Libraries in a rack ................................................................................................ |
31 |
Removing a Library from a rack or tabletop conversion cover ................................................... |
32 |
Moving the rack rails and clip nuts ....................................................................................... |
33 |
Moving the clip nuts ........................................................................................................... |
34 |
Installing the Library in the rack rails ..................................................................................... |
34 |
Relocating tape drives ............................................................................................................... |
35 |
Removing and replacing drive bay covers .................................................................................... |
36 |
Removing the USB device and Ethernet cable from the lower Library ................................................ |
37 |
Extending the pull-out tab .......................................................................................................... |
37 |
Aligning the Libraries ................................................................................................................ |
38 |
Installing the Extender ............................................................................................................... |
39 |
Powering on the extended library ................................................................................................ |
40 |
Checking the Extender LEDs ................................................................................................ |
41 |
Verifying the installation ............................................................................................................. |
42 |
4 Using diagnostic tools and troubleshooting .......................................... |
43 |
HP StorageWorks MSL Library Extender user guide |
3 |
Extender status LEDs .................................................................................................................. |
43 |
The Library Extender cycle test .................................................................................................... |
44 |
The wellness test ....................................................................................................................... |
44 |
Using HP Library & Tape Tools ................................................................................................... |
48 |
Library Extender error codes ...................................................................................................... |
48 |
Additional robotic error sub-codes .............................................................................................. |
53 |
5 Servicing the Library Extender ............................................................ |
55 |
Replacing the Library Extender ................................................................................................... |
55 |
Powering off the Libraries .................................................................................................... |
55 |
Removing the Library Extender ............................................................................................. |
56 |
Installing the new Extender .................................................................................................. |
56 |
Removing the Library Extender .................................................................................................... |
56 |
Disabling extended mode and powering off the Libraries ......................................................... |
56 |
Removing the Library Extender ............................................................................................. |
57 |
Preparing the Libraries to operate as separate Libraries ........................................................... |
57 |
Replacing drive bay covers .................................................................................................. |
58 |
Connecting the Ethernet cable ............................................................................................. |
58 |
Powering on the Libraries ..................................................................................................... |
58 |
Copying the key server token ............................................................................................... |
58 |
Reconfiguring the Libraries ................................................................................................... |
59 |
Settings retained from the extended library ...................................................................... |
59 |
Settings that are set to default values .............................................................................. |
59 |
Settings where the lower Library reverts to earlier values ................................................... |
59 |
Special cases .............................................................................................................. |
60 |
Removing a cartridge from the Extender ....................................................................................... |
60 |
Repackaging the Library Extender ............................................................................................... |
61 |
Releasing the magazines manually ............................................................................................. |
64 |
6 Support and other resources .............................................................. |
67 |
Contacting HP .......................................................................................................................... |
67 |
Before you contact HP ......................................................................................................... |
67 |
HP contact information ........................................................................................................ |
67 |
Subscription service ............................................................................................................ |
67 |
Documentation feedback ..................................................................................................... |
67 |
Related information ................................................................................................................... |
67 |
Documents ........................................................................................................................ |
67 |
Websites ........................................................................................................................... |
68 |
Document conventions and symbols ............................................................................................. |
68 |
Customer self repair .................................................................................................................. |
69 |
A Technical specifications .................................................................... |
71 |
B Electrostatic discharge ...................................................................... |
73 |
Preventing electrostatic damage .................................................................................................. |
73 |
Grounding methods .................................................................................................................. |
73 |
C Regulatory compliance notices .......................................................... |
75 |
Regulatory compliance identification numbers .............................................................................. |
75 |
Federal Communications Commission notice ................................................................................ |
75 |
FCC rating label ................................................................................................................ |
75 |
Class A equipment ....................................................................................................... |
75 |
4
Class B equipment ....................................................................................................... |
76 |
Declaration of Conformity for products marked with the FCC logo, United States only ................. |
76 |
Modification ...................................................................................................................... |
76 |
Cables .............................................................................................................................. |
76 |
Canadian notice (Avis Canadien) ............................................................................................... |
76 |
Class A equipment ............................................................................................................. |
76 |
Class B equipment .............................................................................................................. |
77 |
European Union notice .............................................................................................................. |
77 |
Japanese notices ...................................................................................................................... |
77 |
Japanese VCCI-A notice ...................................................................................................... |
77 |
Japanese VCCI-B notice ...................................................................................................... |
77 |
Japanese power cord statement ............................................................................................ |
77 |
Korean notices ......................................................................................................................... |
78 |
Class A equipment ............................................................................................................. |
78 |
Class B equipment .............................................................................................................. |
78 |
Taiwanese notices ..................................................................................................................... |
78 |
BSMI Class A notice ........................................................................................................... |
78 |
Taiwan battery recycle statement .......................................................................................... |
78 |
Laser compliance notices ........................................................................................................... |
79 |
English laser notice ............................................................................................................. |
79 |
Dutch laser notice ............................................................................................................... |
79 |
French laser notice ............................................................................................................. |
80 |
German laser notice ........................................................................................................... |
80 |
Italian laser notice .............................................................................................................. |
80 |
Japanese laser notice .......................................................................................................... |
81 |
Spanish laser notice ........................................................................................................... |
81 |
Recycling notices ...................................................................................................................... |
81 |
English notice .................................................................................................................... |
81 |
Bulgarian notice ................................................................................................................. |
82 |
Czech notice ..................................................................................................................... |
82 |
Danish notice .................................................................................................................... |
82 |
Dutch notice ...................................................................................................................... |
82 |
Estonian notice .................................................................................................................. |
83 |
Finnish notice ..................................................................................................................... |
83 |
French notice ..................................................................................................................... |
83 |
German notice ................................................................................................................... |
83 |
Greek notice ...................................................................................................................... |
84 |
Hungarian notice ............................................................................................................... |
84 |
Italian notice ...................................................................................................................... |
84 |
Latvian notice .................................................................................................................... |
84 |
Lithuanian notice ................................................................................................................ |
85 |
Polish notice ...................................................................................................................... |
85 |
Portuguese notice ............................................................................................................... |
85 |
Romanian notice ................................................................................................................ |
85 |
Slovak notice ..................................................................................................................... |
86 |
Spanish notice ................................................................................................................... |
86 |
Swedish notice ................................................................................................................... |
86 |
Turkish notice ..................................................................................................................... |
86 |
Battery replacement notices ........................................................................................................ |
87 |
Dutch battery notice ............................................................................................................ |
87 |
French battery notice .......................................................................................................... |
88 |
German battery notice ........................................................................................................ |
88 |
Italian battery notice ........................................................................................................... |
89 |
Japanese battery notice ...................................................................................................... |
89 |
Spanish battery notice ........................................................................................................ |
90 |
HP StorageWorks MSL Library Extender user guide |
5 |
Glossary ............................................................................................ |
91 |
Index ................................................................................................. |
93 |
6

Figures
1 |
Library Extender installed with two MSL4048 Tape Libraries ......................................... |
11 |
2 |
Help available from the RMI ..................................................................................... |
15 |
3 |
Press the power buttons on both Libraries to power on the extended library .................... |
16 |
4 |
Press the power button on the master Library to power off the extended library ............... |
16 |
5 |
Identity > Library page ............................................................................................ |
17 |
6 |
Example of the System Status pane from an extended library with an MSL8096 master |
|
|
Library and MSL4048 lower Library .......................................................................... |
19 |
7 |
Status > Library RMI page for an extended library with an MSL4048 master Library and |
|
|
an MSL2024 lower Library ....................................................................................... |
20 |
8 |
Configuration > System RMI page for an extended library with an MSL8096 master Library |
|
|
and an MSL4048 lower Library ................................................................................ |
22 |
9 |
Library Extender product contents .............................................................................. |
28 |
10 |
Library Extender installed with two MSL4048 Tape Libraries ......................................... |
29 |
11 |
Library power button ............................................................................................... |
31 |
12 |
Two MSL4048 Tape Libraries installed in a rack in the rack rails supplied with the Libraries |
|
|
in adjacent rack locations ........................................................................................ |
31 |
13 |
Removing an MSL4048 from a rack .......................................................................... |
32 |
14 |
Installing the MSL2024 and MSL4048 rack rails ......................................................... |
33 |
15 |
Clip nut locations .................................................................................................... |
34 |
16 |
Installing an MSL4048 and tightening the captive screws ............................................. |
35 |
17 |
Tape drive thumbscrew locations ............................................................................... |
35 |
18 |
Removing a tape drive ............................................................................................. |
36 |
19 |
Removing drive bay covers to create space for the Extender ......................................... |
36 |
20 |
Installing covers on unused drive bays ....................................................................... |
37 |
21 |
Removing the USB device and Ethernet cable from the lower Library .............................. |
37 |
22 |
Trimming the pull-out tab .......................................................................................... |
38 |
23 |
Captive screw locations ........................................................................................... |
38 |
24 |
Aligning the Libraries with the alignment gauge .......................................................... |
39 |
25 |
Aligning the Extender with the upper drive bay ........................................................... |
39 |
26 |
Sliding the pull-out tab into the Library ....................................................................... |
40 |
27 |
Tightening the Extender thumbscrews ......................................................................... |
40 |
28 |
Extended library power buttons ................................................................................ |
41 |
29 |
Library Extender LEDs .............................................................................................. |
41 |
HP StorageWorks MSL Library Extender user guide |
7 |
30 |
Library Extender status LEDs ..................................................................................... |
43 |
31 |
Aligning the Extender tab in the Library slot ................................................................ |
44 |
32 |
Extended Library power off button ............................................................................. |
55 |
33 |
Removing the Extender ............................................................................................ |
56 |
34 |
Removing the Extender ............................................................................................ |
57 |
35 |
Removing the Extender ............................................................................................ |
60 |
36 |
Access to release lever for the right magazines in the master Library .............................. |
65 |
37 |
Access to release lever for the left magazines in the master Library ................................ |
65 |
38 |
Access holes for the right and left magazines in the lower Library .................................. |
65 |
39 |
Releasing the magazine .......................................................................................... |
66 |
8

Tables |
|
|
1 |
Supported configurations ......................................................................................... |
11 |
2 |
Storage slot numbering ............................................................................................ |
12 |
3 |
Mailslot numbering ................................................................................................. |
12 |
4 |
Top-row corner slot positions .................................................................................... |
45 |
5 |
Error codes ............................................................................................................ |
49 |
6 |
Sub-codes for error B8 ............................................................................................. |
50 |
7 |
Sub-codes for error B9 ............................................................................................. |
50 |
8 |
Sub-codes for error BD ............................................................................................ |
50 |
9 |
Sub-codes for error BE ............................................................................................. |
52 |
10 |
Sub-codes related to Library robotics errors during movement to extender position ........... |
53 |
11 |
Document conventions ............................................................................................. |
68 |
12 |
Physical specifications ............................................................................................. |
71 |
13 |
Environmental specifications ..................................................................................... |
71 |
HP StorageWorks MSL Library Extender user guide |
9 |
10
1 Features and overview
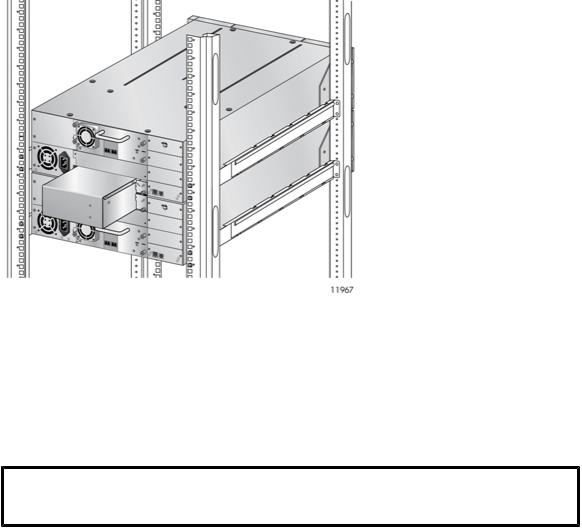
The Library Extender combines two HP StorageWorks MSL Tape Libraries to create a single extended library. Before installing the Extender, the Libraries must be installed in the rack rails supplied with the Libraries in adjacent rack locations, one Library above the other. See the example shown in Figure 1.
Figure 1 Library Extender installed with two MSL4048 Tape Libraries
.
The Extender occupies the lower half-height drive bay of the upper Library and the top half-height drive bay of the lower Library.
The upper Library controls the extended library and is called the master Library. The extended library uses only the master Library OCP, USB port, and Ethernet connection.
The lower Library is controlled by the master Library. The lower Library OCP, USB port, and Ethernet connection are not used by the extended library.
Table 1 Supported configurations
Master Library |
Lower Library |
Total slots |
Total half-height drive |
Total full-height drive |
|
|
|
bays |
bays |
MSL4048 |
MSL2024 |
72 |
3+1 |
1+0 |
MSL4048 |
MSL4048 |
96 |
3+3 |
1+1 |
MSL8096 |
MSL2024 |
120 |
3+1 |
3+0 |
MSL8096 |
MSL4048 |
144 |
3+3 |
3+1 |
HP StorageWorks MSL Library Extender user guide |
11 |
Slot numbering and mailslot configurations
Magazine and mailslot numbering begins with the lower Library and continues with the master Library. For storage slot numbering, see Table 2.
Table 2 Storage slot numbering
Extended library configuration |
Slot numbers (without mailslots enabled) |
||
Lower Library |
Master Library |
Lower Library |
Master Library |
MSL2024 |
MSL4048 |
1–24 |
25–72 |
MSL4048 |
MSL4048 |
1–48 |
49–96 |
MSL2024 |
MSL8096 |
1–24 |
25–120 |
MSL4048 |
MSL8096 |
1–48 |
49–144 |
The mailslots in both Libraries can be configured for use in the extended library. For mailslot numbering, see Table 3.
Table 3 Mailslot numbering
Extended library configuration |
Mailslot numbers (with all mailslots enabled) |
||
Lower Library |
Master Library |
Lower Library |
Master Library |
MSL2024 |
MSL4048 |
M1 |
M2–M4 |
MSL4048 |
MSL4048 |
M1–M3 |
M4–M6 |
MSL2024 |
MSL8096 |
M1 |
M2–M16 |
MSL4048 |
MSL8096 |
M1–M3 |
M4–M19 |
Tape drives
Tape drives are numbered starting with the lower Library and continuing with the master Library.
Any tape drive in the extended library can host the SCSI Library interface. The default is the lowest tape drive in the lower Library.
Power supply redundancy
Both Libraries must have a working power supply for the extended library to operate. To have total power supply redundancy, both Libraries must have working redundant power supplies. In an extended library, if only one Library has redundant power supplies installed, the extended library will continue to operate in case of a power supply failure in that Library. An extended library containing an MSL2024 cannot have total power supply redundancy because the MSL2024 only has one power supply.
12 Features and overview

Using the Extender with the Encryption Kit
The HP StorageWorks 1/8 G2 & MSL LTO-4 Encryption Kit provides secure generation and storage of encryption keys.
An extended library will only access the key server token in the master Library.
 NOTE:
NOTE:
The USB port in the lower Library is not active.
The extended library must contain at least one LTO-4 tape drive to use the Encryption Kit. LTO-4 tape drives can be in any valid drive location in the extended library.
If combining two Libraries that were both using the Encryption Kit, you can copy the keys from one of the tokens onto the other so the token that will be used in the extended library has the keys to read tapes from both Libraries. See the section on combining keys from multiple key server tokens in the
HP StorageWorks 1/8 G2 and MSL Encryption Kit user guide for instructions. To download the user guide from the HP website, see Related documentation, page 67.
If you separate an extended library that uses the Encryption Kit and will have at least one LTO-4 tape drive in each of the Libraries, you can copy the encryption keys on the token from the extended library to a new token so both Libraries have access to all of the keys. See the HP StorageWorks 1/8 G2 and MSL Encryption Kit user guide for instructions. To download the user guide from the HP website, see Related documentation, page 67.
Extended libraries and logical libraries
When the Extender is installed, the extended library is configured as a single logical library. An extended library cannot be partitioned into multiple logical libraries.
If the Libraries are ever separated, each individual Library will become a single logical library until reconfigured.
Installation overview
Successful installation of the Extender requires performing key steps in the order specified in Chapter 3, page 27.
1.Obtain the latest firmware for each Library from the HP website and download it into each Library separately.
2.Enable extended mode on each Library.
3.Power off both Libraries.
4.Position the Libraries in the rack on their own rack rails.
5.Align the two Libraries using the alignment gauge.
HP StorageWorks MSL Library Extender user guide |
13 |

6.Move the tape drives, if necessary, to open the drive bays that will be used by the Extender.
 NOTE:
NOTE:
In an MSL4048, a full-height tape drive will only operate in the two upper or two lower half-height drive locations. Do not install a full height tape drive in the middle half-height drive bays of an MSL4048 Tape Library.
7.Install the Extender.
8.Tighten the captive rack attachment screws on the front of the Libraries.
9.Power on both Libraries and verify that the three Extender LEDs are illuminated.
Rack stability
Rack stability protects personnel and equipment.
 WARNING!
To reduce the risk of personal injury or damage to equipment:
•Extend leveling jacks to the floor.
•Ensure that the full weight of the rack rests on the leveling jacks.
•Install stabilizing feet on the rack.
•In multiple-rack installations, fasten racks together securely.
•Extend only one rack component at a time. Racks can become unstable if more than one component is extended.
14 Features and overview
2 Configuring and operating an extended library
This chapter provides information about extended library configuration and operation tasks that are different from a single Tape Library.
If you are installing the Extender for the first time, read this chapter for reference after installing the Extender following the instructions in Chapter 3, page 27.
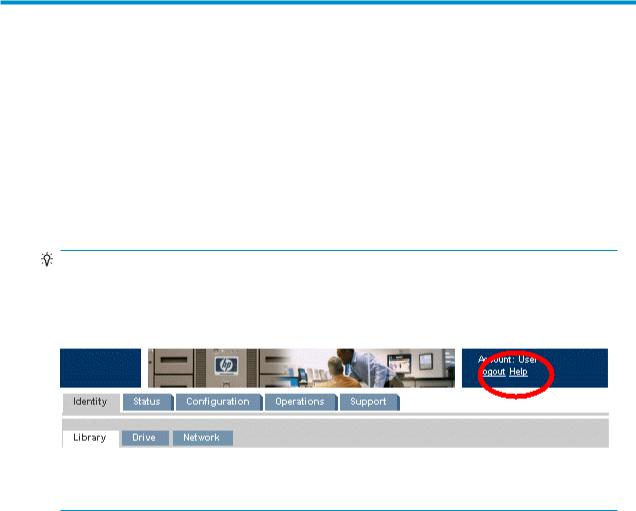
TIP:
Check the Help screens in the RMI for additional information. The help pages are updated with most firmware updates and often contain technical details that are not contained in this document. To access RMI help, click Help on the right side of the Web page banner, as shown in Figure
2 on page 15.
Figure 2 Help available from the RMI
.
Powering on the extended library
To power on the extended library, power on each of the Tape Libraries from their OCPs. The Libraries can be powered on in either order. The initialization sequence is faster if the lower Library is powered on first.
HP StorageWorks MSL Library Extender user guide |
15 |
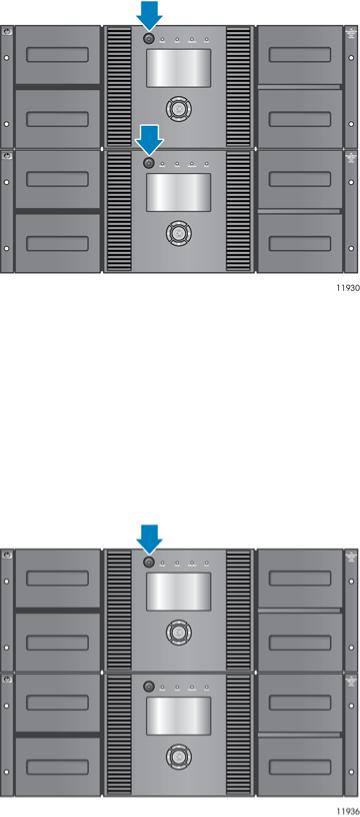
Figure 3 Press the power buttons on both Libraries to power on the extended library
.
If the master Library is powered on first, it will prompt the user to power on the lower Library. If the lower Library is powered on first, it will remain in an uninitialized state until it receives an initialization command from the master Library.
Powering off the extended library
To power off the extended library, power off the master Library. The master Library will power the lower Library off. If the master Library is powered off with the emergency power off procedure or the power cord is removed, the lower Library will lose communication with the master Library and must be powered off by depressing its power button and holding it for at least 10 seconds.
Figure 4 Press the power button on the master Library to power off the extended library
.
16 Configuring and operating an extended library

Viewing identity information
To view detailed information about both Tape Libraries and the Extender, use the RMI Identity > Library page or the master Library Info > Identity OCP screen.
Figure 5 Identity > Library page
.
The Library Information pane displays information about the master Library and the extended library.
•Serial Number — the electronic serial number for the master Library. The part of the serial number before the '_' character, should match the serial number printed on the Library label, located on the pull out tab on the back of the Library. The part of serial number after the '_' character encodes the extended library components as follows:
•X — signifies that the master Library is in extended mode
•ml — shows the height of the master and lower Libraries, respectively
•2 is an MSL2024
•4 is an MSL4048
•8 is an MSL8096
In the example shown in Figure 5, page 17, with the serial number DEC716067E_X84, the master
Library serial number is DEC716067E, the master Library is an MSL8096 and the lower Library is an MSL4048.
•Product ID — how the device identifies itself to the host computer. This will always be MSL G3 Series.
•Currently Installed Library Firmware x.xx / y.yy.
•x.xx is the version of the Library controller firmware. This number is used to reference firmware versions when downloading new firmware from the HP website.
•y.yy is the version of the robotics firmware.
HP StorageWorks MSL Library Extender user guide |
17 |

•Bootcode Firmware Revision.
•Library Mode.
•Automatic — the device will switch from Sequential to Random mode if it receives media changer SCSI commands.
•Manual — the device will stay in the current mode until another mode is configured by a user.
•Random — the device will not automatically load and unload tapes. Instead, it will wait for commands from the backup software or the OCP to load and unload tapes.
•Sequential — the device will automatically unload the tape in the drive when the host software sends an unload command to the drive and then automatically load the tape from the next highest sequentially numbered full slot.
•Loop — in Loop mode, the Library will load the tape from the lowest numbered full slot after the tape from the highest numbered full slot is unloaded. If Loop is not listed, the Library will stop automatically loading and unloading tapes after the tape from the last full slot is unloaded.
 CAUTION:
Since loop mode will endlessly cycle through the tapes, it is possible to overwrite old data. Make sure that there are enough tapes in the Library or that the tapes are regularly rotated in and out to ensure that data you want to save is not overwritten.
•Autoload — the device will automatically load the tape from the lowest numbered full slot on power up.
•WWide Node Name — a world wide unique identifier that the Library reports over SCSI and may be used by operating systems or software applications to identify and track the Library.
The Library Extender pane displays information about the Library Extender.
•Firmware revision — the version of Library Extender firmware.
•Serial Number — the electronic serial number for the Library Extender.
The Lower Library Information pane displays information about the lower Library.
•Serial Number — the electronic serial number for the lower Library. This serial number should match the serial number printed on the Library label, located on the pull out tab under the drive or lowest drive bay cover on the back of the Library.
•Product ID — how the device identifies itself to the host computer. This will always be MSL G3 Series.
•Currently Installed Library Firmware x.xx / y.yy
•x.xx is the version of the Library controller firmware. This number is used to reference firmware versions when downloading new firmware from the HP website.
•y.yy is the version of the robotics firmware.
•Library Height
•2U is an MSL2024
•4U is an MSL4048
Viewing Library status
To view a summary of the extended library status, use the RMI System Status pane.
18 Configuring and operating an extended library
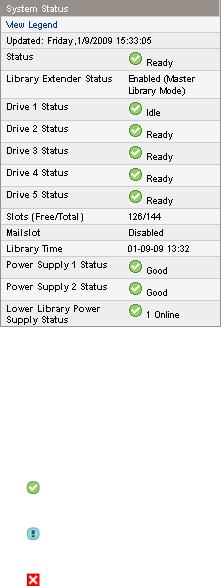
Figure 6 Example of the System Status pane from an extended library with an MSL8096 master Library and MSL4048 lower Library
.
•Updated — the day, date, and time of the most recent status view. This timestamp comes from your computer and may be different from the Library time lower in the pane. Click your browser's refresh button to update the system status.
•Status of the Library and tape drives
The green Status Ok icon indicates that the device is fully operational and that no user intervention is required.
The blue exclamation point Status Warning icon indicates that user intervention is necessary, but that the device can still perform most operations.
The red X Status Error icon indicates that user intervention is required and that the device is not capable of performing some operations.
•Slots (Free/Total) — The number of free and total storage slots.
•Free is the number of empty storage slots.
•Total is the number of storage slots available to the host software, which does NOT include reserved slots.
•Mailslot — shows whether the mailslot is open, closed, or disabled.
•Library Time — the date and time from the Library, which can be set from the OCP or RMI. The Library Time is updated when the system status is refreshed. The time of the most recent refresh is the Updated time at the top of the pane. If you call HP Service and are requested to provide the Library time, refresh the system status with your browser refresh button and then give the service engineer this Library Time.
•Power Supply Status (MSL4048 and MSL8096)
•MSL4048 — Online — The power supply is installed.
•MSL8096 — Good — The power supply is functioning correctly.
HP StorageWorks MSL Library Extender user guide |
19 |

•MSL8096 — Functional, fan failure — The power supply is supplying power to the Library, but the fan has failed so the power supply could fail soon. The power supply should be replaced.
•Installed, failed — The power supply installed in the unit is not working and the Library no longer has redundant power. The power supply should be replaced.
 NOTE:
NOTE:
If the MSL4048 has two power supplies and one fails, after a power cycle the Library will not recognize the failed power supply as installed in the Library.
The number of power supplies installed in the Library is displayed next to the icon.
•MSL8096 — Removed — A power supply was installed in this location before but has been removed. Power Supply 1 will always show Removed when it is missing. Power Supply 2 will show Removed until the Library is rebooted.
For detailed status information, use the RMI Status > Library page or OCP Info > Status screen.
Figure 7 Status > Library RMI page for an extended library with an MSL4048 master Library and an MSL2024 lower Library
.
• Status, Lower Library Status — The status of the master and lower Libraries.
The green Status Ok icon indicates that the device is fully operational and that no user intervention is required.
20 Configuring and operating an extended library
The blue exclamation point Status Warning icon indicates that user intervention is necessary, but that the device can still perform most operations.
The red X Status Error icon indicates that user intervention is required and that the device is not capable of performing some operations.
•Library Extender Status — The status of the Library Extender and extended mode. If the Extender is installed but extended mode not enabled or if extended mode is enabled but the Extender is not enabled, the Library Extender Status will include instructions for addressing the inconsistency.
•Cartridge in Transport — The slot number where the tape currently in the robot originated. None if there is not a tape in the robotic.
•Odometer, Lower Library Odometer — The total number of moves the master Library and lower Library have performed since their manufacture. A cartridge transfer between Libraries will increment both odometers. A cartridge move within a single Library will only increment the odometer in that Library.
•Total Power On Time, Lower Library Total Power On Time— The number of days, hours, and minutes master Library and lower Library have been powered on since their manufacture.
•Robotic Status, Lower Library Robotic Status — The current status of the master Library and lower Library robotics, and a description of the operation the robots are currently performing.
•Internal Temperature, Lower Library Internal Temperature — The internal temperature reported by the master Library and lower Library.
•Power Supply Status — The current status of each of the installed power supplies. (MSL4048 and MSL8096). See Power Supply Status values, page 19.
•Media Removal — Prevented, if the backup software is preventing media removal from the Library. When media removal is prevented, mailslot user access and magazine removal are disabled.
•Level n. Left Magazine — The state of the left magazine at level n. The magazine levels are numbered from the bottom of the Library to the top. For example, Level 1. Left Magazine is the bottom magazine on the left side looking at the Library from the front.
•Present, if the Library senses the presence of a fully inserted magazine.
•Removed, if the magazine is not fully inserted into the Library.
•Level n. Right Magazine — the state of the right magazine at level n.
•Present, if the Library senses the presence of a fully inserted magazine.
•Removed, if the magazine is not fully inserted into the Library.
Configuring the extended library
Configure the extended library from the RMI Configuration > System page or from the master Library OCP Configuration menu.
 NOTE:
NOTE:
In extended mode, the only functions available through the lower Library OCP are disabling extended mode and adjusting the display contrast (MSL4048 or MSL8096 only).
HP StorageWorks MSL Library Extender user guide |
21 |
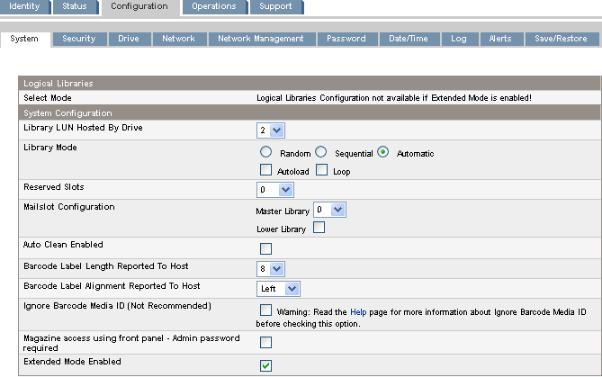
Figure 8 Configuration > System RMI page for an extended library with an MSL8096 master Library and an MSL4048 lower Library
.
•Library LUN Hosted By Drive — Specifies the master tape drive for the extended library through which the host system controls the extended library. The default is the lowest numbered tape drive in the extended library. If an extended library has only one tape drive, it is the master drive for the extended library. If an extended library has more than one tape drive, you may specify the master. The number is the physical drive number.
•Library Mode — Specifies the library mode for the extended library. The default mode is Automatic.
The extended library supports three behavior modes: Random, Sequential, and Automatic. The extended library automatically detects the required mode from the series of SCSI commands it receives; however, you can also change the mode. Select the operating mode based on the capabilities of the software controlling the tape cartridges.
Random mode — In Random mode, the device does not automatically load tapes into the tape drives; it waits for commands from the software or operator to load and unload tapes. Random mode is used with a full featured or a robotics-aware backup application and is the most common mode of operation. Your backup software must support robotics, which may require an additional software module.
Sequential mode — In Sequential mode, the device automatically loads and unloads tapes from the drive. Sequential mode is used when the backup software is NOT robotics-aware or was designed for standalone drives only.
When Extended mode is enabled, the extended library will only use the lowest-numbered tape drive in the extended library.
The operator begins the sequence by loading the desired tape into the tape drive. When a tape is unloaded, the device automatically removes the tape from the drive, returns it to its original slot, then loads the tape from the next available higher numbered slot.
To further determine how tapes are loaded into the tape drive while in Sequential mode, you can set the Loop and Autoload options.
22 Configuring and operating an extended library

•When Autoload mode is set, the device automatically loads the cartridge from the lowestnumbered full slot into the tape drive. It then follows standard sequential operation.
•When Loop mode is on, the original first cartridge in the sequence is reloaded after the device has cycled through all available cartridges. If Loop mode is off and the last cartridge has been unloaded, the device stops loading cartridges until you load another manually.
 CAUTION:
Use caution when choosing Loop mode because it makes it possible to overwrite data on previously written cartridges.
Automatic mode: In Automatic mode, the device switches from Sequential mode into Random mode when it receives certain SCSI commands. Automatic mode is the default setting.
•Reserved Slots — The number of slots in the extended library that are not available to the backup software. You can store cleaning cartridges in reserved slots, or leave reserved slots empty. The slots are reserved from the highest slot number down. The default is 0 reserved slots so the maximum number of slots are available to the host. The extended library must have at least two slots that are not reserved.
•Mailslot Configuration for the master Library and lower Library
•MSL2024 and MSL4048 — configures the mailslot in the lower left magazine as a mailslot or storage slots. The MSL2024 mailslot has one slot; the MSL4048 mailslot has three slots. Enabling the mailslot will reduce the total number of storage slots. The default is disabled.
•MSL8096 — configures the mailslot in the lower-left magazine and upper-right magazine as mailslots or storage slots. Enabling a mailslot will reduce the number of storage slots. The default is 0 mailslots enabled.
You can enable either or both of the mailslots by selecting the number of mailslot slots in the
Mailslot Configuration drop down list.
•0 disables both mailslots.
•3 enables the lower-left mailslot only.
•12 enables the upper-right mailslot only.
•15 enables both mailslots.
 CAUTION:
Enabling or disabling a mailslot will re-number the storage slots in one or both of the Libraries. After enabling or disabling any mailslots, update the backup software inventory. You may also need to re-configure the backup software to adjust the number of storage slots and presence of the mailslot.
•Auto Clean Enabled — When auto clean is enabled, the device automatically loads a cleaning cartridge when a tape drive needs to be cleaned. The device identifies a tape cartridge as a cleaning cartridge if it has a bar code label that starts with CLN or after an unlabeled cleaning tape has been loaded into the tape drive.
The Library can use a cleaning cartridge from any slot, even if the slot is reserved. The Library keeps track of the usage count for each of the cleaning cartridges. When multiple cleaning cartridges are available, the Library will first select a cleaning cartridge with an unknown usage count so the Library can start tracking the cartridge's usage count. If the Library knows the usage count for all of the cleaning cartridges, the Library will select the one with the highest usage count.
HP StorageWorks MSL Library Extender user guide |
23 |

Auto cleaning is disabled by default. You can enable automatic cleaning even if there are no cleaning cartridges in the device. In this case, the device will display a warning message.
 CAUTION:
Only enable automatic cleaning in either the backup application or the Library, not both.
•Barcode Label Length Reported to Host — the number of bar code characters reported to the host application. This option provides compatibility with libraries and software with more limited bar code reading capabilities. The default is 8.
•Barcode Label Alignment Reported to Host — configures the end of the bar code label characters to report to the host application when reporting fewer than the maximum number of characters. For example, when reporting only six characters of the bar code label 12345678, if the alignment is left, the Library will report 123456. If the alignment is right, the Library will report 345678. The default is left, which is used by most software applications.
•Ignore Barcode Media ID — when disabled (default), the barcode Media ID on the tape cartridges will be checked by the Library. The Library will only allow appropriate tape cartridges to be loaded into tape drives. The barcode Media ID is the last two characters of the barcode. For example, an LTO-4 labeled cartridge will not be allowed to move into an LTO-3 tape drive. When Ignore Barcode Media ID is enabled, the Library will move any tape to any tape drive. If the cartridge is incompatible with the tape drive, a message will be displayed. HP strongly recommends that all tape cartridges have barcodes with the correct Media ID.
•Magazine access using front panel - Admin password required — when enabled (default), the Administrator password is required to remove the magazines from the OCP. When disabled, the magazines may be removed using the OCP without entering a password. Robotic motion is prevented when magazines are removed. Allowing unauthorized removal of magazines can leave the Library in a state where backup operations cannot continue if all magazines are not properly replaced in the Library. The default is to require the Administrator password.
•Extended mode enabled — select the box to enable extended mode; clear the box to disable extended mode. The configuration will take effect when the Library power is cycled. Extended mode must be enabled or disabled in both Libraries.
Extended mode can only by disabled in the lower Library from the OCP.
System configuration changes are only applied after the Apply Selections or the Submit button is selected. After making the selection, a warning page informs you of the impact of the proposed change. In some cases a pop-up screen asks you to confirm the change. Many changes also require the device to reboot. You may need to click Refresh to see the changes.
24 Configuring and operating an extended library

Default settings for the extended library
Setting |
Default for the extended library |
Administrator password |
Retained from the master Library |
Mailslot configuration |
All mailslots are disabled |
Network settings |
Retained from the master Library |
Barcode format reporting |
Retained from the master Library |
Reserved slots |
Reserved slots are set to 0 |
SCSI master drive |
Lowest physical drive in the master Library |
SCSI tape drive addresses |
Retained by both Libraries. |
Contrast setting (MSL4048 and MSL8096) |
Retained by both Libraries. |
Library mode |
Automatic |
Autoload |
No |
Loop |
No |
Date and time |
Retained from the master Library. The lower Library is synchron- |
|
ized with the master Library with every command in the extended |
|
library. |
Drive power |
All tape drives are powered on. |
Auto clean |
Retained from master Library |
SNMP |
Retained from the master Library. If SNMP is not configured for |
|
the master Library but is configured for the lower Library, the |
|
extended library takes the settings from the lower Library. |
Allow magazine access without a password |
Retained from the master Library |
Ignore barcode media ID |
Retained from the master Library |
Encryption |
Enabled if encryption is enabled in either Library otherwise dis- |
|
abled. |
Logical libraries (partitioning) |
Disabled |
Updating firmware
Both Libraries must have a firmware version that supports the Library Extender and the firmware versions must be compatible with each other for the extended library to operate. When installing and configuring the extended library the first time, you must update both Libraries to the most recent available firmware versions to ensure that the firmware versions are compatible. For instructions on installing firmware, see Upgrading the Library firmware, page 29.
To find Library firmware that supports the Library Extender:
HP StorageWorks MSL Library Extender user guide |
25 |

1.Browse to http://www.hp.com/support/msl_extender.
2.Select and download the newest firmware version for your Library without _LX_ in the filename.
 NOTE:
NOTE:
The first time you install the Extender you must update the firmware in each Library individually. For future firmware updates, when extended mode is enabled you can update the firmware for both Libraries at the same time with the Extender firmware package. Updating with the firmware package is not only faster and easier, but ensures that the Libraries have compatible firmware versions. When updating firmware for the extended library, select the file with _LX_ in the filename.
The library extender firmware package can be installed from the RMI Support > Firmware page, from the OCP Support > FW Upgrade > By USB screen, or by using HP Library & Tape Tools version 4.8 or newer.
Tape drive firmware is updated through the master Library for all tape drives in the extended library. See the HP StorageWorks MSL2024, MSL4048, and MSL8096 Tape Libraries user and service guide for instructions on updating tape drive firmware.
 NOTE:
NOTE:
Before downgrading the Library firmware to a version that does not support the Extender, disable extended mode in both Libraries and remove the Extender.
Running diagnostic tests
Diagnostic tests for the extended library
•Demo — moves cartridges from the slots to the drives and back. At the end of the test the cartridges are returned to their original slots. The demo is executed from the RMI or OCP.
•Slot to slot — shuffles the cartridges between slots to exercise the robot. At the end of the test the cartridges are NOT returned to their original slots. The slot test is executed from the RMI or OCP.
•Library Extender cycle test — moves the first available cartridge in the master Library to the lower Library and back, exercising the robotics in both Libraries and the Extender, with cartridge exchanges in both directions. At the end of the test the cartridge is returned to its original slot. The Library Extender cycle test is executed from the RMI or OCP.
•Wellness test — exercises all extended library functionality except the external interfaces. The wellness test is executed from the OCP. For instructions on setting and running the wellness test, see The wellness test, page 44.
The demo and slot to slot tests are intended to show the device operating. For Library Extender service and diagnostics, execute the Library Extender cycle test. To verify installation and repairs, execute the wellness test.
26 Configuring and operating an extended library

3 Installing the Library Extender
This chapter provides instructions for installing the Library Extender.
 WARNING!
The MSL2024 Tape Library weighs up to 15.6 kg (34.3 lb) without media and up to 20.4 kg (44.9 lb) with media (24 cartridges). The MSL4048 Tape Library weighs up to 24.6 kg (54.1 lb) without media and up to 34.2 kg (75.2 lb) with media (48 cartridges). The MSL8096 Tape Library weighs up to 46.6 kg (102.7 lb) without media and up to 68.8 kg (151.7 lb) with media (96 cartridges).
•Observe local health and safety requirements and guidelines for manual material handling.
•Remove all tapes to reduce the overall weight of the device and prevent cartridges from falling into the robotic path and damaging the Library.
•Obtain adequate assistance to lift and stabilize the device during installation or removal.
 WARNING!
When placing the Library into or removing the Library from a rack, to reduce the risk of personal injury or damage to equipment:
•Extend the rack's leveling jacks to the floor.
•Ensure that the full weight of the rack rests on the leveling jacks.
•Install stabilizing feet on the rack.
•Extend only one rack component at a time. Racks may become unstable if more than one component is extended.
HP StorageWorks MSL Library Extender user guide |
27 |
Identifying product components
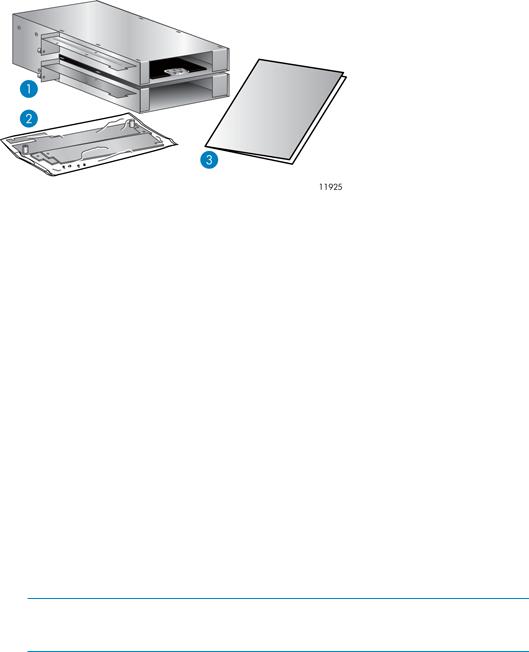
Figure 9 Library Extender product contents
.
Verify that you received the following:
1.Library Extender
2.Packet containing two half-height drive bay covers, four screws, and the alignment gauge.
3.Getting started guide
Downloading product documentation
This document contains information about configuring and operating the extended library. For information about and instructions for installing, configuring, and operating the Tape Libraries, download the HP StorageWorks MSL2024, MSL4048, and MSL8096 user and service guide from the HP website:
1.Browse to
nl
http://www.hp.com/support/tape.
2.In the Tape Storage and Media section, select Tape Libraries.
3.Select HP StorageWorks MSL4048 Tape Library.
 NOTE:
NOTE:
The same user guide is used for the MSL2024, MSL4048, and MSL8096 Tape Libraries.
4.In the Resources for HP StorageWorks MSL4048 Tape Library section, select Manuals.
5.In the User guide section, download the following documents:
•HP StorageWorks MSL2024, MSL4048, and MSL8096 user and service guide
•HP StorageWorks 1/8 G2 and MSL Encryption Kit user guide, if the Libraries use the Encryption Kit
28 Installing the Library Extender
Determining the master and lower Library
The Library Extender is installed with two HP StorageWorks MSL Tape Libraries to combine the cartridge and tape drive slots into a single extended library, as shown in the example in Figure 10, page 29.
Figure 10 Library Extender installed with two MSL4048 Tape Libraries
.
The upper Library controls the extended library and is called the master Library. The extended library uses the master Library OCP, USB port, and Ethernet connection.
The lower Library is operated by the master Library. Its OCP, USB port, and Ethernet connection are not used in the extended library configuration.
The upper Library must be an MSL4048 or MSL8096. The lower Library can be an MSL2024 or MSL4048.
Master (upper) |
Lower |
MSL4048 or MSL8096 |
MSL2024 or MSL4048 |
Saving the Library configurations
When the extended Library is configured, many of the individual Library configuration settings are not retained. If you might ever want to recover their individual configurations, for example to separate the Libraries in the future, save the Library configuration for each Library to a file. See the HP StorageWorks MSL2024, MSL4048, and MSL8096 user and service guide for instructions on saving the Library configuration.
Upgrading the Library firmware
Each Library must have a firmware version that supports the Library Extender, and the firmware versions for the two Libraries must be compatible with each other for the extended library to operate.
HP StorageWorks MSL Library Extender user guide |
29 |
Loading...