


 Loading...
HP Stream Notebook - 11-d010nr, Stream Notebook - 11-d010wm, Stream Notebook - 11-d011wm, Stream Notebook - 11-d077nr User Manual
User Guide
© Copyright 2014 Hewlett-Packard
Development Company, L.P.
Bluetooth is a trademark owned by its proprietor and used by Hewlett-Packard Company under license. Intel is a trademark of Intel Corporation in the U.S. and other countries. Microsoft and Windows are U.S. registered trademarks of the Microsoft group of companies.
The information contained herein is subject to change without notice. The only warranties for HP products and services are set forth in the express warranty statements accompanying such products and services. Nothing herein should be construed as constituting an additional warranty. HP shall not be liable for technical or editorial errors or omissions contained herein.
First Edition: October 2014
Document Part Number: 787340–001
Product notice
This guide describes features that are common to most models. Some features may not be available on your computer.
Not all features are available in all editions of Windows. This computer may require upgraded and/or separately purchased hardware, drivers and/or software to take full advantage of Windows functionality. Go to http://www.microsoft.com for details.
To access the latest user guide, go to http://www.hp.com/support, and select your country. Select Drivers & Downloads, and then follow the on-screen instructions.
Software terms
By installing, copying, downloading, or otherwise using any software product preinstalled on this computer, you agree to be bound by the terms of the HP End User License Agreement (EULA). If you do not accept these license terms, your sole remedy is to return the entire unused product (hardware and software) within 14 days for a full refund subject to the refund policy of your seller.
For any further information or to request a full refund of the price of the computer, please contact your seller.

Safety warning notice
 WARNING! To reduce the possibility of heat-related injuries or of overheating the computer, do not place the computer directly on your lap or obstruct the computer air vents. Use the computer only on a hard, flat surface. Do not allow another hard surface, such as an adjoining optional printer, or a soft surface, such as pillows or rugs or clothing, to block airflow. Also, do not allow the AC adapter to come into contact with the skin or a soft surface, such as pillows or rugs or clothing, during operation. The computer and the AC adapter comply with the user-accessible surface temperature limits defined by the International Standard for Safety of Information Technology Equipment (IEC 60950).
iii
iv Safety warning notice

Processor configuration setting (select models only)


 IMPORTANT: Select computer models are configured with an Intel® Pentium® N35xx series or a Celeron® N28xx/N29xx series processor and a Windows® operating system. Do not change the processor configuration setting in msconfig.exe from 4 or 2 processors to 1 processor. If you do so, your computer will not restart. You will have to perform a factory reset to restore the original settings.
v
vi Processor configuration setting (select models only)

Table of contents
1 |
Starting right ...................................................................................................................................................... |
1 |
|
Visit the HP Apps Store ........................................................................................................................ |
1 |
|
Best practices ....................................................................................................................................... |
1 |
|
Fun things to do .................................................................................................................................... |
1 |
|
More HP resources .............................................................................................................................. |
3 |
2 |
Getting to know your computer ......................................................................................................................... |
5 |
|
Finding your hardware and software information ................................................................................. |
5 |
|
Locating hardware ............................................................................................................... |
5 |
|
Locating software ................................................................................................................. |
5 |
|
Right side ............................................................................................................................................. |
6 |
|
Left side ................................................................................................................................................ |
7 |
|
Display .................................................................................................................................................. |
8 |
|
Top ....................................................................................................................................................... |
9 |
|
Touchpad ............................................................................................................................. |
9 |
|
Lights ................................................................................................................................. |
10 |
|
Buttons ............................................................................................................................... |
11 |
|
Keys ................................................................................................................................... |
12 |
|
Bottom ................................................................................................................................................ |
13 |
|
Labels ................................................................................................................................................. |
14 |
3 Connecting to a network ................................................................................................................................. |
16 |
|
|
Connecting to a wireless network ....................................................................................................... |
16 |
|
Using the wireless controls ................................................................................................ |
16 |
|
Using the wireless button .................................................................................. |
16 |
|
Using operating system controls ....................................................................... |
17 |
|
Sharing data and drives and accessing software .............................................................. |
17 |
|
Using a WLAN ................................................................................................................... |
17 |
|
Using an Internet service provider .................................................................... |
18 |
|
Setting up a WLAN ............................................................................................ |
18 |
|
Configuring a wireless router ............................................................................ |
18 |
|
Protecting your WLAN ....................................................................................... |
19 |
|
Connecting to a WLAN ...................................................................................... |
19 |
|
Using HP Mobile Broadband (select models only) ............................................................ |
20 |
|
Inserting and removing a SIM ........................................................................... |
21 |
|
Using Bluetooth wireless devices (select models only) ..................................................... |
22 |
vii
|
Connecting to a wired network (select models only) .......................................................................... |
22 |
|
Connecting to a local area network (LAN) ......................................................................... |
22 |
4 |
Enjoying entertainment features ..................................................................................................................... |
23 |
|
Multimedia features ............................................................................................................................ |
23 |
|
Using the webcam .............................................................................................................................. |
25 |
|
Using audio ........................................................................................................................................ |
25 |
|
Connecting headphones and microphones ....................................................................... |
25 |
|
Testing your audio features ............................................................................................... |
26 |
|
Using video ......................................................................................................................................... |
26 |
|
Connecting video devices by using an HDMI cable ........................................................... |
27 |
|
Setting up HDMI audio ...................................................................................... |
28 |
|
Discovering and connecting to Miracast-compatible wireless displays (select models |
|
|
only) ................................................................................................................................... |
28 |
5 |
Navigating the screen ..................................................................................................................................... |
29 |
|
Using the TouchPad and gestures ..................................................................................................... |
29 |
|
Tapping .............................................................................................................................. |
30 |
|
Scrolling ............................................................................................................................. |
31 |
|
2-finger pinch zoom ........................................................................................................... |
32 |
|
2-finger click ....................................................................................................................... |
33 |
|
Rotating (select models only) ............................................................................................ |
34 |
|
Edge swipes ...................................................................................................................... |
35 |
|
Display and select a charm ............................................................................... |
35 |
|
Display the Customize icon ............................................................................... |
36 |
|
Switch between open apps ............................................................................... |
37 |
|
Using the keyboard and mouse .......................................................................................................... |
38 |
|
Using the keys ................................................................................................................... |
38 |
|
Using the action keys ........................................................................................ |
38 |
|
Using Windows shortcut keys ........................................................................... |
39 |
|
Using the hot keys ............................................................................................. |
39 |
6 Managing power ............................................................................................................................................. |
40 |
|
|
Initiating Sleep and Hibernation ......................................................................................................... |
40 |
|
Manually initiating and exiting Sleep .................................................................................. |
41 |
|
Manually initiating and exiting Hibernation (select models only) ....................................... |
41 |
|
Setting password protection on wakeup ............................................................................ |
41 |
|
Using the power meter and power settings ........................................................................................ |
42 |
|
Running on battery power .................................................................................................................. |
42 |
|
Factory-sealed battery ....................................................................................................... |
42 |
viii
|
Finding battery information ................................................................................................ |
42 |
|
Conserving battery power .................................................................................................. |
43 |
|
Identifying low battery levels .............................................................................................. |
43 |
|
Resolving a low battery level ............................................................................................. |
43 |
|
Resolving a low battery level when external power is available ........................ |
43 |
|
Resolving a low battery level when no power source is available ..................... |
43 |
|
Resolving a low battery level when the computer cannot exit Hibernation ....... |
43 |
|
Running on external AC power .......................................................................................................... |
44 |
|
Troubleshooting power problems ...................................................................................... |
45 |
|
Shutting down (turning off) the computer ........................................................................................... |
46 |
7 |
Maintaining your computer .............................................................................................................................. |
47 |
|
Improving performance ...................................................................................................................... |
47 |
|
Handling drives .................................................................................................................. |
47 |
|
Using Disk Cleanup ........................................................................................................... |
47 |
|
Updating programs and drivers .......................................................................................................... |
48 |
|
Cleaning your computer ..................................................................................................................... |
48 |
|
Cleaning procedures .......................................................................................................... |
48 |
|
Cleaning the display (All-in-Ones or Notebooks) .............................................. |
49 |
|
Cleaning the sides or cover ............................................................................... |
49 |
|
Cleaning the TouchPad, keyboard, or mouse ................................................... |
49 |
|
Traveling with or shipping your computer ........................................................................................... |
50 |
8 |
Securing your computer and information ........................................................................................................ |
51 |
|
Using passwords ................................................................................................................................ |
51 |
|
Setting Windows passwords .............................................................................................. |
52 |
|
Setting Setup Utility (BIOS) passwords ............................................................................. |
52 |
|
Using Internet security software ......................................................................................................... |
53 |
|
Using antivirus software ..................................................................................................... |
53 |
|
Using firewall software ....................................................................................................... |
53 |
|
Installing software updates ................................................................................................................. |
53 |
|
Installing critical security updates ...................................................................................... |
53 |
|
Installing HP and third-party software updates .................................................................. |
54 |
|
Securing your wireless network .......................................................................................................... |
54 |
|
Backing up your software applications and information ..................................................................... |
54 |
|
Using an optional security cable lock ................................................................................................. |
55 |
9 |
Using Setup Utility (BIOS) and HP PC Hardware Diagnostics (UEFI) ............................................................ |
56 |
|
Starting Setup Utility (BIOS) ............................................................................................................... |
56 |
|
Updating the BIOS ............................................................................................................................. |
56 |
ix
|
Determining the BIOS version ........................................................................................... |
56 |
|
Downloading a BIOS update ............................................................................................. |
57 |
|
Using HP PC Hardware Diagnostics (UEFI) ...................................................................................... |
58 |
|
Downloading HP PC Hardware Diagnostics (UEFI) to a USB device ............................... |
58 |
10 |
Backing up, restoring, and recovering .......................................................................................................... |
59 |
|
Creating recovery media and backups ............................................................................................... |
59 |
|
Creating HP Recovery media ............................................................................................ |
59 |
|
Restore and recovery ......................................................................................................................... |
59 |
|
Recovering using HP Recovery Manager .......................................................................... |
60 |
|
What you need to know ..................................................................................... |
60 |
|
Using the HP Recovery partition (select models only) ...................................... |
61 |
|
Using HP Recovery media to recover ............................................................... |
61 |
|
Changing the computer boot order ................................................................... |
61 |
11 |
Specifications ................................................................................................................................................ |
62 |
|
Input power ......................................................................................................................................... |
62 |
|
Operating environment ....................................................................................................................... |
62 |
12 |
Electrostatic Discharge ................................................................................................................................. |
63 |
Index ................................................................................................................................................................... |
64 |
|
x
1Starting right
This computer is a powerful tool designed to enhance your work and entertainment. Read this chapter to learn about best practices after you set up your computer, fun things to do with your computer, and where to find additional HP resources.
Visit the HP Apps Store
The HP Apps Store offers a wide choice of popular games, entertainment and music apps, productivity apps, and apps exclusive to HP that you can download to the Start screen. The selection is updated regularly and includes regional content and country-specific offers. Be sure to check the HP Apps Store frequently for new and updated features.
 IMPORTANT: You must be connected to the Internet to access the HP Apps Store.
  NOTE: HP picks is available in select countries only.
To view and download an app:
1.From the Start screen, select the Store app.
2.Select HP picks to view all the available apps.
3.Select the app you want to download, and then follow the on-screen instructions. When the download is complete, the app appears on the All apps screen.
Best practices
After you set up and register the computer, we recommend the following steps to get the most out of your smart investment:
●If you haven’t already done so, connect to a wired or wireless network. See details in Connecting to a network on page 16.
●Become familiar with the computer hardware and software. For more information, see Getting to know your computer on page 5 and Enjoying entertainment features on page 23.
●Update or purchase antivirus software. See Using antivirus software on page 53.
●Back up your drive by creating recovery discs or a recovery flash drive. See Backing up, restoring, and recovering on page 59.
Fun things to do
●You know that you can watch a YouTube video on the computer. But did you know that you can also connect your computer to a TV or gaming console? For more information, see Connecting video devices by using an HDMI cable on page 27.
●You know that you can listen to music on the computer. But did you know that you can also stream live radio to the computer and listen to music or talk radio from all over the world? See Using audio on page 25.
Visit the HP Apps Store 1
●You know that you can create a powerful presentation with Microsoft® applications. But did you know you can also connect to a projector to share your ideas with a group? See Connecting video devices by using an HDMI cable on page 27.
●Use the TouchPad and the new Windows® touch gestures for smooth control of images and pages of text. See Using the TouchPad and gestures on page 29.
2Chapter 1 Starting right

More HP resources
You have already used Setup Instructions to turn on the computer and locate this guide. To locate resources that provide product details, how-to information, and more, use this table.
Resource |
Contents |
|||
|
|
|||
Setup Instructions |
● Overview of computer setup and features |
|||
|
|
|||
Help and Support |
● A broad range of how-to information and troubleshooting tips |
|||
To access Help and Support, from the Start screen, |
|
|
||
type help, and then from the Search window, select |
|
|
||
Help and Support. For U.S. support, go to |
|
|
||
http://www.hp.com/go/contactHP. For worldwide |
|
|
||
support, go to http://welcome.hp.com/country/us/en/ |
|
|
||
wwcontact_us.html. |
|
|
||
|
|
|||
Worldwide support |
● Online chat with an HP technician |
|||
To get support in your language, go to |
● |
Support telephone numbers |
||
http://welcome.hp.com/country/us/en/ |
● HP service center locations |
|||
wwcontact_us.html. |
||||
|
|
|||
|
|
|
||
Safety & Comfort Guide |
● |
Proper workstation setup |
||
To access this document: |
● Guidelines for posture and work habits that increase your |
|||
1. |
From the Start screen, type support, and then |
|
comfort and decrease your risk of injury |
|
● Electrical and mechanical safety information |
||||
|
select the HP Support Assistant app. |
|||
|
‒ or – |
|
|
|
|
From the Windows desktop, click the question |
|
|
|
|
mark icon in the notification area, at the far right |
|
|
|
|
of the taskbar. |
|
|
|
2. |
Select My computer, and then select User |
|
|
|
|
guides. |
|
|
|
‒ or – |
|
|
||
Go to http://www.hp.com/ergo. |
|
|
||
|
|
|||
Regulatory, Safety and Environmental Notices |
● Important regulatory notices, including proper battery disposal |
|||
To access this document: |
|
information |
||
|
|
|||
1.From the Start screen, type support, and then select the HP Support Assistant app.
‒ or –
From the Windows desktop, click the question mark icon in the notification area, at the far right of the taskbar.
2.Select My Computer, and then select User Guides.
Limited Warranty* |
● |
Specific warranty information about this computer |
To access this document: |
|
|
1.From the Start screen, type support, and then select the HP Support Assistant app.
‒ or –
More HP resources 3

Resource |
Contents |
From the Windows desktop, click the question mark icon in the notification area, at the far right of the taskbar.
2.Select My computer, and then select Warranty and services.
– or –
Go to http://www.hp.com/go/orderdocuments.
*You can find the expressly provided HP Limited Warranty applicable to your product located with the user guides on your computer and/or on the CD/DVD provided in the box. In some countries/regions, HP may provide a printed HP Limited Warranty in the box. For countries/regions where the warranty is not provided in printed format, you may request a printed copy from http://www.hp.com/go/orderdocuments or write to:
●North America: Hewlett-Packard, MS POD, 11311 Chinden Blvd., Boise, ID 83714, USA
●Europe, Middle East, Africa: Hewlett-Packard, POD, Via G. Di Vittorio, 9, 20063, Cernusco s/Naviglio (MI), Italy
●Asia Pacific: Hewlett-Packard, POD, P.O. Box 200, Alexandra Post Office, Singapore 911507
When you request a printed copy of your warranty, please include your product number, warranty period (found on your service label), name, and postal address.
IMPORTANT: Do NOT return your HP product to the addresses above. For U.S. support, go to http://www.hp.com/go/ contactHP. For worldwide support, go to http://welcome.hp.com/country/us/en/wwcontact_us.html.
4Chapter 1 Starting right

2Getting to know your computer
Finding your hardware and software information
Locating hardware
To find out what hardware is installed on your computer:
1.From the Start screen, type control panel, and then select Control Panel.
2.Select System and Security, select System, and then click Device Manager in the left column. A list displays all the devices installed on your computer.
To find out information about system hardware components and the system BIOS version number, press fn+esc.
Locating software
To find out what software is installed on your computer:
▲From the Start screen, click the down arrow in the lower-left corner of the screen.
Finding your hardware and software information |
5 |
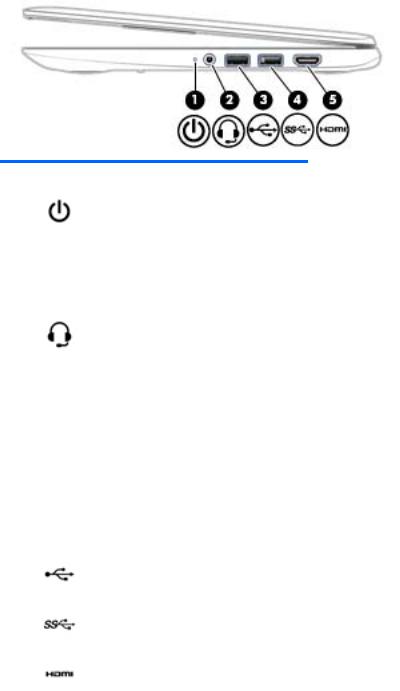
Right side
Component |
|
Description |
|
|
|
(1) |
Power light |
● On: The computer is on. |
|
|
● Blinking: The computer is in the Sleep state, a power- |
|
|
saving state. The computer shuts off power to the |
|
|
display and other unneeded components. |
|
|
● Off: The computer is off or in Hibernation. Hibernation |
|
|
is a power-saving state that uses the least amount of |
|
|
power. |
|
|
|
(2) |
Audio-out (headphone)/Audio-in |
Connects optional powered stereo speakers, headphones, |
|
(microphone) jack |
earbuds, a headset, or a television audio cable. Also |
|
|
connects an optional headset microphone. This jack does |
|
|
not support optional microphone-only devices. |
|
|
WARNING! To reduce the risk of personal injury, adjust |
|
|
the volume before putting on headphones, earbuds, or a |
|
|
headset. For additional safety information, refer to the |
|
|
Regulatory, Safety, and Environmental Notices. To access |
|
|
this guide, from the Start screen, type support, and then |
|
|
select the HP Support Assistant app. |
|
|
NOTE: When a device is connected to the jack, the |
|
|
computer speakers are disabled. |
|
|
NOTE: Be sure that the device cable has a 4-conductor |
|
|
connector that supports both audio-out (headphone) and |
|
|
audio-in (microphone). |
|
|
|
(3) |
USB 2.0 port |
Connects an optional USB device, such as a keyboard, |
|
|
mouse, external drive, printer, scanner or USB hub. |
|
|
|
(4) |
USB 3.0 port |
Connects an optional USB device, such as a keyboard, |
|
|
mouse, external drive, printer, scanner or USB hub. |
|
|
|
(5) |
HDMI port |
Connects an optional video or audio device, such as a high- |
|
|
definition television, any compatible digital or audio |
|
|
component, or a high-speed HDMI device. |
|
|
|
6Chapter 2 Getting to know your computer
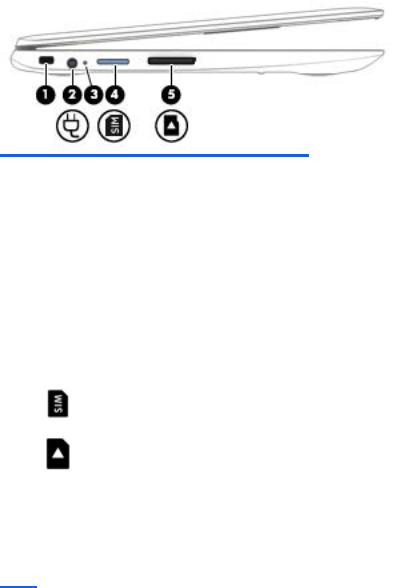
Left side
Component |
|
Description |
|
|
|
(1) |
Security cable slot |
Attaches an optional security cable to the computer. |
|
|
NOTE: The security cable is designed to act as a |
|
|
deterrent, but it may not prevent the computer from being |
|
|
mishandled or stolen. |
|
|
|
(2) |
Power connector |
Connects an AC adapter. |
|
|
|
(3) |
AC adapter light |
● White: The AC adapter is connected and the battery is |
|
|
charged. |
|
|
● Amber: The AC adapter is connected and the battery |
|
|
is charging. |
|
|
● Off: The computer is using battery power. |
|
|
|
(4) |
SIM Card slot (select models only) |
A slot for a SIM card. |
|
|
NOTE: This feature is available on select models only. |
|
|
|
(5) |
Memory card reader |
Reads optional memory cards that store, manage, share, or |
access information. To insert a card:
Hold the card label-side up, with connectors facing the slot, insert the card into the slot, and then push in on the card until it is firmly seated.
To remove a card:
Press in on the card it until it pops out.
Left side |
7 |
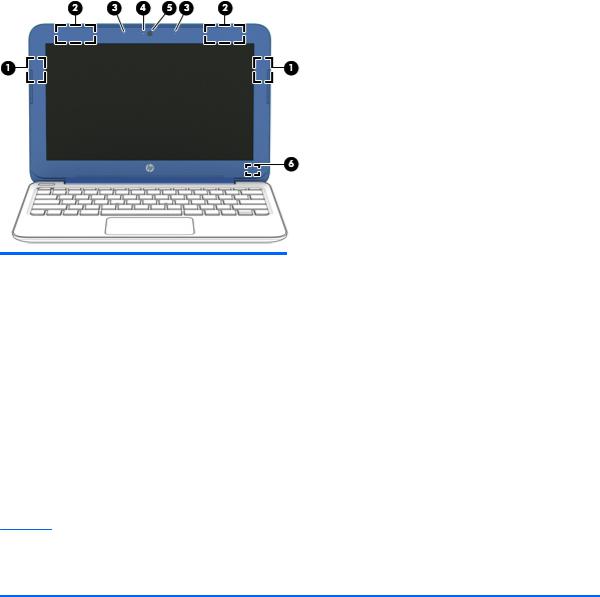
Display
Component |
Description |
|
|
|
|
(1) |
WLAN antennas (2)* |
Send and receive wireless signals. |
|
|
|
(2) |
WWAN antennas (2)* |
Send and receive wireless signals. |
|
|
|
(3) |
Internal microphones |
Record sound. |
|
|
|
(4) |
Webcam light |
On: The webcam is in use. |
|
|
|
(5) |
Webcam |
Records video and captures photographs. Some models allow |
|
|
you to video conference and chat online using streaming video. |
|
|
To use the webcam, from the Start screen, type camera, and |
|
|
then select Camera from the list of applications. |
|
|
|
(6) |
Internal display switch |
Turns off the display and initiates Sleep if the display is closed |
|
|
while the power is on. |
NOTE: The internal display switch is not visible from the outside of the computer.
*The antennas are not visible from the outside of the computer. For optimal transmission, keep the areas immediately around the antennas free from obstructions. For wireless regulatory notices, see the section of the Regulatory, Safety, and Environmental Notices that applies to your country or region. To access this guide, from the Start screen, type support, and then select the HP Support Assistant app.
8Chapter 2 Getting to know your computer

Top
Touchpad
Component |
Description |
|
|
|
|
(1) |
TouchPad zone |
Reads your finger gestures to move the pointer or activate items |
|
|
on the screen. |
|
|
NOTE: The TouchPad also supports edge-swipe gestures. For |
|
|
more information, see Edge swipes on page 35. |
|
|
|
(2) |
Left TouchPad button |
Functions like the left button on an external mouse. |
|
|
|
(3) |
Right TouchPad button |
Functions like the right button on an external mouse. |
|
|
|
Top 9

Lights
Component |
|
Description |
|
|
|
(1) |
Power light |
● On: The computer is on. |
|
|
● Blinking: The computer is in the Sleep state, a power- |
|
|
saving state. The computer shuts off power to the |
|
|
display and other unneeded components. |
|
|
● Off: The computer is off or in Hibernation. Hibernation |
|
|
is a power-saving state that uses the least amount of |
|
|
power. |
|
|
|
(2) |
Caps lock light |
● On: Caps lock is on, which switches the keys to all |
|
|
capital letters. |
|
|
|
(3) |
Mute light |
● Amber: Computer sound is off. |
|
|
● Off: Computer sound is on. |
|
|
|
10 Chapter 2 Getting to know your computer

Buttons
Component |
Description |
||
|
|
|
|
(1) |
Power button |
● |
When the computer is off, press the button to turn on the |
|
|
|
computer. |
|
|
● |
When the computer is on, press the button briefly to initiate |
|
|
|
Sleep. |
|
|
● |
When the computer is in Hibernation, press the button |
|
|
|
briefly to exit Hibernation. |
|
|
CAUTION: Pressing and holding down the power button will |
|
|
|
result in the loss of unsaved information. |
|
|
|
If the computer has stopped responding and Windows |
|
|
|
shutdown procedures are ineffective, press and hold the power |
|
|
|
button down for at least 5 seconds to turn off the computer. To |
|
|
|
learn more about your power settings, see your power options. |
|
|
|
▲ |
From the Start screen, type power, select Power and |
sleep settings, and then select Power and sleep from the list of applications.
- or -
From the Windows desktop, right-click the Start button, and then select Power Options.
Top 11
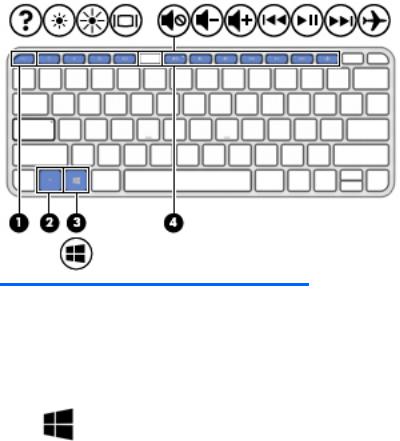
Keys
Component |
|
Description |
|
|
|
(1) |
esc key |
Displays system information when pressed in combination |
|
|
with the fn key. |
|
|
|
(2) |
fn key |
Executes frequently used system functions when pressed |
|
|
in combination with the esc key, or on select models, the |
|
|
spacebar. |
|
|
|
(3) |
Windows key |
Returns you to the Start screen from an open app or the |
|
|
Windows desktop. |
|
|
NOTE: Pressing the Windows key again will return you to |
|
|
the previous screen. |
|
|
|
(4) |
Action keys |
Execute frequently used system functions. |
|
|
NOTE: On select models, the f5 action key turns the |
|
|
radiance backlight keyboard feature off or on. |
|
|
|
12 Chapter 2 Getting to know your computer
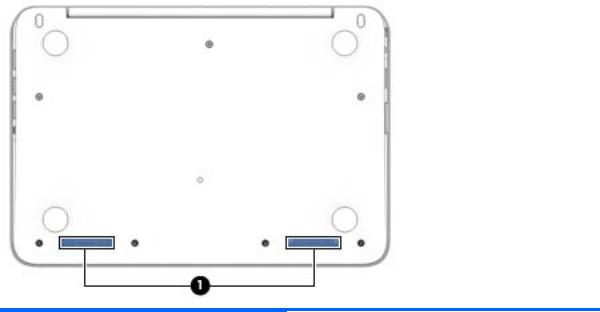
Bottom
Component |
Description |
|
|
|
|
(1) |
Speakers (2) |
Produce sound. |
|
|
|
Bottom 13
Loading...