


home page
hp learning products
http://www.hp.com/support/tape may have a later version
data protection
 index of topics
 contact hp
home page before you start
 tape drive operation
 autoloader operation

 cartridge care
cleaning one-button disaster
recovery
specifications
diagnostics
 troubleshooting
 FAQs
FAQs
SCSI configuration

 UNIX configuration
 ordering supplies
 installing drivers
|
|
|
install |
|
|
|
operate |
|
|
|
operate |
|
|
|
|
|
|
|
|
|
|
|
|||
|
|
|
|
|
|
tape drive |
|
|
|
autoloader |
|
|
|
|
|||||||||||
|
|
|
|
|
|
|
|
|
|
|
|
|
|
|
|
|
|
|
|
|
|
|
|
|
|
|
|
|
|
|
|
|
|
|
|
|
|
|
|
|
|
|
|
|
|
|
|
|
|
|
|
cartridges troubleshoot
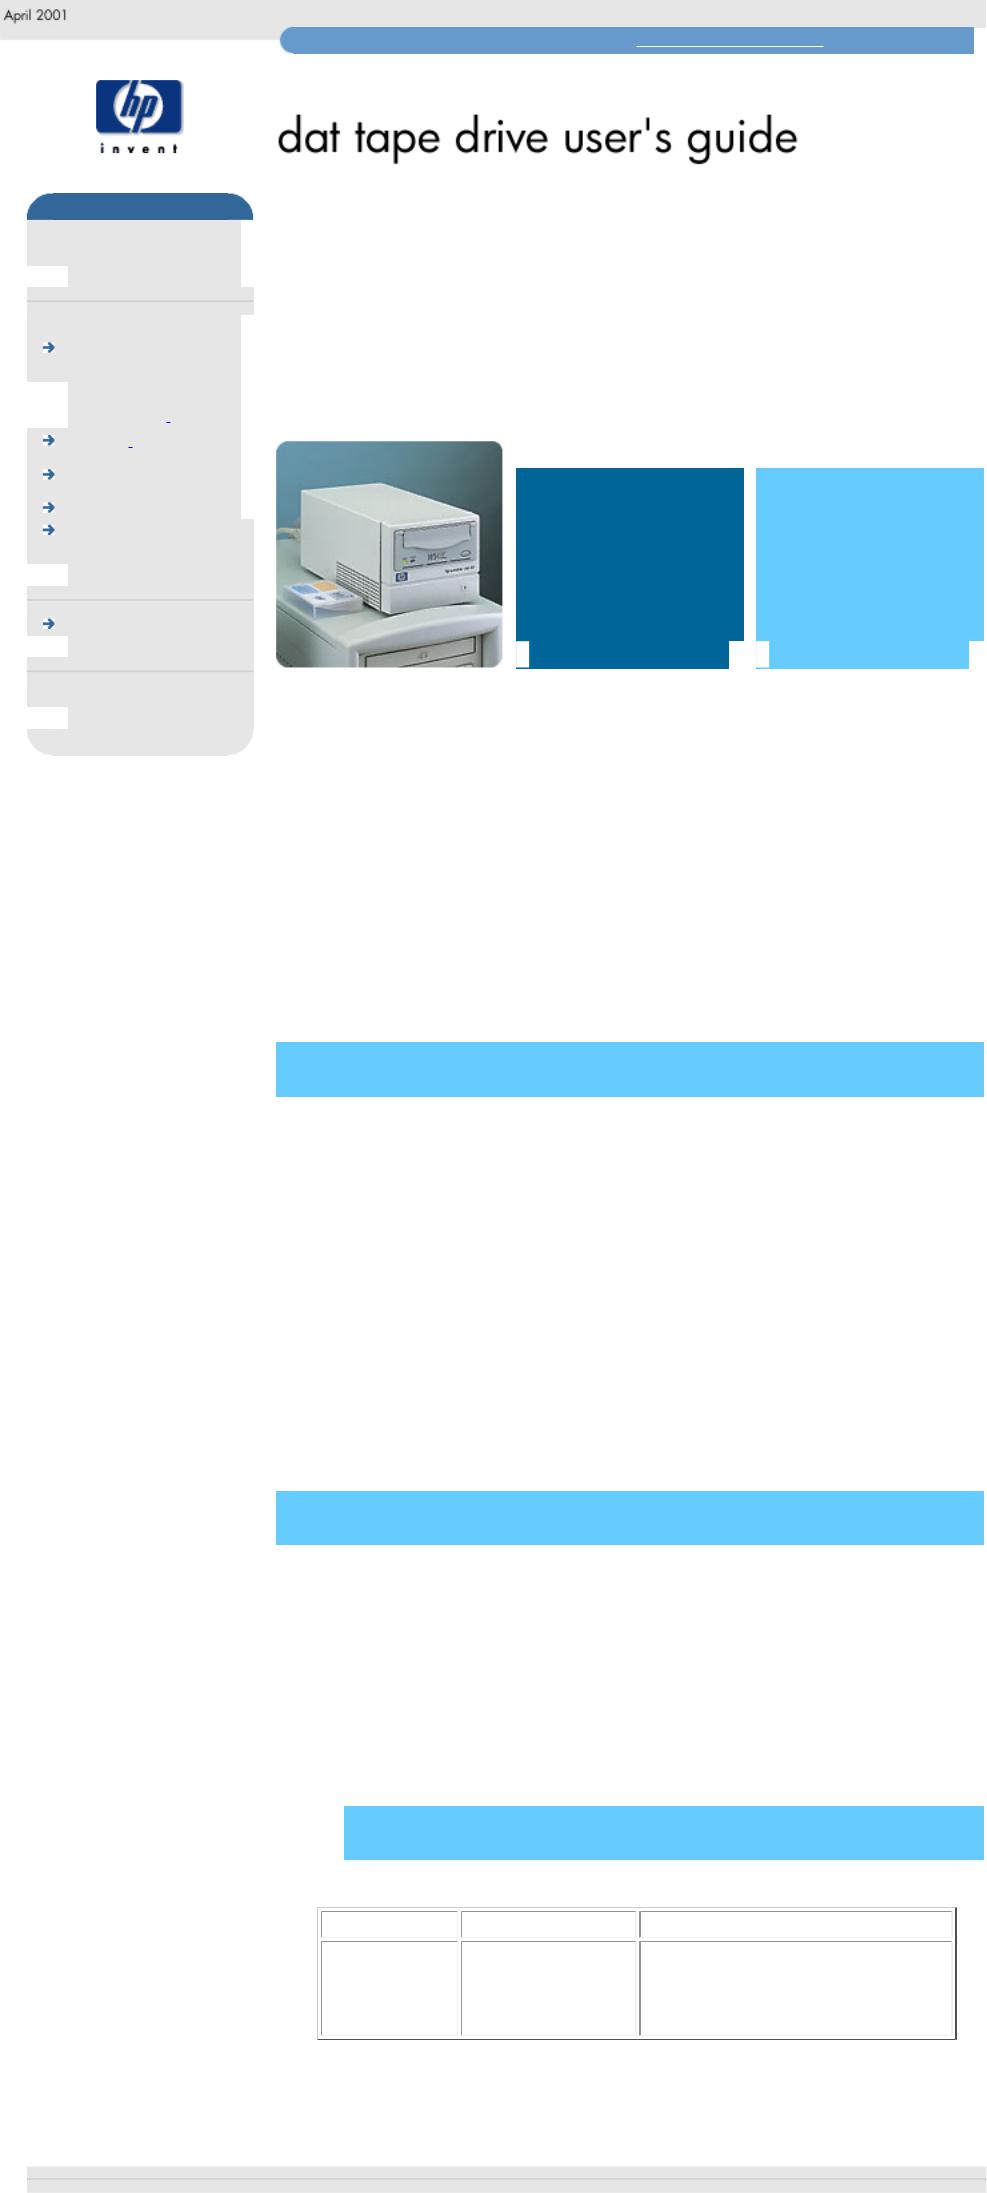
This is the User's Guide for HP Surestore DAT internal, external and removable (rack-mounted) tape drives and autoloaders. It describes how to use HP Surestore DAT tape drives and autoloaders.
To start, click on one of the above topics or select a topic from the navigation pane on the left. For example, click on specifications for a detailed description of the HP Surestore DAT tape drives and autoloaders.
Use the index of topics page to search for a particular topic.
Use the contact hp page to find out contact details for your nearest Customer Care Center.
notice
The information contained in this document is subject to change without notice.
Hewlett-Packard makes no warranty of any kind with regard to the material, including, but not limited to, the implied warranties of merchantability and fitness for a particular purpose.
Hewlett-Packard shall not be liable for errors contained herein or direct, indirect, special, incidental or consequential damages in connection with the furnishing, performance, or use of this document.
This document contains propriety information which is protected by copyright. All rights reserved. No part of this document may be photocopied, reproduced or translated to another language without the prior written consent of HewlettPackard.
copyright
Copyright 1997-2001 Hewlett-Packard. All rights reserved.
Windows and Windows NT are U.S. registered trademarks of Microsoft Corp.
UNIX is a registered trademark of X/Open Company in the U.S. and other countries.
Adobe and Acrobat are trademarkes of Adobe Systems Incorporated.
 revision history
Edition |
Date |
Comments |
1.0 |
April 2001 |
First edition of the HP Surestore |
|
|
DAT user's guide in the new format. |
|
|
Incorporates information from the |
|
|
1999 guide with update notes. |
© 1997-2001, Hewlett-Packard Company
file:///C|/Documents%20and%20Settings/topher.COL-SPRINGS/Desktop/Ultrium/pdf/document/home.htm [11/15/2001 1:24:52 PM]

index
hp learning products
http://www.hp.com/support/tape may have a later version
data protection
index of topics 
 contact hp
home page before you start
 tape drive operation
 autoloader operation

 cartridge care
cleaning one-button disaster
recovery
specifications
diagnostics
 troubleshooting
 FAQs
FAQs
 SCSI configuration
 UNIX configuration
 ordering supplies
 installing drivers
 index
index
 contents of this section
|
|
|
a |
b |
c d e |
|
f |
g h |
i |
j |
l |
m |
|
|
|
|
|
|
|||||||||
|
|
|
n |
o |
p |
r |
s |
t |
|
u |
v |
w |
|
|
|
|
|
|
|
|
|
|
|
|
|
|
|
|
|
|
|
|
|
|
|
|
|
|
|
|
|
a accessories, ordering See Ordering Information
addresses, customer support See Obtaining Service
AIX (IBM UNIX) See IBM AIX 3.2.5+
altitude, operating limits Choose your drive model from Specifications
amber light See Interpreting the Front Panel Lights for tape drives or Interpreting the Autoloader Front Panel
America Online See Worldwide Online Services
anti-static protection See Installation Guide
applications, backup See Backup Software Requirements
archive life See Caring for Cartridges
Asia Pacific support numbers See Technical Support for Asia Pacific
AT&T mode See UNIX Glossary
autoloader
cleaning tape heads See Cleaning the Tape Heads
front panel lights See Front Panel Controls and Indicators front panel messages See Front Panel Messages random mode See Autoloader Modes of Operation stacker mode See Autoloader Modes of Operation
autoloader option switch See Installation Guide
b
backup applications See Backup Software Requirements
backup driver software See Backup Software Requirements
backup failure See You Cannot Back Up or Restore
backup software See Backup Software Requirements
compatibility with HP One-Button Disaster Recovery See HP OneButton Disaster Recovery
compatibility with TapeAlert See Backup Software Requirements problems with See You Cannot Back Up or Restore
backups, scheduling See Choosing a Backup Strategy
backward compatibility See Cartridge Compatibility by Model
Berkeley mode See UNIX Glossary
Bertelsmann See Worldwide Online Services
BIOS See Computer Takes a Long Time to Boot Up
boot up stalls See Computer Boots, Then Halts
boot-up fails See Computer Does Not Boot Up
box contents See Installation Guide
c
cables available See Ordering Information
cable supplied with drive See Installation Guide
capacity, tape See Cartridge Compatibility by Model
care of cartridges See Caring for Cartridges
cartridges
archive life See Caring for Cartridges available from HP See Ordering Information capacity See Cartridge Compatibility by Model care of See Caring for Cartridges
choosing See Choosing Cartridges
drive compatibility See Cartridge Compatibility by Model excessive errors See Cleaning the Tape Heads
forcing ejection See Forcing Ejection for a Tape Drive or Forcing Ejection for an Autoloader
jammed See Jammed Cartridge labels See labels, cartridge
life See Caring for Cartridges
loading cartridges in a drive See Loading and Unloading a Cartridge loading cartridges in a magazine See Loading a Magazine and Cartridges
ordering See Ordering Information storing See Caring for Cartridges tape life See Caring for Cartridges times used See Caring for Cartridges
unloading See Loading and Unloading a Cartridge write-protecting See Write-Protecting Cartridges
certifications Choose your drive model from Specifications
changing SCSI ID See Installation Guide
Clean light See Interpreting the Front Panel Lights or Interpreting the Autoloader Front Panel Lights
cleaning cartridges See Cleaning the Tape Heads
cleaning tape heads See Cleaning the Tape Heads
cleaning as part of backup routine See Cleaning as Part of Your Routine
Compaq UNIX systems See UNIX Configuration Guide: Compaq Systems
compatibility, backward See Cartridge Compatibility by Model
compression
available on HP tape drives Choose your drive model from
Specifications
definition See UNIX Glossary
CompuServe See Worldwide Online Services
computer problems See Problems with Your Computer
condensation See Caring for Cartridges
configuration switches, UNIX See Installation Guide
contacting HP See Obtaining Service
customer support See Obtaining Technical Support
d
DAT drive features Choose your drive model from Specifications
DAT cartridges
about See Choosing Cartridges ordering See Ordering Information
data cartridges
about See Choosing Cartridges ordering See Ordering Information
data compression Choose your drive model from Specifications
DDS
formats See Choosing Cartridges
formats supported See Cartridge Compatibility by Model tape life See Caring for Cartridges
DDS logos See Choosing Cartridges
default SCSI ID See Installation Guide
device filenames
HP-UX See HP-UX Systems
IBM AIX See IBM AIX 3.2.5+
PC UNIX See PC-Based UNIX (SCO)
diagnosing problems See Troubleshooting or Diagnostics
Digital UNIX 4.x See UNIX Configuration Guide: Compaq Systems
disaster recovery See HP One-Button Disaster Recovery
drive
cannot back up or restore See You Cannot Back Up or Restore capacity See Cartridge Compatibility by Model
designations Choose your drive model from Specifications does not power up See Tape Drive Does Not Power Up features Choose your drive model from Specifications
internal identification number Choose your drive model from Specifications
lights See Interpreting the Front Panel Lights or Interpreting the Autoloader Front Panel Lights
maintenance See Cleaning the Tape Heads
models Choose your drive model from Specifications
power requirements Choose your drive model from Specifications returning for service See Returning your HP SureStore Tape Drive specifications Choose your drive model from Specifications switching on See Switching on the Drive
use instructions See Using Your Tape Drive warranty See Warranty
driver software
available online See Worldwide Online Services missing See You Cannot Back Up or Restore
e
Eject button (autoloader) See Eject Button
Eject button (DAT drives) See Loading and UnloadingTape Drives or Using HP One-Button Disaster Recovery
ejecting a cartridge See Loading and Unloading a Cartridge
ejection, forced See Forcing Ejection for a Tape Drive or Forcing Ejection for an Autoloader
electrical requirements Choose your drive model from Specifications
electromagnetic specifications Choose your drive model from Specifications
electrostatic discharge, protection against See Installation Guide
EMC certifications Choose your drive model from Specifications or see the Regulatory Booklet
emergency recovery See HP One-Button Disaster Recovery
environmental specifications Choose your drive model from Specifications
equipment supplied with drive See Installation Guide
error condition signal See Error Condition Signal
error messages (autoloader) See Front Panel Messages
European support numbers See Technical Support for Europe
expired cleaning cartridges See Cleaning the Tape Heads
Express Exchange warranty See Warranty or Returning Your HP SureStore Tape Drive
f
fast, wide SCSI See SCSI Configuration
fault condition See Troubleshooting
features of DAT drives Choose your drive model from Specifications
filemarks See UNIX Glossary
flashing light See Interpreting the Front Panel Lights for tape drives or Interpreting the Autoloader Front Panel
forcing ejection See Forcing Ejection for a Tape Drive or Forcing Ejection for an Autoloader
Form, Customer Service See Customer Service Form
formats, tape See Choosing Cartridges
frequency of backup See Choosing a Backup Strategy
frequency of cleaning See Cleaning the Tape Heads
frequently asked questions See Frequently Asked Questions
front panel See Interpreting the Front Panel Lights for tape drives or Interpreting the Autoloader Front Panel
front panel messages (autoloader) See Front Panel Messages
FTP site See Worldwide Online Services
g
green light See Interpreting the Front Panel Lights for tape drives or Interpreting the Autoloader Front Panel
h
hang during boot-up See Computer Boots, Then Halts
hard error See Error Condition Signal
head cleaner, automatic See Cleaning the Tape Heads
head cleaning See Cleaning the Tape Heads
high error rate See Cleaning the Tape Heads
host adapter, SCSI See Checking Installation Prerequisites
HP Instant Support See Diagnostics
HP One-Button Disaster Recovery See HP One-Button Disaster Recovery
HP part numbers See Ordering Information
HP service agreements See Service Agreements
HP-UX See HP-UX Systems
humidity specifications Choose your drive model from Specifications
i
IBM AIX See IBM AIX 3.2.5+
immediate mode See UNIX Glossary
infinite flush See UNIX Glossary
inserting a cartridge See Loading and Unloading a Cartridge
installation prerequisites See Checking Installation Prerequisites
installing your drive See Installation Guide
Internet sites See Worldwide Online Services
IRIX See Silicon Graphics IRIX
j
jammed cartridges See Jammed Cartridge
jumpers, SCSI ID See Installation Guide
l
labels, cartridge
autoloader Labeling Magazines backup tapes See Labeling Cartridges
one label only See Caring for Cartridges
LEDs See Interpreting the Front Panel Lights for tape drives or Interpreting the Autoloader Front Panel
life of DDS tape See Caring for Cartridges
lights See Interpreting the Front Panel Lights for tape drives or Interpreting the Autoloader Front Panel
Load Cartridge button See Load Cartridge Button
loading cartridges See Loading and Unloading a Cartridge
logo, DDS See Choosing Cartridges
loose connections See Tape Drive Does Not Power Up and You Cannot Back Up or Restore
LUN (logical unit number) See UNIX Glossary
m
magazine
ejecting See Ejecting the Magazine
labeling See Labeling Cartridges and Magazines loading See Loading a Magazine and Cartridges
Magazine Present light See Magazine Present Light
major and minor numbers, HP-UX See HP-UX Systems
maintenance See Cleaning the Tape Heads
measurements Choose your drive model from Specifications
Media Caution light See Interpreting the Front Panel Lights
messages
autoloader See Front Panel Messages TapeAlert monitoring utility See TapeAlert
model numbers Choose your drive model from Specifications
models, DAT drive Choose your drive model from Specifications
monitoring utility See TapeAlert
mounting rails See rail kits
n
narrow SCSI See Narrow and Wide, Fast and Ultra SCSI
non-operating limits Choose your drive model from Specifications
non-warranty service See Obtaining Service
North American support numbers See Technical Support for North and South America
o
one-button disaster recovery See HP One-Button Disaster Recovery
online services See Worldwide Online Services
on-off switch See Switching on the Drive
operating instructions See Using Your Tape Drive or Using Your Autoloader
operating limits Choose your drive model from Specifications
Operator Attention Required light See Operator Attention Required Light
option switch, autoloader See Installation Guide
ordering parts and accessories See Ordering Information
out-of-warranty service See Obtaining Service
overwrite protection See Write-Protecting Cartridges
p
part numbers See Ordering Information
parts supplied with drive See Installation Guide
PC-based UNIX See PC-Based UNIX (SCO)
performance specifications Choose your drive model from Specifications
phone numbers See Obtaining Technical Support
physical specifications Choose your drive model from Specifications
power-cycling See Power-Cycling
power requirements Choose your drive model from Specifications
power switch See Switching on the Drive or Switching on the Autoloader
powering up drive See Switching on the Drive or Switching on the Autoloader
power-up failure See Tape Drive Does Not Power Up
prerequisites for installation See Checking Installation Prerequisites
problems
diagnosing See Troubleshooting
dirty tape heads See Cleaning the Tape Heads
during self-test See If There Are Problems During the Self-Test error condition signal See Error Condition Signal
flashing lights See Interpreting the Front Panel Lights for tape drives or Interpreting the Autoloader Front Panel
frequently asked questions See Frequently Asked Questions with computer See Problems with Your Computer
with tape drive See Problems with Your Tape Drive
product numbers See Ordering Information or Identifying which HP SureStore DAT Product You Have
protection from overwriting See Write-Protecting Cartridges
putting in a cartridge See Loading and Unloading a Cartridge
r
radio interference certifications Choose your drive model from Specifications or see the "Regulatory Information" booklet
rail kits available See Ordering Information
random mode
cleaning tape heads in See Cleaning the Tape Heads
definition See Autoloader Modes of Operation
regulatory information Choose your drive model from Specifications or see the "Regulatory Information" booklet
removing a cartridge See Loading and Unloading a Cartridge
removable drives
about See Replacing a Removable Drive removing See Replacing a Removable Drive replacing See Replacing a Removable Drive
repairs See Returning your HP Surestore Tape Drive for Service
requirements for installation See Checking Installation Prerequisites
restore, failure See You Cannot Back Up or Restore
returning a drive for service See Returning your HP Surestore Tape Drive
s
safety certifications Choose your drive model from Specifications or see the "Regulatory Information" booklet
scheduling backups See Choosing a Backup Strategy
SCO UNIX See PC-Based UNIX (SCO)
SCSI
about See What Is SCSI?
accessories available See Ordering Information bus configuration See Setting Up the SCSI Bus cables See Ordering Information or SCSI Cables
checking configuration See HP Library & Tape Tools connection loose See Tape Drive Does Not Power Up and You Cannot Back Up or Restore
driver software See You Cannot Back Up or Restore LVD devices See Ultra2 and SE SCSI
narrow SCSI See Narrow and Wide, Fast and Ultra SCSI planning the bus See Setting Up the SCSI Bus
SE devices See Ultra2 and SE SCSI termination See SCSI Termination
ultra SCSI See Narrow and Wide, Fast and Ultra SCSI wide SCSI See Narrow and Wide, Fast and Ultra SCSI
SCSI commands
cleaning tape heads in random mode See Cleaning the Tape Heads
SCSI IDs
about See SCSI ID Numbers
changing See Installation Guide for your model conflicting See You Cannot Back Up or Restore
default See Installation Guide for your model identifying existing See Identifying SCSI ID Numbers
planning See Setting Up the SCSI Bus
Select button See Select Button
self-test, autoloader
after installation See Switching on the Autoloader error condition See Operator Attention Required Light
problems during See If There Are Problems During the Self-Test
self-test, drive
after installation See Switching on the Drive error condition See Error Condition Signal
problems during See If There Are Problems During the Self-Test
service See Obtaining Service
service agreements See Service Agreements
Service Form See Customer Service Form
setting SCSI ID See Installation Guide
shelf life, cartridge See Caring for Cartridges
shipping safely See Returning your HP Surestore Tape Drive
shock survival Choose your drive model from Specifications
Silicon Graphics IRIX See Silicon Graphics IRIX
size of drive Choose your drive model from Specifications
software, backup See Backup Software Requirements
Solaris (Sun) See Sun Systems
specifications Choose your drive model from Specifications
stabilizing temperature See Caring for Cartridges
stacker mode
cleaning tape heads in See Cleaning the Tape Heads definition See Autoloader Modes of Operation
storage capacity See Cartridge Compatibility by Model
storing cartridges See Caring for Cartridges
Sun UNIX systems See Sun Systems
supplies See Ordering Information
support telephone numbers See Obtaining Technical Support
switches, UNIX configuration See Installation Guide
switching on drive See Switching on the Drive or Switching on the Autoloader
t
Tape Activity light See Interpreting the Front Panel Lights or Interpreting the Autoloader Front Panel
tape cartridges
about See Choosing Cartridges ordering See Ordering Information
tape format See Choosing Cartridges
tape heads, cleaning See Cleaning the Tape Heads
Tape light See Interpreting the Front Panel Lights or Interpreting the Autoloader Front Panel
TapeAlert See TapeAlert
tapes See Choosing Cartridges
technical support See Obtaining Technical Support or Customer Service Form
telephone numbers See Obtaining Technical Support
temperature limits Choose your drive model from Specifications
temperature, stabilizing See Caring for Cartridges
termination
problems with See Problems with Your Tape Drive SCSI bus See SCSI Termination
testing your drive See Diagnostics
transfer rate Choose your drive model from Specifications
troubleshooting See Troubleshooting
turning on drive See Switching on the Drive or Switching on the Autoloader
u
ultra SCSI See Narrow and Wide, Fast and Ultra SCSI
UNIX systems
about See UNIX Configuration Guide Compaq See Compaq Systems Glossary See UNIX Glossary HP-UX See HP-UX Systems
IBM AIX See IBM AIX 3.2.5+
PC UNIX See PC-Based UNIX (SCO) SCO UNIX See PC-Based UNIX (SCO) Silicon Graphics See Silicon Graphics IRIX Sun See Sun Systems
Verifying installation See Verifying the Installation
Unload button See Loading and Unloading a Cartridge
unloading a cartridge See Loading and Unloading a Cartridge
upgrading firmware See Diagnostics
URL See Worldwide Online Services
US support numbers See Technical Support for North and South America
using the autoloader See Using Your Autoloader
using the drive See Using Your Tape Drive
v
verifying installation
Microsoft Windows systems See Diagnostics
Novell NetWare systems See Diagnostics
UNIX systems See Verifying the Installation
vibration limits Choose your drive model from Specifications
voltage requirements Choose your drive model from Specifications
w
warning signal See Interpreting the Front Panel Lights or Interpreting the Autoloader Front Panel
warranty See Warranty
warranty service See Obtaining Service
weight of drive Choose your drive model from Specifications
wide SCSI See Narrow and Wide, Fast and Ultra SCSI
World Wide Web site See Worldwide Online Services
worn-out cartridges See Cleaning the Tape Heads
write-protected cartridges, unloading See Write-Protecting Cartridges
write-protection See Write-Protecting Cartridges
file:///C|/Documents%20and%20Settings/topher.COL-SPRINGS/Desktop/Ultrium/pdf/document/dds/user/reseller/eng/index.htm (1 of 2) [11/15/2001 1:24:56 PM]

index
© 1997-2001, Hewlett-Packard Company
file:///C|/Documents%20and%20Settings/topher.COL-SPRINGS/Desktop/Ultrium/pdf/document/dds/user/reseller/eng/index.htm (2 of 2) [11/15/2001 1:24:56 PM]
home page
hp learning products
http://www.hp.com/support/tape may have a later version
data protection
 index of topics
 contact hp
home page before you start
 tape drive operation
 autoloader operation

 cartridge care
cleaning one-button disaster
recovery
specifications
diagnostics
 troubleshooting
 FAQs
FAQs
SCSI configuration

 UNIX configuration
 ordering supplies
 installing drivers
|
|
|
install |
|
|
|
operate |
|
|
|
operate |
|
|
|
|
|
|
|
|
|
|
|
|||
|
|
|
|
|
|
tape drive |
|
|
|
autoloader |
|
|
|
|
|||||||||||
|
|
|
|
|
|
|
|
|
|
|
|
|
|
|
|
|
|
|
|
|
|
|
|
|
|
|
|
|
|
|
|
|
|
|
|
|
|
|
|
|
|
|
|
|
|
|
|
|
|
|
|
cartridges troubleshoot
This is the User's Guide for HP Surestore DAT internal, external and removable (rack-mounted) tape drives and autoloaders. It describes how to use HP Surestore DAT tape drives and autoloaders.
To start, click on one of the above topics or select a topic from the navigation pane on the left. For example, click on specifications for a detailed description of the HP Surestore DAT tape drives and autoloaders.
Use the index of topics page to search for a particular topic.
Use the contact hp page to find out contact details for your nearest Customer Care Center.
notice
The information contained in this document is subject to change without notice.
Hewlett-Packard makes no warranty of any kind with regard to the material, including, but not limited to, the implied warranties of merchantability and fitness for a particular purpose.
Hewlett-Packard shall not be liable for errors contained herein or direct, indirect, special, incidental or consequential damages in connection with the furnishing, performance, or use of this document.
This document contains propriety information which is protected by copyright. All rights reserved. No part of this document may be photocopied, reproduced or translated to another language without the prior written consent of HewlettPackard.
copyright
Copyright 1997-2001 Hewlett-Packard. All rights reserved.
Windows and Windows NT are U.S. registered trademarks of Microsoft Corp.
UNIX is a registered trademark of X/Open Company in the U.S. and other countries.
Adobe and Acrobat are trademarkes of Adobe Systems Incorporated.
 revision history
Edition |
Date |
Comments |
1.0 |
April 2001 |
First edition of the HP Surestore |
|
|
DAT user's guide in the new format. |
|
|
Incorporates information from the |
|
|
1999 guide with update notes. |
© 1997-2001, Hewlett-Packard Company
file:///C|/Documents%20and%20Settings/topher.COL-SPRINGS/Desktop/Ultrium/pdf/document/dds/user/reseller/eng/home.htm [11/15/2001 1:24:57 PM]
before you start
hp learning products
http://www.hp.com/support/tape may have a later version
data protection
 index of topics
 contact hp
home page before you start
 tape drive operation
 autoloader operation

 cartridge care cleaning
one-button disaster  recovery
  specifications
  diagnostics
  troubleshooting
 FAQs
FAQs
 SCSI configuration
 UNIX configuration
 ordering supplies
 installing drivers
 before you start
 contents of this section
pre-installation check list installation
how to identify your model
computer and backup software requirements  computer systems
backup software
Windows NT and Novell Netware backup utilities
pre-installation check list
Before you install your HP Surestore DAT drive:
1.Check that your computer meets the requirements for installation.
2.Make a note of the model name, product number, and serial number of your tape drive and record it on page 2 of the "Getting Started" guide.
3.Collect information about the SCSI configuration of your computer and any other devices attached to it and decide how you are going to configure the drive on the SCSI bus. If you are installing on a Windows NT 4, Windows 2000 or Novell NetWare system, you can use the HP Library & TapeTools
software provided on the HP Surestore Tape CD-ROM to do this. If you are not familiar with how to configure a SCSI bus, you may also want to read the SCSI configuration information provided in this guide.
4.Select a free bay for an internal or a removable drive or
Select a site for an external drive.
installation
The "Getting Started" guide provides detailed installation instructions.
Click below for a PDF version of the appropriate guide:
●HP Surestore DAT internal drives: Getting Started guide
●HP Surestore DAT internal autoloaders: Getting Started guide
●HP Surestore DAT external drives: Getting Started guide
●HP Surestore DAT external autoloaders: Getting Started guide
You need a copy of Adobe Acrobat Reader to read the PDF files. If you do not have this software, you can link to Adobe's web site to download a free copy.
how to identify your model
The tape drive or autoloader has its model name on the front panel and its product number and serial number on a label on its base, as shown below.
HP Surestore DAT 24 and DAT 24x6 models also have the DDS-3 logo on the front panel. HP Surestore DAT 40 and DAT 40x6 models have the DDS-4 logo on the front panel.
computer and backup software
The HP Surestore DAT drive has the following hardware and software requirements:
computer systems
If you are installing the tape drive on a UNIX system, refer to the UNIX instructions for further information about the systems supported and installation instructions.
For the latest list of operating systems that support HP Surestore DAT drives, please consult our World Wide Web site (www.hp.com/go/connect).
HP Surestore DAT 24 and DAT 24x6 devices are fast narrow SCSI devices and should be connected to a single-ended (SE) host bus adapter.
HP Surestore DAT 40 and DAT 40x6 devices are ultra wide SCSI devices. For optimum performance the device should be connected to a low voltage differential (LVD) SCSI host adapter. HP Surestore DAT 40 and DAT 40x6 devices may also be connected to SE (single-ended) SCSI host adapters, but cable length will be restricted to the SE rather than the LVD specification. If you would like more information on SCSI specifications and configuring your SCSI bus, read the “SCSI
configuration” topic.
Your computer must have a properly installed and configured SCSI host adapter or a SCSI controller on the motherboard (SCSI-2 or SCSI-3 compliant) with driver software that supports the HP SureStore DAT drive. Connectivity information can be found on our World Wide Web site: //www.hp.com/go/connect. Check the
server documentation for the specification of any built-in SCSI channels. Do not connect to a RAID controller channel; these are for disk drives only. Consult your supplier for further details.
For an internal drive or internal autoloader, you will need:
●A spare 5.25-inch, half-height bay in which to install the drive, or two adjacent half-height bays for an autoloader. You can install an internal drive into a 3.5-inch, half-height bay; use the special converter kit provided with your tape drive.
●A SCSI ribbon cable with active termination (a terminator block).
The DAT 40i drive and DAT 40x6i autoloaders have a 68-pin wide SCSI connector. If your computer uses narrow SCSI, you will need a cable or adapter that enables you to connect a wide SCSI device (68 pins) into the narrow SCSI bus (50 pins). This can be purchased from your supplier. HP Surestore DAT 24i drives and DAT 24x6i autoloaders have a 50-pin narrow SCSI connector. If your computer uses wide SCSI, you will need a cable or adapter that enables you to connect a narrow SCSI device (50
pins) into the wide SCSI bus (68 pins). This is provided with your tape drive.
●Any special mounting tray or rails required to fix the drive into the empty bay.
Check your 'Getting Started Guide' for details of which mounting hardware is supplied with your tape drive or autoloader.
For external drives and autoloaders, the cable provided with DAT 24, DAT 24x6e, DAT 40e and DAT 40x6e products will attach to a computer with a wide SCSI connector (68 pins). If the cable supplied with your drive is not appropriate for your computer's external SCSI connector, you will need to order a new cable. (See ordering supplies.)
For removable drives, no SCSI cables are required to plug the drive into an HP Surestore Tape Array 5300. However, cabling and terminators are required to connect the tape array with the SCSI host. Refer to your HP Surestore Tape Array 5300 Getting Started Guide for further details.
backup software
You need backup software that supports the HP Surestore DAT drive. We recommend using a backup application, which provides good memory management and also supports other useful features, such as TapeAlert. HP, Computer Associates, Veritas, Legato and Yosemite all provide suitable products that have been tested with HP Surestore DAT drives. A TapeWare CD-ROM containing backup software by Yosemite Technologies is supplied with your tape drive. For the latest list of backup packages that support HP Surestore DAT drives, please consult our World Wide Web site (www.hp.com/go/connect).
Details of how to best optimize your tape drive to achieve the maximum performance with your chosen backup application can be obtained from our World Wide Web Site (www.hp.com/support/dat).
Suitable backup applications will include driver software that establishes the interface between the tape drive and the software. Applications usually recognize tape drives by their manufacturers' ID string rather than their model number, so check the table below for the appropriate reference.
Drive Model |
ID String |
HP Surestore DAT 24 |
HP C1537A |
HP Surestore DAT 24x6 |
HP C1557A |
HP Surestore DAT 40 |
HP C5683A |
HP Surestore DAT 40x6 |
HP C5713A |
Windows NT and Novell NetWare backup utilities
If you have Windows NT installed, it contains a built-in backup utility. Similarly, you can use the SBACKUP utility provided with Novell NetWare. However, as neither of these utilities supports HP One-Button Disaster Recovery and other advanced capabilities for backup and restore, you may prefer to use the free backup software provided on the Yosemite TapeWare CD-ROM. This software provides full support for HP One-Button Disaster Recovery.
Before you can use the tape drive with these utilities, you must install the appropriate driver. Install the tape drive hardware before installing the driver. Drivers for Windows NT 3.51 and 4.0 and Novell NetWare 3.12, 4.10, and 4.11 are supplied on this HP Surestore Tape CD-ROM. Select the "Software" option on the Welcome page to install the drivers for Windows Backup or NetWare SBACKUP or you can follow the instructions for installing drivers provided in your operating system documentation.
For detailed information about drivers, refer to the appropriate README file in the DRIVERS directory on this CD. There is a separate sub-directory for each operating system.
You can also find frequently asked questions in the installing drivers topic.
© 1997-2001, Hewlett-Packard Company
file:///C|/Documents%20and%20Settings/topher.COL-SPRINGS/Desktop/Ultrium/pdf/document/dds/user/reseller/eng/getstart.htm [11/15/2001 1:24:58 PM]
operation
hp learning products
http://www.hp.com/support/tape may have a later version
data protection
 index of topics
 contact hp
home page before you start
tape drive operation
the front panel lights
loading & unloading replacing a
removable drive
 backup strategy
 autoloader operation

 cartridge care
cleaning one-button disaster
recovery
specifications
diagnostics
troubleshooting

 FAQs
FAQs
 SCSI configuration
 UNIX configuration
 ordering supplies
 installing drivers
 tape drive operation
|
|
|
|
|
|
|
|
|
|
|
|
|
|
|
|
|
|
|
contents of this section |
|
|
related topics |
|
|||
|
|
switching on the drive |
|
|
interpreting the front panel lights |
|
||
|
|
if you have problems during self- |
|
|
loading and unloading |
|
||
|
|
test |
|
|
cartridges |
|
|
|
|
|
|
|
|
replacing a removable drive |
|
||
|
|
|
|
|
backup strategy |
|
||
|
|
|
|
|
|
|
|
|
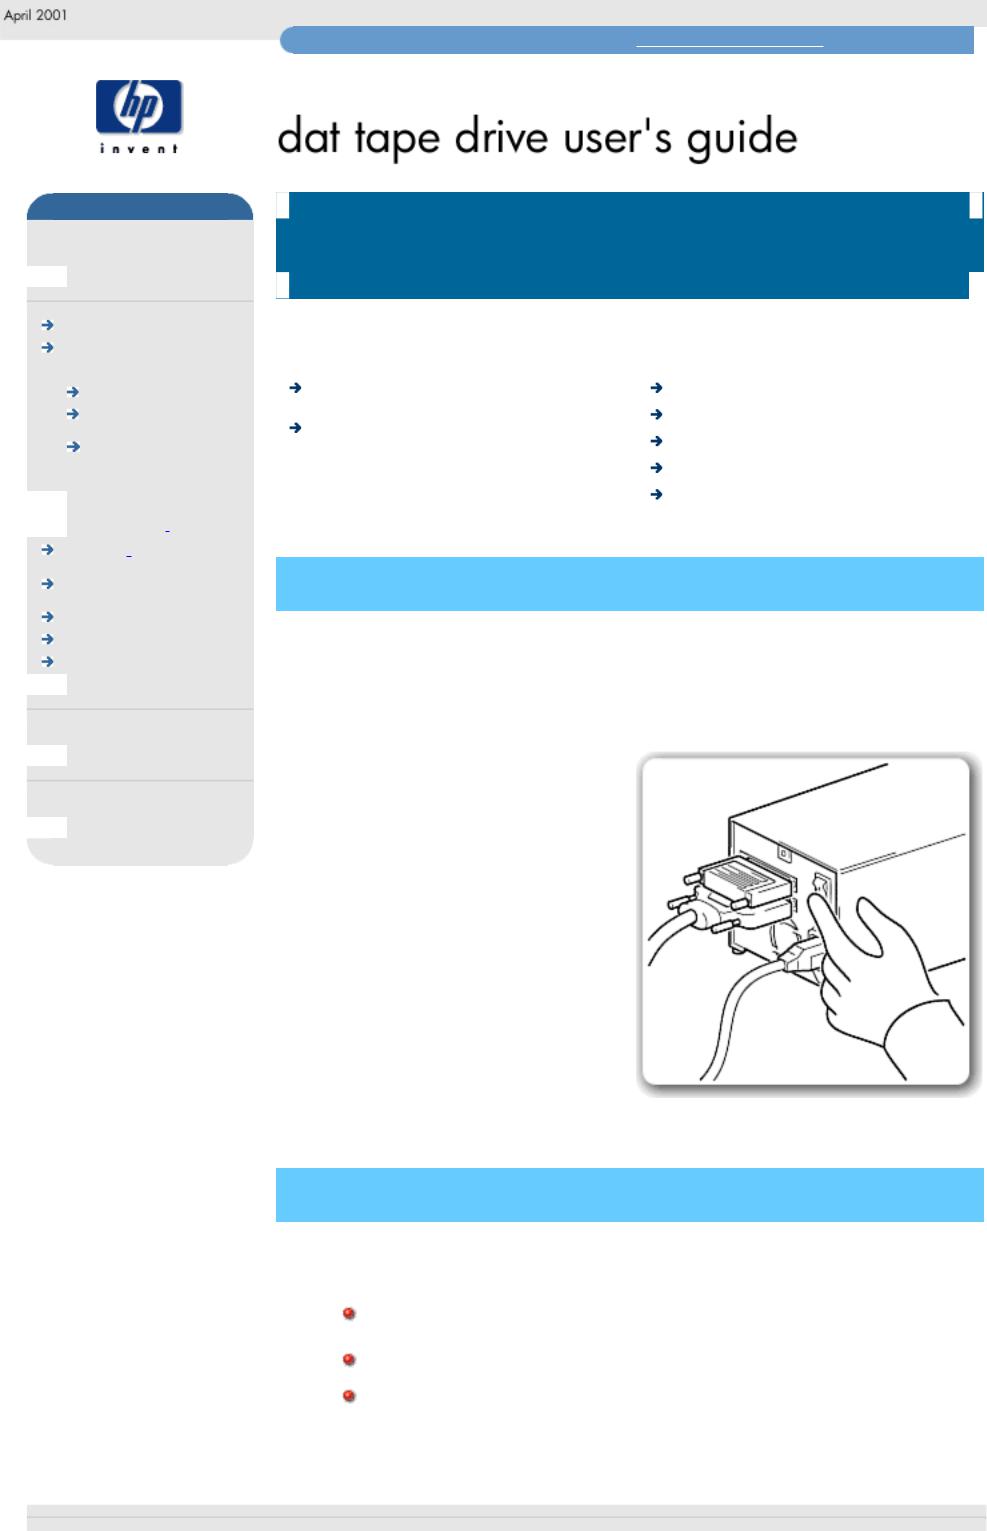
switching on the drive
Internal drives are powered on when you switch on your computer.
Removable drives are powered on when you switch on your tape array and computer.
External drives
Switch on external drives using the power switch on the rear panel, and then switch on the computer.
if you have problems during self-test
If the Tape light goes off but the Media Caution light shows steady amber at the end of the self-test, this indicates a fault condition:
If you have just installed the drive, check the installation for loose connections and repeat the self-test.
Try the troubleshooting procedures or run HP Library & Tape Tools
to determine what the problem is.
If the fault condition persists, call for assistance.
© 1997-2001, Hewlett-Packard Company
file:///C|/Documents%20and%20Settings/topher.COL-SPRINGS/Desktop/Ultrium/pdf/document/dds/user/reseller/eng/operate.htm [11/15/2001 1:24:59 PM]
front panel lights
hp learning products
http://www.hp.com/support/tape may have a later version
data protection
 index of topics
 contact hp
home page before you start
tape drive operation the front panel lights
loading & unloading replacing a
removable drive
 backup strategy
 autoloader operation

 cartridge care
cleaning one-button disaster
recovery
specifications
diagnostics
 troubleshooting
 FAQs
FAQs
SCSI configuration

 UNIX configuration
 ordering supplies
 installing drivers
 the front panel lights
 contents of this section
front panel lights
tape ready signal
tape loading signal
tape activity signal
media caution signal
 error condition signal

 OBDR mode signal
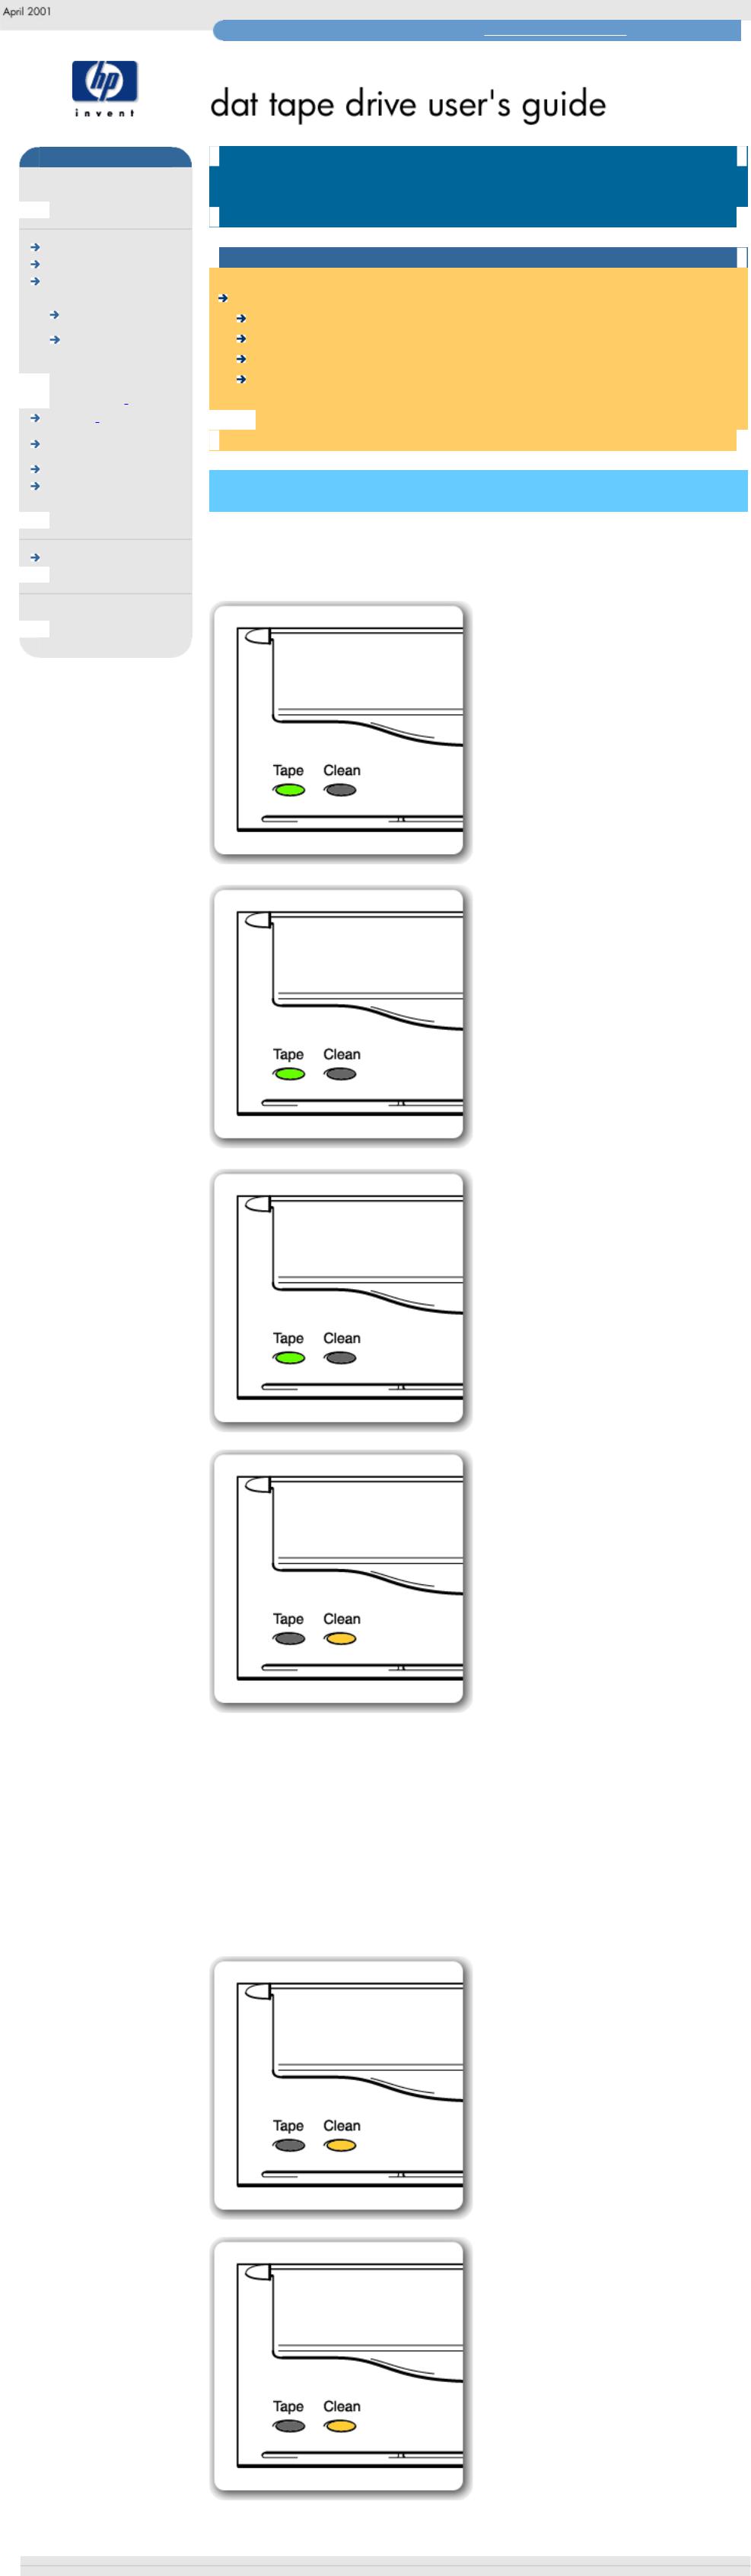
front panel lights
The front panel of your HP Surestore DAT drive has two lights (LEDs), Tape and Clean, that indicate the status of the tape drive as described below.
Tape ready signal
Tape On, steady
Clean Off
The cartridge is loaded and the drive is ready.
Tape loading signal
Tape On, flashing slowly
Clean Off
The cartridge is loading or unloading, or self-test is in progress.
Tape activity signal
Tape On, flashing rapidly
Clean Off
The cartridge is loaded, activity is occurring.
Media caution signal
Tape |
Off, or flashing rapidly |
Clean |
On, flashing slowly |
If the media caution signal is displayed:
●Wait for the current operation to finish, then insert a different tape and repeat the operation that was being performed.
●If the media caution signal does not show this time, it indicates that the original cartridge was nearing the end of its useful life. Copy any data you want to keep from the original tape onto a new tape if possible, then discard the old tape.
●If the media caution signal appears again with the second tape, the tape heads need cleaning.
●If the media caution signal appears after using a cleaning cartridge, the cleaning cartridge has probably expired and should be discarded.
Error condition signal
Tape Off
Clean On, steady
HP Surestore DAT drives perform a comprehensive self-test during powerup. If a hard error causes the self-test to fail, the clean light changes to steady amber. Run HP Library & Tape Tools to help diagnose the problem.
OBDR mode signal
Tape On, flashing slowly
Clean On, flashing slowly, alternating with Tape LED
The tape drive is in disaster recovery mode, restoring the operating system.
© 1997-2001, Hewlett-Packard Company
file:///C|/Documents%20and%20Settings/topher.COL-SPRINGS/Desktop/Ultrium/pdf/document/dds/user/reseller/eng/lights.htm [11/15/2001 1:25:00 PM]

loading and unloading
hp learning products
http://www.hp.com/support/tape may have a later version
data protection
 index of topics
 contact hp
home page before you start
tape drive operation
the front panel lights loading & unloading replacing a
removable drive
 backup strategy
 autoloader operation

 cartridge care
cleaning one-button disaster
recovery
specifications
diagnostics
troubleshooting

 FAQs
FAQs
 SCSI configuration
 UNIX configuration
 ordering supplies
 installing drivers
 loading and unloading tape drives
|
|
|
|
|
|
|
|
|
|
|
|
|
contents of this section |
|
related topics |
|
|
|
to load a cartridge |
|
|
cartridge care |
|
|
internal drives |
|
|
labeling and write-protecting |
|
|
external drives |
|
|
cartridges |
|
|
removable drives |
|
|
replacing a removable drive |
|
|
to unload a cartridge |
|
|
|
|
|
internal drives |
|
|
|
|
|
external drives |
|
|
|
|
|
removable drives |
|
|
|
|
|
emergency unload |
|
|
|
|
|
|
|
|
|
|
|
|
|
|
|
|
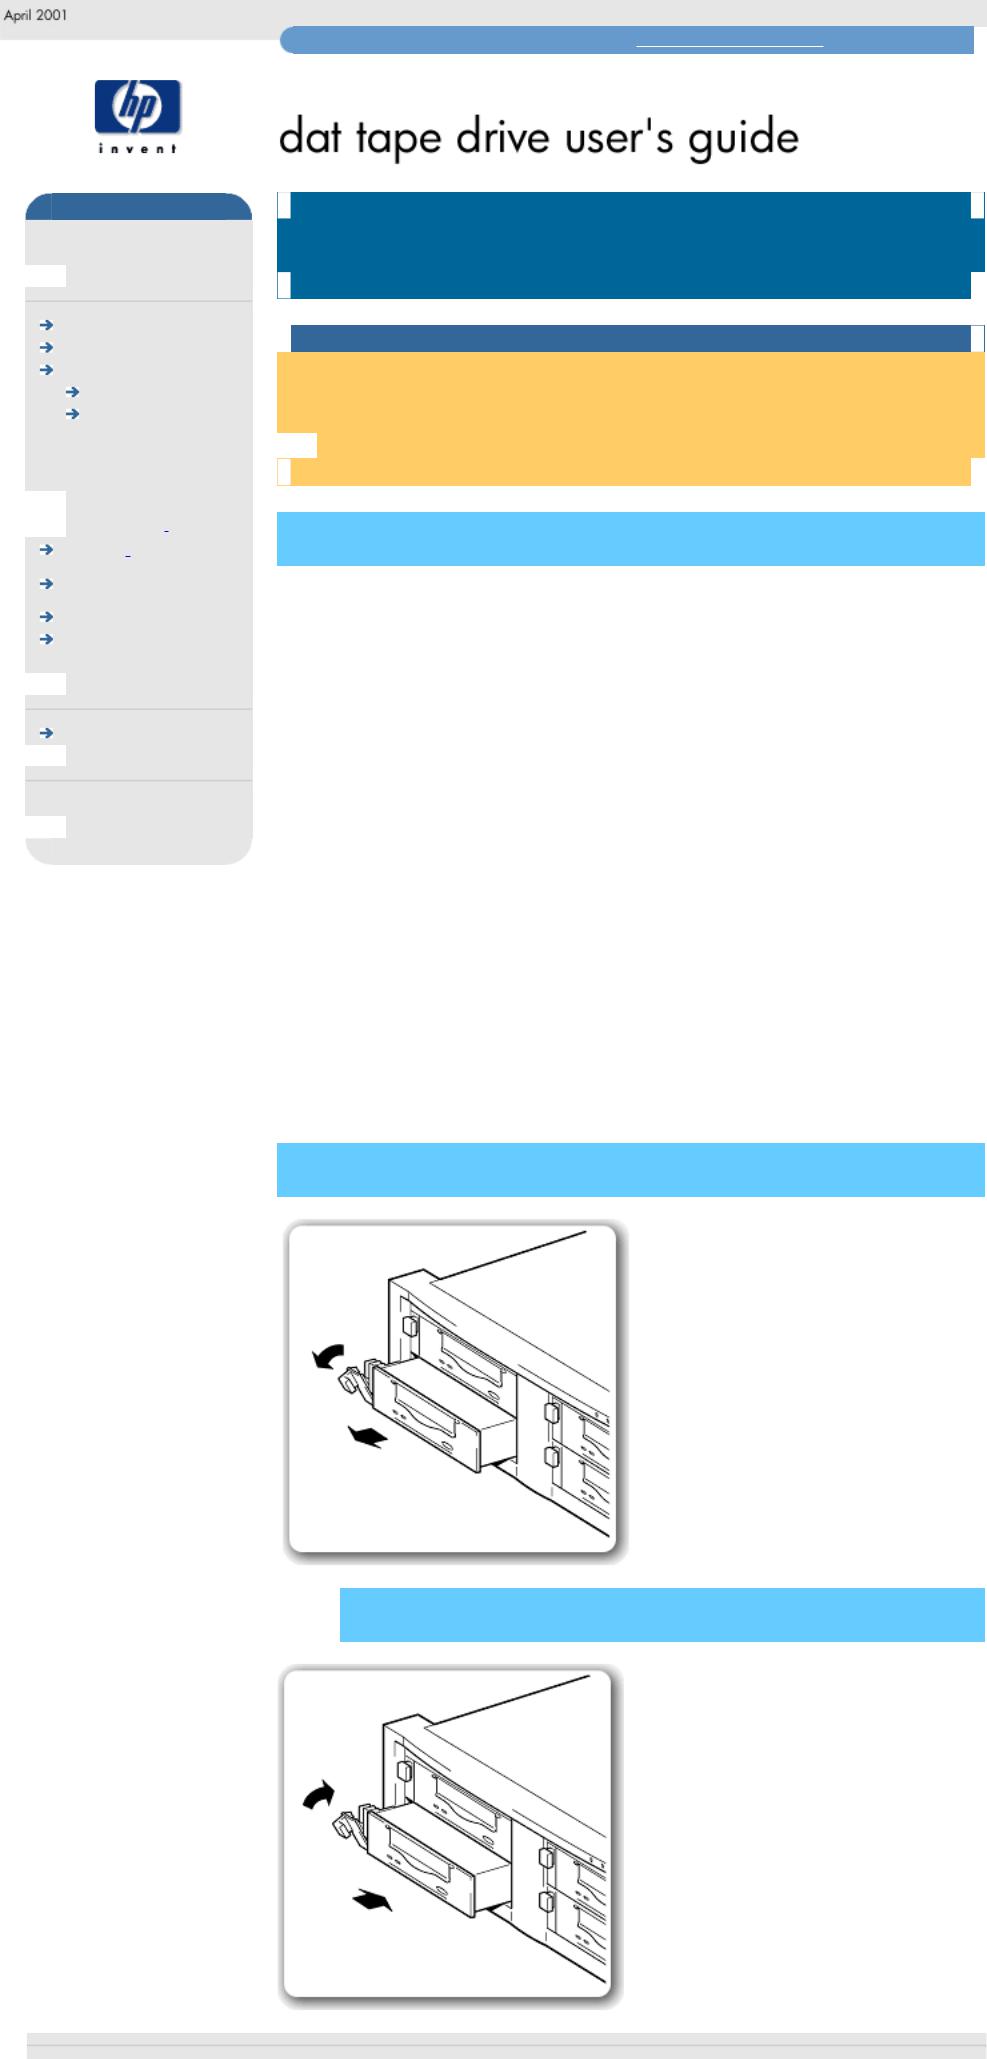
 to load a cartridge
internal drives
Use the correct format HP DDS cartridge with your drive.
HP Surestore DAT drives are configured to detect DDS cartridges. Any cartridge that is not DDS will be treated as write-protected. This means you will only be able to read a non-DDS cartridge, not write to it.
hp surestore DAT 24i |
hp surestore DAT 40i |
1.HP Surestore DAT 24i drives
These drives do not have a cartridge door. Just Insert the cartridge into the slot in front of the drive with the label uppermost.
HP Surestore DAT 40i drives
Slide the cartridge up under the lip of the cartridge door and insert it into the slot with the label uppermost.
2.Apply gentle pressure on the rear of the cartridge until the drive takes the cartridge and loads it.
Do not try to force the cartridge if it does not load properly. The drive will eject the cartridge after about 10 seconds so you can load it again.
When you insert a cartridge, the drive performs a short load sequence. This takes about 5 seconds, during which the Tape light flashes green. When the load sequence is finished, the Tape light shows steady green.
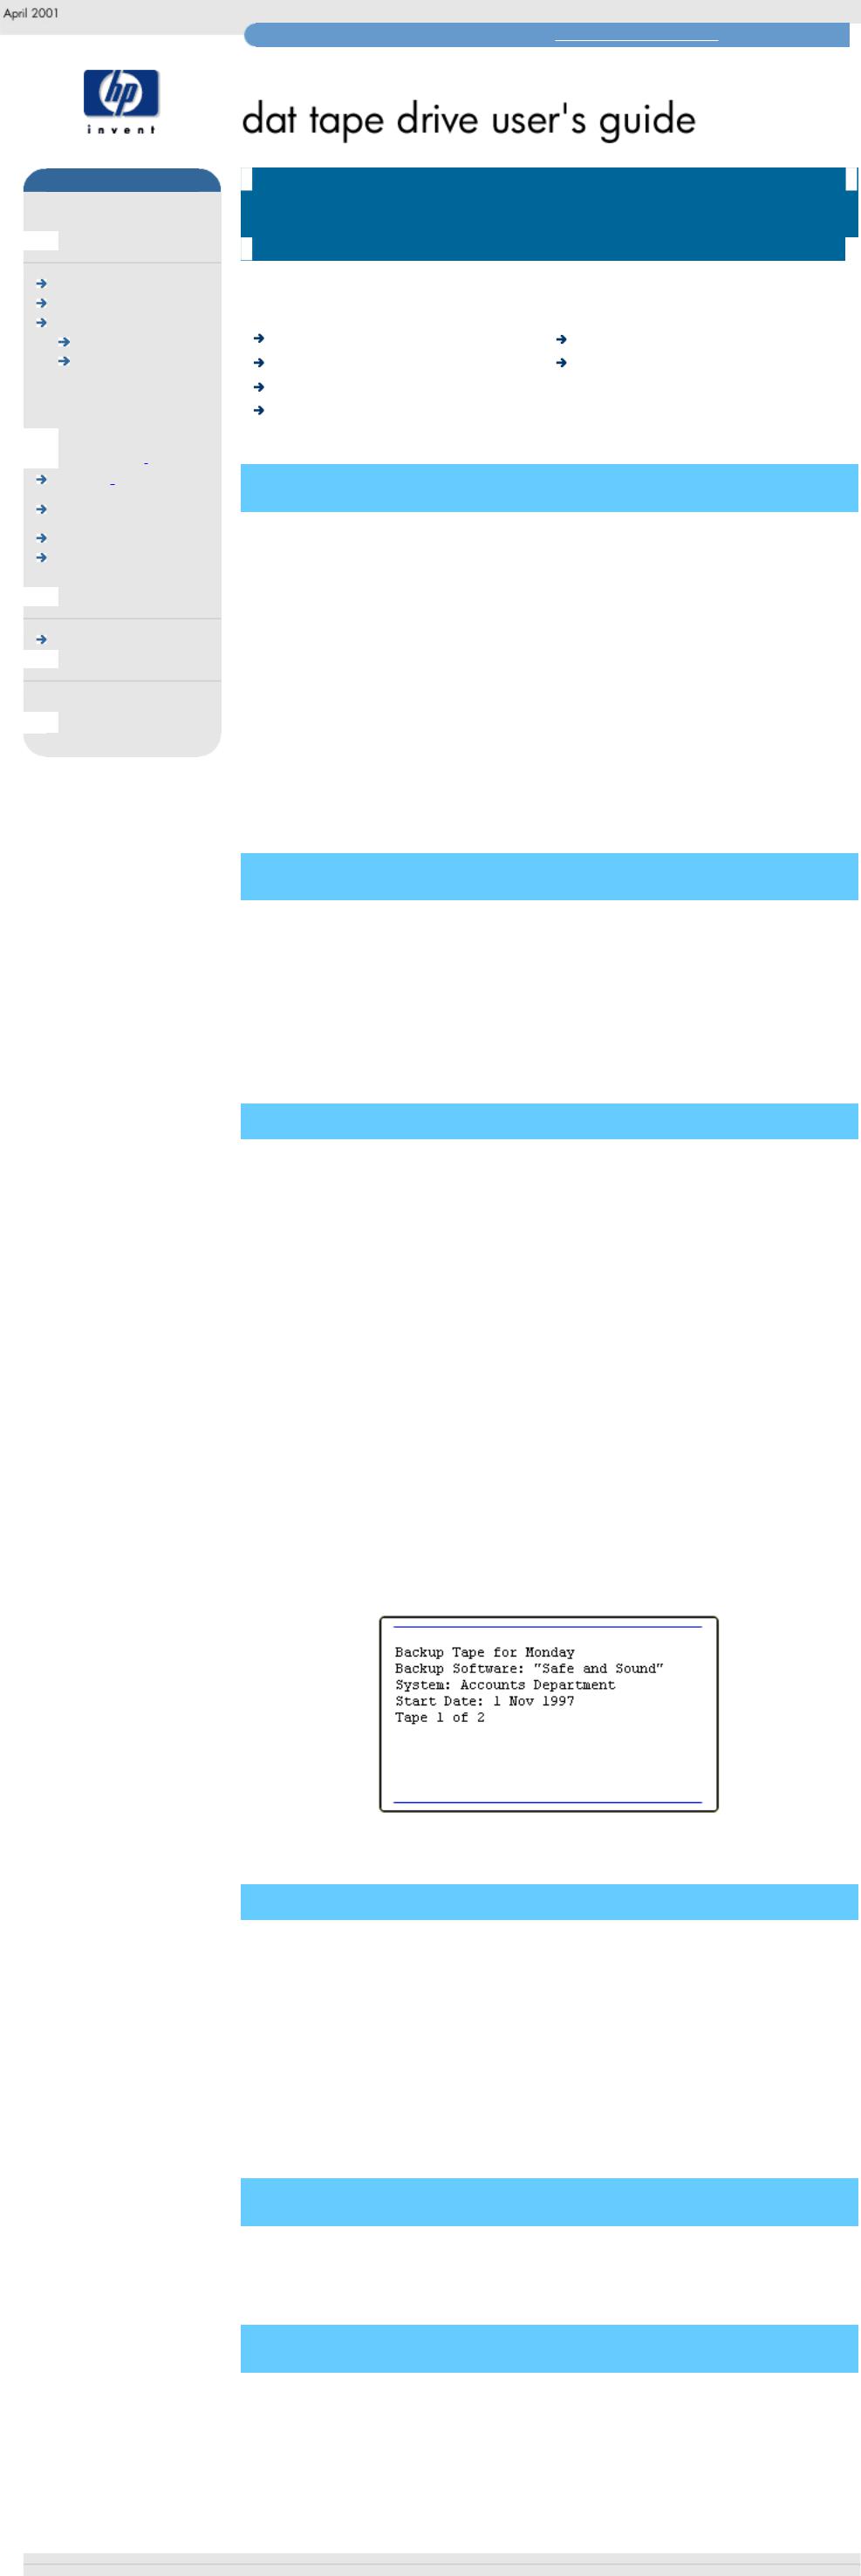
external drives
Use the correct format HP DDS cartridge with your drive.
HP Surestore DAT drives are configured to detect DDS cartridges. Any cartridge that is not DDS will be treated as write-protected. This means you will only be able to read a non-DDS cartridge, not write to it.
hp surestore DAT 24e |
hp surestore DAT 40e |
1.HP Surestore DAT 24e drives
These drives do not have a cartridge door. Just Insert the cartridge into the slot in front of the drive with the label uppermost.
HP Surestore DAT 40e drives
Slide the cartridge up under the lip of the cartridge door and insert it into the slot with the label uppermost.
2.Apply gentle pressure on the rear of the cartridge until the drive takes the cartridge and loads it.
Do not try to force the cartridge if it does not load properly. The drive will eject the cartridge after about 10 seconds so you can load it again.
When you insert a cartridge, the drive performs a short load sequence. This takes about 5 seconds, during which the Tape light flashes green. When the load sequence is finished, the Tape light shows steady green.
removable drives
Use the correct format HP DDS cartridge with your drive.
HP Surestore DAT drives are configured to detect DDS cartridges. Any cartridge that is not DDS will be treated as write-protected. This means you will only be able to read a non-DDS cartridge, not write to it.
hp surestore DAT 24m |
hp surestore DAT 40m |
1.HP Surestore DAT 24i drives
These drives do not have a cartridge door. Just Insert the cartridge into the slot in front of the drive with the label uppermost.
HP Surestore DAT 40i drives
Slide the cartridge up under the lip of the cartridge door and insert it into the slot with the label uppermost.
2.Apply gentle pressure on the rear of the cartridge until the drive takes the cartridge and loads it.
Do not try to force the cartridge if it does not load properly. The drive will eject the cartridge after about 10 seconds so you can load it again.
When you insert a cartridge, the drive performs a short load sequence. This takes about 5 seconds, during which the Tape light flashes green. When the load sequence is finished, the Tape light shows steady green.
 to unload a cartridge
 internal drives
hp surestore DAT 24i |
hp surestore DAT 40i |
1.Press the Eject button on the front panel.
During the unload sequence the Tape light flashes green. The drive completes any task it is currently performing, winds the tape to the beginning and ejects the cartridge. The sequence can take up to 25 seconds for a write-enabled cartridge and 10 seconds for a write-protected cartridge. The sequence may take longer if the tape needs to be rewound first.
2.Remove the cartridge and store it in its plastic case.
 external drives
hp surestore DAT 24e |
hp surestore DAT 40e |
1.Press the Eject button on the front panel.
During the unload sequence the Tape light flashes green. The drive completes any task it is currently performing, winds the tape to the beginning and ejects the cartridge. The sequence can take up to 25 seconds for a write-enabled cartridge and 10 seconds for a write-protected cartridge. The sequence may take longer if the tape needs to be rewound first.
2.Remove the cartridge and store it in its plastic case.
 removable drives
hp surestore DAT 24m |
hp surestore DAT 40m |
1.Press the Eject button on the front panel.
During the unload sequence the Tape light flashes green. The drive completes any task it is currently performing, winds the tape to the beginning and ejects the cartridge. The sequence can take up to 25 seconds for a write-enabled cartridge and 10 seconds for a write-protected cartridge. The sequence may take longer if the tape needs to be rewound first.
2.Remove the cartridge and store it in its plastic case.
emergency unload
If you press the Eject button when the drive is busy, the drive may take some time to respond because it will finish the task it is performing first. This ensures that no data is lost. On rare occasions, however, a system or software fault may cause the tape drive not to respond to an Unload request. In this situation, you can force ejection.
There are two ways of doing this:
 Press the Eject button three times within 5 minutes.
 Hold the Eject button down for at least 15 seconds.
Following either of these actions, the drive waits until 35 seconds have passed from the time of the first press, to give the normal eject procedure a chance to proceed. After this period, it immediately releases the tape and ejects the cartridge, regardless of what operation it was performing. The drive is then reset as though you had turned the power off and then on again.
Caution: You may lose data if you force ejection of a cartridge. The tape may also become unreadable because an EOD (End of Data) mark may not be properly written.
© 1997-2001, Hewlett-Packard Company
file:///C|/Documents%20and%20Settings/topher.COL-SPRINGS/Desktop/Ultrium/pdf/document/dds/user/reseller/eng/load.htm [11/15/2001 1:25:01 PM]
removable drives
hp learning products
http://www.hp.com/support/tape may have a later version
data protection
 index of topics
 contact hp
home page before you start
tape drive operation
the front panel lights
loading & unloading replacing a removable drive
 backup strategy
 autoloader operation

 cartridge care
cleaning one-button disaster
recovery
specifications
diagnostics
 troubleshooting
 FAQs
FAQs
SCSI configuration

 UNIX configuration
 ordering supplies
 installing drivers
 replacing a removable drive
 contents of this section
 overview
  removing a drive
 replacing a drive
overview
HP Surestore DAT removable drives can be removed and replaced without powering down the tape array, providing they are not on the same SCSI bus.
If all drives in the tape array are powered up when the system is turned on, the host will be aware of those drives. You can remove any of those drives and replace it with another drive.
If a drive is not powered up or you place a drive in an empty slot after the system has been powered up, the system will have to be reset before the host will recognize the drive.
Removable drives allow modules to be replaced while powered up as long as no data is being transmitted from the system to the module or to any other module daisy-chained on the same SCSI bus (off-line hot-swap). The SCSI IDs are controlled by the tape array, not by the drives themselves, so if you remove a drive and replace it with another the ID will not change.
If your system is running HPUX, you should be aware of the following when removing a drive:
●In Berkeley mode, the tape position will remain unchanged by a device close operation
●In AT&T mode, a device close operation will cause the tape to be repositioned just after the next tape filemark (the start of the next file).
removing a drive
1. Pull the extraction lever of the drive that you want to replace so that it is in the out position.
2. Using the extraction lever, pull the drive carefully and firmly out of the tape array.
 replacing a drive
1. Ensure that the extractor lever on the drive is in the out position, as shown in the picture.
2. Lift the drive carefully.
3. Align the rear of the drive with the guides on the side of the HP Surestore Tape Array 5300.
4. Slide the drive along the guides until the connectors on the back mate with the connectors at the back of the enclosure.
5. Push the extractor lever in until it locks the drive in position.
© 1997-2001, Hewlett-Packard Company
file:///C|/Documents%20and%20Settings/topher.COL-SPRINGS/Desktop/Ultrium/pdf/document/dds/user/reseller/eng/remdrv.htm [11/15/2001 1:25:02 PM]
choosing a backup strategy
hp learning products
http://www.hp.com/support/tape may have a later version
data protection
 index of topics
 contact hp
home page before you start
tape drive operation
the front panel lights
loading & unloading replacing a
 removable drive backup strategy
 autoloader operation

 cartridge care
cleaning one-button disaster
recovery
specifications
diagnostics
 troubleshooting
 FAQs
FAQs
SCSI configuration

 UNIX configuration
 ordering supplies
 installing drivers
 choosing a backup strategy
|
|
|
|
|
|
|
|
|
|
|
|
|
|
|
|
|
|
|
|
|
contents of this section |
|
related topics |
|
|
||||
|
|
choice of strategy |
|
|
tape drive operation |
|
|
||
|
|
the ten-tape cycle method |
|
|
autoloader operation |
|
|
||
|
|
cleaning as part of your routine |
|
|
|
|
|
|
|
|
|
extending your backup strategy |
|
|
|
|
|
|
|
|
|
|
|
|
|
|
|
|
|
|
|
|
|
|
|
|
|
|
|
choice of strategy
How you organize backup depends very much on how frequently the data changes, how extensive these changes are, and how valuable you consider the information. What is essential is that you follow a routine, so that backup is regular and trouble-free.
There are many systematic methods for backing up data on a regular basis. The ten-tape cycle method recommended in this section is very simple to implement. It also maintains several historical copies of the data so that even if one copy is lost you have a high probability of recovering your lost data.
To ensure longevity of your tapes, it is important to follow the tape usage and storage recommendations outlined in Caring for Cartridges. If you follow the
backup method described in this section, you should renew your tapes each year. (Since no one tape should be used more than 100 times, annual renewal allows for a number of restores in addition to backups.)
the ten-tape cycle method
The ten-tape cycle method uses a systematic approach to ensure data security. It involves maintaining a daily, weekly and monthly backup. Every three months the monthly tapes are recycled.
The advantages of this method are:
●Simplicity: It is very easy to recover data.
●Ease of Access: Data backed up any time over the preceding two months can be easily found and restored.
number of tapes needed
If all the data you wish to back up in a single session will fit onto a single tape, ten tapes are needed, plus any additional tapes you may require for archival storage or file transfers.
If you require more than one tape per backup, you will need ten sets of tapes, where a "set" is the smallest number of tapes that will hold a full backup.
Before making a backup, label the ten tapes as follows:
Monday |
Friday 1 |
Month 1 |
Tuesday |
Friday 2 |
Month 2 |
Wednesday |
Friday 3 |
Month 3 |
Thursday |
|
|
In addition, record on the label the date when you first started using the tape, the name of the system you are backing up, and the backup software used. If you need more than one tape to perform a full daily backup, also record the tape number (such as "Tape 1 of 2").
A sample label is shown below.
method
1.At the end of each Monday, Tuesday, Wednesday and Thursday, perform a full backup to the tape labeled for that day.
2.At the end of the first, second and third Fridays of the month, perform a full backup to the tape labeled for that day.
3.At the end of fourth Friday of the month, back up to the tape labeled for that month.
4.At the end of the fourth month, recycle the monthly tapes; that is, back up to the tape labeled "Month 1."
For additional security, place each of the Friday and monthly tapes in a fire-proof safe or store them off-site.
cleaning as part of your routine
Cleaning the drive's tape heads regularly should be an important part of your data security program. Build a cleaning cycle into your backup regime, so that it is not ignored. Use the recommendations in Cleaning the Tape Heads as a guide for
how often to schedule head cleaning.
extending your backup strategy
You can extend the ten-tape backup routine in several ways:
●Use more monthly tapes. Twelve monthly tapes would give a backup horizon of a whole year.
●Build in another more infrequent cycle. For example, you could have a set of quarterly tapes used for a full backup on the last working day of each quarter. These could then be archived indefinitely.
©1997-2001, Hewlett-Packard Company
file:///C|/Documents%20and%20Settings/topher.COL-SPRINGS/Desktop/Ultrium/pdf/document/dds/user/reseller/eng/strategy.htm [11/15/2001 1:25:04 PM]
operation-autoloaders
hp learning products
http://www.hp.com/support/tape may have a later version
data protection
 index of topics
 contact hp
home page
before you start
tape drive operation autoloader operation
the front panel lights front panel
messages
loading & unloading
modes of operation

 cartridge care
cleaning one-button disaster
recovery
specifications
diagnostics
 troubleshooting
 FAQs
FAQs
SCSI configuration

 UNIX configuration
 ordering supplies
 installing drivers
 autoloader operation
|
|
|
|
|
|
|
|
|
|
|
|
|
|
|
|
|
|
|
|
|
related topics |
|
|
|
contents of this section |
|
|
||||
|
|
|
|
|
|
||
|
|
|
|
interpreting the front panel lights |
|
||
|
|
switching on the autoloader |
|
|
|
|
|
|
|
|
|
|
loading and unloading autoloaders |
|
|
|
|
if you have problems during self- |
|
|
|
|
|
|
test |
|
|
|
|
|
|
|
|
|
|
|
cartridges |
|
|||
|
|
|
|
|
|
|||
|
power-cycling |
|
|
|||||
|
|
|
|
localizing language display (DAT |
|
|||
|
|
|
|
|
|
|||
|
|
|
|
|
40x6 only) |
|
||
|
|
|
|
|
autoloader modes of operation |
|
||
|
|
|
|
|
|
|
|
|
|
|
|
|
|
|
|
|
|
|
|
|
|
|
|
|
|
|
switching on the autoloader |
|
|
|
|
|
|
|
|
|
|
|
|
|
|
|
|
|
External autoloaders: Switch on the autoloader using the power switch on the rear panel by pressing the side with the I symbol down, and then switch on the computer.
Internal autoloaders are powered on when you switch on your computer.
Wait for the autoloader to complete its self-test routine, during which the front panel lights flash and the display shows the message Self Test. The HP SureStore DAT 40x6 autoloader alternates this display with its serial number.
After a successful self-test, the lights stop go out and the autoloader displays the message Insert Mag if there is no magazine loaded. If there is a magazine loaded, the message will say Mag Loaded and the green Magazine Present light (top) will be lit steadily.
 if you have problems during self-test
If the Operator Attention Required light (bottom) shows steady amber at the end of the self-test, this indicates a fault condition:
● If you have just installed the drive, check the installation for loose connections and repeat the self-test.
● Try the troubleshooting procedures or run HP Library &
Tape Tools to determine what the problem is.
● If the fault condition persists, write down the message displayed on the front panel and call for service.
power-cycling
To ensure reliable operation, do not switch off power to the autoloader while it is reading, writing, fast-searching, loading or unloading.
If the cartridge has just been unloaded from the drive (but has not been returned to the magazine) when the autoloader is switched off, the cartridge will be taken into the drive and threaded when the drive is next powered up.
© 1997-2001, Hewlett-Packard Company
file:///C|/Documents%20and%20Settings/topher.COL-SPRINGS/Desktop/Ultrium/pdf/document/dds/user/reseller/eng/operate2.htm [11/15/2001 1:25:05 PM]

autoloader front panel
hp learning products
http://www.hp.com/support/tape may have a later version
data protection
 index of topics
 contact hp
home page
before you start
tape drive operation
autoloader operation the front panel lights front panel
messages
loading & unloading
modes of operation

 cartridge care
cleaning one-button disaster
recovery
specifications
diagnostics
 troubleshooting
 FAQs
FAQs
 SCSI configuration
 UNIX configuration
 ordering supplies
 installing drivers
 front panel lights
|
|
|
|
|
|
|
|
|
|
|
|
|
|
|
|
|
|
|
|
|
|
|
contents of this section |
|
|
related topics |
|
|||||
|
|
front panel controls and indicators |
|
|
|
front panel messages |
|
|
||
|
|
|
|
|
autoloader operation |
|
|
|||
|
|
|
|
|
|
|
|
|||
|
|
|
|
|
|
modes of operation |
|
|
|
|
|
|
LCD display |
|
|
|
|
||||
|
|
magazine present light |
|
|
|
|
|
|
|
|
tape activity light
OAR light
what to do if operator attention is required
select button
load cartridge button eject button
 front panel controls and indicators
The front panel of your HP Surestore DAT autoloader has a LCD display panel, three lights (LEDs), and three buttons as described below.
 LCD display
The LCD display shows status information about the autoloader in each of its five regions. Note that this exact display can never occur; all sections are showing at the same time so that you can see where they are.
1.The ten-character dot matrix display provides information on the autoloader's operating status and potential error conditions. See Front Panel Messages for details of messages that can be displayed here.
2.The large numeral shows the number of the cartridge currently loaded in the drive or the cartridge that you have selected by pressing the Select button repeatedly.
3."DC" is displayed when data compression is being used for writing. "WP" is displayed when the cartridge is write-protected.
4.The six numbered boxes on the right of the display are individually lit to show which magazine slots contain cartridges.
5.The display at the bottom of the display shows how much tape has been used in the current partition. The more lines shown, the more tape has been used. When all the lines show, the partition is full.
 magazine present light (top)
This green light indicates the state of the magazine:
● On indicates that a magazine is loaded.
● Flashing indicates that a magazine is in the process of being loaded, checked, or ejected.
● Off indicates that no magazine is in the autoloader.
 tape activity light (middle)
This green light indicates the activity of the autoloader's internal tape drive:
● On indicates that a cartridge is present in the drive.
● Fast flashing indicates that the data is being read or written.
● Slow flashing indicates that a cartridge is being loaded or unloaded.
● Off indicates that there is no cartridge in the drive.
 OAR light (bottom)
The Operator Attention Required amber light indicates warning conditions:
● On indicates that a serious hardware error has occurred.
● Fast flashing (four times per second) indicates that a firmware upgrade is taking place.
● Medium flashing (twice per second) indicates that the tape cartridge or tape head needs attention.
● Slow flashing indicates some other error condition, see below.
what to do if operator attention is required
The following guidelines suggest what to do, if the OAR warning light sequence requires operator attention:
●On indicates that a serious hardware error has occurred.
If you have just installed the drive, check the installation for loose connections and repeat the self-test.
Try the troubleshooting procedures or run HP Library & Tape Tools to determine what the problem is.
If the fault condition persists, write down the message displayed on the front panel and call for service.
●Medium flashing (twice per second) indicates one of the following conditions:
The tape cartridge is wearing out and should be replaced. The "Worn Media" message will be displayed in this case. Copy any data you wish to keep onto a new cartridge and discard the old cartridge
or
The tape heads need cleaning. The "Clean Me" message will be displayed in this case. The HP Surestore DAT 40x6 autoloader also displays the URL for our World Wide Web Support page. See Cleaning the Tape Heads for further information.
●Slow flashing indicates one of the following conditions:
The front panel door is open when it should not be. The "Close Door" message will be displayed in this case.
There is a cartridge in the tape drive, but no magazine is present. The "Stray Tape" message will be displayed in this case. Load an empty magazine to retrieve the cartridge.
A hard fault condition has occurred. The message displayed will give information about the type of error. Look up the message in Front Panel Messages to determine what to do.
 select button
The Select button allows you to select any of the cartridges in the magazine for loading. If you press the button repeatedly, the number on the left of the front panel display cycles through the cartridges available in the magazine.
 load cartridge button
Press the Load Cartridge button to load the selected cartridge from the magazine into the drive and then put the autoloader into stacker mode. In stacker mode, the loaded cartridge is used first; when it is full, or the host computer sends an UNLOAD command, the autoloader replaces it with the cartridge from the next highest numbered slot in the magazine. See Autoloader Modes of
Operation for more information on stacker mode.
 eject button
Press the Eject button to start the unload process. The drive unloads any cartridge that is currently loaded, and the changer mechanism returns the cartridge to the magazine. The magazine is then ejected.
You can also use the Eject button to force an ejection in an emergency. See Forcing Ejection for more
information on when and why you might do this.
Note: The host computer can disable the Eject button by issuing a SCSI
PREVENT MEDIA REMOVAL command.
© 1997-2001, Hewlett-Packard Company
file:///C|/Documents%20and%20Settings/topher.COL-SPRINGS/Desktop/Ultrium/pdf/document/dds/user/reseller/eng/lights2.htm [11/15/2001 1:25:06 PM]

front panel messages
hp learning products
http://www.hp.com/support/tape may have a later version
data protection
 index of topics
 contact hp
home page
before you start
tape drive operation
autoloader operation
front panel lights front panel messages
loading & unloading
modes of operation

 cartridge care
cleaning one-button disaster
recovery
specifications
diagnostics
 troubleshooting
 FAQs
FAQs
 SCSI configuration
 UNIX configuration
 ordering supplies
 installing drivers
 front panel messages
|
|
|
|
|
|
|
|
|
|
|
|
|
|
|
|
|
|
|
|
|
|
|
|
|
contents of this section |
|
|
related topics |
|
||||||
|
|
|
|
|
|
|
|
|
|
|
|
|
|
front panel messages |
|
|
|
front panel controls and indicators |
|
||||
|
|
status messages |
|
|
|
|
|||||
|
|
|
|
|
|
|
|
|
|||
|
|
error messages |
|
|
|
|
|
autoloader operation |
|
||
|
|
|
|
|
|
|
|
|
|
|
|
|
|
information messages |
|
|
|
modes of operation |
|
||||
|
|
hp surestore DAT 40x6 and |
|
|
|
|
|
|
|
||
|
|
language selection |
|
|
|
|
|
|
|
||
hp surestore DAT 40x6 number codes

 message codes
front panel messages
The messages that can be displayed on the front panel can be divided into three categories:
●Normal autoloader operating status messages
●Error messages
●Information messages
These types are described below. All the messages are listed in alphabetical order below. The type of message is indicated by the letter S (Status), E (Error) or I (Informational) in the Type column.
Note: the HP Surestore DAT 40x6 autoloader also displays the URL of our World Wide Web Support page with certain messages.
status messages
The status messages that appear on the front panel inform you of activity in five areas:
●The self-test
●Magazine activity -- if the magazine is being checked or ejected
●Cartridge activity -- if a cartridge is being loaded or unloaded, or if the heads are being cleaned
●Tape activity -- reading, writing, searching, rewinding and so on
●Firmware upgrading
error messages
The front panel display can display a range of error messages relating to the autoloader's operation. If a fault has been detected with the mechanism, or loss of data may result, the error message may be accompanied by the Operator Attention Required light being on or flashing. This is indicated in the OAR column in the alphabetical list of messages below. Where possible, actions you can take to recover from the error are also given.
information messages
Information messages are displayed when power is applied to the autoloader. They indicate its identity, SCSI ID and configuration. They also tell you when you have pressed the front panel buttons to confirm that the autoloader has recognized the action.
hp surestore DAT 40x6 and language selection
HP Surestore DAT 40x6 models allow you to localize the LED display so that messages are displayed in the desired language.
1.Switch on the autoloader and hold down the Select button on the front panel for five seconds to access the Language? feature.
2.Press the Select button to scroll through the available languages. The selected language is displayed in the LCD display.
If you select Numeric, messages will be displayed as numerical codes, which are defined below.
3.Press the Load button to store the selected language and exit the language selection utility.
To exit the language selection facility without selecting a language, press the Enter button. If the Select button is not pressed for two minutes, the drive will automatically exit the language selection facility without selecting a language.
hp surestore DAT 40x6 and number codes
The HP SureStore DAT 40x6 autoloader has a language selection feature, which allows you to localize the display for French, German, Spanish, Portuguese or Japanese. If your language is not supported, you can select a Numerical code instead and refer to the Messages section below for an explanation of the code. The messages are in alphabetical order, but you can jump directly to the required message by selecting the number from the following list:
0000 |
1001 |
2001 |
3001 |
4000 |
8000 |
|
1002 |
2002 |
3002 |
4001 |
8001 |
|
1003 |
2003 |
3003 |
4002 |
8002 |
|
1004 |
2006 |
3004 |
4003 |
8003 |
|
1006 |
2007 |
3005 |
|
8004 |
|
1007 |
2008 |
|
|
8006 |
|
1008 |
2009 |
|
|
8007 |
|
1009 |
2010 |
|
|
8008 |
|
1010 |
|
|
|
8009 |
|
1011 |
|
|
|
8010 |
|
1012 |
|
|
|
8012 |
|
1013 |
|
|
|
8013 |
|
1014 |
|
|
|
8014 |
|
1015 |
|
|
|
8015 |
|
1016 |
|
|
|
8016 |
|
1017 |
|
|
|
8017 |
|
1018 |
|
|
|
8018 |
|
1019 |
|
|
|
8019 |
|
1021 |
|
|
|
8020 |
|
1022 |
|
|
|
8021 |
|
1023 |
|
|
|
8022 |
|
1024 |
|
|
|
8023 |
|
|
|
|
|
8024 |
|
|
|
|
|
8025 |
8026
8027
message codes
The following abbreviations are used in the message listing below:
Type Column |
OAR Column |
||
E |
Error message |
O |
OAR light is on |
I |
Information message |
F |
OAR light is flashing |
S |
Status message |
|
|
The following list gives the messages that can be shown on the front panel display in alphabetical order. Some of these messages only appear on HP Surestore DAT 40x6 autoloaders.
Number |
Message |
Type |
OAR |
1019 |
At BOD |
E |
O |
|
|
||
1018 |
At EOD |
E |
O |
|
|
8014 |
Bad Media |
E |
F |
|
|
|
|||
8021 |
Cannot |
E |
F |
|
Write Non- |
||||
|
|
|||
|
MRS Tape |
|
|
|
|
Clean Fail: |
E |
F |
|
8009 |
Check |
|||
Cleaning |
|
|
||
|
|
|
Tape
Meaning
A SPACE command encountered BOD (Beginning of Data) unexpectedly. The tape is now positioned at BOD.
A READ or SPACE command encountered the EOD (End of Data) area unexpectedly. The tape is now positioned at EOD.
A READ or SPACE command has failed because the tape cartridge is not in DDS format.
Action: Unload the cartridge and use a DDS-certified (Media Recognition System) cartridge. See Choosing
Cartridges.
A WRITE, WRITE FILEMARK or
ERASE command has been attempted on a non-Media Recognition System cartridge.
Action: Remove the cartridge and replace with a Media Recognition System cartridge. See Choosing
Cartridges.
Cleaning failed, possibly due to an expired cleaning tape.
Action: Use a new cleaning cartridge.
A high error rate has been detected reading or writing.
|
|
E |
F |
Action: Insert a cleaning cartridge to |
|
2001 |
Clean Me |
clean the tape heads, ensuring that |
|||
|
|
||||
|
|
|
|
the tape in the cleaning cartridge has |
|
|
|
|
|
not been used up. See Cleaning the |
|
|
|
|
|
Tape Heads. |
|
1008 |
Cleaning |
S |
|
A cleaning cartridge has been loaded |
|
|
|
into the drive mechanism. |
|||
|
|
|
|
||
|
|
|
|
This message is displayed for two |
|
|
|
|
|
seconds during the power-up |
|
|
|
I |
|
sequence following the SCSI ID. "xx" |
|
|
Config: xxy |
|
is the hex value of the configuration |
||
|
|
|
switch setting on the underside of the |
||
|
|
|
|
||
|
|
|
|
autoloader. "y" is the autoloader option |
|
|
|
|
|
switch value set on the rear panel of |
|
|
|
|
|
the autoloader. |
|
|
|
|
|
The front panel door is open. Any |
|
|
|
|
|
autoloader motion will be delayed. |
|
2006 |
Close Door |
E |
F |
Action: This is probably caused by a |
|
|
|
magazine that is partly inserted |
|||
|
|
|
|
||
|
|
|
|
through the door. Push the magazine |
|
|
|
|
|
fully into the drive or remove it. |
|
|
|
|
|
The drive has stopped communicating |
|
8002 |
Drive |
E |
O |
with the changer mechanism. |
|
Comms |
|
||||
|
|
Action: Call for service. |
|||
|
Error |
|
|
||
8001 |
Drive Fault |
E |
|
The drive has detected an internal |
|
|
|
error. |
|||
|
|
|
|
||
|
|
|
|
An eject command has failed, either |
|
|
|
|
|
after you pressed the Eject button or |
|
8004 |
Eject Fail |
E |
F |
after a host command. |
|
|
|
|
|||
|
|
|
|
Action: Try forcing ejection. |
|
2010 |
Eject Mag |
I |
|
The Eject button has been pressed. |
|
|
|
||||
1015 |
Erase |
S |
|
The drive is erasing data from the |
|
|
|
tape. |
|||
|
|
|
|
||
|
|
|
|
The mechanism has jammed. The |
|
|
|
|
|
number X identifies the reason for the |
|
|
|
|
|
jam. |
|
8000 |
Error X |
E |
F |
Action: Press the Eject button to |
|
|
|
||||
|
|
|
|
attempt to recover the cartridge and |
|
|
|
|
|
magazine. If the problem persists, note |
|
|
|
|
|
the value of X and call for service. |
|
4003 |
ERROR: No |
I |
|
There is no tape in slot 1. HP OBDR |
|
tape in slot |
|
requires a tape in slot 1 from which it |
|||
|
|
||||
|
1 |
|
|
can boot. |
|
|
ERROR: |
I |
|
|
|
4001 |
Unable to |
|
The system cannot boot off the loaded |
||
boot from |
|
|
tape. |
||
|
|
|
|||
|
tape |
|
|
|
|
1023 |
ForceEject |
I |
|
A forced ejection is in progress (see |
|
|
|
Forcing Ejection). |
|||
|
|
|
|
||
|
|
|
|
A SCSI command for generating a one- |
|
1014 |
|
S |
|
or two-partition tape is being executed, |
|
Format |
|
or the drive is changing the size of the |
|||
|
|
||||
|
|
|
|
partitions on an existing two-partition |
|
|
|
|
|
tape. |
|
|
|
|
|
The controller board for the drive |
|
|
|
|
|
mechanism in the autoloader has |
|
|
FRU 1 Dead |
E |
O |
failed its self-test. |
|
|
|
|
|
||
|
|
|
|
Action: Call for service. |
|
|
|
|
|
The drive mechanism has failed its self- |
|
|
|
E |
O |
test |
|
|
FRU 2 Dead |
|
|||
|
|
|
Action: Call for service. |
||
|
|
|
|
||
3002 |
FW Check |
S |
|
Firmware upgrade data is being |
|
|
|
checked for compatibility. |
|||
|
|
|
|
||
|
|
|
|
The autoloader has failed to upgrade |
|
|
|
|
|
the firmware because the new |
|
8024 |
FW Data Err |
E |
F |
firmware is corrupt. |
|
|
|||||
|
|
Action: Obtain a good copy of the |
|||
|
|
|
|
||
|
|
|
|
firmware upgrade. |
|
3003 |
FW |
S |
|
The drive is being upgraded with the |
|
Program |
|
|
new firmware. |
||
|
|
|
|||
3005 |
FW Tape |
I |
|
The tape loaded is a firmware upgrade |
|
|
|
tape. |
|||
|
|
|
|
||
3001 |
FW |
S |
|
Firmware upgrade data is being read |
|
Upgrade |
|
|
from a cartridge. |
||
|
|
|
|||
|
|
|
|
A firmware upgrade failed because of |
|
|
|
|
|
an error in reading data from the |
|
|
FW Read |
E |
F |
cartridge. |
|
8025 |
|
||||
Fail |
|
|
Action: Try again. If it still fails, call for |
||
|
|
|
|||
|
|
|
|
||
|
|
|
|
service. |
|
|
|
|
|
A firmware upgrade failed because the |
|
|
FW Tape |
E |
F |
cartridge is write-protected. |
|
8027 |
|
||||
Write |
Action: Change the write-protect |
||||
|
|
||||
|
Protected |
|
|
||
|
|
|
switch on the cartridge and try again. |
||
|
|
|
|
||
|
|
|
|
A firmware upgrade failed because of |
|
|
|
|
|
an error in writing a modified upgrade |
|
|
FW Write |
E |
F |
count to the tape. |
|
8026 |
|
||||
Fail |
|
|
Action: Try again. If it still fails, call for |
||
|
|
|
|||
|
|
|
|
||
|
|
|
|
service. |
|
|
|
|
|
The autoloader has failed to upgrade |
|
|
|
|
|
the drive firmware because the new |
|
|
Illegal FW |
E |
F |
firmware is incompatible. |
|
|
|
||||
|
|
|
Action: Obtain a correct version of the |
||
|
|
|
|
||
|
|
|
|
firmware upgrade. |
|
|
|
|
|
The autoloader has failed to upgrade |
|
|
|
|
|
the drive firmware because the new |
|
|
Illegal HW |
E |
F |
firmware is for incompatible hardware. |
|
|
|
||||
|
|
|
Action: Obtain a correct version of the |
||
|
|
|
|
||
|
|
|
|
firmware upgrade. |
|
2002 |
Insert Mag |
S |
|
The autoloader is waiting for you to |
|
|
|
insert a magazine. |
|||
|
|
|
|
||
|
|
|
|
A load command has failed, or a load |
|
|
|
|
|
or change partitions command has |
|
|
Load Fail: |
|
|
failed to read the system area of the |
|
8003 |
E |
F |
tape, which stores information about |
||
Try New |
|||||
|
|
tape usage. |
|||
|
Tape |
|
|
||
|
|
|
|
||
|
|
|
|
Action: Use a new cartridge. |
|
|
|
|
|
A load command has failed, or a load |
|
|
|
|
|
or change partitions command has |
|
|
|
|
|
failed to read the system area of the |
|
8007 |
Load Fail: |
E |
F |
tape, which stores information about |
|
Press Eject |
|
|
tape usage. |
||
|
|
|
|||
|
|
|
|
Action: Press the Eject button. |
|
1021 |
Load Lock |
I |
|
Manual loading is locked (Media |
|
|
|
Removal Prevented). |
|||
|
|
|
|
||
2009 |
Load Tape |
I |
|
This is displayed when you press the |
|
|
|
Load Cartridge button. |
|||
|
|
|
|
||
|
|
S |
|
Either a cartridge is being moved from |
|
1003 |
Loading |
|
the magazine and placed into the drive |
||
|
|
mechanism, or the drive is loading a |
|||
|
|
|
|
||
|
|
|
|
cartridge. |
|
1016 |
Locate |
S |
|
The drive is moving the tape to a point |
|
|
|
specified by the host. |
|||
|
|
|
|
||
1002 |
|
S |
|
The autoloader is examining the |
|
Mag Check |
|
magazine to determine which slots are |
|||
|
|
||||
|
|
|
|
occupied. |
|
1001 |
Mag Eject |
S |
|
The autoloader is ejecting the |
|
|
|
magazine. |
|||
|
|
|
|
||
1006 |
|
S |
|
A magazine is present in the |
|
Mag Loaded |
|
autoloader, and the magazine check |
|||
|
|
||||
|
|
|
|
has been carried out. |
|
|
|
|
|
An eject command has been |
|
|
|
|
|
attempted after a SCSI PREVENT |
|
|
|
|
|
MEDIUM REMOVAL command has |
|
|
|
|
|
been sent by the host. |
|
8005 |
Media |
E |
O |
Action: Try again when the media |
|
Removal |
|||||
|
|
removal prevention has been |
|||
|
Prevented |
|
|
||
|
|
|
removed. This can be achieved by the |
||
|
|
|
|
||
|
|
|
|
host sending a SCSI ALLOW MEDIUM |
|
|
|
|
|
REMOVAL command, or by resetting or |
|
|
|
|
|
power-cycling the autoloader. |
|
3004 |
New FW!!!! |
S |
|
The firmware upgrade process has |
|
|
|
been successfully completed. |
|||
|
|
|
|
||
|
|
|
|
The drive is trying to read what |
|
8016 |
No |
E |
F |
appears to be a blank cartridge (one |
|
with no DDS-format End of Data |
|||||
EODmark |
|
|
|||
|
|
|
pattern). This is probably a result of |
||
|
|
|
|
||
|
|
|
|
power failure while writing. |
|
4000 |
OBDR |
I/S |
F |
The drive has switched to HP One- |
|
Button Disaster Recovery mode and is |
|||||
Mode |
|
|
|||
|
|
|
restoring the operating system. |
||
|
|
|
|
||
1017 |
Partition |
S |
|
The drive is switching to the other |
|
|
|
partition on a two-partition tape. |
|||
|
|
|
|
||
|
|
|
|
A command to format the tape has |
|
|
|
|
|
failed because the requested size for |
|
8017 |
Partition 1 |
E |
O |
partition 1 is too large. |
|
|
|||||
too large |
|
|
Action: Try again with a smaller |
||
|
|
|
|||
|
|
|
|
||
|
|
|
|
partition 1 or, if possible, a longer tape. |
|
2007 |
Press Eject |
I |
|
Press the EJECT button. |
|
|
|
||||
1009 |
Read |
S |
|
The drive is reading data from the |
|
|
|
tape. |
|||
|
|
|
|
||
8012 |
Read Fail |
E |
F |
A read has failed. The host should |
|
|
|
reposition and try again. |
|||
|
|
|
|
||
|
Read Only |
S |
|
Loaded cartridge is write-protected. |
|
|
|
|
See the “Ready xxm” message. |
||
|
|
|
|
||
|
|
|
|
A cartridge has been loaded in the |
|
|
|
|
|
DAT drive, and the drive is ready for |
|
|
|
|
|
tape motion commands. "xxm" is the |
|
|
|
S |
|
length of the currently loaded |
|
|
Ready xxm |
|
cartridge. For example, "Ready 125m" |
||
|
|
|
will be displayed when a DDS-3 |
||
|
|
|
|
||
|
|
|
|
(125m) cartridge is loaded. If a write- |
|
|
|
|
|
protected cartridge is loaded, the |
|
|
|
|
|
"Ready xxm" message alternates |
|
|
|
|
|
with the "Read Only" message. |
|
1013 |
Rewind |
S |
|
The drive is rewinding the tape to the |
|
|
|
beginning of the partition. |
|||
|
|
|
|
||
|
|
|
|
A SCSI command error has been |
|
|
|
E |
O |
detected. |
|
8020 |
SCSI Error |
Action: Check the SCSI interface |
|||
|
|
||||
|
|
|
|
||
|
|
|
|
connection and try again. |
|
|
|
I |
|
This indicates the SCSI ID ("x") of the |
|
|
SCSI ID: |
|
autoloader. During the power-on |
||
|
x |
|
|
sequence, it is displayed for 2 |
|
|
|
|
|
seconds. |
|
|
|
|
|
The drive is searching for a record, |
|
|
|
I |
|
filemark, setmark, or BOD (Beginning |
|
1012 |
Search << |
|
of Data) towards the beginning of the |
||
|
|
tape (in SCSI terms, it is responding to |
|||
|
|
|
|
||
|
|
|
|
a SPACE command with a negative |
|
|
|
|
|
Count field). |
|
|
|
|
|
The drive is searching for a record, |
|
|
|
I |
|
filemark, setmark, or EOD (End of |
|
1011 |
Search >> |
|
Data) towards the end of the tape (in |
||
|
|
SCSI terms, it is responding to a |
|||
|
|
|
|
||
|
|
|
|
SPACE command with a positive Count |
|
|
|
|
|
field). |
|
1022 |
Select Lock |
I |
|
Tape Selection is locked (Media |
|
|
|
Removal Prevented). |
|||
|
|
|
|
||
2008 |
|
I |
|
This is displayed when you press the |
|
Select Tape |
|
Select button and for a short time after |
|||
|
|
||||
|
|
|
|
the button is released. |
|
0000 |
Self Test |
S |
|
The autoloader is performing its power- |
|
|
|
on self-test. |
|||
|
|
|
|
||
1007 |
|
S |
|
A cartridge is in the drive but not |
|
SemiLoaded |
|
loaded (the tape has not been |
|||
|
|
||||
|
|
|
|
threaded). |
|
|
|
|
|
There is a cartridge in the tape drive, |
|
|
|
|
|
but there is no magazine present to |
|
2003 |
Stray Tape: |
I |
|
put it in. |
|
Insert Empty |
|
|
|||
|
|
|
|||
|
Mag |
|
|
Action: Insert an empty magazine to |
|
|
|
|
|
retrieve the cartridge. |
|
|
|
|
|
The cartridge in the drive is faulty, |
|
|
|
|
|
possibly because the tape has |
|
|
|
|
|
snapped, or the cartridge has an |
|
|
|
E |
F |
invalid pattern of identification holes. |
|
8006 |
Tape Fault |
|
|||
|
|
Action: Use a new cartridge and |
|||
|
|
|
|
||
|
|
|
|
ensure that it is Media Recognition |
|
|
|
|
|
System. See Choosing Cartridges. |
|
|
|
|
|
A READ, SPACE, WRITE or WRITE |
|
|
|
E |
O |
FILEMARKS command encountered |
|
1024 |
Tape Full |
EOP (End of Partition) unexpectedly. |
|||
|
|
When reading, this may mean the |
|||
|
|
|
|
||
|
|
|
|
required data is on the next cartridge |
|
|
|
|
|
in the sequence. |
|
|
|
|
|
A READ command has encountered |
|
|
|
|
|
compressed data on the tape, and the |
|
|
|
|
|
drive is not currently configured to |
|
|
|
|
|
decompress data. The host may have |
|
|
|
|
|
disabled data compression, or |
|
|
|
|
|
configuration switch 2 (on the |
|
|
|
|
|
underside of the autoloader) may be |
|
8019 |
Tape has |
E |
O |
off so the host's ability to control the |
|
DC data |
|
|
drive's state is disabled. |
||
|
|
|
|||
|
|
|
|
Action: Check that the host has not |
|
|
|
|
|
disabled data compression. Make sure |
|
|
|
|
|
that switch 2 is on by reconfiguring the |
|
|
|
|
|
drive using the configuration switches |
|
|
|
|
|
on the underside of the autoloader. |
|
|
|
|
|
A WRITE, READ, SPACE or REWIND |
|
|
|
|
|
command has failed to complete. The |
|
|
|
|
|
tape is positioned on the far side of the |
|
8013 |
Tape |
E |
O |
bad groups of data. |
|
Position |
|
||||
|
|
Action: Reposition and try again. |
|||
|
Lost |
|
|
|
|
|
|
The cartridge is stuck in the drive. |
|
8008 |
Tape Stuck |
E |
F |
Action: Try forcing ejection. If this fails, |
|
|
|
||||
|
|
|
|
call for service. |
|
|
Unable to |
I |
|
|
|
4002 |
boot: |
|
The system cannot boot off a cleaning |
||
Cleaning |
|
|
tape. |
||
|
|
|
|||
|
tape |
|
|
|
|
|
|
S |
|
Either the drive is unloading a |
|
1004 |
Unloading |
|
cartridge, or a cartridge is being |
||
|
|
ejected from the drive and replaced in |
|||
|
|
|
|
||
|
|
|
|
the magazine. |
|
8022 |
Upgrade Err |
E |
F An error occurred upgrading. |
||
|
|
|
|||
|
|
|
|
A high error rate has been detected |
|
|
|
|
|
while writing, suggesting that the |
|
|
|
|
|
cartridge is nearing the end of its |
|
8015 |
Worn Media |
E |
F |
useful life. |
|
|
|||||
|
|
Action: Copy any data you wish to |
|||
|
|
|
|
||
|
|
|
|
keep from the cartridge onto a new |
|
|
|
|
|
cartridge and discard the old cartridge. |
|
|
|
|
|
The drive is writing data to tape. |
|
|
|
|
|
"x.y:1" is the cumulative |
|
|
|
|
|
compression ratio since power-on, or |
|
1010 |
Write |
S |
|
since the compression ratio was last |
|
|
cleared. For example, "Write 2.1" |
||||
x.y:1 |
|
|
|||
|
|
|
means a compression ratio of 2.1:1. |
||
|
|
|
|
||
|
|
|
|
The compression ratio is only |
|
|
|
|
|
displayed after about 1 megabyte of |
|
|
|
|
|
data has been written since power-on. |
|
|
|
|
|
A WRITE, WRITE FILEMARK or |
|
8010 |
Write Fail |
E |
F |
ERASE command has failed. |
|
|
|||||
|
|
Action: Use a new cartridge. |
|||
|
|
|
|
||
|
Write Fail: |
E |
F |
The drive could not write to the tape. |
|
|
Clean or |
||||
8003 |
The tape is possibly worn or damaged. |
||||
Use New |
|
|
|||
|
|
|
|
||
|
Tape |
|
|
|
|
|
|
|
|
A WRITE, WRITE FILEMARK or |
|
|
|
|
|
ERASE command has been attempted |
|
8018 |
Write |
E |
F |
on a write-protected cartridge. |
|
Protected |
|
||||
|
|
|
|||
|
Tape |
|
|
Action: Remove the cartridge and |
|
|
|
|
|
change it to write-enabled. |
|
|
|
|
|
The upgrade firmware is not |
|
8023 |
Wrong FW |
E |
F compatible. The drive has not been |
||
|
|
programmed. |
|||
|
|
|
|
||
© 1997-2001, Hewlett-Packard Company
file:///C|/Documents%20and%20Settings/topher.COL-SPRINGS/Desktop/Ultrium/pdf/document/dds/user/reseller/eng/messages.htm [11/15/2001 1:25:09 PM]
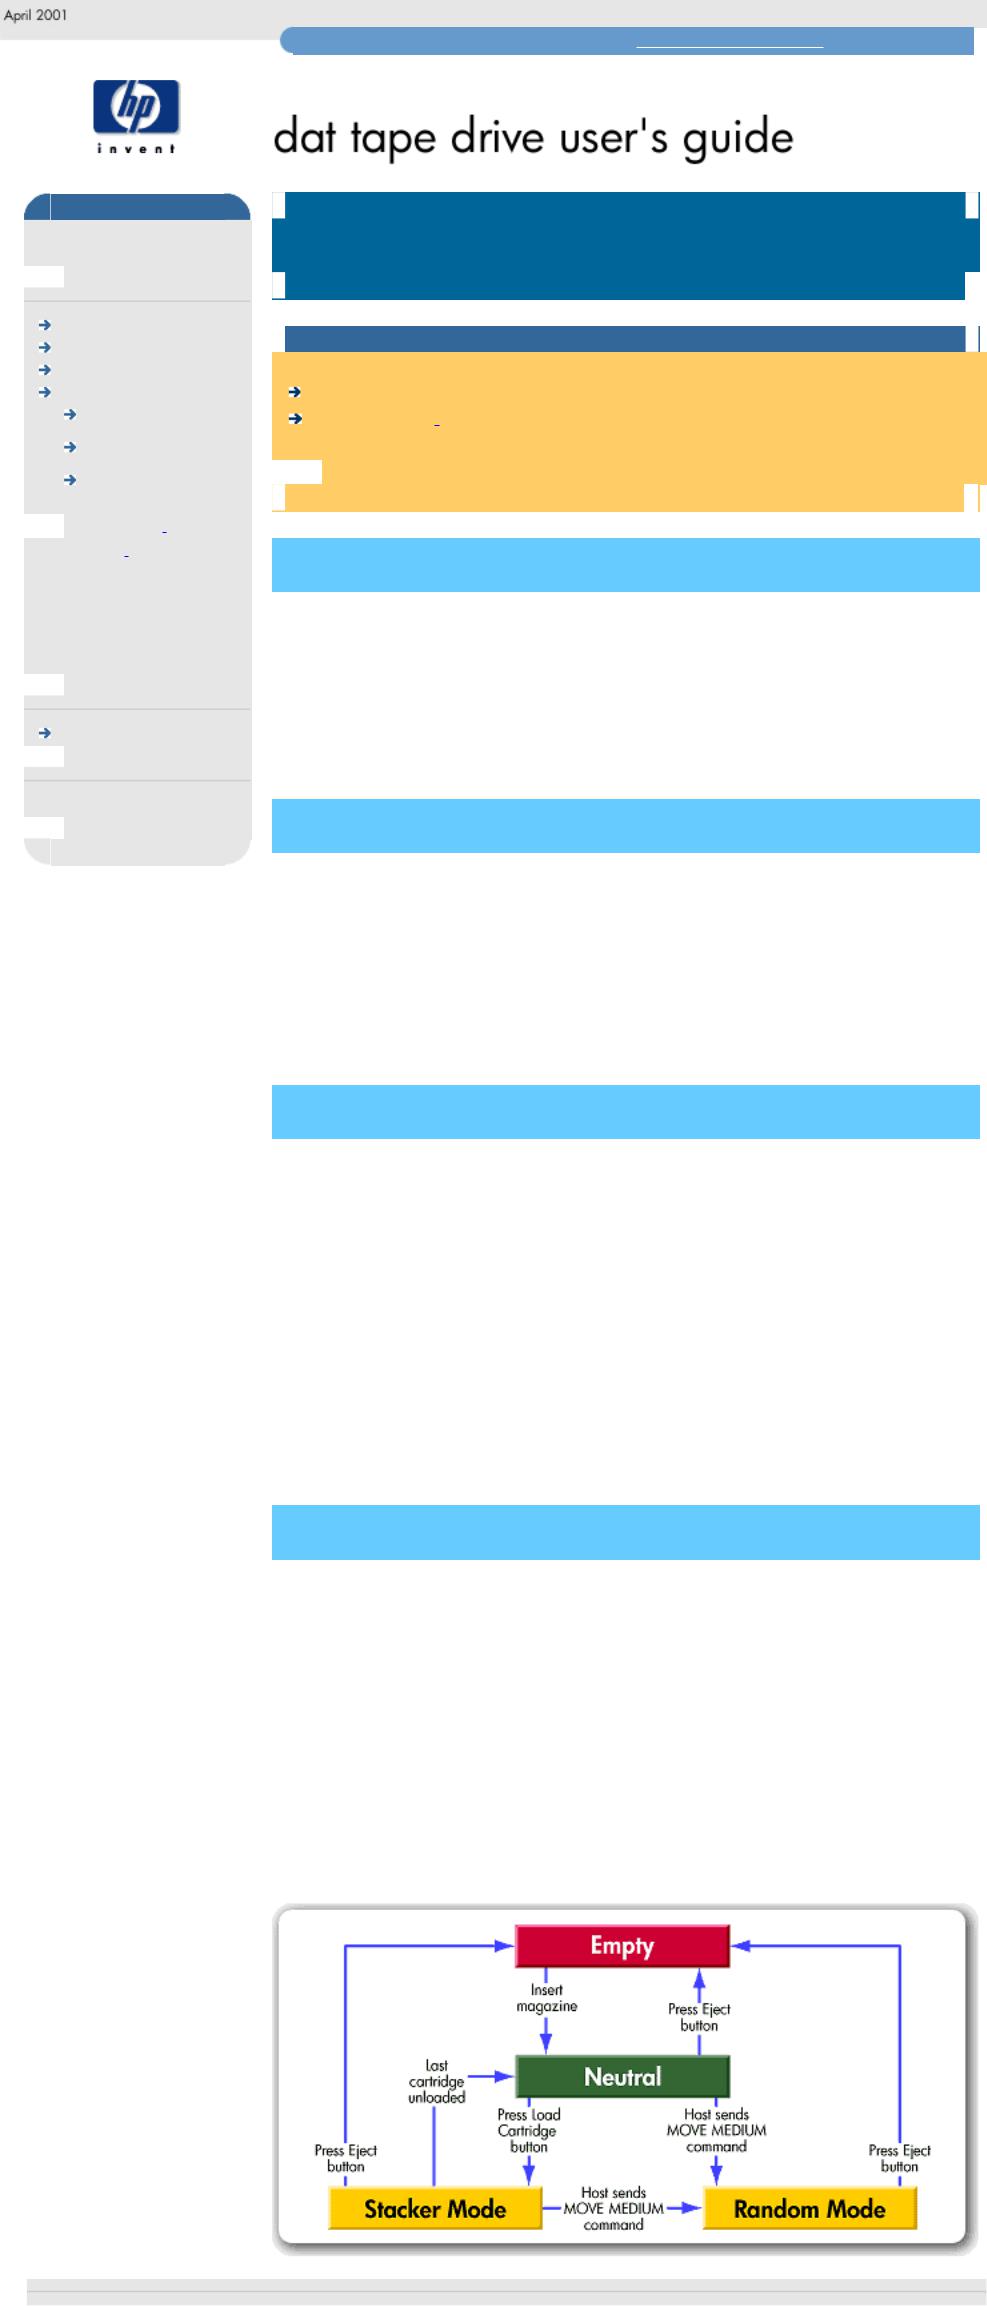
modes of operation
hp learning products
http://www.hp.com/support/tape may have a later version
data protection
 index of topics
 contact hp
home page before you start
tape drive operation autoloader operation
the front panel lights front panel
messages
loading & unloading modes of operation

 cartridge care
 cleaning one-button disaster
  recovery
  specifications
  diagnostics
  troubleshooting
 FAQs
FAQs
SCSI configuration

 UNIX configuration
 ordering supplies
 installing drivers
 autoloader modes of operation
 contents of this section
types of mode stacker mode
 random mode
  changing modes
types of mode
The HP Surestore DAT 24x6 and DAT 40x6 may be operated in either stacker or random mode. Mode is initially determined by what happens after you insert a magazine:
●If the host sends a command (MOVE MEDIUM) to move a cartridge from the magazine to the drive, the autoloader goes into random mode.
●If you select a cartridge by pressing the Select button and then load it by pressing the Load Cartridge button, the autoloader goes into stacker mode.
stacker mode
In stacker mode (also known as sequential mode), the autoloader simply uses the cartridges sequentially from the magazine. When one cartridge is unloaded (following a SCSI UNLOAD command), the autoloader automatically loads the cartridge from the next highest numbered magazine slot.
You can select the first cartridge you want the autoloader to load by using the Select and Load Cartridge buttons on the front panel.
random mode
In random (or changer) mode, the host computer controls the movement of cartridges between magazine and drive. For example, suppose the cartridge from slot 3 is currently loaded and you want to restore a particular file from a particular backup. The software knows that the file is on tape 1, so the host instructs the autoloader to replace cartridge 3 in the magazine and then loads cartridge 1 so that it can restore the file. As a user, you may not even be aware that the cartridge has been changed.
Use of random mode requires two things:
●The host computer must be able to support multiple LUNs (Logical Unit Numbers), by which it identifies different devices at a single SCSI address, so that it can send commands separately to the changer mechanism and the DAT drive in the autoloader.
●The software must be able to provide the necessary functionality.
changing modes
The flowchart below shows how the autoloader moves between four states:
●Empty, when there is no magazine in the autoloader.
●Neutral, when a magazine has been inserted but no cartridges have been moved to the DAT drive and no commands have been received to move a cartridge. It is while the autoloader is in the neutral state that you can select a cartridge for loading using the Select button.
●Stacker mode
●Random mode
The diagram is simplified. In particular, it does not show how the situation is altered if the host computer cannot address multiple LUNs at a single SCSI address.
© 1997-2001, Hewlett-Packard Company
file:///C|/Documents%20and%20Settings/topher.COL-SPRINGS/Desktop/Ultrium/pdf/document/dds/user/reseller/eng/modes.htm [11/15/2001 1:25:11 PM]
 Loading...