


 Loading...
HP StorageWorks
X3000 G2 Network Storage System User
Guide
SWX image version 2.00.0a
Part Number: 5697-0592 First edition: November 2010
Legal and notice information
© Copyright 2010, 2010 Hewlett-Packard Development Company, L.P.
Confidential computer software. Valid license from HP required for possession, use or copying. Consistent with FAR 12.211 and 12.212, Commercial Computer Software, Computer Software Documentation, and Technical Data for Commercial Items are licensed to the U.S. Government under vendor's standard commercial license.
The information contained herein is subject to change without notice. The only warranties for HP products and services are set forth in the express warranty statements accompanying such products and services. Nothing herein should be construed as constituting an additional warranty. HP shall not be liable for technical or editorial errors or omissions contained herein.
Acknowledgments
Intel®, Itanium®, Pentium®, Intel Inside®, and the Intel Inside logo are trademarks or registered trademarks of Intel Corporation or its subsidiaries in the United States and other countries.
Microsoft®, Windows®, Windows® XP, and Windows NT® are U.S. registered trademarks of Microsoft Corporation.
Adobe® and Acrobat® are trademarks of Adobe Systems Incorporated.
Java™ is a US trademark of Sun Microsystems, Inc.
Oracle is a registered US trademark of Oracle Corporation, Redwood City, California.
UNIX® is a registered trademark of The Open Group.
Warranty
WARRANTY STATEMENT: To obtain a copy of the warranty for this product, see the warranty information website:
http://www.hp.com/go/storagewarranty

Contents
1 Installing and configuring the storage system ....................................... |
13 |
Setup overview ......................................................................................................................... |
13 |
Check kit contents .............................................................................................................. |
13 |
Determine an access method ............................................................................................... |
13 |
Locate the serial number, Certificate of Authenticity, and End User License Agreement ........................ |
14 |
Install the storage system hardware ............................................................................................. |
14 |
Connect to the storage system .................................................................................................... |
14 |
Power on the server and log on .................................................................................................. |
15 |
Confirm Windows activation ...................................................................................................... |
16 |
Configure the storage system ...................................................................................................... |
17 |
Complete system configuration ................................................................................................... |
17 |
Additional access methods ......................................................................................................... |
18 |
Using the remote browser method ......................................................................................... |
18 |
Using the Remote Desktop method ........................................................................................ |
18 |
Using the Telnet method ...................................................................................................... |
19 |
Enabling Telnet ............................................................................................................ |
19 |
Default storage settings .............................................................................................................. |
19 |
Physical configuration ......................................................................................................... |
19 |
Default boot sequence ........................................................................................................ |
20 |
2 Storage system component identification ............................................. |
21 |
HP X3400 G2 Network Storage Gateway hardware components ................................................... |
21 |
HP X3800 G2 Network Storage Gateway hardware components ................................................... |
23 |
HP X3800sb G2 Network Storage Gateway Blade hardware components ....................................... |
27 |
SAS and SATA hard drive LEDs ................................................................................................... |
28 |
Systems Insight Display LEDs ...................................................................................................... |
30 |
Systems Insight Display LED combinations .................................................................................... |
31 |
3 Administration tools .......................................................................... |
33 |
Microsoft Windows Storage Server 2008 R2 administration tools ................................................... |
33 |
Remote Desktop for Administration ....................................................................................... |
33 |
Share and Storage Management .......................................................................................... |
33 |
Single Instance Storage ....................................................................................................... |
34 |
Print Management .............................................................................................................. |
35 |
Network File System (NFS) User Mapping ............................................................................. |
35 |
Configuring AD LDS ........................................................................................................... |
36 |
Microsoft hotfix 2222746 .............................................................................................. |
36 |
Phase 1 scripts ............................................................................................................ |
36 |
Phase 2 scripts ............................................................................................................ |
37 |
Script execution ........................................................................................................... |
38 |
Verifying script execution .............................................................................................. |
39 |
Shared access example ................................................................................................ |
41 |
4 Storage management overview .......................................................... |
49 |
X3000 G2 Network Storage System User Guide |
3 |
Storage management elements ................................................................................................... |
49 |
Storage management example ............................................................................................. |
49 |
Physical storage elements .................................................................................................... |
50 |
Arrays ........................................................................................................................ |
51 |
Fault tolerance ............................................................................................................. |
52 |
Online spares ............................................................................................................. |
52 |
Logical storage elements ..................................................................................................... |
52 |
Logical drives (LUNs) .................................................................................................... |
52 |
Partitions .................................................................................................................... |
53 |
Volumes ..................................................................................................................... |
53 |
File system elements ............................................................................................................ |
54 |
File sharing elements .......................................................................................................... |
54 |
Volume Shadow Copy Service overview ................................................................................ |
54 |
Using storage elements ....................................................................................................... |
55 |
Clustered server elements .................................................................................................... |
55 |
Network adapter teaming .......................................................................................................... |
55 |
Management tools .................................................................................................................... |
55 |
HP Systems Insight Manager ................................................................................................ |
55 |
Management Agents .......................................................................................................... |
56 |
5 File server management .................................................................... |
57 |
File services features in Windows Storage Server 2008 R2 ............................................................ |
57 |
Storage Manager for SANs ................................................................................................. |
57 |
Single Instance Storage ....................................................................................................... |
57 |
File Server Resource Manager .............................................................................................. |
57 |
Windows SharePoint Services .............................................................................................. |
57 |
File services management .......................................................................................................... |
58 |
Configuring data storage .................................................................................................... |
58 |
Storage management utilities ............................................................................................... |
58 |
Array management utilities ............................................................................................ |
59 |
Array Configuration Utility ............................................................................................ |
59 |
Disk Management utility ............................................................................................... |
60 |
Guidelines for managing disks and volumes .......................................................................... |
60 |
Scheduling defragmentation ................................................................................................ |
61 |
Disk quotas ....................................................................................................................... |
61 |
Adding storage .................................................................................................................. |
62 |
Expanding storage ...................................................................................................... |
62 |
Extending storage using Windows Storage Utilities .......................................................... |
62 |
Expanding storage for EVA arrays using Command View EVA ........................................... |
63 |
Expanding storage using the Array Configuration Utility ................................................... |
63 |
Volume shadow copies .............................................................................................................. |
64 |
Shadow copy planning ....................................................................................................... |
64 |
Identifying the volume .................................................................................................. |
64 |
Allocating disk space ................................................................................................... |
65 |
Identifying the storage area .......................................................................................... |
66 |
Determining creation frequency ..................................................................................... |
66 |
Shadow copies and drive defragmentation ............................................................................ |
66 |
Mounted drives .................................................................................................................. |
67 |
Managing shadow copies ................................................................................................... |
67 |
The shadow copy cache file .......................................................................................... |
68 |
Enabling and creating shadow copies ............................................................................ |
69 |
Viewing a list of shadow copies ..................................................................................... |
69 |
Set schedules .............................................................................................................. |
70 |
Viewing shadow copy properties ................................................................................... |
70 |
4
Redirecting shadow copies to an alternate volume ........................................................... |
70 |
Disabling shadow copies .............................................................................................. |
71 |
Managing shadow copies from the storage system desktop ..................................................... |
71 |
Shadow Copies for Shared Folders ....................................................................................... |
72 |
SMB shadow copies .................................................................................................... |
73 |
NFS shadow copies ..................................................................................................... |
74 |
Recovery of files or folders ............................................................................................ |
74 |
Recovering a deleted file or folder .................................................................................. |
74 |
Recovering an overwritten or corrupted file ...................................................................... |
75 |
Recovering a folder ...................................................................................................... |
75 |
Backup and shadow copies .......................................................................................... |
76 |
Shadow Copy Transport ...................................................................................................... |
76 |
Folder and share management ................................................................................................... |
76 |
Folder management ............................................................................................................ |
77 |
Share management ............................................................................................................ |
83 |
Share considerations .................................................................................................... |
83 |
Defining Access Control Lists ......................................................................................... |
84 |
Integrating local file system security into Windows domain environments ............................. |
84 |
Comparing administrative (hidden) and standard shares ................................................... |
84 |
Managing shares ........................................................................................................ |
85 |
File Server Resource Manager .................................................................................................... |
85 |
Quota management ........................................................................................................... |
85 |
File screening management ................................................................................................. |
86 |
Storage reports .................................................................................................................. |
86 |
Other Windows disk and data management tools ......................................................................... |
86 |
Additional information and references for file services .................................................................... |
86 |
Backup ............................................................................................................................. |
86 |
HP StorageWorks Library and Tape Tools .............................................................................. |
86 |
Antivirus ............................................................................................................................ |
87 |
6 Cluster administration ....................................................................... |
89 |
Cluster overview ....................................................................................................................... |
89 |
Cluster terms and components .................................................................................................... |
90 |
Nodes .............................................................................................................................. |
90 |
Resources .......................................................................................................................... |
90 |
Cluster groups ................................................................................................................... |
91 |
Virtual servers .................................................................................................................... |
91 |
Failover and failback .......................................................................................................... |
91 |
Quorum disk ..................................................................................................................... |
91 |
Cluster concepts ....................................................................................................................... |
92 |
Sequence of events for cluster resources ................................................................................ |
92 |
Hierarchy of cluster resource components .............................................................................. |
93 |
Cluster planning ....................................................................................................................... |
93 |
Storage planning ............................................................................................................... |
94 |
Network planning .............................................................................................................. |
94 |
Protocol planning ............................................................................................................... |
95 |
Preparing for cluster installation .................................................................................................. |
95 |
Before beginning installation ............................................................................................... |
96 |
Using multipath data paths for high availability ...................................................................... |
96 |
Checklists for cluster server installation .................................................................................. |
96 |
Network requirements .................................................................................................. |
96 |
Shared disk requirements .............................................................................................. |
96 |
Cluster installation ..................................................................................................................... |
97 |
Setting up networks ............................................................................................................ |
97 |
X3000 G2 Network Storage System User Guide |
5 |
Configuring the private network adapter ......................................................................... |
97 |
Configuring the public network adapter .......................................................................... |
98 |
Renaming the local area connection icons ...................................................................... |
98 |
Verifying connectivity and name resolution ...................................................................... |
98 |
Verifying domain membership ....................................................................................... |
98 |
Setting up a cluster account .......................................................................................... |
98 |
About the Quorum disk ................................................................................................ |
98 |
Configuring shared disks .............................................................................................. |
99 |
Verifying disk access and functionality ............................................................................ |
99 |
Configuring cluster service software ............................................................................................. |
99 |
Using Failover Cluster Management ...................................................................................... |
99 |
Creating a cluster ............................................................................................................... |
99 |
Adding nodes to a cluster .................................................................................................... |
99 |
Geographically dispersed clusters ...................................................................................... |
100 |
Cluster groups and resources, including file shares ...................................................................... |
100 |
Cluster group overview ..................................................................................................... |
100 |
Node-based cluster groups ......................................................................................... |
101 |
Load balancing ......................................................................................................... |
101 |
File share resource planning issues ..................................................................................... |
101 |
Resource planning ..................................................................................................... |
101 |
Permissions and access rights on share resources ........................................................... |
102 |
NFS cluster-specific issues ........................................................................................... |
102 |
Non cluster aware file sharing protocols .............................................................................. |
103 |
Adding new storage to a cluster ......................................................................................... |
103 |
Creating physical disk resources .................................................................................. |
103 |
Creating file share resources ....................................................................................... |
103 |
Creating NFS share resources ..................................................................................... |
104 |
Shadow copies in a cluster ................................................................................................ |
104 |
Extend a LUN in a cluster .................................................................................................. |
104 |
MSNFS administration on a server cluster ............................................................................ |
104 |
Best practices for running Server for NFS in a server cluster ............................................. |
104 |
Print services in a cluster .......................................................................................................... |
105 |
Creating a cluster printer spooler ........................................................................................ |
105 |
Advanced cluster administration procedures ............................................................................... |
106 |
Failing over and failing back ............................................................................................. |
106 |
Restarting one cluster node ................................................................................................ |
107 |
Shutting down one cluster node .......................................................................................... |
107 |
Powering down the cluster ................................................................................................. |
107 |
Powering up the cluster ..................................................................................................... |
108 |
7 Troubleshooting, servicing, and maintenance ..................................... |
109 |
Troubleshooting the storage system ............................................................................................ |
109 |
WEBES (Web Based Enterprise Services) ................................................................................... |
109 |
Maintenance and service ......................................................................................................... |
110 |
Maintenance updates ....................................................................................................... |
110 |
System updates .......................................................................................................... |
110 |
Firmware updates ............................................................................................................. |
110 |
Certificate of Authenticity ......................................................................................................... |
110 |
Workarounds for common issues .............................................................................................. |
111 |
8 System recovery ............................................................................. |
113 |
The System Recovery DVD ........................................................................................................ |
113 |
Restore the factory image ......................................................................................................... |
113 |
Using a USB Flash Drive for System Recovery ............................................................................. |
114 |
6
Create a System Recovery USB Flash Drive .......................................................................... |
114 |
Use the USB Flash Drive for System Recovery ....................................................................... |
115 |
Managing disks after a restoration ............................................................................................ |
116 |
9 Support and other resources ............................................................ |
117 |
Contacting HP ........................................................................................................................ |
117 |
Typographic conventions ......................................................................................................... |
117 |
Rack stability .......................................................................................................................... |
118 |
Customer self repair ................................................................................................................ |
118 |
HP Insight Remote Support software .......................................................................................... |
119 |
A Regulatory compliance notices ........................................................ |
121 |
Regulatory compliance identification numbers ............................................................................ |
121 |
Federal Communications Commission notice .............................................................................. |
121 |
FCC rating label .............................................................................................................. |
121 |
Class A equipment ..................................................................................................... |
121 |
Class B equipment ..................................................................................................... |
122 |
Declaration of Conformity for products marked with the FCC logo, United States only ............... |
122 |
Modification .................................................................................................................... |
122 |
Cables ............................................................................................................................ |
122 |
Canadian notice (Avis Canadien) ............................................................................................. |
122 |
Class A equipment ........................................................................................................... |
122 |
Class B equipment ............................................................................................................ |
123 |
European Union notice ............................................................................................................ |
123 |
Japanese notices .................................................................................................................... |
123 |
Japanese VCCI-A notice .................................................................................................... |
123 |
Japanese VCCI-B notice .................................................................................................... |
123 |
Japanese VCCI marking .................................................................................................... |
123 |
Japanese power cord statement .......................................................................................... |
124 |
Korean notices ....................................................................................................................... |
124 |
Class A equipment ........................................................................................................... |
124 |
Class B equipment ............................................................................................................ |
124 |
Taiwanese notices ................................................................................................................... |
124 |
BSMI Class A notice ......................................................................................................... |
124 |
Taiwan battery recycle statement ........................................................................................ |
125 |
Turkish recycling notice ............................................................................................................ |
125 |
Laser compliance notices ......................................................................................................... |
126 |
English laser notice ........................................................................................................... |
126 |
Dutch laser notice ............................................................................................................. |
126 |
French laser notice ........................................................................................................... |
127 |
German laser notice ......................................................................................................... |
127 |
Italian laser notice ............................................................................................................ |
127 |
Japanese laser notice ........................................................................................................ |
128 |
Spanish laser notice ......................................................................................................... |
128 |
Recycling notices .................................................................................................................... |
128 |
English recycling notice ..................................................................................................... |
128 |
Bulgarian recycling notice ................................................................................................. |
129 |
Czech recycling notice ...................................................................................................... |
129 |
Danish recycling notice ..................................................................................................... |
129 |
Dutch recycling notice ....................................................................................................... |
129 |
Estonian recycling notice ................................................................................................... |
130 |
Finnish recycling notice ..................................................................................................... |
130 |
French recycling notice ...................................................................................................... |
130 |
German recycling notice ................................................................................................... |
130 |
X3000 G2 Network Storage System User Guide |
7 |
Greek recycling notice ...................................................................................................... |
131 |
Hungarian recycling notice ................................................................................................ |
131 |
Italian recycling notice ...................................................................................................... |
131 |
Latvian recycling notice ..................................................................................................... |
131 |
Lithuanian recycling notice ................................................................................................. |
132 |
Polish recycling notice ....................................................................................................... |
132 |
Portuguese recycling notice ................................................................................................ |
132 |
Romanian recycling notice ................................................................................................. |
132 |
Slovak recycling notice ...................................................................................................... |
133 |
Spanish recycling notice .................................................................................................... |
133 |
Swedish recycling notice ................................................................................................... |
133 |
Battery replacement notices ...................................................................................................... |
134 |
Dutch battery notice .......................................................................................................... |
134 |
French battery notice ........................................................................................................ |
135 |
German battery notice ...................................................................................................... |
135 |
Italian battery notice ......................................................................................................... |
136 |
Japanese battery notice .................................................................................................... |
136 |
Spanish battery notice ...................................................................................................... |
137 |
Glossary .......................................................................................... |
139 |
Index ............................................................................................... |
141 |
8

Figures
1 |
HP X3400 G2 front panel components ...................................................................... |
21 |
2 |
HP X3400 G2 front panel LEDs ................................................................................ |
22 |
3 |
HP X3400 G2 rear panel components ....................................................................... |
22 |
4 |
HP X3400 G2 rear panel LEDs ................................................................................. |
23 |
5 |
HP X3800 G2 front panel components ...................................................................... |
24 |
6 |
HP X3800 G2 front panel LEDs and buttons ............................................................... |
25 |
7 |
HP X3800 G2 rear panel components ....................................................................... |
25 |
8 |
HP X3800 G2 rear panel LEDs and buttons ............................................................... |
26 |
9 |
HP X3800sb G2 front panel components ................................................................... |
27 |
10 |
HP X3800sb G2 front panel LEDs ............................................................................. |
28 |
11 |
SAS/SATA hard drive LEDs ....................................................................................... |
29 |
12 |
Systems Insight Display LEDs ..................................................................................... |
30 |
13 |
AD LDS Role and Instance ........................................................................................ |
37 |
14 |
AD LDS script execution help screen .......................................................................... |
39 |
15 |
ADSI Edit Connection Settings dialog box .................................................................. |
40 |
16 |
NFS-mapped users and groups in ADSI Edit ............................................................... |
41 |
17 |
NFS Advanced Sharing dialog box ........................................................................... |
43 |
18 |
NFS Share Permissions dialog box ............................................................................ |
43 |
19 |
Permissions for NfsTest dialog box ............................................................................. |
44 |
20 |
Advanced Security Settings for file.txt ........................................................................ |
45 |
21 |
Select User or Group dialog box ............................................................................... |
46 |
22 |
Replace owner on subcontainers and objects .............................................................. |
47 |
23 |
Permissions for NfsTest dialog box ............................................................................. |
47 |
24 |
Storage management process example ...................................................................... |
50 |
25 |
Configuring arrays from physical drives ...................................................................... |
51 |
26 |
RAID 0 (data striping) (S1-S4) of data blocks (B1-B12) ................................................ |
51 |
27 |
Two arrays (A1, A2) and five logical drives (L1 through L5) spread over five physical |
|
|
drives .................................................................................................................... |
53 |
28 |
System administrator view of Shadow Copies for Shared Folders ................................... |
67 |
29 |
Shadow copies stored on a source volume ................................................................. |
68 |
30 |
Shadow copies stored on a separate volume .............................................................. |
68 |
31 |
Accessing shadow copies from My Computer ............................................................. |
72 |
X3000 G2 Network Storage System User Guide |
9 |
32 |
Client GUI ............................................................................................................. |
73 |
33 |
Recovering a deleted file or folder ............................................................................. |
75 |
34 |
Properties dialog box, Security tab ............................................................................ |
78 |
35 |
Advanced Security settings dialog box, Permissions tab ............................................... |
79 |
36 |
User or group Permission Entry dialog box ................................................................. |
80 |
37 |
Advanced Security Settings dialog box, Auditing tab ................................................... |
81 |
38 |
Select User or Group dialog box ............................................................................... |
81 |
39 |
Auditing Entry dialog box for folder name NTFS Test ................................................... |
82 |
40 |
Advanced Security Settings dialog box, Owner tab ..................................................... |
83 |
41 |
Storage system cluster diagram ................................................................................. |
90 |
42 |
Cluster concepts diagram ......................................................................................... |
92 |
10
Tables |
|
|
1 |
Storage system RAID configurations ........................................................................... |
20 |
2 |
HP X3400 G2 front panel LED descriptions ................................................................ |
22 |
3 |
HP X3400 G2 rear panel LED descriptions ................................................................. |
23 |
4 |
HP X3800 G2 front panel LED and button descriptions ................................................ |
25 |
5 |
HP X3800 G2 rear panel LED and button descriptions ................................................. |
26 |
6 |
HP X3800sb G2 front panel LED descriptions ............................................................. |
28 |
7 |
SAS and SATA hard drive LED combinations ............................................................... |
29 |
8 |
Systems Insight Display LED descriptions .................................................................... |
30 |
9 |
Systems Insight Display LEDs and internal health LED combinations ................................ |
31 |
10 |
Summary of RAID methods ....................................................................................... |
52 |
11 |
Tasks and utilities needed for storage system configuration ........................................... |
58 |
12 |
Sharing protocol cluster support ................................................................................ |
95 |
13 |
Power sequencing for cluster installation ..................................................................... |
97 |
14 |
Document conventions ........................................................................................... |
117 |
X3000 G2 Network Storage System User Guide |
11 |
12

1 Installing and configuring the storage system
Setup overview
The HP StorageWorks X3000 G2 Network Storage System comes preinstalled with the Microsoft Windows® Storage Server™ 2008 R2 Enterprise Edition x64operating system with Microsoft iSCSI Software Target and a Microsoft Cluster Service (MSCS) license included.
 IMPORTANT:
•Windows Storage Server 2008 R2 x64 operating systems are designed to support 32–bit applications without modification; however, any 32–bit applications that are run on these operating systems should be thoroughly tested before releasing the storage system to a production environment.
•Windows Storage Server x64 editions support only x64-based versions of Microsoft Management Console (MMC) snap-ins, not 32-bit versions.
Check kit contents
Remove the contents, making sure you have all the components listed below. If components are missing, contact HP technical support.
•HP StorageWorks X3000 G2 Network Storage System (with operating system preloaded)
•Power cord(s)
•Safety and Disposal Documentation CD
•HP StorageWorks Storage System Recovery DVD
•End User License Agreement
•Certificate of Authenticity Card
•Slide rail assembly
•HP ProLiant Essentials Integrated Lights-Out Advanced Pack
 NOTE:
NOTE:
HP StorageWorks X3800 G2 Network Storage Systems support Integrated Lights-Out 3 (iLO 3) remote management software. All other storage system models support iLO 2.
Determine an access method
Before you install the storage system, you need to decide on an access method.
X3000 G2 Network Storage System User Guide |
13 |

The type of access you select is determined by whether or not the network has a Dynamic Host Configuration Protocol (DHCP) server. If the network has a DHCP server, you can install the storage system through the direct attachment or remote management methods. If your network does not have a DHCP server, you must access the storage system through the direct attachment method.
The direct attachment method requires a display, keyboard, and mouse. These components are not provided with the storage system.
 IMPORTANT:
Only the direct attach and remote management access methods can be used to install the storage system. After the storage system installation process is complete and the system's IP address has been assigned, you can then additionally use the remote browser and remote desktop methods to access the storage system.
Locate the serial number, Certificate of Authenticity, and End User License Agreement
For technical support purposes, locate the storage system's serial number, Certificate of Authenticity (COA), and End User License Agreement (EULA). Record the serial number and COA product key and make a print copy of the EULA as needed.
The storage system's serial number is located in several places:
•Top of the storage system or blade
•Back of the storage system
•Inside the storage system shipping box
•Outside of the storage system shipping box
The storage system's Certificate of Authenticity (COA) card is located inside the storage system shipping box. There is also a COA sticker with product key affixed to the top of the storage system or blade.
The storage system's printed End User License Agreement (EULA) is located in the media kit that is shipped with the storage system. There is also an electronic copy of the EULA installed with the storage system at %SystemDrive%\Windows\System32\license.rtf.
Install the storage system hardware
If your storage system is fully racked and cabled, move ahead to Connect to the storage system.
For X3400 and X3800 G2 storage systems, install the rail kit and insert and secure the storage system into the rack by following the HP Rack Rail Kit Installation Instructions.
ForX3800sb G2 G2 storage systems, install the server blade by following the procedures documented in the provided HP StorageWorks X3800sb G2 Network Storage Gateway Blade Quick Start Guide.
Connect to the storage system
Use either the direct connect or remote management method to connect to the storage system.
14 Installing and configuring the storage system

 IMPORTANT:
Only the direct attach and remote management access methods can be used to install the storage system. After the storage system installation process is complete and the system's IP address has been assigned, you can then additionally use the remote browser and remote desktop methods to access the storage system.
•Direct attach — Connect the following cables to the back panel of the storage system in the following sequence: keyboard, mouse, network cable, monitor cable, and power cable. For blade products, connect the cables to the server blade by using an HP c-Class Blade SUV cable. This access method is mandatory if your network does not have a Dynamic Host Configuration Protocol (DHCP) server.
 NOTE:
NOTE:
The keyboard, mouse, and monitor are not provided with the storage system.
HP c-Class Blade SUV cable require USB-compatible devices.
•Remote management — Access the storage system using the Integrated Lights-Out remote management method:
1.Ensure that a network cable is connected to the iLO port located on the back of the storage system.
2.Locate the iLO Network Settings tag attached to the storage system and record the default user name, password, and DNS name.
3.From a remote computer, open a standard Web browser and enter the iLO management hostname of the storage system.
 NOTE:
NOTE:
By default, iLO obtains the management IP address and subnet mask from your network’s DHCP server. The hostname found on the iLO tag is automatically registered with your network’s DNS server.
4.Using the default user information provided on the iLO Network Settings tag, log on to the storage system.
For detailed instructions on using iLO remote management software, see the HP Integrated Lights–Out 2 User Guide or HP ProLiant Integrated Lights-Out 3 User Guide.
Power on the server and log on
Power on the server after installing the hardware and connecting the cables. Powering on the server for the first time initiates the storage system installation process.
X3000 G2 Network Storage System User Guide |
15 |

1.Power on the system by pushing the power button on the front panel. If using iLO, click Momentary Press on the Power Management page to power on the server, then click Launch on the Status Summary page to open the iLO Integrated Remote Console and complete the installation process.
The storage system starts and displays an HP Network Storage System installation screen. The storage system installation process takes approximately 10–15 minutes.
 NOTE:
NOTE:
Your storage system comes pre-installed with the Microsoft Windows Storage Server 2008 R2 operating system. There is no operating system installation required.
When the storage system installation process nears completion, the Windows Storage Server 2008 R2 desktop displays the following message: The user's password must be changed before logging on the first time. Log on to the storage system by establishing an Administrator password:
2.Click OK.
3.Type an Administrator password in the New password box.
4.Re-type the Administrator password in the Confirm password box.
5.Click the blue arrow next to the Confirm password box.
6.Click OK.
After the Administrator password has been set, the storage system completes the installation process and restarts.
7.When prompted, press CTRL+ALT+DELETE to log on to the system. If using iLO, on the iLO Integrated Remote Console tab, click the button labeled CAD and then click the Ctrl-Alt-Del menu item.
 IMPORTANT:
After establishing the new Administrator password, be sure to remember it and record it in a safe place if needed. HP has no way of accessing the system if the new password is lost.
Confirm Windows activation
Immediately after installing the storage system, confirm that your copy of the Microsoft® Windows® Storage Server™ 2008 R2 operating system has been activated.
 IMPORTANT:
Some storage systems may not automatically activate Windows during the system installation process.
To check the activation status of Windows, open Control Panel (Start > Control Panel) and then double-click System. If your copy of Windows has been activated, the status under Windows activation will read Windows is activated. If your copy of Windows has not been activated, you must manually activate it within three days of the initial storage system installation.
To manually activate your copy of Windows:
1.If needed, change your locale settings (Control Panel > Regional and Language Options).
16 Installing and configuring the storage system
2.Record the product key located on the Certificate of Authenticity.
3.In Control Panel, double-click System.
4.Under Windows Activation, click Activate Windows Now.
5.Follow the on-screen instructions. Be sure to choose the Type a different product key option when prompted for a product key.
Microsoft Windows Storage Server 2008 R2 cannot be fully activated online. During the activation process, you will be provided with a telephone number to call to complete the process. Be sure to have the product key available when calling this number.
Configure the storage system
The HP StorageWorks Initial Configuration Tasks window launches automatically on logon. Use this tool to perform setup tasks such as setting the time zone, network configuration, changing the computer name, and joining a domain. When the HP StorageWorks Initial Configuration Tasks window is closed, HP Server Manager is launched automatically. Use HP Server Manager for further customizing of the storage system, such as adding roles and features, and share and storage management.
For detailed information about configuration options in HP StorageWorks Initial Configuration Tasks and Server Manager, see the online help.
Complete system configuration
After the storage system is physically set up and the basic configuration is established, you must complete additional setup tasks. Depending on the deployment scenario of the storage system, these steps can vary. These additional steps can include:
•Running Microsoft Windows Update—HP highly recommends that you run Microsoft Windows updates to identify, review, and install the latest, applicable, critical security updates on the storage system.
•Creating and managing users and groups—User and group information and permissions determine whether a user can access files. If the storage system is deployed into a workgroup environment, this user and group information is stored locally on the device. By contrast, if the storage system is deployed into a domain environment, user and group information is stored on the domain.
•Joining workgroup and domains—These are the two system environments for users and groups. Because users and groups in a domain environment are managed through standard Windows or Active Directory domain administration methods, this document discusses only local users and groups, which are stored and managed on the storage system. For information on managing users and groups on a domain, see the domain documentation available on the Microsoft web site.
If the storage system is deployed in a domain environment, the domain controller will store new accounts on the domain; however, remote systems will store new accounts locally unless they are granted permissions to create accounts on the domain.
•Using Ethernet NIC teaming (optional)—All models are equipped with an HP or Broadcom NIC Teaming utility. The utility allows administrators to configure and monitor Ethernet network interface controller (NIC) teams in a Windows-based operating system. These teams provide options for increasing fault tolerance and throughput.
•Adjusting logging for system, application, and security events.
•Installing third-party software applications—For example, these might include an antivirus application that you install.
•Registering the server — To register the server, refer to the HP Registration website (http://register.hp.com).
X3000 G2 Network Storage System User Guide |
17 |

Additional access methods
After the storage system installation process is complete and the system's IP address has been assigned, you can then additionally use the remote browser, Remote Desktop, and Telnet methods to access the storage system.
Using the remote browser method
The storage system ships with DHCP enabled on the network port. If the server is placed on a DHCP-enabled network and the IP address or server name is known, the server can be accessed through a client running Internet Explorer 5.5 (or later) on that network, using the TCP/IP 3202 port.
 IMPORTANT:
Before you begin this procedure, ensure that you have the following:
•Windows-based PC loaded with Internet Explorer 5.5 (or later) on the same local network as the storage system
•DHCP-enabled network
•Server name or IP address of the storage system
To connect the server to a network using the remote browser method, ensure that the client is configured to download signed ActiveX controls.
To connect the storage system to a network using the remote browser method
1.On the remote client machine open Internet Explorer and enter https:// and the server name of the storage system followed by a hyphen (-), and then:3202. For example, https:// labserver-:3202. Press Enter.
 NOTE:
NOTE:
If you are able to determine the IP address from your DHCP server, you can substitute the IP address for the server name. For example: 192.100.0.1:3202.
2.Click OK on the Security Alert prompt.
3.Log on to the storage system with the administrator user name and password.
 IMPORTANT:
If you are using the remote browser method to access the storage system, always close the remote session before closing your Internet browser. Closing the Internet browser does not close the remote session. Failure to close your remote session impacts the limited number of remote sessions allowed on the storage system at any given time.
Using the Remote Desktop method
Remote Desktop provides the ability for you to log onto and remotely administer your server, giving you a method of managing it from any client. Installed for remote administration, Remote Desktop
18 Installing and configuring the storage system

allows only two concurrent sessions. Leaving a session running takes up one license and can affect other users. If two sessions are running, additional users will be denied access.
To connect the storage system to a network using the Remote Desktop method
1.On the PC client, select Start > Run. At Open, type mstsc, then click OK.
2.Enter the IP address of the storage system in the Computer box and click Connect.
3.Log on to the storage system with the administrator user name and password.
Using the Telnet method
Telnet is a utility that lets users connect to machines, log on, and obtain a command prompt remotely. Telnet is preinstalled on the storage system but must be activated before use.
 CAUTION:
For security reasons, Telnet is disabled by default. The service needs to be modified to enable access to the storage system with Telnet.
Enabling Telnet
The Telnet service needs to be enabled prior to its access.
1.In Server Manager, expand the Configuration node in the left panel.
2.Click System and Network Settings.
3.Under System Settings Configuration, click Telnet.
4.Check the Enable Telnet access to this server check box and then click OK.
Default storage settings
HP StorageWorks X3000 G2 Network Storage Systems are preconfigured with default storage settings. This section provides additional details about the preconfigured storage.
Physical configuration
The logical disks reside on physical drives as shown in the table below.
As of the SWX image version 1.2, the DON'T ERASE volume that was created on earlier versions of HP StorageWorks Network Storage System models is no longer used.
 IMPORTANT:
The first two logical drives are configured for the storage system operating system.
The Operating System volume default factory settings can be customized after the operating system is up and running. The following settings can be changed:
•RAID level can be changed to any RAID level except RAID 0
•OS logical drive size can be changed to 60 GB or higher
X3000 G2 Network Storage System User Guide |
19 |

If the Operating System volume is customized and the System Recovery DVD is run at a later time, the System Recovery process will maintain the custom settings as long as the above criteria are met (RAID level other than RAID 0 and OS logical drive size of 60 GB or higher) and the OS volume is labeled System. If the storage system arrays are deleted and the System Recovery DVD is run, the System Recovery process will configure the storage system using the factory default settings listed in the table below.
HP StorageWorks X3000 G2 Network Storage Systems do not include preconfigured data volumes. The administrator must configure data storage for the storage system. See “Configuring data storage” on page 58 for more information.
The system reserved partition contains the operating system boot loader and allows you to enable BitLocker Drive Encryption for the Operating System volume.
Table 1 Storage system RAID configurations |
|
|
|
Server model |
Logical Disk 1 |
||
• HP StorageWorks X3400 G2 Network Storage |
|
|
|
Gateway |
• |
Operating System Volume |
|
• HP StorageWorks X3800 G2 Network Storage |
|||
• |
RAID 1+0 |
||
Gateway |
|||
• |
Physical Drives 0–1 |
||
• HP StorageWorks X3800sb G2 Network Storage |
|||
|
|
||
Gateway Blade
 NOTE:
NOTE:
In the HP Array Configuration Utility (ACU), logical disks are labeled 1 and 2. In Microsoft Disk Manager, logical disks are displayed as 0 and 1. For HP Smart Array configuration information, see http://h18004.www1.hp.com/products/servers/proliantstorage/arraycontrollers/.
If the operating system has a failure that might result from corrupt system files, a corrupt registry, or the system hangs during boot, see “System recovery” on page 113.
Default boot sequence
The BIOS supports the following default boot sequence:
1.DVD-ROM
2.Bootable USB flash drive
3.HDD
4.PXE (network boot)
Under normal circumstances, the storage systems boot up from the OS logical drive.
•If the system experiences a drive failure, the drive displays an amber disk failure LED.
•If a single drive failure occurs, it is transparent to the operating system.
20 Installing and configuring the storage system
2 Storage system component identification
This chapter provides illustrations of the storage system hardware components.
 NOTE:
NOTE:
The keyboard, mouse, and monitor are used only for the direct attached method of accessing the server. They are not provided with your storage system.
HP X3400 G2 Network Storage Gateway hardware components
The following figures show components and LEDs located on the front and rear panels of the X3400 G2 Network Storage Gateway.
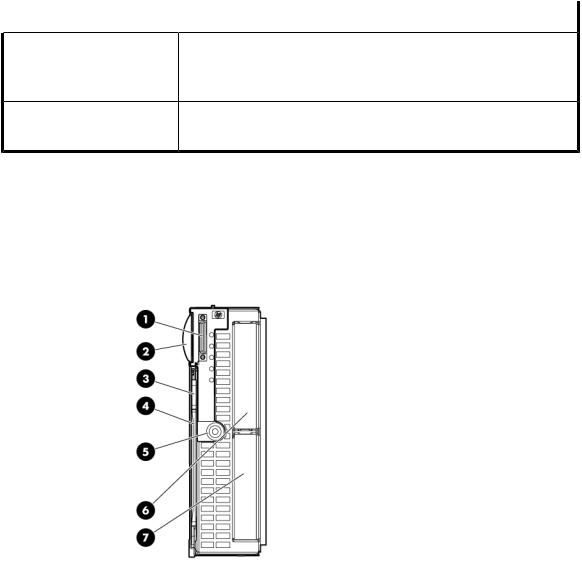
Figure 1 HP X3400 G2 front panel components
.
1.DVD-RW drive
2.Serial label pull tab
3.Two (2) USB ports
4.Four (4) 3.5” hot-plug SAS/SATA hard drive bays
 NOTE:
NOTE:
See “SAS and SATA hard drive LED combinations” on page 29 for HDD LED status descriptions.
X3000 G2 Network Storage System User Guide |
21 |
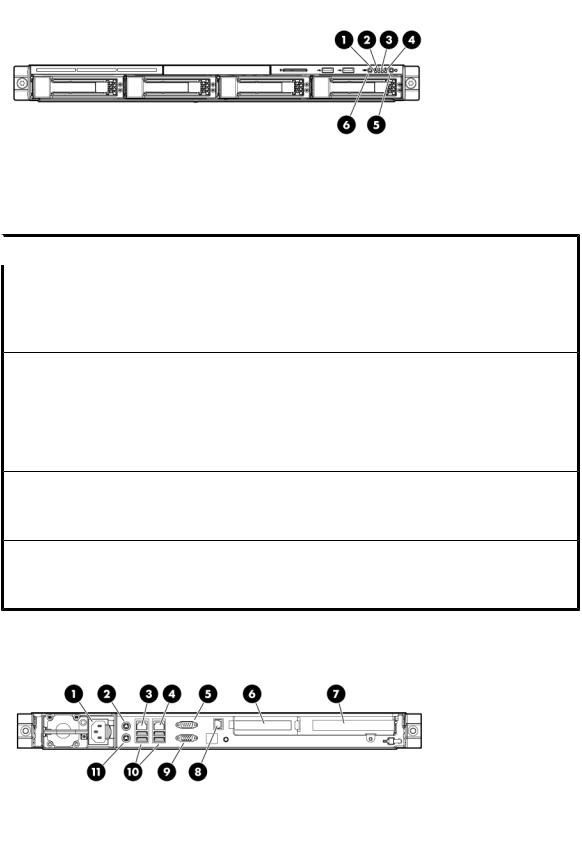
Figure 2 HP X3400 G2 front panel LEDs
.
Table 2 HP X3400 G2 front panel LED descriptions  Item / Description
  Status
Green = System health is normal.
Amber = System health is degraded. 1. Internal health LED Red = System health is critical.
Off = System health is normal (when in standby mode).
2.NIC 1 link/activity LED
3.NIC 2 link/activity LED
4.Drive activity LED
5.Power On/Standby button and system power LED
6.UID button/LED
Green = Network link exists.
Flashing green = Network link and activity exist. Off = No network link exists.
Green = Drive activity is normal.
Off = No drive activity exists.
Green = Normal (system on)
Amber = System is in standby, but power is still applied.
Off = Power cord is not attached or the power supply has failed.
Blue = Identification is activated.
Flashing blue = System is being managed remotely. Off = Identification is deactivated.
Figure 3 HP X3400 G2 rear panel components
.
22 Storage system component identification
1.Power cord connector
2.Mouse connector
3.10/100/1000 NIC 1 connector/shared iLO 2 management port
4.10/100/1000 NIC 2 connector
5.Serial connector
6.Low profile PCIe slot cover (x16 slot open)
7.Full-sized PCIe slot (occupied by Smart Array P212 controller)
8.Dedicated iLO 2 management port (this port is optional and must be purchased separately)
9.Video connector
10.USB connectors (2)
11.Keyboard connector
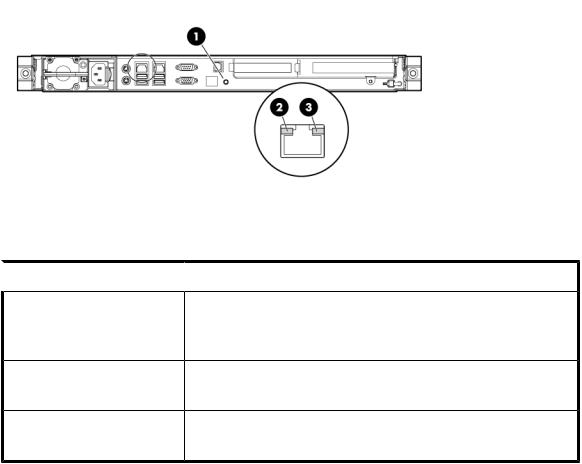
Figure 4 HP X3400 G2 rear panel LEDs
.
Table 3 HP X3400 G2 rear panel LED descriptions
 Item / Description
  Status
1.UID button/LED
2.NIC/iLO 2 link
3.NIC/iLO 2 activity
Blue = Activated
Flashing = System is being managed remotely. Off = Deactivated
Green or flashing green = Activity exists. Off = No activity exists.
Green = Link exists.
Off = No link exists.
HP X3800 G2 Network Storage Gateway hardware components
The following figures show components and LEDs located on the front and rear panels of the X3800 G2 Network Storage Gateway.
X3000 G2 Network Storage System User Guide |
23 |
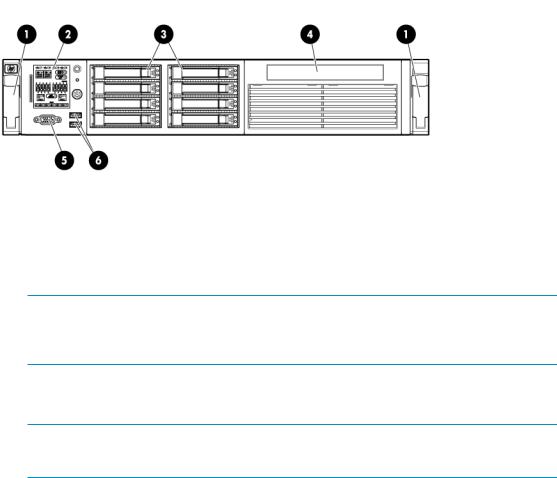
Figure 5 HP X3800 G2 front panel components
.
1.Quick release levers (2)
2.Systems Insight Display
 NOTE:
NOTE:
See “Systems Insight Display LEDs” on page 30 and “Systems Insight Display LED combinations” on page 31 for LED status information.
3.Eight (8) 2.5” SFF SAS / SATA hot plug hard drive bays
 NOTE:
NOTE:
See “SAS and SATA hard drive LED combinations” on page 29 for HDD LED status descriptions.
4.DVD-RW drive
5.Video connector
6.USB connectors (2)
24 Storage system component identification

Figure 6 HP X3800 G2 front panel LEDs and buttons
.
Table 4 HP X3800 G2 front panel LED and button descriptions  Item / Description
  Status
1.UID LED and button
2.System health LED
Blue = Activated
Flashing blue = System being remotely managed Off = Deactivated
Green = Normal
Amber = System degraded Red = System critical
To identify components in degraded or critical state, see
3. Power On/Standby button and system power LED
Green = System on
Amber = System in standby, but power is still applied Off = Power cord not attached or power supply failure
Figure 7 HP X3800 G2 rear panel components
.
1.PCIe slot 5
X3000 G2 Network Storage System User Guide |
25 |
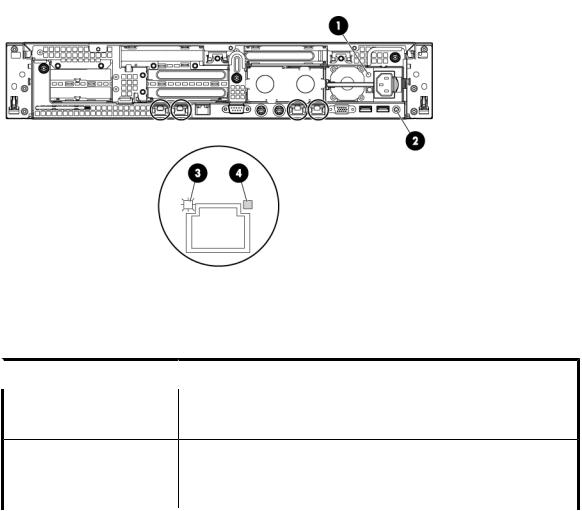
2.PCIe slot 6
3.PCIe slot 4 (occupied by P812 Smart Array controller)
4.PCIe slot 2
5.PCIe slot 3 (SAS Expander)
6.PCIe slot 1
7.Power supply 2 (standard)
8.Power supply 1 (standard)
9.USB connectors (2)
10.Video connector
11.NIC 1 connector
12.NIC 2 connector
13.Mouse connector
14.Keyboard connector
15.Serial connector
16.iLO 3 connector
17.NIC 3 connector
18.NIC 4 connector
Figure 8 HP X3800 G2 rear panel LEDs and buttons
.
Table 5 HP X3800 G2 rear panel LED and button descriptions  Item / Description
  Status
1.Power supply LED
2.UID LED/button
Green = Normal
Off = System is off or power supply has failed
Blue = Activated
Flashing blue = System being managed remotely Off = Deactivated
26 Storage system component identification
 Item / Description
3.NIC/iLO 3 activity LED
4.NIC/iLO 3 link LED
 Status
Green = Network activity Flashing green = Network activity Off = No network activity
Green = Network link
Off = No network link
HP X3800sb G2 Network Storage Gateway Blade hardware components
The following figures show components and LEDs located on the front panel of the X3800sb G2 Network Storage Gateway.
Figure 9 HP X3800sb G2 front panel components
.
1.SUV connector
2.Serial label pull tab
3.Release button
4.Server blade release lever
5.Power On / Standby button
6.Hard drive bay 1
7.Hard drive bay 2
X3000 G2 Network Storage System User Guide |
27 |
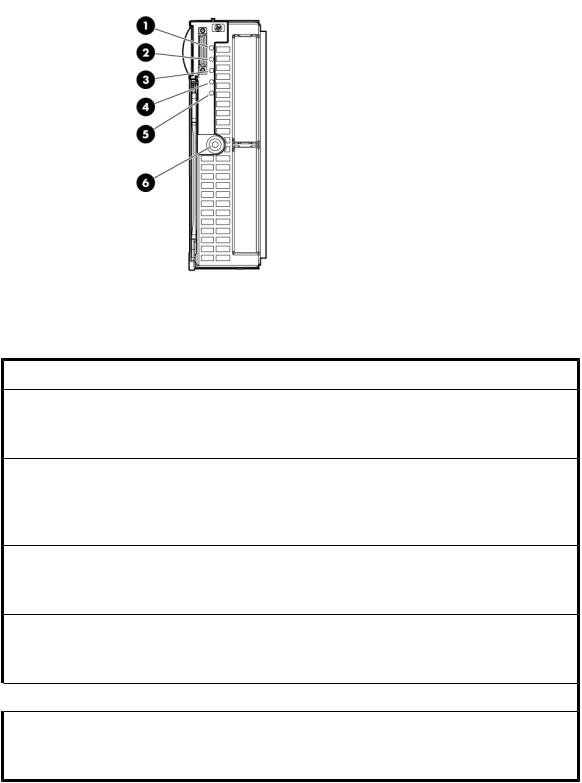
Figure 10 HP X3800sb G2 front panel LEDs
Table 6 |
HP X3800sb G2 front panel LED descriptions |
|
Item / |
Description |
Status |
1.UID LED
2.Health LED
Blue = Identified
Blue flashing = Active remote management Off = No active remote management
Green = Normal
Flashing = Booting
Amber = Degraded condition
Red = Critical condition
3.Flex-10 NIC 1 LED
4.Flex-10 NIC 2 LED
 5. Reserved
6. System power LED
Green = Network linked
Green flashing = Network activity
Off = No link or activity
Green = Network linked
Green flashing = Network activity
Off = No link or activity
 —
—
Green = On
Amber = Standby (auxiliary power available Off = Off
SAS and SATA hard drive LEDs
The following figure shows SAS/SATA hard drive LEDs. These LEDs are located on all HP ProLiant hot plug hard drives.
28 Storage system component identification
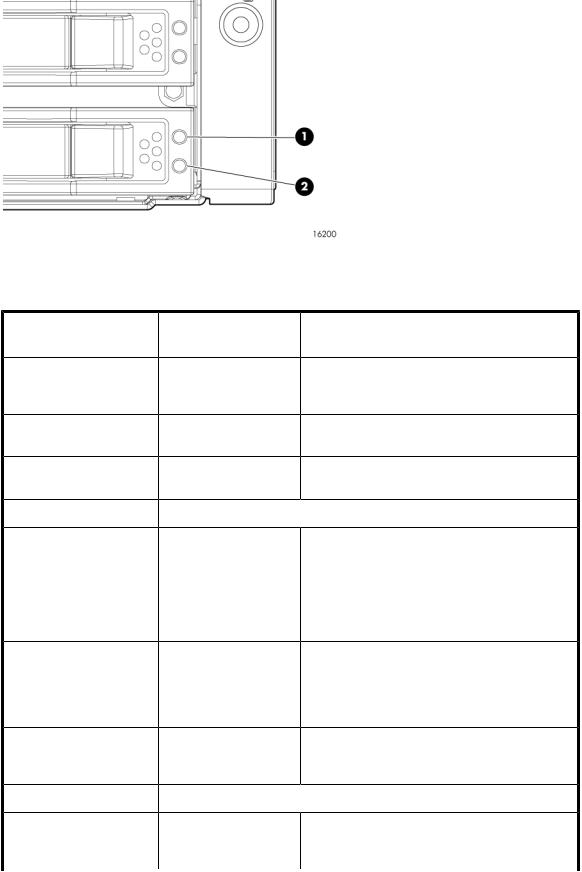
Figure 11 SAS/SATA hard drive LEDs
.
Table 7 SAS and SATA hard drive LED combinations
1. Fault/UID LED (am- |
2. Online/activity LED Status |
ber/blue) |
(green) |
Alternating amber and blue |
On, off, or flashing |
|
Steadily blue |
On, off, or flashing |
|
Amber, flashing regularly (1 |
On |
|
Hz) |
||
|
||
Off |
On |
|
Amber, flashing regularly (1 |
Flashing regularly (1 Hz) |
|
Hz) |
||
|
Off |
Flashing regularly (1 Hz) |
The drive has failed, or a predictive failure alert has been received for this drive; it also has been selected by a management application.
The drive is operating normally, and it has been selected by a management application.
A predictive failure alert has been received for this drive. Replace the drive as soon as possible.
 The drive is online, but it is not active currently.
Do not remove the drive. Removing a drive may terminate the current operation and cause data loss.
The drive is part of an array that is undergoing capacity expansion or stripe migration, but a predictive failure alert has been received for this drive. To minimize the risk of data loss, do not replace the drive until the expansion or migration is complete.
Do not remove the drive. Removing a drive may terminate the current operation and cause data loss.
The drive is rebuilding, or it is part of an array that is undergoing capacity expansion or stripe migration.
Amber, flashing regularly (1 |
Flashing irregularly |
|
Hz) |
||
|
||
Off |
Flashing irregularly |
|
Steadily amber |
Off |
The drive is active, but a predictive failure alert has been received for this drive. Replace the drive as soon as possible.
 The drive is active, and it is operating normally.
A critical fault condition has been identified for this drive, and the controller has placed it offline. Replace the drive as soon as possible.
X3000 G2 Network Storage System User Guide |
29 |

1. Fault/UID LED (am- |
2. Online/activity LED |
|
ber/blue) |
(green) |
|
Amber, flashing regularly (1 |
Off |
|
Hz) |
||
|
||
Off |
Off |
Status
A predictive failure alert has been received for this drive. Replace the drive as soon as possible.
The drive is offline, a spare, or not configured as part of an array.
Systems Insight Display LEDs
The HP Systems Insight Display LEDs represent the system board layout. The display enables diagnosis with the access panel installed.
Figure 12 Systems Insight Display LEDs
.
Table 8 Systems Insight Display LED descriptions
Item / Description |
Status |
Green = Network link
1. NIC link/activity LED |
Flashing green = Network link and activity |
|
Off = No link to network. If the power is off, view the rear panel RJ-45 |
||
|
||
|
LEDs for status. |
|
2. Power cap |
To determine Power cap status, see “Systems Insight Display LED combin- |
|
ations” on page 31. |
||
|
30 Storage system component identification
Loading...