


 Loading...
HP StorageWorks
Library and Tape Tools User Guide
Product Version: 4.2
HP StorageWorks Library and Tape Tools (L&TT) is a comprehensive application that provides functions for identifying, testing, updating, and troubleshooting a wide variety of data storage hardware and media.
*5697-6285*
Part number: 5697–6285
Seventeenth edition: (November 2006)
Legal and notice information
© Copyright 2002-2006 Hewlett-Packard Development Company, L.P.
Hewlett-Packard Company makes no warranty of any kind with regard to this material, including, but not limited to, the implied warranties of merchantability and fitness for a particular purpose. Hewlett-Packard shall not be liable for errors contained herein or for incidental or consequential damages in connection with the furnishing, performance, or use of this material.
This document contains proprietary information, which is protected by copyright. No part of this document may be photocopied, reproduced, or translated into another language without the prior written consent of Hewlett-Packard. The information contained in this document is subject to change without notice.
Compaq Computer Corporation is a wholly-owned subsidiary of Hewlett-Packard Company.
Microsoft®, MS-DOS®, MS Windows®, Windows®, and Windows NT® are U.S. registered trademarks of Microsoft Corporation. UNIX® is a registered trademark of The Open Group.
Hewlett-Packard Company shall not be liable for technical or editorial errors or omissions contained herein. The information is provided “as is” without warranty of any kind and is subject to change without notice. The warranties for Hewlett-Packard Company products are set forth in the express limited warranty statements for such products. Nothing herein should be construed as constituting an additional warranty.

Contents
About this guide |
. . . . . . . . . . . . . . . . . . . . . . . . . . |
11 |
Intended audience . . . . . . . . . . . . . . . . . . . . . . . . . . . . . . . . . . . . . . |
11 |
|
Prerequisites . . . . . . . . . . . . . . . . . . . . . . . . . . . . . . . . . . . . . . . . |
11 |
|
Document conventions and symbols . . . . . . . . . . . . . . . . . . . . . . . . . . . . . |
12 |
|
HP technical support . . . . . . . . . . . . . . . . . . . . . . . . . . . . . . . . . . . . |
13 |
|
Subscription service . . . . . . . . . . . . . . . . . . . . . . . . . . . . . . . . . . . . |
13 |
|
Other HP websites . . . . . . . . . . . . . . . . . . . . . . . . . . . . . . . . . . . . . |
13 |
|
1 Introduction . . . . . . . . . . . . . . . . . . . . . . . . . . . . |
15 |
Software features . . . . . . . . . . . . . . . . . . . . . . . . . . . . . . . . . . . . . |
15 |
Supported products and operating systems . . . . . . . . . . . . . . . . . . . . . . . . . . |
16 |
Finding additional information . . . . . . . . . . . . . . . . . . . . . . . . . . . . . . . . |
16 |
Getting support . . . . . . . . . . . . . . . . . . . . . . . . . . . . . . . . . . . . . . |
16 |
2 Installation . . . . . . . . . . . . . . . . . . . . . . . . . . . . |
17 |
Installing L&TT for Windows . . . . . . . . . . . . . . . . . . . . . . . . . . . . . . . . . |
18 |
Upgrading from a previous version of L&TT . . . . . . . . . . . . . . . . . . . . . . . . |
18 |
Windows installation prerequisites . . . . . . . . . . . . . . . . . . . . . . . . . . . . |
18 |
Installation procedure . . . . . . . . . . . . . . . . . . . . . . . . . . . . . . . . . |
19 |
Installing L&TT for NetWare . . . . . . . . . . . . . . . . . . . . . . . . . . . . . . . . . |
20 |
NetWare installation prerequisites . . . . . . . . . . . . . . . . . . . . . . . . . . . . |
20 |
Installation procedure . . . . . . . . . . . . . . . . . . . . . . . . . . . . . . . . . |
20 |
Installing L&TT for HP-UX, Tru64, and Linux . . . . . . . . . . . . . . . . . . . . . . . . . . |
21 |
HP-UX installation prerequisites . . . . . . . . . . . . . . . . . . . . . . . . . . . . . |
21 |
Tru64 installation prerequisites . . . . . . . . . . . . . . . . . . . . . . . . . . . . . . |
21 |
Linux installation prerequisites . . . . . . . . . . . . . . . . . . . . . . . . . . . . . . |
22 |
Installation procedure . . . . . . . . . . . . . . . . . . . . . . . . . . . . . . . . . |
22 |
Uninstalling previous versions . . . . . . . . . . . . . . . . . . . . . . . . . . . . |
22 |
Installing the latest version . . . . . . . . . . . . . . . . . . . . . . . . . . . . . . |
22 |
Installing L&TT for HP OpenVMS . . . . . . . . . . . . . . . . . . . . . . . . . . . . . . . |
24 |
OpenVMS installation prerequisites . . . . . . . . . . . . . . . . . . . . . . . . . . . . |
24 |
Installation procedure . . . . . . . . . . . . . . . . . . . . . . . . . . . . . . . . . |
24 |
3 Getting Started with L&TT . . . . . . . . . . .
Starting L&TT (GUI) . . . . . . . . . . . . . . . . . . . . .
Using the Scan Mode Selection feature . . . . . . . . . . . . .
Scan mode . . . . . . . . . . . . . . . . . . . . . . .
Using the Saved/Manual Scan screen . . . . . . . . .
Additional device scan considerations . . . . . . . . .
I/O mode . . . . . . . . . . . . . . . . . . . . . . .
Skip this dialog in the future . . . . . . . . . . . . . . . .
Application window layout . . . . . . . . . . . . . . . . . .
Using the Device Information screen . . . . . . . . . . . . . .
Standalone devices . . . . . . . . . . . . . . . . . . .
Library and autoloader products . . . . . . . . . . . . . .
Using the Firmware Management screen . . . . . . . . . . . .
Using the Tests screen . . . . . . . . . . . . . . . . . . . .
Using the Support Ticket Generation screen . . . . . . . . . . .
Starting L&TT (CSI) . . . . . . . . . . . . . . . . . . . . . .
. . . . . . . . . . |
25 |
. . . . . . . . . . . . . . . |
25 |
. . . . . . . . . . . . . . . |
25 |
. . . . . . . . . . . . . . . |
26 |
. . . . . . . . . . . . . . . |
27 |
. . . . . . . . . . . . . . . |
27 |
. . . . . . . . . . . . . . . |
28 |
. . . . . . . . . . . . . . . |
28 |
. . . . . . . . . . . . . . . |
29 |
. . . . . . . . . . . . . . . |
30 |
. . . . . . . . . . . . . . . |
31 |
. . . . . . . . . . . . . . . |
32 |
. . . . . . . . . . . . . . . |
34 |
. . . . . . . . . . . . . . . |
35 |
. . . . . . . . . . . . . . . |
36 |
. . . . . . . . . . . . . . . |
36 |
Library and Tape Tools User Guide |
3 |
Navigating the screens . . . . . . . . . . . . . . . . . . . . . . . . . . . . . . . . . . . |
38 |
Using the Scan Mode Selection screen . . . . . . . . . . . . . . . . . . . . . . . . . . . . |
39 |
Using the Saved/Manual Scan screen . . . . . . . . . . . . . . . . . . . . . . . . . . . . |
40 |
Using the Device Information screen . . . . . . . . . . . . . . . . . . . . . . . . . . . . . |
40 |
Standalone devices . . . . . . . . . . . . . . . . . . . . . . . . . . . . . . . . . . |
41 |
Library and autoloader products . . . . . . . . . . . . . . . . . . . . . . . . . . . . . |
42 |
4 Firmware Management . . . . . . . . . . . . . . . . . . . . . . |
43 |
Accessing firmware revision and release note information (GUI) . . . . . . . . . . . . . . . . . . |
43 |
Acquiring firmware files (GUI) . . . . . . . . . . . . . . . . . . . . . . . . . . . . . . . . |
44 |
Using the Get Files from Web functionality (GUI) . . . . . . . . . . . . . . . . . . . . . . |
44 |
Accessing the Get Files from Web dialog box . . . . . . . . . . . . . . . . . . . . . |
44 |
Selecting and downloading updated firmware files . . . . . . . . . . . . . . . . . . . |
45 |
Viewing firmware revision history . . . . . . . . . . . . . . . . . . . . . . . . . . . |
46 |
Uploading firmware to devices (GUI) . . . . . . . . . . . . . . . . . . . . . . . . . . . . . |
46 |
Advanced options (GUI) . . . . . . . . . . . . . . . . . . . . . . . . . . . . . . . . . . |
47 |
Acquiring firmware files (CSI) . . . . . . . . . . . . . . . . . . . . . . . . . . . . . . . . |
48 |
Using the Get Files from Web functionality (CSI) . . . . . . . . . . . . . . . . . . . . . . |
48 |
Uploading firmware to devices (CSI) . . . . . . . . . . . . . . . . . . . . . . . . . . . . . |
49 |
Advanced options (CSI) . . . . . . . . . . . . . . . . . . . . . . . . . . . . . . . . . . . |
49 |
Using a firmware update (FUP) tape . . . . . . . . . . . . . . . . . . . . . . . . . . . . . |
50 |
Performing the update . . . . . . . . . . . . . . . . . . . . . . . . . . . . . . . . . |
50 |
SDLT . . . . . . . . . . . . . . . . . . . . . . . . . . . . . . . . . . . . . . . |
50 |
DLT VS80/DLT1 . . . . . . . . . . . . . . . . . . . . . . . . . . . . . . . . . . |
51 |
DLT 4000/7000/8000 . . . . . . . . . . . . . . . . . . . . . . . . . . . . . . . |
52 |
Ultrium . . . . . . . . . . . . . . . . . . . . . . . . . . . . . . . . . . . . . . |
53 |
HP DDS/DAT . . . . . . . . . . . . . . . . . . . . . . . . . . . . . . . . . . . |
54 |
Compaq/Sony AIT & DDS . . . . . . . . . . . . . . . . . . . . . . . . . . . . . |
55 |
Converting a firmware update tape to a data tape . . . . . . . . . . . . . . . . . . . . . |
55 |
5 Tests and utility functions . . . . . . . . . . . . . . . . . . . . . |
57 |
Running the tests (GUI) . . . . . . . . . . . . . . . . . . . . . . . . . . . . . . . . . . . |
58 |
Viewing test results . . . . . . . . . . . . . . . . . . . . . . . . . . . . . . . . . . . |
58 |
Running the tests (CSI) . . . . . . . . . . . . . . . . . . . . . . . . . . . . . . . . . . . |
58 |
Viewing test results (CSI) . . . . . . . . . . . . . . . . . . . . . . . . . . . . . . . . |
58 |
Test descriptions . . . . . . . . . . . . . . . . . . . . . . . . . . . . . . . . . . . . . . |
59 |
Performance tests . . . . . . . . . . . . . . . . . . . . . . . . . . . . . . . . . . . |
59 |
Diagnostic tests . . . . . . . . . . . . . . . . . . . . . . . . . . . . . . . . . . . . |
59 |
Acceptance test . . . . . . . . . . . . . . . . . . . . . . . . . . . . . . . . . . |
60 |
Assessment test . . . . . . . . . . . . . . . . . . . . . . . . . . . . . . . . . . |
60 |
Autoloader Exerciser test . . . . . . . . . . . . . . . . . . . . . . . . . . . . . . |
63 |
Compare Statistics test . . . . . . . . . . . . . . . . . . . . . . . . . . . . . . . |
64 |
Connectivity test . . . . . . . . . . . . . . . . . . . . . . . . . . . . . . . . . . |
65 |
DAT autoloader firmware tape creator . . . . . . . . . . . . . . . . . . . . . . . . |
66 |
Data Compression test . . . . . . . . . . . . . . . . . . . . . . . . . . . . . . . |
67 |
Device Analysis test . . . . . . . . . . . . . . . . . . . . . . . . . . . . . . . . |
68 |
Device Configuration test . . . . . . . . . . . . . . . . . . . . . . . . . . . . . . |
69 |
Device Self-Test . . . . . . . . . . . . . . . . . . . . . . . . . . . . . . . . . . |
70 |
DLT SRAM Check test (short and long versions) . . . . . . . . . . . . . . . . . . . . . |
71 |
ESL Vendor ID test . . . . . . . . . . . . . . . . . . . . . . . . . . . . . . . . . |
71 |
Firmware Tape Creator (FUP tape) test . . . . . . . . . . . . . . . . . . . . . . . . |
72 |
Force Tape Eject utility . . . . . . . . . . . . . . . . . . . . . . . . . . . . . . . |
72 |
Full Sweep test . . . . . . . . . . . . . . . . . . . . . . . . . . . . . . . . . . |
73 |
Initialize Element Status test . . . . . . . . . . . . . . . . . . . . . . . . . . . . . |
74 |
Installation Check test . . . . . . . . . . . . . . . . . . . . . . . . . . . . . . . |
75 |
Library Exerciser test . . . . . . . . . . . . . . . . . . . . . . . . . . . . . . . . |
76 |
LTO Cooling Check test . . . . . . . . . . . . . . . . . . . . . . . . . . . . . . . |
76 |
LTO Firmware to Data Tape Creator . . . . . . . . . . . . . . . . . . . . . . . . . |
77 |
LTO Media Assessment test . . . . . . . . . . . . . . . . . . . . . . . . . . . . . |
77 |
4
LTO Stuck Tape test . . . . . . . . . . . . . . . . . .
Media Analysis test . . . . . . . . . . . . . . . . .
Media Erase test . . . . . . . . . . . . . . . . . . .
Media Validation test . . . . . . . . . . . . . . . . .
MO Media Validation test . . . . . . . . . . . . . .
Move test . . . . . . . . . . . . . . . . . . . . . .
Read Media IDs test . . . . . . . . . . . . . . . . .
Read/Write Stress test . . . . . . . . . . . . . . . .
Read/Write test . . . . . . . . . . . . . . . . . . .
Restore Factory Default Settings . . . . . . . . . . . .
SDLT Tape Edge Damage (TED) test . . . . . . . . . . .
Using the Drive Performance test . . . . . . . . . . . . . . . .
Using the System Performance test . . . . . . . . . . . . . . .
Performing the System Performance Restore Pre-Test (GUI) . . .
Performing the System Performance Backup Pre-Test . . . . . .
Performing the System Performance Pre-Tests (CSI) . . . . . . .
Using the Device Analysis test . . . . . . . . . . . . . . . . .
Using the Read/Write test . . . . . . . . . . . . . . . . . . .
Using the Move test . . . . . . . . . . . . . . . . . . . . .
Using the Media Analysis test . . . . . . . . . . . . . . . . .
Using the Library Exerciser test . . . . . . . . . . . . . . . . .
Using the new version . . . . . . . . . . . . . . . . . .
Using the original version . . . . . . . . . . . . . . . . .
Using the utility functions . . . . . . . . . . . . . . . . . . .
. . . . . . . . . . . . . . . |
79 |
. . . . . . . . . . . . . . . |
80 |
. . . . . . . . . . . . . . . |
81 |
. . . . . . . . . . . . . . . |
82 |
. . . . . . . . . . . . . . . |
82 |
. . . . . . . . . . . . . . . |
83 |
. . . . . . . . . . . . . . . |
84 |
. . . . . . . . . . . . . . . |
84 |
. . . . . . . . . . . . . . . |
85 |
. . . . . . . . . . . . . . . |
86 |
. . . . . . . . . . . . . . . |
87 |
. . . . . . . . . . . . . . . |
88 |
. . . . . . . . . . . . . . . |
92 |
. . . . . . . . . . . . . . . |
92 |
. . . . . . . . . . . . . . . |
93 |
. . . . . . . . . . . . . . . |
95 |
. . . . . . . . . . . . . . . |
96 |
. . . . . . . . . . . . . . . |
97 |
. . . . . . . . . . . . . . . |
97 |
. . . . . . . . . . . . . . . |
98 |
. . . . . . . . . . . . . . . |
98 |
. . . . . . . . . . . . . . . |
98 |
. . . . . . . . . . . . . . . |
99 |
. . . . . . . . . . . . . . . |
100 |
6 Reports and support tickets . . . . . . . . . .
Using a report or support ticket (Windows) . . . . . . . . . . .
Using the Support screen . . . . . . . . . . . . . . . . .
Report and support ticket compression . . . . . . . . .
Viewing a report or support ticket . . . . . . . . . . . . .
Setting the detail level . . . . . . . . . . . . . . . .
Other functionality . . . . . . . . . . . . . . . . . .
Viewing embedded data . . . . . . . . . . . . . . .
Saving a report or support ticket . . . . . . . . . . . . . .
Sending a report or support ticket by e-mail . . . . . . . . .
Comparing reports or support tickets . . . . . . . . . . . .
Interpreting a report . . . . . . . . . . . . . . . . . . .
Understanding the margin ratings . . . . . . . . . . .
Things to look for . . . . . . . . . . . . . . . . . .
Device-specific report analysis . . . . . . . . . . . . . . .
LTO drives . . . . . . . . . . . . . . . . . . . . .
LTO media . . . . . . . . . . . . . . . . . . . . .
Generating and viewing a support ticket (CSI) . . . . . . . . . .
Support ticket compression . . . . . . . . . . . . . . . .
Sending a support ticket by e-mail (CSI) . . . . . . . . . . .
Loading or opening support tickets . . . . . . . . . . . . . . .
Using XML support tickets . . . . . . . . . . . . . . . . . . .
Generating an XML support ticket (GUI) . . . . . . . . . . .
Generating an XML support ticket (CSI) . . . . . . . . . . .
Common information reported for all products . . . . . . . . . .
Using the event log . . . . . . . . . . . . . . . . . . . . .
Generating an event log (Windows) . . . . . . . . . . . .
Generating an event log (CSI) . . . . . . . . . . . . . . .
. . . . . . . . . . |
103 |
. . . . . . . . . . . . . . . |
104 |
. . . . . . . . . . . . . . . |
104 |
. . . . . . . . . . . . . . . |
105 |
. . . . . . . . . . . . . . . |
106 |
. . . . . . . . . . . . . . . |
106 |
. . . . . . . . . . . . . . . |
106 |
. . . . . . . . . . . . . . . |
107 |
. . . . . . . . . . . . . . . |
108 |
. . . . . . . . . . . . . . . |
108 |
. . . . . . . . . . . . . . . |
110 |
. . . . . . . . . . . . . . . |
111 |
. . . . . . . . . . . . . . . |
111 |
. . . . . . . . . . . . . . . |
112 |
. . . . . . . . . . . . . . . |
113 |
. . . . . . . . . . . . . . . |
113 |
. . . . . . . . . . . . . . . |
114 |
. . . . . . . . . . . . . . . |
115 |
. . . . . . . . . . . . . . . |
116 |
. . . . . . . . . . . . . . . |
116 |
. . . . . . . . . . . . . . . |
117 |
. . . . . . . . . . . . . . . |
117 |
. . . . . . . . . . . . . . . |
117 |
. . . . . . . . . . . . . . . |
118 |
. . . . . . . . . . . . . . . |
118 |
. . . . . . . . . . . . . . . |
119 |
. . . . . . . . . . . . . . . |
119 |
. . . . . . . . . . . . . . . |
119 |
7 Command Line Functionality . . . . . . . . . . . . . . . . . . . |
121 |
Overview . . . . . . . . . . . . . . . . . . . . . . . . . . . . . . . . . . . . . . . . . |
121 |
Command line functions . . . . . . . . . . . . . . . . . . . . . . . . . . . . . . . . . . |
121 |
Configuring L&TT . . . . . . . . . . . . . . . . . . . . . . . . . . . . . . . . . . . |
122 |
Scanning the bus . . . . . . . . . . . . . . . . . . . . . . . . . . . . . . . . . . . |
122 |
Library and Tape Tools User Guide |
5 |
Running tests . . . . . . . . . . . . . . . . . . . . . . . . . . . . . . . . . . . . . |
123 |
Performing a firmware update . . . . . . . . . . . . . . . . . . . . . . . . . . . . . . |
124 |
Generating a report or support ticket . . . . . . . . . . . . . . . . . . . . . . . . . . . |
126 |
Getting usage help . . . . . . . . . . . . . . . . . . . . . . . . . . . . . . . . . . |
126 |
Return values . . . . . . . . . . . . . . . . . . . . . . . . . . . . . . . . . . . . . . . |
127 |
Using the trace file . . . . . . . . . . . . . . . . . . . . . . . . . . . . . . . . . . . |
127 |
8 Additional Functionality |
. . . . . . . . . . . . . . . . . . . . . |
129 |
Setting software preferences . . . . . . . . . . . . . . . . . . . . . . . . . . . . . . . . . |
129 |
|
Available options . . . . . . . . . . . . . . . . . . . . . . . . . . . . . . . . . . . |
131 |
|
Using the Internet update functionality . . . . . . . . . . . . . . . . . . . . . . . . . . . . |
131 |
|
Using passwords . . . . . . . . . . . . . . . . . . . . . . . . . . . . . . . . . . . . . |
132 |
|
Setting passwords . . . . . . . . . . . . . . . . . . . . . . . . . . . . . . . . . . . |
132 |
|
Using the Front Panel function . . . . . . . . . . . . . . . . . . . . . . . . . . . . . . . . |
133 |
|
Using the Move Media function . . . . . . . . . . . . . . . . . . . . . . . . . . . . . . . |
133 |
|
Possible Move Media error situations . . . . . . . . . . . . . . . . . . . . . . . . . . . |
134 |
|
Performing manual product identification . . . . . . . . . . . . . . . . . . . . . . . . . . . |
135 |
|
Using the Quiet Mode feature . . . . . . . . . . . . . . . . . . . . . . . . . . . . . . . . |
135 |
|
Using the Installation Check feature . . . . . . . . . . . . . . . . . . . . . . . . . . . . . . |
136 |
|
Using L&TT in restricted mode . . . . . . . . . . . . . . . . . . . . . . . . . . . . . . . . |
138 |
|
Using the Tool Status Report . . . . . . . . . . . . . . . . . . . . . . . . . . . . . . . . . |
139 |
|
9 Advanced Installation Topics . . . . . . . . . . . . . . . . . . . |
141 |
Other changes to the system (GUI) . . . . . . . . . . . . . . . . . . . . . . . . . . . . . . |
141 |
Reboot criteria . . . . . . . . . . . . . . . . . . . . . . . . . . . . . . . . . . . . . . . |
141 |
Running L&TT from a CD-ROM or USB flash drive . . . . . . . . . . . . . . . . . . . . . . . . |
141 |
Files installed on the system . . . . . . . . . . . . . . . . . . . . . . . . . . . . . . . . . |
142 |
Other changes to the system (CSI) . . . . . . . . . . . . . . . . . . . . . . . . . . . . |
142 |
10 Frequently Asked Questions . . . . . . . . . . . . . . . . . . . |
143 |
General questions . . . . . . . . . . . . . . . . . . . . . . . . . . . . . . . . . . . . . |
143 |
Why should I run L&TT tests? . . . . . . . . . . . . . . . . . . . . . . . . . . . . . . |
143 |
Where can I find information about media compatibility with my hardware? . . . . . . . . . . |
143 |
Where can I find information about hardware and software compatibility? . . . . . . . . . . . |
144 |
Where can I find information about drive cleaning requirements? . . . . . . . . . . . . . . . |
144 |
How do I install L&TT? . . . . . . . . . . . . . . . . . . . . . . . . . . . . . . . . . |
145 |
How do I use L&TT to find my drive serial number? . . . . . . . . . . . . . . . . . . . . . |
145 |
How do I verify that my drive’s firmware is up to date? . . . . . . . . . . . . . . . . . . . |
145 |
How do I check if my drive is OK? . . . . . . . . . . . . . . . . . . . . . . . . . . . . |
145 |
Why is the Assessment test recommended? . . . . . . . . . . . . . . . . . . . . . . . . |
145 |
Is my LTO tape OK? . . . . . . . . . . . . . . . . . . . . . . . . . . . . . . . . . . |
146 |
Is my non-LTO tape OK? . . . . . . . . . . . . . . . . . . . . . . . . . . . . . . . . |
146 |
Was my backup successful (LTO only)? . . . . . . . . . . . . . . . . . . . . . . . . . . |
146 |
How many more uses are left in this cleaning cartridge (LTO only)? . . . . . . . . . . . . . . |
146 |
How fast will my backups be? . . . . . . . . . . . . . . . . . . . . . . . . . . . . . . |
146 |
How fast will my restores be? . . . . . . . . . . . . . . . . . . . . . . . . . . . . . . |
147 |
How do I verify the capacity of a tape? . . . . . . . . . . . . . . . . . . . . . . . . . . |
147 |
How do I send a support ticket? . . . . . . . . . . . . . . . . . . . . . . . . . . . . . |
147 |
How do I send an L&TT event log? . . . . . . . . . . . . . . . . . . . . . . . . . . . . |
147 |
Windows questions . . . . . . . . . . . . . . . . . . . . . . . . . . . . . . . . . . . . |
148 |
How do I run L&TT from a CD-ROM or USB flash drive? . . . . . . . . . . . . . . . . . . . |
148 |
How do I shut down the application in the taskbar? . . . . . . . . . . . . . . . . . . . . . |
148 |
When installing L&TT for Windows, should I uninstall my previous version first? . . . . . . . . . |
149 |
Why can’t I uninstall L&TT or install a new version? . . . . . . . . . . . . . . . . . . . . . |
149 |
How do I erase an LTO FUP tape? . . . . . . . . . . . . . . . . . . . . . . . . . . . . |
149 |
How do I configure e-mail to send support tickets? . . . . . . . . . . . . . . . . . . . . . |
149 |
Does L&TT use any system resources in the background? . . . . . . . . . . . . . . . . . . . |
150 |
6
I am using an authenticated proxy at my site. How do I configure L&TT to connect to the HP website to download firmware updates? . . . . . . . . . . . . . . . . . . . . . . . . . . . . . . 150 L&TT starts in “restricted” mode and most functionality is unavailable. What is happening? . . . . 150 Why doesn’t L&TT for Windows “see” devices that are connected to a computer running HP-UX? . 150 Why doesn’t L&TT for Windows “see” my USB drives? . . . . . . . . . . . . . . . . . . . . 150
CSI questions . . . . . . . . . . . . . . . . . . . . . . . . . . . . . . . . . . . . . . . 151 How do I set the password? . . . . . . . . . . . . . . . . . . . . . . . . . . . . . . . 151 Why does my display not show any text or only a single line of text on my HP-UX system? . . . . 151 Why doesn’t L&TT for HP-UX “see” some of my devices? . . . . . . . . . . . . . . . . . . . 151 Why am I unable to download firmware/script files using the download option in the CSI (HP-UX,
Linux)? . . . . . . . . . . . . . . . . . . . . . . . . . . . . . . . . . . . . . . . . 152 Why doesn’t L&TT for Tru64 “see” some of my devices? . . . . . . . . . . . . . . . . . . . 152 Why doesn’t L&TT for Linux "see" some of my devices? . . . . . . . . . . . . . . . . . . . 152 Why doesn’t L&TT for Windows “see” devices that are connected to a computer running HP-UX? . 153 How do I disconnect a SCSI device in Tru64? . . . . . . . . . . . . . . . . . . . . . . . 153 How do I connect/disconnect a SCSI device in Linux without rebooting? . . . . . . . . . . . . 153 Why doesn’t L&TT for OpenVMS “see” my media changer? . . . . . . . . . . . . . . . . . 153 Why am I getting "Error activating image PTHREAD$RTL" while running L&TT on OVMS 7.3-1? . . 153
11 Troubleshooting . . . . . . . . . . . . . .
Troubleshooting L&TT . . . . . . . . . . . . . . . . . . . . .
Troubleshooting devices . . . . . . . . . . . . . . . . . . . .
Using L&TT to troubleshoot tape devices . . . . . . . . . . .
Are you performing regular maintenance? . . . . . . . .
Is the drive connected properly? . . . . . . . . . . . .
Is the drive working as expected? . . . . . . . . . . .
Is the drive firmware up to date? . . . . . . . . . . . .
Is the drive performing as expected? . . . . . . . . . .
Is the media in good condition? . . . . . . . . . . . .
Known issues . . . . . . . . . . . . . . . . . . . . . .
Device access issues (RSM on Windows) . . . . . . . .
Device performance issues . . . . . . . . . . . . . .
Firmware issues with Ultrium drives . . . . . . . . . . .
Additional interactive device troubleshooting content . . . . .
Troubleshooting third-party software . . . . . . . . . . . . . .
Backup failed . . . . . . . . . . . . . . . . . . . . . .
. . . . . . . . . . |
155 |
. . . . . . . . . . . . . . . |
155 |
. . . . . . . . . . . . . . . |
155 |
. . . . . . . . . . . . . . . |
155 |
. . . . . . . . . . . . . . . |
156 |
. . . . . . . . . . . . . . . |
156 |
. . . . . . . . . . . . . . . |
156 |
. . . . . . . . . . . . . . . |
157 |
. . . . . . . . . . . . . . . |
157 |
. . . . . . . . . . . . . . . |
157 |
. . . . . . . . . . . . . . . |
157 |
. . . . . . . . . . . . . . . |
157 |
. . . . . . . . . . . . . . . |
158 |
. . . . . . . . . . . . . . . |
159 |
. . . . . . . . . . . . . . . |
159 |
. . . . . . . . . . . . . . . |
159 |
. . . . . . . . . . . . . . . |
159 |
Index . . . . . . . . . . . . . . . . . . . . . . . . . . . . . . |
161 |
Library and Tape Tools User Guide |
7 |

Figures
1 |
..L&TT splash screen . . . . . . . . . . . . . . . . . . . . . . . . . . . . . . . |
26 |
2 |
..Saved/Manual Scan screen . . . . . . . . . . . . . . . . . . . . . . . . . . . |
27 |
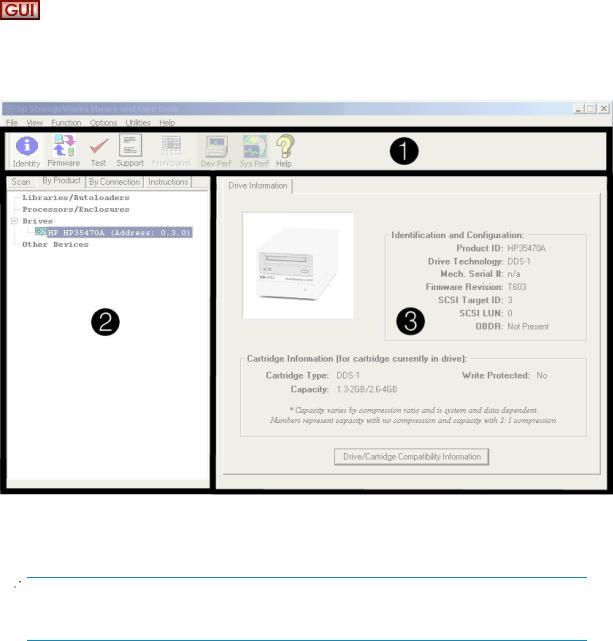
3 |
..L&TT main screen . . . . . . . . . . . . . . . . . . . . . . . . . . . . . . . . |
29 |
4 |
..Compatible data cartridges screen . . . . . . . . . . . . . . . . . . . . . . . . |
32 |
5 |
..Device Information screen showing a library . . . . . . . . . . . . . . . . . . . . |
32 |
6 |
..Firmware Management screen . . . . . . . . . . . . . . . . . . . . . . . . . . |
34 |
7 |
..Tests screen . . . . . . . . . . . . . . . . . . . . . . . . . . . . . . . . . . |
35 |
8 |
..Support Ticket Generation screen . . . . . . . . . . . . . . . . . . . . . . . . . |
36 |
9 |
..Command Help screen accessed from the Main screen . . . . . . . . . . . . . . . . |
38 |
10 |
..Scan Mode Selection screen . . . . . . . . . . . . . . . . . . . . . . . . . . . |
39 |
11 |
..Saved/Manual Scan screen (CSI) . . . . . . . . . . . . . . . . . . . . . . . . . |
39 |
12 |
..CSI Main screen . . . . . . . . . . . . . . . . . . . . . . . . . . . . . . . . |
40 |
13 |
..Device Information screen for a standalone device . . . . . . . . . . . . . . . . . . |
41 |
14 |
..Device Information screen for a library . . . . . . . . . . . . . . . . . . . . . . . |
42 |
15 |
..Get Files from Web dialog box—Firmware tab . . . . . . . . . . . . . . . . . . . |
45 |
16 |
..Firmware Update screen . . . . . . . . . . . . . . . . . . . . . . . . . . . . . |
46 |
17 |
..Factory Firmware Overrides dialog box . . . . . . . . . . . . . . . . . . . . . . |
47 |
18 |
..Drive Performance screen . . . . . . . . . . . . . . . . . . . . . . . . . . . . |
89 |
19 |
..Device Performance Tool screen . . . . . . . . . . . . . . . . . . . . . . . . . . |
90 |
20 |
..Restore Pre-Test tab of the System Performance screen . . . . . . . . . . . . . . . . |
92 |
21 |
..Backup Pre-Test tab of the System Performance screen . . . . . . . . . . . . . . . . |
94 |
22 |
..Backup Pre-Test screen (CSI) . . . . . . . . . . . . . . . . . . . . . . . . . . . |
95 |
23 |
..Restore Pre-Test screen (CSI) . . . . . . . . . . . . . . . . . . . . . . . . . . . |
96 |
24 |
..Support screen . . . . . . . . . . . . . . . . . . . . . . . . . . . . . . . . . |
105 |
25 |
..Example report . . . . . . . . . . . . . . . . . . . . . . . . . . . . . . . . . |
106 |
26 |
..Support ticket with embedded data . . . . . . . . . . . . . . . . . . . . . . . . |
107 |
27 |
..E-mail support ticket dialog box . . . . . . . . . . . . . . . . . . . . . . . . . . |
109 |
28 |
..Support ticket comparison results . . . . . . . . . . . . . . . . . . . . . . . . . |
111 |
29 |
..L&TT Preferences dialog box (default settings shown) . . . . . . . . . . . . . . . . . |
130 |
30 |
..L&TT preferences dialog box (CSI version) . . . . . . . . . . . . . . . . . . . . . |
130 |
31 |
..Front panel screen . . . . . . . . . . . . . . . . . . . . . . . . . . . . . . . |
133 |
32 |
..Move Media screen . . . . . . . . . . . . . . . . . . . . . . . . . . . . . . . |
134 |
33 |
..Installation Check wizard . . . . . . . . . . . . . . . . . . . . . . . . . . . . |
137 |
34 |
..Tool Status Report screen (GUI) . . . . . . . . . . . . . . . . . . . . . . . . . . |
139 |
35 |
..Tool Status Report screen (CSI) . . . . . . . . . . . . . . . . . . . . . . . . . . |
140 |
8

Tables
1 ..Document conventions . . . . . . . . . . . . . . .
2 ..L&TT installation directory locations . . . . . . . . .
. . . . . . . . . . . . . . . |
12 |
. . . . . . . . . . . . . . . |
142 |
Library and Tape Tools User Guide |
9 |
10
About this guide
This user guide provides information to help you:
•Understand features and functionality of L&TT
•Effectively use the full functionality of L&TT to obtain maximum performance from your storage hardware, and to test, diagnose, and resolve hardware issues
“About this Guide” topics include:
•Overview
•Conventions
•Getting Help
Intended audience
This book is intended for:
•Users who want to use L&TT to conveniently update firmware in their storage hardware
•Users who need to test, diagnose, and resolve storage hardware issues
•Support technicians
•Call center personnel
Prerequisites
Before you attempt to use L&TT, you should have a basic understanding of the following technologies:
•Storage hardware functionality and operation
•SCSI operation
Library and Tape Tools User Guide |
11 |

Document conventions and symbols
Table 1 Document conventions
Convention |
Element |
|
|
|
|
Blue text: Table 1 |
Cross-reference links and e-mail addresses |
|
|
|
|
Blue, underlined text: http:// |
Website addresses |
|
www.hp.com |
|
|
|
|
|
Bold text |
• Keys that are pressed |
|
|
• Text typed into a GUI element, such as a box |
|
|
• GUI elements that are clicked or selected, such as menu and |
|
|
|
list items, buttons, tabs, and check boxes |
|
|
|
Italic text |
Text emphasis |
|
|
|
|
Monospace text |
• File and directory names |
|
|
• |
System output |
|
• |
Code |
|
• Commands, their arguments, and argument values |
|
|
|
|
Monospace, italic text |
• |
Code variables |
|
• |
Command variables |
|
|
|
Monospace, bold text |
Emphasized monospace text |
|
 WARNING!
Indicates that failure to follow directions could result in bodily harm or death.
 CAUTION:
Indicates that failure to follow directions could result in damage to equipment or data.
 IMPORTANT:
Provides clarifying information or specific instructions.
 NOTE:
NOTE:
Provides additional information.
TIP:
Provides helpful hints and shortcuts.
12 About this guide

HP technical support
Telephone numbers for worldwide technical support are listed on the HP support website: http://www.hp.com/support/.
Collect the following information before calling:
•Technical support registration number (if applicable)
•Product serial numbers
•Product model names and numbers
•Error messages
•Operating system type and revision level
•Detailed questions
For continuous quality improvement, calls may be recorded or monitored.
Subscription service
HP strongly recommends that customers register online using the Subscriber’s choice website: http://www.hp.com/go/e-updates.
Subscribing to this service provides you with e-mail updates on the latest product enhancements, newest driver versions, and firmware documentation updates as well as instant access to numerous other product resources.
After subscribing, locate your products by selecting Business support and then Storage under Product Category.
Other HP websites
For additional information, see the following HP websites:
•http://www.hp.com
•http://www.hp.com/go/storage
•http://www.hp.com/service_locator
•http://www.docs.hp.com
•http://www.hp.com/support/tapetools
•http://www.hp.com/support/lttcompatibility
Library and Tape Tools User Guide |
13 |
14 About this guide

1 Introduction
HP StorageWorks Library and Tape Tools (L&TT) is a collection of storage hardware management and diagnostic tools for Nearline Tape, Nearline Tape Automation, and Nearline Archival products. L&TT assembles these tools into a single, convenient program.
 IMPORTANT:
This user guide is intended for L&TT version 4.2. Certain features from previous versions of L&TT are no longer supported with this version and are therefore not documented here. HP strongly recommends that you install and use the latest version of L&TT. However, if you must use an earlier version, refer to the online help that is bundled with that version of the program.
Software features
L&TT offers the following features:
•Installation Check—L&TT guides you through a basic installation check of your product. The software assists the user in choosing an appropriate HBA and SCSI IDs, ensuring that the device is detected by the system, and verifying key device functionality.
•Device Identification—L&TT clearly identifies the storage products connected to the system, along with key information on product configuration and status.
•Troubleshooting Tests—L&TT provides various tests to verify product functionality or to isolate product issues. Tests include device self-tests, read/write tests on drives, exerciser tests for autoloaders and libraries, and specific device utilities.
•Firmware Upgrades—L&TT provides a convenient way of updating product firmware, enabling users with an Internet connection to take advantage of ongoing enhancements. The software can be configured to check the Web automatically for firmware updates for connected devices, or users can manually check the Web for updates if the automatic update feature is not desired.
If updated firmware is available, the program notifies the user, and the updates can easily be copied to the system. With libraries, users can upgrade the library and the embedded drive firmware in the same operation.
•Support Ticket Generation—If you experience a problem with a storage product, L&TT can generate a support ticket that includes essential information for troubleshooting the problem. As an alternative to phone support, you can e-mail the support ticket to a support center for assistance. This information streamlines the support process and enables the support staff to better serve you if a support call is made later.
When a support ticket for a device is generated, L&TT performs a Device Analysis test on the device. The support ticket contains generic information about a device, as well as the results of the Device Analysis test. The Device Analysis test can be performed by itself, but HP recommends generating a support ticket because the resulting data is presented in a more useful format.
•Automatic Notification of Web Updates—If a connection to the Internet is present and web updates are enabled in the tool preferences, L&TT automatically informs you of the following updates, if available, each time the program is started:
•New versions of L&TT
•New firmware files for connected devices
•New device-specific functionality for connected devices
Library and Tape Tools User Guide |
15 |

Supported products and operating systems
For a complete listing of compatible products, refer to the specifications page at http://www.hp.com/support/lttcompatibility.
The level of functionality that L&TT offers for each device varies depending on features of the device, and the degree of device integration into L&TT.
Finding additional information
The HP website provides the current version of L&TT for download, and general information about the tool. Access the website at:
http://www.hp.com/support/tapetools
Getting support
E-mail support is available from ltt_team@hp.com. You can expect a response within 24 hours (usually sooner) during a normal business week.
Use this address to obtain support for L&TT to report bugs, to provide feedback on this manual, to report any issues with the L&TT website, or to provide enhancement suggestions. HP appreciates feedback on how to make improvements for future versions of L&TT.
 NOTE:
NOTE:
This address is intended to provide support for L&TT software. This address is not for assistance in troubleshooting hardware products. Refer to the documentation that comes with your hardware for support options for that product.
16 Introduction

2 Installation
This chapter outlines the procedure for installing L&TT on a Microsoft® Windows®, Novell NetWare, HP-UX, HP Tru64, Linux, or HP OpenVMS platform. The Windows version of L&TT uses a graphical user interface (GUI). All other versions of the program use a command screen interface (CSI).
The information in this chapter and in subsequent chapters is presented for both the GUI and CSI versions of L&TT. When using an electronic version of this documentation, click the appropriate link at the beginning of the chapter to quickly jump to the section of documentation that applies to your operating system (OS) or user interface.
Select your OS:
 Installing L&TT for Windows
 Installing L&TT for NetWare
 Installing L&TT for HP-UX, Tru64, and Linux
  Installing L&TT for HP OpenVMS
Library and Tape Tools User Guide |
17 |

Installing L&TT for Windows
The Windows version of L&TT uses the InstallShield application. InstallShield lets you choose the installation directory and select other options. It also sets up shortcuts to launch the application in the Start menu and on the desktop. The Start menu shortcuts also provide access to the online help, the readme file, the report viewer, and the L&TT Installation Check feature.
Upgrading from a previous version of L&TT
Beginning with version 4.0, the L&TT installer automatically uninstalls any previous versions before installing the current version, so it is not necessary to manually uninstall your previous version.
Windows installation prerequisites
Download link |
|
|
http://www.hp.com/support/tapetools |
|
Install time (typical) |
|
|
1-5 minutes |
|
Reboot require |
|
|
A reboot is required only if your system requires ASPI or an upgrade |
|
ments |
|
|
to the currently installed version. On systems that require ASPI, if the |
|
|
|
|
installer detects a previously installed version of ASPI older than v4.57, |
|
|
|
|
it will install a more recent version of ASPI, which will require a reboot. |
|
|
|
|
On Windows NT and 2000, ASPI is not installed as part of the operating |
|
|
|
|
system. If a reboot is unacceptable, do not select the checkbox for this |
|
|
|
|
option in the installation process. If you choose not to install ASPI, you must |
|
|
|
|
use the Miniport driver (Miniport I/O mode) to scan for devices. |
|
|
|
|
Issues may arise, however, when using the Miniport I/O mode with devices |
|
|
|
|
that use non-standard OS drivers, or are “claimed” by other applications or |
|
|
|
|
the OS. When using the Miniport I/O mode when a device is claimed, it |
|
|
|
|
may be necessary to shut down any running backup/storage application |
|
|
|
|
services to make the device accessible to L&TT. Alternatively, using the |
|
|
|
|
ASPI I/O mode may make the device accessible without requiring any |
|
|
|
|
further action. |
|
Software depen |
|
|
Device drivers for the connected tape devices/libraries or default |
|
dencies/prerequi |
|
|
device driver should be present. |
|
sites |
|
|
|
|
|
|
|
NOTE: |
|
|
|
|
||
|
|
|
||
|
|
|
L&TT can be run from a CD ROM or USB flash drive. See "Running |
|
|
|
|
L&TT from a CD-ROM or USB flash drive" on page 141. |
|
|
|
|
|
|
Known issues |
|
|
When downloading the L&TT application from the Web to your local |
|
|
|
|
system, make sure you name the download folder to something other |
|
|
|
than HP StorageWorks Library and Tape Tools or the |
||
|
|
|
installation will fail if you attempt to install from that folder. The failure |
|
|
|
|
error will indicate that a different instance of the installer is already |
|
|
|
|
running. |
|
|
|
|
Also, do not rename the L&TT installation file. Renaming the file may create |
|
|
|
|
a conflict that prevents L&TT from installing. |
|
18 Installation

Installation procedure
To install the current Windows version of L&TT:
1.Download or copy the self-extracting executable file to a temporary location.
 IMPORTANT:
Do not rename this file. Renaming the file may create a conflict that prevents L&TT from installing.
2.Double-click the self-extracting executable file to launch the installer. The InstallShield Wizard screen is displayed.
3.Click Next. Read the program license agreement and click Yes if you agree to and accept the terms of the license agreement.
4.Read the readme file for any last-minute changes to the documentation, then click Next. The Select Features screen is displayed.
5.Select the desired components to install and click Next.
In most cases, the default settings of this screen are adequate. Windows NT 4.0®, Windows 2000, and Windows XP users have the option to install Advanced SCSI Programming Interface (ASPI) support. HP does not recommend installing ASPI support unless you have a good reason to do so.
ASPI support is beneficial when installed storage applications cannot be shut down, and those applications have locked access to the device through the Miniport driver. If ASPI is installed, it is generally not necessary to shut down these applications to access devices through L&TT (although the applications should not be accessing the devices while L&TT is running). ASPI lets you run L&TT on a locked device without rebooting, but a reboot is required after installing ASPI. The benefit of using ASPI is not realized the first time L&TT is run, but it is realized on subsequent runs.
One drawback of ASPI is that USB drives are not supported. If you have USB drives, you must use the Miniport driver.
Beginning with version 4.0, L&TT supports Microsoft Storport technology. Storport is a new storage driver model created by Microsoft for Windows Server 2003 and future Windows® operating systems. Storport offers a higher performance architecture and better Fibre Channel compatibility in Windows systems. If Storport drivers are installed, L&TT automatically uses Storport when you select Miniport I/O.
 NOTE:
NOTE:
ASPI is not officially supported by Windows Server 2003. However, in most cases, it will function properly. If ASPI is installed with Windows Server 2003, L&TT can make use of it if the ASPI I/O mode is selected. However, HP recommends that you use the default NT MiniPort I/O option with Windows Server 2003.
6.Select a destination location to install the program. You can accept the default location or click Browse to install to a different location. After choosing the destination location, click Next.
7.Indicate the program directory in which you want the setup program to create program icons and click Next. The program directory is created in the Programs directory of the Start menu.
8.On the Ready to start installation process screen, click Next. If you need to review or change installation settings, click Back.
9.When installation is complete, the InstallShield wizard displays its final screen. Select Start HP L&TT or Run LTT InstallCheck if you would like the wizard to start
Library and Tape Tools User Guide |
19 |

L&TT or the Installation Check test. Click Finish to close the InstallShield wizard.
Installing L&TT for NetWare
NetWare installation prerequisites
Download link |
http://www.hp.com/support/tapetools |
Install time (typical) |
Less than 2 minutes |
Reboot require- |
None |
ments |
|
Software depen- |
• Device should be recognized by the NWPA subsystem. |
dencies/prerequi |
|
sites |
|
|
• Device drivers for the connected tape devices/libraries or default |
|
device driver should be present. |
|
• L&TT on NetWare currently does not support clustering |
|
configurations. |
Known issues |
None |
Installation procedure
To install the NetWare version of L&TT:
1.Download the L&TT for NetWare file to a temporary directory.
20 Installation
2.From a client workstation, use any standard unzip utility* to extract the file to the SYS:System\ directory on the NetWare server. Make sure that the option to create a directory is enabled
in the archiving software.
 NOTE:
NOTE:
* The unzip NLM that comes with later versions of NetWare has not been tested and should not be used to unzip the archive.
Installing L&TT for HP-UX, Tru64, and Linux
HP-UX installation prerequisites
Download link |
http://www.hp.com/support/tapetools |
Install time (typical) |
Less than 3 minutes |
Reboot require- |
None |
ments |
|
Software depen- |
• Devices do not need to be claimed by the operating system with |
dencies/prerequi- |
ioscan for L&TT to access them. |
sites |
|
|
• The sctl driver must be installed for L&TT to access the device you |
|
want to test. L&TT builds its own pass-through SCSI device files |
|
using the sctl driver, so that driver must be installed; however, L&TT |
|
does not need the operating system to list any of the devices as |
|
"CLAIMED." They may be listed that way (if the appropriate driver |
|
is installed), but they don’t need to be for L&TT to fully access them |
|
(beginning with L&TT v3.3). |
|
• Devices must NOT be listed as "NO HARDWARE" in ioscan. If the |
|
device you want to test with L&TT is listed as "NO HARDWARE" in |
|
ioscan, the communication path between the host and the device |
|
is not working and must be fixed before L&TT will be able to |
|
communicate with the device. |
Known issues |
To install L&TT, you must first uninstall any previous versions. |
Tru64 installation prerequisites
Download link |
http://www.hp.com/support/tapetools |
Install time (typical) |
Less than 3 minutes |
Reboot require- |
A reboot occurs only if hardware manager failed to recognize the |
ments |
connected device. |
Software depen- |
• Device should be recognized by Hardware Manager and SCU |
dencies/prerequi- |
subsystem. |
sites |
|
|
• Device drivers for the connected tape devices/libraries or default |
|
device driver should be present. |
Library and Tape Tools User Guide |
21 |
|
• L&TT on Tru64 UNIX currently does not support clustering |
|
configurations. |
Known issues |
None |
Linux installation prerequisites
Download link |
http://www.hp.com/support/tapetools |
Install time (typical) |
Less than 3 minutes |
Reboot require- |
None |
ments |
|
Software depen- |
• Device should be recognized by proc/SCSI subsystem. |
dencies/prerequi |
|
sites |
|
|
• Device drivers for the connected tape devices/libraries or default |
|
device driver should be present. |
Known issues |
To install L&TT, you must first uninstall any previous versions. |
Installation procedure
Uninstalling previous versions
Before installing L&TT on Linux or HP-UX, you must first uninstall any previous versions.
Uninstalling HP-UX version
To determine if L&TT is already installed, use the following command:
swlist | grep ltt
To remove a previous version of L&TT, use the following command:
swremove HP_LTT<xx>
where <xx> is the version number.
Uninstalling Linux version
To determine if L&TT is already installed, use the following command:
rpm -qa | grep ltt
To remove a previous version of L&TT, use the following command:
rpm -e ltt
Installing the latest version
To install L&TT for HP-UX, Tru64, or Linux:
1.Log in as root.
2.Navigate to the temporary directory: cd /tmp
22 Installation

3.Download or copy the L&TT tar file, hp_ltt<xx>.tar (where <xx> is the version number) to this directory. If you are copying the file from a different location, enter the following (substitute the directory in which the file currently resides for <directory name>):
cp /<directory name>/hp_ltt<xx>.tar /tmp
 NOTE:
NOTE:
The Tru64 tar filename uses the letter “o” in place of zeroes. For L&TT 4.2, the filename is hp_ltt42.tar.
4.Un-tar the L&TT tar file:
tar -xvf hp_ltt<xx>.tar
5.Run the install script in the /tmp directory:
./install_hpltt
 NOTE:
NOTE:
For Linux, the L&TT installer verifies that the operating system you are installing on is supported. If the Linux distribution or release is unsupported, the install script displays a message indicating an installation failure and lists the supported operating systems.
6.After the software is successfully installed, enter the following commands to remove the /tmp/ltt directory and its contents:
cd /tmp
rm -rf ltt
rm -rf install_hpltt
Library and Tape Tools User Guide |
23 |

Installing L&TT for HP OpenVMS
OpenVMS installation prerequisites
Download link |
http://www.hp.com/support/tapetools |
Install time (typical) |
Less than 4 minutes |
Reboot require |
None |
ments |
|
Known issues |
None |
Installation procedure
 NOTE:
NOTE:
Beginning with version 4.1, L&TT is only supported on OpenVMS v 7.3-2 and OpenVMS 8.2 Alpha.
1.Download or copy the install file hp-axpvms-ltt-v<xx>-1.pcsi (where <xx> is the version number) to a temporary directory.
2.Navigate to the directory you copied the install file to and enter the following command to install L&TT:
product install
The installation procedure creates the directory structure opt.ltt in sys$sysdevice:[vms$common] and installs all the required files for L&TT.
3.Set the term to vt100 using the following command: set term /dev=vt100
4.Define the logical name USR so that it points to the directory sys$sysdevice:[vms$common.opt.ltt.misc.usr] using the following command:
define usr sys$sysdevice:[vms$common.opt.ltt.misc.usr]
24 Installation

3 Getting Started with L&TT
This chapter describes how to start L&TT and the basic operation of the software. This chapter is divided into two sections: one for using L&TT in a GUI environment (Windows) and one for using L&TT in a CSI environment (NetWare, HP-UX, Tru64, Linux, and OpenVMS). To quickly jump to the appropriate section, click one of the following links:
 Starting L&TT (GUI)
  Starting L&TT (CSI)
Starting L&TT (GUI)
To start L&TT, do one of the following:
•Double-click the L&TT icon on the desktop (if present).
•Click Start > Programs > HP StorageWorks Library and Tape Tools > HP L&TT.
Using the Scan Mode Selection feature
When L&TT starts, the splash screen opens. The splash screen gives you the opportunity to exit the application if it was started unintentionally and before any SCSI bus activity occurs. This prevents the program from interfering with any backup or other storage applications that currently may be running.
Library and Tape Tools User Guide |
25 |

Figure 1 L&TT splash screen
The splash screen also lets you select the initial scan mode and the SCSI I/O mode (if more than one option is available).
Scan mode
When L&TT starts, it performs a device scan to identify all the devices connected to the computer, either directly or through a SAN. In large SAN environments, a full scan can take a long time. The first time L&TT is run, it must perform a full hardware scan (Hardware Scan option). After that is done, the results of the scan are automatically saved, so the next time L&TT is started, the Saved/Manual Scan option can be used. If the Saved/Manual Scan option is selected before a hardware scan is done, the
list of available devices will be empty.
 NOTE:
NOTE:
If you previously selected the Skip this dialog in the future checkbox on the splash screen, L&TT performs a full hardware scan. To re-enable the splash screen and change the scan option, select Preferences from the Options menu. Check the Display splash screen at startup option and restart L&TT.
Select multiple devices to be scanned from the Saved/Manual Scan screen. In addition, automatically save device selections and reuse them in a later session.
To access the Saved/Manual Scan screen, select the Saved/Manual Scan option and click Continue on the splash screen.
26 Getting Started with L&TT

Figure 2 Saved/Manual Scan screen
Using the Saved/Manual Scan screen
The left panel of the Saved/Manual Scan screen displays the devices that were detected in the last saved scan. If this list is incomplete (for example, if new hardware has been added since the last scan), click Scan Hardware Now to rescan the system for new devices. If you want to manually add a device to the list of devices to be scanned without performing a full hardware scan, click Enter Address Manually.
Use the Select All, Remove All, Select, and Remove buttons to select devices. Selected devices are displayed in the right panel of the screen, and only selected devices will be scanned and identified by L&TT. Devices that are skipped will not be displayed in the Device List on the L&TT main screen.
After selecting all of the devices that you want L&TT to scan and identify, click Continue to perform the scan and proceed to the L&TT main screen. L&TT saves the list of selected devices so the next time you start L&TT and display the Saved/Manual Scan screen, L&TT displays all of the previously selected devices in the right panel.
Additional device scan considerations
After the initial scan is complete and saved, future full system hardware scans become unnecessary in most cases. You must perform a hardware scan after any of these actions have occurred (Windows in NT Miniport I/O mode of operation):
•After the hardware configuration has been changed
•After power cycling more than one of the tape drives on the system
•After updating firmware in more than one of the tape drives on the system
To perform a hardware scan, exit and restart L&TT. On the splash screen, select the Hardware scan option rather than Saved scan. If you do not do this, the Windows operating system might get out of sync with the L&TT saved scan because Windows device rediscovery assigns new logical device names to the devices.
Library and Tape Tools User Guide |
27 |

Also, if you power cycle or update firmware in a device while using a saved scan, the device may not be accessible until it is rediscovered by Windows. If you select the device before it is rediscovered, L&TT generates an error. After Windows has rediscovered the device, the device can be selected without causing an error.
If you are running in saved scan mode and want to rescan the bus for devices, clicking the Rescan button on the Scan tab of L&TT does not initiate a hardware scan. You must exit and restart L&TT, and then choose the hardware scan option on the splash screen to execute a hardware scan.
I/O mode
L&TT selects the input/output (I/O) mode that is most appropriate for the system it is running on. However, this initial screen allows for manual selection of the I/O mode in certain cases. L&TT currently operates in the following two I/O modes:
•NT Miniport—uses an interface that is native to Windows NT 4.0, 2000, XP, and Windows Server 2003. This is the preferred I/O mode on systems where it is available because it does not require the installation of the ASPI interface. However, there are some limitations to the Windows NT Miniport I/O mode related to using devices that are “claimed” by other applications, or that are used with non-standard OS drivers. In those cases, selecting the ASPI I/O mode can make a device accessible.
Beginning with version 4.0, L&TT supports Microsoft Storport technology. Storport is a new storage driver model created by Microsoft for Windows Server 2003 and future Windows® operating systems. Storport offers a higher performance architecture and better Fibre Channel compatibility in Windows systems. If Storport drivers are installed, L&TT automatically uses Storport when you select NT Miniport.
•ASPI—uses an optional I/O programming interface that is available on all versions of Windows. This I/O mode can be used with any Windows operating system. It may require the installation or update of additional OS components, possibly requiring a reboot of the system during installation.
 NOTE:
NOTE:
ASPI is not officially supported by Windows Server 2003. However, in most cases, it will function properly. If ASPI is installed with Windows Server 2003, L&TT can make use of it if the ASPI I/O mode is selected. However, HP recommends that you use the default NT MiniPort I/O option with Windows Server 2003.
Skip this dialog in the future
If this checkbox is selected when you click Continue, the splash screen is not displayed on subsequent uses of L&TT. The program will continue to use the settings that you selected the last time the splash screen was viewed.
To re-enable the splash screen, select Preferences from the Options menu. Check the Display splash screen at startup option and restart L&TT.
28 Getting Started with L&TT
Application window layout
After the I/O mode is selected, click Continue on the splash screen. The L&TT main screen opens.
Figure 3 L&TT main screen
The three sections of the L&TT main screen are:
1.Taskbar—This section contains buttons that provide quick access to the main functions of L&TT and to the online help system.
 NOTE:
NOTE:
Above the Taskbar is the standard Windows menu bar that provides alternate navigation to tool functions, as well as access to a number of other features.
2.Device List—This is a multi-function window that offers several options on the following tabs:
•Scan—Provides either a summary status or detailed information (depending on whether Show Details or Hide Details is selected) about the bus scanning process. If a problem is encountered during the scan, this information may help in determining the cause. When the scan completes successfully, the device list automatically switches to the By Product tab.
The Scan tab also lets you rescan the bus. If any devices have been hot-swapped or powered on after the OS has booted, in most cases, the rescan feature can discover those devices without requiring a reboot of the system.
Library and Tape Tools User Guide |
29 |

 CAUTION:
Swapping SCSI devices, including connecting and disconnecting cables and/or terminators, can cause the system to hang or crash.
 CAUTION:
On Windows NT 4.0, 2000, XP, and Windows Server 2003, changing devices at a specific SCSI address can cause unpredictable behavior. Parts of the operating system may not detect that the device or device type has changed.
•By Product—Shows a list of all the products connected to the system. The list is grouped into the following four categories:
•Libraries and autoloaders
•Drives
•Enclosures and processors
•Other devices
The three number fields listed after the device represent the device address. Each field in the address is separated by a period: the first field represents the HBA channel, the second field represents the SCSI ID, and the third field represents the LUN.
 NOTE:
NOTE:
When using the Miniport I/O mode, the HBA channel field is shown as “A/B,” where A is the channel and B is the subchannel.
•By Connection—Shows all products connected to the system, grouped by the HBA they are connected to. This view makes it easy to see which devices are connected to the same bus as the device in question, and may help in understanding system I/O performance issues.
•Instructions—Contains brief instructions on how to use the selected screen. This view can be disabled in the software preferences.
3.Device Information screen—All the main functions of the program are displayed in this window. The content of this window depends on the device and tool function selected.
Using the Device Information screen
When you select a product from the Device List, the Device Information screen displays information relevant to the device. The Device List also changes to display instructions on this page (if the instructions preference is enabled). If another tool function is currently active, then clicking Identity on the toolbar opens the Device Information screen.
The Device Information screen provides an overview of the selected hardware device and its current configuration and status.
30 Getting Started with L&TT
Loading...