


 Loading...
HP TFT7600 Rackmount Keyboard and Monitor
User Guide
Part Number 365378-002
August 2007 (Second Edition)
© Copyright 2005, 2007 Hewlett-Packard Development Company, L.P.
The information contained herein is subject to change without notice. The only warranties for HP products and services are set forth in the express warranty statements accompanying such products and services. Nothing herein should be construed as constituting an additional warranty. HP shall not be liable for technical or editorial errors or omissions contained herein.

Contents
Introduction.................................................................................................................................. |
5 |
Introduction .............................................................................................................................................. |
5 |
TFT7600 RKM features............................................................................................................................... |
5 |
Components ............................................................................................................................................. |
6 |
Rear components....................................................................................................................................... |
7 |
Installation ................................................................................................................................... |
8 |
Installing the TFT7600 RKM ........................................................................................................................ |
8 |
Kit contents............................................................................................................................................... |
8 |
Installing the HP TFT7600 RKM ................................................................................................................... |
8 |
Accessing the TFT7600 RKM .................................................................................................................... |
12 |
Removing the HP TFT7600 RKM................................................................................................................ |
12 |
Removing the HP 1U Adjustable Toolless Rails ............................................................................................ |
13 |
Removing PS2 cables with cable-locking mechanism.................................................................................... |
13 |
Operational overview ................................................................................................................. |
15 |
On-screen display ................................................................................................................................... |
15 |
Launching OSD menu .............................................................................................................................. |
15 |
Navigating OSD ..................................................................................................................................... |
15 |
OSD menu ............................................................................................................................................. |
16 |
Brightness/Contrast ....................................................................................................................... |
16 |
Image control................................................................................................................................ |
16 |
Advanced..................................................................................................................................... |
17 |
Auto Configuration ........................................................................................................................ |
18 |
Factory settings ............................................................................................................................. |
18 |
Language ..................................................................................................................................... |
18 |
Information ................................................................................................................................... |
18 |
Maintenance .............................................................................................................................. |
19 |
Maintenance and shipping guidelines........................................................................................................ |
19 |
Cleaning the monitor ..................................................................................................................... |
19 |
Shipping the TFT7600 RKM...................................................................................................................... |
20 |
Moving a rack with the TFT7600 RKM installed........................................................................................... |
20 |
Specifications............................................................................................................................. |
21 |
TFT7600 RKM specifications..................................................................................................................... |
21 |
Environmental temperature requirements (independent of altitude)........................................................ |
21 |
Regulatory compliance notices ..................................................................................................... |
22 |
Regulatory compliance identification numbers ............................................................................................. |
22 |
Federal Communications Commission notice............................................................................................... |
22 |
FCC rating label............................................................................................................................ |
22 |
Class A equipment......................................................................................................................... |
22 |
Class B equipment ......................................................................................................................... |
22 |
Declaration of conformity for products marked with the FCC logo, United States only............................. |
23 |
Modifications................................................................................................................................ |
23 |
Cables ......................................................................................................................................... |
23 |
Canadian notice (Avis Canadien).............................................................................................................. |
23 |
Contents |
3 |
European Union regulatory notice ............................................................................................................. |
24 |
Japanese notice ...................................................................................................................................... |
25 |
BSMI notice ............................................................................................................................................ |
25 |
Korean notice ......................................................................................................................................... |
25 |
Disposal of waste equipment by users in private households in the European Union......................................... |
26 |
Power cord requirement ........................................................................................................................... |
26 |
Power cord statement for Japan................................................................................................................. |
26 |
Material disposal .................................................................................................................................... |
26 |
Electrostatic discharge................................................................................................................. |
27 |
Preventing electrostatic discharge .............................................................................................................. |
27 |
Grounding methods to prevent electrostatic discharge.................................................................................. |
27 |
Technical support........................................................................................................................ |
28 |
HP contact information............................................................................................................................. |
28 |
Acronyms and abbreviations........................................................................................................ |
29 |
Index......................................................................................................................................... |
30 |
Contents 4

Introduction
Introduction
The HP TFT7600 RKM is a rack-mountable 1U integrated flat-panel monitor and keyboard with touchpad. NOTE: 1U = 1.75 inches or 44.45 cm
The TFT7600 RKM is mounted on rails with space available to add a 1U KVM switch box behind the unit. The TFT7600 RKM can be used with all HP 5000 and 10000 Series racks.
The TFT7600 RKM uses a 43.18-cm (17-in) color-active matrix TFT LCD.
TFT7600 RKM features
The following table identifies the TFT7600 RKM features:
Feature |
Description |
|
|
Display |
43.18-cm (17-in) viewable area display |
|
|
Resolution |
640 x 480 (VGA) through 1280 x 1024 (SXGA) and 1440 x |
|
900 (WXGA+) |
|
|
Monitor input |
Plugs into a standard VGA connector; does not require a |
|
special graphics adapter card |
|
|
Plug and Play |
Plug-and-Play capability if supported by your system |
|
|
Introduction 5

Feature |
Description |
|
|
|
|
OSD |
Available in seven languages: |
|
|
• |
English |
|
• |
French |
|
• |
German |
|
• |
Italian |
|
• |
Japanese |
|
• |
Simple Chinese |
|
• |
Spanish |
|
|
|
Keyboard with |
Three button touchpad with scroll bar |
|
touchpad |
|
|
|
|
|
Power supply |
12v DC/30 Watt |
|
|
|
|
Scroll keys |
Four scroll keys (inverted T) |
|
|
|
|
Components
Reference number |
Component |
Function |
|
|
|
|
|
1 |
Display release latch |
Pushes down to unlatch |
|
|
|
the display assembly |
|
|
|
|
|
2 |
Blue LED |
Turns on when the display |
|
|
|
is closed |
|
|
|
Helps identify the HP |
|
|
|
TFT7600 in a rack |
|
|
|
|
|
3 |
OSD scroll up and down |
Used to scroll in the OSD |
|
|
button |
menu and adjust |
|
|
|
functions |
|
|
|
|
|
4 |
OSD activation button |
• |
Launches OSD menus |
|
|
• |
Selects |
|
|
• Exits menus and OSD |
|
|
|
|
|
Introduction 6
Reference number |
Component |
Function |
|
|
|
5 |
Scroll lock LED |
|
|
|
|
6 |
Cap lock LED |
|
|
|
|
7 |
Number lock LED |
|
|
|
|
8 |
Touchpad |
|
|
|
|
9 |
Left pick button |
|
|
|
|
10 |
Middle pick button |
|
|
|
|
11 |
Right pick button |
|
|
|
|
12 |
Scroll bar |
|
|
|
|
13 |
USB pass thru |
Pass thru to the rear USB |
|
|
port (callout 1 in the |
|
|
following figure) |
|
|
|
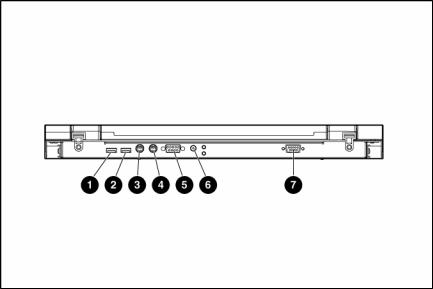
Rear components
Reference number |
Component |
Function |
|
|
|
1 |
USB pass thru |
Connects to a KVM |
|
|
switch virtual media port |
|
|
|
2 |
USB Keyboard/Mouse |
|
|
connector |
|
|
|
|
3 |
PS2 Keyboard connector |
|
|
|
|
4 |
PS2 Mouse connector |
|
|
|
|
5 |
VGA input connector |
|
|
|
|
6 |
Power connection |
|
|
|
|
7 |
Serial firmware port |
Enables user to update |
|
|
TFT7600 firmware |
|
|
|
Introduction 7

Installation
Installing the TFT7600 RKM
The following section covers the installation and setup procedure for installing the TFT7600 RKM.
Kit contents
The kit contains:
•TFT7600 RKM (1)
•M6 screws (4)
•6-32 screws (5)
•HP Adjustable Toolless Rails (2)
•Cable management arm, power adapter with brace rail (1)
•Lock plates (2)
•USB cables (2)
•PS2 cables (2)
•Video cable
•Power cords (2)
•USB cable labels
•Documentation
This kit contains extra hardware for your convenience.
Installing the HP TFT7600 RKM
1.Align the HP 1U Adjustable Toolless Rails with the holes marked on the rack, and snap them into place.
a.Snap one end of the HP 1U Adjustable Toolless Rails into the Retma rails.
b.Extend the other half of the HP 1U Adjustable Toolless Rails to meet the appropriate rack depth, and snap them into place.
NOTE: If the HP 1U Adjustable Toolless Rails do not snap into place, be sure that they align with the holes marked on the rack. The holes marked on the rack must be in the same location for the front and rear of the rack.
Installation 8

2.Extend the inner slides until they lock into place.
3.Align the unit with the extended inner slides, inserting the unit into the rack.
Installation 9

4.Slide the brace rail assembly in between the HP 1U Adjustable Toolless Rails from the rear of the rack.
5.Align the screw holes on the brace rail with the screw holes on the HP 1U Adjustable Toolless Rails.
6.Secure the brace rail to the HP 1U Adjustable Toolless Rails with two 6-32 screws.
Installation 10
Loading...