


 Loading...
HP System Management Homepage 7.2
User Guide
HP-UX, Linux, and Windows Operating Systems
HP Part Number: 509679-009
Published: February 2013
Edition: 1
© Copyright 2009, 2013 Hewlett-Packard Development Company, L.P.
Confidential computer software. Valid license from HP required for possession, use or copying. Consistent with FAR 12.211 and 12.212, Commercial Computer Software, Computer Software Documentation, and Technical Data for Commercial Items are licensed to the U.S. Government under vendor's standard commercial license.
The information contained herein is subject to change without notice. The only warranties for HP products and services are set forth in the express warranty statements accompanying such products and services. Nothing herein should be construed as constituting an additional warranty. HP shall not be liable for technical or editorial errors or omissions contained herein.
Acknowledgments
AMD and ATI are trademarks of Advanced Micro Devices, Inc.
Adobe and Acrobat are trademarks of Adobe Systems Incorporated.
HP-UX Release 10.20 and later and HP-UX Release 11.00 and later (in both 32 and 64-bit configurations) on all HP 9000 computers are Open Group UNIX 95 branded products.
Intel and Itanium are trademarks or registered trademarks of Intel Corporation or its subsidiaries in the United States and other countries. Microsoft and Windows are U.S. registered trademarks of Microsoft Corporation.
Red Hat is a registered trademark of Red Hat, Inc. in the U.S. and other countries.
UNIX is a registered trademark of The Open Group.
Java is a registered trademark of Oracle and/or its affiliates.
Microsoft® Windows® XP and Microsoft® Windows® Server are U.S. registered trademarks of Microsoft Corporation.
Warranty
HP will replace defective delivery media for a period of 90 days from the date of purchase. This warranty applies to all Insight Management products.

Contents |
|
1 Product overview........................................................................................ |
6 |
Product features........................................................................................................................ |
6 |
HP SIM................................................................................................................................... |
6 |
2 Getting started........................................................................................... |
7 |
Signing in................................................................................................................................ |
7 |
Starting HP SMH from Internet Explorer................................................................................... |
8 |
Starting HP SMH from Mozilla or Firefox................................................................................. |
9 |
Starting HP SMH from HP SIM............................................................................................. |
10 |
Configuring firewall settings..................................................................................................... |
10 |
Windows.......................................................................................................................... |
10 |
Linux................................................................................................................................ |
11 |
Red Hat Enterprise Linux 4, 5, and 6............................................................................... |
11 |
SUSE Linux Enterprise Server........................................................................................... |
12 |
Configuring timeout settings for HP-UX....................................................................................... |
13 |
Configuring SMH Service Timeout........................................................................................ |
13 |
Configuring SMH Session Timeout........................................................................................ |
13 |
Automatically importing certificates........................................................................................... |
14 |
Signing out............................................................................................................................ |
15 |
3 Scenarios................................................................................................ |
16 |
IP Binding.............................................................................................................................. |
16 |
IP Restricted Login................................................................................................................... |
16 |
Local Server Certificate............................................................................................................ |
16 |
Port 2301.............................................................................................................................. |
16 |
Kerberos Authentication (Windows only).................................................................................... |
16 |
User Groups.......................................................................................................................... |
16 |
Alternative Names (Windows and Linux only)............................................................................. |
16 |
4 Navigating the software............................................................................ |
17 |
Information areas................................................................................................................... |
19 |
Icon view............................................................................................................................... |
21 |
HP SMH pages...................................................................................................................... |
23 |
5 The Home page....................................................................................... |
25 |
Component Status Summary.................................................................................................... |
25 |
Overall System Health Status.................................................................................................... |
25 |
6 The Settings page..................................................................................... |
26 |
SNMP webagent box.............................................................................................................. |
26 |
SMH Data Source category (Windows and Linux only)........................................................... |
26 |
SNMP Configuration category (Windows and Linux only)....................................................... |
26 |
UI Options category (Windows and Linux only)..................................................................... |
27 |
System Management Homepage Box........................................................................................ |
27 |
UI Properties category........................................................................................................ |
27 |
User Preferences category................................................................................................... |
28 |
Security............................................................................................................................ |
29 |
Anonymous/Local Access category................................................................................. |
30 |
IP Binding category....................................................................................................... |
31 |
IP Restricted Login category............................................................................................ |
32 |
Local Server Certificate category..................................................................................... |
34 |
Port 2301 category....................................................................................................... |
35 |
Timeouts category......................................................................................................... |
37 |
Session Timeout........................................................................................................ |
38 |
Contents 3
UI Timeout............................................................................................................... |
38 |
Trust Mode category...................................................................................................... |
38 |
Configuring Trust Mode............................................................................................. |
39 |
Trusted Management Servers category............................................................................. |
41 |
Kerberos Authentication category (Windows only)............................................................. |
41 |
Kerberos Authentication Procedure.............................................................................. |
41 |
HP SMH Kerberos Authentication................................................................................ |
42 |
Kerberos Administrator ............................................................................................. |
43 |
Kerberos Operator ................................................................................................... |
43 |
Kerberos User ......................................................................................................... |
44 |
User Groups category.................................................................................................... |
44 |
Administrator Group................................................................................................. |
46 |
Operator Group....................................................................................................... |
46 |
User Group............................................................................................................. |
47 |
Handling (proper) of the HP SMH certificate revocation...................................................... |
47 |
Detecting and handling memory leak at runtime (Windows only)......................................... |
48 |
Alternative Names Certificates (Windows and Linux only)................................................... |
48 |
Menus (HP-UX only)............................................................................................................ |
48 |
Add Custom Menu (HP-UX only)...................................................................................... |
49 |
Remove custom menu (HP-UX only).................................................................................. |
49 |
7 The Tasks page........................................................................................ |
50 |
8 The Tools page (HP-UX only)...................................................................... |
51 |
9 The Logs page......................................................................................... |
52 |
System Management Homepage Log........................................................................................ |
52 |
SAM Log............................................................................................................................... |
52 |
Httpd Error Log....................................................................................................................... |
52 |
Supported languages.............................................................................................................. |
53 |
10 The Installed Webapps page (Windows and Linux only).............................. |
55 |
11 The Support page................................................................................... |
56 |
The Help page....................................................................................................................... |
56 |
Search form...................................................................................................................... |
57 |
Credits.................................................................................................................................. |
57 |
12 Command Line Interface configuration....................................................... |
58 |
Anonymous Access................................................................................................................. |
58 |
Display Current Settings (Windows and Linux only)..................................................................... |
58 |
Local Access.......................................................................................................................... |
58 |
IP Restricted Logins.................................................................................................................. |
59 |
IP Binding.............................................................................................................................. |
59 |
Trust Modes........................................................................................................................... |
60 |
Restart service........................................................................................................................ |
60 |
Reject Program Admin Login (Windows and Linux only)............................................................... |
60 |
Win32DisableAcceptEX.......................................................................................................... |
60 |
Enable/disable SSL v2............................................................................................................ |
61 |
Log Rotations (Windows and Linux only).................................................................................... |
61 |
Rotate Log Size (Windows and Linux only)................................................................................. |
61 |
Maximum Number of Threads Allowed...................................................................................... |
61 |
Maximum Number of Sessions (Windows and Linux only)............................................................ |
61 |
Session Timeout...................................................................................................................... |
61 |
UI Timeout............................................................................................................................. |
62 |
Log level................................................................................................................................ |
62 |
Port 2301.............................................................................................................................. |
62 |
Multihomed certificate alternative names list............................................................................... |
62 |
4Contents
Custom UI.............................................................................................................................. |
63 |
Log-based directory................................................................................................................ |
63 |
Configurable logging.............................................................................................................. |
63 |
Autostart mode....................................................................................................................... |
63 |
Httpd Error log....................................................................................................................... |
63 |
Icon view............................................................................................................................... |
64 |
Box Order............................................................................................................................. |
64 |
Box Item Order...................................................................................................................... |
64 |
Kerberos Authentication........................................................................................................... |
64 |
User Groups.......................................................................................................................... |
65 |
Help message........................................................................................................................ |
65 |
File-based Command Line Interface........................................................................................... |
65 |
Command Line Log Reader...................................................................................................... |
66 |
SSL Cipher Suite configuration.................................................................................................. |
67 |
Change locality...................................................................................................................... |
67 |
Detecting and handling memory leak at runtime (Windows only).................................................. |
67 |
13 Troubleshooting topics............................................................................. |
68 |
14 Service and support................................................................................ |
79 |
Support and other resources......................................................................... |
80 |
Information to collect before contacting HP................................................................................. |
80 |
How to contact HP.................................................................................................................. |
80 |
Security bulletin and alert policy for non-HP owned software components...................................... |
80 |
Subscription service................................................................................................................ |
80 |
Registering for software technical support and update service....................................................... |
80 |
How to use your software technical support and update service............................................... |
81 |
HP authorized resellers............................................................................................................ |
81 |
New and changed information in this edition............................................................................. |
81 |
Related Documents................................................................................................................. |
81 |
Typographic conventions......................................................................................................... |
82 |
A HP SMH file locations............................................................................... |
84 |
B HP SMH Ciphers...................................................................................... |
86 |
Ciphers used in HP SMH......................................................................................................... |
86 |
15 Documentation feedback......................................................................... |
87 |
Glossary.................................................................................................... |
88 |
Index......................................................................................................... |
93 |
Contents 5

1 Product overview
HP System Management Homepage (HP SMH) is a web-based interface that consolidates and simplifies single system management for HP servers running the HP-UX, Linux, and Microsoft Windows operating systems. HP SMH aggregates and displays data from Web Agents and other HP Web-enabled System Management Software that include:
•HP Insight Diagnostics
•Array Configuration Utility
•HP Software Version Control Agents
HP SMH enables you to view detailed hardware configuration and status data, performance metrics, system thresholds, diagnostics, and software version control information using a single interface.
Product features
HP SMH provides the following enhanced security and streamlined operations for HP servers running HP-UX, Linux, and Windows operating systems:
•Browser access using operating system-based Secure Sockets Layer (SSL)-secure authentication.
•Common HTTP and HTTPS service for HP Insight Management Agents and utilities, for reduced complexity and system resource requirements.
•Simplified architecture for implementing HTTP security and HP management updates.
•Access control through Network Interface Card (NIC) binding and advanced configuration features for individual and groups of users.
•Broad operating system and browser support.
•Automated log collection via smhassist.
This feature is available only on HP-UX 11i v2 and HP-UX 11i v3 systems.
•Command Line Interface (CLI) - smhconfig - provides users with administrator rights access to set values through the command line.
•Facility to disable port 2301.
•Logging into syslog the activities related to login and logout performed on HP SMH. This feature is available only on HP-UX 11i v2 and HP-UX 11i v3 systems.
•Consolidated API logging for HP SMH and WebApps: Provides an option to log the critical and major events of both the HP SMH and its WebApps to the system log for viewing and auditing.
HP SIM
HP SMH is tightly integrated with HP Systems Insight Manager (HP SIM). You can easily navigate to HP SMH from the System Lists and System Pages in HP SIM.
NOTE: Accepting the HP SIM certificate is the default behavior.
6Product overview

2 Getting started
To get started with HP System Management Homepage (HP SMH), use the following information when configuring HP SMH and setting up users and security properly.
To configure HP SMH:
•On Linux operating systems, HP SMH is installed with default settings. You can configure the settings using the script /opt/hp/hpsmh/sbin/hpSMHSetup.sh for Itanium systems.
•On Windows operating systems, the installation enables you to configure HP SMH settings during installation.
•On both Windows and Linux operating systems, smhconfig allows you to configure the HP SMH security settings.
NOTE: To change the configurations for the Linux and Windows operating systems, see the HP System Management Homepage Installation Guide on the HP Technical Documentation Web site at http://h18013.www1.hp.com/products/servers/management/agents/documentation.html.
To set up user access and security properly:
1.Add user groups to effectively manage user rights.
2.Configure the trust mode.
3.Configure local or anonymous access.
Signing in
The Sign In page enables you to access the Home page, which contains the available HP Insight Management Agent.
NOTE: The following warning is displayed on the login screen whenever the certificate or the keys or both are modified:
The certificate and keys used by SMH to establish SSL (https) connections have been replaced. It might have happened because the previous version was deleted (accidentally or maliciously) or replaced by another application (HP SIM replaces the certificate and keys when installed on top of SMH). Please, verify what happened to the previous version and take the appropriate actions.
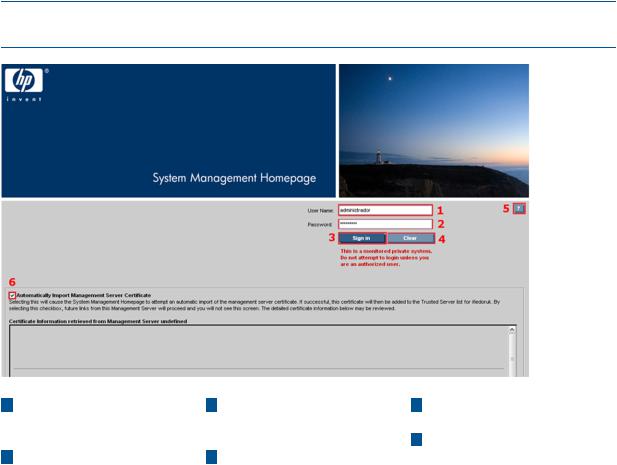
The Sign In page components include:
•Two fields to input your user name and password from an account that is part of a valid group configured in the SMH users groups configuration article.
Signing in |
7 |

NOTE: HP SMH uses the root certificate, intermediate certificate, and the Certificate Root List (CRL) of the certificate to verify the revocation status of trusted certificate used for SSO. If the certificate is found to be revoked or an error is encountered during verification, HP SMH does not allow the user to access HP SMH through SSO and redirects the user to the login page. HP SMH displays the following warning message on the login screen when the SSL certificate is revoked: Failed to verify CA signed certificate used by SMH. See SMH logs for more details.
•Two buttons under the input fields:
◦Sign In
Validates the values in the user name and password. If both values are valid, the HP SMH Home page appears.
◦Clear
Erases the input values.
•The question mark icon, ?, when clicked, displays or hides the tooltip box that displays information about the authentication mechanism and sign-in process.
1User Name. The user must be part of a user group accepted by HP SMH.
2Password. The user name and password must match a valid user.
3 |
Sign In. Validates user name 5 |
Question mark. Show/hide |
|
and password for signing-in |
tooltip box. |
|
to HP SMH. |
|
4 |
Clear. Erases user name and |
|
|
password input fields. |
|
If an error occurs on a sign-in attempt, you are returned to the Sign In page.
A configuration mechanism enables the administrator to customize the image and the message in the Sign In page. The administrator can use a custom logo and warning message. As the pages load, HP SMH verifies if the personalized content is enabled and available. If the content is not available, HP SMH uses the standard image and warning message.
Starting HP SMH from Internet Explorer
To sign in to HP SMH with Internet Explorer:
8Getting started

1.Navigate to https://hostname:2381/.
The first time you browse to this URI, the Security Alert dialog box appears, prompting you to indicate whether to trust the server. If you do not import the certificate, the Security Alert appears every time you browse to HP SMH.
For more information about procedures on changing the configuration variables, see the HP System Management Homepage Installation Guide on the HP Technical Documentation Web site at http://h18013.www1.hp.com/products/servers/management/agents/ documentation.html.
NOTE: To implement your own Public Key Infrastructure (PKI) or install your own generated certificates into each managed system, you can install a certificate authority Root Certificate into each browser to be used for management. If a Root Certificate is implemented, the Security Alert dialog box does not appear. If the alert appears, you might have browsed to the wrong system. For more information about installing the certificate authority Root Certificate, see the online help in your browser.
2.Click Yes.
The Sign In page appears. If you have enabled Anonymous access during installation, then System Management Homepage appears.
3.Enter your user name that is recognized by the operating system.
•Linux
HP SMH initially allows access to users belonging to the root operating system group.
•Windows
HP SMH allows access to users belonging to the Administrators operating system group.
If the user credentials cannot be authenticated, the user is denied access.
After logging into HP SMH as an initially allowed user, use the Security Settings to grant access to users in other operating system groups.
Administrator on Windows and root on Linux have administrator access on HP SMH.
4.Enter the password that is recognized by the operating system.
5.Click Sign In.
The System Management Homepage appears.
Starting HP SMH from Mozilla or Firefox
To sign in to HP SMH with Mozilla or Firefox:
1.Navigate to https://hostname:2381/.
For more information about procedures on changing the configuration variables, see the HP System Management Homepage Installation Guide on the HP Technical Documentation website at http://h18013.www1.hp.com/products/servers/management/agents/documentation.html.
2.Click OK.
The Sign In page appears. If you have enabled Anonymous access during installation, then System Management Homepage appears.
3.Enter your user name that is recognized by the operating system.
•Linux
HP SMH initially allows access to users belonging to the root operating system group.
•Windows
HP SMH allows access to users belonging to the Administrators operating system group.
Signing in |
9 |

Administrator on Windows and root on Linux have administrator access on HP SMH.
4.Enter the password that is recognized by the operating system.
5.Click Sign In.
The System Management Homepage appears.
Starting HP SMH from HP SIM
To start HP SMH by signing in to HP SIM with a Web browser:
1.Navigate to https://hostname:50000/.
The first time you browse to this link, the Security Alert dialog box appears, asking if you want to trust the server. If you do not import the certificate, the Security Alert appears each time you browse to Systems Insight Manager (HP SIM).
NOTE: To implement a custom Public Key Infrastructure (PKI) or install your own generated certificates into each managed system, you can install a certificate authority Root Certificate into each browser to be used for management. If a Root Certificate is implemented, the Security Alert dialog box does not appear. If the alert appears, you might have browsed to the wrong system. For more information about installing the certificate authority Root Certificate, see the online help in your browser.
2.Click Yes.
The Sign In page appears.
3.Enter your user name that is recognized by the operating system.
4.Enter the password that is recognized by the operating system.
5.Click Sign In.
6.Select Tools→System Information→System Management Homepage.
7.Select a target system from the list.
8.Select a check box next to a target system, and then click Apply.
9.Verify the target system by selecting a check box next to the system, and then click Run Now.
The Security Alert dialog box appears, prompting you to trust the server. If you do not import the certificate, the Security Alert appears each time you browse to HP SMH.
The System Management Homepage appears.
Configuring firewall settings
Windows
Some operating systems including Windows XP with Service Pack 2 and Windows Server 2003 SBS implement a firewall that prevents browsers from accessing the ports required for the Version Control Repository Manager access. To resolve this issue, configure the firewall with exceptions to enable browsers to access the ports used by HP SIM and Version Control Repository Manager.
NOTE: For Windows XP with Service Pack 2, the firewall configuration leaves the default SP2 security enhancements intact, but enables traffic over the ports. These ports are required for the Version Control Repository Manager to run. The secure and insecure ports must be added to enable proper communication with your browser.
To configure the firewall:
1.Select Start→Settings→Control Panel.
2.To configure the firewall settings, double-click Windows Firewall.
3.Select Exceptions.
4.Click Add Port.
10 Getting started
5.Enter the following product name and the port number information. Add the exceptions listed in the following table to the firewall protection:
Table 1 Firewall exceptions
Product |
Port Number |
HP SMH Insecure Port: |
2301 |
HP SMH Secure Port: |
2381 |
6.Click OK to save your settings and close the Add a Port dialog box.
7.Click OK to save your settings and close the Windows Firewall dialog box.
Linux
Configuring firewalls varies, depending on the version of Linux installed.
Red Hat Enterprise Linux 4, 5, and 6
The following displays an example of iptables firewall rules for Red Hat Enterprise Linux 4 and 5 in the /etc/sysconfig/iptables file:
#Firewall configuration written by redhat-config-securitylevel
#Manual customization of this file is not recommended. *filter
:INPUT ACCEPT [0:0] :FORWARD ACCEPT [0:0] :OUTPUT ACCEPT [0:0] :RH-Firewall-1-INPUT - [0:0]
-A INPUT -j RH-Firewall-1-INPUT -A FORWARD -j RH-Firewall-1-INPUT
-A RH-Firewall-1-INPUT -i lo -j ACCEPT
-A RH-Firewall-1-INPUT -p icmp --icmp-type any -j ACCEPT -A RH-Firewall-1-INPUT -p 50 -j ACCEPT
-A RH-Firewall-1-INPUT -p 51 -j ACCEPT
-A RH-Firewall-1-INPUT -m state --state ESTABLISHED,RELATED -j ACCEPT
-A RH-Firewall-1-INPUT -m state --state NEW -m tcp -p tcp --dport 80 -j ACCEPT
-A RH-Firewall-1-INPUT -m state --state NEW -m tcp -p tcp --dport 21 -j ACCEPT
-A RH-Firewall-1-INPUT -m state --state NEW -m tcp -p tcp --dport 22 -j ACCEPT
-A RH-Firewall-1-INPUT -j REJECT --reject-with icmp-host-prohibited
COMMIT
The following displays the new value in the iptables firewall rules for Red Hat Enterprise Linux 4 and 5 that allows access to HP SMH in the /etc/sysconfig/iptables file:
#Firewall configuration written by redhat-config-securitylevel
#Manual customization of this file is not recommended. *filter
:INPUT ACCEPT [0:0]
Configuring firewall settings |
11 |
:FORWARD ACCEPT [0:0]
:OUTPUT ACCEPT [0:0] :RH-Firewall-1-INPUT - [0:0]
-A INPUT -j RH-Firewall-1-INPUT
-A FORWARD -j RH-Firewall-1-INPUT
-A RH-Firewall-1-INPUT -i lo -j ACCEPT
-A RH-Firewall-1-INPUT -p icmp --icmp-type any -j ACCEPT -A RH-Firewall-1-INPUT -p 50 -j ACCEPT
-A RH-Firewall-1-INPUT -p 51 -j ACCEPT
-A RH-Firewall-1-INPUT -m state --state ESTABLISHED,RELATED -j ACCEPT
-A RH-Firewall-1-INPUT -m state --state NEW -m tcp -p tcp --dport 80 -j ACCEPT
-A RH-Firewall-1-INPUT -m state --state NEW -m tcp -p tcp --dport 21 -j ACCEPT
-A RH-Firewall-1-INPUT -m state --state NEW -m tcp -p tcp --dport 22 -j ACCEPT
-A RH-Firewall-1-INPUT -m state --state NEW -m tcp -p tcp --dport 2301 -j ACCEPT
-A RH-Firewall-1-INPUT -m state --state NEW -m tcp -p tcp --dport 2381 -j ACCEPT
-A RH-Firewall-1-INPUT -j REJECT --reject-with icmp-host-prohibited COMMIT
SUSE Linux Enterprise Server
SUSE Linux Enterprise Server 9 and 10 firewalls are configured using the YAST2 utility.
To configure the firewall:
1.Using the YAST2 utility, select Security & Users→Firewall.
The Firewall Configuration (Step 1 of 4): Basic Settings window appears.
2.Click Next.
The Firewall Configuration (Step 2 of 4): Services window appears.
3.In the Additional Services field, enter 2301:2381, and then click Next. The Firewall Configuration (Step 3 of 4): Features window appears.
4.Click Next.
The Firewall Configuration (Step 4 of 4): Logging Options window appears.
5.Click Next.
A dialog box appears asking you to confirm your intention to save settings and active firewall.
6.Click Continue.
The firewall is configured and your settings are saved.
12 Getting started

Configuring timeout settings for HP-UX
Two HP SMH timeout settings can be configured:
•SMH service timeout
Sets the amount of time, in minutes, before the HP SMH server stops.
•SMH session timeout
Sets the amount of time, in minutes, before an HP SMH GUI session stops.
NOTE: Selecting the Session never expires check box avoids HP SMH session timeouts by sending a background request every three minutes. This option, when selected, also prevents HP SMH service timeouts. Session never expires is only available on HP-UX systems.
Configuring SMH Service Timeout
The HP SMH service timeout setting enables you to configure the HP SMH timeout in minutes. If service timeout is not defined or is set to 0 (zero), HP SMH starts without a service timeout. If the service timeout is less than the HP SMH session timeout, HP SMH stops 3 minutes after the HP SMH session timeout.
When the HP SMH automatic startup on boot startup mode is used, HP SMH starts without a service timeout.
To modify the service timeout setting, complete the following steps:
1.Copy the existing /opt/hpsmh/conf/timeout.conf file into a different directory.
2.Edit the timeout.conf file:
a.Open /opt/hpsmh/conf/timeout.conf with a text editor.
b.Modify the following line to specify a value greater than 9 minutes.
TIMEOUT-SMH=30
c.Save and close the file.
3.Restart the HP SMH service.
Configuring SMH Session Timeout
The HP SMH session timeout setting enables you to configure the HP SMH GUI timeout in minutes. An HP SMH GUI session is stopped after the session timeout time period elapses without user activity.
If the session timeout is not defined, it is set to 15 minutes.
To modify the session timeout setting, execute the following steps:
1.Copy the existing smhpd.xml file into a different directory. The file is located in the following path.
HP-UX
/opt/hpsmh/conf.common/smhpd.xml
2.Edit the smhpd.xml file:
a.Open smhpd.xml with a text editor in the following manner.
/opt/hpsmh/conf.common/smhpd.xml
b.Add the following line between the <system-management-homepage> and
</system-management-homepage> tags:
<session-timeout>value</session-timeout>
c.Replace value with a value between 6 and 120.
d.Save and close the file.
Configuring timeout settings for HP-UX 13
3.Restart the HP SMH service.
Automatically importing certificates
The Automatically Import Management Server Certificate feature enables you to automatically import the HP SIM certificate when accessing the HP SMH from an HP SIM system.
NOTE: Your login must have administrative access to HP SMH to automatically import the HP SIM certificate.
1 |
User Name. The user must |
3 |
Sign In. Validates user name |
5 |
Question mark. Show/hide |
|
be part of a user group |
|
and password for signing in |
|
tooltip box. |
|
accepted by HP SMH. |
|
to HP SMH. |
6 |
Automatically import |
2 |
Password. The user name |
4 |
Clear. Erases user name and |
|
management server |
|
and password must match a |
|
password input fields. |
|
certificate. Imports certificate |
|
valid user. |
|
|
|
data if checked when the sign |
|
|
|
|
|
in button is pressed. |
To automatically import the HP SIM certificate:
1.From an HP Systems Insight Manager or HP Insight Manager 7 system, select a link to a system.
If the Trust By Certificate option is selected in HP SMH Settings, click the Security link, and then click the Trust Mode , and a certificate for the HP SIM system you are accessing has not been imported into the Trusted Certificates List, the Sign In page displays the Automatically Import Management Server Certificate option. The Certificate Information retrieved from SERVER NAME displays the HP SIM certificate details.
2.If you do not want to add the HP SIM certificate to the Trusted Certificates List; deselect
Automatically Import Management Server Certificate. Deselecting this option still requires you to enter login credentials. However, administrator credentials are not required to login.
If you enable HP SMH to automatically import the HP SIM certificate, future access to the system is seamless. You are not prompted for your login credentials.
3.Leave Automatically Import Management Server Certificate selected, enter your HP SMH credentials, and then click Sign In to automatically import the certificate.
The certificate is added to the Trusted Certificates List.
14 Getting started
Signing out
You can sign out of HP SMH, using either of the following options:
•In the HP SMH header, click Sign Out.
The HP System Management Homepage Sign in page appears.
•Close every instance of the Web browser used to sign in to HP SMH.
Signing out 15

3 Scenarios
IP Binding
You can use IP Binding for example when a system has multiple IP addresses and you want to limit the access to HP SMH to particular networks or subnets like:
•For infrastructure (IPv4 and IPv6)
•Multiple subnets
•Security
•Bandwidth
For more information, see “IP Binding category” (page 31).
IP Restricted Login
IP Restricted Login is useful if you want to:
•Limit remote access to HP SMH to include only specific remote servers
•To exclude entire ranges of remote servers
•Increase security by limiting remote access
For more information, see “IP Restricted Login category” (page 32).
Local Server Certificate
Local server certificate is useful for security reasons through creating self-signed certificates instead of certificates generated by HP.
For more information, see “Local Server Certificate category” (page 34).
Port 2301
For security reasons, you can reduce the amount of open ports in the environment.
For more information, see “Port 2301 category” (page 35).
Kerberos Authentication (Windows only)
Kerberos offers Single Sign-On (SSO) capability on secure networks. In a Kerberos environment, users log in only once at the start of their session, acquiring Kerberos credentials that are used transparently to log in on all other services available, such as SSH, FTP, and authenticated web sessions.
For more information, see “Kerberos Authentication category (Windows only)” (page 41).
User Groups
The user groups feature allows you to manage user access to HP SMH based on operating system level account groups. Operating system account groups can be configured for administration reasons.
For more information, see “User Groups category” (page 44).
Alternative Names (Windows and Linux only)
The alternative names feature simplifies the use of certificates not generated, by HP by enabling HP SMH to recognize DNS names and IP addresses associated with a certificate.
For more information, see “Alternative Names Certificates (Windows and Linux only)” (page 48).
16 Scenarios
4 Navigating the software
The HP System Management Homepage (HP SMH) displays all HP Web-enabled System Management Software that provides information. In addition, HP SMH displays various categories (in boxes) that have icons defining the status of the items.
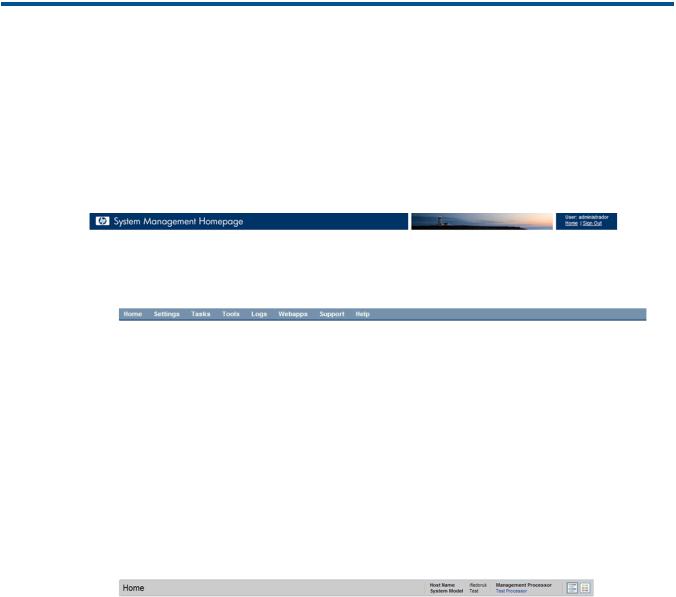
The HP SMH main page is divided into two major areas: the header and the standard container.
•Header Frame
The header frame is constantly visible regardless of the page you are viewing and contains the following four subareas:
◦Master header. In Windows and Linux, the links show the path you are viewing, the user, and a Sign Out link.
◦Menu. Each item is a direct link to a page or section including:
–Home
–Settings
–Tasks
–Tools
–Logs
–Webapps
–Support
–Help
◦Main title area. The area under the master header and menu contains the following items.
–Title.
The title of the section of page you are viewing.
–Host Name.
The name of the system.
–System Model.
The model appears as Unknown if the HP Insight Management Agent for servers is not installed on the system.
–Management Processor.
The name of the management processor.
–Icons.
An option that enables you to switch between icon and list view modes when clicked.
17
Data Source
Indicates which source is populating management data. For instance, WBEM for HP Insight Management WBEM Providers or SNMP for HP Insight Management Agents. If no source is installed, no data string will appear.
–Bread crumbs.
The area under the main title that is divided into four parts.
–First level menu item
–Legend.
A link that, when clicked, displays a tooltip box listing all possible statuses of webapps.
–Refresh.
A link that reloads the header and information areas.
–Time.
Displays the time the page was loaded. When you mouse over the time area, you can see the date the page was loaded.
•Data Frame.
The standard container contains the sections or pages as:
◦
◦
◦
◦
Boxes
Icons
Pages as configurations
Support
18 Navigating the software
◦
◦
Help
Webapps
The data frame shows the status for all HP Web-enabled System Management Software and utilities on the system.
Information areas
Depending on your operating system (Linux or Windows), the following information areas appear in the header or data frames:
•HP SMH Pages
◦Signing In
◦The Home Page
◦The Settings Page
◦The Tasks Page
◦The Tools Page (HP-UX only)
◦The Logs Page
◦The Installed Webapps Page
◦The Support Page
◦The Help Page
◦Current User.
The Current User displays the identity of the user that is signed in.
–If the user is a operating system-based user, a Sign Out link appears.
–If anonymous access is enabled, the Current User displays hpsmh_anonymous and the Sign In link appears.
–If Local Access is enabled, the Current User displays hpsmh_local_anonymous or hpsmh_local_administrator, depending on what level of access has been enabled, and local access appears below user type.
–If user type is hpsmh_local_administrator, no sign in or sign out link appears.
◦Boxes.
Boxes display webapps results in a list of items with their result status.
–An Overall System Health Status icon represents the worst status of items inside the box and appears in the title bar along with the title.
–Under the title bar, is a list of items in the box. Each item can have a status icon to the left of its name.
–In the footer of the box, is an expansion line with a link that, when clicked, expands the height of the box to include the total number of items if the items exceed the five-line limit.
◦Loading screen.
When an item is selected, a status indicator appears as the Loading screen during the load process of the page. This prevents users from selecting other items after the initial selection.
Information areas 19

◦Number of columns.
The number of boxes or columns presented in each line in the list view mode is defined by the display resolution setting. For example, if your resolution is set at 800x600, only three boxes are presented in a line, while in greater resolutions, the number of boxes visible is four.
◦Notes.
Notes are sections placed on the right side and used in most pages. These notes inform you how to use the controls and what kind of values is expected.
◦Icon view.
Icons appear for items and sections. When an icon is clicked, another page appears with its items as icons. You can view the status of the items inside the box by hovering your mouse over the icon to view a tooltip containing the total of Critical, Major, Minor and Warning statuses of installed applications.
◦Timeout Warnings.
Timeout warnings appear as a tooltip box in the page footer on the right side when you do not load a page in SMH within the time limit set for timeouts.
20 Navigating the software
◦Dynamic Lists in Pages.
A dynamically created list of elements appears for each item you want to add or remove to a page and are available for the following pages:
–IP Binding
–IP Restricted Login
–Trust Mode
–Kerberos Authentication
–User Groups
◦Legend:
This link displays a tooltip box that lists the status of the installed webapps.
Table 2 Status icons
Icon |
Status |
Critical
Major
Minor
Warning
Normal
Disabled
Unknown
Informational
•Management Processor.
This displays a link to the Remote Insight Lights-Out Edition (RILOE) board or the Integrated Lights-Out (iLO) board. This information is provided by the HP Insight Management Agent. If no HP Web-enabled System Management Software is installed that provides this information, none appears.
Icon view
Icons.
An option that enables you to switch between icon and list view modes when clicked.
Table 3 Icon View
Icon |
Description |
Component Status Summary
The Component Status Summary displays links to all subsystems that have a critical, major, minor, or warning status, which the integrated HP Web-enabled System Management Software provides. If there are no agents
Icon view 21

 Table 3 Icon View (continued)
Icon Description
installed or no critical, major, minor or warning items, the
Component Status Summary displays no items.
Generic Icon
The generic icon is provided when a webapp does not have an icon.
System Management Homepage
Illustrates sections related to the System Management
Homepage.
Security Options
Provides links that enable you to configure HP SMH settings. It provides links to the following:
• Anonymous/Local Access
• IP Binding
• IP Restricted Login
• Local Server Certificate
• Port 2301 (Windows only)
• Port 2301 and AutoStart (Linux Only)
• Timeouts
• Trust Mode
• Trusted Management Servers
• Kerberos Authentication (Windows Only)
• User Groups
Anonymous/Local Access
Enables the administrator to set options that allow anonymous users to access SMH pages or to allow automatic login to SMH when running in a local console as administrator or anonymous user.
IP Binding
Enables you to control the addresses that SMH is bound to.
IP Restricted Login
Enables you to add addresses from where SMH is accessible or blocked.
Local Server Certificate
This category has two blocks and is used for generation of certificate requests that can be sent to a Certificate Authority (CA) to sign and later import the signed certificate that was received.
Port 2301 (Windows only)
Enables you to configure access to Port 2301.
Port 2301 and AutoStart (Linux only)
Enables you to configure access to Port 2301 and
Autostart.
22 Navigating the software
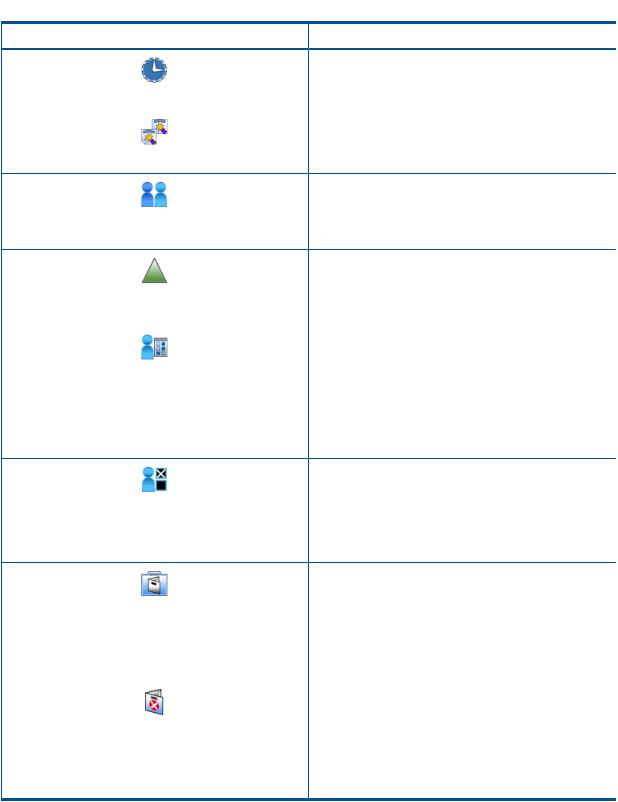
 Table 3 Icon View (continued)
Icon |
Description |
|
Timeouts |
|
Configures the values of timeout for SMH. Two timeouts |
|
can be configured: Session timeout and UI timeout. |
|
Trusted Management Servers |
|
Configures the certificates that are stored in the server and |
|
allows you to add or remove certificates. |
|
User Groups |
|
Allows an authorized user to configure which group of |
|
users has access to HP SMH and their respective access |
|
level. |
|
Kerberos Users |
|
Allows an authorized user to configure which users have |
|
Kerberos authenticated access to HP SMH and their |
|
respective access level. |
|
UI Properties |
|
Controls options for the appearance of HP SMH. It has |
|
controls for choosing between list and icon view, if you |
|
want to use custom text and images relating to your |
|
company, and box and item ordering type by name or by |
|
status. These options serve as the default options for all |
|
users unless users set specific options in User Preferences. |
|
For more information, see UI Properties category. |
|
User Preferences |
|
Enables you to set how HP SMH appears. It has controls |
|
for choosing between list and icon view, and box and item |
|
ordering type by name or status. These settings are valid |
|
for the user who sets them. These values are stored for 30 |
|
days. For more information, see User Preferences category. |
|
System Management Homepage Logs |
|
The System Management Homepage Log contains HP |
|
System Management Homepage (HP SMH) configuration |
|
changes as well as successful and failed sign-in attempts. |
|
It is helpful when troubleshooting sign-in or access issues |
|
when signing in directly to HP SMH, or from the HP Systems |
|
Insight Manager (HP SIM). |
|
Http error log |
|
The Httpd Error Log contains error information generated |
|
by HP SMH modules, Kerberos misconfiguration errors, |
|
and CGI execution errors (httpd). It is the first place to look |
|
when a problem occurs with starting the server or with |
|
server operation because the log often contains details of |
|
what went wrong and how to fix the problem. |
HP SMH pages
The HP SMH displays up to nine pages that enable you to access and configure settings related to participating HP Web-enabled System Management Software. The Tasks page and the Tools page appears if HP Web-enabled System Management Software provides information for them.
HP SMH pages 23
HP SMH pages include:
•“Signing in” (page 7)
•“The Home page” (page 25)
•“The Settings page” (page 26)
•“The Tasks page” (page 50)
•“The Tools page (HP-UX only)” (page 51)
•“The Logs page” (page 52)
•“The Installed Webapps page (Windows and Linux only)” (page 55)
•“The Support page” (page 56)
•The Help page
24 Navigating the software

5 The Home page
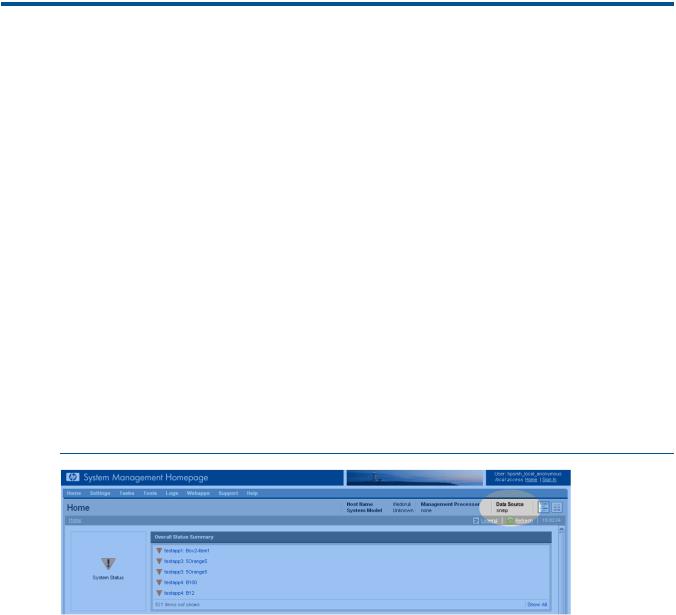
The Home page provides the system, subsystem, and status views of the server. The Home page displays groupings of systems and their status. The information on the Home page is provided by the integrated agents or management utilities.
For Linux and Windows operating systems, the Home page includes information provided by integrated version control, server, and storage agents.
Component Status Summary
The Component Status Summary displays links to all subsystems that have a critical, major, minor, or warning status, which the integrated HP Web-enabled System Management Software provides. If there are no agents installed or no critical, major, minor or warning items, the Component Status Summary displays no items.
Overall System Health Status
The Overall System Health Status displays a status icon with a label below it. A specific webapp sets the value of the Overall System Health Status icon using a predefined heuristic to signal the Overall System Health Status. If no webapp sets the Overall System Health Status, the worst of all the statuses in the Component Status Summary box is displayed.
Component Status Summary 25
6 The Settings page
The Settings page contains links to the settings and configuration pages of the HP System Management Homepage (HP SMH) and other integrated management tools found on the Tools page.
SNMP webagent box
Provides links that enable you to configure HP Web-enabled System Management Software agents.
•SMH Data Source category (Windows and Linux only)
Sets options for HP SMH Data Source.
•SNMP Configuration category (Windows and Linux only)
Sets options for HP Web-enabled System Management Software agents.
•UI Options category (Windows and Linux only)
Sets options for HP Web-enabled System Management Software agents help.
SMH Data Source category (Windows and Linux only)
The Data Source page enables you to change the HP SMH management data source.
The Data Source setting is only available if the HP Insight Management WBEM providers are installed.
NOTE: If no source is installed, SMH Data Source is shown with no data string.
•SMH Data source: WBEM
Indicates that HP Insight Management WBEM Providers are currently providing management data to the SMH pages for this server.
•SMH Data source: SNMP
Indicates that HP Insight Management Agents (SNMP) are currently providing management data to the SMH pages for this server.
To configure the Data Source, complete the following steps:
1.Select Settings from the menu.
2.In the SNMP Webagent box, click the Data Source link.
3.Select SNMP or WBEM .
4.Click Save and Apply Changes.
SNMP Configuration category (Windows and Linux only)
The SNMP Configuration page provides web serving and abstracts security and HP SIM interaction for webapps. For more information, see the HP Systems Insight Manager 5.2 Technical Reference
26 The Settings page
Guide, available on the HP Technical Documentation website at http://h18013.www1.hp.com/ products/servers/management/agents/documentation.html.
To configure the SNMP Configuration, complete the following steps:
1.Select Settings from the menu.
2.In the SNMP Webagent box, click the SNMP Configuration link .
UI Options category (Windows and Linux only)
The UI Options page enables you to display inline help icons.
To configure the UI Options, complete the following steps:
1.Select Settings from the menu.
2.In the SNMP Webagent box, click the UI Options link.
3.Remove the check in the check box beside Show Help Icons to no longer display inline help icons.
Select the check box beside Show Help Icons to display the inline help icons.
4.Click Save and Apply Changes.
System Management Homepage Box
The System Management Homepage Box provides links that enable you to configure HP SMH settings.
•UI Properties category
Sets options for the appearance of HP SMH.
•User Preferences category
Sets how HP SMH appears.
•Security
Displays links for setting the security options.
UI Properties category
The UI Properties category controls options for the appearance of HP SMH. UI Properties has controls for choosing:
•List view
•Icon view
•Box and item ordering type
◦By name
◦By status
•The last option is used by administrators to set custom images for the master header and Sign In Page and custom warning text for the Sign In Page.
System Management Homepage Box 27
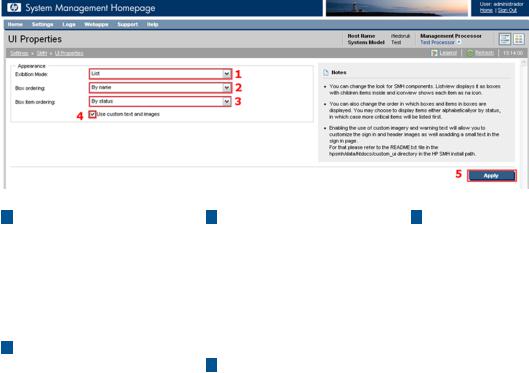
1Presentation Mode
Enables you to set the default presentation mode by selecting from a list. The
Presentation Mode has two options: List View and Icon View.
2Box Ordering
Determines the order that the boxes are shown. If you order by name, the items appear alphabetically. If you order by status, items appear from worst (critical) to best (normal).
3 Box Item Ordering |
5 Apply |
Determines the order that |
Save page data. |
items in boxes are shown. If you order by name, the items appear alphabetically. If you order by status, items appear from worst (critical), to best (normal).
4 Use Custom text and images
Enables the administrator to set custom warning messages in the Sign In page and imagery in the Sign In page and master header.
To set UI Properties, complete the following steps:
1.Select Settings from the menu.
2.In the System Management Homepage box, click the UI Properties link.
3.From the Presentation Mode list, Select List or Icon.
4.From the Box ordering list, select By status or By name.
5.From the Box item ordering dropdown list, select either By status or By name.
6.To use a custom image and custom warning, complete the following steps:
a.Place the image and text files in the following directories:
•SMHBaseDir/data/htdocs/custom_ui/logo0.jpg (for the loading screen image)
•SMHBaseDir/data/htdocs/custom_ui/logo1.jpg (for the master header image)
•SMHBaseDir/data/htdocs/custom_ui/warning1.txt (for the warning text) All three files must be present to view custom images and warning text.
b.Click the check box beside Use custom text and images.
7.Click Apply.
User Preferences category
The User Preferences category controls options for the appearance of HP SMH.
28 The Settings page
1 |
Presentation Mode |
3 Box Item Ordering |
4 Apply |
|
Enables you to set the |
Determines the order that |
Save page data. |
|
default presentation mode |
items in boxes are shown. If |
|
|
by selecting from a list. The |
you order by name, the |
|
|
Presentation Mode has two |
items appear alphabetically. |
|
|
options: List View and Icon |
If you order by status, items |
|
|
View. |
appear from worst (critical), |
|
2 |
Box Ordering |
to best (normal). |
|
Determines the order that the boxes are shown. If you order by name, the items appear alphabetically. If you order by status, items appear from worst (critical) to best (normal).
To set User Preferences, complete the following steps:
1.Select Settings from the menu.
2.In the System Management Homepage box, click the User Preferences link.
3.From the Presentation Mode list, select List or Icon.
4.From the Box ordering list, select By status or By name.
5.From the Box item ordering list, select By status or By name.
6.If you do not want the session to expire (in the case of HP-UX only), click the check box beside
Session Never Expires.
7.Click Apply.
NOTE: Each user is able to set their preferences for a session. Individual user preferences take precendence over settings in UI properties.
Security
The Security link provides options for you to manage the security of HP SMH:
•“Anonymous/Local Access category” (page 30)
•“IP Binding category” (page 31)
•“IP Restricted Login category” (page 32)
•“Local Server Certificate category” (page 34)
•“Port 2301 category” (page 35)
•“Timeouts category” (page 37)
•“Trust Mode category” (page 38)
System Management Homepage Box 29
Loading...