


t450 High Definition
Wireless Camcorder
(hp logo here)
t450
Digital Camcorder
User Manual
User’s Manual

Read This Before Using your t450 Video Camera
SAFETY INSTRUCTIONS
•Do not drop, puncture or disassemble the camera.
•Use the camera with care. Rough handling may damage internal components.
•Do not expose the camera to high temperatures. Avoid contact with water.
•Note that the body of this camera may become warm after extended operation.
•Use only accessories supplied, or recommended by HP.
•Only use the type of battery that came with your camera.
•Remove the battery if the camera will not be used for a long period of time.
Product Information
•Designsandspecificationsofthecameraaresubjecttochangewithoutnotice.Thisincludesprimaryproduct specifications, software, and this user’s manual.
•This User’s Manual is a general guide for reference only.
•The illustrations and screen shots in this manual may not be the same as those your camera.
For an electronic copy of the manual (PDF), or updates to this manual go to www.hp.com/support
EN
2
|
Contents |
|
Read This Before Using yout t450 Video Camera ....................................... |
2 |
|
Section 1 Getting to Know Your Camera.................................................. |
4 |
|
Section 2 |
Getting Started...................................................................... |
7 |
Section 3 |
Record Mode......................................................................... |
10 |
Section 4 |
Playback Mode..................................................................... |
22 |
Section 5 |
Camera Settings................................................................... |
27 |
Section 6 Wireless-to-PC, WiVideo Suite............................................... |
31 |
|
Section 7 Wireless-to-Mobile, WiVideo AP............................................. |
35 |
|
Section 8 Wireless-to-Cloud, Ustream................................................... |
39 |
|
Section 9 Viewing Photos and Videos on your TV.................................... |
43 |
|
Section 10 Viewing Photos and Videos on your PC................................... |
44 |
|
Section11 SpecificationsandSystemRequirements............................... |
45 |
|
Section 12 |
Troubleshooting.................................................................. |
47 |

Section 1
Getting to Know Your t450 Video Camera
Overview
Thet450videocameraisequippedwitha5MegaPixelsensoranditcanrecordH.264formatvideos.H.264 technology allows for extended video recording using less memory. The t450 can capture high quality imagesupto16mega-pixels,byinterpolation.Withit’scolortouch-screenLCDmonitor,youcaneasilyview your videos and photos.
The 3” LCD touch screen is an ideal platform for operating your camera. The menu options are accessible with your fingertip. With the touch panel, you can select options and settings directly and quickly.
The t450 video camera records HD video at a resolution of 1920x1080. You may connect the t450 to an HDTV using an HDMI cable, and playback your high-definition videos on the wide screen HDTV.
Thet450isequippedwithwireless(WiFi)moduleandanexclusivevideoapplication.Youcanbroadcast live streaming video onto the Ustream website. Your family and friends can watch your live video streaming from their smart phones, tablets, or personal computers.
10X optical zoom offers tremendous scene composition control for the videos and photos you take. Advanced options, such as Prerecord, Time Lapse, and Slow Motion, add fun to the recording process.
Built-inmemoryallowsyoutotakesomephotosandrecordlimitedvideoswithoutamemorycard.However, a the memory card slot allows your to significantly the storage capacity.
Thethreadmountingringonthelensfacilitatethemountingofscrew-onlensandfilterforadvancedeffects suchasanauxiliarywide-anglelensforprovidingbetterwide-angleshots,amacrolensforcapturingclose- up photos, or other special effects filters.
The t450 has an advanced uploading feature. With the exclusive built-in Internet Direct application, you can upload videos captured by the camera to a web site effortlessly .
Note
•A portion ofthe built-in memory is used for the camera’s Firmware codeand software.
•You may install the bundled software application for editing the videos on your PC.
•Toenablewirelessconnectivity toyourPC,installtheWiVideoprogram(forWindows® only)onyourPC and make sure the wireless LAN module ofyour computer is activated and working on your LAN
Standard Accessories
Unpack the package and ensure a list of standard accessories below are included:
•Mini USB Cable
•HDMI Cable
•AC charger/adaptor
•Lithium-ion Rechargeable Battery
•Quick Start Guide
•Lens Cover and Strap
EN
4
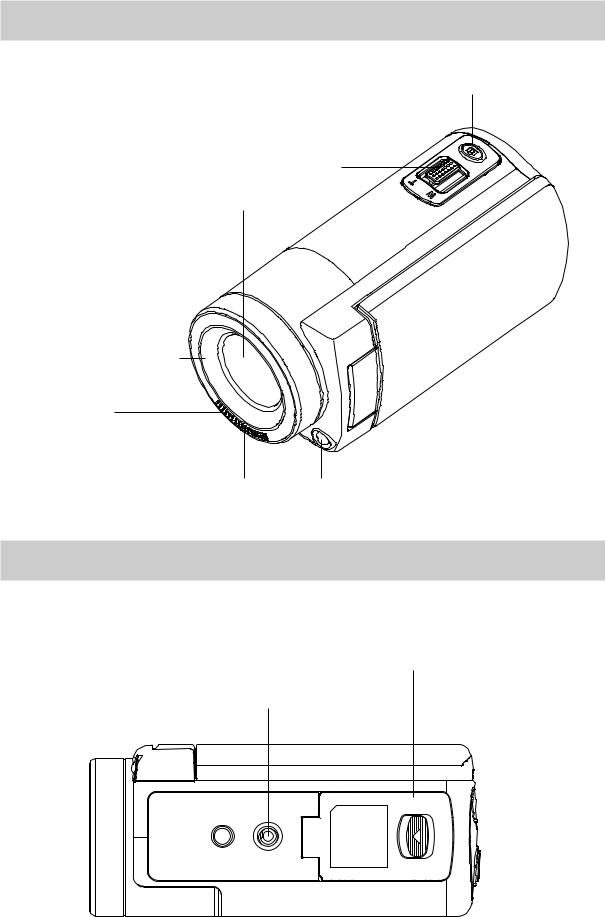
Front View
[Photo Button
[Tele/Wide Button
Optical Lens
External Lens Mount
Microphone
Indicator Light
Bottom View
Battery / SD Card Cover
Tripod Socket
EN
5

Side/Rear View
Indicator LED
Record Button
Mini USB Port
HDMI Port
Speaker
Power Button
Wireless (WiFi) On/Off Button
Touch Screen LCD |
Pause Button |
EN
6

Section 2
Getting Started
Loading the Battery
Before using the camera, you must insert the supplied Lithium-ion rechargeable battery.
1.Slide the latch and open the battery cover.
2.Insert the battery observing to the correct polarity ( + and -) as shown to the right.
3. Close the battery cover.
Note
•Different battery types and ambient operating temperatures will affect the battery performance.
•Never expose the battery to extreme heat. Do not dispose ofa battery by burning or by throwing it into a fire. Heat
can cause the battery to explode and/or release caustic liquid, which both may possibly cause serious injuries.
•Turn the power offand stop using the battery ifyou detect that the battery is excessively hot.
Charge the battery
Charge the battery fully before first use, using the AC charger or the provided USB cable. The LED on the back of the camera will blink as an indication of active charging. The LED will turn to a solid light, indicating that charging is complete. A full charge requires 4- 5 hours. The LED indicator light will turn off completely after 3 to 5 minutes. Actual charging time will vary depending upon battery condition and ambient temperature.
Note
•Never charge the battery in a way other than instructed. Otherwise, a fire or battery explosion may occur resulting in damage or serious injury.
•Use the AC adapter provided only with the proper power
supply voltage as indicated on the adapter.
• Using any other power supply voltage might cause damage |
|
to the camera or possibly electric shock. |
Adapter charging mode |
•When you need to disconnect power from the camera, be sure to unplug the power adapter from the electrical outlet.
• If a wireless connection is active, the camera will keep
running until the power runs out.
PC USB charging mode
EN
7

Inserting and Removing an SD Memory Card (Optional)
The t450 comes with limited internal memory which allows you to store some photos and videos. You can expand the memory capacity by using an optional SD memory card. Depending on the manner in which your local retailer bundled the camera package a memory card may have been included in the package. If not Secure Digital (SD) memory cards are commonly available at computer stores, large retailers, and drug stores
1.Insert an SD memory card into the slot until it clicks and locks in place. Refer to the figure below.
2.To remove an SD card from the camera, press the card inwards to release it.
3.When the card pops out, gently remove it from its slot.
4.Recommended memory capacity: 4 GB or more.
Note
•When a memory card is been inserted all new videos/photos will be stored on the card as opposed to the built-in memory.
•SD cards may be “locked” to protect data on the card from being erased. When an SD card is locked it is “read-only” while it is locked. No photos or videos can
be recorded when an SD card is locked. Make sure the lock is on the writeable unlocked position before recording any media.
EN
8
Turning the Video Camera On
•To turn on the camera:
1.Flip out the LCD panel and the camera will turn on automatically.
2.Or, press the Power Button for one second to turn it on.
3.After idle for 3 minutes, the camera will turn off automatically.
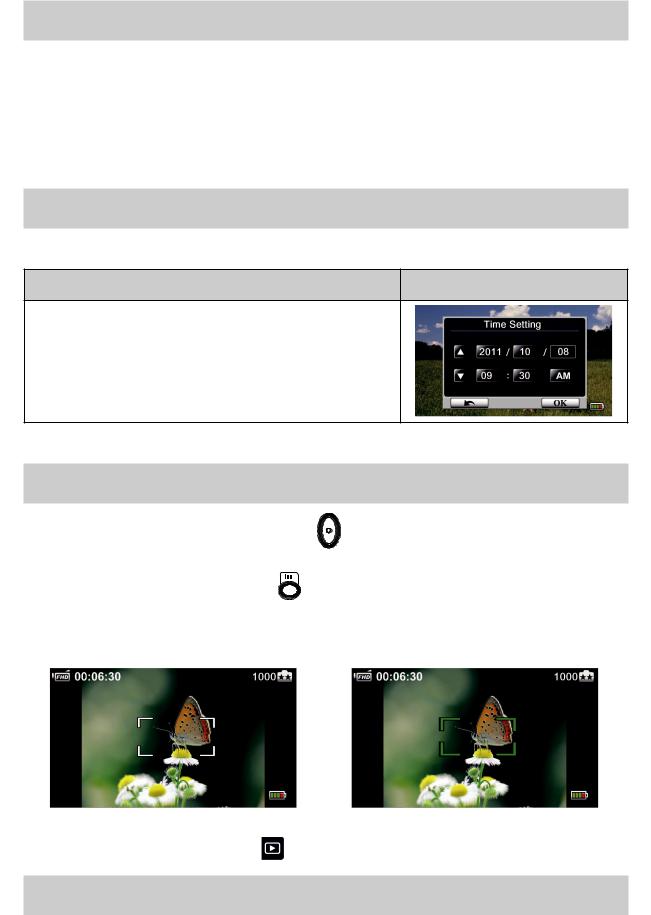
ConfiguringtheInitialDateandTimeSetup
• The time setting screen allows you to set the current date and time:
Operation |
Display Screen |
1.Touch the Year, Month, Day, Hour, Minute, and AM/PM icons to set them.
2.Adjust the numeric value by touching  /
/ 
3.Touch the OK icon (  ) to confirm the setting.
4.Touch the Exit icon (  ) to exit.
Getting Started
• |
To record a video: Press the Video Record Button |
to start recording video. To stop recording, press it |
|
|
again. |
|
|
• |
To pause recording: Press the Pause Button |
to pause recording. To continue the recording, press it |
|
|
again. |
|
|
•To take a photo: Press the Photo shutter Button halfway down until the focusing frame turns from white to green. Then, press it down fully to take your photo.
|
|
|
Focusing Frame: White |
|
Focusing Frame: Green |
• To view stored videos and photos: Touch |
on the screen to switch to the Playback |
|
TurningtheVideoCameraOff
•To turn off the camera: You can either press the Power Button  for one second, or you can close the LCD panel.
EN
9
Section 3
Record Mode
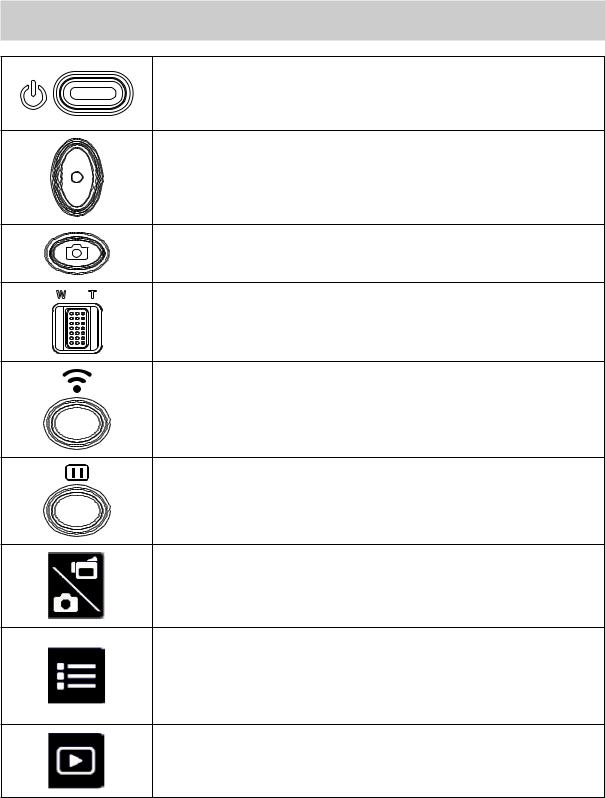
Button Function
Power
•Flip out the LCD panel or press the Power button.
•After idle for 3 minutes, the camera will turn off automatically.
Record
•Press to begin recording a video.
•Press again to stop recording.
Photo
•Press the photo shutter button to take a photo.
Telephoto/Wide
•T: Zoom in.
•W: Zoom out.
Wireless
•Touch to enable/disable wireless
Use the wireless function to link to a PC, Mobile device, or the Internet (Ustream).
Pause
•Press to pause recording.
•Press again to continue recording.
Video/Photo Mode
•Touch to switch between Video and Photo.
•The default mode (when the camera powers-up) is Video mode.
Menu
•Touch to open the option menu.
•Scroll left/right or touch  to navigate amongst the three menu pages (Video/Photo/Setting).
Playback
•Touch to go to the Playback Mode.
•View or delete recorded fiiles.
Note: The Video/Photo Mode, Menu, and Playback icons will auto-hide to the left of the screen. Simply touch the screen to display these icons.
EN
10

LCD Monitor Information
The indicators shown below may display on the LCD:
|
Video Resolution |
|
|
|
Full HD (1080p 30 fps) |
|
|
HD (720p 60 fps) |
|
|
HD (720p 30 fps) |
|
|
VGA (640×480) |
(1) |
|
|
|
|
Slow Motion (Record video at QVGA resolution.) |
|
Photo Resolution |
|
|
|
16MP (by interpolation) |
|
|
5MP (native resolution) |
|
|
3MP |
(2) |
00:06:30 |
Remaining recording time at the current video resolution |
1000 |
|
|
|
Remaining number of images at the current resolution |
|
(3) |
|
Date Printing (Photo Recording Only) |
EN
11

|
Scene Mode |
|
|
|
|
|
|
Soft Skin. This mode will soften skin tones to help hide blemishes. |
|
|
|
|
|
Night. Use this feature to help lighten up recording in night or dark |
|
|
environments. |
(4) |
|
Backlight. Use this mode to help lighten up objects in front of sunlight |
|
backgrounds. |
|
|
|
|
|
|
Black/White. Use this mode to record video in Black and White. |
|
|
|
|
|
Classic. Use this feature to record video to look like old fashion movies. |
|
|
|
|
|
Negative. Use this to record video in negative film appearance. |
|
|
|
|
White Balance |
|
|
|
|
|
|
Daylight |
(5) |
|
|
|
Fluorescent |
|
|
|
|
|
|
|
|
|
Tungsten |
|
|
|
(6) |
|
Face Tracking On (Photo only) |
|
|
|
(7) |
|
Video Stabilization (Video recording only) |
|
|
|
(8) |
|
Time Lapse (Video recording Only) |
|
|
|
|
|
Digital Light On |
(9) |
|
|
|
Illumination Light On |
|
|
|
|
|
|
|
(10) |
|
SD Card Inserted |
|
|
|
|
|
Zoom indicator: |
|
|
1 X to 50X (10 X Optical zoom and 5 X Digital zoom) |
(11) |
|
|
|
Motion Detection (Video Recording Only) |
|
|
|
|
|
|
|
(12) |
|
Self-timer enabled |
|
|
|
|
|
Wireless Signal Strength |
(13) |
|
|
|
Wireless to PC, Mobile, or Internet/Cloud is on |
|
|
|
|
|
|
|
EN
12
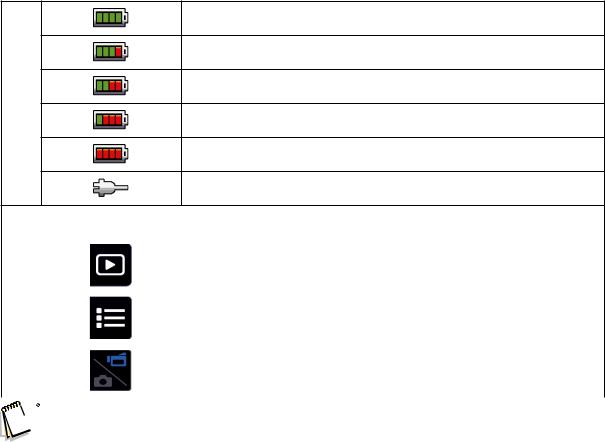
Battery: full power
Battery: high power
Battery: medium power
(14)
Battery: low power
Battery: no power
AC power mode
On-screen touchable function icon
(15) |
|
Playback Mode On |
|
|
|
(16) |
|
Menu On |
|
|
|
(17) |
|
Switch between Video and Photo Mode |
|
|
|


 Note
Note
•Tap on the screen to close the touch sensitive function bar. Tap again to show the bar.
•The Time Lapse and Slow Motion functions cannot be used simultaneously. They are mutually exclusive. (IfTime Lapse is on , then Slow Motion must be off; or vice versa.)
•The Motion Detect, Slow Motion, and Time Lapse functions cannot be used simultaneously. They are mutually exclusive. (IfMotion Detect is enabled, the Slow Motion and Time Lapse functions will be disabled.)
•The Motion Detect and Zoom functions cannot be used simultaneously.
•The Motion Detect, Time Lapse, Slow Motion, and Pause functions cannot be used simultaneously.
•When charging the camera, you can turn on the camera and it will be usable. Battery charging will take longer, however.
•The wireless signal strength indicates the connection strength between your wireless access point and your camera. Some access points may not allow you to connect to their network. Networks may require a password, or a MAC address, or may require other authorization. Check with your LAN administrator or service provider.
•Ifrequired, the MAC address ofyour camera may be found in the Settings Menu. Go to the settings menu and press the “ID” icon.
EN
13

Video Recording
•Press the Video Button to start recording. When a video is being recorded, a time indicator will display on the LCD monitor (
  00:06:30 ). To stop recording, press it again.
•To pause recording, press the Pause Button  . To continue recording, press it again.
•Touch  on the screen to view the recorded video
•Four video resolution and frame-rate settings are available:
Video Quality
Full HD (1080p 30 fps)
HD (720p 60 fps)
HD (720p 30 fps)
VGA (640×480)

 Note
Note
•The resolution ofan image captured during video recording is the same as the video resolution.
•When the Slow Motion function is activated, the video resolution is QVGA and the field-of-view (angle) is reduced.
Photo Capture
•Press the Photo Shutter Button  halfway down until the focusing frame turns from white to green. Then, press it fully down to take your photo.
•Touch  on the screen to view your photo.
•Three photo resolution settings are available:
Image Quality
16 Mega Pixels (by interpolation)
5 Mega Pixels (native sensor resolution)
3 Mega Pixels
Using the Zoom Function
•Optical zoom magnifies the scene of interest when recording videos or taking photos.
1.To zoom in/out, press the Tele/Wide Button  . The camera first zooms in using its optical zoom lens. When the optical zoom lens is at it maximum extent zooming stops temporarily. Press and hold the Tele Button (T) again if you wish zoom in (digitally) beyond the optical zoom range. The digital zoom is activated and zooming continues digitally.
2.Zoom can be set from 1 X to 50 X (10X Optical zoom and then 5 X Digital zoom).
EN
14
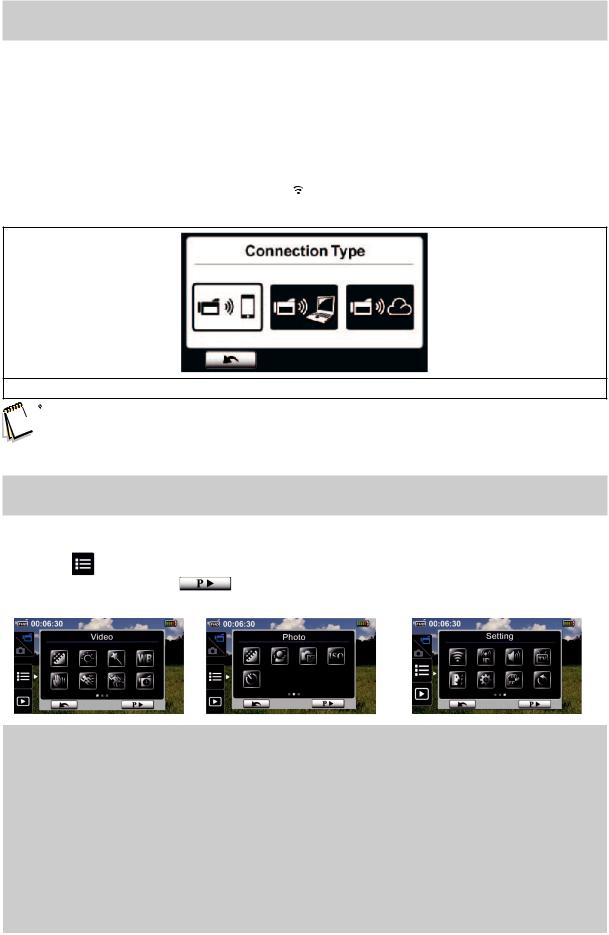
Using a Wireless Connection
• There are three Wireless connection options:
1.Connect to a PC which is also connected wirelessly to the same segment of your LAN
2.Connect to a handheld mobile device such as an iPhone or Android with wireless access ability
3.ConnecttotheInternet(theCloud)tostreamlivevideofromyourcameratotheinternetforbroadcastonthe Ustream website .
•To start a wireless connection press the Wireless  button.
Three Connection Types

 Note
Note
•For more detail, please refer to sections 6, 7, and 8.
Recording Options Menus
Menu Flow |
|
|
1. |
Touch |
on the screen to open the Menus. |
2. |
Scroll left / right or touch on the menu screen to navigate amongst the three pages. |
|
|
|
|
|
|
|
|
Video |
|
Photo |
|
Setting* |
|
|
|
|
|
|
• |
Video Resolution |
• |
Photo Resolution |
• |
Wireless Connection Type |
• |
Light |
• |
Face Tracking |
• |
Wireless ID |
• |
Scene |
• |
Date Printing |
• |
Menu Sound |
• |
White Balance |
• |
ISO |
• |
TV System |
• |
Video Stabilization |
• |
Self-Timer |
• |
Language |
• |
Motion Detect |
|
|
• |
Time Setting |
• |
Slow Motion |
|
|
• |
Format memory |
• |
Time Lapse |
|
|
• |
Default Setting |
|
|
|
|
|
|
* Refer to Section 5 for more detail ofthe Setting menu.
EN
15
 Loading...