


 Loading...
HP StorageWorks Ultrium
SCSI Tape Drives
User Guide
Installation, Operating and Troubleshooting information for Ultrium half-height SCSI tape drives
Part number: EH841-90903
First edition: September 2006
Legal and notice information
© Copyright 2006 Hewlett-Packard Development Company, L.P.
Hewlett-Packard Company makes no warranty of any kind with regard to this material, including, but not limited to, the implied warranties of merchantability and fitness for a particular purpose. Hewlett-Packard shall not be liable for errors contained herein or for incidental or consequential damages in connection with the furnishing, performance, or use of this material.
This document contains proprietary information, which is protected by copyright. No part of this document may be photocopied, reproduced, or translated into another language without the prior written consent of Hewlett-Packard. The information is provided “as is” without warranty of any kind and is subject to change without notice. The only warranties for HP products and services are set forth in the express warranty statements accompanying such products and services. Nothing herein should be construed as constituting an additional warranty. HP shall not be liable for technical or editorial errors or omissions contained herein.
Linear Tape-Open, LTO, LTO Logo, Ultrium and Ultrium Logo are trademarks of Certance, HP and IBM in the US, other countries or both.
Patented under one or more of U.S. Patents Nos. 5,003,307; 5,016,009; 5,463,390; 5,506,580; held by Hi/fn, Inc. Microsoft, Windows, Windows NT, and Windows XP are U.S. registered trademarks of Microsoft Corporation. UNIX® is a registered trademark of The Open Group.
HP StorageWorks Ultrium SCSI Tape Drives User Guide

Contents
About this guide . . . . . . . . . . . . . . . . . . . . . . . . . . . . . . . . . . . . . . . . . 7
Related documentation . . . . . . . . . . . . . . . . . . . . . . . . . . . . . . . . . . . . . . . . . . . 7 Registering your tape drive . . . . . . . . . . . . . . . . . . . . . . . . . . . . . . . . . . . . . . . . 7 HP technical support . . . . . . . . . . . . . . . . . . . . . . . . . . . . . . . . . . . . . . . . . . . . 7 HP-authorized reseller . . . . . . . . . . . . . . . . . . . . . . . . . . . . . . . . . . . . . . . . . 8 Helpful web sites . . . . . . . . . . . . . . . . . . . . . . . . . . . . . . . . . . . . . . . . . . . . 8
1 Before you start . . . . . . . . . . . . . . . . . . . . . . . . . . . . . . . . . . . . . . 9
HP StorageWorks Ultrium models . . . . . . . . . . . . . . . . . . . . . . . . . . . . . . . . . . . 9 Which operating systems are supported? . . . . . . . . . . . . . . . . . . . . . . . . . . . . . 10 How do I connect the drive to my server? . . . . . . . . . . . . . . . . . . . . . . . . . . . . . 10 Internal drives. . . . . . . . . . . . . . . . . . . . . . . . . . . . . . . . . . . . . . . . . . . . . . 11 External drives . . . . . . . . . . . . . . . . . . . . . . . . . . . . . . . . . . . . . . . . . . . . . 11 Removable drives . . . . . . . . . . . . . . . . . . . . . . . . . . . . . . . . . . . . . . . . . . . 11 Why is the SCSI bus type important? . . . . . . . . . . . . . . . . . . . . . . . . . . . . . . . . 11 How can I check the SCSI bus type and SCSI ID? . . . . . . . . . . . . . . . . . . . . . . . 12 Using the HP StorageWorks Tape CD-ROM . . . . . . . . . . . . . . . . . . . . . . . . . . . 12 Usage models . . . . . . . . . . . . . . . . . . . . . . . . . . . . . . . . . . . . . . . . . . . . . . . . 13 Other usage models . . . . . . . . . . . . . . . . . . . . . . . . . . . . . . . . . . . . . . . . . 14
2 Drivers and backup software. . . . . . . . . . . . . . . . . . . . . . . . . . . . 15
Install drivers. . . . . . . . . . . . . . . . . . . . . . . . . . . . . . . . . . . . . . . . . . . . . . . . . 15 Installing on Windows. . . . . . . . . . . . . . . . . . . . . . . . . . . . . . . . . . . . . . . . 15 Installing on UNIX. . . . . . . . . . . . . . . . . . . . . . . . . . . . . . . . . . . . . . . . . . . 15 Installing on IA64 . . . . . . . . . . . . . . . . . . . . . . . . . . . . . . . . . . . . . . . . . . . 15 Upgrade backup software . . . . . . . . . . . . . . . . . . . . . . . . . . . . . . . . . . . . . . . 15
3 Installing an internal Ultrium tape drive. . . . . . . . . . . . . . . . . . . . . 17
Check the drive’s SCSI ID . . . . . . . . . . . . . . . . . . . . . . . . . . . . . . . . . . . . . . . . 17 Prepare mounting bay . . . . . . . . . . . . . . . . . . . . . . . . . . . . . . . . . . . . . . . . . . 18 Attach mounting hardware . . . . . . . . . . . . . . . . . . . . . . . . . . . . . . . . . . . . . . . 19 HP ProLiant servers . . . . . . . . . . . . . . . . . . . . . . . . . . . . . . . . . . . . . . . . . . 20 Other servers . . . . . . . . . . . . . . . . . . . . . . . . . . . . . . . . . . . . . . . . . . . . . . 21 Install drive . . . . . . . . . . . . . . . . . . . . . . . . . . . . . . . . . . . . . . . . . . . . . . . . . . 22 Attach power and SCSI cables . . . . . . . . . . . . . . . . . . . . . . . . . . . . . . . . . . . . 23 Where should the SCSI terminator be? . . . . . . . . . . . . . . . . . . . . . . . . . . . . 23 Secure the drive . . . . . . . . . . . . . . . . . . . . . . . . . . . . . . . . . . . . . . . . . . . . . . 25 Mounting hardware used (HP ProLiant) . . . . . . . . . . . . . . . . . . . . . . . . . . . . 25 No mounting hardware used . . . . . . . . . . . . . . . . . . . . . . . . . . . . . . . . . . . 25
HP StorageWorks Ultrium SCSI Tape Drives User Guide |
3 |
4 Installing an external Ultrium tape drive. . . . . . . . . . . . . . . . . . . . . 27
Check the drive’s SCSI ID . . . . . . . . . . . . . . . . . . . . . . . . . . . . . . . . . . . . . . . 27 Connect the SCSI cable . . . . . . . . . . . . . . . . . . . . . . . . . . . . . . . . . . . . . . . . . 28 Does the tape drive need a terminator? . . . . . . . . . . . . . . . . . . . . . . . . . . . 29 Connect the power cable . . . . . . . . . . . . . . . . . . . . . . . . . . . . . . . . . . . . . . . . 30
5 Installing a removable Ultrium tape drive. . . . . . . . . . . . . . . . . . . . 31
Which rackmount systems can I use?. . . . . . . . . . . . . . . . . . . . . . . . . . . . . . . . 31 Electrical specification . . . . . . . . . . . . . . . . . . . . . . . . . . . . . . . . . . . . . . . 31 Airflow requirements . . . . . . . . . . . . . . . . . . . . . . . . . . . . . . . . . . . . . . . . 31 How do I connect the drive to my server? . . . . . . . . . . . . . . . . . . . . . . . . . . 31 Install the drive . . . . . . . . . . . . . . . . . . . . . . . . . . . . . . . . . . . . . . . . . . . . . . . 32 Set the drive’s SCSI ID . . . . . . . . . . . . . . . . . . . . . . . . . . . . . . . . . . . . . . . . . . 33 Why does the tape drive need a terminator? . . . . . . . . . . . . . . . . . . . . . . . . 34 Replacing the drive . . . . . . . . . . . . . . . . . . . . . . . . . . . . . . . . . . . . . . . . . . . . 35
6 Verify installation . . . . . . . . . . . . . . . . . . . . . . . . . . . . . . . . . . . . 37
7 Operating your tape drive. . . . . . . . . . . . . . . . . . . . . . . . . . . . . . 39
Front panel . . . . . . . . . . . . . . . . . . . . . . . . . . . . . . . . . . . . . . . . . . . . . . . . . 39 Loading and unloading . . . . . . . . . . . . . . . . . . . . . . . . . . . . . . . . . . . . . . . . . 40 Inserting cartridges. . . . . . . . . . . . . . . . . . . . . . . . . . . . . . . . . . . . . . . . . . 40 Removing cartridges. . . . . . . . . . . . . . . . . . . . . . . . . . . . . . . . . . . . . . . . . 41 Removing power from the drive . . . . . . . . . . . . . . . . . . . . . . . . . . . . . . . . . . . 41
8 Use the correct media . . . . . . . . . . . . . . . . . . . . . . . . . . . . . . . . . 43
Data cartridges. . . . . . . . . . . . . . . . . . . . . . . . . . . . . . . . . . . . . . . . . . . . . . . 43 Write protecting cartridges . . . . . . . . . . . . . . . . . . . . . . . . . . . . . . . . . . . . . . 44 Cleaning cartridges. . . . . . . . . . . . . . . . . . . . . . . . . . . . . . . . . . . . . . . . . . . . 46 To clean the tape drive . . . . . . . . . . . . . . . . . . . . . . . . . . . . . . . . . . . . . . . 46 Handling cartridges . . . . . . . . . . . . . . . . . . . . . . . . . . . . . . . . . . . . . . . . . . . 46 Operating and storage environment . . . . . . . . . . . . . . . . . . . . . . . . . . . . . . . . 47
9 Using HP OBDR . . . . . . . . . . . . . . . . . . . . . . . . . . . . . . . . . . . . . 49
Compatibility . . . . . . . . . . . . . . . . . . . . . . . . . . . . . . . . . . . . . . . . . . . . . . . . 49 What does HP OBDR do? . . . . . . . . . . . . . . . . . . . . . . . . . . . . . . . . . . . . . . . 49 Remote disaster recovery (ProLiant servers only) . . . . . . . . . . . . . . . . . . . . . . . . 49 Testing for compatibility. . . . . . . . . . . . . . . . . . . . . . . . . . . . . . . . . . . . . . . . . 50 Running HP OBDR . . . . . . . . . . . . . . . . . . . . . . . . . . . . . . . . . . . . . . . . . . . . 50
If restore fails. . . . . . . . . . . . . . . . . . . . . . . . . . . . . . . . . . . . . . . . . . . . . . 51
10 Diagnostic Tools and Performance . . . . . . . . . . . . . . . . . . . . . . . . 53
Diagnostic tools . . . . . . . . . . . . . . . . . . . . . . . . . . . . . . . . . . . . . . . . . . . . . . 53 Troubleshooting with Library & Tape Tools . . . . . . . . . . . . . . . . . . . . . . . . . 53 Performance Assessment Tools . . . . . . . . . . . . . . . . . . . . . . . . . . . . . . . . . . . . 54 Optimizing performance . . . . . . . . . . . . . . . . . . . . . . . . . . . . . . . . . . . . . . 54 Is the tape drive on a dedicated SCSI bus? . . . . . . . . . . . . . . . . . . . . . . . . . 54 Can your system deliver the required performance? . . . . . . . . . . . . . . . . . . . 54
4
11 Troubleshooting . . . . . . . . . . . . . . . . . . . . . . . . . . . . . . . . . . . . . 57
General Procedure . . . . . . . . . . . . . . . . . . . . . . . . . . . . . . . . . . . . . . . . . . . . 57 Understanding LED sequences . . . . . . . . . . . . . . . . . . . . . . . . . . . . . . . . . . . . 58 Problems with cartridges . . . . . . . . . . . . . . . . . . . . . . . . . . . . . . . . . . . . . . . . 61 The cartridge is jammed . . . . . . . . . . . . . . . . . . . . . . . . . . . . . . . . . . . . . . 62 The drive will not accept the cartridge (or ejects it immediately) . . . . . . . . . . . 62
12 Replacing an internal tape drive . . . . . . . . . . . . . . . . . . . . . . . . . . 65
To disconnect your drive . . . . . . . . . . . . . . . . . . . . . . . . . . . . . . . . . . . . . . . . 65 To reconnect your tape drive . . . . . . . . . . . . . . . . . . . . . . . . . . . . . . . . . . . . . 65
A SCSI configuration guide. . . . . . . . . . . . . . . . . . . . . . . . . . . . . . . 67
SCSI in HP StorageWorks Ultrium devices . . . . . . . . . . . . . . . . . . . . . . . . . . . . 67 SCSI terminology . . . . . . . . . . . . . . . . . . . . . . . . . . . . . . . . . . . . . . . . . . . . . 67 Setting up the SCSI bus . . . . . . . . . . . . . . . . . . . . . . . . . . . . . . . . . . . . . . . . . 68 SCSI ID numbers . . . . . . . . . . . . . . . . . . . . . . . . . . . . . . . . . . . . . . . . . . . 68 Identifying SCSI IDs. . . . . . . . . . . . . . . . . . . . . . . . . . . . . . . . . . . . . . . . . . . . 68 Setting the SCSI id on HP StorageWorks drives . . . . . . . . . . . . . . . . . . . . . . . . 69 SCSI termination . . . . . . . . . . . . . . . . . . . . . . . . . . . . . . . . . . . . . . . . . . . . . . 69 Internal drives . . . . . . . . . . . . . . . . . . . . . . . . . . . . . . . . . . . . . . . . . . . . . 70 External drives . . . . . . . . . . . . . . . . . . . . . . . . . . . . . . . . . . . . . . . . . . . . . 71 Removable drives. . . . . . . . . . . . . . . . . . . . . . . . . . . . . . . . . . . . . . . . . . . 72 SCSI cables . . . . . . . . . . . . . . . . . . . . . . . . . . . . . . . . . . . . . . . . . . . . . . . . . 72 Cable length . . . . . . . . . . . . . . . . . . . . . . . . . . . . . . . . . . . . . . . . . . . . . . 72 Cable quality. . . . . . . . . . . . . . . . . . . . . . . . . . . . . . . . . . . . . . . . . . . . . . 73 Note on SE and LVD interfaces . . . . . . . . . . . . . . . . . . . . . . . . . . . . . . . . . 73
HP StorageWorks Ultrium SCSI Tape Drives User Guide |
5 |
6

About this guide
This guide provides information about:
•Installing the HP StorageWorks Ultrium SCSI half-height tape drive
•Using the HP StorageWorks Ultrium SCSI half-height tape drive
•Troubleshooting the HP StorageWorks Ultrium SCSI half-height tape drive
Related documentation
In addition to this guide, please refer to other documents for this product:
•‘Start here’ poster for an overview of the installation information in this guide (available in English, French, German and Japanese)
•Regulatory booklet
•Safety booklet
These and other HP documents can be found on the HP web site: http://www.docs.hp.com.
Registering your tape drive
Once you have installed and tested your HP StorageWorks Ultrium tape drive, please take a few minutes to register your product. You can register via the web (www.register.hp.com).
To ensure your registration is complete, there are a number of questions on the electronic form that are mandatory. Other questions are optional. However, the more you feel able to complete, the better HP can meet your needs.
HP technical support
Telephone numbers for worldwide technical support are listed on the HP support web site: http://www.hp.com/support/.
Collect the following information before calling:
•Technical support registration number (if applicable)
•Product serial numbers
•Product model names and numbers
•Applicable error messages
•Operating system type and revision level
•Detailed, specific questions
For continuous quality improvement, calls may be recorded or monitored.
HP strongly recommends that customers sign up online using the Subscriber's choice web site at http://www.hp.com/go/e-updates.
HP StorageWorks Ultrium SCSI Tape Drives User Guide |
7 |
•Subscribing to this service provides you with e-mail updates on the latest product enhancements, newest versions of drivers, and firmware documentation updates as well as instant access to numerous other product resources.
•After signing up, you can quickly locate your products by selecting Business support and then Storage under Product Category.
HP-authorized reseller
For the name of your nearest HP-authorized reseller:
•In the United States, call 1-800-345-1518.
•Elsewhere, visit the HP web site: http://www.hp.com. Then click Contact HP to find locations and telephone numbers.
Helpful web sites
For third-party product information, see the following HP web sites:
•http://www.hp.com
•http://www.hp.com/go/connect/
•http://www.hp.com/go/storage/
•http://www.hp.com/support/
•http://www.docs.hp.com
8

1 Before you start
HP StorageWorks Ultrium models
This guide describes how to install and operate the following HP StorageWorks Ultrium tape drive models:
•HP StorageWorks Ultrium 920 internal, external and removable tape drives, These are Ultra 320 SCSI devices with a maximum burst transfer speed of 320 MB/second. They can write uncompressed data at up to 60 MB/s (216 GB/hour) or compressed data at up to 120 MB/s (432 GB/hour), assuming 2:1 compression.
•HP StorageWorks Ultrium 448 internal, external and removable tape drives. These are Ultra 160 SCSI devices with a maximum burst transfer speed of 160 MB/second. They can write uncompressed data at up to 24 MB/s (86 GB/hour) or compressed data at up to 48 MB/s (172 GB/hour), assuming 2:1 compression.
•HP StorageWorks Ultrium 232 internal and external tape drives. These are Ultra 160 SCSI devices with a maximum burst transfer speed of 160 MB/second. They can write uncompressed data at up to 16 MB/s (59.6 GB/hour) or compressed data at up to 32 MB/s (119.2 GB/hour), assuming 2:1 compression.
For a detailed product specification, please refer to our World Wide Web site (www.hp.com).
HP StorageWorks Ultrium SCSI Tape Drives User Guide |
9 |
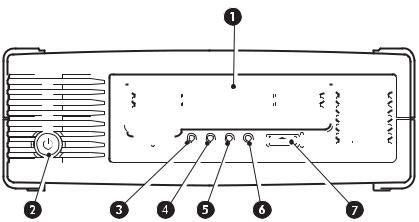
Figure 1 Front view of half-height Ultrium tape drive
|
|
|
|
|
|
|
|
|
|
|
|
|
|
|
|
|
|
|
|
|
|
|
|
|
|
|
|
|
|
|
|
|
|
|
|
|
|
|
|
|
|
|
|
|
|
|
|
|
|
|
|
|
|
|
|
|
|
|
|
|
|
|
|
|
|
|
|
|
|
|
|
|
|
|
|
|
|
|
|
|
|
|
|
|
|
|
|
|
|
|
|
|
|
|
|
|
|
|
|
|
|
|
|
|
|
|
|
|
|
|
|
|
|
|
|
|
|
|
|
|
|
|
|
|
|
|
|
|
|
|
|
|
|
|
|
|
|
|
|
|
|
|
|
|
|
|
|
|
|
|
|
|
|
|
|
|
|
|
|
|
|
|
|
|
|
|
|
|
|
|
|
|
|
|
|
|
|
|
|
|
|
|
|
|
|
|
|
|
|
|
|
|
|
|
|
|
|
|
|
|
|
|
|
|
|
|
|
|
|
|
|
|
|
|
|
|
|
|
|
|
|
|
|
|
|
|
|
|
|
|
|
|
|
|
|
|
|
|
|
|
|
|
|
|
|
|
|
|
|
|
|
|
|
|
|
|
|
|
|
|
|
|
|
|
|
|
|
|
|
|
|
|
|
|
|
|
|
|
|
|
|
|
|
|
|
|
|
|
|
|
|
|
|
|
|
|
|
|
|
|
|
|
|
|
|
|
|
|
|
|
|
|
|
|
|
|
|
|
|
|
|
|
|
|
|
|
|
|
|
|
|
|
|
|
|
|
|
|
|
|
|
|
|
|
|
|
|
|
|
|
|
|
|
|
|
|
|
|
|
|
|
|
|
|
|
|
|
|
|
|
|
|
|
|
|
|
|
|
|
|
|
|
|
|
|
|
|
|
|
|
|
|
|
|
|
|
|
|
|
|
|
|
|
|
|
|
|
|
|
|
|
|
|
|
|
|
|
|
|
|
|
|
|
|
|
|
|
|
|
|
|
|
|
|
|
|
|
|
|
|
|
|
|
|
|
|
|
|
|
|
|
|
|
|
|
|
|
|
|
|
|
|
|
|
|
|
|
|
|
|
|
|
|
1 |
|
|
|
|
|
|
Cassette door |
|
|
||||||||||||||||||||||||||||||||
|
|
|
|
|
|
|
|
|
|
|
|
|
|
|
|
|
|
|
|
|
|
|
|
|
|
|
|
|
|
|
|
|
|
|
|
|
|
|
|
|
|
|
|
2 |
|
|
|
|
|
|
On/Off switch (external drives only) |
|
|
||||||||||||||||||||||||||||||||
|
|
|
|
|
|
|
|
|
|
|
|
|
|
|
|
|
|
|
|
|
|
|
|
|
|
|
|
|
|
|
|
|
|
|
|
|
|
|
|
|
|
|
|
3 |
|
|
|
|
|
|
Clean LED |
|
|
||||||||||||||||||||||||||||||||
|
|
|
|
|
|
|
|
|
|
|
|
|
|
|
|
|
|
|
|
|
|
|
|
|
|
|
|
|
|
|
|
|
|
|
|
|
|
|
|
|
|
|
|
4 |
|
|
|
|
|
|
Tape LED |
|
|
||||||||||||||||||||||||||||||||
|
|
|
|
|
|
|
|
|
|
|
|
|
|
|
|
|
|
|
|
|
|
|
|
|
|
|
|
|
|
|
|
|
|
|
|
|
|
|
|
|
|
|
|
5 |
|
|
|
|
|
|
Drive LED |
|
|
||||||||||||||||||||||||||||||||
|
|
|
|
|
|
|
|
|
|
|
|
|
|
|
|
|
|
|
|
|
|
|
|
|
|
|
|
|
|
|
|
|
|
|
|
|
|
|
|
|
|
|
|
6 |
|
|
|
|
|
|
Ready LED |
|
|
||||||||||||||||||||||||||||||||
|
|
|
|
|
|
|
|
|
|
|
|
|
|
|
|
|
|
|
|
|
|
|
|
|
|
|
|
|
|
|
|
|
|
|
|
|
|
|
|
|
|
|
|
7 |
|
|
|
|
|
|
Eject button |
|
|
||||||||||||||||||||||||||||||||
|
|
|
|
|
|
|
|
|
|
|
|
|
|
|
|
|
|
|
|
|
|
|
|
|
|
|
|
|
|
|
|
|
|
|
|
|
|
|
|
|
|
|
Which operating systems are supported?
HP StorageWorks Ultrium drives can be connected to servers running under Windows®, NetWare, HP-UX, UNIX, Tru64, Linux and other major operating systems. Refer to the “HP StorageWorks Tape Software Compatibility” topic on our World Wide Web site (www.hp.com/go/connect) for the most recent information about the operating system versions that are supported.
How do I connect the drive to my server?
The following guidelines apply:
•You will need a properly installed and configured SCSI host bus adapter (HBA) or a built-in SCSI controller on your server and a suitably-rated SCSI cable. This should be an Ultra320 or Ultra160 SCSI HBA. See also ”Why is the SCSI bus type important?” on page 11.
•For optimum performance the drive should be the only device on the SCSI bus.
•Always terminate the SCSI bus. Ultrium internal and removable tape drives require terminators; external tape drives are auto terminating, as long as they are on a dedicated SCSI bus or the last device on a chain.
10 Before you start
•Do not attach the drive to the same SCSI bus as your disk drive or to a RAID controller (unless you are connecting to a ProLiant server with a Smart Array 6i RAID controller).
 NOTE: Always refer to www.hp.com/go/connect to ensure that you are connecting to a supported HBA running the recommended firmware version.
Internal drives
The tape drive is installed into a spare, industry-standard, 5¼-inch, half-height drive bay in your server (or HP Rack-Mount Option Kit) and is attached to the SCSI bus of the host server. Use an LVDS-compatible ribbon cable to connect the tape drive to a spare 68-pin, high density (HD), wide SCSI connector on the host server. For most servers we recommend that you use the terminated SCSI ribbon cable supplied with the drive.
See also ”Installing an internal Ultrium tape drive” on page 17.
External drives
Your tape drive is supplied with a 68-pin, wide, VHD-to-HD SCSI cable to attach to the host server. See also ”Installing an external Ultrium tape drive” on page 27.
Check the usage models on ”Usage models” on page 13. This shows how the HP StorageWorks Ultrium tape drive can be used in different system architectures.
Removable drives
The individual tape drives are connected to their host server via the high-density LVD/SE SCSI connectors on the back of the tape array. They do not require any SCSI cables to plug into the tape array. However, cabling and terminators are required to connect the tape array with the SCSI host. See also ”Installing a removable Ultrium tape drive” on page 31.
Why is the SCSI bus type important?
The SCSI bus type determines the speed at which data can be transferred between devices on the bus and the maximum length of cable that can be used. HP Ultrium 920 drives support a burst transfer rate of 320 MB/sec. HP Ultrium 448 and 232 drives support a burst transfer rate of 160 MB/sec. To benefit from this level of performance, it is important to ensure that the drives are connected to a SCSI bus of a similar or higher specification. This means that you need:
•An Ultra320 bus for HP Ultrium 920 drives
An Ultra160 or Ultra320 SCSI bus for HP Ultrium 448 and 232 drives
If you attach the drive to a lower specification SCSI bus, it will still work but data may not be transferred as quickly.
•LVD-rated SCSI cabling and terminators. The LVD interface enables the data to be transferred at the drive's maximum rate.
HP StorageWorks Ultrium SCSI Tape Drives User Guide 11
Table 1 Supported SCSI bus types
Ultra320 LVD |
Yes. This is a recommended configuration for Ultrium 920, Ultrium 448 and |
|
Ultrium 232 tape drives. |
|
Do not daisy chain Ultrium 920 tape drives and do not daisy chain Ultrium |
|
448 and Ultrium 232 tape drives with Ultra320 devices. |
|
|
Ultra160 LVD |
Yes. This is a recommended configuration for Ultrium 448 and 232 tape |
|
drives. It is an acceptable configuration for Ultrium 920 tape drives. |
|
Up to two Ultrium 448 and 232 tape drives may be daisy chained. Do not |
|
daisy chain Ultrium 920 tape drives. |
|
|
Ultra2 LVD |
Yes. This is acceptable for one Ultrium 448 drive per bus or two Ultrium |
|
232 drives per bus. |
|
|
Ultra wide LVD and |
These are not recommended configurations as they will restrict |
single-ended |
performance. |
|
|
Ultra narrow, |
No. This will severely restrict performance and you will need a suitable |
single-ended |
cable or adapter. |
|
|
High Voltage |
No. The drive will not work and you may damage the drive or controller |
Differential |
|
|
|
How can I check the SCSI bus type and SCSI ID?
For many operating systems, you can install and run HP Library & Tape Tools from either the
HP StorageWorks Tape CD-ROM or www.hp.com/support/tapetools to check your server’s current SCSI configuration (see also ”Diagnostic tools” on page 53). This will provide information about the SCSI bus and the SCSI IDs in use.
Using the HP StorageWorks Tape CD-ROM
The HP StorageWorks Tape CD-ROM is a central source of information about your tape drive with utilities for getting the best performance from your tape drive.
Use the HP StorageWorks Tape CD-ROM to check installation, as described in this guide, and to verify and troubleshoot performance after installation. It helps you to:
•Install your product, which includes access to drivers, an installation check, and performance information and tools
•Learn about your product
•Register your product
•Buy media online
•Troubleshoot with HP Library & Tape Tools.
12 Before you start

Usage models
HP StorageWorks Ultrium tape drives can be used in a stand-alone or network environment. However, they should always be directly attached to suitably-rated SCSI connector on the storage server.
Figure 2 usage model
AServer
BTape drive
HP StorageWorks Ultrium SCSI Tape Drives User Guide 13

The following table shows the recommended usage models and ”Optimizing performance” on page 54 provides further information about factors that can affect performance.
Table 2 Recommended usage models
Direct Attach, |
Across the Network, |
|||||||||||||||||||||||||||||||||||
single storage server |
single storage server, multiple clients |
|||||||||||||||||||||||||||||||||||
|
|
|
|
|
|
|
|
|
|
|
|
|
|
|
|
|
|
|
|
|
|
|
|
|
|
|
|
|
|
|
|
|
|
|
|
|
|
|
|
|
|
|
|
|
|
|
|
|
|
|
|
|
|
|
|
|
|
|
|
|
|
|
|
|
|
|
|
|
|
|
|
|
|
|
|
|
|
|
|
|
|
|
|
|
|
|
|
|
|
|
|
|
|
|
|
|
|
|
|
|
|
|
|
|
|
|
|
|
|
|
|
|
|
|
|
|
|
|
|
|
|
|
|
|
|
|
|
|
|
|
|
|
|
|
|
|
|
|
|
|
|
|
|
|
|
|
|
|
|
|
|
|
|
|
|
|
|
|
|
|
|
|
|
|
|
|
|
|
|
|
|
|
|
|
|
|
|
|
|
|
|
|
|
|
|
|
|
|
|
|
|
|
|
|
|
|
|
|
|
|
|
|
|
|
|
|
|
|
|
|
|
|
|
|
|
|
|
|
|
|
|
|
|
|
|
|
|
|
|
|
|
|
|
|
|
|
|
|
|
|
|
|
|
|
|
|
|
|
|
|
|
|
|
|
|
|
|
|
|
|
|
|
|
|
|
|
|
|
|
|
|
|
|
|
|
|
|
|
|
|
|
|
|
|
|
|
|
|
|
|
|
|
|
|
|
|
|
|
|
|
|
|
|
|
|
|
|
|
|
|
|
|
|
|
|
|
|
|
|
|
|
|
|
|
|
|
|
|
|
|
|
|
|
|
|
|
|
|
|
|
|
|
|
|
|
|
|
|
|
|
|
|
|
|
|
|
|
|
|
|
|
|
|
|
|
|
|
|
|
|
|
|
|
|
|
|
|
|
|
|
|
|
|
|
|
|
|
|
|
|
|
|
|
|
|
|
|
|
|
|
|
|
|
|
|
|
|
|
|
|
|
|
|
|
|
|
|
|
|
|
|
|
|
|
|
|
|
|
|
|
|
|
|
|
|
|
|
|
|
|
|
|
|
|
|
|
|
|
|
|
|
|
|
|
|
|
|
|
|
|
|
|
|
|
|
|
|
|
|
|
|
|
|
|
|
|
|
|
|
|
|
|
|
|
|
|
|
|
|
|
|
|
|
|
|
|
|
|
|
|
|
|
|
|
|
|
|
|
|
|
|
|
|
|
|
|
|
|
|
|
|
|
|
|
|
|
|
|
|
|
|
|
|
|
|
|
|
|
|
|
|
|
|
|
|
|
|
|
|
|
|
|
|
|
Ultrium 920 |
Recommended |
Not recommended |
|
|
|
Ultrium 448 |
Recommended |
Recommended, anything less than Gigabit Ethernet |
|
|
may limit performance |
|
|
|
Ultrium 232 |
Recommended |
Recommended, anything less than 100 Base-T Ethernet |
|
|
may limit performance |
A RAID disk subsystem is recommended for all usage models.
A single spindle disk will not be able to deliver good data throughput for an Ultrium 920 at any compression ratio. To maximize the capability of your Ultrium 920 drive, utilize aggregated disk sources (RAID) with multiple disk spindles.
A single disk, particularly a fast disk such as a 15K RPM drive, will be sufficient for Ultrium 448 and Ultrium 232 tape drives, but be aware of other factors that can affect performance—such as, compressibility of data, disk fragmentation and the number of files. See also ”Optimizing performance” on page 54.
Use our free performance assessment tools, which are available stand-alone or integrated into HP Library & Tape Tools, to check tape performance and test whether your disk subsystem can supply data at the optimum transfer rate. You can also use these tools to calibrate your restore performance and maximal tape performance with more compressible data.
Other usage models
The tape drive may work with other usage models, such as network attach storage (NAS) and storage area networks (SAN), but HP does not currently provide technical support for installing and using stand-alone Ultrium tape drives with these architectures. Similarly, connection to fibre channel may be possible, if you purchase and install a fibre channel/SCSI bridge, but it is not currently a supported option. Please check www.hp.com/go/connect for the latest supported configurations.
14 Before you start

2 Drivers and backup software
Install drivers
Installing on Windows
The driver available from Microsoft update is acceptable, but the HP driver provides better support for all the features of your new tape drive. It is regularly updated and is available on the HP StorageWorks CD-ROM or on the HP Support web site at www.hp.com/support.
 NOTE: The HP driver is suitable for use in most applications, but refer also to the documentation of your software application to ensure you are using the recommended driver.
Installing on UNIX
The recommended backup applications use the operating system’s standard, built-in device drivers. To upgrade drivers we recommend that you patch to the latest version of the operating system or configure device files, as described in the UNIX Configuration Guide on the CD-ROM.
Installing on IA64
If you are installing on an IA64 system, such as an HP Integrity server, check www.hp.com/go/connect for the latest information on the availability of backup application upgrades and drivers.
Upgrade backup software
It is important to check www.hp.com/go/connect for software compatibility and install any recommended upgrades.
For optimum performance it is important to use a backup application that is appropriate for your system’s configuration. In a direct attach configuration, where the tape drive is attached to a standalone server, you can use backup software that is designed for a single server environment. In network configurations you will need backup software that supports enterprise environments. HP, Symantec, Legato, Yosemite and Computer Associates all provide suitable products. Further details about these and other products that may be appropriate can be found on our connectivity web site.
1.Go to our connectivity web site: www.hp.com/go/connect and select tape backup.
2.Select software compatibility.
3.Select your combination of operating system and tape drive model in the table. A list of supported backup applications is displayed. This will also tell you whether your configuration is compatible with HP One-Button Disaster Recovery, HP OBDR. (All HP StorageWorks Ultrium tape drives support HP OBDR. However, you can only use this feature if your system configuration and backup application also support it. See ”Compatibility” on page 49.)
4.Make sure you have a backup application that supports HP StorageWorks Ultrium tape drives and download any upgrades or patches, if required.
HP StorageWorks Ultrium SCSI Tape Drives User Guide 15
16 Drivers and backup software

3 Installing an internal Ultrium tape drive
If you are installing an external Ultrium tape drive, please refer to Chapter 4. If you are installing a removable Ultrium tape drive, please refer to Chapter 5.
Check the drive’s SCSI ID
Your HP StorageWorks Ultrium drive is shipped with a default SCSI ID of 3. Each device on the SCSI bus must have an unique SCSI ID number. The drive can be assigned any unused ID between 0 and 15. Do not use SCSI ID 7, which is reserved for the SCSI controller. SCSI ID 0 is typically assigned to the boot disk and should also not be used unless the tape drive is on a dedicated SCSI bus.
 CAUTION: Static electricity can damage electronic components. Always wear an antistatic wriststrap if possible. If not, to equalize the electromagnetic charges, touch a bare metal part of the server (such as the back plate) before you remove the tape drive from its bag.
Figure 3 Checking the SCSI ID
HP StorageWorks Ultrium SCSI Tape Drives User Guide 17

1.Determine whether you need to change the SCSI ID from the default of 3.
For most operating systems you can run HP Library & Tape Tools from the
HP StorageWorks Tape CD-ROM to check your server’s current SCSI configuration (see
page 53). This will provide information about the SCSI bus and the SCSI IDs in use. To do this, select the ‘troubleshoot with L&TT’ option from the CD-ROM menu. (See also ”Troubleshooting with Library & Tape Tools” on page 53.)
The UNIX Configuration Guide on the HP StorageWorks Tape CD-ROM also contains instructions on how to determine the SCSI IDs of existing devices on UNIX servers.
2.Change the tape drive’s SCSI ID, if necessary.
The SCSI ID is set using jumpers on a set of pins at the rear of the drive, as shown in figure 3. Use tweezers or small pliers to move the jumpers to the pattern corresponding to the ID you want. Spare jumpers are provided with the drive.
Prepare mounting bay
For many servers, no mounting tray or rails are required. Devices simply slide into the server’s chassis and are fixed with screws. Other servers have built-in trays or rails.
Rail kits for a number of industry-standard servers may be available. For more details refer to: www.hp.com/go/connect.
Some servers use non-standard mounting rails and do not include spares. If this is the case with your system, you will have to order these accessories from the server manufacturer before you can install the tape drive.
 WARNING! To avoid personal injury or damage to the server or tape drive, ensure that the server is disconnected from the mains power supply while you install the drive.
 CAUTION: Static electricity can damage electronic components. Always wear an antistatic wriststrap if one is available. If not, after you have disconnected power from the server and removed the cover, touch a bare metal part of the chassis. Similarly, touch a bare metal part of the drive before installing it.
1.Assemble the necessary tools and materials:
•Phillips screwdriver
•Flat-bladed screwdriver (if your server uses slotted screws)
•Torx screwdriver (if your server uses torx screws)
•Your server manuals (for reference during installation)
2.Perform a normal system shutdown and turn off the server and any connected peripherals.
3.Remove the cover and front panel from the server, as detailed in your server’s documentation.
As you work inside the server, you may have to disconnect other signal cables or power cables from other devices to maneuver the new drive into place. If you have to do this, make a note of their position and connections so you can put them back correctly later.
18 Installing an internal Ultrium tape drive
NOTE: The server must provide forced cooling and be capable of drawing 6 cfm (0.17 m3/minute or 10.08 m3/hour) of air through the tape drive at 40o C ambient operation. This reduces to 4 cfm at 35o C ambient operation. Ensure that empty bays have the appropriate blanking plates installed so that airflow is maintained.
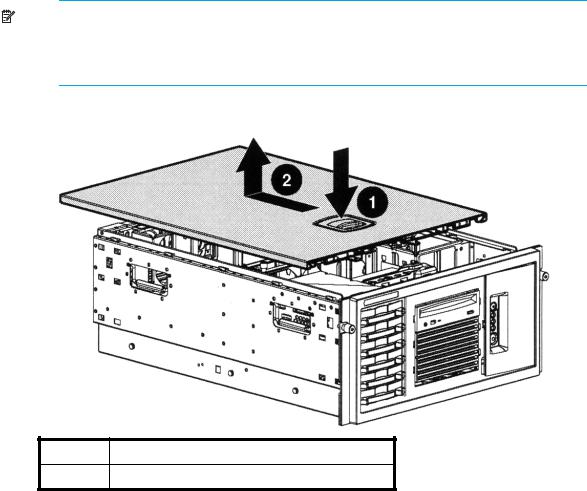
Figure 4 Removing cover from ProLiant ML370 server
1Release catch
2Push cover back and lift off
4.Remove the filler panel from a spare 5¼-inch bay of your server, as described in your server’s documentation. With some servers, such as the HP AlphaServer ES40, you must also remove the half-height device divider.
5.You are now ready to install your tape drive.
Attach mounting hardware
If your server requires special rails or other hardware to install the tape drive, mount them on the tape drive now.
If your server does not require special mounting hardware, proceed to ”Install drive” on page 22 now.
HP StorageWorks Ultrium SCSI Tape Drives User Guide 19
 CAUTION: The Ultrium half-height drive only allows 3 mm of the engagement of the screw into the drive. If you remove an existing drive, do not assume the screws that you remove are the correct length for your new Ultrium drive. Always use the screws supplied with your Ultrium drive.
HP ProLiant servers
 NOTE: If mounting hardware is supplied with your tape drive, it may not be exactly the same as shown in the illustrations.
Different models of server require different mounting methods. The server may also incorporate a locking mechanism to hold the tape drive in place. See ”Secure the drive” on page 25.
Please check your HP ProLiant server documentation to ascertain the correct method of mounting, and to check whether mounting hardware is provided with the server.
Mounting rails
Some HP ProLiant servers, such as ML570, require mounting rails. These may be metal or plastic rails attached to the server's drive bay filler panel.
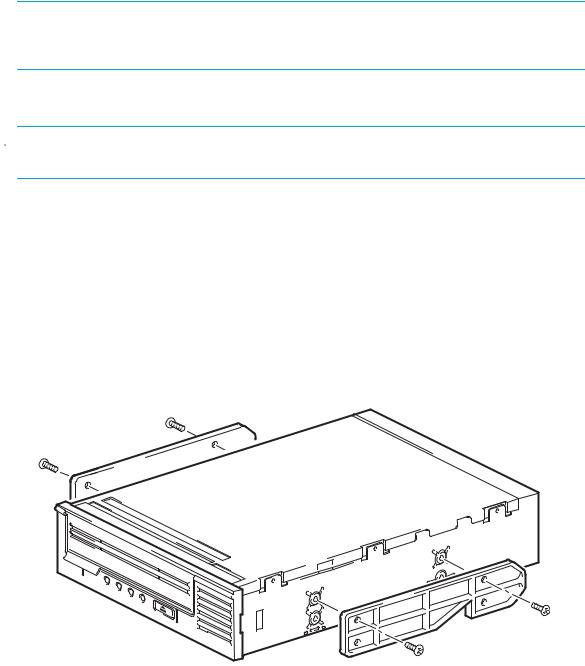
Use a regular Phillips screwdriver to attach the appropriate rails. Use the M3 screws provided with the tape drive, in the screw pack labeled General Mounting Screws’, as shown in Figure 5a.
Figure 5 Attaching mounting rails in a typical HP ProLiant ML570
Ensure you do use the M3 screws provided. The rails may be attached to the filler panel by screws of a different thread/size type and these should not be used. If in doubt, refer to your HP ProLiant server documentation.
20 Installing an internal Ultrium tape drive
Mounting screws
Other HP ProLiant server models, such as ML350 and ML370, only require the use of special locating screws with no mounting rail.
Use a T8 Torx screwdriver to attach the appropriate screws. You may need to purchase the M3 screws separately. Position the screws, as shown in Figure 6.
Figure 6 Attaching locating screws in a typical HP ProLiant 350 or 370
|
|
|
|
|
|
|
|
|
|
|
|
|
|
|
|
|
|
|
|
|
|
|
|
|
|
|
|
|
|
|
|
|
|
|
|
|
|
|
|
|
|
|
|
|
|
|
|
|
|
|
|
|
|
|
|
|
|
|
|
|
|
|
|
|
|
|
|
|
|
|
|
|
|
|
|
|
|
|
|
|
|
|
|
|
|
|
|
|
|
|
|
|
|
|
|
|
|
|
|
|
|
|
|
|
|
|
|
|
|
|
|
|
|
|
|
|
|
|
|
|
|
|
|
|
|
|
|
|
|
|
|
|
|
|
|
|
|
|
|
|
|
|
|
|
|
|
|
|
|
|
|
|
|
|
|
|
|
|
|
|
|
|
|
|
|
|
|
|
|
|
|
|
|
|
|
|
|
|
|
|
|
|
|
|
|
|
|
|
|
|
|
|
|
|
|
|
|
|
|
|
|
|
|
|
|
|
|
|
|
|
|
|
|
|
|
|
|
|
|
|
|
|
|
|
|
|
|
|
|
|
|
|
|
|
|
|
|
|
|
|
|
|
|
|
|
|
|
|
|
|
|
|
|
|
|
|
|
|
|
|
|
|
|
|
|
|
|
|
|
|
|
|
|
|
|
|
|
|
|
|
|
|
|
|
|
|
|
|
|
|
|
|
|
|
|
|
|
|
|
|
|
|
|
|
|
|
|
|
|
|
|
|
|
|
|
|
|
|
|
|
|
|
|
|
|
|
|
|
|
|
|
|
|
|
|
|
|
|
|
|
|
|
|
|
|
|
|
|
1 |
|
|
M3 mounting screws |
|
|
|
|
|
|
|
|
|
|
||||||||||||||
|
|
|
|
|
|
|
|
|
|
|
|
|
|
|
|
|
|
|
|
|
|
|
|
|
|
|
|
|
|
2 |
|
|
M3 offset mounting screws |
|
|
|
|
|
|
|
|
|
|
||||||||||||||
|
|
|
|
|
|
|
|
|
|
|
|
|
|
|
|
|
|
|
|
|
|
|
|
|
|
|
|
|
•HP ProLiant ML350: Use the metal shims and screw pack labeled ‘ProLiant 350’. These have a thicker head than the general mounting screws.
•HP ProLiant ML370: Use the metal shims and screw pack labeled ‘ProLiant 370’. These have a thick offset piece and a thicker head than the general mounting screws.
Other servers
1.Attach the appropriate mounting hardware. Refer to the manufacturer’s documentation for instructions.
•If you are installing on a server that requires a tray, place the tape drive in the tray.
•Some servers have snap-on mounting rails attached to the filler panel. These can be removed and attached to the tape drive with screws.
HP StorageWorks Ultrium SCSI Tape Drives User Guide 21

Install drive
1.Slide the tape drive into the open bay, aligning the tray or rails with the slots in the bay, as shown in Figure 7.
Figure 7 Installing tape drive
If your server does not use mounting hardware, check that the holes in the chassis are aligned with the holes in the side of the tape drive.
Do not secure the drive at this point because you may have to move the drive to get the cables into place.
22 Installing an internal Ultrium tape drive
Loading...