


 Loading...
HP DesignJet T200/T600 Printer series User Guide

© Copyright 2020 HP Development Company,
L.P.
Edition 1
Legal notices
The information contained herein is subject to change without notice.
The only warranties for HP products and services are set forth in the express warranty statement accompanying such products and services. Nothing herein should be construed as constituting an additional warranty. HP shall not be liable for technical or editorial errors or omissions contained herein.
IPv6-ready
Wi-Fi certified
Trademarks
Adobe®, Acrobat®, and Adobe Photoshop® are trademarks of Adobe Systems Incorporated.
ENERGY STAR and the ENERGY STAR mark are registered U.S. trademarks.
Microsoft® and Windows® are U.S. registered trademarks of Microsoft Corporation.
Apple and AirPrint are trademarks of Apple Inc., registered in the U.S. and other countries.

Table of contents
1 Introduction ............................................................................................................................................................................................... |
1 |
Safety precautions ................................................................................................................................................................... |
1 |
Using this guide ........................................................................................................................................................................ |
2 |
Printer models .......................................................................................................................................................................... |
3 |
Main features ............................................................................................................................................................................. |
4 |
Main components ..................................................................................................................................................................... |
4 |
Turn the printer on and off ...................................................................................................................................................... |
7 |
Front panel ................................................................................................................................................................................ |
8 |
Printer solutions ....................................................................................................................................................................... |
9 |
Mobile Printing ........................................................................................................................................................................ |
11 |
Enable email printing ............................................................................................................................................................. |
11 |
Reports .................................................................................................................................................................................... |
11 |
2 Connecting the printer ........................................................................................................................................................................... |
13 |
Choose which connection method to use .......................................................................................................................... |
13 |
1. Connect the printer to your network .............................................................................................................................. |
14 |
2. Set up your device ............................................................................................................................................................. |
15 |
Other options .......................................................................................................................................................................... |
15 |
3 Setting up the printer ............................................................................................................................................................................. |
17 |
Introduction ............................................................................................................................................................................. |
17 |
Automatic firmware update .................................................................................................................................................. |
17 |
Turn email notifications on and off ...................................................................................................................................... |
17 |
Turn alerts on and off ............................................................................................................................................................ |
17 |
Control access to the Embedded Web Server ................................................................................................................... |
19 |
Set Windows driver preferences .......................................................................................................................................... |
19 |
4 Personalizing the printer ....................................................................................................................................................................... |
20 |
Change the language of the front-panel display .............................................................................................................. |
20 |
Access the Embedded Web Server ...................................................................................................................................... |
20 |
Change the language of the Embedded Web Server ....................................................................................................... |
20 |
Access the HP Utility (Windows only) .................................................................................................................................. |
21 |
Change the language of the HP Utility ................................................................................................................................ |
21 |
Change the sleep mode setting ........................................................................................................................................... |
21 |
Configure power button mode ............................................................................................................................................. |
21 |
Change the auto-off setting ................................................................................................................................................. |
21 |
ENWW |
iii |
Change the front-panel display brightness ....................................................................................................................... |
22 |
Configure network settings .................................................................................................................................................. |
22 |
Configure firewall settings .................................................................................................................................................... |
23 |
Embedded Web Server security settings ........................................................................................................................... |
24 |
5 Paper handling ........................................................................................................................................................................................ |
26 |
General paper-loading advice .............................................................................................................................................. |
26 |
Load a roll onto the spindle .................................................................................................................................................. |
26 |
Load a roll into the printer .................................................................................................................................................... |
27 |
Unload a roll ............................................................................................................................................................................ |
28 |
Load a single sheet ................................................................................................................................................................ |
28 |
Unload a single sheet ............................................................................................................................................................ |
29 |
Use the multi-sheet tray ....................................................................................................................................................... |
29 |
View information about the paper ...................................................................................................................................... |
30 |
Maintain paper ........................................................................................................................................................................ |
31 |
Change the drying time ......................................................................................................................................................... |
31 |
Turn the automatic cutter on and off .................................................................................................................................. |
31 |
Form feed and form feed and cut ....................................................................................................................................... |
32 |
6 Printing ..................................................................................................................................................................................................... |
33 |
Mobile Printing ........................................................................................................................................................................ |
33 |
Print using Wi-Fi Direct .......................................................................................................................................................... |
34 |
Easy printing with HP Click ................................................................................................................................................... |
36 |
Printing from an application using a printer driver ........................................................................................................... |
37 |
7 Practical printing examples .................................................................................................................................................................. |
43 |
Print a draft for revision with the correct scale ................................................................................................................. |
43 |
Print a PDF multipage job from Adobe Acrobat Reader or Adobe Acrobat Pro ............................................................ |
43 |
Print a document with the correct colors ........................................................................................................................... |
44 |
Print a project using Autodesk AutoCAD ............................................................................................................................ |
48 |
Print a presentation ............................................................................................................................................................... |
50 |
Print and scale from Microsoft Office .................................................................................................................................. |
52 |
8 Handling ink cartridges and printhead ................................................................................................................................................ |
54 |
About the ink cartridges ........................................................................................................................................................ |
54 |
Storage of anonymous usage information ........................................................................................................................ |
54 |
Check ink cartridge status .................................................................................................................................................... |
54 |
Replace an ink cartridge ........................................................................................................................................................ |
55 |
About the printhead ............................................................................................................................................................... |
56 |
Safe mode ............................................................................................................................................................................... |
56 |
iv |
ENWW |
9 Maintaining the printer .......................................................................................................................................................................... |
58 |
Check printer status ............................................................................................................................................................... |
58 |
Take care of the printer ......................................................................................................................................................... |
58 |
Clean the exterior of the printer .......................................................................................................................................... |
58 |
Print Quality Diagnostic Report ............................................................................................................................................ |
58 |
Clean the printhead ................................................................................................................................................................ |
59 |
Align the printhead ................................................................................................................................................................ |
60 |
Replace the printhead ........................................................................................................................................................... |
61 |
Clean the encoder strip ......................................................................................................................................................... |
63 |
Recalibrate the paper advance ............................................................................................................................................ |
64 |
Move or store the printer ...................................................................................................................................................... |
65 |
Firmware update .................................................................................................................................................................... |
65 |
Software update ..................................................................................................................................................................... |
65 |
Printer maintenance kits ....................................................................................................................................................... |
65 |
HP Support Assistant ............................................................................................................................................................. |
66 |
10 Accessories ............................................................................................................................................................................................ |
67 |
How to order supplies and accessories .............................................................................................................................. |
67 |
Introduction to the accessories ............................................................................................................................................ |
68 |
11 Troubleshooting paper issues ............................................................................................................................................................ |
69 |
Paper cannot be loaded successfully .................................................................................................................................. |
69 |
Paper type is not in the driver .............................................................................................................................................. |
71 |
Printer printed on the wrong paper type ........................................................................................................................... |
72 |
Paper mismatch ..................................................................................................................................................................... |
73 |
Roll has jammed ..................................................................................................................................................................... |
73 |
Prevent a jam .......................................................................................................................................................................... |
74 |
Multi-sheet tray has jammed ............................................................................................................................................... |
75 |
A strip stays on the output tray and generates jams ....................................................................................................... |
77 |
Printer displays out of paper when paper is available ..................................................................................................... |
77 |
Prints do not fall neatly into the bin .................................................................................................................................... |
77 |
Sheet stays in the printer when the print has been completed ..................................................................................... |
77 |
Paper is cut when the print has been completed ............................................................................................................. |
78 |
Cutter does not cut well ........................................................................................................................................................ |
78 |
Roll is loose on the spindle ................................................................................................................................................... |
78 |
12 Troubleshooting print-quality issues ................................................................................................................................................ |
79 |
General printing advice ......................................................................................................................................................... |
79 |
Horizontal lines across the image (banding) ..................................................................................................................... |
79 |
Lines are too thick, too thin or missing ............................................................................................................................... |
80 |
ENWW |
v |
Lines appear stepped or jagged .......................................................................................................................................... |
80 |
Lines print double or in the wrong colors ........................................................................................................................... |
80 |
Lines are discontinuous ........................................................................................................................................................ |
81 |
Lines are blurred ..................................................................................................................................................................... |
81 |
Line lengths are inaccurate ................................................................................................................................................... |
82 |
Whole image is blurry or grainy ........................................................................................................................................... |
82 |
Paper is not flat ...................................................................................................................................................................... |
83 |
Print is scuffed or scratched ................................................................................................................................................. |
83 |
Ink marks on the paper ......................................................................................................................................................... |
84 |
Black ink comes off when you touch the print .................................................................................................................. |
84 |
Edges of objects are stepped or not sharp ........................................................................................................................ |
84 |
Edges of objects are darker than expected ....................................................................................................................... |
85 |
Vertical lines of different colors ........................................................................................................................................... |
85 |
White spots on the print ........................................................................................................................................................ |
85 |
Colors are inaccurate ............................................................................................................................................................. |
85 |
Colors are fading .................................................................................................................................................................... |
86 |
Image is incomplete (clipped at the bottom) ..................................................................................................................... |
86 |
Image is clipped ...................................................................................................................................................................... |
86 |
Some objects are missing from the printed image .......................................................................................................... |
87 |
If you still have a problem ..................................................................................................................................................... |
87 |
13 Troubleshooting ink cartridge and printhead issues ...................................................................................................................... |
88 |
Cannot insert an ink cartridge .............................................................................................................................................. |
88 |
Ink cartridge status messages ............................................................................................................................................. |
88 |
Cannot insert the printhead ................................................................................................................................................. |
88 |
14 Troubleshooting data communication issues ................................................................................................................................. |
89 |
Communication failures between computer and printer ................................................................................................. |
89 |
Wired network issues ............................................................................................................................................................ |
90 |
Wireless network issues ........................................................................................................................................................ |
90 |
Mobile Printing issues ............................................................................................................................................................ |
93 |
Network configuration page ................................................................................................................................................. |
93 |
15 Troubleshooting general printer issues ........................................................................................................................................... |
95 |
Printer does not start ............................................................................................................................................................ |
95 |
Printer does not print ............................................................................................................................................................ |
95 |
Printer seems slow ................................................................................................................................................................ |
95 |
Front panel is frozen .............................................................................................................................................................. |
96 |
Cannot access the Embedded Web Server ........................................................................................................................ |
96 |
Restore factory defaults and settings ................................................................................................................................ |
96 |
vi |
ENWW |
Alerts ........................................................................................................................................................................................ |
97 |
16 Front-panel error messages .............................................................................................................................................................. |
98 |
Text messages and numerical error codes ........................................................................................................................ |
98 |
17 HP Customer Care .............................................................................................................................................................................. |
100 |
Introduction .......................................................................................................................................................................... |
100 |
HP Professional Services .................................................................................................................................................... |
100 |
Customer Self Repair .......................................................................................................................................................... |
101 |
Contact HP Support ............................................................................................................................................................. |
101 |
18 Printer specifications ......................................................................................................................................................................... |
103 |
Functional specifications .................................................................................................................................................... |
103 |
Mobile Printing specifications ............................................................................................................................................ |
104 |
Physical specifications ........................................................................................................................................................ |
105 |
Memory specifications ........................................................................................................................................................ |
105 |
Power specifications ............................................................................................................................................................ |
105 |
Ecological specifications ..................................................................................................................................................... |
106 |
Environmental specifications ............................................................................................................................................. |
106 |
Acoustic specifications ........................................................................................................................................................ |
106 |
Glossary ..................................................................................................................................................................................................... |
107 |
Index ........................................................................................................................................................................................................... |
110 |
ENWW |
vii |
viii |
ENWW |
1Introduction
Essential safety precautions and an overview of the printer's main features, components, software options and printing possibilities.
Safety precautions
Ensure proper use of the printer to prevent the printer from being damaged.
Follow these precautions at all times:
●Use the power supply voltage specified on the label. Avoid overloading the printer's electrical outlet with multiple devices.
●Do not disassemble or repair the printer yourself. Contact your local HP Service Representative for service, see HP Support Center on page 100.
●Use only the electrical cord supplied by HP with the printer. Do not damage, cut, or repair the power cord. A damaged power cord can cause fire or electric shock. Replace a damaged power cord with an HP-approved power cord.
●Do not allow metal or liquids (except those used in HP Cleaning Kits) to touch the internal parts of the printer. Doing so may cause fire, electric shock, or other serious hazards.
●For printers without a stand:
●Use a support strong enough to hold at least twice the total combined weight of the printer, supplies, and accessories.
●Ensure the printer fits fully within the support's surface.
●Ensure that the support is used exclusively for the printer.
●Ensure that all the printer rubber bearings are located fully within the support's surface.
●Follow the assembly instructions that came with the printer, and keep them available to ensure safe usage.
●Power off the printer and unplug the power cord from the power outlet in any of the following cases:
●When placing your hands inside the printer
●If there is smoke or an unusual smell coming from the printer
●If the printer is making an unusual noise not heard during normal operation
ENWW |
Safety precautions 1 |
●A piece of metal or a liquid (not part of cleaning and maintenance routines) touches internal parts of the printer
●During an electrical storm (thunder and lightning)
●During a power failure
Using this guide
This guide can be downloaded from the HP Support Center.
See http://www.hp.com/go/DesignJetT200/manuals or http://www.hp.com/go/DesignJetT600/manuals.
Introduction
This is a brief introduction to the printer and its documentation for new users.
Use and maintenance
To help you carry out normal printer procedures.
Topics include the following:
●Connecting the printer on page 13
●Setting up the printer on page 17
●Personalizing the printer on page 20
●Paper handling on page 26
●Printing on page 33
●Mobile Printing on page 33
●Practical printing examples on page 43
●Handling ink cartridges and printhead on page 54
●Maintaining the printer on page 58
Troubleshooting
To help you solve problems that may occur while printing.
Included are the following topics:
●Troubleshooting paper issues on page 69
●Troubleshooting print-quality issues on page 79
●Troubleshooting ink cartridge and printhead issues on page 88
●Troubleshooting data communication issues on page 89
●Troubleshooting general printer issues on page 95
●Text messages and numerical error codes on page 98
2 Chapter 1 Introduction |
ENWW |
Accessories, support and specifications
Reference information, including customer care, the printer specifications, and part numbers for paper types, ink supplies, and accessories.
Accessories on page 67, HP Customer Care on page 100, and Printer specifications on page 103.
Glossary
The glossary contains definitions of printing and HP terms used in this documentation.
Glossary on page 107.
Index
In addition to the table of contents, there is an alphabetical index to help you to find topics quickly.
Warnings and cautions
Symbols are used in this manual to ensure the proper use of the printer and to prevent the printer from being damaged.
Follow the instructions marked with these symbols:
 WARNING! Failure to follow the guidelines marked with this symbol could result in serious personal injury or death.
CAUTION: Failure to follow the guidelines marked with this symbol could result in minor personal injury or damage to the printer.
Printer models
This guide covers various printer models. There may be slight differences depending on the model. Printer models are normally referred to by their short names for brevity:
Full name |
Short name |
|
|
HP DesignJet T210 24-in Printer |
T210 |
|
|
HP DesignJet T230 24-in Printer |
T230 |
|
|
HP DesignJet T250 24-in Printer |
T250 |
|
|
HP DesignJet T630 24-in Printer |
T630-24 |
|
|
HP DesignJet T650 24-in Printer |
T650-24 |
|
|
HP DesignJet T630 36-in Printer |
T630-36 |
|
|
HP DesignJet T650 36-in Printer |
T650-36 |
|
|
 NOTE: The images appearing in this User Guide may not look the same as the printer you have.
ENWW |
Printer models 3 |
Main features
HP DesignJet T200/T600 Printer series are four color inkjet printers, designed to deliver CAD / Construction drawings as well as high quality graphics.
Paper up to 610 mm (24 in) or 914 mm (36) wide can be used to print on. Some major features of the printer are shown below:
●Print resolution of up to 2400 × 1200 dpi using the Best print-quality option, the Maximum Detail option and photo paper
●The printer can be controlled from its front panel or from a remote computer using the Embedded Web Server, HP DesignJet Utility*. It can also be controlled from your tablet, or from your mobile device with the HP Smart App.
●Handles roll and cut-sheet paper, with a multi-sheet tray which automaticaly switches between both*
●Touch-sensitive front panel in color, with an intuitive graphical user interface
●Supports USB, Ethernet, or Wi-Fi connection
●Includes Web-connected features such as automatic firmware upgrades
●Supports remote printing from mobile devices with HP Smart App, see http://www.hpsmart.com
●Economode for printing economically
●Enables easy printing from desktop with HP Click, see http://www.hp.com/go/designjetclick
●Ink and paper usage information available from the Embedded Web Server, see Access the Embedded Web Server on page 20
●Supplies information, troubleshooting, and firmware updates available from the HP Utility, see Access the HP Utility (Windows only) on page 21
●Access to the online HP Support Center, see HP Support Center on page 100
●HP Support Assistant supports the printer, see HP Support Assistant on page 66
●Compatible with the HP Applications Center – Poster App, see http://www.hpapplicationscenter.com
*Windows only
* Multi-sheet tray included in HP DesignJet T600 and available as accessory for HP DesignJet T200 Printer series
Main components
Hardware features of your printer.
Front view (T600 Printer series)
Overview of the front of the printer's main hardware components.
4 Chapter 1 Introduction |
ENWW |
1.Multi-sheet tray
2.Front panel
3.Main door
4.Ink cartridges
5.Carriage
6.Stand
Rear view (T600 Printer series)
Overview of the back of the printer's main hardware components.
ENWW |
Main components 5 |
1.Paper roll
2.Communication ports
3.Fast Ethernet port, to connect to a network
4.Speed USB device port, to connect a computer
5.Power button
6.Power socket
7.Multi-sheet tray
Rear view (T200 Printer Series)
Overview of the back of the printer's main hardware components.  NOTE: The multi-sheet tray is an accessory for this model.
6 Chapter 1 Introduction |
ENWW |
1.Blue stop
2.Spindle
3.Paper roll
4.Fast Ethernet port, to connect to a network
5.Speed USB device port, to connect a computer
6.Power button
7.Power socket
Turn the printer on and off
The power key is located at the back of the printer.
The power key can also be used to put the printer into sleep mode. See Configure power button mode
on page 21. The key is illuminated when the printer is on. It flashes when the printer is in transition between on and off.
However, if you plan to store the printer for a long period or the power key does not seem to work, you are recommended to unplug the power cord.
ENWW |
Turn the printer on and off 7 |
To turn it back on, plug in the power cord.
When the printer is powered back on, it takes about three minutes to initialize and check and prepare the printhead.
 NOTE: When the printer has not been used for a certain period of time (the default time is determined by Energy Star), it saves power by going into sleep mode. However, any interaction with the printer's front-panel display, or sending a new job to print, returns it to active mode, and it can resume printing immediately. To change the sleep mode time, see Change the sleep mode setting on page 21.
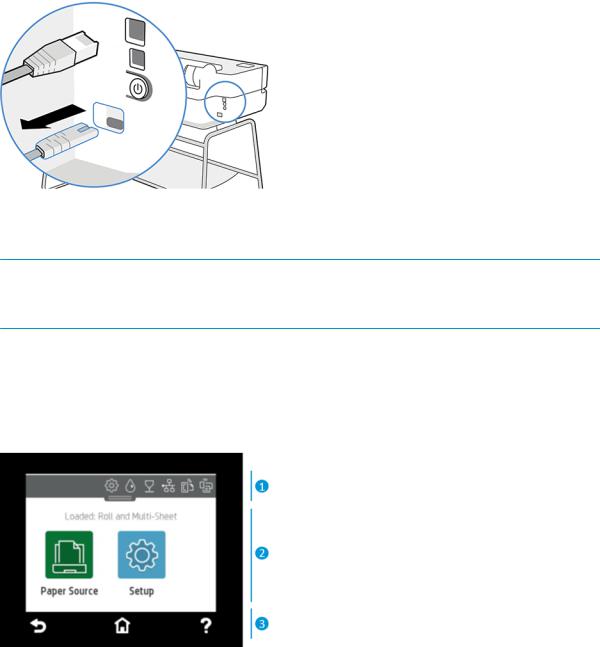
Front panel
Located on the front left of the printer there is a touch-sensitive screen with a graphical user interface. From it, you can print, view information, change settings, and perform calibrations and tests, etc.
The front panel also displays alerts (warning and error messages) when needed.
1. Dashboard icons
The front panel dashboard lets you access the icons on the display, check the status of the printer, or monitor and manage current and scheduled printer tasks.
Tap or swipe down the tab at the top of a screen to open the dashboard:
●Tap  to change printer settings.
●Tap  to view ink information.
●Tap  to view printhead information.
8 Chapter 1 Introduction |
ENWW |

●Tap  to view connectivity status information and to perform network configuration. If a network cable is connected,
  is displayed instead.
 NOTE: It is not possible to use wireless and wired network connections simultaneously.
●Tap  to view information about Wi-Fi Direct.
●Tap  to view information and configure ePrint to print from a computer or mobile device, sending an email to the printer.
If the printer is left idle for some time, it goes into sleep mode and switches off the front-panel display. See how to configure the power management: Configure power button mode on page 21.
2. Home screen dynamic icons
The front panel has a central area to display dynamic information and icons.
The following items are displayed when you tap the paper icon  :
:
●Tap  to load, unload, and change options for roll paper.
●Tap  to change options for the multi-sheet tray, or to activate it.
●Tap  to load, unload, and change options for single sheets.
To change the printer settings or print reports, use the options available in:  .
.
 NOTE: The active paper source is indicated by a slightly larger icon, with a white tick in a green circle:
  .
.
3. Fixed icons
On the lower side of the screen up to 3 fixed icons can be seen at different times. Normally they are not all displayed at the same time.
●Tap  to return to the home screen.
●Tap  to view help about the current screen.
●Tap  to go back to the previous screen without discarding changes.
Printer solutions
Drivers and other tools are provided with your printer to raster, review, print locally/remotely, and access support if required.
The following software is available for your printer at: http://123.hp.com or http://www.hp.com/go/ DesignJetT200/software or http://www.hp.com/go/DesignJetT600/software:
●Driver for Windows and Mac
ENWW |
Printer solutions 9 |

●The HP DesignJet driver that offers a preview, which enables you to see a basic preview of how your job will print
●The Embedded Web Server that allows you to manage the printer from a remote computer, update the printer's firmware and change various printer settings, etc.
See Access the Embedded Web Server on page 20.
●The HP Utility (Windows only) that allows you to manage the printer from a remote computer:
See Access the HP Utility (Windows only) on page 21.
 NOTE: New versions of all printer software can be expected to appear from time to time. In some cases, when you receive your printer there may already be later versions available on HP's website of some of the software provided with it.
10 Chapter 1 Introduction |
ENWW |
Mobile Printing
Your printer can be connected to the Internet and the Web, providing various benefits.
●Automatic firmware updates (see Firmware update on page 65)
●Print on HP printers from almost anywhere with HP Smart App
●Print on HP printers from almost any device, including smartphones and tablet computers To take advantage of these benefits, your printer must be connected to the Internet.
For the latest information, see http://www.hp.com/go/designjetmobility.
Enable email printing
Turn on Web Services to allow your printer to communicate securely over the Internet with web-connected printing services.
1.Make sure that your printer is correctly connected to the Internet.
2.Enable Web Services during initial setup of the printer, or later by touching  on the home screen and following the instructions on the front panel. The printer may need to restart if it has updated its firmware.
3.Retrieve the printer’s email address by touching  on the home screen at any time.
4.This is an optional step: If you are the printer administrator, log in at HP Smart (http://www.hpsmart.com) to customize your printer’s email address or manage user access for remote printing.
For the latest information, support, and terms of use of the HP Smart see http://www.hpsmart.com. You can also benefit from automatic firmware updates after following this setup.
Reports
The internal prints give various kinds of information about your printer. They can be requested from the front panel.
Before requesting any internal print, check that the printer and the paper are ready for printing. The loaded paper should be at least A4 portrait—210 mm ((8.27 in)) wide—otherwise the print may be clipped.
To print any internal print, tap  , then scroll down to Reports and tap it, then select the internal print you want. These are some of the prints available:
●Demo prints that show some of the capabilities of the printer
–Drawing demo
–Rendering demo
–GIS map demo
●User info prints
● Printer status report ● Print quality report
● Web access test report ● Network configuration
ENWW |
Mobile Printing 11 |
●Wireless test report
●Job log
●Error log
12 Chapter 1 Introduction |
ENWW |
2Connecting the printer
Printing has never been easier, and your printer comes with various options for connecting to help you do so.
Choose which connection method to use
Your printer can be connected via Wireless, Gigabit Ethernet, or Hi-Speed USB.
Table 2-1 Connectivity methods
Step 1: Connect the printer to your network:
|
OPTION B |
|
Use the front panel to choose one of these |
|
options: |
OPTION A |
Connect to Wi-Fi |
Using your mobile |
- If the printer is new, just follow the steps in the |
If you connect a new printer, the HP Smart App ( available in |
front panel |
|
|
App Store and Play Store) can lead you through the process. |
- Printer and device must be connected to the |
Please note that both printer and device must be connected |
same Wi-Fi |
to the same Wi-Fi |
Connect to Ethernet |
|
|
|
If printer is new, connect the Ethernet cable |
|
before turning it on |
|
Connect to USB |
|
Use Hi-Speed USB cable, male USB type A to |
|
male USB type B |
|
|
Step 2: Set up your device: |
|
-Printer and devices must be connected to the same network
-If required you can find your printer's IP by scrolling down from the top of the screen
Automatic setup
Go to http://123.hp.com to download the HP software and driver
or
For advanced setup or additional software:
Go to the support page for your printer series: http://www.hp.com/go/DesignJetT200/software or http://www.hp.com/go/DesignJetT600/ software
 NOTE: If you connect an Ethernet cable, it turns off the wireless capability of the printer.
ENWW |
Choose which connection method to use 13 |


 NOTE: Wireless connections can be affected by the location of the network router and the device. In order to improve a wireless connection:
1.Position the wireless access point in a more central position within the work place.
2.Place the wireless access point away from dense materials. Metal, concrete, double thick walls are the hardest to penetrate, wood and plasterboard are easier. Consider this when you position the printer.
3.Change the wireless channel to one that is not being used. Preferably 1, 6, or 11, as these are non-overlapping channels.
4.Extend the range of the wireless network with the use of a simple wireless extender or add more wireless access points.
1.Connect the printer to your network
If this is the first time you are using the printer: Connect your printer by using the HP Smart App.
 NOTE: Use the HP Smart APP for printer Setup during initialization. If your printer is not new and you want to use the HP Smart App you need to go to the Default Configuration mode.
Set up using the HP Smart App
You can use the HP Smart App to set up the printer on your wireless network.
The HP Smart App is supported on iOS, Android, and Windows devices. For information, see Print from Apple iOS or Android with HP Smart App on page 33.
1.If you are using an iOS or Android mobile device, make sure that Bluetooth is turned on. (HP Smart uses Bluetooth to make the setup process faster and easier on iOS and Android mobile devices.)
 NOTE: The HP Smart App uses Bluetooth for printer setup only. Printing using Bluetooth is not supported.
2.Open the HP Smart App.
3.Windows: On the home screen, tap Set Up a New Printer and follow the onscreen instructions to add a printer to your network.
or
Android: On the home screen, tap the + icon and then tap Add Printer. Follow the onscreen instructions to add a printer to your network.
Set up the printer on your wireless network
On the front panel, use the Wireless Setup Wizard or Wi-Fi Protected Setup to set up wireless communication.
1.From the front panel, tap or swipe down the tab at the top of the screen to open the dashboard, and then tap  .
.
2.Tap  .
.
3.Tap Wireless Settings.
4.Tap Wireless Setup Wizard or Wi-Fi Protected Setup.
5.Follow the front panel instructions to complete the setup.
If you are already using the printer with a different type of connection, such as a USB connection, to change see Mobile Printing on page 33.
14 Chapter 2 Connecting the printer |
ENWW |

2. Set up your device
Prepare your printer with the correct software for your device.
Install the software (Windows)
Make sure to connect the printer and computer or mobile device to the same network.
Download the software from http://123.hp.com or go to http://www.hp.com/go/DesignJetT200/software or http://www.hp.com/go/DesignJetT600/software.
Install the software (Mac OS X)
Make sure to connect the printer and computer or mobile device to the same network.
Download the software from http://123.hp.com or go to http://www.hp.com/go/DesignJetT200/software or http://www.hp.com/go/DesignJetT600/software.
Add your printer
Add a printer to a network under Mac OS X.
▲Go to System Preferences►Printers and Scanners, and then tap + to add a new printer.
●If you installed the driver: Select the IP tab, enter your IP address, and select the protocol HP JetdirectSocket. Tap Continue.
●If you want to use AirPrint: Choose your printer from the list of displayed network printers, and tap Add. Then, in the Use menu, select Secure AirPrint or AirPrint, and then tap Add.
TIP: To see the bonjour name on the front panel, open the printer's dashboard and tap the  or
or  icon.
icon.
Other options
There are other ways to connect your printer directly to a computer.
Connect a computer to the printer by USB cable (Windows)
You can connect your printer directly to a computer without going through a network, by using the printer's builtin Hi-Speed USB device port. A USB connection may be faster than a network connection, but it has some disadvantages that you should bear in mind.
●The cable is of limited length.
●It is more difficult to share the printer.
●You cannot use Web Services.
●You cannot use automatic firmware updates.
 NOTE: The use of non-certified USB cables can lead to connectivity problems. Only cables certified by the USB Implementor's Forum ( http://www.usb.org/) should be used with this printer.
Printer sharing considerations
Any other users sharing your USB-connected printer will be able to send print jobs, but will not be able to receive information from the printer—which affects status reports, administration and troubleshooting.
ENWW |
2. Set up your device 15 |

TIP: The best way to share the printer over a network is to connect the printer not to any computer, but to the network. See Connecting the printer on page 13.
16 Chapter 2 Connecting the printer |
ENWW |

3Setting up the printer
Set automatic firmware updates, email notifications and driver preferences, and control access to the Embedded Web Server.
Introduction
There are various printer settings that the printer administrator may wish to control as soon as a new printer is assembled and ready for use.
Automatic firmware update
The printer can automatically check for a firmware update periodically.
See Firmware update on page 65
Turn email notifications on and off
In order to receive email notifications from the printer, you must have configured the email server.
●SMTP server: The IP address or hostname of the outgoing mail server (SMTP) that will process all email messages from the printer. If the mail server requires authentication, email notifications will not work.
●Printer email address: Each email message sent by the printer must include a return address, which does not need to be a real, functional email address, but it should be unique, so that recipients of the message can identify the printer that sent it.
You can turn specific email notifications on or off by clicking Email alerts in the Embedded Web Server tab.
Turn alerts on and off
Printer alerts warn you when there is a printer problem that you can correct by taking action, or when one of your printing jobs changes its status. The alerts are displayed by the printer's front panel, by the HP Utility, by the printer driver and by the Embedded Web Server.
You can change the alert settings in various ways to display all, some, or none of the available alerts.
To access alert settings under Windows:
●Click Alert Settings in the Tools menu of the Embedded Web Server.
●Right-click the HP DesignJet Utility's system icon, and click Alert Settings.
In the Alert Settings window, you can use the Alerting slider to turn off alerts completely.
ENWW |
Introduction 17 |
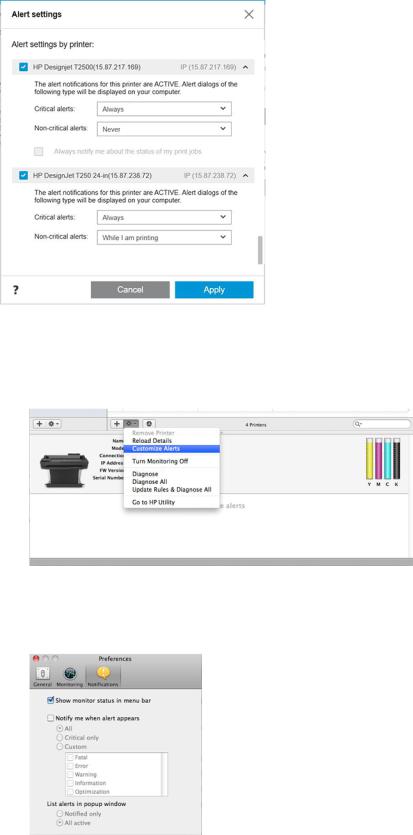
Alternatively, you can choose when, if ever, to display critical or non-critical alerts.
To access alert settings under Mac OS X:
●Open HP Printer Monitor preferences, select your printer, and then Customize Alerts, so that you can set each individual alert to appear in specific cases and with a specific time interval.
●You can turn off alerts completely by unchecking the Show monitor status in menu bar box in the Notifications tab of the HP Printer Monitor preferences. If you leave that box checked but uncheck the Notify me when alert appears box (as below), the alerts will be available in the HP Printer Monitor, but will not pop up in the Dock screen.
18 Chapter 3 Setting up the printer |
ENWW |
Control access to the Embedded Web Server
You can prevent users from modifying important device settings by setting a password in the Embedded Web Server.
Users without the password can see only the Information tabs. Once set, the password is required to view or change any parameters in the other tabs.
Set Windows driver preferences
You can change some default settings in your printer driver according to your own preferences, for instance to set color or paper-saving options.
To change default settings, click the Start or Search button on your computer’s screen (depending on your version of Windows), then click Devices and Settings, Devices and printers or Print Management. Then right-click your printer's icon and click Printing preferences or Set Printing Defaults. Any settings you change in the Printing Preferences window will be saved as default values for the current user.
To set the default values for all the users of your system, right-click the printer’s icon again, click Printer Properties, go to the Advanced tab, and click Printing Defaults. Any settings you change in the Printing Defaults window will be saved for all users.
ENWW |
Control access to the Embedded Web Server 19 |

4Personalizing the printer
You can set your printer preferences such as language, sleep mode, firewall, and front panel brightness settings etc.
Change the language of the front-panel display
Your printer includes many language options to choose from.
To change the language of the front-panel menus and messages:
If you can understand the current front-panel display language, tap  then Preferences > language. Select your preferred language.
Access the Embedded Web Server
Manage your printer remotely using an ordinary web browser running on any computer.
To access the Embedded Web Server on any computer, open your Web browser and type the IP address of your printer.
You can see your printer's IP address on the front panel, open the dashboard and tap  or
or  .
.
To access the Embedded Web Server, you must have a TCP/IP connection to your printer. You can access the Embedded Web Server indirectly through the HP Utility, if you connect to your printer with a TCP/IP connection (wired or wireless).
The first time you access the Embedded Web Server, the computer requests your username and password to prevent unauthorized users from remotely configuring the printer, or viewing printer settings. The password is required to change or view printer settings. By default the user is admin. The PIN is found behind the printer.
You can print the printer status report: Setup►Reports►Printer status report.
 NOTE: The status report has the PIN. If your changed the initial PIN by default and forgot it, go to Troubleshooting general printer issues on page 95.
The following browsers are known to be compatible with the Embedded Web Server:
●Microsoft Internet Explorer 11 and later for Windows 7 and later
●Apple Safari 8 and later for OS X 10.10 and later
●Mozilla Firefox (latest version)
●Google Chrome (latest version)
If you have followed these instructions but failed to get through to the Embedded Web Server, see Cannot access the Embedded Web Server on page 96.
Change the language of the Embedded Web Server
The default language is the same as your browser but if it is not supported, it will appear in English. You can change it to any supported one.
20 Chapter 4 Personalizing the printer |
ENWW |
Embedded Web Server supported languages are English, Portuguese, Spanish, French, Italian, German, Polish, Russian, Simplified Chinese, Traditional Chinese, Korean, and Japanese. There is a tab at the top right of the window to select them from.
Access the HP Utility (Windows only)
Manage your printer from a computer with a USB, TCP/IP, or Wi-Fi connection.
The first time you access to the application you need to enter the printer information. Enter the printer's IP address or hostname to add it to the printer list. Alternatively, select General search to find all HP DesignJet and HP PageWide XL printers on your network.
●Under Windows, start the HP Utility from your desktop shortcut or from Start > All Programs > HP >
HP DesignJet Utility > HP DesignJet Utility. This launches the HP DesignJet Utility, showing the HP DesignJet printers installed on your computer.
●When you select your printer in the left pane, everything that appears in the right pane is specific to that printer.
Change the language of the HP Utility
Choose from English, Portuguese, Spanish, Catalan (Windows only), French, Italian, German, Russian, Simplified Chinese, Traditional Chinese, Korean, and Japanese.
●Under Windows, the language will be adjusted to your regional language settings as defined in the Windows Control Panel.
Change the sleep mode setting
If the printer is left switched on but unused for a certain period of time, it automatically goes to sleep to save power.
To change the time the printer waits before it goes into sleep mode, go to the front panel and tap  , then Power management > Sleep mode. Select the wait time you want.
Configure power button mode
You can set the printer to turn itself off or enter into sleep mode.
Go to  , then Power Management►Power Button Mode and select the option you want.
To change the time that elapses before sleep mode, tap  , then Power Management►Sleep Mode. You can set a time between 5 minutes and the maximum time allowed by the current energy savings regulations.
The printer wakes from sleep mode and switches on the front-panel display whenever there is some external interaction with it.
Information about specific uses of the front panel can be found throughout this guide.
Change the auto-off setting
The printer can be set to turn the itself off automatically which is useful for power management control.
ENWW |
Access the HP Utility (Windows only) 21 |
For example, setting the printer's auto-off feature to 2 hours would turn the printer off after 2 hours of inactivity. In this way, you can save more energy. However, the auto-off feature is automatically disabled when the printer is connected to a network, to avoid inconveniencing network users.
If you are using a USB connection, you can set the printer to turn itself off completely after 2 to 12 hours of inactivity. At the front panel, tap  , then Power Management > Auto-off.
Change the front-panel display brightness
The level of brightness displayed can be adjusted.
To change the brightness of the front-panel display, tap  , then Preferences > Screen brightness and select the value you want. Tap Done to set the value.
Configure network settings
You can view and configure the network settings from the Embedded Web Server, the HP Utility or the front panel.
●From the Embedded Web Server: Select the Network tab.
●From the HP Utility: You can access the Embedded Web Server through the HP Utility.
●From the front panel: Swipe down the dashboard, tap  then scroll down the menu and touch Network setup.
The following options are available:
●Print the start Guide to print the instructions
●Enable/Disable wireless turns the wireless connection on or off.
●Wireless setup wizard provides an easy way to connect to a wireless network.
●Wi-Fi protected setup allows you to set up a connection with a wireless network using WPS (pushbutton or pin) encryption.
●View wireless details displays information about the wireless network
●IP settings allows you to select the IP address -automatic or manual (Static)
●Print Wireless test report print information about the wireless network
●Print wireless network test runs diagnostic tests of wireless connectivity
●Ethernet settings view and print ethernet details
●Advanced setup
●Link speed sets the speed at which data are transmitted over the network. The default is Automatic.
●IP settings allows you to view or change the IP address, subnet mask, default gateway, and DNS address.
●General settings
○Hostname allows you to change the hostname.
○Proxy settings allows you to change the proxy settings
○Bonjour name allows you to change the bonjour name
22 Chapter 4 Personalizing the printer |
ENWW |
Loading...