


INSTALLATION MANUAL
Domestic hot water tank with option kit for air to water heat pump system
EKHWSU150B3V3
EKHWSU200B3V3
EKHWSU300B3V3
EKUHWBB
EKUHW2WB
EKHWSU150B3V3 |
EKUHWBB |
Domestic hot water tank with option kit for air to |
EKHWSU200B3V3 |
|
water heat pump system |
EKHWSU300B3V3 |
EKUHW2WB |
Installation manual
Contents |
Page |
Introduction |
Introduction ....................................................................................... |
1 |
|
General information.................................................................................. |
1 |
Scope of this manual................................................................................ |
1 |
Model identification .................................................................................. |
1 |
Accessories....................................................................................... |
1 |
Accessories supplied with the EKHWSU domestic hot water tank .......... |
1 |
Accessories supplied with the EKUHWBB option kit for the |
|
domestic hot water tank ........................................................................... |
2 |
Accessories supplied with the EKUHW2WB option kit for the |
|
domestic hot water tank when the EKSOLHWAV1 option kit is |
|
installed .................................................................................................... |
2 |
Optional equipment .................................................................................. |
2 |
Installation of the EKHWSU domestic hot water tank ....................... |
2 |
Main components..................................................................................... |
3 |
Outlook diagram....................................................................................... |
4 |
Installation guidelines............................................................................... |
4 |
Installing the domestic hot water tank ...................................................... |
4 |
Connecting the water circuits ................................................................... |
4 |
Field wiring ............................................................................................... |
6 |
Installation of the option kit on the domestic hot water tank.............. |
9 |
Piping requirements ................................................................................. |
9 |
Installation procedure of the option kit.................................................... |
10 |
General information
Thank you for purchasing this Daikin Altherma EKHWSU domestic hot water tank.
The Daikin Altherma domestic hot water tank must be installed by a competent person and be installed in compliance with instructions as of subject in this manual, all current legislation, codes of practice and regulations governing the installation of unvented hot water cylinders in force at the date of installation.
This installation is subject to building regulation approval, notify Local Authority of intention to install.
The domestic hot water tank is to be connected to the Daikin Altherma unit.
The EKHWSU domestic hot water tank with integrated 3 kW electrical booster heater is available in three types: 150, 200 and 300. All models can be floor mounted, while the 150 type model can be wall mounted as well via option kit EKWBSWW150.
Commissioning................................................................................ |
10 |
Filling up................................................................................................. |
10 |
Draining.................................................................................................. |
10 |
Maintenance..................................................................................... |
11 |
Troubleshooting................................................................................ |
11 |
General guidelines .................................................................................. |
11 |
General symptoms .................................................................................. |
11 |
Scope of this manual
This installation manual describes the procedures for installing and connecting the EKHWSU domestic hot water tanks with the EKUHWBB option kit and with the EKUHW2WB option kit in case the EKSOLHWAV1 option kit is to be installed as well.
Technical specifications................................................................... |
12 |
Domestic hot water tank specifications .................................................. |
12 |
Pressure reducing valve specifications .................................................. |
13 |
Field wiring diagram ............................................................................... |
13 |
READ THESE INSTRUCTIONS CAREFULLY BEFORE INSTALLATION. KEEP THIS MANUAL IN A HANDY PLACE FOR FUTURE REFERENCE.
PLEASE LEAVE THIS MANUAL WITH THE EKHWSU DOMESTIC HOT WATER TANK AFTER INSTALLATION.
IMPROPER INSTALLATION OR ATTACHMENT OF EQUIPMENT OR ACCESSORIES COULD RESULT IN ELECTRIC SHOCK, SHORT-CIRCUIT, LEAKS, FIRE OR OTHER DAMAGE TO THE EQUIPMENT. BE SURE ONLY TO USE ACCESSORIES MADE BY DAIKIN WHICH ARE SPECIFICALLY DESIGNED FOR USE WITH THE EQUIPMENT AND HAVE THEM INSTALLED BY A PROFESSIONAL.
Model identification
Domestic hot water tank
EK HWS U 150 B |
3 |
V3 |
Booster heater voltage
V3=1P, 230 V
Capacity booster heater: 3 kW
Series
Indication of storage capacity in litres
Special version for United Kingdom only Standard version when no letter is mentioned
Hot Water stainless Steel tank European Kit
Accessories
IF UNSURE OF INSTALLATION PROCEDURES OR USE, ALWAYS CONTACT YOUR DAIKIN DEALER FOR ADVICE AND INFORMATION.
THE UNIT DESCRIBED IN THIS MANUAL IS DESIGNED FOR INDOOR INSTALLATION ONLY AND FOR AMBIENT TEMPERATURES RANGING 0°C~35°C.
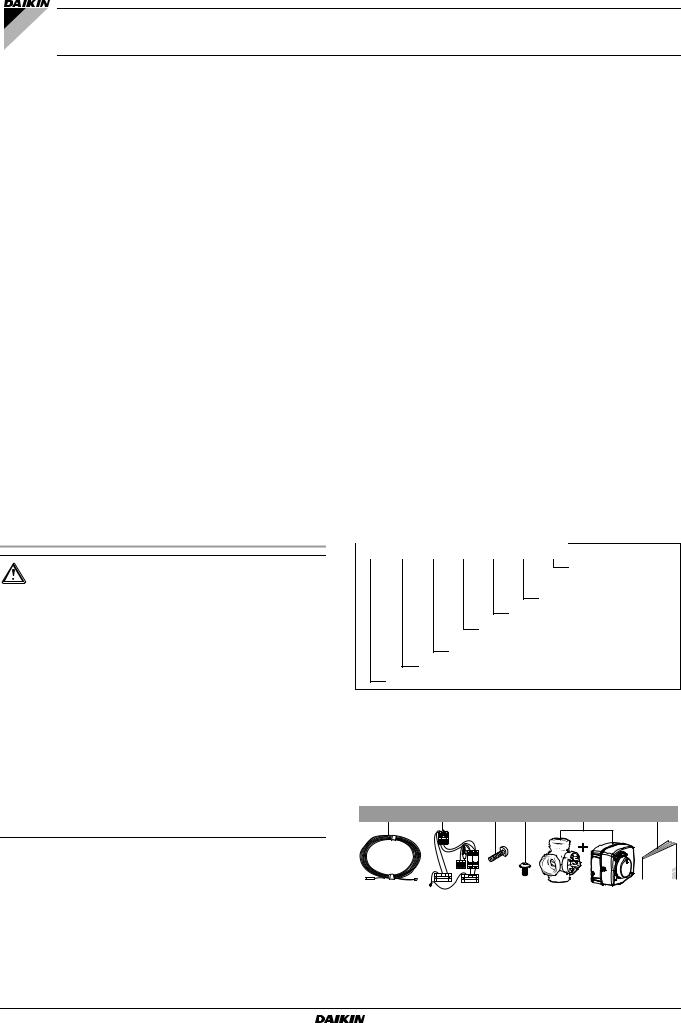
Accessories supplied with the EKHWSU domestic hot water tank
1 |
2 |
3 |
4 |
5 |
6 |
1x |
1x |
2x |
4x |
1x |
1x |
Installation manual
1
1Thermistor + connection wire (12 m)
2Contactor - fuse assembly
3Contactor fixing screw
4Tapping screw
53-way valve + motor
6Installation manual
EKUHWBB + EKUHW2WB + EKHWSU150-300B3V3
Domestic hot water tank with option kit for air to water heat pump system
4P344370-1 – 2013.03

Accessories supplied with the EKUHWBB option kit for the domestic hot water tank
1 |
2 |
3 |
4 |
1x |
1x |
1x |
1x |
5 |
6 |
7 |
8 |
1x |
1x |
1x |
1x |
1Pressure reducing valve and expansion relief valve. Water inlet and water outlet 22 mm connection, discharge piping connection 15 mm
2Adaptor 22 mm×3/4" Female BSP
3T-piece 1/2" Female BSP×15 mm×15 mm
4Expansion vessel of 18 litres 3/4" Male BSP
5Tundish 15 mm inlet, 22 mm outlet
6Elbow/Drain valve 22 mm×3/4" Male BSP
7T-piece 22 mm×22 mm×22 mm
8Instruction sheet
Accessories supplied with the EKUHW2WB option kit for the domestic hot water tank when the EKSOLHWAV1 option kit is installed
1 |
2 |
3 |
|||
|
1x |
|
2x |
|
1x |
|
|
|
|
|
|
|
|
|
|
|
|
|
|
|
|
|
|
1Solenoid 2-way valve 3/4" Female BSP×3/4" Female BSP
2Connection nipple 3/4" Male BSP
3PG nipple and nut
Optional equipment
EKWBSWW150: kit, including a wall bracket for a domestic hot water tank of 150 litres.
Installation of the EKHWSU domestic hot water tank
The total Daikin Altherma system is designed for combination with a Daikin Altherma domestic hot water tank. In case another tank or a spare part other than native Daikin is being used in combination with the Daikin Altherma unit, Daikin cannot guarantee neither good operation nor reliability of the system. For those reasons Daikin cannot give warranty of the system in such case.
The equipment is not intended for use in a potentially explosive atmosphere.
For safety reasons, it is not allowed to add ethylene glycol to the water circuit. Adding ethylene glycol might lead to contamination of the domestic water if a leakage would occur in the heat exchanger coil.
Only this tank can be used in combination with the solar kit option.
Domestic water quality must be according to EN directive 98/83 EC.
Wherever possible the main supply pipe should be in 22 mm. The minimum main water supply requirement should be 1.5 bar working pressure and 20 litres per minute flow rate. At these values outlet flow rates may be poor if several outlets are used simultaneously, the higher the available pressure and flow rate the better the system performance will be.
It is important that the storage capacity of the domestic water tank meets normal daily fluctuations in consumption of hot water without any fall of the water outlet temperature during use.
Immediately after installation, the domestic hot water tank must be flushed with fresh water. This procedure must be repeated at least once a day the first 5 consecutive days after installation.
If applicable legislation requires a chemical disinfection in specific situations, involving the Altherma domestic hot water tank, please be aware that the domestic hot water tank is a stainless steel cylinder containing an aluminium anode. We therefore advise in these circumstances to use a non-chloride based disinfectant approved for use with water intended for human consumption.
Where the secondary return circuits are used an additional expansion vessel may be required.
EKUHWBB + EKUHW2WB + EKHWSU150-300B3V3 |
Installation manual |
Domestic hot water tank with option kit for air to water heat pump |
2 |
system |
4P344370-1 – 2013.03
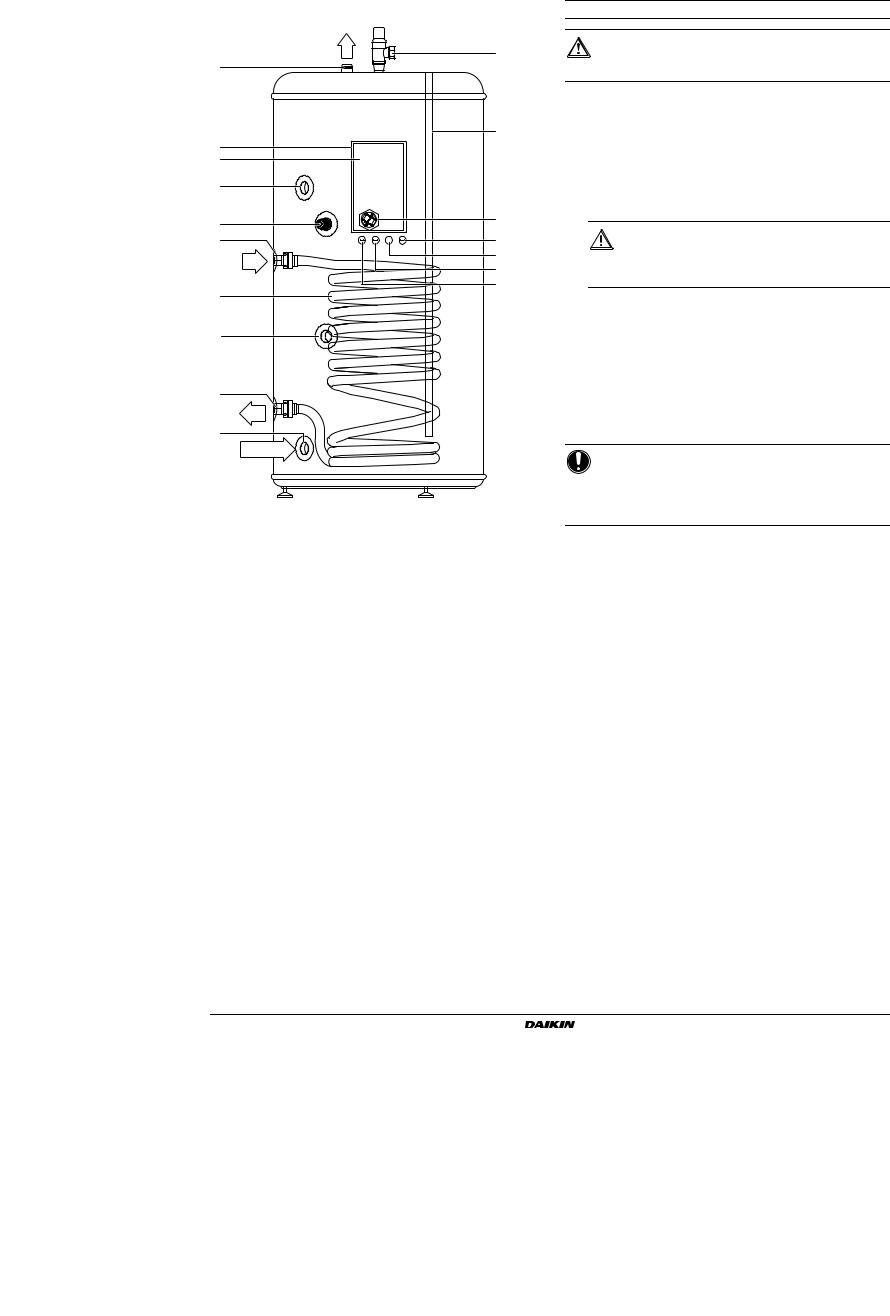
Main components
|
H |
2 |
|
|
|
1 |
|
|
|
|
17 |
3 |
|
|
4 |
|
|
5 |
|
|
6 |
|
16 |
|
|
|
7 |
|
12 |
|
F |
13 |
|
14 |
|
|
|
|
8 |
|
15 |
|
|
|
9 |
|
|
10 |
|
|
|
R |
|
11 |
|
|
|
C |
|
1Hot water connection
2Temperature and pressure relief valve
3Electrical box
4Electrical box lid
5Recirculation hole
6Thermistor socket
7Flow inlet connection
8Heat exchanger coil
9Threaded thermistor hole for use with solar kit option. Refer to the installation manual of the EKSOLHWAV1 option kit.
10Return outlet connection
11Cold water connection
12Only in case of installing the EKSOLHWAV1 option kit Cable hole to fit PG nipple and nut for use with solar kit option. Refer to the installation manual of the EKSOLHWAV1 option kit.
13Cable hole to fit PG nipple and nut into for cable connections of booster heater, power supply and thermal protection cable.
14Only in case of installing the EKSOLHWAV1 option kit. Cable hole to fit PG nipple and nut into for cable connections of solenoid valve. Refer to the installation manual of the EKSOLHWAV1 option kit.
15Only in case of installing the EKSOLHWAV1 option kit. Cable hole to fit PG nipple and nut into for cable connections of solenoid valve power supply and solar pump power supply. Refer to the installation manual of the EKSOLHWAV1 option kit.
16Electrical booster heater
17Anode for corrosion protection
Safety devices
The domestic hot tank relief valve connections should
not be used for other purposes.
Do not install heaters without thermal cut-outs.
Thermal protector — The booster heater in the domestic hot water tank is equipped with a thermal protector (setting 85°C).
For EKUHW2WB only: Secondary thermal protector (solenoid 2-way valve) — The thermal protector will close the solenoid 2-way valve (setting 85°C).
Both thermal protectors are activated when the temperature becomes too high. When activated, the protectors have to be reset on the domestic hot water tank by pressing the red button (for access, remove the electrical box lid).
The electrical box lid must only be opened by a
licensed electrician.
Switch off the power supply before opening the electrical box lid.
For EKUHW2WB only: Thermostat (solenoid 2-way valve)
The thermostat will close the solenoid 2-way valve when the temperature becomes too high (setting 79°C).
Temperature and pressure relief valve
The temperature and pressure relief valve prevents excessive water temperature (>95°C) and excessive water pressure (≥10 bar) in the domestic hot water tank.
Expansion relief valve (option kit)
The pressure relief valve prevents excessive water pressure (≥8 bar) in the water circuit.
NOTICE
Refer to "Installation of the option kit on the domestic hot water tank" on page 9 for connection of other safety devices in accordance with relevant local and national regulations.
Installation manual |
EKUHWBB + EKUHW2WB + EKHWSU150-300B3V3 |
3 |
Domestic hot water tank with option kit for air to water heat pump |
system |
4P344370-1 – 2013.03

Outlook diagram


 100
100


73
 30
30  45
45
105 |
400 |
|
|
|
15 |
300
|
|
|
|
|
|
|
|
|
|
|
|
15 mm |
6 |
|||
|
|
|
|
|
|
|
|
|
|
|
|
|
|
|
1 |
|
|
|
|
|
|
|
|
|
|
|
|
|
|
|
|
|
|
|
|
|
|
|
|
|
|
|
|
|
|
|
|
|
|
|
2 |
7 |
3 |
9 |
8 |
4 |
5 |
1Hot water connection
2Recirculation hole
3Flow inlet connection (see also "Installation guidelines" on page 4 regarding pipe size to use)
4Return outlet connection (see also "Installation guidelines" on page 4 regarding pipe size to use)
5Cold water connection
6Temperature and pressure relief valve connection
7Thermistor socket
8Threaded thermistor hole for use with solar kit option. Refer to the installation manual of the EKSOLHWAV1 option kit.
9Warning label
EKUHWBB + EKUHW2WB + EKHWSU150-300B3V3
Domestic hot water tank with option kit for air to water heat pump system
|
H1 |
H2 |
H3 |
H4 |
H5 |
EKHWSU150B3V3 |
900 mm |
475 mm |
185 mm |
1015 mm |
605 mm |
EKHWSU200B3V3 |
1150 mm |
630 mm |
200 mm |
1265 mm |
830 mm |
|
|
|
|
|
|
EKHWSU300B3V3 |
1600 mm |
630 mm |
200 mm |
1715 mm |
830 mm |
Installation guidelines
Keep in mind the following guidelines when installing the domestic hot water tank:
The installation location is frost-free.
Make sure to make the piping in size 1" or more (and reduce to 3/4" at the inlet of the tank) as to have sufficient water volume in the piping between unit and domestic hot water tank.
Locate the domestic hot water tank in a suitable position to facilitate easy maintenance; remember access is required to the electrical box. Refer to the grey zones in the outlook diagram.
The domestic hot water tank model EKHWSU150B3V3 can be floor or wall mounted. In case of wall mounting, wall mounting kit EKWBSWW150 is required (separate ordering).
If installing an EKHWSU* domestic hot water tank, installing the option kit EKUHWB is obligatory. Refer to the UK Building Regulation G3.
If installing the kit EKSOLHWAV1, installing the option kit EKUHW2WB is obligatory.
Take care that in the event of a leak, water cannot cause any damage to the installation space and surroundings.
Installing the domestic hot water tank
1Check if all domestic hot water tank accessories (see "Accessories" on page 1) are enclosed.
2When floor mounting, place the domestic hot water tank on a level surface. When wall mounting (only for EKHWSU150B3V3 model), make sure the wall is sturdy. In both cases, make sure the tank is mounted level.
3Apply thermal paste to the thermistor and insert the thermistor as deep as possible in the thermistor socket. Fix using the nut provided.
Connecting the water circuits
Refer to "Typical application examples" described in the installation manual delivered with the unit for details on connecting the water circuits and the motorised 3-way valve.
Connecting the 3-way valve
1 Refer to the figure below before making the connection.
|
|
44 |
|
|
44 |
|
13 |
|
77 |
38 |
67 |
111
Installation manual
4
4P344370-1 – 2013.03
 Loading...