


Installation and maintenance instructions
Daikin Altherma M ECH2O
EKHWMX300C
EKHWMXB300C
EKHWMX500C
EKHWMXB500C
Installation and
maintenance instructions English Solar storage tank with heating
07/2019
List of contents
1 General Information. . . . . . . . . . . . . . . . . . . . 3
1.1 Refer to the manual . . . . . . . . . . . . . . . . . . . . . . . 3 1.2 Warranty conditions . . . . . . . . . . . . . . . . . . . . . . . 3
2 Safety . . . . . . . . . . . . . . . . . . . . . . . . . . . . . . . 4
2.1 Warnings and symbols. . . . . . . . . . . . . . . . . . . . . 4
2.1.1 Meaning of the warnings . . . . . . . . . . . . . . . . . . . . . .4 2.1.2 Validity. . . . . . . . . . . . . . . . . . . . . . . . . . . . . . . . . . . .4 2.1.3 Handling instructions. . . . . . . . . . . . . . . . . . . . . . . . .4
2.2 Avoiding danger . . . . . . . . . . . . . . . . . . . . . . . . . . 4 2.3 Intended use . . . . . . . . . . . . . . . . . . . . . . . . . . . . 5 2.4 Instructions for operating safety. . . . . . . . . . . . . . 5
2.4.1 Before working on the hydraulic system . . . . . . . . . .5 2.4.2 Electrical installation . . . . . . . . . . . . . . . . . . . . . . . . .5 2.4.3 Site of installation . . . . . . . . . . . . . . . . . . . . . . . . . . .6 2.4.4 Heating system and sanitary connection . . . . . . . . .6
2.4.5Demands on the heating and pressure-free storage
water . . . . . . . . . . . . . . . . . . . . . . . . . . . . . . . . . . . . .6 2.4.6 Operation . . . . . . . . . . . . . . . . . . . . . . . . . . . . . . . . .6 2.4.7 Instruct the owner . . . . . . . . . . . . . . . . . . . . . . . . . . .6
3 Product description. . . . . . . . . . . . . . . . . . . . 8
3.1 Design and components . . . . . . . . . . . . . . . . . . . 8
3.1.1Exterior of the device and interior structure
EKHWMX(B)300C. . . . . . . . . . . . . . . . . . . . . . . . . . .8
3.1.2Exterior of the device and interior structure
EKHWMX(B)500C. . . . . . . . . . . . . . . . . . . . . . . . . . .9 3.1.3 Upper side of the device . . . . . . . . . . . . . . . . . . . . .10
4 Set-up and installation . . . . . . . . . . . . . . . . 12
4.1 Dimensions and connections . . . . . . . . . . . . . . . 13
4.1.1 EKHWMX(B)300C. . . . . . . . . . . . . . . . . . . . . . . . . .13 4.1.2 EKHWMX(B)500C. . . . . . . . . . . . . . . . . . . . . . . . . .14 4.1.3 Scope of delivery. . . . . . . . . . . . . . . . . . . . . . . . . . .15
4.2 Installation . . . . . . . . . . . . . . . . . . . . . . . . . . . . . 15 4.3 Removing the cover and thermal insulation. . . . 17 4.4 Water connection . . . . . . . . . . . . . . . . . . . . . . . . 18
4.4.1Aligning the connections of the heating supply and
return. . . . . . . . . . . . . . . . . . . . . . . . . . . . . . . . . . . .19 4.4.2 Connecting hydraulic lines . . . . . . . . . . . . . . . . . . .20 4.4.3 Installation of the DB connection kit . . . . . . . . . . . .22 4.4.4 Installation of the P connection kit. . . . . . . . . . . . . .22
4.5 Electrical connection . . . . . . . . . . . . . . . . . . . . . 22
4.5.1Daikin Altherma M ECH2O overall connection
diagram . . . . . . . . . . . . . . . . . . . . . . . . . . . . . . . . . .23 4.5.2 Position of the printed circuit boards . . . . . . . . . . . .24
4.5.3RoCon BM2C printed circuit board connection
diagram . . . . . . . . . . . . . . . . . . . . . . . . . . . . . . . . . .24 4.5.4 Mains connection Daikin Altherma M ECH2O. . . . .25
4.5.5Opening the controller housing and establishing
electrical connections . . . . . . . . . . . . . . . . . . . . . . .25 4.5.6 Connecting the heat pump outdoor unit . . . . . . . . .25 4.5.7 Connecting an external switching contact. . . . . . . .25 4.5.8 External requirement request (EBA) . . . . . . . . . . . .26 4.5.9 Connecting an external heat generator. . . . . . . . . .26 4.5.10 Connecting a Daikin room thermostat. . . . . . . . . . .27 4.5.11 Connecting optional Daikin RoCon system
components. . . . . . . . . . . . . . . . . . . . . . . . . . . . . . .28 4.5.12 Connecting a Daikin FWXV-ATV3 . . . . . . . . . . . . .28 4.5.13 Connecting switching contacts (AUX outputs) . . . .29 4.5.14 Off-peak mains connection (HT/NT) . . . . . . . . . . . .29 4.5.15 Connecting an intelligent controller
(Smart Grid - SG) . . . . . . . . . . . . . . . . . . . . . . . . . .30 4.5.16 Symbols and key names for connection and wiring
diagrams . . . . . . . . . . . . . . . . . . . . . . . . . . . . . . . . .30
4.6 Filling the system on the water side . . . . . . . . . 31
4.6.1Checking the water quality and adjusting the
pressure gauge . . . . . . . . . . . . . . . . . . . . . . . . . . . 31 4.6.2 Filling the hot water heat exchanger . . . . . . . . . . . 31 4.6.3 Filling the storage tank . . . . . . . . . . . . . . . . . . . . . 31 4.6.4 Filling the heating system . . . . . . . . . . . . . . . . . . . 31
5 Start-up. . . . . . . . . . . . . . . . . . . . . . . . . . . . . 32
5.1 Initial start-up. . . . . . . . . . . . . . . . . . . . . . . . . . . 33
5.1.1 Requirements . . . . . . . . . . . . . . . . . . . . . . . . . . . . 33 5.1.2 Starting the device. . . . . . . . . . . . . . . . . . . . . . . . . 33 5.1.3 Setting commissioning parameters . . . . . . . . . . . . 33 5.1.4 Bleeding the hydraulic system. . . . . . . . . . . . . . . . 34 5.1.5 Checking the minimum flow. . . . . . . . . . . . . . . . . . 35
5.1.6Setting the parameter Screed Program
(only when required) . . . . . . . . . . . . . . . . . . . . . . . 35
5.2 Re-commissioning. . . . . . . . . . . . . . . . . . . . . . . 35
5.2.1 Requirements . . . . . . . . . . . . . . . . . . . . . . . . . . . . 35 5.2.2 Start-up . . . . . . . . . . . . . . . . . . . . . . . . . . . . . . . . . 35
6 Taking out of operation. . . . . . . . . . . . . . . . 37
6.1 Temporary shutdown . . . . . . . . . . . . . . . . . . . . 37
6.1.1 Draining the storage tank . . . . . . . . . . . . . . . . . . . 37 6.1.2 Draining the heating circuit and hot water circuit. . 38
6.2 Final shutdown . . . . . . . . . . . . . . . . . . . . . . . . . 39
7 Service and maintenance . . . . . . . . . . . . . . 40
7.1 General . . . . . . . . . . . . . . . . . . . . . . . . . . . . . . . 40 7.2 Activities to be performed annually . . . . . . . . . . 40 7.3 Filling, topping up the storage tank . . . . . . . . . . 41 7.4 Filling, topping up the heating system. . . . . . . . 42
7.4.1 Protecting the water circuit against freezing . . . . . 42 7.4.2 Filling, topping up steps. . . . . . . . . . . . . . . . . . . . . 43
8 Errors, malfunctions and messages . . . . . 45
8.1 Recognising errors, correcting malfunctions . . . 45
8.1.1 Current error display . . . . . . . . . . . . . . . . . . . . . . . 45 8.1.2 Reading out the protocol . . . . . . . . . . . . . . . . . . . . 45 8.1.3 Troubleshooting. . . . . . . . . . . . . . . . . . . . . . . . . . . 45
8.2 Malfunctions . . . . . . . . . . . . . . . . . . . . . . . . . . . 46 8.3 Error codes . . . . . . . . . . . . . . . . . . . . . . . . . . . . 50 8.4 Control and configuration of DIP switches . . . . 58 8.5 Emergency operation . . . . . . . . . . . . . . . . . . . . 58
9 Hydraulic system connection. . . . . . . . . . . 59
10 Technical data . . . . . . . . . . . . . . . . . . . . . . . 61
10.1 Equipment data . . . . . . . . . . . . . . . . . . . . . . . . . 61
10.1.1 EKHWMX(B)300C . . . . . . . . . . . . . . . . . . . . . . . . . 61 10.1.2 EKHWMX(B)500C . . . . . . . . . . . . . . . . . . . . . . . . . 62
10.2 Information on the type plate. . . . . . . . . . . . . . . 63 10.3 Characteristic lines . . . . . . . . . . . . . . . . . . . . . . 64
10.3.1 Sensor characteristic lines. . . . . . . . . . . . . . . . . . . 64
10.4 Tightening torque . . . . . . . . . . . . . . . . . . . . . . . 64 10.5 Circuit diagram Daikin Altherma M ECH2O. . . . 65
11 Notes. . . . . . . . . . . . . . . . . . . . . . . . . . . . . . . 66 12 List of keywords . . . . . . . . . . . . . . . . . . . . . 67
Installation and maintenance instructions |
Daikin Altherma M ECH2O |
2 |
Solar storage tank with heating controller |
008.1446799_00 – 07/2019 – EN |

1 General Information
1 General Information
1.1 Refer to the manual
Original Operating Instructions
These instructions are a >> translation of the original version << in your language.
Please read this manual carefully and thoroughly before proceeding with the installation or modification of the heating system.
Target Group
These instructions are aimed at people who are authorised and who have successfully completed a qualifying technical or skilled manual training program for the particular work to be carried out and who have participated in professional development seminars recognised by the appropriate responsible authority. This, in particular, includes heating specialists and climate control technicians who have experience, as a result of their technical training and their knowledge of the subject, of proper and appropriate installation and maintenance of heating, climate control and cooling installations and heat pumps.
This manual provides all the necessary information for installation, start-up and maintenance, as well as basic information on operation and settings. All parameters needed for trouble-free operation have been configured at the factory. Please see the attached documents for a detailed description of operation and control.
Relevant documents
–Daikin Altherma M ECH2O:
–Operating instructions for the user/owner
–Commissioning checklist
–the operating manual for the user/owner
–RoCon mb controller operating instructions
–Outdoor unit for Daikin Altherma M ECH2O: the respective installation and operating instructions.
–On connection of a Daikin solar system: the respective installation and operating instructions.
–On connection of a Daikin FWXV-ATV3: the respective installation and operating instructions.
–On connection of a control component available as an accessory (room station, mixer module, etc.): the associated installation and operating instructions.
The guides are included in the scope of supply for the individual units.
1.2 Warranty conditions
The legal guarantee conditions fundamentally apply. Our warranty conditions beyond that can be found online on your sales presentative's webpage.
|
|
|
|
|
|
|
|
Daikin Altherma M ECH2O |
Installation and maintenance instructions |
|
|
Solar storage tank with heating controller |
3 |
|
|
008.1446799_00 – 07/2019 – EN |
|
|
|

2 Safety
2 Safety
2.1 Warnings and symbols
2.1.1 Meaning of the warnings
Warnings in this manual are classified according into their severity and probability of occurrence.
DANGER!
Draws attention to imminent danger.
Disregarding this warning can lead to serious injury or death.
WARNING!
Indicates a potentially dangerous situation.
Disregarding this warning may result in serious physical injury or death.
CAUTION!
Indicates a situation which may cause possible damage.
Disregarding this warning may cause damage to property and the environment.
This symbol identifies user tips and particularly useful information, but not warnings or hazards.
Special warning signs
Some types of danger are represented by special symbols:
 Electric current
 Risk of burning or scalding
 Risk of environmental damage
 Danger of local freezing up
 Health impairing or irritant materials
 Prescribed temperature for continuous use
  Danger of explosion
2.1.2 Validity
Some information in this manual has limited validity. The validity is highlighted by a symbol.
 Heat pump outdoor unit
 Heat pump interior unit EKHWMX(B)
FWXV-ATV3
Observe specified tightening torque (see chap. 10.4 "Tightening torque")
Only applicable to the unpressurised solar system (DrainBack).
Only applicable for the pressurised solar system.
2.1.3 Handling instructions
●Handling instructions are shown as a list. Actions for which the sequential order must be maintained are numbered.
Results of actions are identified with an arrow.

 Entry into a setting procedure

 Exit from a setting procedure
2.2 Avoiding danger
The Daikin Altherma M ECH2O is built according to the state-of-the-art and the recognised technical rules. However, improper use may result in serious physical injuries or death, as well as property damage.
To avoid hazards, only install and operate the Daikin Altherma M ECH2O:
–as stipulated and in perfect condition,
–with an awareness of safety and the hazards involved.
This assumes knowledge and use of the contents of this manual, of the relevant accident prevention regulations as well as the recognised safety-related and occupational health rules.
Installation and maintenance instructions |
Daikin Altherma M ECH2O |
4 |
Solar storage tank with heating controller |
008.1446799_00 – 07/2019 – EN |
2 Safety
WARNING!
This equipment must only be used by children aged 8 and above and by persons with restricted physical, sensory or mental capabilities or with a lack of experience and knowledge, if they are under supervision or if they have been instructed in the safe use of the equipment and understand the dangers arising therefrom.
Children must not play with the equipment.
Cleaning or user maintenance must not be carried out by children without supervision.
2.3 Intended use
The Daikin Altherma M ECH2O must only be used to prepare hot water, as a room heating system and as a room cooling system.
The Daikin Altherma M ECH2O must only be installed, connected and operated according to the data in these instructions.
Only the use of a suitable outdoor unit approved by Daikin is permitted. The following combinations are permissible in this respect:
Indoor unit |
Outdoor unit |
Heating and cooling (X) |
|
|
|
EKHWMX300C |
|
|
|
EKHWMXB300C |
EBLQ05C2V3 |
EKHWMX500C |
EBLQ07C2V3 |
|
|
EKHWMXB500C |
|
|
|
Tab. 2-1 Permissible combinations of Daikin Altherma M ECH2O solar storage tanks with heating controller and Daikin Altherma M ECH2O outdoor units
Any other use outside the intended use is considered as improper. The operator alone shall bear responsibility for any resulting damage.
Intended use also includes compliance with the maintenance and service conditions. Replacement parts must at least satisfy the technical requirements defined by the manufacturer.
This is the case, for example, with original spare parts.
2.4 Instructions for operating safety
2.4.1 Before working on the hydraulic system
●Work on the Daikin Altherma M ECH2O (such as e.g. installation, connection and initial commissioning) must only be carried out by
persons who are authorised, who have successfully completed qualifying technical or vocational training for the respective activity and who have taken part in advanced training sessions recognised by the relevant responsible authority. This, in particular, includes heating specialists and climate control technicians who have experience, as a result of their technical training and their knowledge of the subject, of proper and appropriate installation and maintenance of heating, climate control and cooling installations and heat pumps.
●Switch off the external main switch during all
work on the Daikin Altherma M ECH2O, and secure it to prevent unintentional activation.
●Seals must not be damaged or removed.
●Make sure that the safety valves comply with the requirements of EN 12828 when connecting on the heating side, and with the requirements of EN 12897 when connecting on the domestic water side.
●Only original Daikin replacement parts may be used.
●When working on the hydraulics, you must first drain the water or release the pressure using the internal KFE valve. Otherwise hot water can jet out under pressure and result in injury.
2.4.2 Electrical installation
●Electrical installation must only be carried out by specialist personnel with electrical engineering qualifications and subject to compliance with the valid electrical engineering guidelines as well as the regulations of the responsible utility company (EVU).
●Compare the mains voltage (~230 V, 50 Hz or ~400 V, 50 Hz) indicated on the type plate with the supply voltage before connecting to the mains.
●Before beginning work on live parts, disconnect all of the systems circuits from the power supply (switch off main switch, disconnect fuse) and secure against unintentional restart.
●Equipment covers and service panels must be replaced as soon as the work is completed.
Daikin Altherma M ECH2O |
Installation and maintenance instructions |
Solar storage tank with heating controller |
5 |
008.1446799_00 – 07/2019 – EN |
2 Safety
2.4.3 Site of installation
For safe and fault-free operation, the installation location of the Daikin Altherma M ECH2O must meet certain criteria. Information on this can be found in chap. 4.2.
Information on the installation site of other components can be found in the associated documentation supplied with them.
2.4.4Heating system and sanitary connection
●Create a heating system according to the safety requirements of EN 12828.
●With a sanitary connection you must comply with
– EN 1717 – Protection against pollution of potable water installations and general requirements of devices to prevent pollution by backflow
– EN 806 – Specifications for installations inside buildings conveying water for human consumption
– and, in addition, the country-specific legal regulations.
The connection of a solar installation, an electric heating rod or an alternative heat generator may cause the storage temperature to exceed 60 °C.
●Scalding protection (e.g. VTA32 + Screw set 1") must therefore be fitted during installation.
The domestic water quality must comply with the EU Guideline 98/83 EC and the regionaly-applicable regulations.
If the Daikin Altherma M ECH2O is connected to a heating system with steel pipes, radiators or non-diffusion-proof floor heating pipes, sludge and swarf can enter the hot water storage tank and cause blockages, local overheating or corrosion damage.
●To prevent possible damage, fit a dirt filter or sludge separator into the heating return flow of the system.
– SAS 1
●The dirt filter must be cleaned at regular intervals.
2.4.5Demands on the heating and pressurefree storage water
Observe the relevant regulations of technology to prevent creation of corrosion products and deposits.
Minimum requirements regarding the quality of filling and supplementary water:
–Water hardness (calcium and magnesium, calculated as calcium carbonate):
≤ 3 mmol/l
–Conductivity: ≤ 1500 (ideal: ≤ 100) μS/cm
–Chloride: ≤ 250 mg/l
–Sulphate: ≤ 250 mg/l
–pH-values (heating water): 6.5 - 8.5
Using filling water and top-up water which does not meet the stated quality requirements can cause a considerably reduced service life of the equipment. The responsibility for this lies solely with the operator.
If a pressurised solar system or optional external heat source is connected to the system via the corrugated-tube heat exchanger (Bild 3-1 and Bild 3-2, item 14), then these minimum requirements also apply to the fill and top-up water for this heating circuit.
2.4.6 Operation
The Daikin Altherma M ECH2O:
●Do not operate until all installation and connection work is completed.
●Only operate with a completely full storage tank (Level indicator) and heating circuit.
●Operate at a maximum pressure of 3 bar.
●Only connect with a pressure reducer on the external water supply (supply line).
●only operate if the protective cover is installed.
The specified servicing intervals should be adhered to and inspection work must be carried out.
2.4.7 Instruct the owner
●Before you hand over the Daikin Altherma M
ECH2O, explain to the user how to operate and check the system.
|
|
|
|
|
|
|
|
|
|
Installation and maintenance instructions |
Daikin Altherma M ECH2O |
6 |
Solar storage tank with heating controller |
||
008.1446799_00 – 07/2019 – EN |
|||

2 Safety
●Hand over the technical documentation (this document and all supporting documents) to the user and advise him that these documents must be made available at all times and be stored in the immediate vicinity of the unit.
●Document the handover by filling out the installation and instruction forms together with the owner and sign them.
|
|
|
|
|
|
|
|
Daikin Altherma M ECH2O |
Installation and maintenance instructions |
|
|
Solar storage tank with heating controller |
7 |
|
|
008.1446799_00 – 07/2019 – EN |
|
|
|
3 Product description
3 Product description
3.1 Design and components
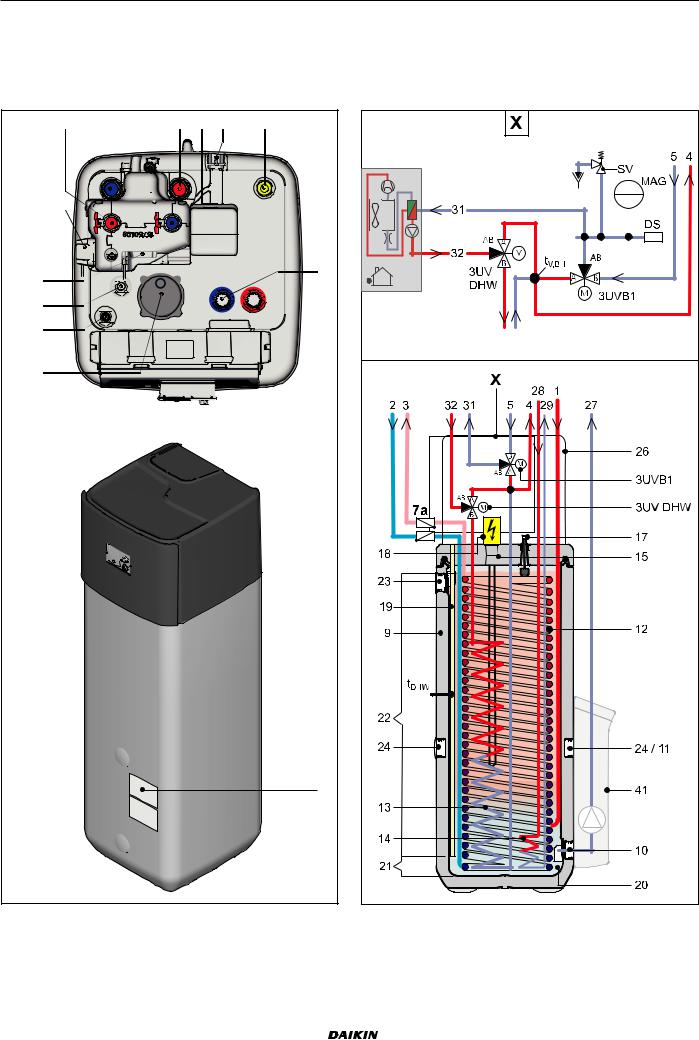
3.1.1 Exterior of the device and interior structure EKHWMX(B)300C
4 |
2 |
|
|
|
|
|
|
|
3 |
5 |
30 |
1 |
|||||||
|
|
|
|
|
|
|
|
|
|
|
|
|
|
|
|
|
|
|
|
|
|
|
|
|
|
|
|
|
|
|
|
|
|
|
|
|
|
|
|
|
|
|
|
|
|
|
|
|
|
|
|
|
|
|
|
|
|
|
|
|
|
|
|
|
|
|
|
|
|
|
|
|
|
|
|
|
|
|
|
|
|
|
|
|
|
|
|
|
|
|
|
|
|
|
|
|
|
|
|
|
|
|
|
|
|
|
|
|
|
|
|
|
|
|
|
|
|
|
|
3UV DHW
33


 3UVB1
3UVB1 


 17
17 


19
18
RoConB1


24
10
29


 28
28


 RoCon B1
 26
26
25
Fig. 3-1 EKHWMX(B)300C design and components (exterior view and interior structure) Key names, see tab. 3-1
|
|
|
|
|
|
|
|
|
|
Installation and maintenance instructions |
Daikin Altherma M ECH2O |
8 |
Solar storage tank with heating controller |
||
008.1446799_00 – 07/2019 – EN |
|||

3 Product description
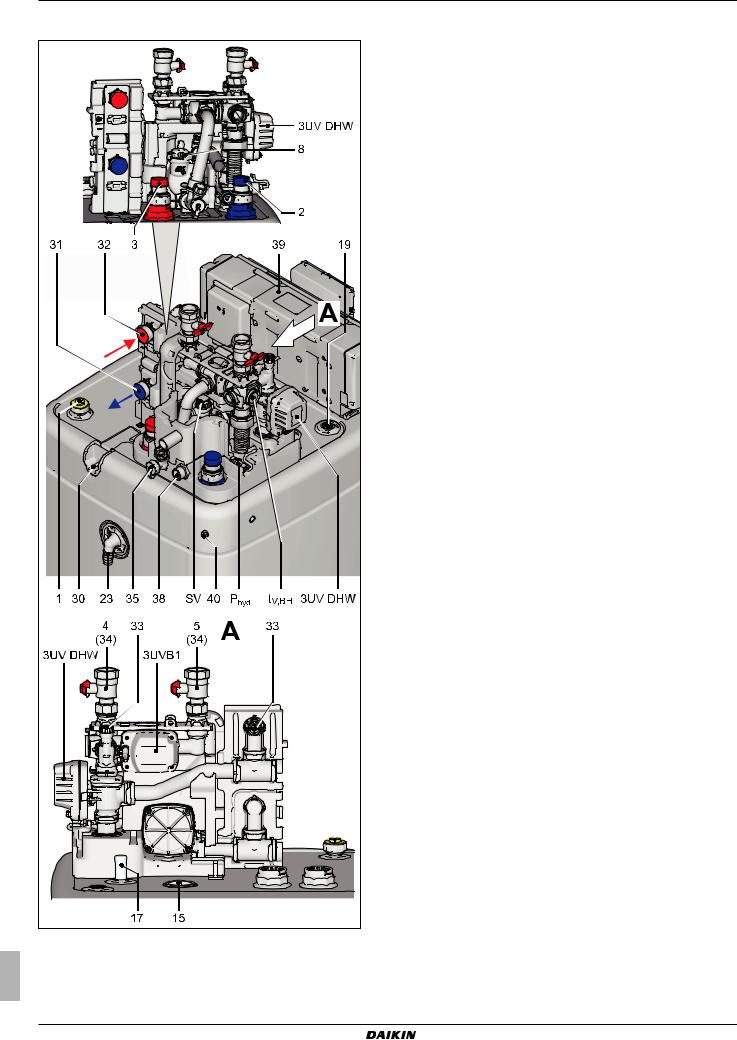
3.1.2 Exterior of the device and interior structure EKHWMX(B)500C
Fig. 3-2 EKHWMX(B)500C design and components (exterior view and interior structure)
Key names, see tab. 3-1
|
|
|
|
|
|
|
|
Daikin Altherma M ECH2O |
Installation and maintenance instructions |
|
|
Solar storage tank with heating controller |
9 |
|
|
008.1446799_00 – 07/2019 – EN |
|
|
|
3 Product description
3.1.3 Upper side of the device
Fig. 3-3 Design and components (all types): upper side of the device
Installation and maintenance instructions |
Daikin Altherma M ECH2O |
10 |
Solar storage tank with heating controller |
008.1446799_00 – 07/2019 – EN |
|
|
|
|
|
|
|
|
|
3 |
Product description |
|
|
|
|
|
|
|||||
1 |
|
Solar feed or connection for further |
18 |
Optional: electric backup heater |
3UVB1 |
|||||
|
heat source (1" IG) |
|
(EKBUxx) |
|
|
3-way switch valve (internal heat genera- |
||||
2 |
Cold water connection (1" AG) |
19 |
Sensor immersion sleeve for storage tank |
|
tor circuit) |
|||||
3 |
Hot water (1" AG) |
20 |
temperature sensor tDHW |
3UV DHW |
||||||
4 |
Heating feed (1" AG)* |
Pressure-free storage tank water |
|
3-way switch valve (hot water / heating) |
||||||
5 |
Heating return flow (1" AG)* |
21 |
Solar zone |
|
|
|
||||
7a |
Recommended accessories: |
22 |
Hot water zone |
Phyd |
Pressure sensor |
|||||
|
non-return valves (2x) |
23 |
Safety overflow connection |
MAG |
|
|||||
8 |
Automatic bleeder |
24 |
Mount for handle |
|
Diaphragm expansion vessel (optional) |
|||||
9 |
Storage tank (double walled jacket made |
25 |
Rating plate |
|
SV |
Safety pressure relief valve (heating cir- |
||||
|
of polypropylene with PUR hard foam heat |
26 |
Cover |
|
|
cuit) |
||||
|
insulation) |
27 |
|
|
Solar return flow |
tDHW |
|
|||
|
|
|
|
|||||||
10 |
Filling and draining connection or |
28 |
|
|
Solar feed (3/4" IG + 1" AG) |
|
Storage tank temperature sensor |
|||
|
|
solar return flow connection |
|
(type EKHWMXB… only) |
tV, BH |
|
||||
|
|
|
|
|||||||
|
|
|
|
|||||||
11 |
Mount for solar controller or handle |
29 |
|
|
Solar return flow (3/4" IG + 1" AG) |
|
Backup heater feed temperature sensor |
|||
12 |
Heat exchanger (stainless steel) for do- |
|
(type EKHWMXB… only) |
|
|
|||||
|
mestic hot water heating |
30 |
Discharge fitting cover |
RoCon B1 |
||||||
13 |
Heat exchanger (stainless steel) for stor- |
31 |
Outdoor unit water inlet connection |
|
Daikin Altherma M ECH2O controller con- |
|||||
|
age tank charging and heating support |
|
(1" AG)* |
|
|
trol panel |
||||
14 |
Heat exchanger (stainless steel) for pres- |
32 |
Outdoor unit water outlet connection |
|
|
|||||
|
surised solar system charging (type |
|
(1" IG)* |
|
|
Safety devices |
||||
|
EKHWMXB… only) |
33 |
Vent valve (manual) |
|
Observe tightening torque! |
|||||
15 |
Connection for optional electric backup |
34 |
Ball cock (heating circuit)* |
AG |
External thread |
|||||
|
heater EKBUxx (R 1½" IG) |
35 |
Combined filling and draining valve (heat- |
IG |
Internal thread |
|||||
16 |
|
Solar - inflow layering pipe |
|
ing circuit) |
|
* |
Ball cock (1" IG) is supplied. |
|||
17 |
Fill level indicator (storage tank water) |
38 |
Diaphragm expansion vessel connection |
|
|
|||||
|
|
|
39 |
Controller housing with electr. connector |
|
|
||||
|
|
|
|
block |
|
|
|
|||
|
|
|
40 |
Holding burls for protective cover |
|
|
||||
|
|
|
41 |
EKSRPS4A |
|
|
|
|||
|
|
|
|
Optional: |
|
Daikin solar control and |
|
|
||
|
|
|
|
pump unit |
|
|
|
|||
|
|
|
|
|
|
|
|
|
|
|
Tab. 3-1 Legend for fig. 3-1 to fig. 3-3
|
|
|
|
|
|
|
|
Daikin Altherma M ECH2O |
Installation and maintenance instructions |
|
|
Solar storage tank with heating controller |
11 |
|
|
008.1446799_00 – 07/2019 – EN |
|
|
|
4 Set-up and installation
4 Set-up and installation
WARNING!
Cooling systems (heating pumps), climate control systems and heating devices that have been set up and installed incorrectly can both endanger life and health of people and be impaired in their function.
Work on the Daikin Altherma M ECH2O (such as e.g. installation, repair, connection and initial commissioning) must only be carried out by persons who are authorised, who have successfully completed qualifying technical or vocational training for the respective activity and who have taken part in advanced training sessions recognised by the relevant responsible authority. This especially includes heating specialists and specialist electricians, who have experience in the proper installation and maintenance of heating systems due to their technical training and specialist knowledge.
|
|
|
|
|
|
|
|
|
|
Installation and maintenance instructions |
Daikin Altherma M ECH2O |
12 |
Solar storage tank with heating controller |
||
008.1446799_00 – 07/2019 – EN |
|||
4 Set-up and installation
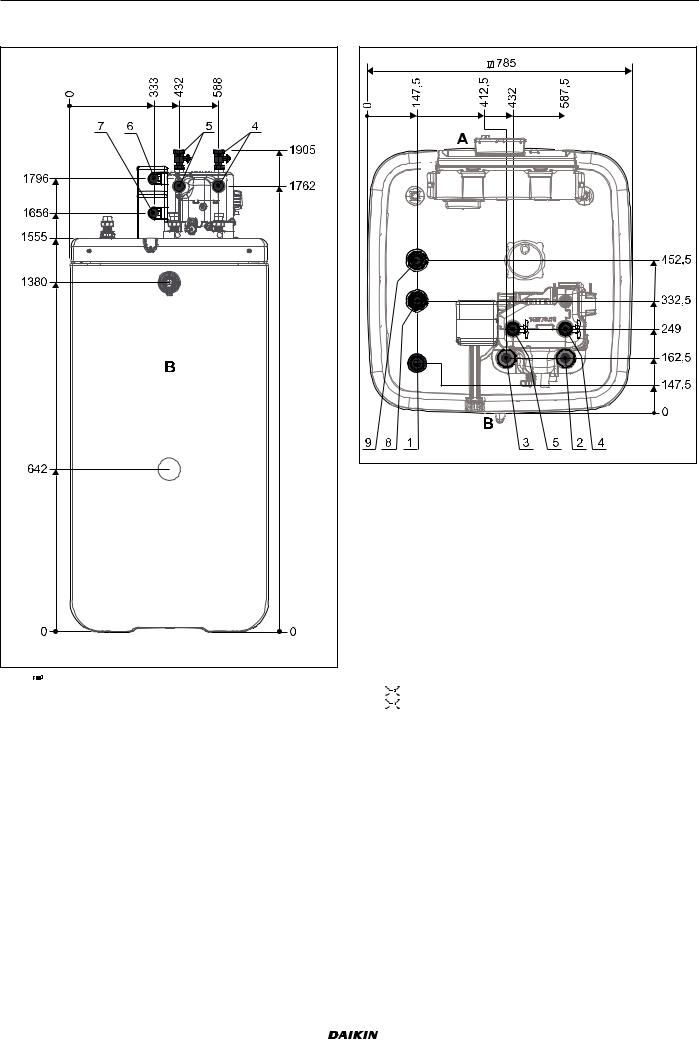
4.1 Dimensions and connections
4.1.1 EKHWMX(B)300C
1 |
|
|
Solar inflow |
7 |
Outdoor unit water inlet connection |
|
2 |
Cold water |
8 |
|
Solar feed (type EKHWMXB… only) |
||
|
||||||
3 |
Hot water |
9 |
|
Solar return (type EKHWMXB… only) |
||
|
||||||
4 |
Heating flow |
|
|
|
||
5 |
Heating return flow |
A |
Front |
|||
6 |
Outdoor unit water outlet connection |
B |
Rear |
|||
Fig. 4-1 EKHWMX(B)300C connections and dimensions
|
|
|
|
|
|
|
|
Daikin Altherma M ECH2O |
Installation and maintenance instructions |
|
|
Solar storage tank with heating controller |
13 |
|
|
008.1446799_00 – 07/2019 – EN |
|
|
|
4 Set-up and installation
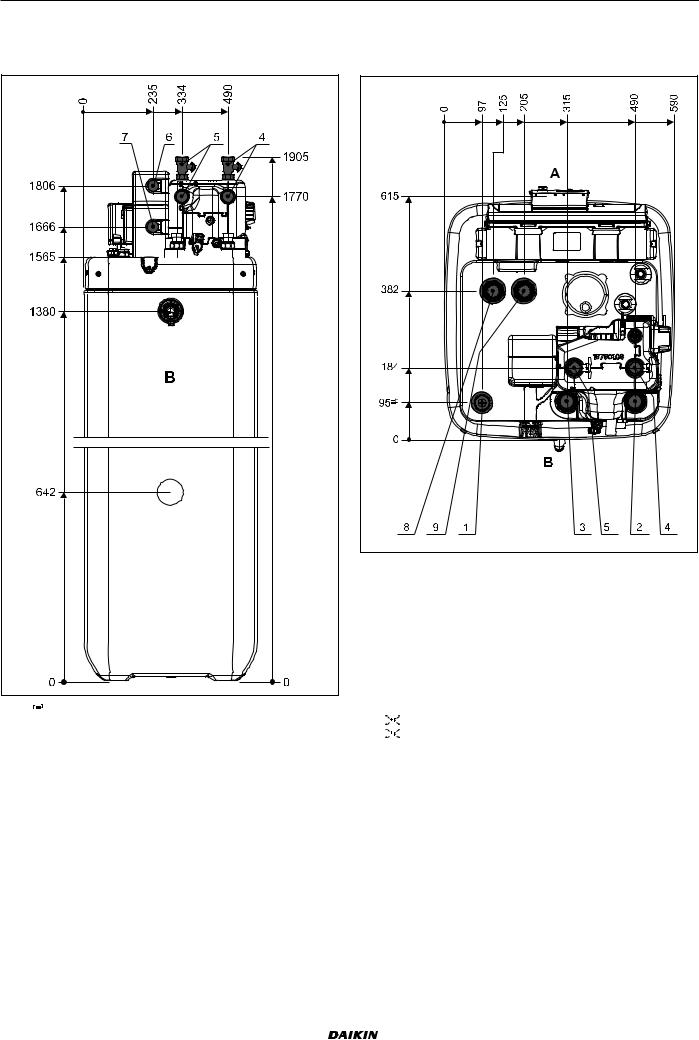
4.1.2 EKHWMX(B)500C
1 |
|
|
Solar inflow |
7 |
Outdoor unit water inlet connection |
|
2 |
Cold water |
8 |
|
Solar feed (type EKHWMXB… only) |
||
|
||||||
3 |
Hot water |
9 |
|
Solar return (type EKHWMXB… only) |
||
|
||||||
4 |
Heating flow |
|
|
|
||
5 |
Heating return flow |
A |
Front |
|||
6 |
Outdoor unit water outlet connection |
B |
Rear |
|||
Fig. 4-2 EKHWMX(B)500C connections and dimensions
|
|
|
|
|
|
|
|
|
|
Installation and maintenance instructions |
Daikin Altherma M ECH2O |
14 |
Solar storage tank with heating controller |
||
008.1446799_00 – 07/2019 – EN |
|||
4 Set-up and installation
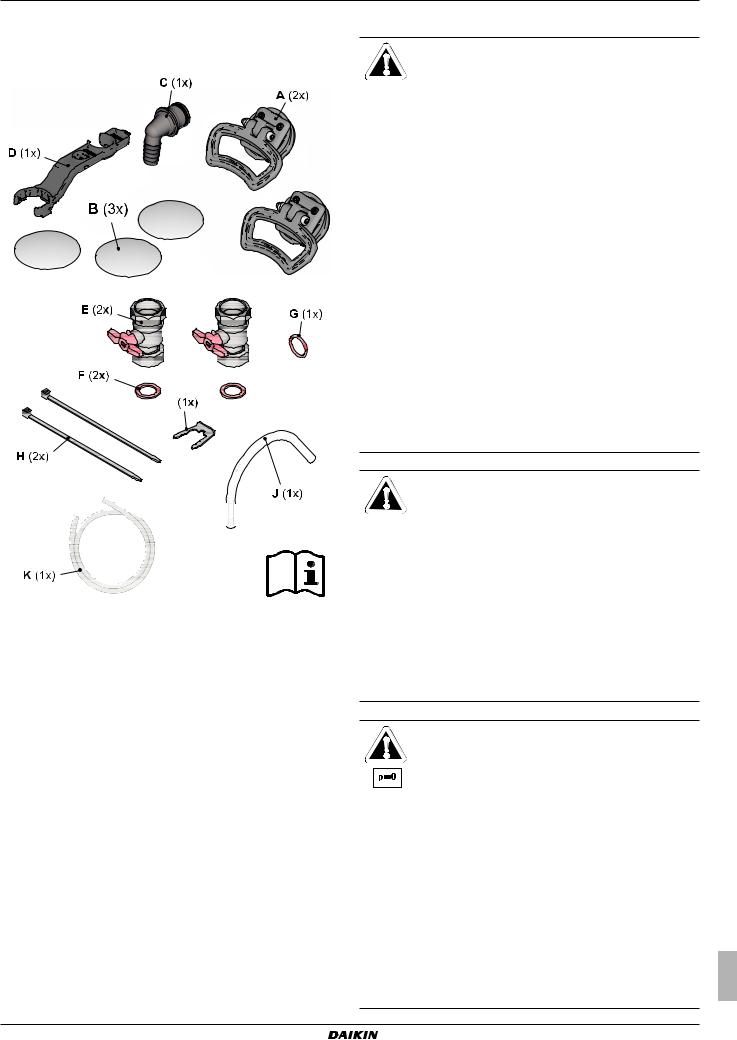
4.1.3 Scope of delivery
–Daikin Altherma M ECH2O
–Bag of accessories (see fig. 4-3)
|
|
|
|
|
|
|
|
|
|
|
|
|
|
|
|
|
|
|
|
|
|
|
|
|
|
|
|
|
|
|
|
|
|
|
|
|
|
|
|
|
|
|
|
|
|
|
|
|
|
|
|
|
|
|
|
|
|
|
|
|
|
|
|
|
|
|
|
|
|
|
|
|
|
|
|
|
|
|
|
|
|
|
|
|
|
|
|
|
|
|
|
|
|
|
|
|
|
|
|
|
|
|
|
|
|
|
|
|
|
|
|
|
|
|
|
|
|
|
|
|
|
|
|
|
|
|
|
|
|
|
|
|
|
|
|
|
|
|
|
|
|
|
|
|
|
|
|
|
|
|
|
|
|
|
|
|
|
|
|
|
|
|
|
|
|
|
|
|
|
|
|
|
|
|
|
|
|
|
|
|
|
|
|
|
|
|
|
|
|
|
|
|
|
|
|
|
|
|
|
|
|
|
|
|
|
|
|
|
|
|
|
|
|
|
|
|
|
|
|
|
|
|
|
|
|
|
|
|
|
|
|
|
|
|
|
|
|
|
|
|
|
|
|
|
|
|
|
|
|
|
|
|
|
|
|
|
|
|
|
|
|
|
|
|
|
|
|
|
|
|
|
|
|
|
|
|
|
|
|
|
|
|
|
|
|
|
|
|
|
|
|
|
|
|
|
|
A |
|
Handles (only required for |
E |
Ball cock |
||||||||||||||||||||||
|
|
|
|
transport) |
F |
Flat seal |
||||||||||||||||||||
B |
|
Cover screen |
G |
O-ring |
||||||||||||||||||||||
C |
|
Hose connecting piece for |
H |
Cable tie |
||||||||||||||||||||||
|
|
|
|
safety overflow |
I |
Plug bracket |
||||||||||||||||||||
D |
|
Spanner |
J |
Venting tube |
||||||||||||||||||||||
|
|
|
|
|
|
|
|
|
|
|
|
|
|
|
|
|
|
|
K |
Cover drain hose |
||||||
Fig. 4-3 Contents of bag of accessories
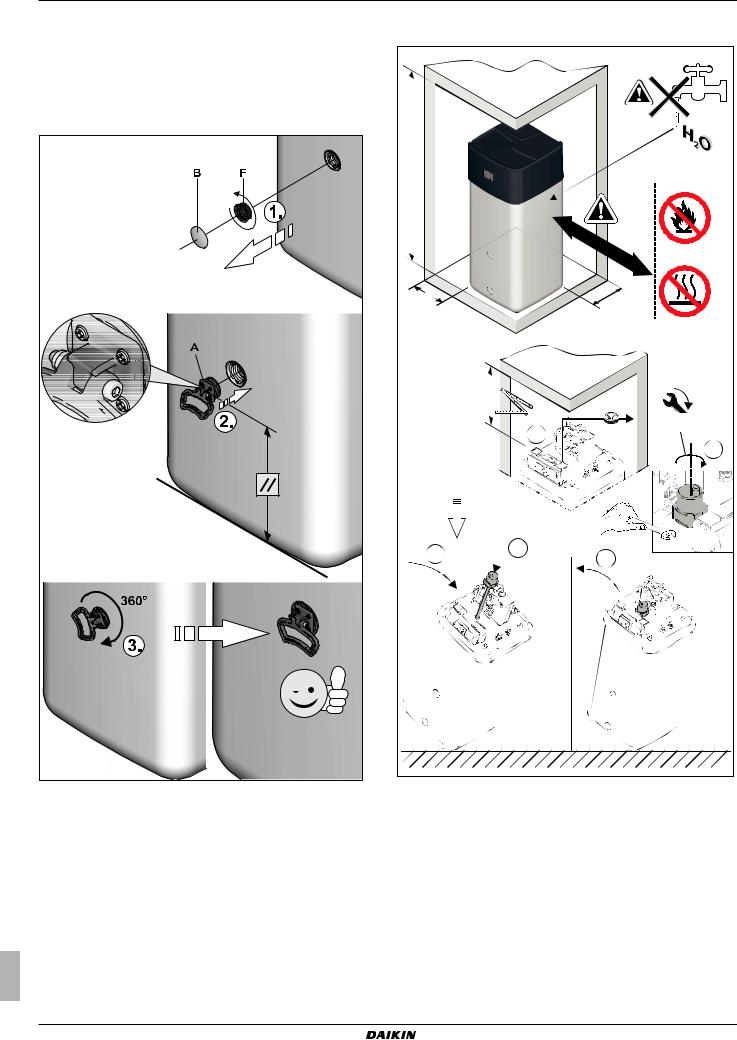
4.2 Installation
CAUTION!
●Only install the Daikin Altherma M ECH2O if a sufficient ground carrying capacity of
1050 kg/m² plus safety margin is ensured.
The ground must be flat and level.
●Outdoor installation is not permissible.
●Installation in an explosion-risk environment is not permissible.
●The electronic controller must never be exposed to the effects of weather.
●The storage tank may not be exposed to continuous direct sunlight, as the UV radiation and the effects of the weather will damage the plastic.
●The Daikin Altherma M ECH2O must be installed protected from frost.
●Make sure that the supply company does not provide corrosive domestic water.
–Suitable water treatment may be required.
WARNING!
The plastic wall of the storage tank of the Daikin Altherma M ECH2O can melt under the effects of external heat (>80 °C) and, in the extreme case, can catch fire.
●Only install the Daikin Altherma M ECH2O with a minimum distance of 1 m to other heat sources (>80 °C) (e.g. electrical heater, oil heater, chimney) and the material to be combusted.
CAUTION!
If the Daikin Altherma M ECH2O is not installed a sufficient distance below the flat solar panels (the top edge of the storage tank is higher than the bottom edge of the solar panels), the unpressurised solar system in the outdoor area will not be able to drain completely.
●Install the Daikin Altherma M ECH2O sufficiently low at the flat solar panels (observe minimum gradient in the solar connection lines) in the case of a DrainBack solar connection.
Daikin Altherma M ECH2O |
Installation and maintenance instructions |
Solar storage tank with heating controller |
15 |
008.1446799_00 – 07/2019 – EN |
4 Set-up and installation
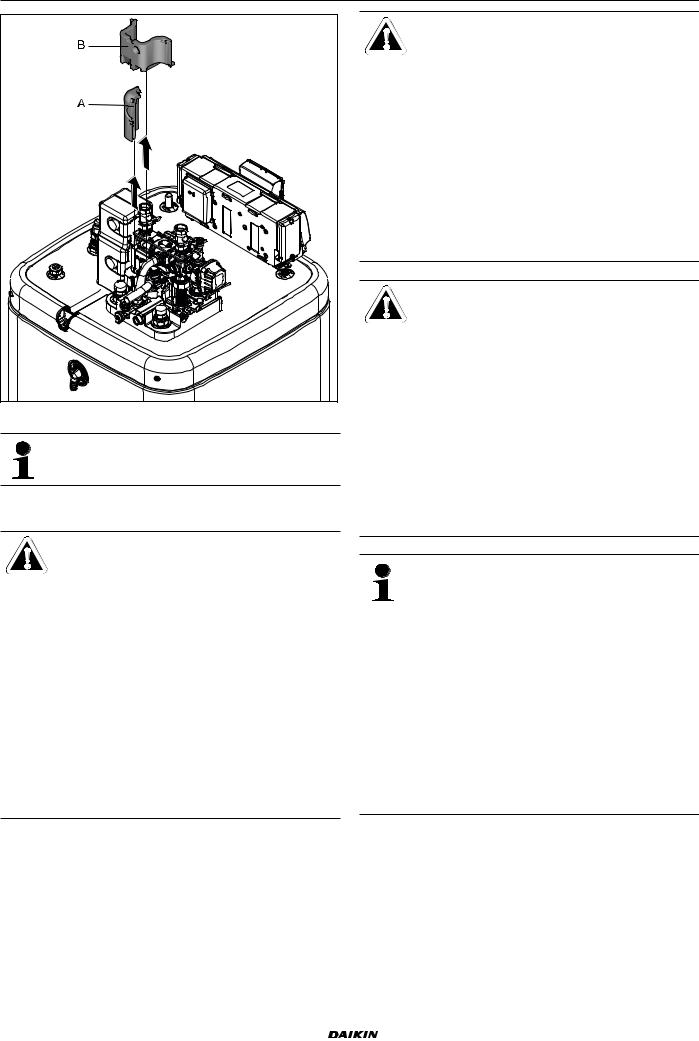
●Remove packing and dispose of it in an environment-friendly manner.
●Pull off the cover screens (fig. 4-4, item B) from the storage tank and unscrew the threaded fittings (fig. 4-4, item F) from the openings at which the handles are to be fitted (fig. 3-1 to fig. 3-2, item 24).
●Screw the handles (fig. 4-4, item A) into the now uncovered threaded holes.
Observe the installation and operating instructions enclosed with the accessories (  tightening torque, see chap. 10.4).
<![endif]>≥ 2050
|
<1000 |
mm |
>80°C |
|
|
||
s2 |
s1 |
|
|
|
|
||
X |
|
|
max. 10 Nm |
|
|||
|
|
|
|
1. |
|
||
|
|
||
|
|
5. |
X 1200 mm |
|
|
2. |
3. |
4. |
|
||
|
|
A |
Handle |
F Threaded piece |
Fig. 4-5 Installation (shown on EKHWMX(B)500C with installation of |
|
the optional backup heater) |
||||
B |
Cover screen |
|
||
|
|
Fig. 4-4 Installing the handles
●Install the Daikin Altherma M ECH2O at the installation site.
–Recommended clearances (fig. 4-5):
From the wall: (s1) ≥ 100 mm, (s2) ≥ 500 mm. From the ceiling (X): ≥ 1200 mm, at least 480 mm.
–Transport the Daikin Altherma M ECH2O using the handles.
–When setting up the unit in a cabinet, behind panels or in other restricted conditions, sufficient ventilation (e.g., using ventilation gratings) must be ensured.
●If required, install the optional backup heater (EKBUxx) in the Daikin Altherma M ECH2O (fig. 4-5).
Installation and maintenance instructions |
Daikin Altherma M ECH2O |
16 |
Solar storage tank with heating controller |
008.1446799_00 – 07/2019 – EN |
4 Set-up and installation
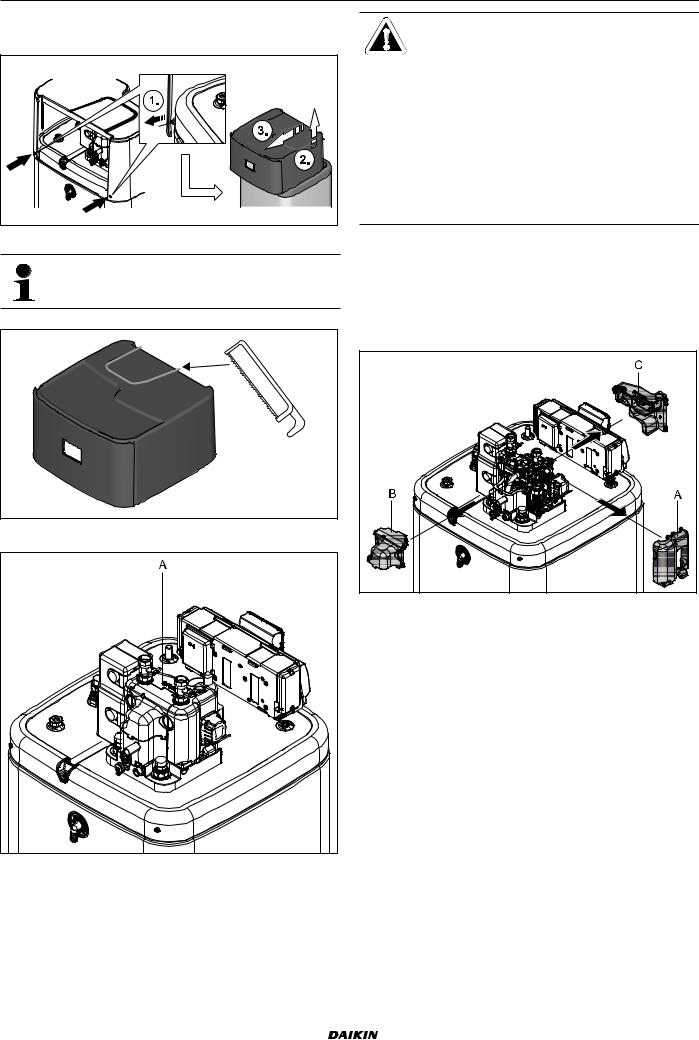
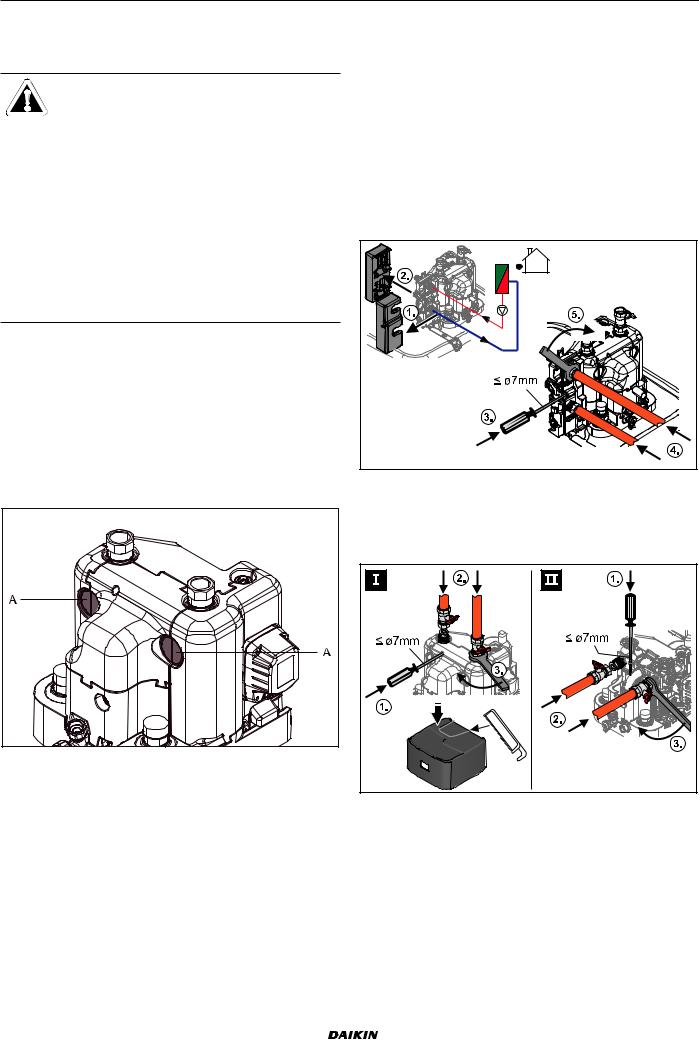
4.3Removing the cover and thermal insulation
● Raise the cover at the rear and remove forwards.
Fig. 4-6 Remove the protective cover
If the installation conditions require the hydraulic connection directly upwards, the cover can be cut out along the broken line.
Fig. 4-7 Producing the cover cut-out
Fig. 4-8 Daikin Altherma M ECH2O without protective cover
CAUTION!
The thermal insulation (fig. 4-8, item A) consists of pressure-sensitive EPP moulded parts that can be easily damaged if not handled correctly.
●Only remove the thermal insulation in the order stated below and in the stated directions.
●Do not use force.
●Do not use tools.
●Remove the thermal insulation in the following order:
–Pull the side insulating element off horizontally (fig. 4-9, item A).
–Pull the rear insulating element off horizontally (fig. 4-9, item B).
–Pull the front insulating element off horizontally (fig. 4-9, item C).
Fig. 4-9 Removing the top thermal insulation
●As required: Remove the bottom thermal insulation in the following order:
–Pull the side insulating element off vertically (fig. 4-10, item A).
–Pull the rear insulating element off vertically (fig. 4-10, item B).
|
|
|
|
|
|
|
|
Daikin Altherma M ECH2O |
Installation and maintenance instructions |
|
|
Solar storage tank with heating controller |
17 |
|
|
008.1446799_00 – 07/2019 – EN |
|
|
|
4 Set-up and installation
Fig. 4-10 Removing the bottom thermal insulation
The thermal insulation is installed in reverse order.
4.4 Water connection
CAUTION!
If the Daikin Altherma M ECH2O is connected to a heating system with steel pipes, radiators or non-diffusion-proof floor heating pipes, slurry and swarf could enter the hot water storage tank and cause blockages, local overheating or corrosion.
●Flush the feed pipes before filling the heat exchanger.
●Rinse out the heat distribution network (in the existing heating system).
●Install a dirt filter or sludge separator in the heating return flow (see chap. 2.4.4).
CAUTION!
If the Daikin Altherma M ECH2O is connected to a cold water supply line in which steel pipes are used, swarf can enter the stainless steel corrugated tube heat exchanger and remain there.
This can lead to contact corrosion damage and subsequently to leakage.
●Flush the feed pipes before filling the heat exchanger.
●Install a dirt filter in the cold water supply (see chap. 2.4.4).
EKHWMXB300C AND EKHWMXB500C ONLY
CAUTION!
If the heat exchanger for pressurised solar system charging (fig. 4-1 / fig. 4-2, items 8+9) is connected to an external heater (e.g. woodburning boiler), the Daikin Altherma M ECH2O can be damaged or destroyed due to an excessively high feed temperature at these connections.
●The inflow temperature of the external heating unit should be limited to max. 95 °C.
In accordance with EN 12828 a safety valve that limits the maximum permissible operating pressure in the heating system must be installed on or in the immediate vicinity of the heat generator. There may not be any
hydraulic blocking elements between the heat generator and the safety valve.
Any steam or heating water which may escape must be drained by a suitable blow-off line with constant gradient in a frost-pro- tected, safe and observable manner.
A diaphragm expansion vessel suitably sized and preset for the heating system must be connected to the Daikin Altherma M ECH2O. There may not be any hydraulic blocking elements between the heat generator and the diaphragm expansion vessel.
Daikin recommends installing a mechanical pressure gauge for filling the heating system.
●Observe the stipulations of EN 806 and DIN 1988 for domestic water pipes.
●Install the Daikin Altherma M ECH2O close to the withdrawal point to dispense with the need for a circulation line. If a circulation line is mandatory, it must be installed according to the schematic diagrams in chap. 9 "Hydraulic system connection".
|
|
|
|
|
|
|
|
|
|
Installation and maintenance instructions |
Daikin Altherma M ECH2O |
18 |
Solar storage tank with heating controller |
||
008.1446799_00 – 07/2019 – EN |
|||
4 Set-up and installation
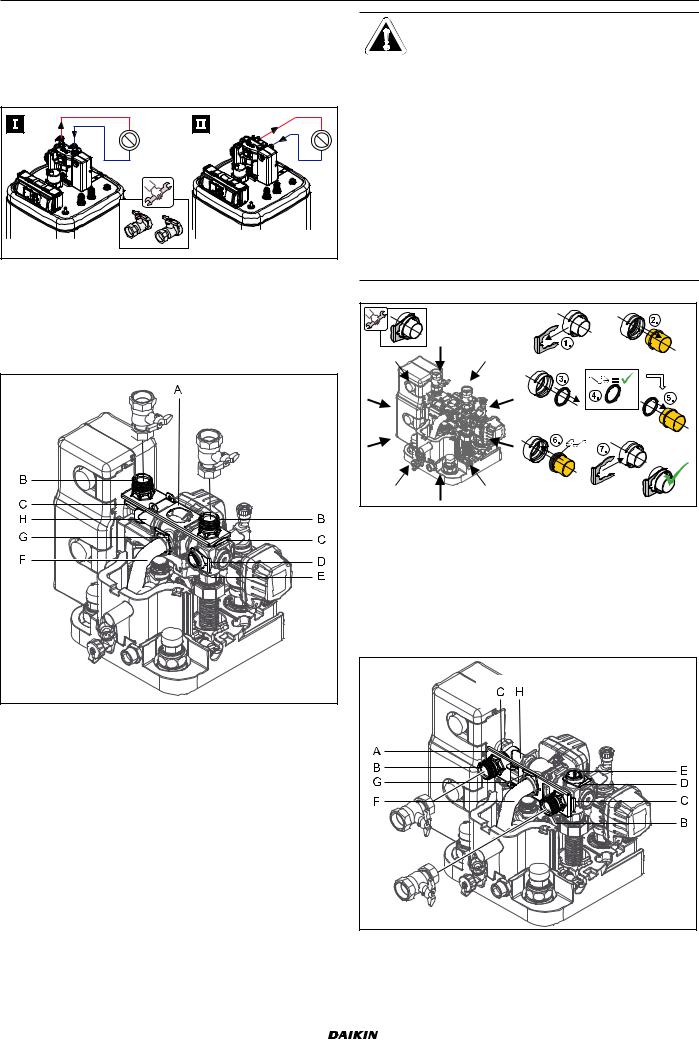
4.4.1Aligning the connections of the heating supply and return
The connections of the heating supply and return can be directed upwards or backwards in order to adapt it optimally to the structural conditions of the installation site (see fig. 4-11).
Fig. 4-11 Variants for aligning the heating feed and return
The device is supplied with upwards aligned connections as standard. The following conversion steps are required in order to direct the connections to the rear out of the device:
●Remove the protective cover and top thermal insulation (see chap. 4.3).
CAUTION!
When working on the hydraulics, pay attention to the installation position of the O-rings to avoid damaging them and causing leaks.
●Always place O-rings on the part to be inserted after a plug connection has been removed or before it is installed (see
fig. 4-13).
●Connection of heating lines by plug connection must be without tension. Establish suitable tension relief particularly for connection with flexible lines (not breathable!).
Fig. 4-13 Assembly of the plug connections
●Remove the retaining plate (fig. 4-12, item A).
●Pull off the sealing plug plug bracket (fig. 4-12, item D).
●Pull out the sealing plug (fig. 4-12, item E).
●Turn the elbow (fig. 4-12, item H) 90° to the rear.
●Pull the plug bracket off the manifold (fig. 4-12, item G).
●Carefully pull the manifold (fig. 4-12, item F) so far backwards out of its horizontal mounting that the retaining plate
(fig. 4-14, item A) can be pushed vertically in between.
Fig. 4-12 Aligning the heating supply and return upwards
● Pull the two plug brackets off the connection couplings (fig. 4-12, item C).
● Pull off the two connection couplings (fig. 4-12, item B).
Fig. 4-14 Heating supply and return connections aligned to the rear
|
|
|
|
|
|
|
|
Daikin Altherma M ECH2O |
Installation and maintenance instructions |
|
|
Solar storage tank with heating controller |
19 |
|
|
008.1446799_00 – 07/2019 – EN |
|
|
|
4 Set-up and installation
●Slide the retaining plate between the manifold and its horizontal mounting and insert the manifold (fig. 4-14, item F) back into its mounting through the middle hole of the retaining plate.
CAUTION!
If the plug brackets cannot be put on properly, the couplings can be detached from their mountings to ensure a very strong or continuous escape of liquid can occur.
●Before putting on a plug bracket, make sure that the plug bracket engages in the coupling groove. To do so, insert the coupling far enough into the mounting that the groove is visible through the plug bracket mounting.
●Insert the plug bracket up to the end stop.
●Secure the manifold with plug bracket (fig. 4-14, item G) in its mounting again.
●Insert the two connection couplings (fig. 4-14, item B) into the lateral mountings through the retaining plate.
●Secure the two connection couplings with plug brackets (fig. 4-14, item C) in their mountings.
●Insert the sealing plug (fig. 4-14, item E) into the upper mounting.
●Secure the sealing plug with plug bracket (fig. 4-14, item D).
●Cut out side openings in the thermal insulation (fig. 4-15, item A) using a suitable tool.
Fig. 4-15 Cut-out in thermal insulation
4.4.2 Connecting hydraulic lines
Prerequisite: optional accessories (e.g. solar, backup heater) are mounted on the Daikin Altherma M ECH2O as specified in the enclosed instructions.
●Check cold water pressure (maximum 6 bar).
–If a higher pressure is present in the domestic water pipe, a pressure reducer will need to be installed.
●Establish hydraulic connections on the Daikin Altherma M ECH2O.
–Refer to fig. 4-1 / fig. 4-2 and tab. 3-1 for the position and dimensions of the heater connections and the outdoor unit connections. The details of the hydraulic connection from the indoor unit to the water inlet and outlet of the outdoor unit can be seen in fig. 4-16.
Fig. 4-16 Establishing the hydraulic connection to the outdoor unit
–  Pay attention to the stipulated tightening torque (see chap. 10.4 "Tightening torque"). To avoid damage, apply the necessary counter-torque with a suitable tool, see fig. 4-17.
Fig. 4-17 Establishing the heating connections
–Install the line so that the sound insulation hood can be positioned easily after installation.
–For rearward facing connections: Support hydraulic lines suitably according to the spatial conditions, see fig. 4-18.
|
|
|
|
|
|
|
|
|
|
Installation and maintenance instructions |
Daikin Altherma M ECH2O |
20 |
Solar storage tank with heating controller |
||
008.1446799_00 – 07/2019 – EN |
|||
4 Set-up and installation
Fig. 4-18 Supporting rear-facing hydraulic lines
–Connect the water for filling or refilling the heating system as per EN 1717 so that contamination of the drinking water due to return flow is reliably prevented.
●Connect the drain line to the safety overpressure valve and diaphragm expansion vessel as per EN 12828.
–Check the seat of the drain hose on the pressure relief valve.
–If necessary, connect and install a separate hose.
●Carefully insulate pipework against heat loss and to avoid condensation (insulation thickness at least 20 mm).
–Water shortage protection: the controller's pressure and temperature monitoring function shuts off the Daikin Altherma
M ECH2O reliably if there is a shortage of water. No additional water shortage protection is needed in the construction.
–Damage due to deposits and corrosion: observe the relevant technical rules to avoid corrosion products and deposits. Minimum requirements regarding the quality of filling and supplementary water:
–Water hardness (calcium and magnesium, calculated as calcium carbonate): ≤ 3 mmol/l
–Conductivity: ≤ 1500 (ideal: ≤ 100) μS/cm
–Chloride: ≤ 250 mg/l
–Sulphate: ≤ 250 mg/l
–pH-values (heating water): 6.5 - 8.5
Measures for desalination, softening, hardness stabilisation or other suitable conditioning measures are necessary to adhere to the required water quality if the filling and top-up water have a high overall hardness or other properties that deviate from the minimum requirements.
Fig. 4-19 Installation of drain hose at safety overflow
●Connect the discharge fitting on the cover (fig. 3-3, item 30) to the waste water installation with the enclosed hose section.
●Connecting a diaphragm expansion vessel (see fig. 4-20)
–Connect a suitably dimensioned and preset diaphragm expansion vessel for the heating system. There must not be any hydraulic blocking elements between the heat generator and the safety valve.
–Position the diaphragm expansion vessel in an easily accessible place (maintenance, parts replacement)
Fig. 4-20 Mounting the diaphragm expansion vessel
WARNING!
There is a danger of scalding at hot water temperatures over 60 °C. This is possible when using solar energy if an external heater is connected, the Legionella protection is activated, or the target hot water temperature is set to be greater than 60 °C.
●Install scalding protection (hot water mixing facility (e.g. VTA32 + Screw set 1").
●Connect the drain hose to the hose connector for the safety overflow (fig. 3-1 to fig. 3-3, item 23).
–Use transparent drain hose (draining water must be visible).
–Connect the drain hose to an adequately dimensioned waste water installation.
–Drain should not be lockable.
Daikin Altherma M ECH2O |
Installation and maintenance instructions |
Solar storage tank with heating controller |
21 |
008.1446799_00 – 07/2019 – EN |
 Loading...