


TV SIMULATOR STS 12 A2
TV SIMULATOR |
SYMULATOR TV |
Operating instructions |
Instrukcja obsługi |
JELENLÉT SZIMULÁTOR |
TV-SIMULATOR |
Használati utasítás |
Navodila za uporabo |
SIMULÁTOR TELEVIZE |
TV SIMULÁTOR |
Návod k obsluze |
Návod na obsluhu |
TV-SIMULATOR |
|
Bedienungsanleitung |
|
IAN 102656
Before reading, unfold the page containing the illustrations and familiarise yourself with all functions of the device.
Przed przeczytaniem proszę rozłożyć stronę z ilustracjami, a następnie proszę zapoznać się z wszystkimi funkcjami urządzenia.
Olvasás előtt kattintson az ábrát tartalmazó oldalra és végezetül ismerje meg a készülék mindegyik funkcióját.
Pred branjem odprite stran s slikami in se nato seznanite z vsemi funkcijami naprave.
Před čtením si otevřete stranu s obrázky a potom se seznamte se všemi funkcemi přístroje.
Pred čítaním si odklopte stranu s obrázkami a potom sa oboznámte so všetkými funkciami prístroja.
Klappen Sie vor dem Lesen die Seite mit den Abbildungen aus und machen Sie sich anschließend mit allen Funktionen des Gerätes vertraut.
GB |
Operating instructions |
Page |
1 |
PL |
Instrukcja obsługi |
Strona |
17 |
HU |
Használati utasítás |
Oldal |
33 |
SI |
Navodila za uporabo |
Stran |
49 |
CZ |
Návod k obsluze |
Strana |
65 |
SK |
Návod na obsluhu |
Strana |
91 |
DE / AT / CH |
Bedienungsanleitung |
Seite |
107 |


Index
GB
Introduction . . . . . . . . . . . . . . . . . . . . . . . . . . . . . . . . . . 2
Copyright . . . . . . . . . . . . . . . . . . . . . . . . . . . . . . . . . . . . 2
Intended use . . . . . . . . . . . . . . . . . . . . . . . . . . . . . . . . . |
2 |
Scope of delivery and transport inspection . . . . . . . . 3
Unpacking . . . . . . . . . . . . . . . . . . . . . . . . . . . . . . . . . . . . . . . . . . . 3 Disposal of the packaging . . . . . . . . . . . . . . . . . . . . . . . . . . . . . . . 4
Operating elements . . . . . . . . . . . . . . . . . . . . . . . . . . . |
4 |
Technical data . . . . . . . . . . . . . . . . . . . . . . . . . . . . . . . . 4
Safety instructions. . . . . . . . . . . . . . . . . . . . . . . . . . . . . 5
Functions . . . . . . . . . . . . . . . . . . . . . . . . . . . . . . . . . . . . |
7 |
Setup . . . . . . . . . . . . . . . . . . . . . . . . . . . . . . . . . . . . . . . |
7 |
Wall mounting . . . . . . . . . . . . . . . . . . . . . . . . . . . . . . . . 8
Operation . . . . . . . . . . . . . . . . . . . . . . . . . . . . . . . . . . |
11 |
Cleaning . . . . . . . . . . . . . . . . . . . . . . . . . . . . . . . . . . . . |
13 |
Storage . . . . . . . . . . . . . . . . . . . . . . . . . . . . . . . . . . . . |
13 |
Disposal of the appliance . . . . . . . . . . . . . . . . . . . . . . 13
Appendix . . . . . . . . . . . . . . . . . . . . . . . . . . . . . . . . . . . 14
Notes on the EC Declaration of Conformity. . . . . . . . . . . . . . . . . 14 Warranty . . . . . . . . . . . . . . . . . . . . . . . . . . . . . . . . . . . . . . . . . . . 14 Service . . . . . . . . . . . . . . . . . . . . . . . . . . . . . . . . . . . . . . . . . . . . . 15 Importer . . . . . . . . . . . . . . . . . . . . . . . . . . . . . . . . . . . . . . . . . . . . 15
STS 12 A2 |
1 |

Introduction
GB
Congratulations on the purchase of your new appliance.
You have clearly decided in favour of a high-quality product. These operating instructions are a part of this product. They contain important information in regard to safety, use and disposal. Before using the product, familiarise yourself with all operating and safety instructions. Use this appliance only as described and only for the specified areas of application. In addition, pass these operating instructions on to whoever might acquire the appliance at a future date.
Copyright
This documentation is copyright protected.
Any copying or reproduction of it, including as extracts, as well as the reproduction of images, also in an altered state, is only permitted with the written authorisation of the manufacturer.
Intended use
This appliance is used to simulate light proportions similar to those created by a TV set. This appliance is intended exclusively for indoor use in private households. Do not use it for commercial applications!
 WARNING
Risks from unintended use!
Risks can be engendered if the appliance is used for unintended purposes and/or other types of use.
►Use the appliance exclusively for its intended purposes.
►Observe the procedures described in these operating instructions.
2 |
STS 12 A2 |

Claims of any kind for damage resulting from unintended use, incom-
petent repairs, unauthorised modification or the use of unauthorised GB spare parts will not be accepted. The user alone bears the risk.
Scope of delivery and transport inspection
 WARNING
►Packaging materials should not be used as a plaything. There is a risk of su ocation.
This appliance is supplied with the following components as standard:
TV Simulator
Power adapter
Assembly material (2 screws, 2 plugs, adhesive strips)
Operating instructions
NOTE
►Check the contents to ensure that everything is available and for signs of visible damage.
►If the contents are not complete, or are damaged due to defective packaging or through transportation, contact the Service Hotline (see chapter Service).
Unpacking
♦Remove all appliance parts and these operating instructions from the carton.
♦Remove all packaging materials from the appliance.
STS 12 A2 |
3 |
Disposal of the packaging
GB |
The packaging protects the appliance against transport damage. |
|
|
|
The packaging materials are selected from the point of view of |
|
their environmental friendliness and disposal technology and are |
|
therefore recyclable. |
|
The recirculation of packaging into the material circuit |
|
saves on raw material and reduces the amount of waste |
|
generated. Dispose of packaging material that is no longer |
|
needed as per the regionally established regulations. |
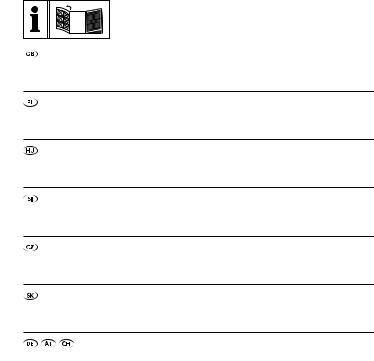
Operating elements
1Light surface
2Power adapter
3Barrel connector
4Plug socket
5Stand
6Switch
7Holes for wall mounting
8Twilight sensor
Technical data
Power adapter Type YA-DY1304-9-200
Input voltage |
100 - 240 V ~, 50 - 60 Hz |
||
Current consumption |
200 mA |
||
Output voltage |
9 V |
|
|
|
|||
Output current |
200 mA |
||
4 |
STS 12 A2 |
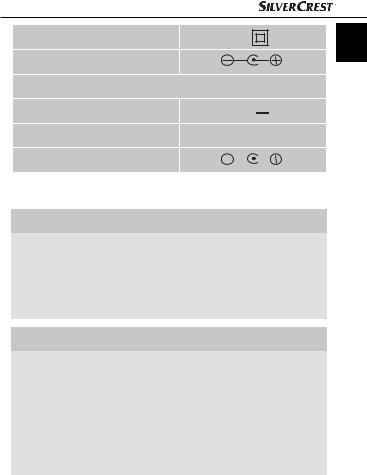
Protection class |
II / |
GB |
Polarity |
|
|
Appliance
Input voltage |
9 V |
|
|
|
||||
|
||||||||
Current consumption |
200 mA |
|||||||
Polarity |
|
|
|
|
|
|
|
|
|
|
|
|
|
|
|
||
Safety instructions
 RISK OF ELECTRIC SHOCK!
►Use the appliance only indoors. Do not use the appliance outdoors.
►Do not use the appliance if the power adapter or the power cable are damaged.
►Ensure that water or moisture cannot penetrate the appliance.
 WARNING - RISK OF INJURY!
►This appliance is not intended for use by individuals (including children) with restricted physical, physiological or intellectual abilities or deficiencies in experience and/or knowledge unless they are supervised by a person responsible for their safety or receive instructions from this person in how the appliance is to be used.
►Children should be supervised to ensure that they do not play with the appliance.
STS 12 A2 |
5 |

GB |
WARNING - RISK OF INJURY! |
|
►Do not use the appliance if people su ering from epilepsy are in the room. The changes in light levels can cause epileptic seizures in people susceptible to them.
►Before use, check the appliance for visible external damage. Do not operate a damaged appliance or one that has been dropped. There is also a risk of personal injury!
►Never look directly into the LEDs! They are very bright and can cause injury to the eyes!
►Repairs must only be carried out by authorised specialist companies or by the Customer Service. Incompetent repairs may result in risks for the user. In addition, warranty claims become void.
►Place the power cable such that no one can stumble over it.
CAUTION - PROPERTY DAMAGE
►Do not operate the appliance close to open flames (e.g. candles). The appliance could be irreparably damaged!
►Avoid direct sunlight. The appliance could be irreparably damaged!
►This appliance must not be exposed to rain. Protect the appliance against moisture and the penetration of liquids and objects into the housing. Never submerge the appliance in water and do not place objects filled with liquids (such as vases) on the appliance. The appliance could be irreparably damaged!
►Operate the appliance only with the supplied power adapter.
6 |
STS 12 A2 |

Functions
GB
With this TV simulator you can simulate the flicker patterns of a switched-on television and so feign your presence to potential burglars.
For this purpose 5 di erent settings are available:
ON: the LEDs light up in di erent colours and combinations.
DUSK+2HRS: the LEDs switch on automatically at dusk and then light up for 2 hours.
DUSK+4HRS: the LEDs switch on automatically at dusk and then light up for 4 hours.
DUSK+6HRS: the LEDs switch on automatically at dusk and then light up for 6 hours.
OFF: the appliance is switched o .
Setup
Select a suitable location for setting up the appliance. This location must fulfil the following criteria:
―The TV Simulator may not be directly visible from outdoors.
―The flickering generated by the TV simulator must be visible on the walls and/or ceiling from outdoors.
―A power socket must be easily accessible.
―The TV Simulator must be installed such that it can be influenced by the twilight. This means that the fall of light from outside must be given! It should also be borne in mind that, the closer the appliance is to a wall, the less light the twilight sensor 8 will have fall on it.
―The TV Simulator may not be located near a window which could be well lit from outdoors, such as on a busy street or next to street lights.
―There should be no additional time-controlled light source in the room, e.g. a night light.
STS 12 A2 |
7 |
♦ Place the appliance on a firm and flat surface so that it is stable GB and secure. To help prevent it from tipping over, you can secure
the stand 5 with the adhesive strips.
CAUTION - PROPERTY DAMAGE
►Do not use the adhesive strips to hang the appliance on a wall! The appliance may fall down and be irreparably damaged!
♦Align the light surface 1 so that the flicker is visible on the walls and/or ceiling
♦Connect the power adapter 2 with the appliance by inserting the barrel connector 3 into the plug socket 4 at the rear side of the appliance.
♦Connect the power adapter 2 into a power socket.
NOTE
►It is best to check the location and alignment of the appliance in the dark from outdoors and through the window. Only in this way can you assess whether the appliance is aligned so that it appears as if someone is watching television inside.
If necessary, realign the appliance.
Wall mounting
 RISK OF ELECTRIC SHOCK!
Ensure that there are no power cables or other conduits or pipes in the wall at the location where you intend to bore the holes for the wall holder. It would be a potentially fatal risk to bore into a current carrying electric cable!
8 |
STS 12 A2 |

Select a suitable mounting location for the appliance: |
|
― The TV Simulator may not be directly visible from outdoors. |
GB |
|
―The flickering generated by the TV simulator must be visible on the walls and/or ceiling from outdoors.
―A power socket must be easily accessible.
―The TV Simulator must be installed such that it can be influenced by the twilight. This means that the fall of light from outside must be given! Take note that when wall mounted, the twilight sensor 8 is very close to the wall which a ects the fall of light.
―The TV Simulator may not be located near a window which could be well lit from outdoors, such as on a busy street or next to street lights.
―There should be no additional time-controlled light source in the room, e.g. a night light.
♦Remove the stand 5 by bending it slightly apart and then pull the restraints out of the mountings.
♦Drill two holes with a spacing of about 45 mm. Use the stand 5 to mark the holes: the spacing will thus be measured correctly. The boreholes must be suitable for 8 mm wall plugs.
♦Insert the supplied plugs into the holes and screw the stand 5 firmly down through the holes for wall mounting 7 using the supplied screws.
♦Push the TV Simulator back onto the stand 5. Ensure that the two cross-shaped restraints engage correctly with the mountings.
STS 12 A2 |
9 |
CAUTION - PROPERTY DAMAGE
GB
►Before you connect the appliance to the power supply, check to ensure that the required input voltage as given on the type plate tallies with that for the intended power source.
►Check to ensure that the cable for the power adapter 2 is not damaged and that it does not lead over hot surfaces and/or sharp edges, otherwise it could be damaged.
►Ensure that the cable for the power adapter 2 is not over-taut or kinked.
♦Connect the power adapter 2 with the appliance by inserting the barrel connector 3 into the plug socket 4 at the rear side of the appliance.
♦Align the light surface 1 so that the flicker is visible on the walls and/or ceiling.
♦Connect the power adapter 2 into a power socket.
NOTE
►It is best to check the location and alignment of the appliance in the dark from outdoors and through the window. Only in this way can you assess whether the appliance is aligned so that it appears as if someone is watching television inside.
If necessary, realign the appliance.
10 |
STS 12 A2 |

Operation
GB
♦When it gets dark early, for example, in the winter months, set switch 6 to “DUSK+6HRS“. 3 green LEDs light up immediately. The appliance becomes active at dusk and, for 6 hours, simulates the flickering of a television. After 6 hours the appliance switches itself o , except for the 3 green LEDs.
As soon as it is dusk again, the appliance switches back on for 6 hours.
To switch your appliance o again, you need to slide switch 6 to the position “OFF“.
NOTE
►In the case of exposure to light (> ca. 30 lux) the TV Simulator also switches o before the 6 hours have lapsed.
♦Set the switch 6 to “DUSK+4HRS“, for example, during autumn and spring. 2 blue LEDs light up immediately. The appliance becomes active at dusk and, for 4 hours, simulates the flickering of a television. After 4 hours the appliance switches itself o , except for the 2 blue LEDs.
As soon as it is dusk again, the appliance switches back on for 4 hours.
To switch your appliance o again, you need to slide switch 6 to the position “OFF“.
NOTE
►In the case of exposure to light (> ca. 30 lux) the TV Simulator also switches o before the 4 hours have lapsed.
STS 12 A2 |
11 |

♦ When it gets dark late, for example, in the summer months, set GB switch 6 to “DUSK+2HRS“. A red LED lights up immediately.
The appliance becomes active at dusk and, for 2 hours, simulates the flickering of a television. After 2 hours the appliance switches itself o , except for the red LED.
As soon as it is dusk again, the appliance switches back on for 2 hours.
To switch your appliance o again, you need to slide switch 6 to the position “OFF“.
NOTE
►In the case of exposure to light (> ca. 30 lux) the TV Simulator also switches o before the 2 hours have lapsed.
♦Place switch 6 at “ON” to have the appliance permanently switched on. To switch your appliance o , you need to slide switch 6 to the position “OFF”.
NOTE
►Neither this TV Simulator, nor any other simulation systems, can guarantee that you will not be burgled. However, the TV Simulator conveys to potential burglars that someone is at home and watching TV.
►In every case, we recommend good door locks and anti-burglar aids, such as security doors and windows, as well as an alarm system, to deter burglars from breaking into your home.
12 |
STS 12 A2 |
Cleaning
GB
CAUTION - PROPERTY DAMAGE
►Ensure that, when cleaning it, no moisture can penetrate into the appliance, so as to avoid irreparable damage to it.
►Ensure that you remove the power adapter 2 from the power socket before cleaning the appliance.
♦Clean the surfaces of the appliance and the power adapter 2 with a soft, dry cloth.
♦For stubborn soiling, use a damp cloth and possibly add a mild detergent to it.
♦Ensure that the appliance and the power adapter 2 are completely dry before using them again.
Storage
Should you decide not use the appliance for an extended period, disconnect it from the power supply and store it in a clean and dry location away from direct sunlight. If the appliance is mounted to the wall, disconnect it from the power socket.
Disposal of the appliance
Do not dispose of the appliance in your
normal domestic waste. This product is subject to the provisions of European
Directive 2012/19/EU-WEEE (Waste Electrical and Electronic Equipment).
Dispose of the appliance through an approved disposal centre or at your community waste facility. Please observe the currently
applicable regulations. In case of doubt, please contact your waste disposal centre.
STS 12 A2 |
13 |

Appendix
GB
Notes on the EC Declaration of Conformity
This appliance, with regard to conformity with essential requirements and other relevant provisions, complies with the guidelines of the Electromagnetic Compatibility Directive 2004/108/EC, the Directive for Low Voltage Appliances 2006/95/EC, the RoHS Directive 2011/65/EU and the ERP Directive 2009/125/EC. The complete original declaration of conformity can be obtained from the importer.
Warranty
The warranty for this appliance is for 3 years from the date of purchase. This appliance has been manufactured with care and meticulously examined before delivery.
Please retain your receipt as proof of purchase. In the event of a warranty claim, please contact our Customer Service department by telephone. Only in this way can a post-free despatch for your goods be assured.
NOTE
►The warranty applies to material or manufacturing faults only, not for transport damage, parts subject to wear and tear or for damage to fragile parts.
This appliance is intended solely for private domestic use, not for commercial applications. If this product has been subjected to improper or inappropriate handling, abuse, or modifications not carried out by one of our authorised service centres, the warranty will be considered void.
14 |
STS 12 A2 |

Your statutory rights are not restricted in any way by this warranty.
The warranty period is not extended by repairs made under the GB warranty. This applies also to replaced and repaired parts.
Damages and defects extant at the time of purchase must be reported immediately after unpacking, resp. no later than two days after the date of purchase.
Repairs made after the lapse of the warranty period are subject to charge.
Service
 Service Great Britain
Tel.: 0871 5000 720 (£ 0.10/Min.)
E-Mail: kompernass@lidl.co.uk
IAN 102656
Hotline availability:
Monday to Friday 08:00 - 20:00 (CET)
Importer
KOMPERNASS HANDELS GMBH BURGSTRASSE 21
44867 BOCHUM GERMANY www.kompernass.com
STS 12 A2 |
15 |

16 |
STS 12 A2 |

Spis treści
Wstęp . . . . . . . . . . . . . . . . . . . . . . . . . . . . . . . . . . . . . . 18
. . . . . . . . . . . . . . . . . . . . . . . . . . . . .Prawa autorskie |
18 |
PL |
Użytkowanie zgodne z przeznaczeniem . . . . . . . . . 18
Zakres dostawy i przegląd po rozpakowaniu . . . . 19
Rozpakowanie . . . . . . . . . . . . . . . . . . . . . . . . . . . . . . . . . . . . . . . 19 Utylizacja opakowania . . . . . . . . . . . . . . . . . . . . . . . . . . . . . . . . 20
Elementy obsługowe . . . . . . . . . . . . . . . . . . . . . . . . . |
20 |
Dane techniczne . . . . . . . . . . . . . . . . . . . . . . . . . . . . . |
20 |
Wskazówki bezpieczeństwa . . . . . . . . . . . . . . . . . . . 21
Funkcje . . . . . . . . . . . . . . . . . . . . . . . . . . . . . . . . . . . . . 23
Ustawianie. . . . . . . . . . . . . . . . . . . . . . . . . . . . . . . . . . 23
Montaż na ścianie . . . . . . . . . . . . . . . . . . . . . . . . . . . . 25
Obsługa . . . . . . . . . . . . . . . . . . . . . . . . . . . . . . . . . . . . 27
Czyszczenie . . . . . . . . . . . . . . . . . . . . . . . . . . . . . . . . . 29
Składowanie . . . . . . . . . . . . . . . . . . . . . . . . . . . . . . . . 29
Utylizacja urządzenia. . . . . . . . . . . . . . . . . . . . . . . . . 30
Załącznik . . . . . . . . . . . . . . . . . . . . . . . . . . . . . . . . . . . 30
Wskazówki dotyczące deklaracji zgodności WE . . . . . . . . . . . . 30 Gwarancja . . . . . . . . . . . . . . . . . . . . . . . . . . . . . . . . . . . . . . . . . . 31 Serwis. . . . . . . . . . . . . . . . . . . . . . . . . . . . . . . . . . . . . . . . . . . . . . 32 Importer . . . . . . . . . . . . . . . . . . . . . . . . . . . . . . . . . . . . . . . . . . . . 32
STS 12 A2 |
17 |
Wstęp
Serdecznie gratulujemy zakupu nowego urządzenia.
Wybrany produkt charakteryzuje się wysoką jakością. Instrukcja PL obsługi jest częścią tego produktu. Zawiera ona ważne informacje
na temat bezpieczeństwa, użytkowania i usuwania. Przed rozpoczęciem użytkowania produktu należy zapoznać się ze wszystkimi informacjami dotyczącymi obsługi i bezpieczeństwa. Produkt należy użytkować wyłącznie zgodnie z zamieszczonym tu opisem oraz
w podanym zakresie zastosowań. W przypadku przekazania urządzenia innej osobie należy dołączyć również instrukcję obsługi.
Prawa autorskie
Niniejsza dokumentacja jest chroniona prawem autorskim. Wszelki rodzaj powielania lub przedruku, także we fragmentach,
jak również reprodukcja ilustracji, również w zmienionym stanie, jest dozwolone wyłącznie po uzyskaniu pisemnej zgody producenta.
Użytkowanie zgodne z przeznaczeniem
Niniejsze urządzenie to służy do symulowania oświetlenia podobnego do działającego telewizora. Urządzenie to przeznaczone jest wyłącznie do zastosowań prywatnych wewnątrz pomieszczeń.
Nie należy go używać do celów komercyjnych!
 OSTRZEŻENIE
Niebezpieczeństwo związane z użytkowaniem niezgodnym z przeznaczeniem!
Użytkowanie urządzenia w sposób niezgodny z jego przeznaczeniem i/lub inny rodzaj wykorzystania urządzenia może wiązać się z różnymi zagrożeniami.
►Urządzenie należy użytkować wyłącznie w sposób zgodny z jego przeznaczeniem.
►Należy przestrzegać zasad postępowania opisanych w niniejszej instrukcji obsługi.
18 |
STS 12 A2 |

Roszczenia wszelkiego rodzaju, wynikające ze szkód powstałych |
|
|
wskutek użytkowania niezgodnie z przeznaczeniem, przeprowadzenia |
|
|
niefachowych napraw, zmian wprowadzonych bez zezwolenia lub |
|
|
wskutek zastosowania niedopuszczonych części zamiennych, są |
PL |
|
wykluczone. Ryzyko ponosi wyłącznie użytkownik. |
||
|
Zakres dostawy i
przegląd po rozpakowaniu
 OSTRZEŻENIE
►Elementów opakowania nie dawać dzieciom do zabawy. Istnieje niebezpieczeństwo uduszenia.
Urządzenie dostarczane jest standardowo z następującymi elementami:
Symulator TV
Zasilacz sieciowy
Materiał montażowy (2 śruby, 2 kołki rozporowe, taśma klejąca)
Instrukcja obsługi
WSKAZÓWKA
►Po rozpakowaniu nowego urządzenia sprawdź, czy w środku znajdują się wszystkie części i czy nie ma żadnych widocznych uszkodzeń.
►W przypadku stwierdzenia braku lub uszkodzenia jakiegokolwiek elementu wskutek wadliwego opakowania lub transportu skontaktuj się z infolinią serwisową (patrz rozdział Serwis).
Rozpakowanie
♦Wyjmij wszystkie elementy urządzenia oraz instrukcję obsługi z kartonu.
♦Usuń z urządzenia wszelkie materiały opakowaniowe.
STS 12 A2 |
19 |
|
Utylizacja opakowania |
|
Opakowanie chroni urządzenie przed uszkodzeniami podczas |
|
transportu. Materiały opakowaniowe są przyjazne dla środowiska |
PL |
i można poddać je procesowi recyklingu. |
Przekazanie opakowania do ponownego przetworzenia pozwoli oszczędzić surowce naturalne i zmniejszyć zanieczyszczenie środowiska. Zbędne opakowania utylizować zgodnie z lokalnymi przepisami.
Elementy obsługowe
1Powierzchnia świecenia
2Zasilacz sieciowy
3Wtyczka dwubiegunowa
4Gniazdo wtykowe
5Podstawa
6Przełącznik
7Otwory do montażu ściennego
8Czujnik zmierzchu
Dane techniczne
Zasilacz sieciowy typu YA-DY1304-9-200
Napięcie wejściowe |
100 - 240 V ~, 50 - 60 Hz |
||
Pobór prądu |
200 mA |
||
Napięcie wyjściowe |
9 V |
|
|
|
|||
Prąd wyjściowy |
200 mA |
||
20 |
STS 12 A2 |
Stopień ochrony |
II / |
||
Biegunowość |
|
|
|
|
|
||
Urządzenie |
|
|
|
|
|
|
PL |
||
Napięcie wejściowe |
9 V |
|
|
|
|
||||
|
|||||||||
Pobór prądu |
200 mA |
||||||||
Biegunowość |
|
|
|
|
|
|
|
|
|
|
|
|
|
|
|
|
|
||
Wskazówki bezpieczeństwa
 NIEBEZPIECZEŃSTWO PORAŻENIA
PRĄDEM ELEKTRYCZNYM!
►Korzystaj z urządzenia tylko w pomieszczeniach! Nie używaj urządzenia na zewnątrz.
►Urządzenia nie wolno używać, gdy uszkodzony jest przewód zasilający lub wtyk sieciowy.
►Uważaj na to, aby woda ani wilgoć nie dostały się do wnętrza urządzenia.
 OSTRZEŻENIE –
NIEBEZPIECZEŃSTWO ODNIESIENIA OBRAŻEŃ!
►Opisywane urządzenie nie jest przeznaczone do obsługi przez osoby (w tym również dzieci) o ograniczonych zdolnościach fizycznych, sensorycznych lub umysłowych lub nieposiadające wystarczającego doświadczenia i/lub wiedzy; chyba że będą one korzystały z niego pod nadzorem osoby odpowiedzialnej za ich bezpieczeństwo lub też otrzymają od niej stosowne wskazówki dotyczące jego prawidłowej obsługi.
►Należy zapewnić nadzór nad dziećmi, aby nie bawiły się one urządzeniem.
STS 12 A2 |
21 |

|
|
|
OSTRZEŻENIE – |
|
|
|
NIEBEZPIECZEŃSTWO ODNIESIENIA OBRAŻEŃ! |
|
|
|
|
PL |
|
► |
Nie używać urządzenia, jeśli w pomieszczeniu przebywają |
|
|
osoby chore na epilepsję. Zmiana światła może u wrażliwych |
|
|
|
|
|
|
|
|
osób powodować ataki epilepsji. |
|
|
|
|
|
|
► Przed przystąpieniem do użytkowania sprawdź, czy urządzenie |
|
|
|
|
nie ma widocznych uszkodzeń. Nie uruchamiaj uszkodzonego |
|
|
|
ani upuszczonego urządzenia. Niebezpieczeństwo odniesie- |
|
|
|
nia obrażeń! |
|
|
► |
Nigdy nie patrz bezpośrednio w diody! Diody są bardzo |
|
|
|
jasne i mogą spowodować uszkodzenie wzroku! |
► Naprawy urządzenia zlecać wyłącznie w autoryzowanych punktach serwisowych lub w serwisie producenta. Nieprawidłowo wykonane naprawy mogą powodować zagrożenia dla użytkownika. Prowadzą one też do utraty gwarancji.
► Przewód sieciowy ułóż tak, aby nikt nie mógł się o niego potknąć.
UWAGA – SZKODY MATERIALNE
►Nie używaj urządzenia w pobliżu otwartego ognia (np. świec). Grozi to trwałym uszkodzeniem urządzenia.
►Chroń urządzenie przed bezpośrednim nasłonecznieniem. Grozi to trwałym uszkodzeniem urządzenia.
►Urządzenie nie może być narażone na działanie deszczu. Chroń urządzenie przed wilgocią i przedostawaniem się cieczy oraz przedmiotów do jego obudowy. Nigdy nie zanurzaj urządzenia w wodzie ani nie ustawiaj na nim żadnych przedmiotów wypełnionych cieczą (np. waz). Grozi to trwałym uszkodzeniem urządzenia.
►Urządzenie należy używać tylko z dostarczonym zasilaczem sieciowym.
22 |
STS 12 A2 |

Funkcje
Za pomocą symulatora TV można symulować migotanie podobne do tego, jakie powstaje przy działającym telewizorze i w ten sposób uda-
wać obecność domowników, odstraszając w ten sposób potencjalnych PL włamywaczy.
Dostępnych jest 5 różnych ustawień:
ON: diody świecą różnymi kolorami i w różnych kombinacjach.
DUSK+2HRS: diody włączają się automatycznie o zmierzchu i świecą się następnie przez 2 godziny.
DUSK+4HRS: diody włączają się automatycznie o zmierzchu i świecą się następnie przez 4 godziny.
DUSK+6HRS: diody włączają się automatycznie o zmierzchu i świecą się następnie przez 6 godzin.
OFF: urządzenie jest wyłączone.
Ustawianie
Znajdź odpowiednie miejsce na umieszczenie urządzenia. Wybrane miejsce ustawienia musi spełniać następujące kryteria:
―Symulator TV nie może być bezpośrednio widoczny z zewnątrz.
―Migotanie wytwarzane przez symulator TV musi być widoczne z zewnątrz na ścianach i/lub suficie.
―Gniazdo zasilania sieciowego musi być łatwo dostępne.
―Symulator TV musi zostać zainstalowany w taki sposób, aby mógł być sterowany przez zapadanie zmierzchu. Oznacza to, że do urządzenia musi docierać światło pochodzące z zewnątrz! Należy również zauważyć, że czujnik zmierzchu 8 rejestruje o tyle mniej światła, im bliżej ściany stoi urządzenie.
―Symulator TV nie może być używany przy oknie, które może zostać jasno oświetlone od zewnątrz, jak na przykład okno przy drodze o dużym natężeniu ruchu lub oświetlane przez latarnie uliczne.
STS 12 A2 |
23 |

―W pokoju nie powinno znajdować się żadne dodatkowe źródło światła sterowane za pomocą zegara sterującego, np. lampka nocna.
PL |
♦ Ustaw urządzenie na równym i twardym podłożu, aby stało |
|
stabilnie. By zapobiec przewróceniu się urządzenia, można |
||
|
||
|
podstawę 5 przymocować za pomocą taśmy klejącej. |
UWAGA – SZKODY MATERIALNE
►Nie używaj taśmy klejącej, aby zamocować urządzenie na ścianie! Urządzenie może spaść i zostać w ten sposób nieodwracalnie uszkodzone!
♦Ustaw powierzchnię świecenia 1 tak, aby migotanie było widoczne na ścianach i/lub suficie.
♦Podłącz zasilacz sieciowy 2 do urządzenia poprzez włożenie wtyczki dwubiegunowej 3 do gniazda 4 z tyłu urządzenia.
♦Podłącz zasilacz sieciowy 2 do gniazda zasilania.
WSKAZÓWKA
►Sprawdź miejsce ustawienia i orientację urządzenia najlepiej w ciemności, patrząc z zewnątrz przez okno. Tylko tak można ocenić, czy urządzenie jest ustawione w taki sposób, aby wyglądało na to, że ktoś ogląda telewizję. W razie potrzeby ustaw urządzenie ponownie.
24 |
STS 12 A2 |

Montaż na ścianie
NIEBEZPIECZEŃSTWO PORAŻENIA |
|
|
|
||
PRĄDEM ELEKTRYCZNYM! |
|
PL |
Przed przystąpieniem do wiercenia otworów do zamoco- |
|
|
wania urządzenia upewnij się, czy w ścianie nie biegną w |
|
|
tym miejscu przewody elektryczne ani żadne inne kable lub |
|
|
rury. Przewiercenie przewodu elektrycznego będącego pod |
|
|
napięciem grozi utratą życia! |
|
|
Znajdź odpowiednie miejsce do montażu urządzenia: |
|
|
―Symulator TV nie może być bezpośrednio widoczny z zewnątrz.
―Migotanie wytwarzane przez symulator TV musi być widoczne z zewnątrz na ścianach i/lub suficie.
―Gniazdo zasilania sieciowego musi być łatwo dostępne.
―Symulator TV musi zostać zainstalowany w taki sposób, aby mógł być sterowany przez zapadanie zmierzchu. Oznacza to, że do urządzenia musi docierać światło pochodzące z zewnątrz! Należy uważać, aby podczas montażu ściennego czujnik zmierzchowy 8 był blisko ściany i w ten sposób mógł być sterowany wpadającym światłem.
―Symulator TV nie może być używany przy oknie, które może zostać jasno oświetlone od zewnątrz, jak na przykład okno przy drodze o dużym natężeniu ruchu lub oświetlane przez latarnie uliczne.
―W pokoju nie powinno znajdować się żadne dodatkowe źródło światła sterowane przy pomocy zegara sterującego, np. lampka nocna.
STS 12 A2 |
25 |

♦Zdejmij podstawę 5 przez rozwarcie jej lekko i wyciągnięcie zaczepów z uchwytów.
♦Wywierć dwa otwory w odległości ok. 45 mm. Użyj podstawy 5
PL |
do zaznaczenia otworów: w ten sposób odległość zostanie |
|
prawidłowo zmierzona. Do wykonanych otworów muszą |
|
wejść kołki o średnicy 8 mm. |
♦Włóż znajdujące się w zestawie kołki rozporowe w otwory i przykręć podstawę 5 przez otwory do montażu ściennego 7 za pomocą znajdujących się w zestawie śrub.
♦Wsuń symulator TV ponownie na podstawę 5.
♦Zwróć uwagę na to, by oba krzyżakowe zaczepy dolne i zaczepy boczne weszły dokładnie w mocowania.
UWAGA – SZKODY MATERIALNE
►Przed podłączeniem urządzenia porównaj dane dotyczące wymaganego napięcia elektrycznego na tabliczce znamionowej z parametrami źródła napięcia przewidzianego do zasilania.
►Upewnij się, że przewód sieciowy zasilacza sieciowego 2 nie jest uszkodzony oraz nie jest ułożony na gorących powierzchniach i/lub ostrych krawędziach, ponieważ mógłby ulec uszkodzeniu.
►Uważaj na to, aby przewód zasilacza sieciowego 2 nie był silnie naprężony ani załamany.
♦Podłącz zasilacz sieciowy 2 do urządzenia poprzez włożenie wtyczki dwubiegunowej 3 do gniazda 4 z tyłu urządzenia.
♦Ustaw powierzchnię świecenia 1 tak, aby migotanie było widoczne na ścianach i/lub suficie.
♦Podłącz zasilacz sieciowy 2 do gniazda zasilania.
26 |
STS 12 A2 |

WSKAZÓWKA
►Sprawdź miejsce instalacji i orientację urządzenia najlepiej w ciemności, patrząc z zewnątrz przez okno. Tylko tak można
ocenić, czy urządzenie jest ustawione w taki sposób, aby |
PL |
wyglądało na to, że ktoś ogląda telewizję. W razie potrzeby |
|
ustaw urządzenie ponownie. |
|
Obsługa
♦W okresach, gdy szybko zapada zmrok, na przykład w miesiącach zimowych, ustaw przełącznik 6w położeniu „DUSK+ 6HRS“. Natychmiast zapalą się 3 zielone diody. O zmierzchu urządzenie włącza się i symuluje przez 6 godzin migotanie ekranu telewizyjnego. Po 6 godzinach urządzenie wyłącza się za wyjątkiem 3 zielonych diod. Gdy znów zapadnie zmrok, urządzenie włączy się znów na 6 godzin. Aby ponownie wyłączyć urządzenie, należy przesunąć przełącznik 6 na „OFF”.
WSKAZÓWKA
►Gdy do pomieszczenia wpada światło (> ok. 30 Lux), symulator TV wyłączy się jeszcze przed upływem 6 godzin.
♦Podczas na przykład miesięcy jesiennych lub wiosennych ustaw przełącznik 6 w położeniu „DUSK+4HRS“. Natychmiast zapalą się 2 niebieskie diody. O zmierzchu urządzenie włącza się i symuluje przez 4 godzin migotanie ekranu telewizyjnego. Po 4 godzinach urządzenie wyłącza się za wyjątkiem 2 niebieskich diod.
Gdy znów zapadnie zmrok, urządzenie włączy się znów na 4 godziny.
Aby ponownie wyłączyć urządzenie, należy przesunąć przełącznik 6 na „OFF”.
STS 12 A2 |
27 |
 Loading...