


English.............................................................................................................. |
2 |
Polski .............................................................................................................. |
24 |
Magyar.......................................................................................................... |
46 |
Deutsch .......................................................................................................... |
68 |
V 1.92

|
English |
Wireless keyboard with wireless mouse STMS 2017 A1 |
|
|
|
Contents |
|
|
|
|
|
|
|
|
|
Introduction |
3 |
|
|
|
Intended Use |
3 |
|
|
|
Package Contents |
4 |
|
|
|
Technical Data |
5 |
|
|
|
System Requirements ...................................................................................................................................... |
5 |
|
|
|
Safety Instructions |
6 |
|
|
|
Children and Persons with Disabilities........................................................................................................... |
6 |
|
|
|
Batteries........................................................................................................................................................... |
7 |
|
|
|
R/F Interface ................................................................................................................................................... |
7 |
|
|
|
Operating Environment .................................................................................................................................. |
7 |
|
|
|
Copyright ........................................................................................................................................................ |
8 |
|
|
|
Storing When Not Using the Product............................................................................................................ |
8 |
|
|
|
Overview......................................................................................................................................................... |
9 |
|
|
|
Before Getting Started |
11 |
|
|
|
Inserting the Batteries ................................................................................................................................... |
11 |
|
|
|
Connecting the USB Nano Receiver ........................................................................................................... |
13 |
|
|
|
The Wristpad................................................................................................................................................. |
14 |
|
|
|
Software Installation ..................................................................................................................................... |
15 |
|
|
|
Task Bar Symbols.......................................................................................................................................... |
16 |
|
|
|
Getting Started |
17 |
|
|
|
Toggling between Operating Modes ......................................................................................................... |
17 |
|
|
|
Configuring the Wireless Mouse ................................................................................................................. |
17 |
|
|
|
Configuring the Wireless Keyboard............................................................................................................ |
18 |
|
|
|
Maintenance / Cleaning |
19 |
|
|
|
Environmental Considerations and Recycling |
20 |
|
|
|
Conformity Notes |
20 |
|
|
|
Troubleshooting |
21 |
|
|
|
Warranty and Service Information |
22 |
|
|
|
|
|
|
|
2 |
|
|
|
|

Wireless keyboard with wireless mouse STMS 2017 A1 |
English |
Introduction
Thank you for purchasing the wireless design keyboard with wireless mouse and USB nano receiver STMS 2017 A1. The devices feature a SmartLink technology that makes any manual synchronisation obsolete. Several special keys and buttons on both appliances help you adapt the operation of the mouse and keyboard to your personal wishes. The mouse features a tilt wheel (4-way scroll wheel) enabling you to scroll horizontally as well as vertically.
Intended Use
This Keyboard and Mouse Set, consisting of a wireless keyboard, wireless mouse and USB nano receiver, is an IT device. The device may not be used outdoors or in tropical climates. This product has not been designed for corporate or commercial applications. Use the product in domestic environments for private applications only. Any use other than that mentioned above does not correspond to the intended use. This device fulfils all that relates to CE Conformity, relevant norms and standards. Any modifications to the equipment other than recommended changes by the manufacturer may result in these directives no longer being met. The manufacturer is not liable for any damage or interference caused by unauthorized modifications. Only use the accessories recommended by the manufacturer.
Please observe the regulations and laws in the country of use.
3

English |
Wireless keyboard with wireless mouse STMS 2017 A1 |
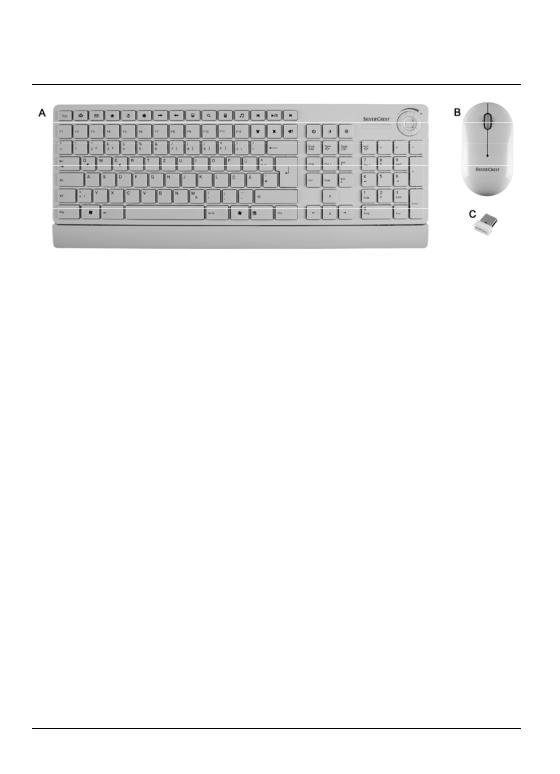
Package Contents
A Wireless keyboard STMS 2017 A1
BWireless Mouse STMS 2017 A1
CUSB nano receiver STMS2017A1-R (inserted into the wireless mouse by default)
D2 AAA-type batteries, 1.5V (Micro) for wireless keyboard (not illustrated)
E2 AAA-type batteries, 1.5V (Micro) for wireless mouse (not illustrated)
F CD-ROM with software (not shown)
GUser's manual (not shown)
4

Wireless keyboard with wireless mouse STMS 2017 A1 |
English |
Technical Data
-2.4 GHz radio frequency
-SmartLink technology (dispenses with the need to connect the receiver and mouse/keyboard manually)
-Range up to 5m
Keyboard
-20 special keys (hotkeys), 17 of which are programmable
-Volume control
-Scroll wheel
-446 mm x 172 mm x 28 mm (LxWxH, with wristpad), 446 mm x 143 mm x 28 mm (LxWxH, without wristpad)
-635g (without batteries, with wristpad)
-2 batteries type AAA, 1,5V (Micro)
Mouse
-Optical sensor with selectable resolution of 800 cpi and 1600 cpi
-8 buttons, 7 of which are programmable
-Tilt wheel (4-way scroll wheel)
-107 mm x 57 mm x 32 mm (LxWxH)
-68 g (without batteries)
-2 batteries type AAA, 1,5V (Micro)
USB Nano Receiver
-15.5 mm x 7 mm x 18 mm (LxWxH)
-2 g
System Requirements
-Intel® Pentium® III / AMD AthlonTM or higher
-1 free USB-2.0 port
-Microsoft® Windows® XP, Windows Vista® or Windows® 7
-CD-ROM drive or DVD drive for installing the software
5
English |
Wireless keyboard with wireless mouse STMS 2017 A1 |
Safety Instructions
Before first using the device read the following instructions carefully and take note of the safety warnings, even if you are familiar with using electronic devices. Keep this manual in a safe place for future reference. If you sell or pass on the appliance, you should absolutely ensure to hand over these instructions as well.
This icon denotes important information for the safe operation of the product and for the user’s safety.
This icon alerts about a strong light source.
This symbol denotes further information on the topic.
Avoid harm to the eyes. Never look directly into the LED beam.
Children and Persons with Disabilities
Electrical appliances do not belong in the hands of children. Also people with disabilities shall use electrical devices accordingly. Do not allow children or persons with disabilities to use electrical devices when not under supervision. These people may not comprehend the presence of potential risks. Batteries and small parts represent potential choking hazards. Keep the batteries out of reach. If a battery is swallowed, seek medical help immediately. Keep the packaging away from children and persons with disabilities too, as there is danger of suffocation.
6

Wireless keyboard with wireless mouse STMS 2017 A1 |
English |
Batteries
Please always insert the batteries with the poles pointing in the proper direction. Never attempt to recharge the batteries and under no circumstances try to incinerate them. Do not use different batteries (e.g. old and new, alkaline and carbon, etc.) simultaneously. Remove batteries if appliance is not being used for any longer periods of time. Inappropriate battery use may result in explosion and leakage risks.
R/F Interface
Please switch off the appliance in airplanes, hospitals, operating theatres and in the vicinity of medical electronic system. The radio waves transmitted could impair the functionality of sensitive appliances. Observe a minimum distance of 20 cm between the appliance and any pacemaker as the radio waves could impair the function of the pacemaker. The transmitted radio waves may create interference noises in hearing aids. Do not allow the appliance to be introduced in the vicinity of inflammable gases or in environments subject to a risk of explosion (e.g. paint shops) as long as the radio component is switched on, because the transmitted radio waves could trigger an explosion or fire. The coverage/range of the radio waves varies depending on the surrounding and environmental conditions. In any data exchange via wireless connections, unauthorized third parties are also able to receive the data. Targa GmbH is not liable for any radio or television interference caused by unauthorized modifications of this appliance. Targa furthermore accepts no liability for the replacement or exchange of connection cables and appliances not specified by Targa GmbH. The user is solely responsible for the elimination of interferences caused by such an unauthorized modification, as well as for the replacement or exchange of the appliances concerned.
Operating Environment
Position the device on a firm, even surface and do not place any objects on top of it. The appliance is not designed for operation in spaces subject to high humidity or temperatures (e.g. bathrooms) or in excessively dusty locations. Operating temperature and air humidity: 5°C to 40°C, max. relative air humidity 90%.
 Please ensure that:
-the appliance is not exposed to direct sources of heat (e.g. heating elements);
-the appliance is not exposed to direct sunlight or artificial light;
7

English |
Wireless keyboard with wireless mouse STMS 2017 A1 |
-any contact with splashes and/or drips of water and other liquids is avoided and the device is not operated near water; in particular, the appliance may never be submerged (do not place waterfilled objects such as vases or open drinks containers on top of or near the appliance);
-the appliance is not placed in the direct vicinity of magnetic fields (e.g. loudspeakers);
-no sources of open flame (e. g. lighted candles) are placed on top of or near the appliance;
-the appliance is not penetrated by foreign objects;
-the appliance is not exposed to strong temperature fluctuations;
-the appliance is not subjected to excessive shaking or vibration.
Copyright
The entire content of this User’s Manual is copyrighted and is provided to the reader for information purposes only.
Copying data and information without the prior written and explicit authorization from the author is strictly forbidden. This also applies to any commercial use of the contents and information.
All texts and figures are up-to-date as per the date of print release. We assume no liability for any changes.
Storing When Not Using the Product
When left unused for a long period of time, remove the batteries from the wireless keyboard and from the wireless mouse. Remove the USB nano receiver from your computer’s USB port and insert it into the storage compartment of the mouse. Also make sure that the storage temperature is maintained between 5 °C and 40 °C. The humidity must not exceed 90% relative humidity.
8
Wireless keyboard with wireless mouse STMS 2017 A1 |
English |
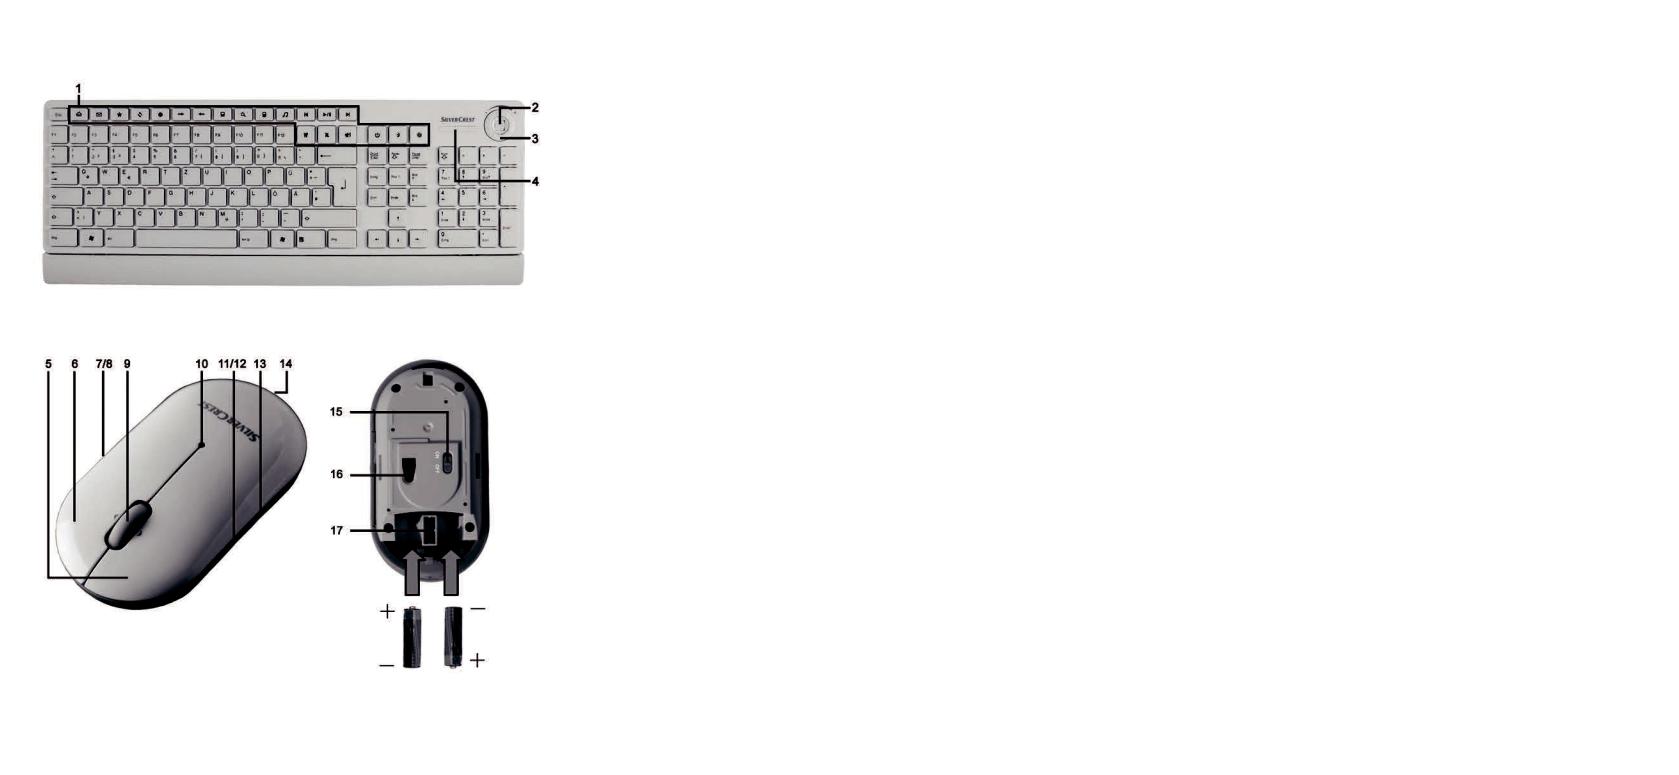
Overview
1 Special buttons (hotkeys)
2 Scroll wheel
3Volume control
4Battery level indicator*
* After inserting the batteries into the keyboard, the indicator will flash several times during automatic synchronisation with the USB receiver. When the synchronisation is completed, the status indicator will stop lighting.
9
English |
Wireless keyboard with wireless mouse STMS 2017 A1 |
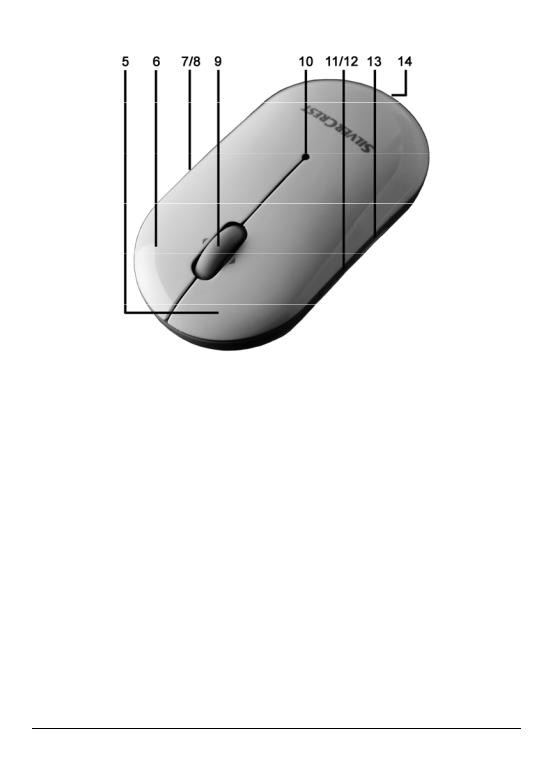
5 |
Left mouse button |
6 |
Right mouse button |
7 |
Zoom - (default mode) |
|
Play / Pause (media mode) |
8Zoom + (default mode)
Launch Media Player (media mode)
9Tilt wheel (4-way scroll wheel)
Volume control and mute (media mode)
10Battery level indicator
11Back (default)
Previous title (media mode)
12Forward (default)
Next title (media mode)
13800/1600 cpi toggle switch (press briefly) Standard / media mode toggle switch (keep pressed for 3 seconds)
14Battery compartment lock (on the back)
10
Wireless keyboard with wireless mouse STMS 2017 A1 |
English |
Before Getting Started
Unpack all the devices and use the package contents checklist on page 4 to verify that you have received all items listed.
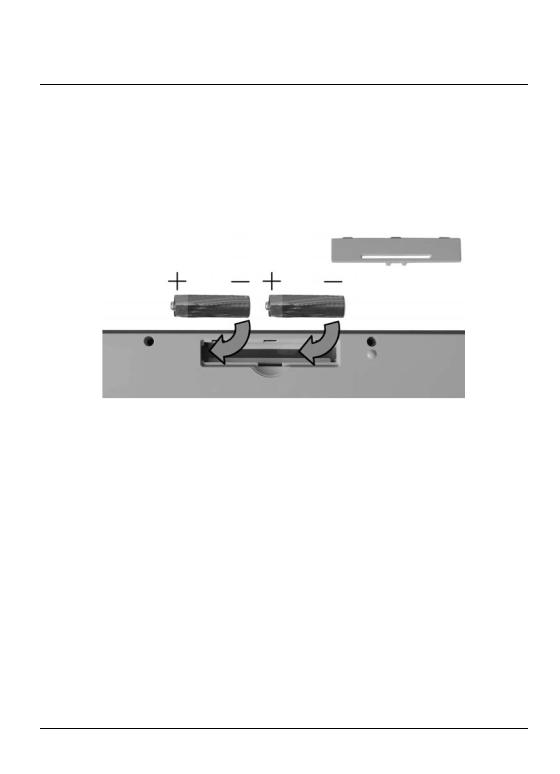
Inserting the Batteries
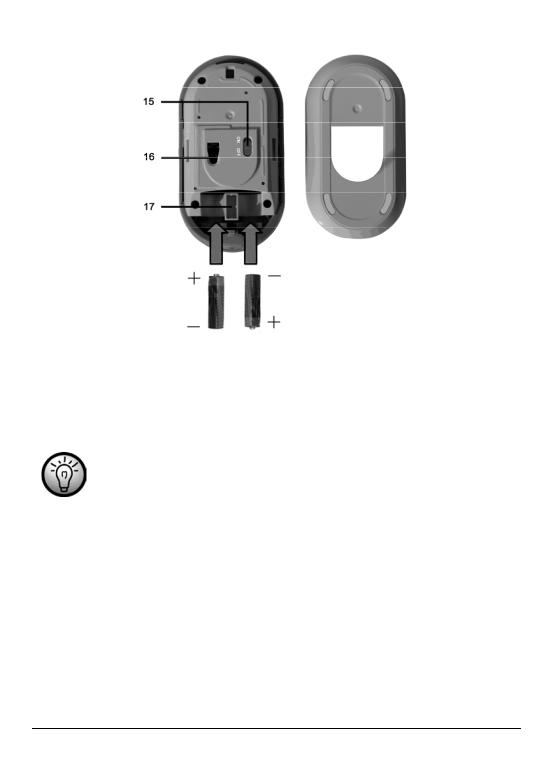
Insert the batteries into the wireless keyboard and wireless mouse as shown in the following figures. Take care to insert the batteries into the device observing the correct polarity (+ and – ) The correct polarity is labelled on the batteries and inside the battery compartment.
Fig.: Detailed view of bottom of the keyboard
Open the battery compartment of the wireless mouse and insert the batteries. Then close the battery compartment.
Remove the bottom part of the wireless mouse. To do this, press the unlock button (14) on the back of the wireless mouse. The lock will release and you can open and remove the bottom part.
Insert the batteries.
Remove the USB nano receiver (C) from its storage compartment (17).
Close the wireless mouse. To do this, insert the noses on the bottom part into the hole located on the front of the wireless mouse. Then close the bottom part on the wireless mouse until the unlock button (14) clicks into place.
Press the On/Off switch (15) to position "ON" to power the wireless mouse on.
11
English |
Wireless keyboard with wireless mouse STMS 2017 A1 |
Fig.: |
Detailed view of the |
|
opened mouse |
15On/off button of the wireless mouse
16Optical sensor
17USB nano receiver storage compartment
The wireless mouse features an automatic standby function. When not using the wireless mouse for a certain time, it will power off. Move the wireless mouse or press any mouse button to power it back on (the drivers must be installed).
The devices feature a battery level indicator (4 and 10). As soon as they light-up, the batteries of the respective device are exhausted. When this happens, replace the batteries with new batteries of the same type.
12

Wireless keyboard with wireless mouse STMS 2017 A1 English
Connecting the USB Nano Receiver
If you still have your old keyboard and mouse connected to the computer, please shut down your computer, disconnect the corresponding devices from the PC and restart the computer.
Remove the USB nano receiver from its storage compartment (see the chapter “Inserting the Batteries”).
Plug the USB nano receiver into a free USB port on your poweredon computer.
Fig.: Miniature USB Receiver
The operating system will automatically recognize the new hardware and install the required drivers. Depending on the operating system installed, the following screen messages may appear:
Windows® XP
When the receiver is connected for the first time, the operating system Windows® 2000/XP displays the message „New hardware detected“. Wait until the message „The new hardware has been installed and is now ready for use“ is displayed before using your mouse and keyboard.
Windows Vista®, Windows® 7
When the receiver is connected for the first time, the operating system Windows Vista® displays the message „Installation of appliance driver software“. Wait until the message „The appliances are ready for use now“ appears. The mouse and keyboard are now operational and ready to be used.
If the connection to the nano receiver is interrupted or if it is not possible to establish a connection, remove the batteries from the mouse and keyboard and reinsert them.
13

English |
Wireless keyboard with wireless mouse STMS 2017 A1 |
The Wristpad
If necessary, you can attach the supplied wristpad to the bottom of the keyboard. Turn the wireless keyboard and the wristpad upside down. Preferably lay a cloth under it to avoid any damage.
Carefully slide one part of the first clip into the hole on the bottom of the keyboard by applying slight pressure only (see the following figure on the left).
Release the pressure so that the other side of the clip clicks into the hole (see the following figure in the middle).
The second clip is now positioned in front of the other hole. Press the clip of the wristpad carefully into the hole (see the following figure on the right). The clips will release and click into the hole.
To release the wristpad, turn the wireless keyboard over with the wristpad upside down. Preferably lay a cloth under it to avoid any damage.
Carefully swivel the wristpad upwards (towards the bottom of the wireless keyboard) by slightly pulling it at the same time. The clips will release from their holes.
14
Wireless keyboard with wireless mouse STMS 2017 A1 |
English |
Software Installation
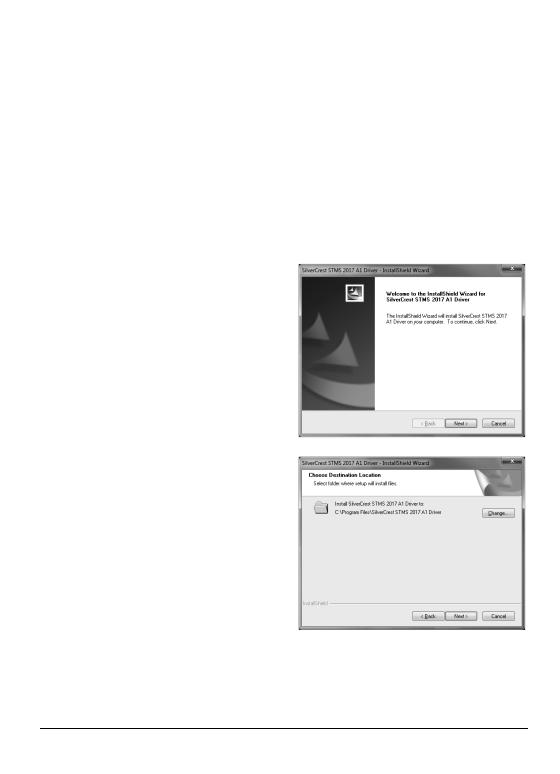
In order to be able to use the full function-capabilities of your wireless keyboard and wireless mouse, you must install the supplied software. Insert the included CD-ROM in the CD-ROM drive of your computer. The installation process should start automatically, failing that, start the CD-ROM file "Setup.exe" manually by double-clicking it.
Only with the operating system Windows Vista® / Windows® 7 the installation will initially be stopped by the user account control function with the message: „An unidentified program is attempting to access the computer”. Click on „OK“ to continue with the installation.
The following installation illustrations correspond to the operating system Windows® 7. The windows displayed in the operating systems Windows® XP/Vista® are slightly different, but their content is the same.
Click on Next to start the installation.
Here you can select the target folder for the installation via the Change button or use the suggested folder. Click on Next to proceed with the installation.
15
English |
Wireless keyboard with wireless mouse STMS 2017 A1 |
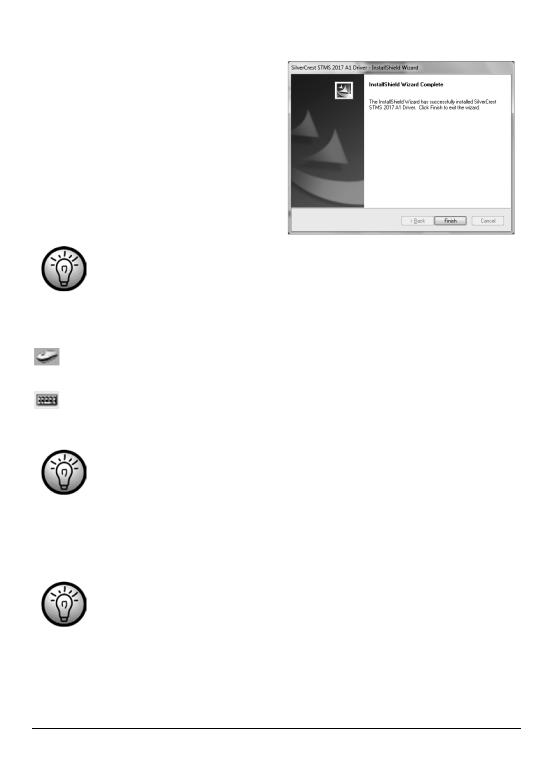
Click Finish to finish the setup programme.
If you are prompted to restart your computer, restart it before using the software.
Task Bar Symbols
A double click on this symbol opens the configuration menu for the optical mouse (see page 17 – “Configuring the Wireless Mouse ” for a description).
A double click on this symbol opens the configuration menu for the keyboard (see page 18
– “Configuring the Wireless Keyboard ” for a description).
Right-click on the corresponding icon to open a menu showing the following options:
Open |
Opens the configuration menu of the corresponding device. |
Info |
Shows information about the version of the installed driver. |
Exit |
Exits the function. If necessary, you can open the applications again |
|
from the Start menu of your operating system. |
The operating systems default settings will hide disabled icons in the task bar. It is recommended to disabled the “Hide inactive icons” option in task bar properties.
16
Wireless keyboard with wireless mouse STMS 2017 A1 |
English |
Getting Started
Toggling between Operating Modes
Use the CPI button (13) to quickly toggle between 800 cpi and 1600 cpi resolution for optical tracking. Tracking at 1600 cpi offers a higher accuracy.
If you would like to toggle between standard operation and media operation on the mouse, press the CPI button (13) and keep it pressed for a minimum of 3 seconds until the power control lamp (10) briefly lights up. Please see the list on page 10 for information on the functions available in the media operation mode. In media operating mode you can press the tilt wheel (9) to the left or right to adjust the sound volume. While in standby mode the Windows audio volume can still be adjusted by turning the scroll wheel, as long as the volume window has been enabled in the taskbar.
Configuring the Wireless Mouse
Double-click on the  icon in the task bar (lower-right corner on your screen, near the system clock). Or right-click on the
  icon and select “Open” from the context menu.
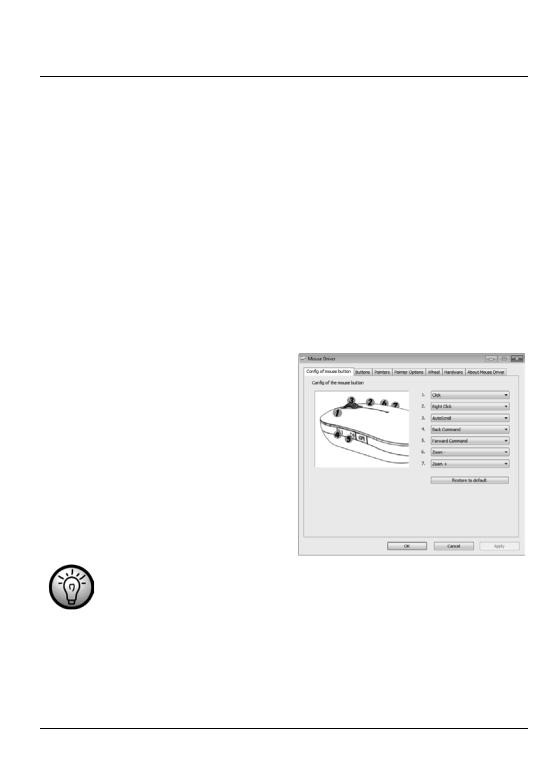
The mouse configuration menu will appear.
Here you can specify functions for selected mouse buttons. Simply click on the selection switch next to the corresponding mouse button and select a function from the menu by clicking on it with the left mouse button.
You can restore the mouse to its original state by clicking the „Restore to default“ button.
All selected options apply to the default mode. The button assignments for media mode cannot be modified.
If you would like to apply your changes, please click on the „Apply“ button (the window will remain open) or the „OK“ button (the window will close).
17
English |
Wireless keyboard with wireless mouse STMS 2017 A1 |
Configuring the Wireless Keyboard
The wireless keyboard features 20 hotkeys (quick access keys), a volume adjustment button and a scroll wheel. Following software installation, the special keys offer the following standard functions. 17 hotkeys can furthermore be freely programmed according to your requirements.
Hotkey Description
Standard internet browser (e.g. Internet Explorer)
Standard email programme (e.g. Microsoft® Outlook)
Internet-browser favourites
Update display
Stops loading the page in your Web Browser.
Forward (e.g. Internet Explorer)
Back (e.g. Internet Explorer)
Open desktop
Search
Start pocket calculator
Starts the standard media player (e.g. Microsoft® Media Player)
Previous title
Play / Pause
Next title
Sound on/off
Start Microsoft® Word (needs to be installed)
Start Microsoft® Excel (needs to be installed)
Switch computer on/off *
(Many mainboards feature a BIOS setting such as, for example, „Boot on USB“, „Power on by USB“, or a corresponding setting). Activate this function in order to be able to switch the computer on and off via the keyboard. Please also consult the documentation of your computer or main board before activating the BIOS setting.
Initiate sleep mode *
Starting from sleep mode *
* not freely programmable
18
Wireless keyboard with wireless mouse STMS 2017 A1 |
English |
Double-click on this symbol  in the task bar to configure the programmable hotkeys (bottom right of your screen, next to the system clock). Or right-click on the
  icon and select “Open” from the context menu.
The following menu opens:
Here you can assign a function for the highlighted keyboard keys. Click on the radio button corresponding to the key and select the desired function from the menu.
The following option “Select a program to run” ([ … ] button) lets you select any executable file on the hard disk of your computer which will be run by pressing the corresponding function button.
To do this, click the [ … ] button next to the desired function button. The program browse dialog box will open. Browse for the desired executable file and confirm the settings. This procedure depends on the operating system.
By using the "Restore All To Default" you can return all modified functions to factory default.
Maintenance / Cleaning
Repair activities are required if the appliance has been damaged, liquids or objects have penetrated the casing, the appliance has been exposed to rain or moisture, the appliance is not working properly or if it has been dropped. If you notice any smoke developing, unusual noises or scents, please switch off the appliance immediately. In such cases the appliance may not be operated until a professional specialist has checked it. Any repairs are only to be performed by qualified professional technicians. Never open the casing of the appliance or of any accessories. Only clean the appliance with a clean and dry cloth, never using any aggressive liquids.
19
English |
Wireless keyboard with wireless mouse STMS 2017 A1 |
Environmental Considerations and Recycling
All appliances labelled with this symbol are subject to the European directive 2002/96/EC. All electrical and electronic appliances need to be disposed off separately via the facilities provided for this purpose by the authorities and may not be included in the domestic waste. The USB nano receiver is also an electronics device and must be properly disposed of.
The proper disposal of old appliances helps to protect the environment and prevents risks for your personal health. For further information about proper disposal, contact your local government, disposal bodies or the shop where you bought the device.
Also recycle the packaging material properly. Cardboard packaging can be taken to paper recycling containers or public collection points for recycling. Any films or plastic contained in the packaging should be taken to your public collection points.
Please take care to protect the environment. Used batteries do not belong in the domestic waste and need to be handed in at a collection point for used batteries instead. Please note that batteries must be disposed of fully discharged at appropriate collection points for old batteries. If disposing of batteries which are not fully discharged, take precautions to prevent short circuits.
Conformity Notes
The mouse and keyboard set complies with the basic and other relevant requirements of the R&TTE Directive 99/5/EC. The corresponding Declaration of Conformity can be found at the end of this User's Manual.
20

Wireless keyboard with wireless mouse STMS 2017 A1 |
English |
Troubleshooting
If after installation the wireless keyboard and the wireless mouse do not respond, please test the following:
Check that the batteries have been inserted properly (with the poles pointing in the right direction).
Check that the USB Nano Receiver is connected to the computer properly (see page 13 – Connecting the USB Nano Receiver).
Try another USB port.
Please note that when using multiple sets the different components such as the wireless mouse, wireless keyboard and USB nano receiver cannot be swapped.
Check the battery power (insert new batteries, if required).
Please note that you need to use a mat (e.g. mouse pad) if you intend to use the mouse on a glass surface or glossy surface.
If the icons for "Num Lock", "Caps Lock" and/or "Scroll Lock" do not appear in the task bar, please try the following:
Check the taskbar settings to see if inactive icons are hidden. Disable this function to show all icons at all times.
When typing on the wireless keyboard unexpected characters appear, please check the following:
Check if the proper input language has been set in Control Panel.
Restart your computer and check the keyboard input again.
21

English |
Wireless keyboard with wireless mouse STMS 2017 A1 |
Warranty and Service Information
Warranty of Targa GmbH
Dear Customer,
This device is sold with three years warranty from the date of purchase. In the event of product defects, you have legal rights towards the seller. These statutory rights are not restricted by our warranty as described below.
Warranty conditions
The warranty period commences upon the date of purchase. Please keep the original receipt in a safe place as it is required as proof of purchase. If any material or manufacturing faults occur within three years of purchase of this product, we will repair or replace the product free of charge as we deem appropriate.
Warranty period and legal warranty rights
The warranty period is not extended in the event of a warranty claim. This also applies to replaced and repaired parts. Any damage or defects discovered upon purchase must be reported immediately when the product has been unpacked. Any repairs required after the warranty period will be subject to charge.
Scope of warranty
The device was carefully manufactured in compliance with stringent quality guidelines and subjected to thorough testing before it left the works. The warranty applies to material and manufacturing faults. This warranty does not cover product components which are subject to normal wear and which can therefore be regarded as wearing parts, or damage to fragile components such as switches, rechargeable batteries or components made of glass. This warranty is void if the product is damaged, incorrectly used or serviced. To ensure correct use of the product, always comply fully with all instructions contained in the user manual. The warnings and recommendations in the user manual regarding correct and incorrect use and handling of the product must always be observed and complied with. The product is solely designed for private use and is not suitable for commercial applications. The warranty is rendered void in the event of incorrect handling and misuse, if it is subjected to force, and also if any person other than our authorised service technicians interfere with the device. No new warranty period commences if the product is repaired or replaced.
Submitting warranty claims
To ensure speedy handling of your complaint, please note the following:
22
Wireless keyboard with wireless mouse STMS 2017 A1 |
English |
-Before using your product for the first time, please read the enclosed documentation or online help carefully. Should any problems arise which cannot be solved in this way, please call our hotline.
-Always have your receipt, the product article number as well as the serial number (if available) to hand as proof of purchase.
-If it is not possible to solve the problem on the phone, our hotline support staff will initiate further servicing procedures depending on the fault.
Service
Phone: |
0207 – 36 50 744 |
E-Mail: service.GB@targa-online.com
Phone: |
01 – 242 15 83 |
E-Mail: service.IE@targa-online.com
Phone: |
800 – 62 175 |
E-Mail: service.MT@targa-online.com
Phone: |
800 – 92 496 |
E-Mail: service.CY@targa-online.com
IAN: 73762
Manufacturer
Please note that the following address is not a service address. First contact the service point stated above.
TARGA GmbH
Postfach 22 44
D-59482 Soest
www.targa.de
23

|
Polski |
Klawiatura bezprzewodowa z myszą bezprzewodową STMS 2017 A1 |
|
||
|
Spis treści |
|
|
|
|
|
|
|
|
|
|
|
Wprowadzenie |
|
25 |
|
|
|
Przeznaczenie |
|
25 |
|
|
|
Zawartość opakowania |
|
26 |
|
|
|
Dane techniczne |
|
27 |
|
|
|
Wymagania systemowe............................................................................................................................... |
|
27 |
|
|
|
Instrukcje dotyczące bezpieczeństwa |
28 |
|
|
|
|
Dzieci i osoby niepełnosprawne ................................................................................................................. |
28 |
|
||
|
Baterie ........................................................................................................................................................... |
|
29 |
|
|
|
Zakłócenia o częstotliwości radiowej ......................................................................................................... |
29 |
|
||
|
Środowisko pracy......................................................................................................................................... |
|
29 |
|
|
|
Prawa autorskie ............................................................................................................................................ |
|
30 |
|
|
|
Przechowywanie nieużywanego produktu................................................................................................. |
30 |
|
||
|
Informacje ogólne |
|
31 |
|
|
|
Czynności przygotowawcze |
|
33 |
|
|
|
Wkładanie baterii......................................................................................................................................... |
|
33 |
|
|
|
Podłączanie nanoodbiornika USB .............................................................................................................. |
35 |
|
||
|
Podkładka pod nadgarstki........................................................................................................................... |
|
36 |
|
|
|
Instalowanie oprogramowania ................................................................................................................... |
37 |
|
||
|
Ikony na pasku zadań.................................................................................................................................. |
|
38 |
|
|
|
Rozpoczynamy |
|
39 |
|
|
|
Zmiana trybu pracy ...................................................................................................................................... |
|
39 |
|
|
|
Konfigurowanie optycznej myszy bezprzewodowej ................................................................................. |
39 |
|
||
|
Konfigurowanie klawiatury bezprzewodowej............................................................................................ |
40 |
|
||
|
Konserwacja i czyszczenie |
|
41 |
|
|
|
Ochrona środowiska i recykling |
|
42 |
|
|
|
Zgodność z normami i dyrektywami |
42 |
|
|
|
|
Rozwiązywanie problemów |
|
43 |
|
|
|
Informacje gwarancyjne i serwisowe |
44 |
|
|
|
|
|
|
|
|
|
24 |
|
|
|
|
|

Klawiatura bezprzewodowa z myszą bezprzewodową STMS 2017 A1 |
Polski |
Wprowadzenie
Dziękujemy za wybranie klawiatury bezprzewodowej z myszą bezprzewodową i nanoodbiornikiem USB STMS 2017 A1. Dzięki zastosowaniu technologii SmartLink nie jest już wymagana ręczna synchronizacja tych urządzeń. Liczne klawisze funkcyjne umożliwiają dostosowanie myszy i klawiatury do potrzeb użytkownika. Mysz jest wyposażona w przechylne kółko (4-kierunkowe kółko przewijania), umożliwiające przewijanie w kierunku poziomym, oprócz zwykłego przewijania w kierunku pionowym.
Przeznaczenie
Ten zestaw klawiatury i myszy jest urządzeniem IT, składającym się z bezprzewodowej klawiatury, bezprzewodowej myszy oraz nanoodbiornika USB. Z urządzenia nie można korzystać na dworze ani w klimacie tropikalnym. Ten produkt nie jest przeznaczony do użytku firmowego ani komercyjnego. Produkt przeznaczony jest wyłącznie do prywatnego użytku domowego. Jakiekolwiek użycie inne niż wymienione powyżej stanowi przypadek nieprawidłowej eksploatacji. Urządzenie spełnia wymagania dyrektyw, norm i standardów Unii Europejskiej (CE). Wszelkie modyfikacje urządzenia mogą powodować, że wymagania tych norm i standardów przestaną być spełniane. Producent nie ponosi odpowiedzialności za jakiekolwiek szkody lub zakłócenia spowodowanie nieprzestrzeganiem powyższych instrukcji. Używać wyłącznie akcesoriów zalecanych przez producenta.
Prosimy postępować zgodnie z przepisami i regulacjami obowiązującymi w kraju użytkowania produktu.
25
Polski |
Klawiatura bezprzewodowa z myszą bezprzewodową STMS 2017 A1 |
Zawartość opakowania
A Klawiatura bezprzewodowa STMS 2017 A1
BMysz bezprzewodowa STMS 2017 A1
CNanoodbiornik USB STMS2017A1-R (umieszczony domyślnie w obudowie myszy)
D 2 baterie AAA, 1,5 V (Micro) do zasilania klawiatury bezprzewodowej (nie pokazane) E 2 baterie AAA, 1,5 V (Micro) do zasilania myszy bezprzewodowej (nie pokazane)
F Płyta CD-ROM z oprogramowaniem (nie pokazana)
GInstrukcja użytkownika (nie pokazana)
26
 Loading...