


CD Stereo System
Operating Instructions
Model No. SC-VK31
VOLUME |
EE En Ru
Before connecting, operating or adjusting this product, please read these instructions completely. Please keep this manual for future reference.
RQT7704-R
G0404CP0

Dear customer
Thank you for purchasing this product.
For optimum performance and safety, please read these instructions carefully.
These operating instructions are applicable to the following system.
|
|
System |
|
|
SC-VK31 |
||
|
|
|
|
|
|
|
|
|
|
Main unit |
|
|
SA-VK31 |
||
|
|
|
|
|
|
|
|
|
|
Speakers |
|
|
SB-VK31 |
||
|
|
|
|
|
|
|
|
|
|
|
|
|
|
|
|
|
|
|
|
|
|
|
|
|
|
|
|
|
|
|
|
|
|
|
|
|
|
|
|
|
|
|
|
|
|
|
|
|
|
|
|
|
|
|
|
|
|
|
|
|
|
|
|
|
|
|
|
|
|
|
|
|
|
|
|
|
|
|
|
|
|
|
|
|
|
|
|
|
|
|
|
|
|
|
|
|
|
|
|
|
|
|
|
|
|
|
|
|
|
|
|
|
|
|
|
|
|
|
|
|
|
|
|
|
|
|
|
|
|
|
|
|
|
|
|
|
|
|
|
|
|
|
|
|
|
|
|
|
|
|
|
|
|
|
|
|
|
|
|
Inside of product
CAUTION!
THIS PRODUCT UTILIZES A LASER.
USE OF CONTROLS OR ADJUSTMENTS OR PERFORMANCE OF PROCEDURES OTHER THAN THOSE SPECIFIED HEREIN MAY RESULT IN HAZARDOUS RADIATION EXPOSURE.
DO NOT OPEN COVERS AND DO NOT REPAIR YOURSELF. REFER SERVICING TO QUALIFIED PERSONNEL.
CAUTION!
•DO NOT INSTALL OR PLACE THIS UNIT IN A BOOKCASE, BUILT-IN CABINET OR IN ANOTHER
CONFINED SPACE. ENSURE THE UNIT IS WELL VENTILATED. TO PREVENT RISK OF ELECTRIC SHOCK OR FIRE HAZARD DUE TO OVERHEATING, ENSURE THAT CURTAINS AND ANY OTHER MATERIALS DO NOT OBSTRUCT THE VENTILATION VENTS.
•DO NOT OBSTRUCT THE UNIT’S VENTILATION OPENINGS WITH NEWSPAPERS, TABLECLOTHS, CURTAINS, AND SIMILAR ITEMS.
•DO NOT PLACE SOURCES OF NAKED FLAMES, SUCH AS LIGHTED CANDLES, ON THE UNIT.
•DISPOSE OF BATTERIES IN AN ENVIRONMENTALLY FRIENDLY MANNER.
WARNING:
TO REDUCE THE RISK OF FIRE, ELECTRIC SHOCK OR PRODUCT DAMAGE, DO NOT EXPOSE THIS APPARATUS TO RAIN, MOISTURE, DRIPPING OR SPLASHING AND THAT NO OBJECTS FILLED WITH LIQUIDS, SUCH AS VASES, SHALL BE PLACED ON THE APPARATUS.
2
Table of contents |
|
Safety precautions ................................................... |
3 |
Supplied accessories .............................................. |
3 |
Placement of speakers ............................................ |
3 |
The remote control .................................................. |
3 |
Set-up ....................................................................... |
4 |
Front panel controls ................................................ |
5 |
CDs ........................................................................... |
6 |
How discs with MP3 differ from CDs ................... |
10 |
The radio: manual tuning ...................................... |
12 |
The radio: preset tuning........................................ |
12 |
Cassettes ................................................................ |
13 |
Sound quality/sound field ..................................... |
13 |
Recording ............................................................... |
13 |
Enjoying karaoke ................................................... |
14 |
Optional antenna connections ............................. |
15 |
External unit connections ..................................... |
15 |
Using an external unit ........................................... |
15 |
Turning the demo function on/off ........................ |
16 |
Convenient functions ............................................ |
16 |
Auto-off function.................................................... |
16 |
Setting the time...................................................... |
16 |
Using the timers .................................................... |
17 |
Troubleshooting guide .......................................... |
18 |
Maintenance ........................................................... |
18 |
Specifications ........................................................ |
19 |
This product may receive radio interference caused by mobile telephones during use. If such interference is apparent, please increase separation between the product and the mobile telephone.
The socket outlet shall be installed near the equipment and easily accessible or the mains plug or an appliance coupler shall remain readily operable.
THIS UNIT IS INTENDED FOR USE IN MODERATE CLIMATES.
RQT7704

Safety precautions
Placement
Set the unit up on an even surface away from direct sunlight, high temperatures, high humidity, and excessive vibration. These conditions can damage the cabinet and other components, thereby shortening the unit’s service life.
Do not place heavy items on the unit.
Voltage
Do not use high voltage power sources. This can overload the unit and cause a fire.
Do not use a DC power source. Check the source carefully when setting the unit up on a ship or other place where DC is used.
Power cord protection
Ensure the AC power cord is connected correctly and not damaged. Poor connection and lead damage can cause fire or electric shock.
Do not pull, bend, or place heavy items on the cord.
Grasp the plug firmly when unplugging the cord. Pulling the AC power cord can cause electric shock.
Do not handle the plug with wet hands. This can cause electric shock.
Foreign matter
Do not let metal objects fall inside the unit. This can cause electric shock or malfunction.
Do not let liquids get into the unit. This can cause electric shock or malfunction. If this occurs, immediately disconnect the unit from the power supply and contact your dealer.
Do not spray insecticides onto or into the unit. They contain flammable gases which can ignite if sprayed into the unit.
Service
Do not attempt to repair this unit by yourself. If sound is interrupted, indicators fail to light, smoke appears, or any other problem that is not covered in these instructions occurs, disconnect the AC power cord and contact your dealer or an authorized service center. Electric shock or damage to the unit can occur if the unit is repaired, disassembled or reconstructed by unqualified persons.
Extend operating life by disconnecting the unit from the power source if it is not to be used for a long time.
Supplied accessories
Please check and identify the supplied accessories.
AC power supply cord ... 1 pc. |
AM loop antenna ........ |
1 pc. |
........FM indoor antenna |
1 pc. |
|
...................Batteries |
2 pcs. |
Video connection |
|
Remote control |
|
cable .......................... |
1 pc. |
transmitter .................. |
1 pc. |
|
|
(N2QAJB000117) |
|
Placement of speakers
Speakers are designed identically so that no left or right channel orientation is necessary.
If irregular coloring occurs on your television
These speakers are designed to be used close to a television, but the picture may be affected with some televisions and set-up combinations.
If this occurs, turn the television off for about 30 minutes.
The television’s demagnetizing function should correct the problem. If it persists, move the speakers further away from the television.
Note
•Keep your speakers at least 10 mm away from the system for proper ventilation.
•You cannot take the front net off the speakers.
The remote control
UM-3
• |
Insert so |
the remote control. |
• |
Do not use rechargeable type batteries. |
|
Do not:
•mix old and new batteries.
•use different types at the same time.
•heat or expose to flame.
•take apart or short-circuit.
•attempt to recharge alkaline or manganese batteries.
•use batteries if the covering has been peeled off.
•keep together with metallic objects such as necklaces. Mishandling of batteries can cause electrolyte leakage which can damage items the fluid contacts and may cause a fire.
If electrolyte leaks from the batteries, consult your dealer.
Wash thoroughly with water if electrolyte comes in contact with any part of your body.
Remove if the remote control is not going to be used for a long period of time. Store in a cool, dark place.
Replace if the unit does not respond to the remote control even when held close to the front panel.
Use
Remote control  signal sensor
30˚ |
30˚ |
|
Transmission |
About 7 meters in front of |
|
window |
||
the signal sensor |
||
|
Aim at the sensor, avoiding obstacles, at a maximum range of 7 meters directly in front of the unit.
•Keep the transmission window and the unit’s sensor free from dust.
•Operation can be affected by strong light sources, such as direct sunlight, and the glass doors on cabinets.
Do not:
• put heavy objects on the remote control. |
3 |
|
• |
take the remote control apart. |
|
• |
spill liquids onto the remote control. |
RQT7704 |

Set-up
Connect the AC power supply cord only after all other connections have been made.
Preparation
Twist and pull off the vinyl tip of the antenna wires and speaker cords.
2 AM loop antenna
Stand the antenna up on its base.
4 Video connection cable


 1. Connect the video connection cable from the VIDEO OUT terminal of the rear panel of this unit to the VIDEO IN terminal of the TV.
2.Set the VIDEO OUT switch according to the television set to be connected.
PAL : When connecting a PAL system TV. NTSC : When connecting an NTSC system TV.
For details, refer to the operating instructions of TV.
(R) |
(L) |
|
1 FM indoor antenna |
|
Adhesive tape |
|
Affix where |
|
reception is |
|
best. |
5 AC power supply cord
Connector
Appliance inlet
Approx. 6 mm 
Insertion of connector
Even when the connector is perfectly inserted, depending on the type of inlet used, the front part of the connector may jut out as shown in the drawing.
However there is no problem using the unit.
Note Note
The included AC power supply cord is for use with this unit only. Do not use it with other equipment.
For your reference
Information you enter into the unit’s memory, except for time, remains intact for up to a week after the AC power supply cord is disconnected.
4
3 Speaker cords
Blue
Black
|
|
Connect the left (L) |
Red |
|
side in the same way. |
|
||
|
|
|
Grey
Red (+)
Black (–)
3
 2 1
2 1
Blue (–)
Grey (+)
Use only the supplied speakers.
The combination of the main unit and speakers provide the best sound. Using other speakers can damage the unit and sound quality will be negatively affected.
Caution
•Use the speakers only with the recommended system. Failure to do so may lead to damage to the amplifier and/or the speakers, and may result in the risk of fire. Consult a qualified service person if damage has occurred or if
you experience a sudden change in performance.
•Do not attach these speakers to walls or ceilings.
RQT7704

Front panel controls
Main unit
DOWN |
UP |
|
PREV |
SELECT |
NEXT |
REW |
|
FF |
TUNER |
CD |
PBC |
BAND |
|
|
|
|
|
DISPLAY |
|
STOP |
DEMO |
|
|
DECK 1 |
|
DECK 2 |
TAPE
AUX
Remote control
1AC supply indicator [AC IN]
This indicator lights when the unit is connected to the AC mains supply.
2Standby/on switch [f/I]
Press to switch the unit from on to standby mode or vice versa. In standby mode, the unit is still consuming a small amount of power.
3Display
4 Deck select button [DECK 1/2] .............................................. |
13 |
5 Record button [a REC] ......................................................... |
14 |
6 Microphone volume control [MIC VOL] ............................... |
14 |
7 Microphone jacks [MIC 1, 2] .................................................. |
14 |
8 Deck 1 cassette holder ......................................................... |
13 |
9 Disc tray |
|
! CD tray open/close button [c OPEN/CLOSE] ....................... |
6 |
! CD direct play buttons [1–5] .................................................. |
6 |
# Super sound EQ button [SUPER SOUND EQ] .................... |
13 |
$ Built-in sound equalizer button [SOUND EQ] ...................... |
13 |
% Headphones jack [PHONES] ................................................ |
16 |
& Deck 2 cassette holder ......................................................... |
13 |
Center console |
|
( Tuner/band select button [TUNER, BAND] .......................... |
12 |
) CD skip/search/previous/next, VCD slow advance, tape fast- |
|
forward/rewind, tune/preset channel select, time adjust buttons |
|
[g/REW/3, PREV, 4/FF/f, NEXT] ................... |
7, 12, 13 |
~ Display, demonstration button [DISPLAY, –DEMO] ........... |
16 |
+ Deck 1 open button [c DECK 1] .......................................... |
13 |
, AUX button [AUX] .................................................................. |
15 |
- Volume control [VOLUME DOWN, UP] ................................. |
14 |
. CD play/pause, select button [:/J CD, SELECT] ................. |
6 |
/ Stop/program clear, PBC on/off button [L STOP, PBC] .... |
6, 7, 13 |
: Deck 2 open button [c DECK 2] .......................................... |
13 |
; Tape play/direction button [; : TAPE] ............................... |
13 |
Buttons such as 2 function in exactly the same way as the |
|
buttons on the main unit. |
|
< Sleep timer + Auto off button [SLEEP, –AUTO OFF] |
.... 16, 17 |
= Multi screen button [MULTI-SCREEN] ................................... |
9 |
> Disc button [DISC] .................................................................. |
7 |
? Program button [PROGRAM] ..................................... |
8, 11, 12 |
@ Time access button [TIME ACCESS] ..................................... |
9 |
[ Play mode select button [PLAY MODE] ........................ |
8, 11-14 |
\ Repeat button [REPEAT] ........................................................ |
7 |
] On-screen display button [OSD] ............................................ |
7 |
^ Tuner/band select, AUX button [TUNER/AUX] .............. |
12, 15 |
_ CD pause button [J PAUSE] .................................................. |
6 |
{ Zoom button [ZOOM] .............................................................. |
7 |
| CD display button [CD DISP] ........................................... |
7, 10 |
}CD skip/search/previous/next, album skip, preset channel select, time adjust buttons
[g f,  ALBUM
ALBUM  , PREV 3 NEXT 4] ....... 7-9, 11, 12, 16
VShift button [SHIFT]
To use functions labeled in orange:
|
|
|
|
|
|
|
|
|
|
|
|
|
|
|
|
|
|
|
|
|
|
|
|
|
|
|
|
While pressing [SHIFT], press the corresponding button. |
|
||
|
|
|
|
|
|
|
|
|
|
|
|
|
|
|
|
|
|
|
|
|
|
|
|
|
|
|
|
0 Muting button [MUTING] ....................................................... |
|
16 |
|
|
|
|
|
|
|
|
|
|
|
|
|
|
|
|
|||||||||||||||||
|
|
|
|
|
|
|
|
|
|
|
|
|
|
|
|
|
|
|
|
|
|
|
|
|
|
|
|
1 Dimmer + Play timer/record timer button |
|
|
|
|
|
|
|
|
|
|
|
|
|
|
|
|
|
|
|
|
|
|
|
|
|
|
|
|
|
|
|
[DIMMER, rPLAY/REC] ................................................... |
|
16, 17 |
|
|
|
|
|
|
|
|
|
|
|
|
|
|
|
|
|
|
|
|
|
|
|
|
|
|
|
|
|
2 Clock/timer button [CLOCK/TIMER] ................................ |
|
16, 17 |
|
|
|
|
|
|
|
|
|
|
|
|
|
|
|
|
|
|
|
|
|
|
|
|
|
|
|
|
|
|
|
||
|
|
|
|
|
|
|
|
|
|
|
|
|
|
|
|
|
|
|
|
|
|
|
|
|
|
|
|
3 Video index buttons [ V-INDEX |
] ................................... |
9 |
|
|
|
|
|
|
|
|
|
|
|
|
|
|
|
|
|
|
|
|
|
|
|
|
|
|
|
|
|
...................................Resume play button [RESUME PLAY] |
7 |
|
|
|
|
|
|
|
|
|
|
|
|
|
|
|
|
|
|
|
|
|
|
|
|
|
|
|
|
|
|
5 Return button [ ] |
|
7, 10 |
|
|
|
|
|
|
|
|
|
|
|||||||||||||||||||||||
|
|
|
|
|
|
|
|
|
|
|
|
|
|
|
|
|
|
|
|
|
|
|
|
|
|
|
|
6 Key control buttons [KEYCON, , |
] |
15 |
|
|
|
|
|
|
|
|
|
|
|
|
|
|
|
|
|
|
|
|
|
|
|
|
|
|
|
|
|
|
|||
|
|
|
|
|
|
|
|
|
|
|
|
|
|
|
|
|
|
|
|
|
|
|
|
|
|
|
|
|
|||
|
|
|
|
|
|
|
|
|
|
|
|
|
|
|
|
|
|
|
|
|
|
|
|
|
|
|
|
|
|||
|
|
|
|
|
|
|
|
|
|
|
|
|
|
|
|
|
|
|
|
|
|
|
|
|
|
|
|
7 Numbered buttons [X10, 1–9, 0] .............................. |
|
6-9, 11, 12 |
|
|
|
|
|
|
|
|
|
|
|
|
|
|
|
|
|
|
|
|
|
|
|
|
|
|
|
|
|
|
|
||
|
|
|
|
|
|
|
|
|
|
|
|
|
|
|
|
|
|
|
|
|
|
|
|
|
|
|
|
8 CD play, select button [: CD, SELECT] |
6-10 |
|
|
|
|
|
|
|
|
|
|
|
|
|
|
|
|
|
|
|
|
|
|
|
|
|
|
|
|
|
|
|
|||
|
|
|
|
|
|
|
|
|
|
|
|
|
|
|
|
|
|
|
|
|
|
|
|
|
|
|
|
9 Karaoke button [KARAOKE] |
|
14 |
|
|
|
|
|
|
|
|
|
|
|
|
|
|
|
|
|
|
|
|
|
|
|
|
|
|
|
|
|
|
|||
|
|
|
|
|
|
|
|
|
|
|
|
|
|
|
|
|
|
|
|
|
|
|
|
|
|
|
|
! Cursor buttons [8, 9, ;, :]/Enter button [ENTER] .... |
7, 10, 11, 13 |
|
|
|
|
|
|
|
|
|
|
|
|
|
|
|
|
|
|
|
|
|
|
|
|
|
|
|
|
|
|
Echo button [ECHO] ............................................................. |
|
15 |
|
|
|
|
|
|
|
|
|
|
|
|
|
|
|
|
|
|
|
|
|
|
|
|
|
|
|
|
|
# Tape fast-forward/rewind, manual tuning, VCD slow |
|
||
|
|
|
|
|
|
|
|
|
|
|
|
|
|
|
|
|
|
|
|
|
|
|
|
|
|
|
|
advance buttons [( ), REW FF] .............................. |
7, 12 |
|
|
|
|
|
|
|
|
|
|
|
|
|
|
|
|
|
|
|
|
|
|
|
|
|
|
|
|
|
|
$ Built-in sound equalizer/manual EQ button |
|
|
|
|
|
|
|
5 |
|||||||||||||||||||||||||||
|
|
|
|
|
|
|
|
|
|
|
|
|
|
|
|
|
|
|
|
|
|
|
|
|
|
|
|
[SOUND EQ, –MANUAL EQ] .................................................. |
|
13 |
|
|
|
|
|
|
|
|
|
|
|
|
|
|
|
|
|
|
|
|
|
|
|
|
|
|
|
|
|
|
|
|
|
RQT7704

CDs
CD selection
Disc type |
|
Logo |
|
Indication in these |
||||||||||||||||||||||||||||||||||||||||||
|
|
|
|
|
|
|
|
|
|
|
|
|
|
operating instructions |
||||||||||||||||||||||||||||||||
|
|
|
|
|
|
|
|
|
|
|
|
|
|
|
|
|
|
|
|
|
|
|
|
|
|
|
|
|
|
|
|
|
|
|
|
|
|
|
|
|
|
|
|
|
|
|
Video CD |
|
|
|
|
||||||||||||||||||||||||||||||||||||||||||
|
|
|
VCD 1.1 |
|
||||||||||||||||||||||||||||||||||||||||||
(version 1.1) |
|
|
|
Operated |
in the same way as audio |
|||||||||||||||||||||||||||||||||||||||||
|
|
|
|
|
|
|
|
|
|
|
|
|
|
CDs, these CDs allow playback of |
||||||||||||||||||||||||||||||||
|
|
|
|
|
|
|
|
|
|
|
|
|
|
video pictures as well as sound, but |
||||||||||||||||||||||||||||||||
|
|
|
|
|
|
|
|
|
|
|
|
|
|
they are not equipped with PBC\. |
||||||||||||||||||||||||||||||||
|
|
|
|
|
|
|
|
|
|
|
|
|
|
|
|
|
|
|
|
|
|
|
|
|
|
|
|
|
|
|
|
|
|
|
|
|
|
|
|
|
|
|
|
|
|
|
Video CD |
|
|
|
VCD 2.0 |
||||||||||||||||||||||||||||||||||||||||||
(version 2.0) |
|
|
|
Equipped with PBC\, these CDs allow |
||||||||||||||||||||||||||||||||||||||||||
|
|
|
|
|
|
|
|
|
|
|
|
|
|
playback of menus on the TV screen |
||||||||||||||||||||||||||||||||
|
|
|
|
|
|
|
|
|
|
|
|
|
|
as well as high resolution still pictures. |
||||||||||||||||||||||||||||||||
|
|
|
|
|
|
|
|
|
|
|
|
|
|
You can use functions described for |
||||||||||||||||||||||||||||||||
|
|
|
|
|
|
|
|
|
|
|
|
|
|
video CD version 1.1 by turning |
||||||||||||||||||||||||||||||||
|
|
|
|
|
|
|
|
|
|
|
|
|
|
PBC off (see page 7) |
||||||||||||||||||||||||||||||||
CD
CD
MP3
–
Discs recorded with MP3
\PBC (Playback control)
PBC is a signal recorded on version 2.0 CDs that enables you to control playback. It makes video enjoyment more interesting by allowing you to interact with the system via menus, search functions or other typically computer-like operations.
Do not:
•use irregularly shaped CDs.
•attach extra labels and stickers.
•use CDs with labels and stickers that are coming off or with adhesive exuding from under labels and stickers.
•attach scratch proof covers or any other kind of accessory.
•write anything on the CD.
•clean CDs with liquids. (Wipe with a soft, dry cloth.)
•use CDs printed with label printers available on the market.
XXXX XXXX XXXXX |
XXXX XX |
XXXX XXXX XXXXX XXXX XXXX
x |
|
|
x xxxx |
|
x |
xxxxxxxxxxxxx |
xxxxxx |
|
xx |
xxxxx xx |
|
|
x |
xxxx x |
x
x x
xx
xx
x
x
To prevent damage
Always observe the following points:
•Load only 1 CD on the tray.
•Load CDs as shown in the figure.
An adaptor is not needed with 8 cm CDs (singles).
8 cm CD |
XXX |
XXX |
XXXX |
||
|
XXXX |
|
XXXXXXXX |
|
|
XXXXXXXXXXXXXX |
||
|
XXXXXXXXX |
XXXX |
|
XXXX |
|
12 cm CD
• Set the system on a flat, level surface.
• Always unload all CDs before moving the unit.
• Always stop the changer before loading or changing CDs. You cannot change CDs while a disc is playing.
Do not:
•set the unit on top of magazines, inclined surfaces, etc.
•move the unit while a tray is opening/closing, or when loaded.
•put anything except a CD in the tray.
•use cleaning CDs or CDs which are badly warped or cracked.
•disconnect the AC power supply cord from the household AC outlet during disc changing operation.
This unit can play CD-DA (digital audio), MP3 and video CD format CD-R and CD-RW that have been finalized (a process that enables players to play CD-R and CD-RW) upon completion of recording. It may not be able to play some CD-R or CD-RW due to the
6 condition of the recording.
Basic play
|
3 |
PREV, |
|
NEXT |
PBC |
|
SELECT |
|
SHIFT |
PAUSE
REW, |
FF |
VCD 2.0
You can use menus displayed on the TV screen to control playback when running interactive software.
VCD 2.0 VCD 1.1
Preparation:
Turn the television on, select video input with the television input switch.
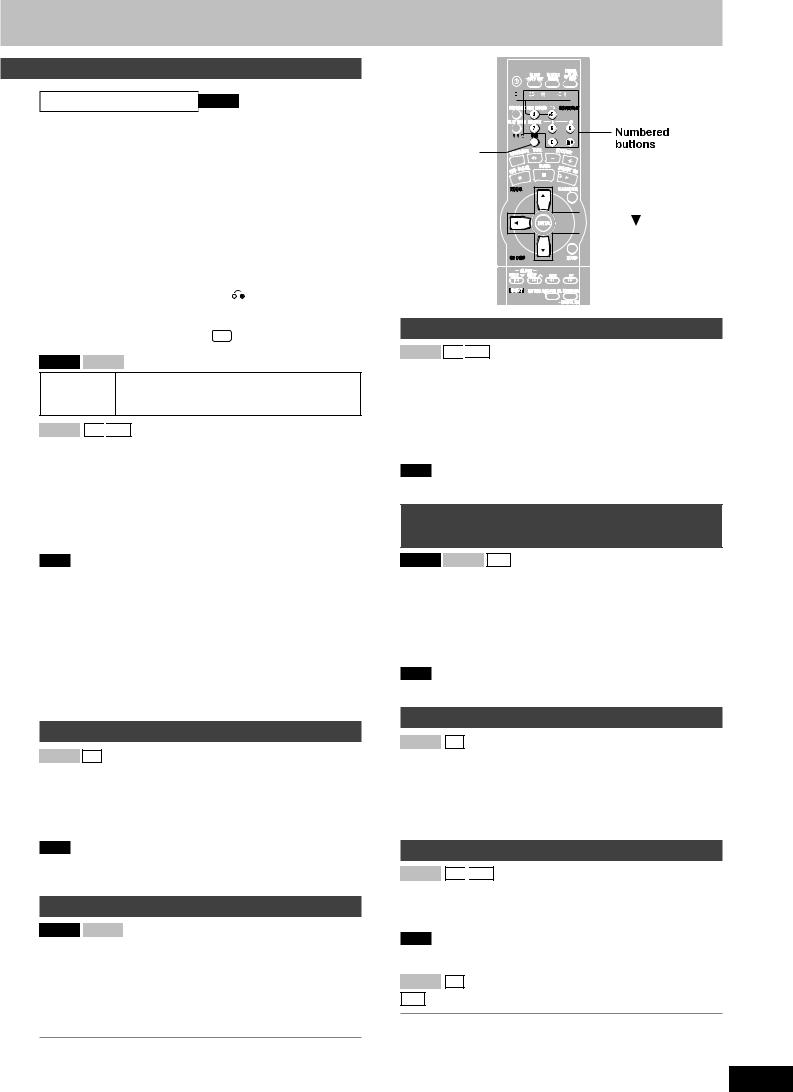
1Press [c OPEN/CLOSE] to open the tray.
The unit comes on.
2Set a CD in the tray. (Label must face upward.)
To continue loading CDs in the other trays
Press [1]–[5] to select the required tray and press [c OPEN/ CLOSE] to open the tray.
Press [c OPEN/CLOSE] to close the tray.
3Press [1]–[5] to select the desired disc.
(Alternatively, you can press [:/J CD] if the current disc is your
desired CD.)


 Current disc indicator
VCD 1.1 CD
The track number and its elapsed playing time are shown.
VCD 2.0
The menu screen appears on the TV (with some discs, it may not appear immediately). The menu screens that appear may differ depending on the disc.
Some software may display the menu screen after animated or still screens have been played.
VCD 2.0
4Press the numbered buttons on the remote control to select the menu item.
To select 1–9, press the corresponding numbered button.
To select a two-digit number, press [h10], and then the two numbers you want.
For example:
Menu item 10 : [h10] [1] [0] Menu item 25 : [h10] [2] [5]
A different menu is displayed or animated/still screens are played.
High-precision still screens are also automatically distinguished and played.
Use the CD Play Mode function’s ALL-DISC mode to play CDs in
succession. ( VCD 1.1 CD A page 8) ( MP3 A page 11)
To stop
Press [L STOP].
The total number of tracks and total playing time are shown.
To pause
VCD 1.1 |
|
CD |
|
MP3 |
Main unit: Press [:/J CD] during play. |
|||||
|
|
|
|
|
|
|
|
|
|
Remote Control: Press [ J PAUSE] |
VCD 2.0 |
|
VCD 1.1 |
|
CD |
MP3 |
|||||
|
|
|
|
|
|
|
|
|
|
during play. |
Press [:/J CD] on the main set or [: CD] on the remote control to resume play.
“ ” indication
It indicates current disc has 16 or more tracks.
One touch play
During standby mode and when a CD is loaded, press [:/J CD] or [1]–[5].
The unit comes on and play starts.
RQT7704
How to work with menus VCD 2.0 
Menus vary with the software. Press the buttons in response to what appears on the TV and in accordance with the CD’s instructions.
(Example)
To select a menu |
Press the numbered buttons on the remote |
item |
control to select the menu item. |
|
To select track 10 or over, press [X10] |
|
then the two digits. |
To move to the |
Press [NEXT] or [PREV]. |
next/previous item |
|
To make a selection |
Press [SELECT]. |
during PBC playback |
|
(Depending on disc) |
|
To return to the |
Press [SHIFT] + [ ] on the remote control. |
previous menu |
|
To quit menu play |
While in stop mode |
|
Press [PBC]. “ PBC OFF” appears on the display. |
|
|
VCD 2.0 VCD 1.1
To advance in While paused
slow motion Hold down [4/FF/f] (Press [) FF] on the remote control.)
VCD 1.1 CD 
 MP3
MP3
To skip forward/ |
|
Press [g/REW/3] (backward) or |
|||||
backward |
|
[4/FF/f] (forward) during play. |
|||||
|
|
|
|
|
|
|
|
|
|
|
|
|
|
||
VCD 2.0 |
|
VCD 1.1 |
|
|
CD |
|
|
|
|
|
|
|
|
|
|
To search |
|
Hold down [g/REW/3] (backward) or |
|||||
forward/ |
|
[4/FF/f] (forward) (Press [( REW] or |
|||||
backward |
|
[) FF] on the remote control) during play. |
|||||
|
|
|
|
|
|
|
|
Note
•The search speed increases up to 4 steps.
•The slow motion advance speed decreases up to 3 steps.
•Sound may not be issued during use of the search function when video CDs are played in menu operation.
•When slide show-type (continuous changing of still screens) video
CD software is played in menu operation, fast-forwarding or rewinding of the CD may not be possible.
•During 1-RANDOM or A-RANDOM play (A page 8), you cannot skip to tracks already played.
•During program play, 1-RANDOM or A-RANDOM play (A page 8) you can search only within the track.
Resume play
VCD 1.1 CD
Remote control only
This function allows you to resume CD playback (A page 6) from the point it was stopped at, even if the unit was turned off.
Press [SHIFT] + [RESUME PLAY] in the stop mode.
Note
Resume does not work if the tray is opened or changed, or during program, 1-Disc Random or All-Disc Random modes.
Zoom function
VCD 2.0 VCD 1.1
Remote control only
Use the zoom function to expand a portion of the picture on your screen.
1While paused Press [ZOOM].
The screen will expand a portion of the picture.
2Press [8, 9, ;, :] to view different portions of the picture.
To exit zoom function
Press [ZOOM].
DISC 


 [1] – [5]
 RESUME PLAY
REPEAT 


OSD
ZOOM 


 , ,
, , ,
, 
CD DISP 
SHIFT 

Direct access play
VCD 1.1 CD 
 MP3
MP3
Remote control only
1Press [DISC] and (within 10 seconds) [1]–[5] to select the disc.
2Select the track with the numbered buttons.
To select track 10 or over, press [X10] then the two digits.
Play starts from the selected track.
Note
You cannot use this function with 1-RANDOM or A-RANDOM mode.
Television OSD indicators (On Screen Display)
VCD 2.0 VCD 1.1 MP3
Remote control only
OSD displays the CD operation, mode, and display information on a television screen.
Press [OSD].
Every time you press the button:
OSD ON ↔ OSD OFF
Note
OSD indicators differ depending on video CD software.
CD display
VCD 1.1 CD
Remote control only
You can display the remaining play time of the current track.
Press [CD DISP] during play or pause.
Every time you press the button:
Elapsed play time ↔ Remaining play time
Repeat play
VCD 1.1 CD 
 MP3
MP3
Remote control only
Press [REPEAT] during play.
“ ” is displayed.
Note
You can use repeat mode with program play and CD play mode functions.
VCD 1.1 CD (A page 8)
MP3 (A page 11)
To cancel repeat play
Press [REPEAT] to clear “ ”.
”.
7
RQT7704

CDs
To listen to specific CDs and tracks (CD Play Mode function)
VCD 1.1 CD
Remote control only
Preparation: Press [: CD] and then [L CLEAR].
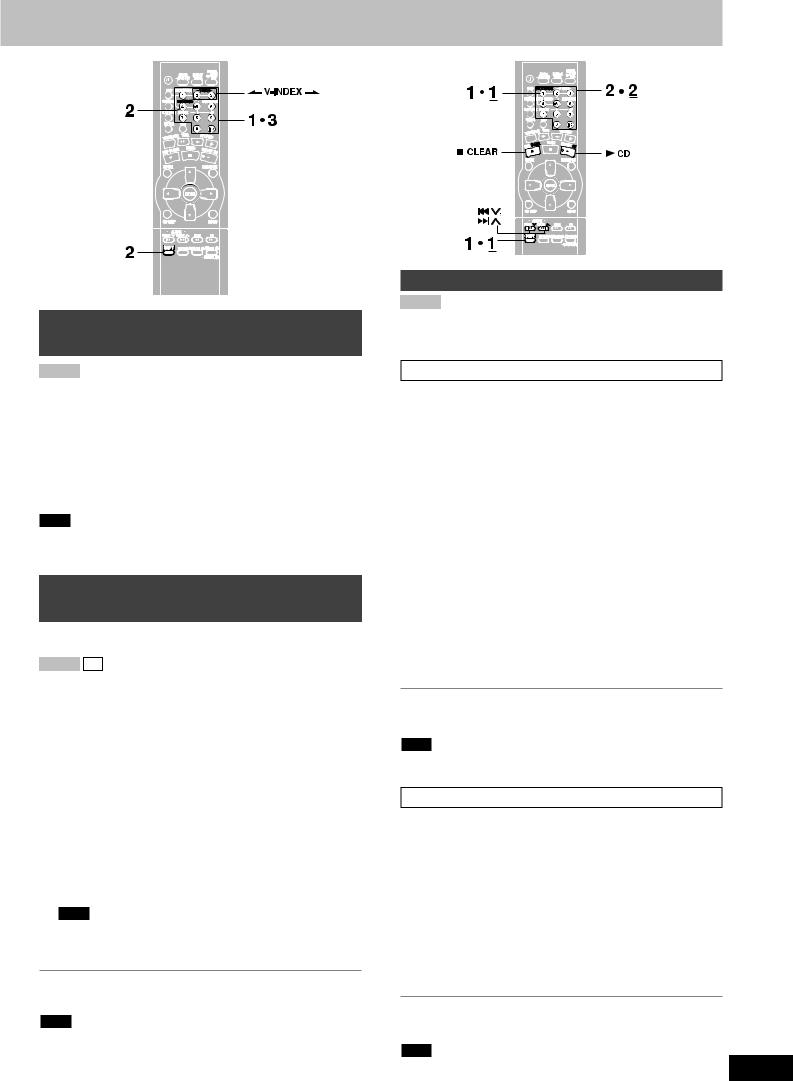
1Press [PLAY MODE] to select the desired mode.
Every time you press the button:
ALL-DISC  1-SONG
  1-RANDOM
  A-RANDOM
|
|
|
1-DISC |
|
|
|
|
|
|
|
|
|
|
|
|
||
ALL-DISC: |
Plays all loaded discs in succession from the |
||||
|
|
selected disc to the final disc \. |
|||
1-SONG: |
Plays one selected track on the selected disc. |
||||
1-RANDOM: Plays one selected disc in random order. |
|||||
A-RANDOM: Plays all loaded discs in random order. |
|||||
1-DISC: |
Plays one selected disc. |
||||
(The original display is restored in about 2 seconds.)
Proceed to step 4 when you selected A-RANDOM in step 1.
2Press [DISC] and (within 10 seconds) [1]–[5] to select the disc.
The CD starts.
3Only when you selected “1-SONG” in step 1
Select the track with the numbered buttons.
To select track 10 or over, press [X10] then the two digits. Play starts from the selected track.
4Only when you selected “A-RANDOM” in step 1
Press [: CD] to start play.
To stop play
Press [L CLEAR].
When playback ends
The current play mode will be retained.
\ Final disc
For example, if play starts from disc 4, disc 3 will be the “final disc”. Order of progression: Disc 4z5z1z2z3
8
4
Program play
VCD 1.1 CD
You can program up to 24 tracks.
Remote control only
Preparation: Press [: CD] and then [L CLEAR].
1Press [PROGRAM].
“PGM” appears.
2Press [DISC] and (within 10 seconds) [1]–[5] to select the disc.
3Select the tracks with the numbered buttons.
To select track 10 or over, press [X10] then the two digits.
Repeat steps 2 and 3 to program other tracks.
4Press [: CD] to start play.
To exit program mode
Press [PROGRAM] in the stop mode. (You can replay your program by pressing [PROGRAM] then [: CD].)
To cancel
Press [L CLEAR] in the stop mode. “CLEAR” is displayed.
To check program contents
Press [g 3] or [f 4] while “P” is displayed.
Every time you press the button, the track number and program order are displayed.
To add to the program
Do steps 2 and 3 while “P” is displayed.
RQT7704
To find a particular scene using a video index number
VCD 1.1
Remote control only
A particular scene in a track you want to watch can be located by selecting a video index number.
Check the user’s manual or other material for information on whether video CD software contains video index numbers.
Press [SHIFT] + [V-INDEX ( ) or (
 )] in the play mode to select the video index number.
Play starts at the video index selected.
Note
With some discs, it may not be possible to make a video index search with the motion picture.
To find a particular scene using the time (TIME ACCESS)
This function allows you to specify a time in the current track and begin play from that point.
VCD 1.1 CD
Remote control only
Preparation:
Make sure OSD is on (A page 7).
1Press the numbered buttons to select the desired track number.
That track will start playing.
2Press [SHIFT] + [TIME ACCESS].
The track duration appears on the TV screen.
3Press the numbered buttons to enter the time of the desired part.
Example:
22:40 : [2] [2] [4] [0] 00:25 : [0] [0] [2] [5] Play starts from the selected time.
Note
The time to be entered should be a portion of the current track time. If, for example, you are playing track 2, and you enter “0:25”, play begins from 25 seconds into track 2.
To cancel this function
Press [SHIFT] + [TIME ACCESS] again.
Note
You cannot use time access in program, 1-Disc Random and All-Disc Random modes.
Multi screen functions
VCD 1.1
Remote control only
There are two multi-screen modes:
DISC MULTI-SCREEN and TRACK MULTI-SCREEN.
Disc multi screen
This function divides the screen up into several parts and displays the picture from each of the tracks. You can select the track you want from the various pictures on the screen.
Preparation:
Make sure OSD is on (A page 7).
1(While playback is stopped)
Press [SHIFT] + [MULTI-SCREEN].
Track 1 will first be played back for a few seconds, then will be displayed as a still picture. The same will then happen for the following tracks. Up to 9 tracks will be displayed on the screen at a time.
To display subsequent tracks:
Press [f 4].
To display previous tracks: Press [g 3].
To cancel the multi-screen mode: Press [L CLEAR].
2Press the numbered buttons to select the desired track number.
That track will start playing. The number of the selected track is displayed on the unit’s display.
For your reference:
If you press [: CD] or press [SHIFT] + [MULTI-SCREEN] as a track is being displayed as in step 1, that track will start playing.
Note
You cannot use disc multi screen in program, 1-Disc Random and
All-Disc Random modes.
Track multi screen
A track is divided into 9 sections and those sections are shown on the multi screen. Playback can then be started from the section of your choice.
(During playback)
1Press [SHIFT] + [MULTI-SCREEN].
The beginning five second segment of the track is played back, then the last frame of the segment is displayed on the multi screen.
To cancel the multi-screen mode: Press [L CLEAR].
2Press the numbered buttons to select the desired section of the track.
Playback begins from that section.
For your reference:
If you press [: CD] or press [SHIFT] + [MULTI-SCREEN] as a track is being displayed, playback begins from that section.
Note |
|
You cannot use track multi screen in program, 1-Disc Random and |
9 |
All-Disc Random modes. |
RQT7704

How discs with MP3 differ from CDs
This unit can play MP3 files recorded on CD-R/RW with a computer.
Files are treated as tracks and folders are treated as albums.
This unit can access up to 999 tracks, 195 albums and 20 sessions.
When making MP3 files to play on this unit
Disc format
Discs must conform to ISO9660 level 1 or 2 (except for extended formats).
File format
MP3 files must have the extension “.MP3” or “.mp3”.
To play in a certain order |
Example: |
|||||||
Prefix the folder and file names with 3-digit |
root |
|||||||
numbers in the order you want to play them. |
|
|
|
001 |
|
|
||
|
|
|
|
|
||||
Files may not be recorded in numbered order if |
|
|
|
|
|
|
001.mp3 |
|
|
|
|
|
|
|
|||
the prefixes have different numbers of digits. |
|
|
|
|
|
|
||
|
|
|
|
|
|
002.mp3 |
||
|
|
|
|
|
|
|||
|
|
|
|
|
|
003.mp3 |
||
For example: 1????.mp3, 2????.mp3, 10????.mp3. |
|
|
|
|
|
|
||
|
|
|
|
|
|
|
||
However, some writing software may also |
|
|
|
|
|
|
|
|
cause recording to occur in a different order. |
|
|
002 |
|
001.mp3 |
|||
|
|
|
||||||
|
|
|
|
|
|
|
|
|
MPEG Layer-3 audio decoding technology |
|
|
|
|
|
|
|
|
|
|
|
|
|
|
|
||
|
|
|
|
|
|
|
002.mp3 |
|
|
|
|
|
|
|
|
||
licensed from Fraunhofer IIS and Thomson |
|
|
|
|
|
|
|
003.mp3 |
|
|
|
|
|
|
|
||
|
|
|
|
|
|
|
|
|
multimedia. |
|
|
|
|
|
|
|
|
|
|
|
|
|
|
|
|
|
Limitations on MP3 play
•This unit is not compatible with packet-write format.
•When both MP3 and CD-DA data is recorded on the disc over a number of sessions:
•If the first session contains MP3 recordings, the unit will play from the MP3 made in that session till the session before the first CD-DA recordings.
•If the first session contains CD-DA recordings, the unit will play only the recordings made in that session. The subsequent sessions will be ignored.
•Maximum number of displayable characters: Album/track title: 21
ID3 title/artist name: 24
Text data that the unit doesn’t support cannot be displayed.
(ID3 is a tag embedded in MP3 track to provide information about the track.)
•You cannot use 1-RANDOM play, A-RANDOM play, search function, and time access function.
•Some MP3 may not be played due to the condition of the disc or recording.
•Recordings will not necessarily be played in the order you recorded them.
File format indicator
“.MP3”: Indicates the disc contains MP3 files
10
CD DISP 

SHIFT 


Using menus to play MP3 discs
Remote control only
Preparation:
1.Turn the television on, select the video input with the television input switch.
2.Select the desired disc (A page 6).
1 An album list appears.
R O O T |
|
|
0 0 1 E N G P O P |
Album name |
|
0 0 2 |
E N G J A Z Z |
|
0 0 3 |
E N G R N B |
|
0 0 4 E N G M U S I C A L |
|
|
0 0 5 E N G S O U N D T R AC K |
|
|
PAG E 0 1 / 1 2 |
|
|
Press [8 , 9] to select an album and press [ENTER].
2 A track list appears. |
|
|
|
|
|
|
|||||
Current album |
|
|
|
|
|
|
|
|
|
|
|
|
0 0 2 E N G JA Z Z |
|
|
|
|
|
|
||||
|
|
|
|
|
|
|
|
|
|||
name |
|
|
|
|
|
|
|
|
Track name |
||
|
|
|
|
0 0 1 C R Y M E A |
R I V E R |
|
|
|
|
||
|
|
|
|
0 0 2 E A S T O F T H E S U N |
|
|
|
|
|||
|
|
|
|
0 0 3 I ' V E G O T Y O U |
|
|
|
|
|||
|
|
|
|
0 0 4 H E A V E N |
|
|
|
|
|
|
|
|
|
|
|
0 0 5 R A I N B O W |
|
|
|
|
|
|
|
|
|
|
|
P A G E 0 1 / 0 7 |
|
|
|
|
|
|
|
|
|
|
|
|
|
|
|
|
|
|
|
Press [8 , 9] to select a track and press [: CD]. |
|||||||||||
Play starts. |
|
|
|
|
|
|
|
|
|
||
|
|
|
|
|
|
|
|
|
|
|
|
ID3 title name |
|
|
0 0 2 E N G JA Z Z |
|
|
|
|
|
|
||
|
|
R A I N B OW |
|
|
|
|
|
ID3 artist |
|||
|
|
|
|
JA M E S H E N S O N |
|
|
|
|
|
|
|
|
|
|
|
0 0 1 C R Y M E A |
R I V E R |
|
|
|
name |
||
|
|
|
|
0 0 2 E A S T O F T H E S U N |
|
|
|||||
|
|
|
|
|
|
|
|
||||
|
|
|
|
0 0 3 I ' V E G O T Y O U |
|
|
|
|
|||
|
|
|
|
0 0 4 H E A V E N |
|
|
|
|
|
|
|
|
|
|
|
0 0 5 R A I N B O W |
|
|
|
|
|
|
|
|
|
|
P A G E 0 1 / 0 7 |
|
|
|
|
|
|
||
|
|
|
|
|
|
|
|
|
|
|
|
To stop play
Press [L CLEAR].
To return to album list while in track list
Press [SHIFT] G [ 
 ].
].
CD display for MP3
Remote control only
During play or pause
Press [CD DISP] to select a desired CD display mode.
Every time you press the button:
Track Name  Album Name
 Elapsed Time

If you press the button when the track or album name is scrolling : The next display will be shown.
ends scrolling : The current display will be shown again.
RQT7704
4
 4 3
4 3
CD play mode function for MP3
Remote control only
Preparation: Press [: CD] and then [L CLEAR].
1Press [PLAY MODE] to select the desired mode.
Every time you press the button:
ALL-DISC → 1-SONG → 1-DISC
↑
ALL-DISC: Plays all loaded discs in succession from the
|
selected disc to the final disc \. |
1-SONG: |
Plays one selected track on the selected disc. |
1-DISC: |
Plays one selected disc. |
(The original display is restored in about 2 seconds.)
2Press [DISC] and (within 10 seconds) [1]–[5] to select the disc.
The CD starts.
3When you selected “1-SONG” in step 1
Press [SHIFT] µ [ALBUM ( or
or )] to select the album.
Play starts from the first track of the selected album.
4When you selected “1-SONG” in step 1
Press [f 4] or [ g 3] to select a track and press [: CD].
Play starts.
To stop play
Press [L CLEAR].
When playback ends
The current play mode will be retained in memory until it is changed even if the unit is turned off.
\ Final disc
For example, if play starts from disc 4, disc 3 will be the “final disc”. Order of progression: Disc 4z5z1z2z3
Note
You cannot use program mode together with CD Play Mode function.
4
SHIFT
Program play for MP3
You can program up to 24 tracks.
Remote control only
Preparation:
1.Turn the television on, select the video input with the television input switch.
2.Select the desired disc (A page 6)
3.Press [L CLEAR].
1An album list appears.
Press [PROGRAM].
2Press [8 , 9] to select an album and press [ENTER].
3A track list appears.
Press [8 , 9] to select a track and press [ENTER] to add it to the program.
Repeat this step to program other tracks.
To program from another album
1.Press [SHIFT] + [ 
 ].
].
2.Do steps 2~3.
4Press [: CD] to start play.
To exit program mode
Press [PROGRAM] in the stop mode. You can replay your program by pressing [PROGRAM] then [: CD].
You can do the following while “P” is displayed
•To check program contents
Press [f 4] or [g 3].
Every time you press the button, the track number and program order are displayed.
•To add to the program
While checking program contents Press [ENTER].
Do steps 2-3.
•To clear all tracks
Press [L CLEAR].
Note
•You cannot program more than one disc for MP3.
•You cannot program CD-DA tracks together with MP3 tracks.
•The program memory is cleared when you change a disc or open the CD tray.
11
RQT7704

The radio: manual tuning
3 |
3 |
|
1Press [TUNER, BAND] to select band.
The unit comes on.
Every time you press the button: FM ↔ AM
2Press [PLAY MODE] on the remote control to select “MANUAL”.
Every time you press the button:
MANUAL ↔ PRESET
3Hold down [g/REW/3] or [4/FF/f] for a moment to search for a station.
The frequency stops when it finds a clear station.
To stop during the process, press [g/REW/3] or [4/FF/f].
Under excessive interference, a station may not be found.
Press [g/REW/3] or [4/FF/f] repeatedly to tune step-by- step.
“TUNED” is displayed when a radio station is tuned.
“ST” is displayed when a stereo FM broadcast is being received.
If noise is excessive in FM
Remote control only
Hold down [PLAY MODE] to display “MONO”.
Monaural sound is selected and noise reduces when reception is weak.
Hold down [PLAY MODE] again to cancel the mode. “MONO” is also cancelled if the frequency is changed.
12
The radio: preset tuning
Remote control only
There are two methods of pre-setting stations.
Automatic presetting : All the stations the tuner can receive are preset.
Manual presetting : You can select the stations to preset and the order they are preset in.
Up to 15 stations each can be set in the FM and AM bands.
Preparation:
Press [TUNER/AUX] to select “FM” or “AM”.
Automatic presetting
Do the following once each for FM and AM.
Preparation: Tune to the frequency where pre-setting is to begin.
Hold down [PROGRAM] until the frequency changes.
The tuner presets all the stations it can receive into the channels in ascending order. When finished, the last station memorized is tuned in.
Manual presetting
Pre-set the stations one at a time.
1Press [PROGRAM] then press [( REW] or [) FF] to tune to the desired station.
2Press [PROGRAM] then press [g 3] or [f 4] to select a channel.
3 Press [PROGRAM].
The station occupying a channel is erased if another station is preset in that channel.
Selecting channels
Press the numbered buttons to select the channel.
To enter channel 10 or over, press [>10], then the two digits.
OR
1 Press [PLAY MODE] to select “PRESET”.
2 Press [g 3] or [f 4] to select the channel.
RQT7704
 Loading...