


Operating Instructions
Bruksanvisning Betjeningsvejledning Käyttöohjeet
Instrukcja obsługi
Návod k obsluze
Wireless Speaker System
Trådlöst högtalarsystem Trådløst højttalersystem Langaton kaiutinjärjestelmä
Zestaw głośników bezprzewodowych Bezdrátová souprava reproduktorů
Model No. SC-TMAX10
Thank you for purchasing this product.
For optimum performance and safety, please read these instructions carefully.
Please keep this manual for future reference.
Tack för valet av denna apparat.
Läs igenom bruksanvisningen noga för bästa resultat och för säkerhets skull.
Spara denna bruksanvisning.
Tak fordi du har valgt dette produkt.
Læs venligst denne betjeningsvejledning omhyggeligt, således at optimal ydelse og sikkerhed opnås.
Gem vejledningen til senere brug.
Kiitos, että hankit tämän tuotteen.
Lue nämä ohjeet huolellisesti parhaan suorituskyvyn ja turvallisuuden takaamiseksi.
Säilytä ohje tulevaa tarvetta varten.
Dziękujemy za zakupienie tego produktu.
Proszę dokładnie zapoznać się z tą instrukcją obsługi, aby jak najlepiej wykorzystać to urządzenie i zapewnić jego bezpieczne użytkowanie.
Prosimy o zachowanie niniejszej instrukcji obsługi.
Děkujeme za zakoupení tohoto výrobku.
Pro dosažení optimálního výkonu a z bezpečnostních důvodu si pečlivě přečtěte tyto pokyny.
Uschovejte si prosím tento návod k obsluze.
E |
TQBJ2186 |

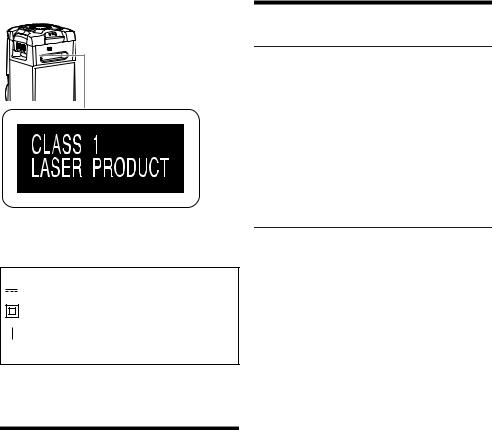
Your system and the illustrations can look differently.
Back of product
The symbols on this product (including the accessories) represent the following:
 AC
AC
DC
Class II equipment (The construction of the product is double-insulated.)
ON
 Standby
|
Table of contents |
|
|
Safety precautions . . . . . . . . . . . . . . . . . . . . . . . . . . . . |
. 2 |
|
Caution for AC mains lead . . . . . . . . . . . . . . . . . . . . . . |
. 3 |
|
Sales and Support Information . . . . . . . . . . . . . . . . . . . . |
3 |
|
Supplied accessories . . . . . . . . . . . . . . . . . . . . . . . . . . . |
3 |
|
Transporting the unit. . . . . . . . . . . . . . . . . . . . . . . . . . . . |
4 |
|
Maintenance . . . . . . . . . . . . . . . . . . . . . . . . . . . . . . . . . . |
4 |
|
Power sources . . . . . . . . . . . . . . . . . . . . . . . . . . . . . . . . |
4 |
|
Preparing the remote control . . . . . . . . . . . . . . . . . . . . . |
5 |
|
Overview of controls . . . . . . . . . . . . . . . . . . . . . . . . . . . . |
6 |
|
Preparing media . . . . . . . . . . . . . . . . . . . . . . . . . . . . . . . |
8 |
|
Media playback. . . . . . . . . . . . . . . . . . . . . . . . . . . . . . . . |
9 |
|
Radio. . . . . . . . . . . . . . . . . . . . . . . . . . . . . . . . . . . . . . . |
10 |
|
Sound effects . . . . . . . . . . . . . . . . . . . . . . . . . . . . . . . . |
11 |
|
Illumination . . . . . . . . . . . . . . . . . . . . . . . . . . . . . . . . . . |
11 |
|
DJ functions . . . . . . . . . . . . . . . . . . . . . . . . . . . . . . . . . |
11 |
|
Using a microphone . . . . . . . . . . . . . . . . . . . . . . . . . . . |
12 |
|
Karaoke. . . . . . . . . . . . . . . . . . . . . . . . . . . . . . . . . . . . . |
13 |
|
Clock and timers. . . . . . . . . . . . . . . . . . . . . . . . . . . . . . |
13 |
|
External equipment. . . . . . . . . . . . . . . . . . . . . . . . . . . . |
14 |
|
Others. . . . . . . . . . . . . . . . . . . . . . . . . . . . . . . . . . . . . . |
15 |
|
Troubleshooting . . . . . . . . . . . . . . . . . . . . . . . . . . . . . . |
15 |
TQBJ2186 |
|
|
|
References . . . . . . . . . . . . . . . . . . . . . . . . . . . . . . . . . . |
18 |
|
Specifications . . . . . . . . . . . . . . . . . . . . . . . . . . . . . . . . |
19 |
2
Safety precautions
WARNING!
Unit
•To reduce the risk of fire, electric shock or product damage,
–Do not expose this unit to rain, moisture, dripping or splashing.
–Do not place objects filled with liquids, such as vases, on this unit.
–Use the recommended accessories.
–Do not remove covers.
–Do not repair this unit by yourself. Refer servicing to qualified service personnel.
–Do not let metal objects fall inside this unit.
CAUTION!
Unit
•To reduce the risk of fire, electric shock or product damage,
–Do not install or place this unit in a bookcase, built-in cabinet or in another confined space. Ensure this unit is well ventilated.
–Do not obstruct this unit’s ventilation openings with newspapers, tablecloths, curtains, and similar items.
–Do not place sources of naked flames, such as lighted candles, on this unit.
•This unit is intended for use in moderate climates.
•This unit may receive radio interference caused by mobile telephones during use. If such interference occurs, please increase separation between this unit and the mobile telephone.
•This unit utilizes a laser. Use of controls or adjustments or performance of procedures other than those specified herein may result in hazardous radiation exposure.
•Set the unit up on an even surface away from direct sunlight, high temperatures, high humidity, and excessive vibration.
•This system might get warm after prolonged usage. This is normal. Do not be alarmed.
AC mains lead
•The mains plug is the disconnecting device. Install this unit so that the mains plug can be unplugged from the socket outlet immediately.
Battery
•Danger of explosion if battery is incorrectly replaced. Replace only with the type recommended by the manufacturer.
•When disposing of the batteries, please contact your local authorities or dealer and ask for the correct method of disposal.
•Do not heat or expose to flame.
•Do not leave the battery(ies) in a car exposed to direct sunlight for a long period of time with doors and windows closed.
•Do not break open or short-circuit the battery.
•Do not charge the alkaline or manganese battery.
•Do not use the battery if the cover has peeled off.
•Remove the battery if you do not use the remote control for a long period of time. Keep in a cool, dark area.
2

Caution for AC mains lead
(For the AC mains plug of three pins)
For your safety, please read the following text carefully.
This appliance is supplied with a moulded three pin mains plug for your safety and convenience.
A 3-ampere fuse is fitted in this plug.
Should the fuse need to be replaced please ensure that the replacement fuse has a rating of 3-ampere and that it is approved by ASTA or BSI to BS1362.
Check for the ASTA mark  or the BSI mark
  on the body of the fuse.
If the plug contains a removable fuse cover you must ensure that it is refitted when the fuse is replaced.
If you lose the fuse cover the plug must not be used until a replacement cover is obtained.
A replacement fuse cover can be purchased from your local dealer.
Before use
Remove the connector cover.
How to replace the fuse
The location of the fuse differ according to the type of AC mains plug (figures A and B). Confirm the AC mains plug fitted and follow the instructions below.
Illustrations may differ from actual AC mains plug. 1. Open the fuse cover with a screwdriver.
Figure A |
Figure B |
Fuse cover
2. Replace the fuse and close or attach the fuse cover.
Figure A |
Figure B |

 Fuse (3 ampere) Fuse (3 ampere)
Sales and Support Information
For the United Kingdom and Ireland
Customer Communications Centre
•For customers within the UK: 0344 844 3899
•For customers within Ireland: 01 289 8333
•Monday – Friday 9:00am – 5:00pm (Excluding public holidays).
•For further support on your product, please visit our website: www.panasonic.co.uk
Direct Sales at Panasonic UK
•Order accessory and consumable items for your product with ease and confidence by phoning our Customer Communications Centre Monday – Friday 9:00am – 5:00pm (Excluding public holidays).
•Or go on line through our Internet Accessory ordering application at www.pas-europe.com.
•Most major credit and debit cards accepted.
•All enquiries transactions and distribution facilities are provided directly by Panasonic UK.
•It couldn’t be simpler!
•Also available through our Internet is direct shopping for a wide range of finished products. Take a browse on our website for further details.
Supplied accessories
Check and identify the supplied accessories. Product numbers correct as of May 2019. These may be subject to change.
2 AC mains leads
For the United Kingdom and Ireland
(TNMX213)
1 FM indoor antenna
(TSAA0009)
1 Remote control
(N2QAYB001215)
1 Remote control battery
For the United Kingdom and Ireland
1 Antenna plug adaptor
(TPBAA172)
Note:
Use the AC mains lead that is suitable for your household mains socket.
ENGLISH
TQBJ2186
3
3

Transporting the unit
Preparation
Disconnect all connected devices and cables from the unit.
Power sources
The unit can be switched on by using AC power supply source. If AC power supply source is not available, you can use an external power bank.
TQBJ2186
4
Note:
•Keep the unit at least 10 mm away from other objects for proper ventilation.
•The speakers do not have magnetic shielding. Do not put them near PCs or other equipment easily influenced by magnetism.
•When you play at high levels for a long period, it can cause damage to the speakers and decrease the life of the speakers.
•Decrease the volume in these conditions to prevent damage:
–When the sound is distorted.
–When you adjust the sound quality.
CAUTION!
•Improper handling or transportation manner may cause the unit to fall, etc., resulting in damage and/or personal injury.
•Do not touch the speaker cone’s reverberating surfaces:
–This may damage the speaker cone.
–The speaker cone may be hot.
•Do not put the unit on a table or any elevated surface.
•Do not allow children to climb on the unit.
•Be careful when babies or children are near.
Maintenance
Disconnect the AC mains lead before maintenance. Clean this system with a soft, dry cloth.
•Never use alcohol, paint thinner or benzine to clean this system.
•Before using chemically treated cloth, read the instructions that came with the cloth carefully.
Using the household mains socket
Connect the AC mains lead.
(For the AC mains plug of three pins)
READ THE “Caution for AC mains lead” BEFORE CONNECTION.
To household mains socket
Conserving power
The system consumes a small amount of power even when it is in standby mode. Disconnect the power supply if you do not use the system.
Some settings will be lost after you disconnect the system. You have to set them again.
Note:
•Do not use any other AC mains lead except the supplied one.
•Hold the unit when connecting or disconnecting the AC mains lead to prevent the unit from falling.
•Keep the antennas away from the AC mains lead to avoid picking up noise.
4

Using an external power bank
Connect the external power bank (not supplied) to the micro USB port at the rear of the unit.
USB cable (not supplied)
External power bank (not supplied)
Note:
•“PWR BANK” is shown for 5 seconds when using the external power bank as the power source.
•When the unit is connected to both household mains socket and external power bank, the power is supplied through the household mains socket.
•If the power supply is disconnected, the unit will switch to power bank mode and vice versa.
•When using power bank as the power source, you cannot do USB charging.
•Power bank cannot be charged while connected to the unit.
•Do not use power bank that does not conform to safety standards.
•Do not use power bank output power below 5 V, 2 A.
•Do not use damaged power bank. This can cause fire, electric shock or product damage.
Preparing the remote control
Use alkaline or manganese battery.
Install the battery so that the poles (+ and –) align with those in the remote control.
ENGLISH
TQBJ2186
5
5

Overview of controls
Do the procedures with the remote control. You can also use the buttons on the unit if they are the same.
A Standby/on switch [`], [1]
Press to switch the unit from on to standby mode or vice versa. In standby mode, the unit is still consuming a small amount of power.
When the unit’s power source is other than household mains socket, press [1] on the unit to switch it on.
B Decrease the brightness of the display panel
The illumination is also switched off. To cancel, press the button again.
C Select the audio source
Press [SELECT <, >] (unit: [SELECT]) repeatedly to select the source:
USB  CD
CD  FM
FM
BLUETOOTH  AUX
AUX  D-IN
D-IN
On the unit:
To start Bluetooth® pairing, press and hold [  ]. D Basic playback control
E View the setup menu
F View the content information G Select or confirm the option H Set the sleep timer
I Adjust the volume level
On the unit:
Press [VOL] and then turn [VOLUME/MULTI CONTROL] to adjust the volume.
Adjust the microphone volume level
Press and hold [–MIC VOL] until “MIC VOL” is shown. Turn [VOLUME/MULTI CONTROL] to adjust the volume.
J Mute the sound
To cancel, press the button again.
“MUTE” is also cancelled when you adjust the volume or when you switch off the system.
K View the play menu
L Select the sound effects
TQBJ2186
6
6
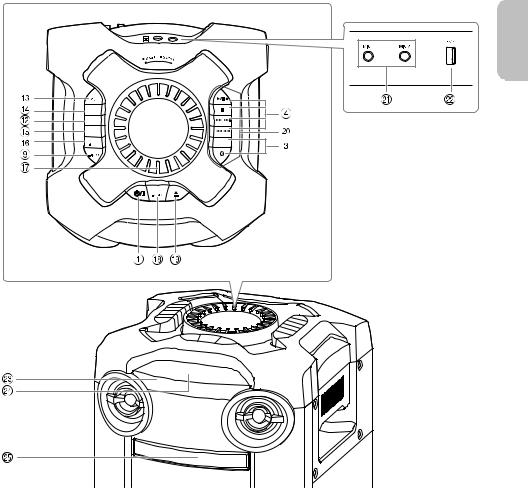
Top panel
ILLUMINATION |
|
SOUND |
DJ4 |
ALBUM/ |
DJ3 |
TRACK |
|
KARAOKE |
SELECT DJ2 |
VOL |
|
|
DJ1 |
|
JUKEBOX |
ENGLISH
MSelect DJ effect or DJ sampler
NSelect the illumination effects
OSelect MP3 album or track
Press [ALBUM/TRACK] to select album or track.
Browse tracks or albums
Press [R, T] or turn [VOLUME/MULTI CONTROL] to browse.
To start playback from the selection, press [4/9].
PSelect the Karaoke effects
To cancel, press and hold [–OFF] until “OFF EFFECT” is shown.
QVolume or multi control knob
Do not turn knob fast to prevent irregular of volume operation.
RSelect DJ jukebox Select DEMO play
Press and hold [–DEMO] for more than 2 seconds, the built-in demonstration song will be played.
Press [8] to stop the demonstration.
SOpen or close the disc tray
TDJ function direct buttons
Press [DJ] to switch on the DJ function.
Press [DJ1] to [DJ6] to select the desired function. To cancel, press the selected [DJ1] to [DJ6] again.
UMicrophone jack
VUSB port ( ) Play MP3 tracks.
WRemote control sensor
Point the remote control at the remote control sensor, away from obstacles and within the operation range.
Distance: Within approximately 7 m
Angle: Approximately 20° up and down, 30° left and right
XDisplay panel
YDisc tray
TQBJ2186
7
7

Preparing media
Disc
1Press [x] on the unit to open the disc tray.
Put in a disc with the label facing up. Press again to close the disc tray.
2Press [SELECT <, >] repeatedly to select “CD”.
USB
Preparation
Before you connect a USB device to the system, make sure you do a backup of the data.
1Decrease the volume and connect the USB device to the USB port.
2Press [SELECT <, >] repeatedly to select “USB”.
Note:
•Do not use a USB extension cable. The system cannot recognise USB device connected through a cable.
•Some devices cannot be charged as the maximum USB charging current is 0.5 A only.
Bluetooth®
You can connect and play an audio device wirelessly through Bluetooth®.
Preparation
•Switch on the unit.
•Switch on the Bluetooth® feature of the device and put the device near the system.
•Read the operating instructions of the device for details.
█ Pairing a device
Preparation
If this system is connected to a Bluetooth® device, disconnect it (~8).
1Press [  ].
].
If “PAIRING” is shown, continue with step 3.
2Press [PLAY MENU] to select “PAIRING” and then press [OK].
3Select “SC-TMAX10” from the Bluetooth® menu of
the device.
If prompted for a passkey, input “0000” or “1234”. The device connects with this system automatically after pairing is complete.
The MAC address (example: 6C:5A:B5:B3:1D:0F) may be shown before “SC-TMAX10” is shown.
The name of the connected device is shown for a few seconds.
|
Using the unit |
||
TQBJ2186 |
1 |
Press and hold [ ] until “PAIRING” is shown. |
|
2 |
Select “SC-TMAX10” from the Bluetooth® menu of |
||
|
|||
the device.
8
Note:
•You can pair up to 8 devices with this system. If a 9th device is paired, the device that has not been used for the longest time will be replaced.
•Depending on the searching functionality of the Bluetooth® device and the surrounding environment, if the product name is not shown on the Bluetooth® menu of the device, switch off and then switch on the Bluetooth® feature of the device repeatedly during the pairing process.
█ Connecting a device
Preparation
If this system is connected to a Bluetooth® device, disconnect it (~8).
1Press [  ].
].
“BLUETOOTH READY” is shown.
2Select “SC-TMAX10” from the Bluetooth® menu of
the device.
The name of the connected device is shown for a few seconds.
3Start playback on the device.
Note:
•A device must be paired to connect.
•When “BLUETOOTH” is selected as the source, this system will automatically try to connect to the last connected device. (“LINKING” is shown during this process.)
█ Multi Connect
This system supports Multi Connect, which can connect up to 3 devices simultaneously.
To switch between the connected devices
When one of the connected devices is playing, you can easily switch control to another connected device simply by starting a playback on that device. The previous playback will be paused automatically.
Note:
This function may not work for some apps or devices (depending on app or device specifications).
█ Disconnecting a device
While a Bluetooth® device is connected
1Press [PLAY MENU] repeatedly to select “DISCONNECT?”.
2Press [R, T] to select “OK? YES” and then press
[OK].
“BLUETOOTH READY” is shown. To cancel, select “OK? NO”.
Using the unit
Press and hold [  ] until “PAIRING” is shown.
Note:
•This function disconnects all connected devices.
•A device is disconnected when you:
–Select a different source.
–Move the device out of the maximum range.
–Disable the Bluetooth® transmission of the device.
–Switch off the system or the device.
8
Media playback
The following marks indicate the availability of the feature.
 : CD-R/RW in CD-DA format or with MP3 files.
: : USB device with MP3 files. BLUETOOTH : Bluetooth® device.
Basic playback
|
|
: |
|
BLUETOOTH |
|
|||||
|
|
|
|
|
||||||
Play |
|
|
|
Press [4/9]. |
||||||
Stop |
|
|
|
Press [8]. |
||||||
|
|
|
|
|
|
|
|
|
position is memorised. |
|
|
|
|
|
|
|
The |
||||
|
|
|
|
|
|
“RESUME” is shown. |
||||
|
|
|
|
|
|
Press again to stop fully. |
||||
Pause |
|
|
|
Press [4/9]. |
||||||
|
|
|
|
|
|
Press again to continue playback. |
||||
Skip |
|
|
Press [2/3] or [5/6] to skip track. |
|||||||
|
|
|
|
|
: |
|
: |
|
||
|
|
|
|
|
|
Press [R, T] to skip MP3 album. |
||||
Search |
|
|
|
Press and hold [2/3] or [5/6]. |
||||||
Note:
Depending on the Bluetooth® device, some operations may not work.
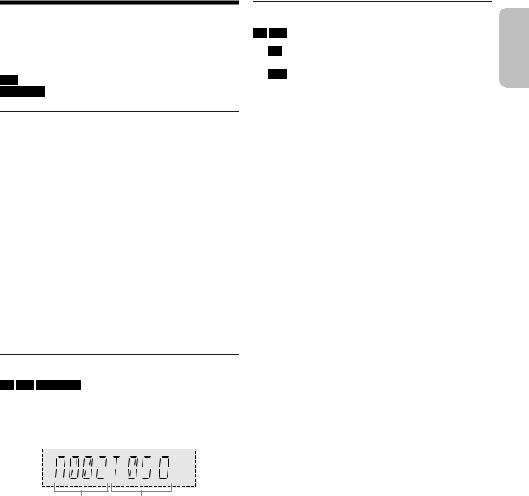
Viewing available information
:: BLUETOOTH
You can view the available information, such as MP3 album and track number, on the display panel.
Press [DISPLAY] repeatedly.
Example: MP3 album and track number display.
Album Track number number
Note:
•Maximum characters that can be shown: Approximately 32
•This system supports ver. 1.0, 1.1 and 2.3 ID3 tags.
•Text data that the system does not support can show differently.
Play menu
::
1 :
Press [PLAY MENU].
:
Press [PLAY MENU] repeatedly to select “PLAYMODE”.
2Press [R, T] to select the setting and then press
[OK].
OFF PLAYMODE |
Cancel the setting. |
1-TRACK |
Play one selected track. |
|
Press [2/3] or [5/6] to |
|
select the track. |
1-ALBUM |
Play one selected MP3 album. |
|
Press [R, T] to select the MP3 |
|
album. |
RANDOM |
Play all tracks randomly. |
1-ALBUM |
Play all tracks in one selected MP3 |
RANDOM |
album randomly. |
|
Press [R, T] to select the MP3 |
|
album. |
ALL REPEAT |
Repeat all tracks. |
1-TRACK REPEAT |
Repeat 1-TRACK. |
1-ALBUM REPEAT |
Repeat 1-ALBUM. |
RANDOM REPEAT |
Repeat random playback. |
1-ALBUM |
Repeat 1-ALBUM RANDOM. |
RANDOM REPEAT |
|
Note:
•During random playback, you cannot skip to tracks which have been played.
•The setting is cancelled when you open the disc tray or disconnect the USB device.
ENGLISH
TQBJ2186
9
9

█ Note on disc
•This system can play CD-R/RW with CD-DA or MP3 format content.
•Before playback, finalise the disc on the device it was recorded on.
•Some CD-R/RW cannot be played because of the condition of the recording.
█ Note on USB device
•This system does not guarantee connection with all USB devices.
•This system supports USB 2.0 full speed.
•This system can support USB devices of up to 32 GB.
•Only FAT 12/16/32 file system is supported.
█ Note on MP3 file
•Files are defined as tracks and folders are defined as albums.
•Tracks must have the extension “.mp3” or “.MP3”.
•Tracks will not necessarily be played in the order you recorded them.
•Some files can fail to work because of the sector size.
MP3 file on disc
•This system can access up to:
–255 albums (including root folder)
–999 tracks
–20 sessions
•Disc must conform to ISO9660 level 1 or 2 (except for extended formats).
MP3 file on USB device
•This system can access up to:
–800 albums (including root folder)
–8000 tracks
–999 tracks in one album
Radio
Connect the FM indoor antenna.
Adhesive tape (not supplied)
Note:
Put the antenna where reception is best.
For the United Kingdom and Ireland
Connect the FM outdoor antenna.
Use an outdoor antenna if reception is poor.

 FM outdoor antenna
  (not supplied)
 75 Ω coaxial cable


 (not supplied) Antenna plug adaptor
CAUTION!
Keep the antenna plug adaptor out of reach of children to prevent swallowing.
Note:
•Do not use the outdoor antenna during a lightning storm.
•Disconnect the outdoor antenna if you do not use the system.
Preparation
Press [SELECT <, >] repeatedly to select “FM”.
Manual tuning
1 Press [PLAY MENU] repeatedly to select
“TUNE MODE”.
Or press [8] on the unit to select “MANUAL”. Continue with step 3.
2 Press [R, T] to select “MANUAL” and then press
[OK].
3 Press [2/3] or [5/6] to tune in to the
station.
To tune automatically, press and hold the button until the frequency starts changing quickly.
TQBJ2186
10
10
Memory presetting
You can preset up to 30 FM stations.
█ Automatic presetting
1Press [PLAY MENU] to select “A.PRESET”.
2Press [R, T] to select “LOWEST” or “CURRENT” and then press [OK].
LOWEST |
Tuning begins from the lowest |
|
frequency. |
CURRENT |
Tuning begins from the current |
|
frequency. |
The tuner presets all the stations it can receive into the channels in ascending order.
To cancel, press [8].
█ Manual presetting
1Press [PLAY MENU] repeatedly to select
“TUNE MODE”.
Or press [8] on the unit to select “MANUAL”. Continue with step 3.
2Press [R, T] to select “MANUAL” and then press
[OK].
3Press [2/3] or [5/6] to tune in to the station.
4Press [OK].
5Press [R, T] to select a preset number and then
press [OK].
Do steps 3 through 5 again to preset more stations. The new station replaces any station that occupies the same preset number.
█ Selecting a preset station
1Press [PLAY MENU] repeatedly to select
“TUNE MODE”.
Or press [8] on the unit to select “PRESET”. Continue with step 3.
2Press [R, T] to select “PRESET” and then press
[OK].
3Press [2/3] or [5/6] to select the preset station.
RDS broadcasting
This system can show the text data transmitted by the radio data system (RDS) available in some areas.
Press [DISPLAY] repeatedly.
PS |
Programme service |
PTY |
Programme type |
FREQ |
Frequency |
Note:
RDS may not be available if reception is poor.
Sound effects |
|
|
|
|
ENGLISH |
||
1 Press [SOUND] repeatedly to select the effect. |
|
||
|
|
||
2 Press [R, T] to select the setting and then press |
|
|
|
[OK]. |
|
|
|
Or turn [VOLUME/MULTI CONTROL] to select the |
|
|
|
setting. |
|
|
|
|
|
|
|
PRESET EQ |
“ROCK”, “POP”, “AFRO BEAT”, |
|
|
|
“ARABIC”, “PERSIAN”, “INDIA |
|
|
|
BASS”, “DANGDUT”, “MALAY |
|
|
|
POP”, “ELECTRONICA”, |
|
|
|
“REGGAETON”, “SALSA”, |
|
|
|
“SAMBA”, “KARAOKE” or “FLAT” |
|
|
BASS/MID/TREBLE |
–4 to +4 |
|
|
|
Note: |
|
|
|
These settings can change when you |
|
|
|
select a PRESET EQ setting. |
|
|
D.BASS LEVEL |
“OFF”, “LEVEL 1” to “LEVEL 6” |
|
|
Illumination
You can change the illumination effect on the system.
1Press [SETUP] repeatedly to select
“ILLUMINATION”.
Or press [ILLUMINATION] on the unit.
2Press [R, T] to select the effect and then press
[OK].
Or turn [VOLUME/MULTI CONTROL] to select the effect.
PATTERN |
A selection of 3 illumination patterns in blue. |
OFF |
Cancel the effect. |
Note:
When the dimmer function is switched on, the illumination on the system will remain off even when you switch on the illumination function.
DJ functions
You can use the DJ functions to add sound effects or sample sound between songs.
Using the “Panasonic MAX Juke” app
You can download and install the free Android™ app “Panasonic MAX Juke” on Google Play™ for additional features, such as to request song playback from multiple devices simultaneously. You can also call up the tracks you want to play through the app. For details on the app, refer to the site below. http://av.jpn.support.panasonic.com/support/global/ cs/audio/app/
(This site is in English only.)
Note: |
TQBJ2186 |
The DJ function is switched off when you switch off the system |
|
or change to another source. |
11 |
|
11

DJ jukebox
:
You can use the DJ jukebox function to add sample sound mix between songs.
1Press [PLAY MENU] to select “JUKEBOX”.
2Press [R, T] to select the setting and then press
[OK].
Using the unit
1Press [JUKEBOX] to select “DJ JUKEBOX
SELECT NUMBER”.
To cancel, select “OFF JUKEBOX”.
2Press [DJ1] to [DJ6] to select the effect.
Sample sound is added to the intervals of all tracks. To cancel, press the button again.
Note:
The system switches to repeat mode automatically when you switch on DJ jukebox.
█ Changing the repeat setting
1Press [PLAY MENU] repeatedly to select “PLAYMODE”.
2Press [R, T] to select the setting and then press
[OK].
RANDOM REPEAT |
Repeat random playback. |
ALL TITLE REPEAT |
Repeat all tracks. |
RANDOM MIX |
Repeat random playback. Sample |
REPEAT |
sound is added to the intervals of |
|
all tracks. |
Note:
You cannot select the DJ jukebox effect when you are using “RANDOM MIX REPEAT” mode.
DJ effect
(Except for D-IN and AUX source)
By unit only
You can use the DJ effect function to add sound effects.
1Press [DJ] to select “DJ EFFECT SELECT
NUMBER” or “ON DJ EFFECT”.
To cancel, select “OFF EFFECT”.
2Press [DJ1] to [DJ6] to select the effect.
|
[DJ1] |
PHASER |
|
|
Add space and dimension to the sound. |
|
[DJ2] |
FILTER |
|
|
Enhance or filter specific ranges of the sound. |
|
[DJ3] |
SOUND CHOPPER |
|
|
Cut off the sound periodically. |
|
[DJ4] |
ELECTRO ECHO |
|
|
Add digital echo to the sound. |
|
[DJ5] |
PITCH SHIFTER |
TQBJ2186 |
|
Adjust the keys of the sound. |
[DJ6] |
HARMONIZER |
|
|
|
Add notes to the sound to create harmony. |
12 |
To cancel, press the button again. |
|
3Turn [VOLUME/MULTI CONTROL] to select the setting.
Note:
DJ effect is switched off when you switch off the system, change to D-IN, AUX source.
DJ sampler
(Except for D-IN and AUX source)
By unit only
You can apply a scratch sound or sample sound to the track you are playing.
1Press [DJ] to select “SAMPLER SELECT
NUMBER” or “ON SAMPLER”.
To cancel, select “OFF EFFECT”.
2Press [DJ1] to [DJ6] to select the desired sound.
To cancel, press the button again.
3Turn [VOLUME/MULTI CONTROL].
Using a microphone
Preparation
Decrease the volume of the system to its minimum before you connect or disconnect a microphone.
1Connect a microphone (not supplied) to the
microphone jack.
Plug type: Ø 6.3 mm monaural
2Press [SOUND] on the remote control repeatedly
to select “MIC VOL”.
Or press and hold [–MIC VOL] until “MIC VOL” is shown.
3Press [R, T] to adjust the volume of the
microphone and then press [OK].
Or turn [VOLUME/MULTI CONTROL] to adjust the volume of the microphone.
4If you want to sing with the background music,
play the music source and adjust the volume of the system.
Note:
•If a strange noise (howling) is emitted, move the microphone away from the speakers, or decrease the volume of the microphone.
•When you do not use the microphone, disconnect it from the microphone jack, and decrease the volume of the microphone to its minimum.
12

Karaoke
Preparation
Select the music source.
Note:
The Karaoke function is switched off when you switch off the system.
Karaoke effect
You can use the Karaoke effect function to add sound effects.
1Press [SOUND] on the remote control repeatedly
to select “KARAOKE EFFECT” and then press [R, T] to select the effect.
Or press [KARAOKE] repeatedly to select the effect.
VOCAL |
|
Reduce the vocal level or change the |
|
CANCEL |
|
audio mode (depending on the source). |
|
ECHO |
|
Add an echo effect to the sound. |
|
KEY |
|
Change the key of a song. |
|
CONTROL |
|
Note: |
|
|
|
The setting is cancelled when you change |
|
|
|
to another source. |
|
TEMPO |
|
: |
|
|
|
Change the speed of a song. |
|
BGM |
Change the background music level. |
||
MIC EQ |
|
Select a MIC EQ mode. |
|
OFF |
|
Cancel the effect. |
|
EFFECT |
|
Press [OK] to confirm. |
|
|
|
Or press and hold [–OFF] until “OFF |
|
|
|
EFFECT” is shown. |
|
To check the current setting, press [OK].
2Press [2/3] or [5/6] to select the setting
and then press [OK].
Or turn [VOLUME/MULTI CONTROL] to select the setting.
VOCAL |
“OFF”, 1 to 3, “L”, “R”, “L+R” |
CANCEL |
When using stereo source not |
|
|
|
formatted for Karaoke |
|
It is recommended to use “2 VOCAL |
|
CANCEL” for most songs. |
|
When using Karaoke formatted |
|
source |
|
L: Only left channel sound |
|
(accompaniment only) |
|
R: Only right channel sound (vocals |
|
only) |
|
L+R: Left and right channel sounds are |
|
mixed |
ECHO |
“OFF”, 1 to 4 |
KEY |
–6 to +6 |
CONTROL |
|
TEMPO |
“OFF”, –2 to +2 |
BGM |
“OFF”, 1 to 3 |
MIC EQ |
“SINGING” or “SPEECH” |
Clock and timers |
ENGLISH |
|
|
Setting the clock |
|
This is a 24-hour clock.
1Press [SETUP] repeatedly to select “CLOCK”.
2Press [R, T] to set the time and then press [OK].
To check the time
Press [SETUP] to select “CLOCK” and then press [OK].
In standby mode, press [DISPLAY].
Note:
•The clock is reset when there is a power failure or when the AC mains lead is disconnected.
•Reset the clock regularly to maintain accuracy.
Sleep timer
The sleep timer switches off the system after the set time.
Press [SLEEP] to select the setting (in minutes).
To cancel, select “OFF”.
SLEEP 30 SLEEP 60
 SLEEP 90
 SLEEP120
 OFF
OFF 
To check the remaining time
Press [SLEEP].
Note:
•The remaining time is shown for a few seconds every minute. “SLEEP 1” is always shown when only 1 minute remains.
•The sleep timer always comes first. Be sure not to set an overlap of timers.
Play timer
(Except for Bluetooth®, D-IN and AUX source)
You can set the timer to come on at a certain time to wake you up.
Preparation
Set the clock.
1Press [SETUP] repeatedly to select “TIMER ADJ”.
2Press [R, T] to select “#PLAY” and then press
[OK].
3Press [R, T] to set the start time and then press
[OK].
4Do step 3 again to set the end time.
5Press [R, T] to select the source you want to play and then press [OK].
To start the timer |
|
||
1 |
Prepare the source you want to listen to (disc, |
|
|
2 |
USB or radio). |
TQBJ2186 |
|
Press [SETUP] repeatedly to select “TIMER SET”. |
|||
|
|||
|
|
13 |
|
13

3Press [R, T] to select “PLAY ON” and then press
[OK].
To cancel, select “PLAY OFF”.
The system must be switched off for the timer to operate.
To check the setting
1Press [SETUP] repeatedly to select “TIMER ADJ”.
2Press [R, T] to select “#PLAY” and then press
[OK].
In standby mode, press [DISPLAY] two times.
Note:
•The timer starts at a low volume and increases gradually to the preset level.
•The timer comes on at the set time every day if the timer is on.
•If you switch off the system and then switch on again while a timer is in operation, the timer will not stop at the end time.
External equipment
Preparation
•Disconnect the AC mains lead.
•Switch off all equipment and read the appropriate operating instructions.
Note:
•Do not bend cables at sharp angles.
•Components and cables are sold separately.
•Sound distortion can occur when you use an adapter.
•If you want to connect equipment other than those described, refer to the audio dealer.
Using the optical input
You can connect a TV, VCR, DVD player etc., and listen to the audio through this system.
TV (not supplied)
Rear panel of this unit
Optical digital audio cable (not supplied)
1Connect the external equipment.
2Press [SELECT <, >] repeatedly to select “D-IN”.
3Play the external equipment.
TQBJ2186
14
Note:
•This system supports linear PCM signal.
•Multi-channel source will be converged to 2 channels.
•Sampling frequency: 32 kHz, 44.1 kHz, 48 kHz, up to 96 kHz
•The sound is muted if the signal format or frequency is not supported.
•If there are sounds coming from the TV’s speakers, decrease the volume of the TV to its minimum.
Using the auxiliary input
You can connect a VCR, DVD player etc., and listen to the audio through this system.
DVD player (not supplied)
Rear panel of this unit
Audio cable (not supplied)
1Connect the external equipment.
2Press [SELECT <, >] repeatedly to select “AUX”.
3Play the external equipment.
14

Others
Auto off
This system automatically switches off when you do not use it for approximately 20 minutes.
1Press [SETUP] repeatedly to select “AUTO OFF”.
2Press [R, T] to select “ON” and then press [OK].
To cancel, select “OFF”.
Note:
•This function does not work when you are in radio source.
•This function may not work when a microphone is connected.
Bluetooth® standby
This function automatically switches on the system when you establish a Bluetooth® connection from a paired device.
1Press [SETUP] repeatedly to select “BLUETOOTH STANDBY”.
2Press [R, T] to select “ON” and then press [OK].
To cancel, select “OFF”.
Note:
•This function only works when the AC mains lead is connected.
•Some devices may take longer to respond. If you are connected to a Bluetooth® device before switching off the system, wait for a minimum of 5 seconds before connecting to this system from your Bluetooth® device again.
Software update
Occasionally, Panasonic may release updated software for this unit that may add or improve the way a feature operates. These updates are available free of charge. For more details, refer to the following website. http://panasonic.jp/support/global/cs/
(This site is in English only.)
█ Checking the software version
1Press [SETUP] repeatedly to select “SW VER.”
and then press [OK].
The software version is shown.
2Press [OK] again to exit.
Troubleshooting |
ENGLISH |
Before requesting service, make the following checks. If |
|
you are in doubt about some of the check points, or if the |
|
solutions indicated do not solve the problem, consult your |
|
dealer for instructions. |
|
█ Common problems
The unit does not work.
•The safety device has been activated. Do the following:
1.Press [1] on the unit to switch the unit to standby mode. If the unit does not switch to standby mode, disconnect the AC mains lead and then connect it again.
2.Press [1] again to switch on the unit. If the problem persists, consult your dealer.
The display panel lights up and changes continuously in standby mode.
• Press and hold [8] on the unit until “SDEMO OFF” is shown.
No operations can be done with the remote control.
• Examine that the battery is installed correctly.
Sound is distorted or no sound.
•Adjust the volume of the system.
•Switch off the system, determine and correct the cause, and then switch on again. It can be caused by straining of the speakers through excessive volume or power, and when using the system in a hot environment.
A humming sound can be heard during playback.
•An AC mains lead or fluorescent light is near the cables. Keep other appliances and cords away from the cables of this system.
The sound level reduces.
•The protection circuit has been activated due to the continuous use at high volume output. This is to protect the system and maintain the sound quality.
█ Disc
Display not shown correctly.
Playback does not start.
•You have not put in the disc correctly. Put it in correctly.
•Disc is dirty. Clean the disc.
•Replace the disc if it is scratched, warped, or non-standard.
•There is condensation. Let the system dry for 1 to 2 hours.
The total number of tracks shown is incorrect.
The disc cannot be read.
Distorted sound is heard.
•You put in a disc that the system cannot play. Change to a playable disc.
•You put in a disc that has not been finalised.
█ USB
The USB device or the contents in it cannot be read.
•The format of the USB device or the contents in it are not compatible with the system.
•USB devices with storage capacity of more than 32 GB cannot work in some conditions.
Slow operation of the USB device.
•Large content size or large memory USB device takes longer time to read.
TQBJ2186
15
15

█ Bluetooth®
Pairing cannot be done.
•Check the Bluetooth® device condition.
•The device is out of the 10 m communication range. Move the device nearer to the system.
The device cannot be connected.
•The pairing of the device was unsuccessful. Do pairing again (~8).
•The pairing of the device has been replaced. Do pairing again (~8).
•This system might be connected to a different device. Disconnect the other device and try connecting the device again.
•The system may have a problem. Switch off the system and then switch on again.
The device is connected but audio cannot be heard through the system.
•For some built-in Bluetooth® devices, you have to set the audio output to “SC-TMAX10” manually. Read the operating instructions of the device for details.
Playback during Multi Connect is not working or no sound.
•Restart the app of the device.
•The control of the device was not switched successfully. Disconnect the existing connected devices and try again.
Sound from the device is interrupted.
•The device is out of the 10 m communication range. Move the device nearer to the system.
•Remove any obstacle between the system and the device.
•Other devices that use the 2.4 GHz frequency band (wireless router, microwaves, cordless phones, etc.) are interfering. Move the device nearer to the system and distance it from the other devices.
█ Radio
Sound is distorted.
•Use an optional FM outdoor antenna. The antenna should be installed by a competent technician.
A beat sound is heard.
•Switch off the TV or move it away from the system.
•Move mobile telephones away from the system if the interference is apparent.
TQBJ2186
16
█ Unit displays
“--:--”
•You connected the AC mains lead for the first time or there was a power failure recently. Set the clock.
•Track play time is more than 99 minutes.
“ADJUST CLOCK”
• The clock is not set. Adjust the clock.
“ADJUST TIMER”
• The play timer is not set. Adjust the play timer.
“ALB FULL”
• The number of albums has exceeded the supported limit.
“AUDIO UNSUPPORTED”
•The signal format or frequency is not supported.
•This system does not support bitstream signals. Change the digital audio output setting on the external equipment to PCM.
•This system supports sampling frequencies of 32 kHz, 44.1 kHz, 48 kHz, up to 96 kHz. Select only the supported sampling frequencies on the connected equipment.
•Try connecting the external equipment by using the auxiliary input.
“AUTO OFF”
•The system has not been used for 20 minutes and will switch off within a minute. To cancel, press any button.
“DEVICE CONNECTED FULL”
•You have connected 3 Bluetooth® devices. To connect another device, disconnect one of the connected devices and try again.
“ERROR”
•An incorrect operation was done. Read the instructions and try again.
“F” / “F” (“” represents a number.)
•The protection circuit has been activated and the system may be switched off automatically.
•Disconnect the AC mains lead and wait for a few seconds before connecting it again. If the problem persists, disconnect the AC mains lead and consult your dealer.
“NO DISC”
• You have not put in a disc.
“NO PLAY” “UNSUPPORT”
•There is no album or track in the USB device.
•Examine the content. You can only play supported format.
•The files in the USB device can be corrupted. Format the USB device and try again.
•The system may have a problem. Switch off the system and then switch on again.
“NOT SUPPORT MULTI CONNECT”
•The Bluetooth® connection cannot be established. Disconnect the existing connected devices and try again.
“NOT SUPPORTED”
•To use Karaoke effect in D-IN source, change the digital audio output setting on the external equipment to PCM.
“PLAYERROR”
•An unsupported MP3 file has been played. The system will skip that track and play the next one.
“REMOTE 1” “REMOTE 2”
•The remote control and the unit are using different codes. Change the code of the remote control.
–When “REMOTE 1” is shown, press and hold [OK] and [ ] on the remote control for a minimum of 4 seconds.
–When “REMOTE 2” is shown, press and hold [OK] and [<] for a minimum of 4 seconds.
16

“USB NO DEVICE”
• The USB device is not connected. Examine the connection.
“USB OVER CURRENT ERROR”
•The USB device is drawing too much power. Disconnect the USB device, switch off the system and then switch on again.
•Check the connection, it may be caused by a faulty USB cable.
“VBR”
•The system cannot show the remaining play time for variable bit rate (VBR) tracks.
Remote control code
When other Panasonic equipment responds to the remote control of this system, change the remote control code for this system.
Preparation
Press [SELECT] repeatedly on the unit to select “AUX”.
█ To set the code to “REMOTE 2”
1Press and hold [SELECT] on the unit and [<] until “REMOTE 2” is shown.
2Press and hold [OK] and [<] for a minimum of 4 seconds.
█ To set the code to “REMOTE 1”
1Press and hold [SELECT] on the unit and [  ] on the remote control until “REMOTE 1” is shown.
2Press and hold [OK] and [  ] on the remote control for a minimum of 4 seconds.
System memory reset
Reset the memory when the following situations occur:
•There is no response when buttons are pressed.
•You want to clear and reset the memory contents.
1Press and hold [1] on the unit until “RESET?” is shown.
2While you press and hold [1] on the unit, press
[SELECT].
“RESET” is shown.
After “– – – – – – – – –” is shown, the unit will switch off automatically.
All the settings are set back to the factory preset. It is necessary to set the memory items again.
DEMO play
The unit will play built-in demonstration song for 1 minute.
1Press and hold  for more than 2 seconds.
“WAIT FOR DEMO PLAY” is shown while you press and hold the button.
Demonstration song is played and “DEMOPLAY” is shown.
2Press [8] to stop the demonstration song.
ENGLISH
TQBJ2186
17
17

References
About Bluetooth®
Panasonic bears no responsibility for data and/or information that is compromised during a wireless transmission.
Frequency band
• This system uses the 2.4 GHz frequency band.
Certification
•This system conforms to the frequency restrictions and has received certification based on frequency laws. Thus, a wireless permit is not necessary.
•The actions below are punishable by law in some countries:
–Taking apart or modifying the unit.
–Removing specification indications.
Restrictions of use
•Wireless transmission and/or usage with all Bluetooth® equipped devices is not guaranteed.
•All devices must conform to standards set by the Bluetooth SIG, Inc.
•Depending on the specifications and settings of a device, it can fail to connect or some operations can be different.
•This system supports Bluetooth® security features. But depending on the operating environment and/or settings, this security is possibly not sufficient. Transmit data wirelessly to this system with caution.
•This system cannot transmit data to a Bluetooth® device.
Range of use
•Use this device at a maximum range of 10 m.
•The range can decrease depending on the environment, obstacles or interference.
Interference from other devices
•This system may not function properly and troubles such as noise and sound jumps may arise due to radio wave interference if this unit is located too close to other Bluetooth® devices or the devices that use the 2.4 GHz band.
•This system may not function properly if radio waves from a nearby broadcasting station, etc. is too strong.
Intended usage
•This system is for normal, general use only.
•Do not use this system near an equipment or in an environment that is sensitive to radio frequency interference (example: airports, hospitals, laboratories, etc.).
Licenses
The Bluetooth® word mark and logos are registered trademarks owned by Bluetooth SIG, Inc. and any use of such marks by Panasonic Corporation is under license. Other trademarks and trade names are those of their respective owners.
Android and Google Play are trademarks of Google LLC.
Disposal of Old Equipment and Batteries Only for European Union and countries with recycling systems
These symbols on the products, packaging, and/or accompanying documents mean that used electrical and electronic products and batteries must not be mixed with general household waste.
For proper treatment, recovery and recycling of old products and used batteries, please take them to applicable collection points in accordance with your national legislation. By disposing of them correctly, you will help to save valuable resources and prevent any potential negative effects on human health and the environment.
For more information about collection and recycling, please contact your local municipality.
Penalties may be applicable for incorrect disposal of this waste, in accordance with national legislation.
Note for the battery symbol (bottom symbol):
This symbol might be used in combination with a chemical symbol. In this case it complies with the requirement set by the Directive for the chemical involved.
TQBJ2186
18
18

Specifications
█ General
Power supply |
AC 220 V to 240 V, 50 Hz |
Power consumption |
47 W |
Power consumption in standby mode (approximate)
With “BLUETOOTH STANDBY” set to “OFF” |
0.5 W |
With “BLUETOOTH STANDBY” set to “ON” |
0.6 W |
Dimensions (W x H x D) 285 mm x 585 mm x 303 mm
Mass |
10.2 kg |
Operating temperature range |
0°C to +40°C |
Operating humidity range
35% to 80% RH (no condensation)
█ Amplifier section
RMS output power (AC Power supply)
Front Ch (both ch driven)
150 W per channel (3 Ω), 1 kHz, 30% THD
Total RMS power |
300 W |
█ Tuner section
Frequency modulation (FM) |
|
Preset memory |
30 stations |
Frequency range |
|
87.50 MHz to 108.00 MHz (50 kHz step) Antenna terminals 75 Ω (unbalanced)
█ Disc section
Disc played (8 cm or 12 cm)
CD, CD-R/RW (CD-DA, MP3 )
)
 MPEG-1 Layer 3
Pick up |
|
Wavelength |
790 nm (CD) |
NORSK |
|
Bølgelengde |
790 nm (CD) |
Laserstyrke |
Ingen farlig stråling sendes ut |
█ Terminal section
USB port |
|
USB standard |
USB 2.0 full speed |
Media file format support |
MP3 (*.mp3) |
USB device file system |
FAT12, FAT16, FAT32 |
Digital audio input |
|
Optical digital input |
Optical terminal |
Sampling frequency
|
32 kHz, 44.1 kHz, 48 kHz, 96 kHz |
Audio format |
PCM |
Microphone |
|
Terminal |
Mono, 6.3 mm jack (2 system) |
Analog audio input |
|
Audio input |
Pin jack (1 system) |
DC IN |
|
Terminal type |
USB Micro-B, 5 V, 2 A |
█ Bluetooth® section
Version |
Bluetooth® Ver. 5.0 |
Class |
Class 1 |
Supported profiles |
A2DP, AVRCP, SPP |
Frequency band |
2.4 GHz band FH-SS |
Operating frequency |
2402 MHz to 2480 MHz |
Maximum power (EIRP) |
8 dBm |
Operation distance |
30 m line of sight |
Supported codec |
SBC |
█ Speaker section
Speaker unit(s) |
|
Woofer |
20 cm cone type x 1 |
Tweeter |
6 cm cone type x 2 |
Note:
•Specifications are subject to change without notice. Mass and dimensions are approximate.
•Total harmonic distortion is measured by the digital spectrum analyser.
ENGLISH
TQBJ2186
19
19

English
Declaration of Conformity (DoC)
Hereby, “Panasonic Corporation” declares that this product is in compliance with the essential requirements and other relevant provisions of Directive 2014/53/EU.
Customers can download a copy of the original DoC to our RE products from our DoC server: http://www.ptc.panasonic.eu
Contact to Authorised Representative:
Panasonic Marketing Europe GmbH, Panasonic Testing Centre, Winsbergring 15, 22525 Hamburg, Germany
Type of wireless |
Frequency band |
Maximum power |
|
|
(dBm E.I.R.P.) |
Bluetooth® |
2402 – 2480 MHz |
8 dBm |
Latviski
Atbilstības deklarācija (DoC)
Ar šo “Panasonic Corporation” paziņo, ka šis izstrādājums atbilst pamatprasībām un pārējiem Direktīvas 2014/53/ES noteikumiem.
Pircēji var lejupielādēt oriģinālo DoC kopiju mūsu RE izstrādājumos no mūsu DoC servera: http://www.ptc.panasonic.eu
Lūdzam sazināties ar pilnvaroto parstāvi:
Panasonic Marketing Europe GmbH, Panasonic Testing Centre, Winsbergring 15, 22525 Hamburg, Vācijā
Bezvadu tips |
Frekvenču josla |
Maksimālā jauda |
|
|
(dBm EIRP) |
Bluetooth® |
2402 – 2480 MHz |
8 dBm |
Lietuviškai
Atitikties deklaracija (AD)
Bendrovė “Panasonic Corporation” patvirtina, kad šis gaminys atitinka direktyvos 2014/53/ES esminius reikalavimus ir kitas taikytinas nuostatas.
Mūsų RE gaminių originalios atitikties deklaracijos kopiją klientai gali atsisiųsti iš mūsų AD serverio: http://www.ptc.panasonic.eu
Įgaliotojo atstovo adresas:
Panasonic Marketing Europe GmbH, Panasonic Testing Centre, Winsbergring 15, 22525 Hamburg, Vokietija
Bevielio ryšio |
Dažnių |
Maksimali |
|
siuntimo galia |
|||
tinklas |
diapazonas |
||
(dBm e.i.r.p.) |
|||
|
|
||
Bluetooth® |
2402 – 2480 MHz |
8 dBm |
Slovensko
Izjava o skladnosti (DoC)
“Panasonic Corporation” v tem dokumentu izjavlja, da je izdelek v skladu z bistvenimi zahtevami in drugimi pomembnimi določbami Direktive 2014/53/EU.
Stranka lahko naloži izvod izvirnega DoC o naših izdelkih RE s strežnika DoC:
http://www.ptc.panasonic.eu
Naslov pooblaščenega predstavnika:
Panasonic Marketing Europe GmbH, Panasonic Testing Centre, Winsbergring 15, 22525 Hamburg, Nemčija
Vrsta brezžične |
Frekvenčni pas |
Največja moč |
|
povezave |
(dBm EIRP) |
||
|
|||
Bluetooth® |
2402 – 2480 MHz |
8 dBm |
Slovensky
Vyhlásenie o zhode (DoC)
“Panasonic Corporation” týmto vyhlasuje, že tento výrobok je v súlade so základnými požiadavkami a ďalšími príslušnými ustanoveniami smernice 2014/53/EÚ.
Zákazníci si môžu stiahnuť kópiu pôvodného DoC na naše RE výrobky z nášho servera DoC: http://www.ptc.panasonic.eu
Kontakt na splnomocneného zástupcu:
Panasonic Marketing Europe GmbH, Panasonic Testing Centre, Winsbergring 15, 22525 Hamburg, Nemecko
Typbezdrôtového |
Frekvenčné |
Maximálny výkon |
pripojenia |
pásmo |
(dBm e.i.r.p.) |
Bluetooth® |
2402 – 2480 MHz |
8 dBm |
Magyar
Megfelelőségi Nyilatkozat (DoC)
Ezennel a, “Panasonic Corporation” kijelenti, hogy a jelen termék kielégíti az 2014/53/EU Irányelv létfontosságú követelményeit és más vonatkozó rendelkezéseit.
A vásárlók letölthetik az RE termékek eredeti DoC másolatát a DoC szerverünkről: http://www.ptc.panasonic.eu
A hivatalos képviselő elérhetősége:
Panasonic Marketing Europe GmbH, Panasonic Testing Centre, Winsbergring 15, 22525 Hamburg, Németország
Maximális Wireless típus Frekvenciasáv teljesítmény (dBm e.i.r.p.)
Bluetooth® |
2402 – 2480 MHz |
8 dBm |
TQBJ2186
20
20
Ελληνικά
Δήλωση συμμόρφωσης (DoC)
H “Panasonic Corporation” δηλώνει ότι το προϊόν αυτό είναι συμμορφωμένο προς τις βασικές απαιτήσεις και άλλες σχετικές διατάξεις της Οδηγίας 2014/53/EΕ.
Οι πελάτες μπορούν να κατεβάσουν ένα αντίγραφο του πρωτοτύπου DoC για τα RE προϊόντα μας από τον DoC server μας:
http://www.ptc.panasonic.eu
Επικοινωνήστε με τον Εξουσιοδοτημένο Αντιπροσωπό μας: Panasonic Marketing Europe GmbH, Panasonic Testing Centre, Winsbergring 15, 22525 Hamburg, Γερμανία
Τύπο ασύρματης |
Ζώνη |
Μέγιστη ισχύς |
|
συχνοτήτων |
(dBm e.i.r.p.) |
||
|
|||
Bluetooth® |
2402 – 2480 MHz |
8 dBm |
Português
Declaração de Conformidade (DoC)
Com o presente documento, a “Panasonic Corporation” declara que este produto se encontra em conformidade com os requisitos específicos e demais especificações referentes à Diretiva 2014/53/UE.
Os clientes podem baixar uma cópia da declaração de conformidade (DoC) para nossos produtos RE do Server DoC:
http://www.ptc.panasonic.eu
Contacto com um Representante Autorizado: Panasonic Marketing Europe GmbH, Panasonic Testing Centre, Winsbergring 15, 22525 Hamburg, Alemanha
Tipo de ligação |
Banda de |
Potência |
|
máxima |
|||
sem fios |
frequência |
||
(dBm e.i.r.p.) |
|||
|
|
||
Bluetooth® |
2402 – 2480 MHz |
8 dBm |
Eesti keel Vastavusdeklaratsioon (DoC)
Käesolevaga kinnitab “Panasonic Corporation”, et see toode vastab direktiivi 2014/53/EL olulistele nõuetele ja teistele asjakohastele sätetele.
Kliendid saavad koopia meie RE toodetele kehtiva originaalvastavusdeklaratsiooni koopia alla laadida meie DoC-serverist:
http://www.ptc.panasonic.eu
Võtke ühendust volitatud esindajaga:
Panasonic Marketing Europe GmbH, Panasonic Testing Centre, Winsbergring 15, 22525 Hamburg, Saksamaa
Juhtmevaba |
|
Maksimaalne |
|
Sagedusriba |
võimsus |
||
seadme tüüp |
|||
|
(dBm EIRP) |
||
|
|
||
Bluetooth® |
2402 – 2480 MHz |
8 dBm |
Norsk Samsvarserklæring (DoC)
“Panasonic Corporation” erklærer herved at dette produktet samsvarer med de grunnleggende kravene og andre relevante bestemmelser i direktivet 2014/53/EU.
Kundene kan laste ned en kopi av den originale samsvarserklæringen (DoC) for vårt RE utstyr fra vår DoC server:
http://www.ptc.panasonic.eu Kontaktinformasjon autorisert representant:
Panasonic Marketing Europe GmbH, Panasonic Testing Centre, Winsbergring 15, 22525 Hamburg, Tyskland
Type trådløs |
Frekvensbånd |
Maks. effekt |
|
(dBm e.i.r.p.) |
|||
|
|
||
Bluetooth® |
2402 – 2480 MHz |
8 dBm |
Български
Декларация за съответствие (DoC)
С настоящото “Panasonic Corporation” декларира, че този продукт е в съответствие с основните изисквания и други съответни разпоредби на Директива
2014/53/EС.
Потребителите могат да свалят копие от оригиналните DoC към нашите продуктите от типа RE от сървъра, на който се съхраняват DoC: http://www.ptc.panasonic.eu
Свържете се с нашия упълномощен представител: Panasonic Marketing Europe GmbH, Panasonic Testing Centre, Winsbergring 15, 22525 Hamburg, Германия
Вид безжична |
|
Максимална |
|
Честотна лента |
мощност |
||
връзка |
|||
|
(dBm e.i.r.p.) |
||
|
|
||
Bluetooth® |
2402 – 2480 MHz |
8 dBm |
Român
Declaraţie de Conformitate (DoC)
“Panasonic Corporation” declară prin prezenta că acest produs este conform cu cerinţele esenţiale şi alte prevederi relevante ale Directivei 2014/53/UE.
Clienţii pot descărca o copie a DoC-ului original al produselor noastre RE de la adressa noastră DoC din Internet:
http://www.ptc.panasonic.eu Contactaţi Reprezentantul Autorizat:
Panasonic Marketing Europe GmbH, Panasonic Testing Centre, Winsbergring 15, 22525 Hamburg, Germania
|
Interval de |
Putere |
|
Tip de wireless |
maximă |
||
frecvenţă |
|||
|
(dBm e.i.r.p.) |
||
|
|
||
Bluetooth® |
2402 – 2480 MHz |
8 dBm |
ENGLISH
TQBJ2186
21
21
Hrvatski
Deklaracija o podobnosti (DoC)
Ovime „Panasonic Corporation” izjavljuje da ovaj proizvod udovoljava osnovnim zahtjevima i ostalim relevantnim odredbama Direktive 2014/53/EU.
Kupci mogu preuzeti kopiju originalne DoC za naše RE proizvode s našeg DoC poslužitelja: http://www.ptc.panasonic.eu
Adresa ovlaštenog predstavništva:
Panasonic Marketing Europe GmbH, Panasonic Testing Centre, Winsbergring 15, 22525 Hamburg, Njemačka
Vrsta bežične |
Frekvencijski |
Maksimalna |
|
snaga |
|||
mreže |
pojas |
||
(dBm e.i.r.p.) |
|||
|
|
||
Bluetooth® |
2402 – 2480 MHz |
8 dBm |
Türkçe
Uygunluk Beyanı (DoC)
“Panasonic Corporation” bu belge ile bu ürünün 2014/53/EU Direkti’nin temel gerekliliklerine ve diğer ilgili hükümlerine uygun olduğunu beyan eder.
Müşterilerimiz RE ürünlerimizle ilgili orijinal DoC belgesinin bir kopyasını DoC sunucumuzdan indirebilir: http://www.ptc.panasonic.eu
Yetkili Temsilci ile temasa geçin:
Panasonic Marketing Europe GmbH, Panasonic Testing Centre, Winsbergring 15, 22525 Hamburg, Almanya
Kablosuz türü |
Frekans bandı |
Maksimum güç |
|
(dBm e.i.r.p.) |
|||
|
|
||
Bluetooth® |
2402 – 2480 MHz |
8 dBm |
TQBJ2186
22
22

ENGLISH
TQBJ2186
23
23
Ditt system och bilderna kan se olika ut.
KLASS 1 LASER APPARAT
Symbolerna på denna produkt (inklusive tillbehören) representerar följande:
 Växelström
Likström
Klass II-utrustning (Produktens konstruktion är
dubbelisolerad.)
PÅ
 Standby
|
Innehållsförteckning |
|
|
Säkerhetsföreskrifter. . . . . . . . . . . . . . . . . . . . . . . . . . . |
. 2 |
|
Medföljande tillbehör. . . . . . . . . . . . . . . . . . . . . . . . . . . . |
3 |
|
Referenser . . . . . . . . . . . . . . . . . . . . . . . . . . . . . . . . . . . |
3 |
|
Underhåll. . . . . . . . . . . . . . . . . . . . . . . . . . . . . . . . . . . . . |
4 |
|
Transportera enheten . . . . . . . . . . . . . . . . . . . . . . . . . . . |
4 |
|
Strömkällor . . . . . . . . . . . . . . . . . . . . . . . . . . . . . . . . . . . |
5 |
|
Förbereda fjärrkontrollen. . . . . . . . . . . . . . . . . . . . . . . . . |
5 |
|
Beskrivning av kontrollerna. . . . . . . . . . . . . . . . . . . . . . . |
6 |
|
Förbereda median. . . . . . . . . . . . . . . . . . . . . . . . . . . . . . |
8 |
|
Mediauppspelning. . . . . . . . . . . . . . . . . . . . . . . . . . . . . . |
9 |
|
Radio. . . . . . . . . . . . . . . . . . . . . . . . . . . . . . . . . . . . . . . |
10 |
|
Ljudeffekter . . . . . . . . . . . . . . . . . . . . . . . . . . . . . . . . . . |
11 |
|
Belysning . . . . . . . . . . . . . . . . . . . . . . . . . . . . . . . . . . . |
11 |
|
DJ-funktioner. . . . . . . . . . . . . . . . . . . . . . . . . . . . . . . . . |
11 |
|
Använda en mikrofon . . . . . . . . . . . . . . . . . . . . . . . . . . |
12 |
|
Karaoke. . . . . . . . . . . . . . . . . . . . . . . . . . . . . . . . . . . . . |
13 |
|
Klocka och timer . . . . . . . . . . . . . . . . . . . . . . . . . . . . . . |
13 |
|
Extern utrustning. . . . . . . . . . . . . . . . . . . . . . . . . . . . . . |
14 |
|
Övrigt . . . . . . . . . . . . . . . . . . . . . . . . . . . . . . . . . . . . . . |
15 |
|
Felsökningsschema . . . . . . . . . . . . . . . . . . . . . . . . . . . |
15 |
|
Specifikationer . . . . . . . . . . . . . . . . . . . . . . . . . . . . . . . |
18 |
TQBJ2186 |
|
|
2
Säkerhetsföreskrifter
VARNING!
Enhet
•För att reducera risken för brand, elektrisk stöt eller produktskada:
–Utsätt inte den här apparaten för regn, fukt, droppar eller skvätt.
–Placera inga föremål fyllda med vätska, som t.ex. vaser, på denna enhet.
–Använd rekommenderade tillbehör.
–Avlägsna inte höljen.
–Försök inte reparera denna enhet på egen hand. Låt utbildad servicepersonal utföra service och reparationer.
–Låt inte föremål av metall falla in i enheten.
FÖRSIKTIGHET!
Enhet
•För att reducera risken för brand, elektrisk stöt eller produktskada:
–För att apparaten ska få god ventilation, installera eller placera den inte i en bokhylla, ett inbyggt skåp eller i andra begränsade utrymmen.
–Se till att enhetens ventilationsöppningar inte är förtäppta av tidningar, bordsdukar, gardiner eller liknande föremål.
–Ställ inga föremål med öppen låga, så som ett tänt stearinljus, ovanpå enheten.
•Denna enhet är avsedd för användning på platser med tempererat klimat.
•Det kan inträffa att den här enheten under användningen tar emot radiostörningar, orsakade av mobiltelefoner. Öka avståndet mellan enheten och mobiltelefonen om störningarna är uppenbara.
•I denna produkt används laser. Om apparaten och dess funktioner används eller justeras på annat sätt än vad som specificeras i denna bruksanvisning kan den avge farlig strålning.
•Placera enheten på en plan yta där den inte utsätts för direkt solljus, höga temperaturer, hög luftfuktighet eller kraftiga vibrationer.
•Detta system kan bli varmt efter längre tids användning. Detta är normalt. Var inte orolig.
AC-strömsladd
•Strömkontakten är urkopplingsenheten. Installera denna enhet så att strömkontakten kan kopplas ur från uttaget direkt.
Batteri
•Explosionsrisk förekommer om batteriet inte sätts i korrekt. Ersätt endast med sort som rekommenderas av tillverkaren.
•När du gör dig av med batterierna, var god kontakta dina lokala myndigheter eller din lokala återförsäljare och fråga efter rätt metod för avfallshantering.
•Värm inte upp och utsätt inte batteriet för öppen eld.
•Lämna inte batteriet(/erna) i en bil som utsätts för direkt solljus under en längre period med dörrar och fönster stängda.
•Bryt inte upp och kortslut inte batteriet.
•Återuppladda inte alkaliskt batteri eller brunstens-batteri.
24

•Använd inte batteriet om höljet skalats av.
•Ta ur batteriet om du inte ska använda fjärrkontrollen under en längre tidsperiod. Förvara på en sval, mörk plats.
Medföljande tillbehör
Var god kontrollera och pricka av de medföljande tillbehören.
2 AC-strömsladdar
1 FM-inomhusantenn
1 Fjärrkontroll
(N2QAYB001215)
1 Batteri till fjärrkontrollen
För Storbritannien och Irland
1 Antennkontaktadapter
FÖRSIKTIGHET!
Håll antennkontaktadaptern utom räckhåll för barn för att undvika att de stoppar den i munnen och sväljer den.
Observera:
Använd den AC-strömsladd som passar för ditt hushålls nätuttag.
Försäkran om överensstämmelse (DoC)
Härmed deklarerar ”Panasonic Corporation” att denna produkt överensstämmer med grundläggande krav och andra relevanta bestämmelser i Direktiv 2014/53/EU.
Kunderna kan ladda ner en kopia av originalförsäkran (DoC) gällande våra RE-produkter från vår DoC-server: http://www.ptc.panasonic.eu
Kontakt till Auktoriserad Representant:
Panasonic Marketing Europe GmbH, Panasonic Testing Centre, Winsbergring 15, 22525 Hamburg, Tyskland
Typ av trådlös |
Frekvensområde |
Maximal effekt |
anslutning |
|
(dBm EIRP) |
Bluetooth® |
2402 – 2480 MHz |
8 dBm |
Referenser
Om Bluetooth®
Panasonic har inget ansvar för data och/eller information som äventyras under en trådlös överföring.
Frekvensområde |
SVENSKA |
• Detta system använder 2,4 GHz-frekvensbandet. |
|
Certifiering |
|
• Detta system överensstämmer med |
|
frekvensrestriktionerna och har erhållit certifiering |
|
baserat på frekvenslagar. En trådlöshetstillåtelse är |
|
därför inte nödvändig. |
|
• Åtgärderna nedan är straffbara enligt lag i vissa länder: |
|
– Isärtagning eller modifiering av enheten. |
|
– Avlägsna specifikationsindikationer. |
|
Användningsbegränsningar
•Trådlös överföring och/eller användning med samtliga Bluetooth®-utrustade enheter garanteras inte.
•Alla enheter måste överensstämma med de normer som Bluetooth SIG, Inc. satt upp.
•Beroende på en enhets specifikationer och inställningar kan den misslyckas med att ansluta eller vissa funktioner kan vara annorlunda.
•Detta system stöder Bluetooth®-säkerhetsfunktioner. Men beroende på användningsmiljön och/eller inställningarna kanske denna säkerhet inte är tillräcklig. Överför data trådlöst till detta system med försiktighet.
•Detta system kan inte överföra data till en Bluetooth®-enhet.
Användningsräckvidd
•Använd denna enhet inom en maximal räckvidd på 10 m.
•Räckvidden kan minska beroende på omgivningen, hinder och störningar.
Störningar från andra enheter
•Detta system kanske inte fungerar riktigt och problem som störljud och ljudhopp kan uppstå på grund av radiovågsstörningar om denna enhet är placerad för nära andra Bluetooth®-enheter eller enheter som använder 2,4 GHz-bandet.
•Detta system kanske inte fungerar riktigt om radiovågor från en närliggande sändande station e.d. är för starka.
Avsedd användning
•Detta system är avsett för normal, allmän användning endast.
•Använd inte detta system nära en utrustning eller i en omgivning som är känslig för radiofrekvensstörningar (exempel: flygplatser, sjukhus, laboratorier, osv.).
TQBJ2186
3
25

Licenser
Bluetooth®-ordmärket och logotyperna är registrerade varumärken som tillhör Bluetooth SIG, Inc. och all användning som Panasonic Corporation gör av sådana märken sker under licens. Andra varumärken och varunamn tillhör sina respektive ägare.
Android och Google Play är varumärken som tillhör Google LLC.
Avfallshantering av gammal utrustning och batterier Endast för Europeiska Unionen och länder med återvinningssystem
Dessa symboler på produkter, förpackningar och/eller medföljande dokument betyder att man inte får blanda elektriska och elektroniska produkter eller batterier med vanliga hushållssopor.
För att gamla produkter och använda batterier ska hanteras och återvinnas på rätt sätt ska man ta dem till passande uppsamlingsställe i enlighet med nationella bestämmelser.
När du kasserar dem på rätt sätt hjälper du till att spara på värdefulla resurser och förebygga en potentiell negativ inverkan på människors hälsa och på miljön.
För mer information om uppsamling och återvinning var god kontakta din kommun. Olämplig avfallshantering kan beläggas med straff i enlighet med nationella bestämmelser.
Notering till batterisymbolen (bottensymbol):
Denna symbol kan användas i kombination med en kemisk symbol. I detta fall iakttar den de krav som ställs upp i direktivet för den aktuella kemikalien.
Underhåll
Koppla ur AC-strömsladden innan underhåll. Rengör detta system med en mjuk, torr trasa.
•Använd aldrig alkohol, målarthinner eller ren bensin för att rengöra detta system.
•Innan kemiskt behandlade rengöringsdukar används, bör anvisningarna som medföljer duken läsas igenom noggrant.
Transportera enheten
Förberedelser
Koppla ur alla anslutna enheter och kablar från enheten.
Observera:
•Ha enheten på åtminstone 10 mm avstånd från andra föremål för ordentlig ventilation.
•De här högtalarna är inte magnetiskt avskärmade. Placera dem inte nära datorer eller andra apparater som lätt påverkas av magnetism.
•När du spelar på hög volym under en lång tid, kan det skada högtalarna och förkorta livslängden på högtalarna.
•Sänk volymen under dessa omständigheter för att förebygga skada:
–Om ljudet förvrängs.
–Vid justering av ljudkvaliteten.
FÖRSIKTIGHET!
•Oriktig hantering eller transportering kan göra så att enheten faller, etc., vilket kan resultera i skada och/eller personskada.
•Rör inte högtalarkonens återljudande ytor:
–Detta kan skada högtalarkonen.
–Högtalarkonen kan vara varm.
•Placera inte enheten på ett bord eller på någon upphöjd yta.
•Tillåt inte barn att klättra på enheten.
•Var försiktig om spädbarn eller barn finns nära.
TQBJ2186
4
26

Strömkällor
Enheten kan sättas på med AC-strömtillförselkällan. Om AC-strömtillförselkällan inte är tillgänglig kan du använda en extern powerbank.
Använda hushållet nätuttaget
Anslut AC-strömsladden.
Till vägguttaget
Spara ström
Systemet förbrukar en liten mängd ström även när den är i standbyläge. Koppla ur strömförsörjningen om du inte använder systemet.
En del inställningar förloras då du kopplar ur systemet. Du behöver ställa in dem igen.
Observera:
•Använd inte några andra AC-strömsladden än den medföljande.
•Håll enheten när du ansluter eller kopplar ur AC-strömsladden för att förhindra att enheten faller.
•Håll antennerna borta från AC-strömsladden för att undvika att störljud tas upp.
Använda en extern powerbank
Anslut den externa powerbanken (medföljer ej) till mikro-USB-porten på enhetens baksida.
USB-kabel (medföljer ej)
Extern  powerbank
(medföljer ej)
Observera:
•”PWR BANK” visas i 5 sekunder när du använder extern powerbank som strömkälla.
•När enheten är ansluten till både nätuttag och extern powerbank förses ström genom nätuttaget.
•Om strömtillförseln är urkopplad kommer enheten att växla till powerbankläge och vice versa.
•När powerbank används som strömkälla, kan du inte ladda via USB.
•Powerbank kan inte laddas när den är ansluten till enheten.
•Använd inte powerbank som inte överensstämmer med säkerhetsföreskrifter.
•Använd inte uteffekt från powerbank på lägre än 2 A, 5 V.
•Använd inte skadad powerbank. Detta kan orsaka brand, elektrisk stöt eller produktskada.
Förbereda fjärrkontrollen
Använd alkaliskt batteri eller brunstensbatteri.
Sätt i batteriet så att polerna (+ och –) är riktade med dem i fjärrkontrollen.
SVENSKA
TQBJ2186
5
27
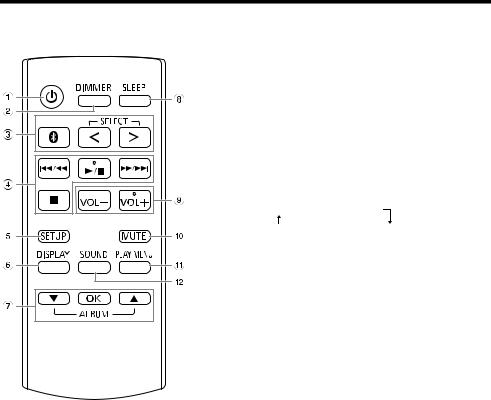
Beskrivning av kontrollerna
Utför procedurerna med fjärrkontrollen. Du kan även använda knapparna på enheten om de är samma knappar.
A Strömställare standbyläge/på [`], [1]
Tryck på knappen för att ställa apparaten i standbyläge då den är på, eller tvärtom. Apparaten förbrukar en aning ström även när den står i standbyläge.
Om enhetens strömkälla är en annan än nätuttaget, tryck på [1] på enheten för att sätta på den.
B Sänk ljusstyrkan på displaypanelen
Belysningen stängs av också.
För att avbryta, tryck en gång till på knappen.
C Välj ljudkälla
Tryck på [SELECT <, >] (enhet: [SELECT) upprepat för att välja källa:
USB  CD
CD  FM
FM
BLUETOOTH  AUX
AUX  D-IN
D-IN
På enheten:
För att starta Bluetooth®-ihopkoppling, tryck och håll nere [  ].
].
D Grundläggande uppspelningskontroll E Visa inställningsmeny
F Visa information om innehåll G Välj eller bekräfta alternativet H Ställ in insomningstimern
I Justera volymnivån
På enheten:
Tryck på [VOL] och vrid sedan på [VOLUME/MULTI CONTROL] för att justera volymen.
Justera mikrofonen volymnivå
Tryck och håll nere [–MIC VOL] tills ”MIC VOL” visas. Vrid på [VOLUME/MULTI CONTROL] för att justera volymen.
J Stäng av ljudet
För att avbryta, tryck en gång till på knappen. ”MUTE” avbryts även då du justerar volymen eller då du stänger av systemet.
K Visa uppspelnings-meny L Välj ljudeffekter
TQBJ2186
6
28

Toppanel
ILLUMINATION |
|
SOUND |
DJ4 |
ALBUM/ |
DJ3 |
TRACK |
|
KARAOKE |
SELECT DJ2 |
VOL |
|
|
DJ1 |
|
JUKEBOX |
SVENSKA
MVälj DJ-effekt eller DJ-sampler
NVälj belysningseffekter
OVälj MP3-album eller -spår
Tryck på [ALBUM/TRACK] för att välja album eller spår.
Bläddra bland spår eller album
Tryck på [R, T] eller vrid på [VOLUME/MULTI CONTROL] för att bläddra.
För att starta uppspelning från urvalet, tryck på [4/9].
PVälj Karaokeeffekter
För att avbryta, tryck och håll nere [–OFF] tills ”OFF EFFECT” visas.
QVolymeller multikontrollratt
Vrid inte snabbt på ratten för att förhindra oregelbunden volymkontroll.
RVälj DJ jukebox
Välj DEMO-uppspelning
Tryck och håll nere [–DEMO] i mer än 2 sekunder, och den inbyggda demonstrationslåten spelas upp. Tryck på [8] för att stoppa demonstrationen.
SÖppna eller stäng skivluckan
TDJ-funktionsdirektknappar
Tryck på [DJ] för att sätta på DJ-funktionen. Tryck på [DJ1] till [DJ6] för att välja den önskade funktionen.
För att avbryta, tryck på vald [DJ1] till [DJ6] igen.
UMikrofonuttag
VUSB-port ( ) Spela upp MP3-spår.
WFjärrkontrollsensor
Peka fjärrkontrollen mot fjärrkontrollsensorn, utan hinder i vägen och inom användningsräckvidden. Avstånd: Inom ungefär 7 m
Vinkel: Ungefär 20° uppåt och nedåt, 30° till vänster och till höger
XDisplaypanel
YSkivfack
TQBJ2186
7
29

Förbereda median
Skiva
1Tryck på [x] på enheten för att öppna skivluckan.
Sätt i en skiva med etiketten vänd uppåt. Tryck en gång till för att stänga skivluckan.
2Tryck på [SELECT <, >] upprepat för att välja ”CD”.
USB
Förberedelser
Innan du ansluter en USB-enhet till systemet, se till att ha säkerhetskopierat datan.
1Sänk volymen och anslut USB-enheten till USB-porten.
2Tryck på [SELECT <, >] upprepat för att välja ”USB”.
Observera:
•Använd inte en USB-förlängningskabel. Systemet kan inte känna igen en USB-enhet ansluten genom en kabel.
•Vissa enheter kan inte laddas eftersom den maximala USB-laddningsströmmen endast är 0,5 A.
Bluetooth®
Du kan ansluta och spela upp en ljudenhet trådlöst genom Bluetooth®.
Förberedelser
•Sätt på enheten.
•Sätt på Bluetooth®-funktionen på enheten och placera enheten nära systemet.
•Läs användarinstruktionerna till enheten för mer information.
█ Koppla ihop en enhet
Förberedelser
Om detta system är anslutet till en Bluetooth®-enhet, koppla ur den (~8).
1Tryck på [  ].
].
Om ”PAIRING” visas, fortsätt med steg 3.
2Tryck på [PLAY MENU] för att välja ”PAIRING” och tryck sedan på [OK].
3Välj ”SC-TMAX10” från enhetens
Bluetooth®-meny.
Om du frågas efter huvudnyckel, skriv ”0000” eller ”1234”.
Enheten ansluter till detta system automatiskt efter att ihopkopplingen är slutförd.
MAC-adressen (exempel: 6C:5A:B5:B3:1D:0F) kan visas innan ”SC-TMAX10” visas.
Den anslutna enhetens namn visas i några sekunder.
TQBJ2186 |
Använda enheten |
|
2 |
Välj ”SC-TMAX10” från enhetens |
|
|
1 |
Tryck och håll nere [ ] tills ”PAIRING” visas. |
8Bluetooth®-meny.
Observera:
•Du kan koppla ihop upp till 8 enheter med detta system. Om en 9:e enhet kopplas ihop byts den enhet som inte använts under längst tid ut.
•Beroende på sökfunktionaliteten hos Bluetooth®-enheten och den omgivande miljön ska du, om produktnamnet inte visas på enhetens Bluetooth®-meny, stänga av och sen sätta på enhetens Bluetooth®-funktionen upprepat under ihopkopplingsprocessen.
█ Ansluta en enhet
Förberedelser
Om detta system är anslutet till en Bluetooth®-enhet, koppla ur den (~8).
1Tryck på [  ].
].
”BLUETOOTH READY” visas.
2Välj ”SC-TMAX10” från enhetens
Bluetooth®-meny.
Den anslutna enhetens namn visas i några sekunder.
3Starta uppspelning på enheten.
Observera:
•En enhet måste vara ihopkopplad för att ansluta.
•När ”BLUETOOTH” är valt som källa, försöker detta system automatiskt att ansluta till den senast anslutna enheten. (”LINKING” visas under denna process.)
█ Fleranslutning
Detta system stödjer fleranslutning, som kan ansluta upp till 3 enheter samtidigt.
För att växla mellan de anslutna enheterna
När en av de anslutna enheterna spelas upp kan du enkelt växla styrningen till en annan ansluten enhet genom att starta en uppspelning på den enheten. Den tidigare uppspelningen kommer att pausas automatiskt.
Observera:
Denna funktion kanske inte fungerar för vissa appar eller enheter (beroende på appseller enhetsspecifikationer).
█ Koppla ur en enhet
Medan en Bluetooth®-enhet är ansluten
1Tryck på [PLAY MENU] upprepat för att välja ”DISCONNECT?”.
2Tryck på [R, T] för att välja ”OK? YES” och tryck
sedan på [OK].
”BLUETOOTH READY” visas. För att avbryta, välj ”OK? NO”.
Använda enheten
Tryck och håll nere [  ] tills ”PAIRING” visas.
Observera:
•Denna funktion kopplar ur alla anslutna enheter.
•En enhet kopplas ur då du:
–Väljer en annan källa.
–Flyttar enheten utanför den maximala räckvidden.
–Inaktiverar Bluetooth®-överföringen för enheten.
–Stänger av systemet eller enheten.
30
 Loading...