


SC-SB1

EG
Operating Instructions
Bedienungsanleitung
Mode d’emploi
Istruzioni per l’uso
Instrucciones de funcionamiento
Gebruiksaanwijzing
Návod k obsluze
Instrukcja obsługi
Felhasználói kézikönyv
Speaker System
Lautsprecheranlage
Enceintes acoustiques
Cassa acustica
Cajas acústicas
Luidsprekersysteem
Reprosoustava
Zestaw głośników
Hangsugárzó rendszer
Model No./Modell Nr./Modèle n°/Model No./Modelo N./
Model Nr./Model č./Nr Modelu/Modellszám: SC-SB1
Thank you for purchasing this product.
Please read these instructions carefully before using this
product, and save this manual for future use.
Wir möchten Ihnen für den Kauf dieses Produkts danken.
Bitte lesen Sie diese Anleitung vor der Inbetriebnahme
dieses Produkts aufmerksam durch, und bewahren Sie
dieses Handbuch für spätere Bezugnahme griffbereit auf.
Nous vous remercions d’avoir acheté cet appareil.
Veuillez lire attentivement les présentes instructions avant
d’utiliser ce produit, et conserver ce manuel pour
utilisation ultérieure.
La ringraziamo per l’acquisto di questo prodotto.
Leggere attentamente queste istruzioni prima di utilizzare
il presente prodotto, e conservare questo manuale per usi
futuri.
Le agradecemos haber adquirido este producto.
Lea cuidadosamente estas instrucciones antes de usar
este producto, y guarde este manual para usarlo en el
futuro.
Hartelijk dank voor de aankoop van dit product.
Lees deze instructies zorgvuldig door voordat u dit
product gebruikt en bewaar deze handleiding, zodat u
deze later kunt raadplegen.
Děkujeme za zakoupení tohoto výrobku.
Před použitím tohoto produktu si pečlivě přečtěte tyto
pokyny a celý návod si uložte pro pozdější použití.
Dziękujemy za zakupienie tego produktu.
Przed przystąpieniem do eksploatacji opisywanego
produktu należy dokładnie przeczytać niniejsze zalecenia
i zachować instrukcję obsługi do wglądu.
Köszönjük, hogy ezt a terméket választotta.
Mielőtt használatba venné a terméket, olvassa el
figyelmesen az utasításokat; őrizze meg a kézikönyvet a
jövőbeli használat céljából.
TQBS0132

Table of contents
Safety precautions
WARNING
Unit
≥ To reduce the risk of fire, electric shock or product
damage,
j Do not expose this unit to rain, moisture, dripping or
splashing.
j Do not place objects filled with liquids, such as
vases, on this unit.
j Use only the recommended accessories.
j Do not remove covers.
j Do not repair this unit by yourself. Refer servicing to
qualified service personnel.
AC mains lead
≥ To reduce the risk of fire, electric shock or product
damage,
j Ensure that the power supply voltage corresponds to
the voltage printed on this unit.
j Insert the mains plug fully into the socket outlet.
j Do not pull, bend, or place heavy items on the lead.
j Do not handle the plug with wet hands.
j Hold onto the mains plug body when disconnecting
the plug.
j Do not use a damaged mains plug or socket outlet.
≥ The mains plug is the disconnecting device.
Install this unit so that the mains plug can be
unplugged from the socket outlet immediately.
Button-type battery (Lithium battery)
≥ Risk of fire, explosion and burns. Do not recharge,
disassemble, heat above 60
WARNING
DO NOT INGEST BATTERY,
CHEMICAL BURN HAZARD
This product contains a coin/button cell battery. If the
coin/button cell battery is swallowed, it can cause
severe internal burns in just 2 hours and can lead to
death. Keep new and used batteries away from
children. If the battery compartment does not close
securely, stop using the product and keep it away from
children. If you think batteries might have been
swallowed or placed inside any part of the body, seek
immediate medical attention.
o
C or incinerate.
CAUTION
Unit
≥ Do not place sources of naked flames, such as lighted
candles, on this unit.
≥ This unit may receive radio interference caused by
mobile telephones during use. If such interference
occurs, please increase separation between this unit
and the mobile telephone.
≥ This unit is intended for use in moderate climates.
≥ Product Identification Marking is located on the rear of
the unit.
Placement
≥ Place this unit on an even surface.
≥ To reduce the risk of fire, electric shock or product
damage,
j Do not install or place this unit in a bookcase, built-in
cabinet or in another confined space. Ensure this
unit is well ventilated.
j Do not obstruct this unit’s ventilation openings with
newspapers, tablecloths, curtains, and similar items.
j Do not expose this unit to direct sunlight, high
temperatures, high humidity, and excessive
vibration.
≥ Do not place this unit and other devices (Blu-ray disc
recorder, external HDD, etc.) directly on top of each
other, as this may cause HDD failure or data damage.
Button-type battery (Lithium battery)
≥ Danger of explosion if battery is incorrectly replaced.
Replace only with the type recommended by the
manufacturer.
≥ Insert with poles aligned.
≥ Mishandling of batteries can cause electrolyte leakage
and may cause a fire.
j Remove the battery if you do not intend to use the
remote control for a long period of time. Store in a
cool, dark place.
j Do not heat or expose to flame.
j Do not leave the battery(ies) in a car exposed to
direct sunlight for a long period of time with doors
and windows closed.
≥ When disposing of the batteries, please contact your
local authorities or dealer and ask for the correct
method of disposal.
AC adaptor
≥ The AC adaptor operates on AC between 220 V and
240 V. But obtain a suitable plug adaptor if the plug
does not fit the AC mains socket.
TQBS0132
(2)
2

Precautions
ENGLISH
About Bluetooth
Panasonic bears no responsibility for data and/or
information that is compromised during a wireless
transmission.
®
∫ Frequency band used
This system uses the 2.4 GHz frequency band.
∫ Certification of this device
≥ This system conforms to frequency restrictions and has
received certification based on frequency laws. Thus, a
wireless permit is not necessary.
≥ The action below are punishable by law in some
countries:
j Taking apart or modifying the unit.
j Removing specification indications.
∫ Restrictions of use
≥ Wireless transmission and/or usage with all Bluetooth®
equipped devices is not guaranteed.
≥ All devices must conform to standards set by Bluetooth
SIG, Inc.
≥ Depending on the specifications and settings of a
device, it can fail to connect or some operations can be
different.
≥ This system supports Bluetooth
depending on the operating environment and/or
settings, this security is possibly not sufficient. Transmit
data wirelessly to this system with caution.
≥ This system cannot transmit data to a Bluetooth
device.
®
security features. But
®
∫ Range of use
Use this device at a maximum range of 10 m.
The range can decrease depending on the environment,
obstacles or interference.
∫ Interference from other devices
≥ This system may not function properly and troubles
such as noise and sound jumps may arise due to radio
wave interference if this system is located too close to
other Bluetooth
2.4 GHz band.
≥ This system may not function properly if radio waves
from a nearby broadcasting station, etc. are too strong.
®
devices or the devices that use the
∫ Intended usage
≥ This system is for normal, general use only.
≥ Do not use this system near equipment or in an
environment that is sensitive to radio frequency
interference (example: airports, hospitals, laboratories,
etc).
TQBS0132
(3)
3

Table of contents
Safety precautions........................ 2
About Bluetooth
Before use
Accessories................................... 4
Unit care ........................................ 4
Control reference guide ............... 5
This system (Front / Sides).................... 5
This system (Rear) ................................ 5
Remote control ...................................... 6
Getting started
®
......................... 3
Before use
Accessories
Check the supplied accessory before using this
system.
∏ 1 Remote control (with a battery)
(N2QAYC000119)
∏ 1 AC mains lead
∏ 1 AC adaptor
≥ Product numbers are correct as of April 2017. These
may be subject to change.
≥ Do not use AC mains lead and AC adaptor with other
equipment.
≥ Do not use any other AC mains lead and AC adaptors
except the supplied one.
Connections.................................. 7
Operations
Using this system......................... 9
Linked operations with the TV
(VIERA Link
“HDAVI Control
Bluetooth
®
connection............... 11
TM
”)................ 10
Advanced operations ................. 11
Reference
Troubleshooting ......................... 13
License ........................................ 14
Specifications ............................. 15
≥The illustrations shown may differ from your
unit.
≥Operations in this operating instructions are
described mainly with the remote control,
but you can perform the operations on this
system if the controls are the same.
Unit care
∫ Clean this system with a soft, dry cloth
≥ When dirt is heavy, wring a cloth moistened in water
tightly to wipe the dirt, and then wipe it with a dry cloth.
≥ Never use alcohol, paint thinner or benzine to clean this
system.
≥ Before using chemically-treated cloth, carefully read the
instructions that came with the cloth.
∫ To dispose or transfer this system
This system may keep the user settings information in this
system. If you discard this system either by disposal or
transfer, then follow the procedure to return all the settings
to the factory presets to delete the user settings.
(> 13, “To return to the factory defaults.”)
≥ The operation history may be recorded in the memory
of this system.
TQBS0132
(4)
4
Precautions
Reference Getting started
Before useOperations
Control reference guide
5
1
2
3
4
5
1 2 43
6
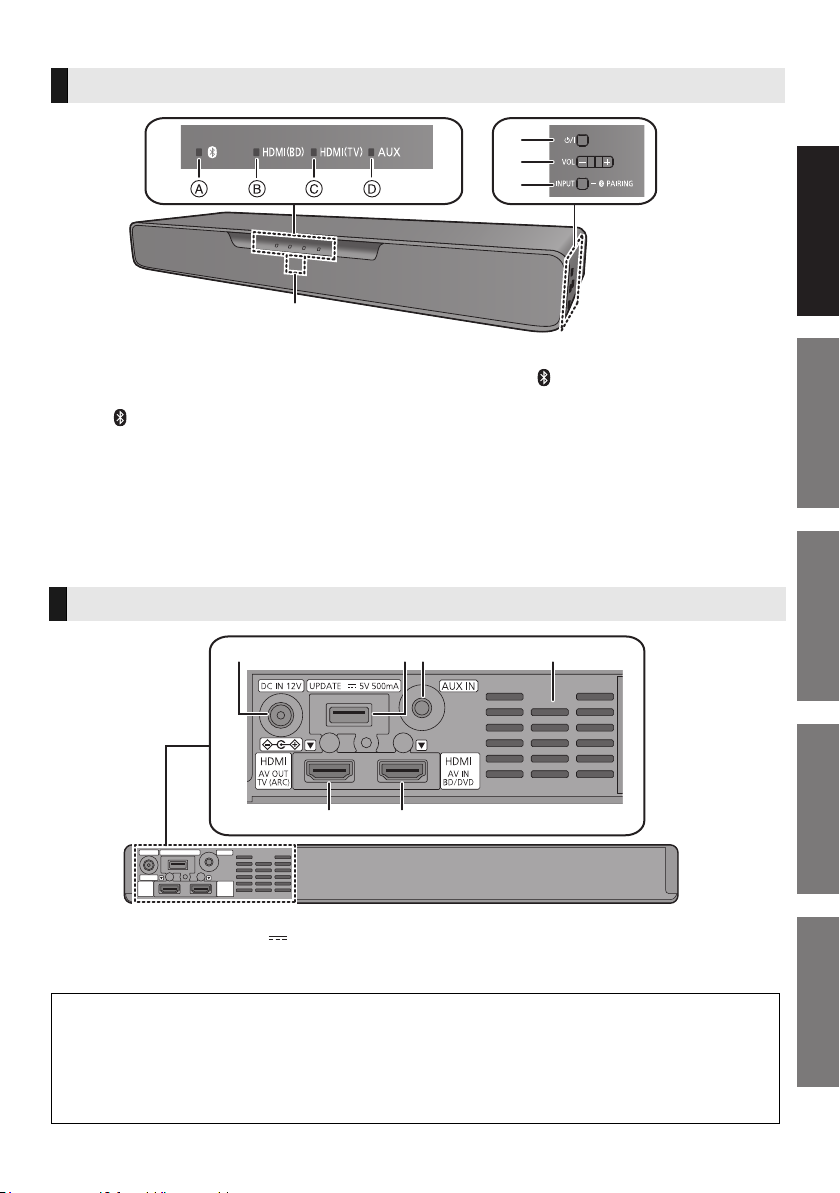
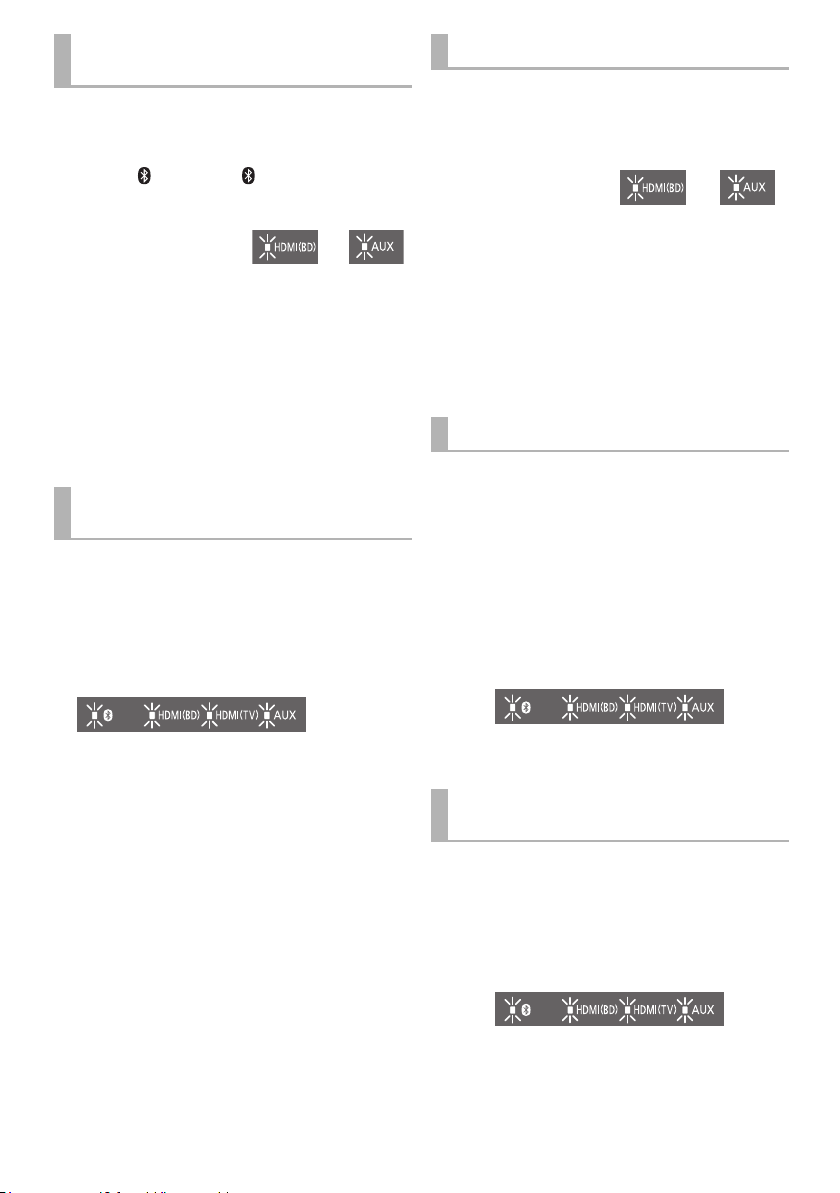
This system (Front / Sides)
1 LED indicators
The currently-selected device is indicated by the
lighting of the corresponding indicator.
A (Bluetooth®) indicator (lights up blue)
B HDMI(BD) indicator (lights up green)
C HDMI(TV) indicator (lights up green)
D AUX indicator (lights up green)
2 Standby/on switch (Í/I)
Press to switch the unit from on to standby mode or
vice versa. In standby mode, the unit is still
consuming a small amount of power.
3 Adjust the volume of this system (> 9)
4 [INPUT / j PAIRING] button
≥ Selects the connected device
(The device changes each time this button is
pressed)
≥ Registers Bluetooth
5 Remote control signal sensor
Distance: Within approx. 7 m directly in front
Angle: Approx. 20e up and down and approx.
30e left and right
®
devices
This system (Rear)
1 DC IN (12 V) terminal
2 Firmware update (UPDATE DC 5 V 500 mA)
terminal*
3 AUDIO IN (AUX IN) terminal
* Note about firmware updates
Use the firmware update terminal to update the version of this system through a USB memory
device. (Not used for normal operations.) For more details about version updates, refer to the
support site below.
http://av.jpn.support.panasonic.com/support/global/cs/
(This site is in English only.)
4 Ventilation holes
5 HDMI AV OUT (TV (ARC)) terminal
6 HDMI AV IN (BD/DVD) terminal
TQBS0132
(5)
5
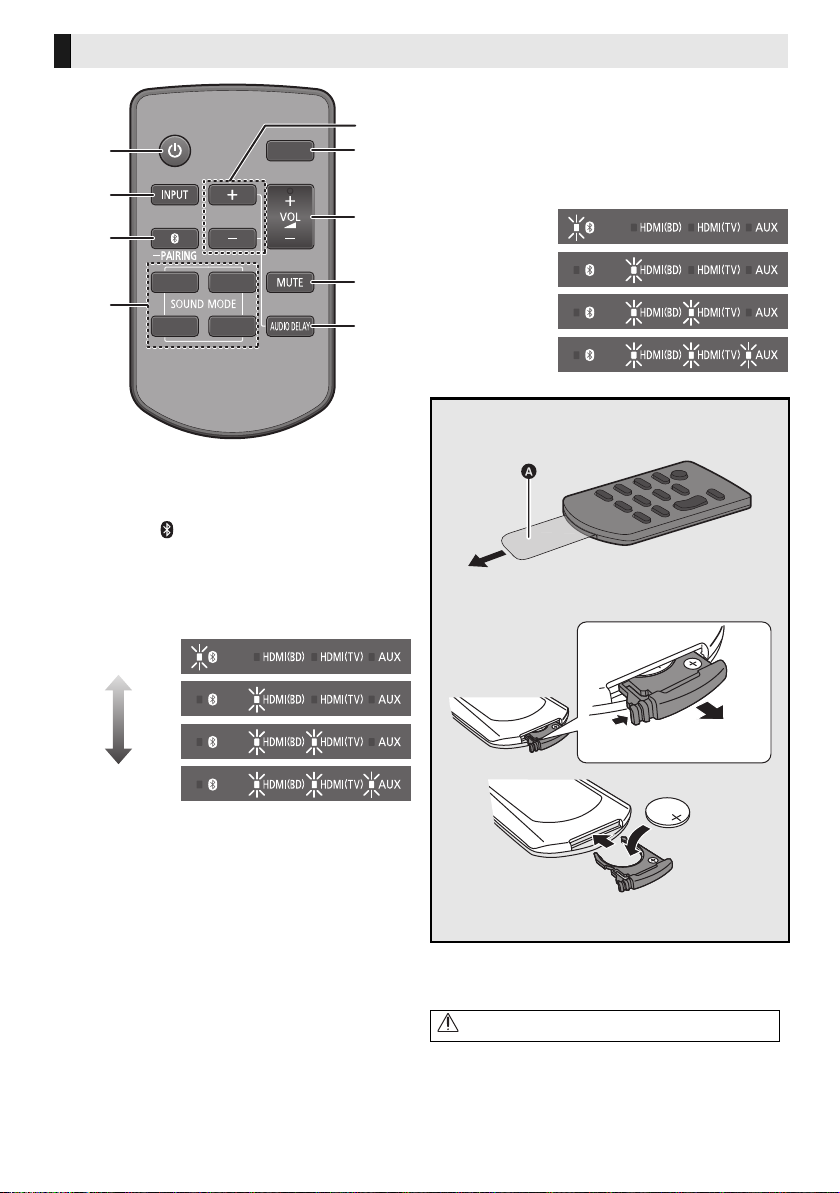
Remote control
ュリヮヮユン
ヴヶャヸヰヰョユン
ヮヶヴリヤ ヷヰリヤユ
ヴヵモワュモンュ
ヤリワユヮモ
5
7
6
9
8
1
2
3
4
Lowest
Highest
"Level 1"
"Level 2"
“Auto”
"Off”
1 Turn this system on or off (> 9)
2 Select the input source (> 9)
“HDMI(BD)” --# “HDMI(TV)” --# “AUX”
^----------- “ ” (Bluetooth
3 Select the Bluetooth
(> 9)
4 Select the sound mode (> 9)
5 Adjust the bass (adjustable in four steps)
®
) -----------}
®
device as the source
≥ If no operation is performed for about 10 sec or any
button other than [i SUBWOOFER],
[SUBWOOFER j] or [DIMMER] is pressed, the
indicators return to normal status.
(If the bass is accidentally adjusted when
[i SUBWOOFER] or [SUBWOOFER j] is
pressed, follow the steps again from step 1.)
∫ Before using for the first time
Remove the insulation sheet A.
∫ To replace a button-type battery
Battery type: CR2025 (Lithium battery)
6 Switch the brightness of the LED indicators
7 Adjust the volume of this system (> 9)
8 Mute the sound (> 9)
9 Adjust the delay between video and audio
1 Press [AUDIO DELAY] on the remote control.
≥ The current mode will be indicated by the
corresponding LED indicator.
2 While the current mode is indicated (about
10 sec), press [i SUBWOOFER] or
[SUBWOOFER j].
≥ The setting changes in the following order each
time you press [i SUBWOOFER].
(It changes in the reverse order if you press
[SUBWOOFER j].)
“Auto” --# “Off” --# “Level 1” --# “Level 2”
TQBS0132
(6)
6
≥ Set the button-type battery with its (i) mark
facing upward.
≥ The symbols on the supplied remote control
represent the following:
Warning (refer to Operating Instructions for the button
cell battery)
Getting started
Before use
Getting started
HDMI IN
(ARC)
HDMI IN (ARC)
HDMI OUT
≥ Be sure to connect to the TV’s
ARC compatible terminal.
TV
What is ARC?
ARC is an abbreviation of “Audio Return
Channel”, also known as HDMI ARC. It
refers to one of the HDMI functions. When
you connect the terminal labelled “ARC”
and this system, TV pictures and sound can
be enjoyed with a single HDMI cable.
HDMI cable
(not supplied)
HDMI cable
(not supplied)
This system
(rear)
Blu-ray disc recorder/player
To a household
mains socket
AC adaptor
(supplied)
AC mains lead
(supplied)
Connections
≥Turn off all equipment before connection and read the appropriate operating instructions.
Do not connect the AC mains lead for this system to the socket outlet until all connections have
been completed.
≥ Purchase an HDMI cable rated as “High-Speed HDMI Cable”. Operation is not possible with a cable
that does not meet the HDMI standards.
This system supports 3D content.
≥ You can connect a 3D-compatible TV and a 3D-compatible Blu-ray disc recorder/player to this
system and enjoy spectacular 3D images of commercially-available Blu-ray discs and other storage
media.
This system supports HDR (High Dynamic Range) pass-through of 4K (50p/60p) signals.
≥ An HDMI cable that supports 18 Gbps is required to enjoy 4K (50p/60p) HDR content.
≥ You can connect a 4K-compatible TV and a 4K-compatible Blu-ray disc recorder/player to this
system and enjoy smooth high-definition pictures even on a large screen. (Two HDMI cables that
support 18 Gbps are required.)
≥Do not place this system directly on top of another device, such as a Blu-ray disc recorder.
≥Keep magnetised items away. Magnetised cards, watches, etc., can be damaged if placed too close to
this system.
≥The unit is in the standby condition when the AC adaptor is connected. The primary circuit is always
“live” as long as the AC adaptor is connected to an electrical outlet.
≥This system consumes a small amount of AC power (> 15) even when it is turned off. In the interest of
power conservation, if you will not be using this system for a long time, unplug it from the household
mains socket.
≥The symbols on the supplied AC adaptor represent the following:
AC
DC
Class II equipment (The construction of the product is double-insulated.)
TQBS0132
(7)
7

∫ Changing the settings of your TV
This system
(rear)
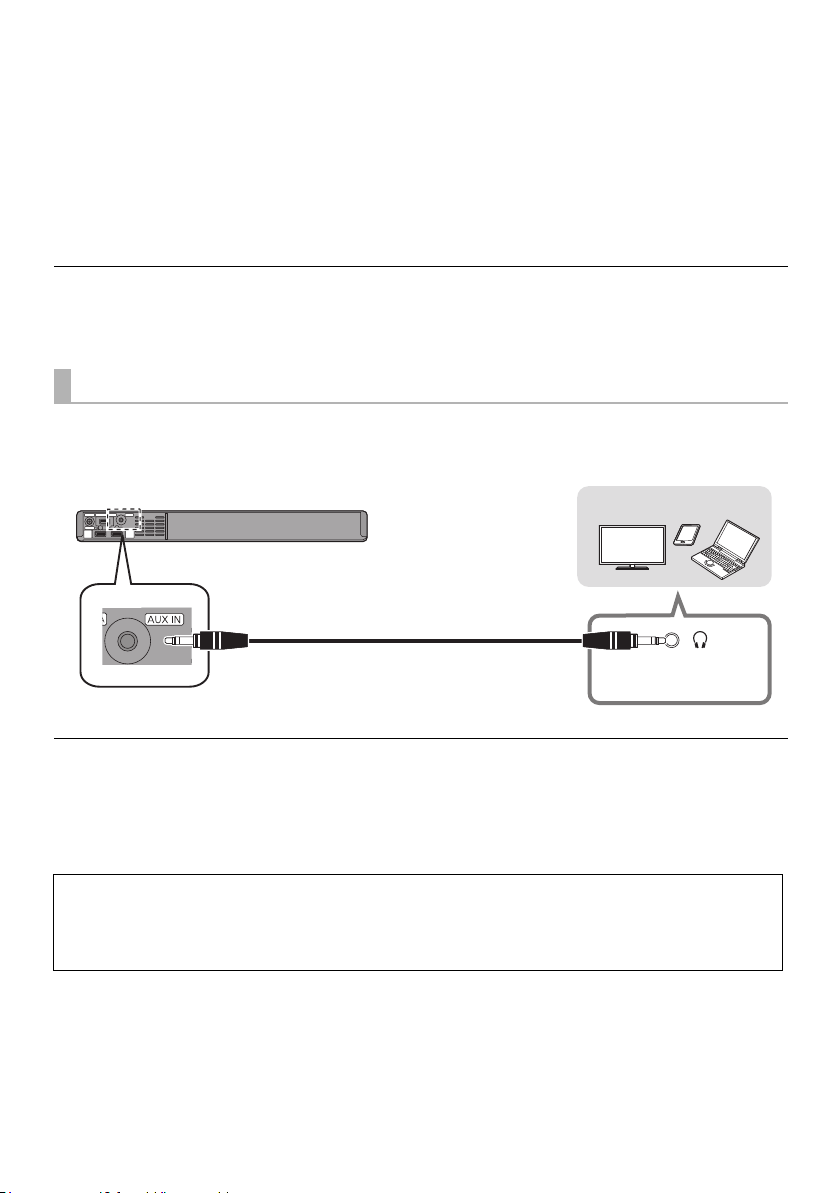
Stereo mini plug audio cable (not supplied)
Device to be connected
Headphone/earphone
jack
To connect this system and the TV with an HDMI cable, you need to change the TV settings to output
sound correctly from this system. The instructions below use a Panasonic TV (VIERA) as an example.
≥The operating procedure and the names of on-screen displays differ depending on the TV (VIERA).
Refer to the operating instructions or electronic operating instructions for the TV (VIERA) for details.
1 Connect this system and the TV with an HDMI cable. (> 7)
≥ After connecting this system and the TV, turn them on.
2 Set the TV’s sound output destination to “Home Cinema”.
≥ Operation example:
Press [Apps], select “VIERA Link”, and set “Speaker Selection” to “Home Cinema”.
≥ Check to see if the VIERA Link setting of each device is turned on.
≥ Please also follow the steps above after adding a new device, reconnecting to the TV or restoring the default settings.
Using the AUDIO IN (AUX IN) terminal
You can also connect this unit using a stereo mini plug audio cable (not supplied).
Set the input of this system to “AUX”.
≥ Use an HDMI cable (not supplied) to connect a Blu-ray disc recorder/player.
≥ When a stereo mini plug audio cable (not supplied) is connected, high-res sound sources are output in CD-sound
source quality.
≥ The VIERA Link function of this system (> 10, “Linked operations with the TV (VIERA Link “HDAVI Control
not be used.
For more details about other connection methods, refer to the support site below.
http://av.jpn.support.panasonic.com/support/global/cs/
(This site is in English only.)
TQBS0132
(8)
8
TM
”)”) can

Getting started
Operations
Operations
ュリヮヮユン
ヴヶャヸヰヰョユン
ヮヶヴリヤ ヷヰリヤユ
ヴヵモワュモンュ
ヤリワユヮモ
1
2
Using this system
Preparation
≥ Turn on the TV and/or connected device.
1 Press [Í] to turn on this system.
2 Select the source.
Press To select
“
[INPUT]
[] “ ” (Bluetooth
HDMI(BD)” # “HDMI(TV)” # “AUX
^------- “ ” (Bluetooth®) !------}
®
)
∫ To adjust the volume of this system
Press [i VOL j].
≥ Each input mode retains a separate volume setting.
∫ To select a sound mode
You can change the sound mode by pressing the
appropriate button.
≥ Confirm that the HDMI(TV) indicator and the AUX indicator
blink twice.
MUSIC: Enhance the sound of musical
instruments and songs.
VOICE: Enhance the voice of news and sports
commentaries.
CINEMA: Produces three-dimensional sound
unique to movies.
STANDARD: Best suited for dramas and comedy
shows.
”
∫ When “ ” is selected as the source
On the Bluetooth® device:
Select this system as the output source of the
connected Bluetooth
playback.
®
device and start the
∫ To mute the sound
Press [MUTE].
≥ While muting, the HDMI(BD) indicator, HDMI(TV) indicator,
and AUX indicator blink simultaneously.
≥ To cancel, press the button again or adjust the volume.
≥ Muting is cancelled if this system is turned off.
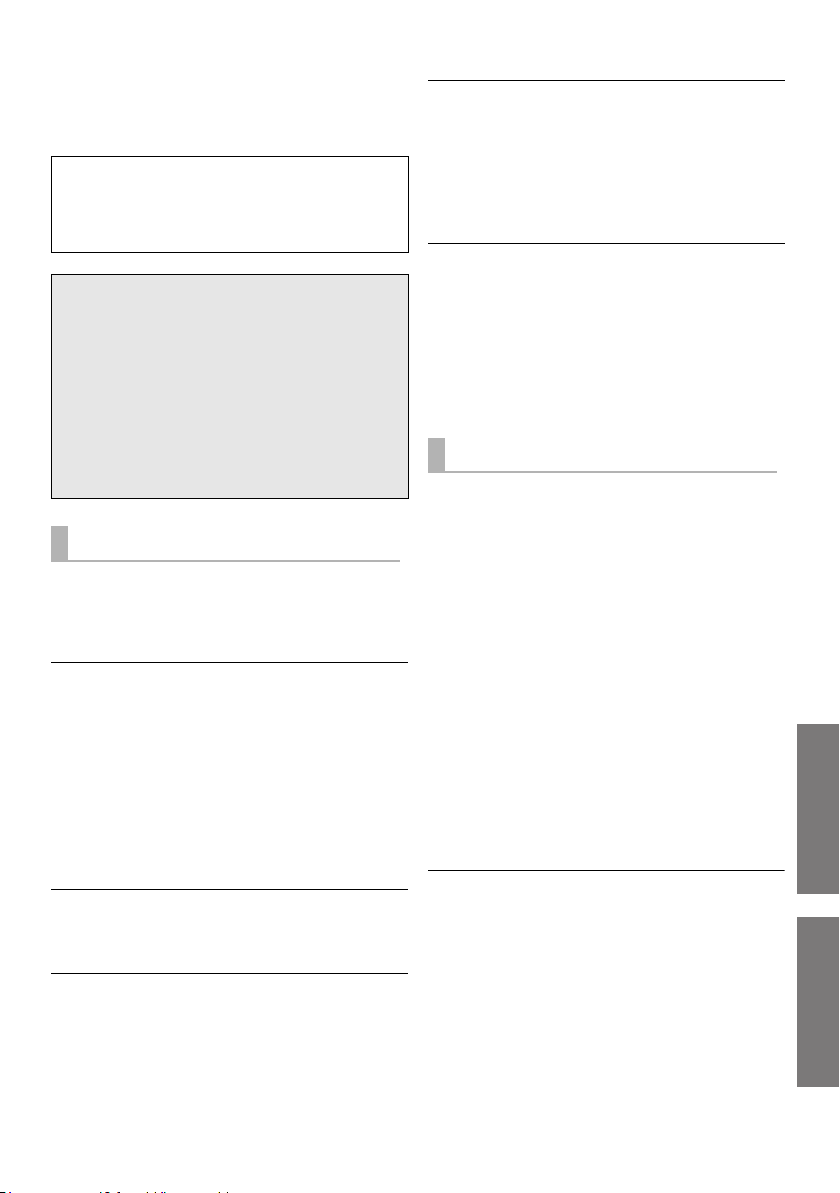
∫ When “HDMI(BD)” is selected as the
source
On the TV and the connected device:
Select the TV’s input for this system and start the
playback on the connected device.
If this system does not operate as expected or sound is unusual, returning the settings to the
factory preset may solve the problem. (> 13, “To return to the factory defaults.”)
When the problem persists (> 13, “Sound / Image”)
≥ If there is sound coming out of the TV’s speakers, reduce the volume of the TV to its minimum.
≥ The maximum volume levels of the TV and this system may differ.
≥ Switch the TV’s input to the TV tuner to select the TV as the video and audio source while playing the device
connected to the HDMI AV OUT (TV (ARC)) terminal. In addition, when VIERA Link (HDMI) is turned off, switch the
input of this system to TV mode.
≥ To select the TV as the audio source while playing the device connected to the AUDIO IN (AUX IN) terminal, switch
the input of the TV to the TV tuner.
TQBS0132
(9)
9

Linked operations with the TV
(VIERA Link “HDAVI Control
What is VIERA Link “HDAVI
Control”?
VIERA Link “HDAVI Contr ol” is a co nveni ent
function that offers linked operations of this
system, and a Panasonic TV (VIERA) under
“HDAVI Control”.
You can use this function by connecting the
equipment with an HDMI cable. See the
operating instructions for connected
equipment for operational details.
What you can do with VIERA
Link “HDAVI Control”
To make sure that the audio is output from this
system, turn this system on by using the TV’s
remote control and selecting home cinema from
the speaker menu of VIERA Link menu.
The availability and function of the settings may
vary depending on the TV. Refer to the operating
instructions for the TV for details.
∫ Speaker control
You can select whether audio output is from this
system or the TV speakers by using the TV menu
settings.
Home cinema
This system is active.
≥ When this system is in standby mode, changing the TV
speakers to this system in the VIERA Link menu will
automatically turn this system on.
≥ You can control the volume setting of this system using
the volume or mute button on the TV remote control.
≥ If you turn off this system, TV speakers will be
automatically activated.
≥ Audio will automatically be output from this system if the
TV is compatible to VIERA Link “HDAVI Control 4” or
later.
TV
TV speakers are active.
TM
∫ Automatic input switching
When the following operations are performed, this
system will automatically change the input to the
corresponding source.
jWhen play starts on an HDMI connected
j
* If the speaker output setting on the TV is set to this
∫ Power off link
When the TV is turned off, this system also turns
off automatically. (This function does not work
when Bluetooth
∫ Automatic lip-sync function
Delay between audio and video is automatically
adjusted by adding time-lag to the audio output,
enabling you to enjoy smooth audio for the picture.
≥ The delay information is automatically set if the TV is
≥ VIERA Link “HDAVI Control”, based on the control functions
≥ This unit supports “HDAVI Control 5” function.
≥ Please refer to individual manuals for other manufacturers’
”)
device.*
When the TV input is changed.
system, the TV and this system turn on automatically
(Power on link).
®
is the source.)
(for HDAVI Control 3 or later)
compatible to VIERA Link “HDAVI Control 3” or later
and the VIERA Link is set to on.
provided by HDMI which is an industry standard known as
HDMI CEC (Consumer Electronics Control), is a unique
function that we have developed and added. As such, its
operation with other manufacturers’ equipment that
supports HDMI CEC cannot be guaranteed.
“HDAVI Control 5” is the standard for Panasonic’s HDAVI
Control compatible equipment. This standard is compatible
with Panasonic’s conventional HDAVI equipment.
equipment supporting VIERA Link function.
10
(10)
TQBS0132
Operations
Bluetooth® connection
“On” “Off”
“On” “Off”
By using the Bluetooth® connection, you can listen
to the sound from the Bluetooth
from this system wirelessly.
≥ Refer to the operating instructions of the Bluetooth® device
for further instruction on how to connect a Bluetooth
device.
Preparation
≥ Turn on the Bluetooth® feature of the device and
place the device near this system.
Bluetooth® pairing
1 Press [ ] to select “ ”.
≥ If the “ ” indicator flashes quickly, go to step 3.
2 Press and hold [ ] until the “ ” indicator
flashes quickly.
≥ If the “ ” indicator flashes slowly, repeat step 2.
3 Select “SC-SB1” from the Bluetooth
device’s Bluetooth
≥ If prompted for the passkey on the Bluetooth® device,
enter “0000”.
≥ Once the Bluetooth
indicator stops flashing and lights up.
®
device is connected, the “ ”
≥ You can register up to 8 devices with this system. If a 9th
device is paired, the device that has not been used for the
longest time will be replaced.
Connecting a paired Bluetooth®
device
1 Press [ ] to select “ ”.
≥ If the “ ” indicator lights, a Bluetooth® device is
already connected with this system. Disconnect it.
(> below)
2 Select “SC-SB1” from the Bluetooth
device’s Bluetooth® menu.
®
menu.
®
audio device
®
®
®
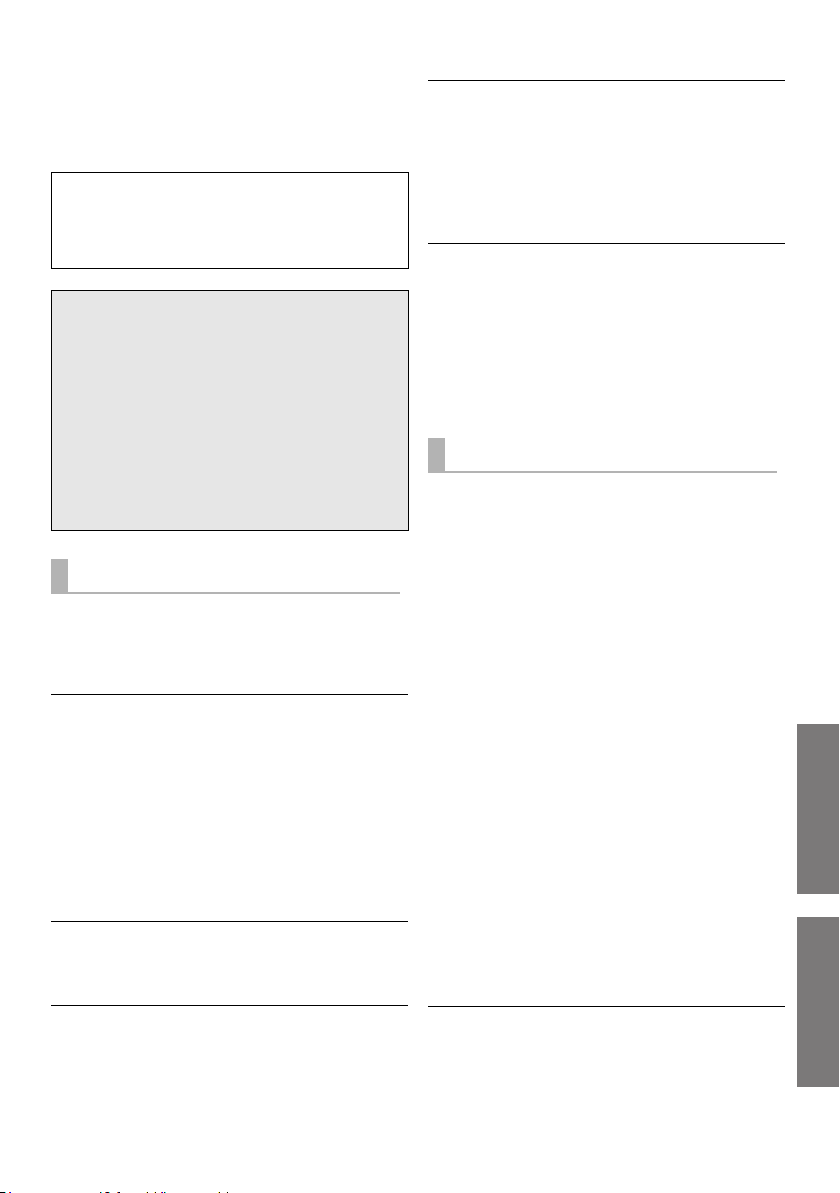
Advanced operations
Auto Power Down
This system is automatically turned off if there is no audio
input and when you do not use it for approx. 19 min and
30 sec.
1 While pressing
and holding
[i SUBWOOFER]
on the remote control, press and hold
[VOL s] on this system for more than
4 sec.
≥ The current mode will be indicated by the
corresponding LED indicator.
2 While the current mode is indicated (about
20 sec), press [i SUBWOOFER] again.
≥ The setting changes each time [i SUBWOOFER] is
pressed.
≥ The indicator for the selected setting blinks for 20 sec and
then exits the setting mode.
≥ The setting is maintained until it is changed again.
≥ Default setting of this function is “On”.
Bluetooth® Standby
This function allows you to connect a paired Bluetooth®
device when this system is in standby mode.
1 While pressing
and holding
[SUBWOOFER j]
on the remote control, press and hold
[VOL s] on this system for more than
4 sec.
≥ The current mode will be indicated by the
corresponding LED indicator.
2 While the current mode is indicated (about
20 sec), press [SUBWOOFER j] again.
≥ The setting changes each time [SUB WOOFER j] is
pressed.
≥ The indicator for the selected setting blinks for 20 sec and
then exits the setting mode.
≥ The setting is maintained until it is changed again.
≥ Default setting of this function is “On”.
∫ Disconnecting a Bluetooth® device
Press and hold [ ] until the “ ” indicator flashes.
≥ This system can only be connected to one device at a time.
TQBS0132
(11)
11
Switching the Bluetooth®
“Mode 1” “Mode 2”
“TV” “Music”
communication mode
Change the Bluetooth® connection link mode to suit the
connection type. You can switch to Mode 2 (priority on
sound quality) or Mode 1 (priority on connectivity) by
following the steps below.
1 Press [ ] to select “ ”.
≥ Turn off the connection of your device in advance.
2 While pressing
and holding
[DIMMER] on the
remote control,
press and hold [VOL s] on this system for
more than 4 sec.
≥ The current mode will be indicated by the
corresponding LED indicator.
3 While the current mode is indicated (about
10 sec), press [DIMMER] again.
≥ The setting changes each time [DIMMER] is pressed.
≥ The indicator for the selected setting blinks for 10 sec and
then exits the setting mode.
≥ The setting is maintained until it is changed again.
≥ Default setting of this function is "Mode 2".
Turning off VIERA Link (HDMI)
(HDAVI ControlTM)
You can turn off VIERA Link when, for example, operation
becomes unstable while a non-Panasonic HDMIcompatible device is connected.
While pressing and holding [MUTE] on the
remote control, press and hold [VOL s] on this
system for more than 4 sec.
≥ All the indicators will blink once when the volume limitation
is turned off.
Switching the AUX input mode
You can switch the AUX input mode (TV/Music) by
following the steps below. Select the “TV” mode to
connect to the TV, or select the “Music” mode to connect
to a music device, etc.
1 While pressing
and holding
[INPUT] on the
remote control,
press and hold [VOL s] on this system for
more than 4 sec.
≥ The current mode will be indicated by the
corresponding LED indicator.
2 While the current mode is indicated (about
20 sec), press [INPUT] again.
≥ The setting changes each time [INPUT] is pressed.
≥ The indicator for the selected setting blinks for 20 sec and
then exits the setting mode.
≥ Default setting of this function is “TV” mode.
Remote control code
When other Panasonic devices respond to this system’s
remote control, change the remote control code on this
system and the remote control.
Preparation
≥ Turn off all other Panasonic products.
≥ Turn on this system.
Change the remote control code to code 2:
1 Aim the remote control at this system’s remote
control sensor.
2 Press and hold [MUTE] and [VOL s] on the
remote control for more than 4 sec.
≥ All the indicators will blink for 10 sec when the code of
this system is changed.
≥ When VIERA Link (HDMI) is turned off, the ARC function
becomes unavailable. To select the TV as the source, be
sure to connect a stereo mini plug audio cable (not
supplied).
≥ To reset the setting, return to the factory preset. (> 13)
≥ Default setting of this function is “On”.
12
(12)
TQBS0132
≥ To change the remote control code to code 1, repeat the
steps above, but replace [VOL s]
with [VOL i].
Turning off the volume
limitation
If a state of the lowered volume disturbs you every time
this system turns on, for example, it is possible to turn off
this function as follows:
While pressing and holding [MUTE] on the
remote control, press and hold [VOL i] on this
system for more than 4 sec.
≥ All the indicators will blink once when the volume limitation
is turned off.
≥ Default setting of this function is “On”.
≥ To reset the setting, return to the factory preset. (> 13)
Reference
Operations
Reference
Troubleshooting
Before requesting service, make the following checks. If
you are in doubt about some of the check points, or if the
solutions indicated in the following guide do not solve the
problem, consult your dealer for instructions.
For further dedicated help, support and
advice about this system please visit:
http://av.jpn.support.panasonic.com/support/global/cs/
(This site is in English only.)
To return to the factory defaults.
While this system is on, press and hold [Í/I] on
this system for more than 4 sec.
(All the indicators will blink twice when this
system is reset.)
If this system does not operate as expected,
returning the settings to the factory defaults
may solve the problem.
The remote control code will return to “1” when
≥
this system is returned to the factory preset. To
change the remote control code, refer to page 12.
General operation
No power.
≥ Insert the AC mains lead securely. (> 7)
≥ If the indicators blink and this system turns off
immediately after you have turned it on, unplug the AC
mains lead and consult your dealer.
The remote control does not work properly.
≥ The battery is depleted. Replace it with a new one.
(> 6)
≥ It may be necessary to set the code of the remote
control again after changing the battery of the remote
control. (> 12)
≥ Use the remote control within the correct operation
range. (> 5)
≥ The remote control signal sensor may not receive
signals if exposed to direct sunlight or strong light from
an inverter fluorescent lamp.
≥ It is possible that the insulation sheet has not been
removed. Remove the insulation sheet. (> 6)
The “AUX” indicator keeps blinking fast.
Turn off this system and unplug the AC mains lead first,
and then consult your dealer. Describe the LED indicator
status when consulting the dealer.
This system is automatically switched to
standby mode.
“Auto Power Down” function is on.
This system will automatically switch to standby mode
when no signal is input and no operation is performed for
approx. 19 min and 30 sec. Refer to page 11 to turn this
function off.
This system does not operate correctly.
≥ Is the HDMI cable connected to the IN and OUT
terminals the other way around?
Turn off this system, and disconnect the AC mains lead
and reconnect the HDMI cable.
≥ If the AUX indicator blinks in a pattern of two blinks
followed by a pause three times, the remote control
code of this system is different from that of the remote
control. Set their remote control code again.
VIERA Link (HDMI) related operations no
longer function properly.
≥ This may occur when the HDMI connections are
changed, after a power failure or after the AC mains
lead has been removed. Try the following:
j After connecting the TV (VIERA) and this system with
an HDMI cable and turning on the TV (VIERA),
disconnect the AC mains lead of this system while
leaving the system turned on, and reconnect the AC
mains lead.
Sound / Image
The TV’s sound is not heard from this system.
No sound (or image) is output even after the
connected device starts playback.
≥ Turn muting off. (> 9)
≥ Check the connections to the other device. (> 7)
≥ Turn this system off and then on again.
≥ If this system is connected to a TV with an HDMI cable,
check that the TV’s HDMI terminal is labelled “HDMI
(ARC)”. If not, TV sound cannot be output from this
system. When using a TV with an HDMI terminal that is
not labelled “ARC”, connect the headphone/earphone
jack of the TV and the AUDIO IN (AUX IN) terminal
using a stereo mini plug audio cable (not supplied).
(> 8, “Using the AUDIO IN (AUX IN) terminal”)
≥ If this system is connected to a Panasonic TV (VIERA),
when you turn on this system by operating it directly,
sound may not be output from it. In this case, turn on
this system via VIERA Link by operating the remote
control of the TV (VIERA).
≥ If the connections are correct, there might be a problem
with the cables. Redo the connections with different
cables.
Check the audio output settings on the connected device.
≥
The volume is lowered when this system is
turned on.
If this system is turned off with the volume setting in the
greater half (above 50), this system will automatically
lower the volume to the middle (50) when this system is
turned on. (> 12)
TQBS0132
(13)
13
There is no audio.
The power of this system turns off
automatically.
(When this system detects a problem, a safety measure is
activated and this system automatically switches to
standby mode.)
≥ There is a problem with the amplifier.
≥ Is the volume extremely high?
If so, lower the volume.
≥ Is this system placed in an extremely hot place?
If so, move this system to a cooler place and wait a few
moments and then try to turn it on again.
≥ Depending on the combination of the TV and the
connected device used, when the TV is turned off and
on or the input is switched, audio may be temporarily
disabled.
≥ If the HDMI(BD) indicator and the HDMI(TV) indicator
light up and the AUX indicator keeps blinking,
HDCP 2.2 is not supported by the HDMI terminal or
setup of the TV. Refer to the operating instructions of
the TV for details.
License
The Bluetooth® word mark and logos are registered
trademarks owned by the Bluetooth SIG, Inc. and any use
of such marks by Panasonic Corporation is under license.
Other trademarks and trade names are those of their
respective owners.
The terms HDMI and HDMI High-Definition Multimedia
Interface, and the HDMI Logo are trademarks or registered
trademarks of HDMI Licensing Administrator, Inc. in the
United States and other countries.
HDAVI Control
Applicable to HDMI AV OUT (TV (ARC)) only
TM
is a trademark of Panasonic Corporation.
Bluetooth
®
Pairing cannot be done.
Check the Bluetooth® device condition.
The device cannot be connected.
≥ The pairing of the device was unsuccessful or the
registration has been replaced. Try pairing the device
again. (> 11 )
≥ This system might be connected to a different device.
Disconnect the other device and try pairing the device
again.
The device is connected but audio cannot be
heard through this system.
For some built-in Bluetooth® devices, you have to set the
audio output to “SC-SB1” manually. Read the operating
instructions for the device for details.
The sound is interrupted.
≥ The device is out of the 10 m communication range.
Bring the Bluetooth
≥ Remove any obstacle between this system and the
device.
≥ Other devices that use the 2.4 GHz frequency band
(wireless router, microwaves, cordless phones, etc.) are
interfering. Bring the Bluetooth
system and distance it from the other devices.
®
device closer to this system.
®
device closer to this
For DTS patents, see http://patents.dts.com.
Manufactured under license from DTS Licensing Limited.
DTS, the Symbol, & DTS and the Symbol together are
registered trademarks of DTS, Inc.
© DTS, Inc. All Rights Reserved.
Dolby, Dolby Audio, and the double-D symbol are
trademarks of Dolby Laboratories.
14
(14)
TQBS0132

Reference
Specifications
AMPLIFIER SECTION
RMS output power (non-simultaneous drive)
Front ch (L, R ch)
10 W per channel (1 kHz, 10 %, 6 ≠)
Subwoofer ch
20 W (100 Hz, 10 %, 3 ≠)
Total RMS output power
SPEAKER SECTION
Front speakers (Built-in, L/R)
Full range
4 cm cone type k 1/ch
Twe ete r
1.4 cm dome type k 1/ch
Impedance (Total)
Subwoofers (Built-in)
Woofer
8 cm cone type k 1
Impedance (Total)
Passive radiator
Bluetooth® SECTION
Bluetooth® system specification
Bluetooth
Wireless equipment classification
Supported profiles
Supported codec
Frequency band
Operating distance
Approx. 10 m Line of sight
®
Ver. 2.1+EDR
2.4 GHz band FH-SS
TERMINALS SECTION
HDAVI Control
This unit supports “HDAVI Control 5” function.
HDMI AV input (BD/DVD) 1
Input connector type A (19 pin)
HDMI AV output (TV (ARC)) 1
Output connector type A (19 pin)
For update only 1
AUX input 1
Terminal type ‰ 3.5 mm Stereo mini
40 W
6 ≠
3 ≠
8cm k2
Class 1
A2DP
SBC
Sampling frequency
(HDMI ARC) 32 kHz, 44.1 kHz, 48 kHz
(HDMI) 32 kHz, 44.1 kHz, 48 kHz,
88.2kHz, 96kHz,
176.4 kHz, 192 kHz
Audio format
(BD/DVD)
Linear PCM (2 ch)
(TV (ARC))
Linear PCM (2 ch),
Dolby Digital / DTS (Bitstream)
GENERAL
Power supply
DC 12 V 4 A
AC adaptor
AC 220 V to 240 V, 50/60 Hz
Power consumption
Approx. 11 W
Power consumption in standby mode
When “Network Standby”* is “OFF”
Approx. 0.3 W
When “Network Standby”* is “ON”
Approx. 0.5 W
Dimensions (WkHkD)
Approx. 430 k52 k130 mm
(including the projecting parts)
Approx. 431 k52 k132 mm
Mass
Approx. 1.8 kg
Operating temperature range
o
C to r40oC
0
Operating humidity range
20 % to 80 % RH (no condensation)
* “Network Standby” means “Bluetooth® Standby” and
“VIERA Link”.
≥ Specifications are subject to change without notice.
≥ Mass and dimensions are approximate.
≥ Total harmonic distortion is measured by a digital spectrum
analyzer.
TQBS0132
(15)
15
Inhaltsverzeichnis
Vorsichtsmaßnahmen
WARNUNG
Gerät
≥ Zur Reduzierung der Gefahr von Brand, elektrischem
Schlag und Beschädigung:
j Setzen Sie dieses Gerät weder Regen, noch
Feuchtigkeit, Tropfen oder Spritzern aus.
j Stellen Sie keine mit Flüssigkeiten gefüllten Gefäße,
wie Vasen, auf dieses Gerät.
Ausschliesslich das empfohlene Zubehör verwenden.
j
j Entfernen Sie die Abdeckungen nicht.
Reparieren Sie dieses Gerät nicht selbst. Wenden Sie
j
sich zur Wartung an qualifiziertes Kundendienstpersonal.
Netzkabel
≥ Zur Reduzierung der Gefahr von Brand, elektrischem
Schlag und Beschädigung:
j Gewährleisten Sie, dass die Spannung der
Stromversorgung dem auf diesem Gerät
angegebenen Wert entspricht.
Fügen Sie den Netzstecker vollständig in die Steckdose ein.
j
j
Ziehen Sie nicht an der Leitung, knicken Sie sie nicht
und stellen Sie keine schweren Gegenstände darauf.
j
Fassen Sie den Stecker nicht mit nassen Händen an.
j Fassen Sie den Stecker beim Herausziehen an
seinem Korpus an.
j Verwenden Sie keinen Netzstecker und keine
Steckdose, die beschädigt sind.
≥ Der Netzstecker ist das trennende Gerät.
Installieren Sie dieses Gerät so, dass der Netzstecker
sofort aus der Wandsteckdose gezogen werden kann.
Knopfzelle (Lithium-Batterie)
≥
Brand-, Explosions- und Verbrennungsgefahr! Nicht aufladen,
zerlegen, auf mehr als 60
WARNUNG
DIE BATTERIE DARF NICHT
VERSCHLUCKT WERDEN, ES
BESTEHT CHEMISCHE
VERBRENNUNGSGEFAHR
Dieses Produkt enthält eine Münz-/Knopfzellenbatterie.Ein
Verschlucken von Knopfzellenbatterien kann innerhalb von
nur 2 Stunden zu schweren inneren Verbrennungen und in
der Folge zum Tod führen. Bewahren Sie neue sowie
gebrauchte Batterien außerhalb der Reichweite von Kindern
auf. Wenn das Batteriefach sich nicht zuverlässig schließen
lässt, verwenden Sie das Produkt nicht länger und bewahren
es außerhalb der Reichweite von Kindern auf. Wenn Sie
vermuten, dass Batterien verschluckt oder anderweitig in den
Körper gelangt sein könnten, nehmen Sie sofort ärztliche
Hilfe in Anspruch.
TQBS0132
(16)
2
x
C erhitzen oder in ein Feuer werfen.
ACHTUNG
Gerät
≥ Stellen Sie keine Quellen offener Flammen, z.B.
brennende Kerzen, auf das Gerät.
Dieses Gerät kann beim Betrieb Hochfrequenzstörungen
≥
auffangen, die durch die Benutzung von Mobiltelefonen
verursacht werden. Sollte eine solche Störung
festgestellt werden, sollte das Handy in größerer
Entfernung zu diesem Gerät betrieben werden.
≥ Dieses Gerät ist für den Betrieb in Ländern mit
gemässigtem Klima bestimmt.
≥ Die Produktkennzeichnung befindet sich auf der
Rückseite des Geräts.
Aufstellung
≥ Stellen Sie dieses Gerät auf eine ebene Oberfläche.
≥ Zur Reduzierung der Gefahr von Brand, elektrischem
Schlag und Beschädigung:
j Installieren oder positionieren Sie dieses Gerät nicht
in einem Bücherregal, Einbauschrank oder einem
sonstigen engen Raum. Stellen Sie eine gute
Belüftung des Gerätes sicher.
Achten Sie darauf, die Entlüftungsschlitze des Gerätes
j
nicht durch Gegenstände aus Papier oder Stoff zu
blockieren, z.B. Zeitungen, Tischdecken und Vorhänge.
j Setzen Sie dieses Gerät keinem direkten
Sonnenlicht, hohen Temperaturen, starker
Feuchtigkeit und übermäßigen Erschütterungen aus.
≥ Platzieren Sie dieses Gerät und andere Geräte (Blu-
ray-Disc-Rekorder, externe Festplatten usw.) nicht
direkt aufeinander. Ansonsten kann es zu
Beschädigungen an Festplatten/Daten kommen.
Knopfzelle (Lithium-Batterie)
≥ Explosionsgefahr bei falschem Anbringen der Batterie.
Ersetzen Sie die Batterie nur durch den vom Hersteller
empfohlenen Typ.
≥ Mit richtiger Ausrichtung der Pole einlegen.
≥ Der Missbrauch der Batterien kann zu einem
Auslaufen von Elektrolyt und einem Brand führen.
j Entfernen Sie die Batterien, wenn Sie die
Fernbedienung über längere Zeit nicht benutzen.
Bewahren Sie sie an einem kühlen, dunklen Ort auf.
Niemals starker Hitze oder offenem Feuer aussetzen.
j
j Lassen Sie die Batterie(n) nie längere Zeit in einem
Auto mit geschlossenen Türen und Fenstern zurück,
das direkter Sonneneinstrahlung ausgesetzt ist.
≥ Wenden Sie sich zur Entsorgung der Batterien an die
lokalen Behörden oder erfragen Sie die richtige
Vorgehensweise zur Entsorgung.
Netzadapter
≥ Der Netzadapter kann mit Wechselstrom zwischen
220 V und 240 V betrieben werden. Verwenden Sie
aber einen geeigneten Steckeradapter, wenn der
Stecker nicht in die Netzsteckdose passt.

Vorsichtsmaßnahmen
DEUTSCH
Über Bluetooth
Panasonic übernimmt keine Verantwortung für
Daten und/oder Informationen, die während einer
drahtlosen Übertragung gefährdet sind.
®
∫ Verwendetes Frequenzband
Dieses System verwendet das 2,4 GHz Frequenzband.
∫ Zertifizierung dieses Geräts
≥ Dieses System entspricht den
Frequenzbeschränkungen und wurde gemäß dem
Frequenzrecht zertifiziert. Daher ist keine
Drahtlosgenehmigung erforderlich.
≥ Die unten genannten Handlungen sind in einigen
Ländern strafbar:
j Ein Auseinanderbauen oder Modifizieren des Geräts.
j Ein Entfernen der Spezifikationskennzeichnungen.
∫ Nutzungsbeschränkungen
≥ Die drahtlose Übertragung und/oder Nutzung mit allen
mit Bluetooth
garantiert werden.
≥ Alle Geräte müssen den durch Bluetooth SIG, Inc.
festgelegten Standards entsprechen.
Je nach Spezifikationen und Einstellungen eines Gerätes,
≥
kann die Verbindung unter Umständen nicht hergestellt
werden, oder einige Funktionen können sich unterscheiden.
≥ Dieses System unterstützt Bluetooth®-
Sicherheitsfunktionen. Aber je nach Betriebsumgebung
und/oder Einstellungen, ist diese Sicherheit
möglicherweise nicht ausreichend. Übertragen Sie mit
Vorsicht drahtlos Daten an dieses System.
≥ Dieses System kann keine Daten an ein Bluetooth
Gerät übertragen.
®
ausgerüsteten Geräten kann nicht
∫ Einsatzbereich
Verwenden Sie dieses Gerät bei einer maximalen
Reichweite von 10 m.
Die Reichweite kann je nach Umgebung, Hindernissen
oder Interferenzen, abnehmen.
∫ Interferenz von anderen Geräten
≥ Dieses System funktioniert aufgrund von
Funkwelleninterferenzen möglicherweise nicht korrekt,
oder es können Störungen wie Rauschen und
Tonsprünge auftreten, wenn dieses System zu nahe an
anderen Bluetooth
ist, die das 2,4 GHz-Band verwenden.
≥ Dieses System könnte nicht korrekt funktionieren, wenn
die Funkwellen einer nahe gelegenen Sendestation,
etc. zu stark sind.
®
-Geräten oder Geräten aufgestellt
∫ Verwendungszweck
≥ Dieses System ist nur für den normalen, allgemeinen
Gebrauch gedacht.
≥ Verwenden Sie dieses System nicht in der Nähe von
Geräten oder in einer Umgebung, die gegenüber
hochfrequenten Störungen empfindlich ist (Beispiel:
Flughäfen, Krankenhäuser, Labors, etc).
®
-
TQBS0132
(17)
3

Inhaltsverzeichnis
Vorsichtsmaßnahmen .................. 2
Über Bluetooth
Vor dem Gebrauch
Zubehörteile .................................. 4
Pflege des Geräts ......................... 4
Benutzung der
Bedienelemente ........................ 5
Dieses System (Vorderseite/Seiten)...... 5
Dieses System (Rückseite) ................... 5
Fernbedienung ...................................... 6
®
............................ 3
Vor dem Gebrauch
Zubehörteile
Überprüfen Sie vor der Nutzung dieses Systems
das mitgelieferte Zubehör.
∏ 1 Fernbedienung (mit Batterie)
(N2QAYC000119)
∏ 1 Netzkabel
∏ 1 Netzadapter
≥ Stand der Produktnummern: April 2017. Änderungen
vorbehalten.
≥ Verwenden Sie das Netzkabel und den Netzadapter
nicht mit anderen Geräten.
≥ Verwenden Sie ausschließlich das mitgelieferte
Netzkabel und den mitgelieferten Netzadapter.
Inbetriebnahme
Anschlüsse.................................... 7
Vorgänge
Verwendung dieses Systems ...... 9
Verknüpfter Betrieb mit dem
Fernseher
(VIERA Link
“HDAVI Control
Bluetooth
®
-Verbindung.............. 11
TM
”)................ 10
Erweiterte Bedienvorgänge ....... 11
Referenz
Fehlerbeseitigung....................... 13
Lizenz........................................... 14
Technische Daten....................... 15
≥ Die gezeigten Abbildungen können sich von
Ihrem Gerät unterscheiden.
≥ Die Bedienvorgänge in dieser
Bedienungsanleitung werden überwiegend
mit Fernbedienung beschrieben. Sie
können die Bedienvorgänge jedoch auch an
diesem System ausführen, indem Sie die
entsprechenden Bedienelemente
verwenden.
Pflege des Geräts
∫ Reinigen Sie dieses System mit einem
weichen, trockenen Tuch
≥ Wringen Sie bei starker Verschmutzung ein mit Wasser
angefeuchtetes Tuch fest aus, um den Schmutz
abzuwischen und wischen Sie dann mit einem
trockenen Tuch nach.
≥ Verwenden Sie zur Reinigung dieses Systems niemals
Alkohol, Farbverdünnungsmittel oder Benzin.
≥ Bevor Sie ein chemisch behandeltes Tuch benutzen,
lesen Sie bitte die Gebrauchsanweisung des Tuches
sorgfältig durch.
∫ Entsorgung oder Weitergabe des
Systems
Dieses Gerät behält die Benutzereinstellungsdaten
möglicherweise bei. Führen Sie also, wenn Sie dieses
System entsorgen oder weitergeben, den Vorgang zum
Zurücksetzen auf die Werkseinstellungen und Löschen
der Benutzereinstellungen aus.
(> 13, “Zurücksetzen auf die Werkseinstellungen.”)
≥ Der Bedienungsverlauf wird möglicherweise im
Speicher dieses Systems aufgezeichnet.
TQBS0132
(18)
4

Vorsichtsmaßnahmen
Vor dem GebrauchInbetriebnahmeVorgängeReferenz
Benutzung der Bedienelemente
5
1
2
3
4
5
1 2 43
6
Dieses System (Vorderseite/Seiten)
1 LED-Anzeigen
Das aktuell ausgewählte Gerät wird angezeigt, indem
die entsprechende Anzeige leuchtet.
A (Bluetooth®)-Anzeige (leuchtet blau)
B HDMI(BD)-Anzeige (leuchtet grün)
C HDMI(TV)-Anzeige (leuchtet grün)
D AUX-Anzeige (leuchtet grün)
2 Bereitschafts-/Ein-Schalter (Í/I)
Drücken Sie diese Taste, um das Gerät ein- oder in den
Stand-by-Modus zu schalten. Auch im Stand-by-Modus
verbraucht das Gerät eine geringe Menge Strom.
Dieses System (Rückseite)
1 DC IN (12 V)-Anschluss
2 Anschluss für Firmware-Updates
(UPDATE DC 5 V 500 mA)*
3 AUDIO IN-Anschluss (AUX IN)
* Hinweis zu Firmware-Updates
Verwenden Sie den Anschluss für Firmware-Updates, um die Version dieses Systems über ein
USB-Speichergerät zu aktualisieren. (Wird bei normalen Bedienvorgängen nicht verwendet.)
Weitere Informationen zu Aktualisierungen der Version finden Sie auf der unten genannten SupportWebsite.
http://av.jpn.support.panasonic.com/support/global/cs/
(Diese Site ist nur auf Englisch verfügbar.)
3 Passen Sie die Lautstärke dieses Systems an (>9)
4 [INPUT / j PAIRING]-Taste
≥ Das angeschlossene Gerät wird ausgewählt
(Das Gerät wird mit jedem Druck auf diese
Taste geändert)
≥ Es werden Bluetooth
5 Fernbedienungssensor
Reichweite:
Winkel: Winkel: Ca. 20e nach oben und unten,
4 Belüftungsöffnungen
5 HDMI AV OUT (TV (ARC))-Anschluss
6 HDMI AV IN (BD/DVD)-Anschluss
Ca. 7 m direkt von vorne
ca. 30e nach links und rechts
®
-Geräte registriert
TQBS0132
(19)
5
Fernbedienung
ュリヮヮユン
ヴヶャヸヰヰョユン
ヮヶヴリヤ ヷヰリヤユ
ヴヵモワュモンュ
ヤリワユヮモ
5
7
6
9
8
1
2
3
4
Niedrigste
Höchste
"Level 1"
"Level 2"
“Auto”
"Aus”
1 Dieses System ein- oder ausschalten (> 9)
2 Wählen Sie die Eingangsquelle (> 9)
"HDMI(BD)" --# "HDMI(TV)" --# "AUX"
^----------- “ ” (Bluetooth
3 Wählen Sie das Bluetooth
(> 9)
4 Hiermit wird der Sound-Modus ausgewählt.
(> 9)
5 Passen Sie den Bass (in vier Schritten) an.
®
) -----------}
®
-Gerät als Quelle
≥ Wenn für ca. 10 Sek. kein Bedienvorgang erfolgt
oder eine andere Taste als [i SUBWOOFER],
[SUBWOOFER j] oder [DIMMER] gedrückt wird,
kehren die Anzeigen zum normalen Status zurück.
(Wenn die Bassfrequenzen versehentlich
angepasst werden, wenn [i SUBWOOFER] oder
[SUBWOOFER j] gedrückt wird, führen Sie die
Schritte ab Schritt 1 erneut aus.)
∫ Vor dem ersten Gebrauch
Entfernen Sie die Isolierfolie A.
∫ Austauschen einer Knopfbatterie
Batterietyp: CR2025 (Lithium-Batterie)
6 Passen Sie die Helligkeit der LED-Anzeigen an.
7 Passen Sie die Lautstärke dieses Systems an
(> 9)
8 Stummschalten (> 9)
9 Passen Sie die Verzögerung zwischen Video
und Audio an.
1 Drücken Sie [AUDIO DELAY] auf der
Fernbedienung.
≥ Der aktuelle Modus wird von der entsprechenden
LED-Anzeige angezeigt.
2 Wenn der aktuelle Modus angezeigt wird (ca.
10 Sek.), drücken Sie [i SUBWOOFER] oder
[SUBWOOFER j].
≥ Die Einstellung wird mit jedem Druck auf
[i SUBWOOFER] in der folgenden Reihenfolge
geändert
(in umgekehrter Reihenfolge, wenn
[SUBWOOFER j] gedrückt wird):
"Auto" --# "Aus" --# "Level 1" --# "Level 2"”
TQBS0132
(20)
6
≥ Setzen Sie die Knopfbatterie mit der
(i)-Markierung nach oben zeigend ein.
≥ Die Symbole auf der mitgelieferten
Fernbedienung haben die folgenden
Bedeutungen:
Warnung (lesen Sie die Bedienungsanleitung der
Knopfzellenbatterie)

Inbetriebnahme
Vor dem Gebrauch
Inbetriebnahme
HDMI IN
(ARC)
HDMI IN (ARC)
HDMI OUT
≥
Achten Sie darauf, die Verbindung am
zum ARC kompatiblen Anschluss des
Fernsehers herzustellen.
TV
Was ist ARC?
ARC ist die Abkürzung von "Audio Return
Channel", auch bekannt als HDMI ARC. Es bezieht
sich auf eine der HDMI-Funktionen. Wenn Sie den
"ARC"-Anschluss und dieses System verbinden,
können Fernsehbilder und Audio über ein einziges
HDMI-Kabel übertragen werden.
HDMI-Kabel
(nicht mitgeliefert)
HDMI-Kabel
(nicht mitgeliefert)
Dieses System
(Rückseite)
Blu-ray-Disc-Rekorder/
-Player
An eine
Netzsteckdose
Netzadapter
(mitgeliefert)
Netzkabel
(mitgeliefert)
Anschlüsse
≥Schalten Sie vor dem Anschluss alle Geräte aus, und lesen Sie die betreffenden
Bedienungsanleitungen durch.
Schließen Sie das Netzkabel erst dann an die Steckdose an, wenn alle anderen Anschlüsse
erfolgt sind.
≥ Erwerben Sie ein HDMI-Kabel, das als "High-Speed HDMI Cable" eingestuft wurde. Der Betrieb ist
nur mit Kabeln möglich, die den HDMI-Standards genügen.
Dieses System unterstützt 3D-Inhalte.
≥ Sie können einen 3D-kompatiblen Fernseher und einen 3D-kompatiblen Blu-ray-Disc-Rekorder/-
Player an dieses System anschließen und spektakuläre 3D-Bilder von handelsüblichen Blu-rayDiscs und anderen Speichermedien genießen.
Dieses System unterstützt die HDR-Übertragung (High Dynamic Range) von 4K-Signalen (50p/60p).
≥ Es ist ein HDMI-Kabel erforderlich, das 18 Gbps unterstützt, um 4K (50p/60p)-HDR-Inhalte
wiederzugeben.
≥ Sie können einen 4K-kompatiblen Fernseher und einen 4K-kompatiblen Blu-ray-Disc-Rekorder/-
Player an dieses System anschließen und glatte HD-Bilder auch auf einem großen Bildschirm
genießen. (Es sind zwei HDMI-Kabel erforderlich, die 18 Gbps unterstützen.)
≥Platzieren Sie dieses System nicht auf anderen Geräten wie Blu-ray-Disc-Rekordern.
≥Halten Sie magnetisierte Gegenstände fern. Magnetkarten, Uhren usw. können beschädigt werden,
wenn sie zu nahe an diesem Gerät platziert werden.
≥Das Gerät befindet sich im Standby-Modus, wenn der Netzadapter angeschlossen wird. Der
Primärkreis ist immer aktiv, so lange der Netzadapter an eine Steckdose angeschlossen ist.
≥Dieses System verbraucht auch eine geringe Menge Strom (> 15), wenn es ausgeschaltet ist. Ziehen
Sie, im Interesse der Energieeinsparung, den Stecker aus der Netzsteckdose, wenn Sie das System
für eine lange Zeit nicht verwenden.
≥Die Symbole auf dem mitgelieferten Netzadapter haben die folgenden Bedeutungen:
Wechselstrom
Gleichstrom
Gerät der Klasse II (doppelt isoliert konstruiert)
TQBS0132
(21)
7
∫ Ändern der Einstellungen des Fernsehers
Dieses System
(Rückseite)
Stereo-Ministecker-Audiokabel
(nicht im Lieferumfang enthalten)
Anzuschließendes Gerät
Kopfhörer-/
Ohrhörerbuchse
Sie müssen die Einstellungen des Fernsehers ändern, um dieses System und den Fernseher über ein
HDMI-Kabel zu verbinden und Sound korrekt über dieses System wiederzugeben. Bei den folgenden
Anweisungen wurde ein Fernseher von Panasonic (VIERA) als Beispiel verwendet.
≥Die Bedienschritte und die angezeigten Namen variieren je nach Fernseher (VIERA). Einzelheiten
finden Sie in der (elektronischen) Bedienungsanleitung des Fernsehers (VIERA).
1 Verbinden Sie dieses System und den Fernseher über ein HDMI-Kabel. (> 7)
≥ Wenn dieses System und der Fernseher verbunden sind, schalten Sie sie ein.
2 Stellen Sie das Ausgabeziel des Fernseher-Sounds auf "Heimkino" ein.
≥ Bedienungsbeispiel:
Drücken Sie [Apps], wählen Sie "VIERA Link" aus und stellen Sie "Lautsprecher Auswahl" auf "Heimkino" ein.
≥ Vergewissern Sie sich, dass die VIERA Link-Einstellung an beiden Geräten eingeschaltet ist.
≥ Führen Sie außerdem die oben genannten Schritte aus, wenn ein neues Gerät hinzugefügt, der Fernseher erneut
angeschlossen oder die Standardeinstellungen wiederhergestellt wurden.
Verwenden des AUDIO IN (AUX IN)-Anschlusses
Sie können dieses Gerät auch über ein Stereo-Ministecker-Audiokabel (nicht im Lieferumfang enthalten)
anschließen.
Stellen Sie den Eingang dieses Systems auf "AUX" ein.
≥ Verwenden Sie ein HDMI-Kabel (nicht im Lieferumfang enthalten),. um einen Blu-ray-Disc-Rekorder/-Player
anzuschließen.
≥ Wenn ein Stereo-Ministecker-Audiokabel (nicht im Lieferumfang enthalten) angeschlossen wird, können
hochauflösende Soundquellen in CD-Klangqualität wiedergegeben werden.
≥ Die VIERA Link-Funktion dieses Systems (> 10, “Verknüpfter Betrieb mit dem Fernseher (VIERA Link “HDAVI
TM
”)”) kann nicht verwendet werden.
Control
Weitere Informationen zu anderen Anschlussmethoden finden Sie auf der unten genannten Support-
http://av.jpn.support.panasonic.com/support/global/cs/
(Diese Site ist nur auf Englisch verfügbar.)
TQBS0132
(22)
8
Website.

Inbetriebnahme
Vorgänge
Vorgänge
ュリヮヮユン
ヴヶャヸヰヰョユン
ヮヶヴリヤ ヷヰリヤユ
ヴヵモワュモンュ
ヤリワユヮモ
1
2
Verwendung dieses
Systems
Vorbereitung
≥ Schalten Sie den Fernseher und/oder das
angeschlossene Gerät an.
1 Drücken Sie [Í], um dieses System
einzuschalten.
2 Wählen Sie die Quelle.
Drücken
Sie
[INPUT]
[] “ ” (Bluetooth
∫ Wenn “ ” als Quelle gewählt ist
Am Bluetooth®-Gerät:
Wählen Sie dieses System als Ausgangsquelle
des angeschlossenen Bluetooth
beginnen Sie die Wiedergabe.
Zur Auswahl von
“
HDMI(BD)” # “HDMI(TV)” # “AUX
^------- “ ” (Bluetooth®) !------}
®
)
®
-Geräts und
∫ Einstellen der Lautstärke des Systems
Drücken Sie [i VOL j].
≥ Jeder Eingangsmodus behält eine eigene
Lautstärkeneinstellung bei.
∫ Auswählen eines Sound-Modus
Sie können den Sound-Modus mit der
entsprechenden Taste auswählen.
≥ Vergewissern Sie sich, dass die HDMI(TV)- und die AUX-
Anzeige zweimal blinken.
MUSIC: Verbessert den Ton von
Musikinstrumenten und Liedern.
VOICE: Verstärkt die Stimmen der Sprecher bei
Nachrichten und Sportkommentaren.
CINEMA: Erzeugt einen kräftigen,
dreidimensionalen Ton für Filme.
STANDARD: Bestens für dramatische Filme und
Unterhaltungsshows geeignet.
”
∫ Stummschalten
Drücken Sie [MUTE].
≥ Während der Stummschaltung blinken HDMI(BD)-,
HDMI(TV)- und AUX-Anzeige gleichzeitig.
≥ Drücken Sie die Taste erneut, um abzubrechen oder regeln
Sie die Lautstärke.
≥ Die Stummschaltung wird abgebrochen, wenn dieses
System ausgeschaltet wird.
∫ Wenn “HDMI(BD)” als Quelle gewählt
ist
Schalten Sie den Fernseher und das
angeschlossene Gerät ein:
Wählen Sie den TV-Eingang für dieses System
und starten Sie die Wiedergabe am
angeschlossenen Gerät.
Funktioniert dieses System nicht wie erwartet oder ist der Ton ungewöhnlich, kann durch ein
Rücksetzen der Einstellungen auf die Werkseinstellungen das Problem behoben werden.
(> 13, “Zurücksetzen auf die Werkseinstellungen.”)
Wenn das Problem weiterhin besteht: (> 13, “Audio/Bild”)
≥
Kommt Sound aus den Lautsprechern des Fernsehers, verringern Sie die Lautstärke des Fernsehers auf das Minimum.
≥ Die maximalen Lautstärkepegel von Fernseher und diesem System können sich unterscheiden.
Wechseln Sie den Eingang des Fernsehers zum Fernseher-Tuner, um den Fernseher als Video- und Audioquelle
≥
auszuwählen, während eine Wiedergabe vom an den HDMI AV OUT (TV (ARC))-Anschluss angeschlossene Gerät erfolgt.
Wenn außerdem VIERA Link (HDMI) ausgeschaltet ist, wechseln Sie den Eingang dieses Systems in den TV-Modus.
≥ Um den Fernseher als Audioquelle auszuwählen, während eine Wiedergabe vom Gerät erfolgt, das an den AUDIO
IN (AUX IN)-Anschluss angeschlossen ist, wechseln Sie den Eingang des Fernsehers zum TV-Tuner.
TQBS0132
(23)
9

Verknüpfter Betrieb mit dem Fernseher
TM
(VIERA Link “HDAVI Control
Was ist VIERA Link “HDAVI
Control”?
VIERA Link “HDAVI Control” ist eine
nützliche Funktion, die eine Verknüpfung
der Bedienung dieses Geräts mit einem
Panasonic-Fernsehgerät (VIERA) unter
“HDAVI Control” bietet.
Sie können diese Funktion verwenden,
indem Sie die Geräte über ein HDMI-Kabel
anschließen. Einzelheiten zur Bedienung
finden Sie in der Betriebsanleitung der
angeschlossenen Geräte.
Möglichkeiten von
“HDAVI Control”
Um sicherzustellen, dass die Audioausgabe über
dieses System erfolgt, schalten Sie dieses System
mit der TV-Fernbedienung ein und wählen Sie
über das Lautsprechermenü im Menü VIERA Link
die Heimkino-Option aus.
Die Verfügbarkeit und die Funktion der
Einstellungen kann je nach Fernseher variieren.
Siehe in der Bedienungsanleitung des Fernsehers
für Details.
∫ Lautsprechersteuerung
Mithilfe der TV-Menüeinstellungen können Sie
auswählen, ob die Tonausgabe über dieses Gerät
oder die TV-Lautsprecher erfolgen soll.
Heimkino
Dieses System ist aktiv.
≥ Wenn sich dieses System im Standby-Modus befindet,
wird durch Wechseln der TV-Lautsprecher zu diesem
System im VIERA Link-Menü dieses System
automatisch eingeschaltet.
≥ Sie können die Lautstärkeeinstellung dieses Systems
mithilfe der Lautstärke- oder Stummschalt-Taste auf der
Fernbedienung des Fernsehers regeln.
≥ Wenn Sie dieses System ausschalten, werden die TV-
Lautsprecher automatisch aktiviert.
≥ Der Ton wird automatisch von diesem System ausgegeben,
wenn der Fernseher zu VIERA Link “HDAVI Control 4” oder
einer neueren Version kompatibel ist.
TV
TV-Lautsprecher sind aktiviert.
VIERA Link
”)
∫ Automatische Eingangsumschaltung
Wenn die folgenden Bedienvorgänge ausgeführt
werden, wechselt dieses System automatisch zur
entsprechenden Eingangsquelle.
jBei Beginn der Wiedergabe auf einem an die
HDMI-Schnittstelle angeschlossenen Gerät.*
jWenn der Fernsehereingang gewechselt wird
* Wenn die Ausgangseinstellung der Lautsprecher am
Fernseher auf dieses System eingestellt ist, werden
Fernseher und dieses System automatisch eingeschaltet
(Einschaltautomatik).
∫ Ausschalt-Link
Wenn der Fernseher ausgeschaltet wird, so wird
dieses System automatisch ausgeschaltet. (Diese
Funktion ist nicht aktiv, wenn Bluetooth
genutzt wird.)
∫ Automatische Lippen-
Synchronisation
(HDAVI Control 3 oder später)
Eine Verzögerung zwischen Ton und Bild wird
automatisch durch Hinzufügen eines Zeitlochs bei
der Tonausgabe korrigiert, wodurch Sie einen
störungsfreien zum Bild vernehmen.
≥ Bei Fernsehgeräten, die kompatibel mit dem VIERA
Link “HDAVI Control 3” oder später sind, erfolgt die
Verzögerungseinstellung automatisch und der VIERA
Link wird auf Ein eingestellt.
≥ VIERA Link “HDAVI Control”, beruht auf den
Steuerungsfunktionen von HDMI, wobei es sich um einen
Industriestandard namens HDMI CEC (Consumer
Electronics Control) handelt, und ist eine von uns eigens
entwickelte und hinzugefügte Funktion. Deshalb kann ihr
Betrieb bei Geräten anderer Hersteller, die HDMI CEC
unterstützen, nicht gewährleistet werden.
≥ Dieses Gerät unterstützt die Funktion “HDAVI Control 5”.
“HDAVI Control 5” ist der Standard für die zu Panasonics
HDAVI Control kompatible Ausstattung. Diese Norm ist mit
bisherigen HDAVI-Geräten von Panasonic kompatibel.
≥ Angaben zu Geräten anderer Hersteller, welche die VIERA
Link-Funktion unterstützen, können Sie den jeweiligen
Handbüchern entnehmen.
®
als Quelle
10
(24)
TQBS0132

Vorgänge
Bluetooth®-Verbindung
“Ein” “Aus”
“Ein” “Aus”
Durch Verwendung der Bluetooth® Verbindung
können Sie drahtlos Sound vom Bluetooth
Audiogerät mit diesem Gerät anhören.
≥ Weitere Informationen zur Verbindung eines Bluetooth®-
Geräts finden Sie in der Bedienungsanleitung des
®
Bluetooth
-Geräts.
Vorbereitung
≥
Schalten Sie die Bluetooth®-Funktion des Geräts ein
und bringen Sie das Gerät in die Nähe des Systems.
Bluetooth®-Verbindung
1 Drücken Sie [ ] zur Auswahl von “ ”.
≥ Blinkt die “ ”-Anzeige schnell, begeben Sie sich zu
Schritt 3.
2 Drücken und halten Sie [ ] bis die “ ”-
Anzeige schnell blinkt.
≥ Blinkt die “ ”-Anzeige langsam, wiederholen Sie
Schritt 2.
3 Wählen Sie “SC-SB1” aus dem Bluetooth
Menü des Bluetooth
≥
Wenn Sie zur Eingabe des Zugangsschlüssels am
®
Bluetooth
≥ Sobald das Bluetooth®-Gerät angeschlossen ist, hört
-Gerät aufgefordert werden, geben Sie “0000” ein.
die “ ”-Anzeige auf zu blinken und leuchtet auf.
®
-Geräts.
≥ Mit diesem System können Sie bis zu 8 Geräte registrieren.
Wird ein 9. Gerät angekoppelt, wird das Gerät, das am
längsten nicht verwendet wurde, ersetzt.
Anschluss eines gekoppelten
Bluetooth®-Geräts
1 Drücken Sie [ ] zur Auswahl von “ ”.
≥ Leuchtet die “ ”-Anzeige auf, ist bereits ein
2 Wählen Sie “SC-SB1” aus dem Bluetooth
Menü des Bluetooth®-Geräts.
∫ Abtrennen eines Bluetooth®-Geräts
Halten Sie [ ] gedrückt, bis die " "-Anzeige zu
blinken beginnt.
®
Bluetooth
Dieses abtrennen.
-Gerät an dieses System angeschlossen.
(>unterhalb)
®
®
®
Erweiterte
Bedienvorgänge
Auto Power Down-Funktion
Dieses System wird automatisch ausgeschaltet, wenn ca.
19 Min. und 30 Sek. lang kein Audioeingang und kein
Bedienvorgang erfolgt.
1 Halten Sie
[i SUBWOOFER]
auf der
Fernbedienung gedrückt und drücken Sie
währenddessen [VOL s] an diesem System
länger als 4 Sek.
≥ Der aktuelle Modus wird von der entsprechenden LED-
Anzeige angezeigt.
2 Wenn der aktuelle Modus angezeigt wird
(ca. 20 Sek.), drücken Sie [i SUBWOOFER]
noch einmal.
≥ Die Einstellung ändert sich jedes Mal, wenn
[i SUBWOOFER] gedrückt wird.
≥ Die Anzeige für die gewählte Funktion blinkt 20 Sekunden
lang und der Einstellungsmodus wird anschließend
beendet.
-
≥ Die Einstellung wird bis zu einer erneuten Veränderung
beibehalten.
≥ Die Standardeinstellung dieser Funktion lautet "Ein".
Bluetooth®-Standby
Mithilfe dieser Funktion können Sie ein gekoppeltes
®
Bluetooth
im Standby-Modus befindet.
1 Halten Sie
2 Wenn der aktuelle Modus angezeigt wird
-
≥ Die Einstellung ändert sich jedes Mal, wenn
≥ Die Anzeige für die gewählte Funktion blinkt 20 Sekunden
≥ Die Einstellung wird beibehalten, bis diese wieder geändert
≥ Die Standardeinstellung dieser Funktion lautet "Ein".
-Gerät anschließen, wenn dieses System sich
[SUBWOOFER j]
auf der
Fernbedienung gedrückt und drücken Sie
währenddessen [VOL s] an diesem
System länger als 4 Sek.
≥ Der aktuelle Modus wird von der entsprechenden LED-
Anzeige angezeigt.
(ca. 20 Sek.), drücken Sie
[SUBWOOFER j] noch einmal.
[SUB WOOFER j] gedrückt wird.
lang und der Einstellungsmodus wird anschließend
beendet.
wird.
≥ Dieses System kann nur mit einem Gerät auf einmal
verbunden sein.
TQBS0132
(25)
11
Wechseln des Bluetooth®-
“Modus 1” “Modus 2”
"TV" “Musik”
Kommunikationsmodus
Ändern Sie den Bluetooth®-Anschluss-Link-Modus, um
den Anschlusstyp anzupassen. Sie können zu Modus 2
(Priorität auf Klangqualität) oder Modus 1 (Priorität auf
Konnektivität) wechseln, indem Sie die folgenden Schritte
ausführen:
1 Drücken Sie [ ] zur Auswahl von “ ”.
≥ Schalten Sie zuvor die Verbindung Ihres Geräts aus.
2 Halten Sie
[DIMMER] auf der
Fernbedienung
gedrückt und
drücken Sie währenddessen [VOL s] an
diesem System länger als 4 Sek.
≥ Der aktuelle Modus wird von der entsprechenden LED-
Anzeige angezeigt.
3 Wenn der aktuelle Modus angezeigt wird
(ca. 10 Sek.), drücken Sie [DIMMER] noch
einmal.
≥ Die Einstellung ändert sich jedes Mal, wenn [DIMMER]
gedrückt wird.
≥ Die Anzeige der ausgewählten Funktion blinkt 10 Sekunden
lang, und anschließend wird der Einstellungsmodus
beendet.
≥ Die Einstellung wird beibehalten, bis diese wieder geändert
wird.
≥ Die Standardeinstellung dieser Funktion lautet "Modus 2".
Ausschalten von VIERA Link
(HDMI) (HDAVI ControlTM)
Sie können VIERA Link ausschalten, wenn beispielsweise
ein nicht mit Panasonic HDMI kompatibles Gerät
angeschlossen und der Betrieb instabil ist.
Halten Sie [MUTE] auf der Fernbedienung
gedrückt und drücken Sie währenddessen
[VOL s] an diesem System länger als 4 Sek.
≥ Alle Anzeigen blinken einmal, wenn die
Lautstärkebegrenzung ausgeschaltet wird.
≥ Wenn VIERA Link (HDMI) ausgeschaltet ist, so ist die ARC-
Funktion nicht verfügbar. Um den Fernseher als Quelle
auszuwählen, müssen Sie ein Stereo-MinisteckerAudiokabel (nicht im Lieferumfang enthalten) anschließen.
≥ Setzen Sie, um diesen Vorgang rückgängig zu machen, alle
Einstellungen auf Werkseinstellungen zurück. (> 13)
≥ Die Standardeinstellung dieser Funktion lautet "Ein".
Wechseln des AUX-Eingangsmodus
Sie können den AUX-Eingangsmodus (TV/Musik)
wechseln, indem Sie die folgenden Schritte ausführen:
Wählen Sie den "TV"-Modus aus, um den Fernseher
anzuschließen, oder den "Music"-Modus, um ein
Musikgerät usw. anzuschließen.
1 Halten Sie
[INPUT] auf der
Fernbedienung
gedrückt und
drücken Sie währenddessen [VOL s] an
diesem System länger als 4 Sek.
≥ Der aktuelle Modus wird von der entsprechenden LED-
Anzeige angezeigt.
2
Wenn der aktuelle Modus angezeigt wird (ca.
20 Sek.), drücken Sie [INPUT] noch einmal.
≥ Die Einstellung ändert sich jedes Mal, wenn [INPUT]
gedrückt wird.
≥
Die Anzeige für die gewählte Funktion blinkt 20 Sekunden
lang und der Einstellungsmodus wird anschließend beendet.
≥ Die Standardeinstellung dieser Funktion ist der "TV"-Modus.
Fernbedienungscode
Wenn andere Panasonic-Geräte auf die Fernbedienung dieses
Systems reagieren, ändern Sie den Fernbedienungscode an
diesem System und an der Fernbedienung.
Vorbereitung
≥ Schalten Sie alle anderen Panasonic-Produkte aus.
≥ Schalten Sie das System ein.
Ändern Sie den Code der Fernbedienung in Code 2:
1 Richten Sie die Fernbedienung auf den
Fernbedienungssensor des Systems.
2
Drücken und halten Sie [MUTE] und [VOLs] auf
der Fernbedienung für mehr als 4 Sek. gedrückt.
≥ Alle Anzeigen blinken für 10 Sek., wenn der Code
dieses Systems geändert wird.
≥ Um den Fernbedienungscode in Code 1 zu wechseln,
wiederholen Sie die obigen Schritte, aber ersetzen Sie
[VOL s] durch [VOL i].
Ausschalten der
Lautstärkenbegrenzung
Sollte Sie ein leiser Lautstärkezustand jedes Mal dann
stören, wenn Sie dieses System einschalten, können Sie
z. B. diese Funktion wie folgt ausschalten:
Halten Sie [MUTE] auf der Fernbedienung
gedrückt und drücken Sie währenddessen
[VOL i] an diesem System länger als 4 Sek.
≥ Alle Anzeigen blinken einmal, wenn die
Lautstärkebegrenzung ausgeschaltet wird.
12
(26)
TQBS0132
≥ Die Standardeinstellung dieser Funktion lautet "Ein".
≥ Setzen Sie, um diesen Vorgang rückgängig zu machen, alle
Einstellungen auf Werkseinstellungen zurück. (> 13)
Referenz
Vorgänge
Referenz
Fehlerbeseitigung
Prüfen Sie die folgenden Punkte, bevor Sie sich an den
Kundendienst wenden. Falls Sie bei einigen Prüfpunkten
Zweifel haben oder das Problem sich durch die in der
folgenden Aufstellung vorgeschlagenen Lösungen nicht
beheben lässt, wenden Sie sich bitte an Ihren Händler.
Weitere spezielle Hilfe, Support und Beratung
zu diesem System erhalten Sie unter:
http://av.jpn.support.panasonic.com/support/global/cs/
(Diese Site ist nur auf Englisch verfügbar.)
Zurücksetzen auf die Werkseinstellungen.
Während dieses System eingeschaltet ist, halten Sie
Í
/I] an diesem System länger als 4 Sek. gedrückt.
[
(Alle Anzeigen werden zweimal blinken, wenn
dieses System zurückgesetzt wird.)
Funktioniert dieses System nicht wie erwartet,
kann das Zurücksetzen der Einstellungen auf
die Werkseinstellungen das Problem beheben.
≥
Der Fernbedienungscode kehrt auf “1” zurück,
wenn dieses System auf die Werkseinstellungen
zurückgesetzt wird. Um den
Fernbedienungscode zu ändern, siehe Seite 12.
Allgemeine Bedienung
Kein Strom.
≥ Das Netzkabel sicher einführen. (> 7)
Wenn die Anzeigen blinken und sich dieses System
≥
nach dem Einschalten sofort wieder ausschaltet, trennen
Sie das Netzkabel ab und wenden sich an Ihren Händler.
Die Fernbedienung funktioniert nicht richtig.
≥
Die Batterie ist leer. Ersetzen Sie es durch ein neues. (>6)
≥ Nach einem Batteriewechsel der Fernbedienung muss
der Code der Fernbedienung unter Umständen neu
eingestellt werden. (> 12)
≥ Verwenden Sie die Fernbedienung innerhalb des
richtigen Betriebsbereichs. (> 5)
≥ Der Signalsensor der Fernbedienung empfängt
möglicherweise keine Signale, wenn er direktem
Sonnenlicht oder starkem InverterLeuchtstoffröhrenlicht ausgesetzt wird.
≥ Möglicherweise wurde die Trennfolie nicht entfernt.
Entfernen Sie die Trennfolie. (> 6)
Die "AUX"-Anzeige blinkt weiterhin schnell.
Schalten Sie dieses System aus, trennen Sie das Netzkabel
ab und wenden Sie sich an Ihren Händler. Beschreiben Sie
beim Händler den Status der LED-Anzeigen.
Dieses System wird automatisch in den
Standby-Modus geschaltet.
Die “Auto Power Down”-Funktion ist an.
Dieses System wird automatisch in den Standby-Modus
geschaltet, wenn kein Signal eingeht und für ca. 19 Min.
und 30 Sek. kein Bedienvorgang erfolgt. Auf Seite 11
finden Sie Informationen zum Ausschalten dieser Funktion.
Dieses System funktioniert nicht ordnungsgemäß.
≥
Ist das HDMI-Kabel verkehrt herum an die IN- und OUTAnschlüsse angeschlossen?
Schalten Sie dieses System aus, trennen Sie das Netzkabel
ab und schließen Sie das HDMI-Kabel korrekt an.
≥
Wenn die AUX-Anzeige dreimal im folgenden Muster blinkt:
zweimal blinken, Pause, so unterscheidet sich der
Fernbedienungscode dieses Systems von dem der
Fernbedienung. Stellen Sie den Fernbedienungscode erneut ein.
VIERA Link (HDMI)-bezogene Bedienvorgänge können
nicht mehr ordnungsgemäß ausgeführt werden.
≥
Dies kann geschehen, wenn nach einem Stromausfall oder
nach dem Abtrennen des Netzkabels die HDMIVerbindungen geändert wurden. Versuchen Sie Folgendes:
j Wenn Sie den Fernseher (VIERA) und dieses
System über ein HDMI-Kabel verbunden und den
Fernseher (VIERA) eingeschaltet haben, trennen Sie
das Netzkabel bei eingeschaltetem System ab und
schließen es dann wieder an.
Audio/Bild
Die Audiosignale des Fernsehers werden nicht
über dieses System wiedergegeben.
Es wird kein Klang/kein Bild ausgegeben,
obwohl die Wiedergabe am angeschlossenen
Gerät begonnen hat.
≥ Stummschaltung ausschalten. (> 9)
≥ Überprüfen Sie die Anschlüsse der anderen Geräte.
(> 7)
≥ Dieses Gerät aus- und wieder einschalten.
Wenn dieses System über ein HDMI-Kabel mit dem
≥
Fernseher verbunden ist, vergewissern Sie sich, dass der
HDMI-Anschluss des Fernsehers mit "HDMI (ARC)"
gekennzeichnet ist. Anderenfalls können die Audiosignale
des Fernsehers nicht über dieses System ausgegeben
werden. Wenn ein Fernseher mit HDMI-Anschluss
verwendet wird, welcher nicht mit "ARC" gekennzeichnet
ist, verbinden Sie den Kopfhörer-/Ohrhöreranschluss des
Fernsehers mit dem AUDIO IN (AUX IN)-Anschluss
dieses Systems mit einem Stereo-Ministecker-Audiokabel
(nicht im Lieferumfang enthalten).
>
8, “Verwenden des AUDIO IN (AUX IN)-Anschlusses”)
(
≥
Wenn dieses System mit einem Panasonic-Fernseher
(VIERA) verbunden ist und Sie dieses System
einschalten, indem Sie es direkt bedienen, erfolgt
möglicherweise keine Audioausgabe. Schalten Sie dieses
System in diesem Fall über VIERA Link ein. Verwenden
Sie dazu die Fernbedienung des Fernsehers (VIERA).
≥
Ist der Anschluss richtig, liegt vielleicht ein Problem an den
Kabeln vor. Wiederholen Sie die Anschlüsse mit anderen Kabeln.
≥ Überprüfen Sie die Tonausgabe-Einstellungen am
angeschlossenen Gerät.
Die Lautstärke wird verringert, wenn dieses
System eingeschaltet wird.
Wenn dieses System ausgeschaltet wird, während sich die
Lautstärkeeinstellung im oberen Bereich (über 50) befindet, wird
die Lautstärke dieses Systems automatisch auf mittlere Werte
(50) verringert, wenn dieses System eingeschaltet wird. (
TQBS0132
(27)
>
12)
13
Es ist kein Ton zu hören.
Dieses System wird automatisch
ausgeschaltet.
(Wenn dieses System ein Problem erkennt, wird eine
Sicherheitsmaßnahme aktiviert, und dieses System wird
automatisch in den Standby-Modus geschaltet.)
≥ Es liegt ein Problem am Verstärker vor.
≥ Ist die Lautstärke extrem hoch?
Verringern Sie in diesem Fall die Lautstärke.
≥ Steht das Gerät an einem sehr heißen Ort?
Versetzen Sie das Gerät in diesem Fall an einen
kühleren Ort, warten Sie kurzzeitig ab und versuchen
Sie dann, es erneut einzuschalten.
≥ Je nach Kombination von Fernseher und
angeschlossenem Gerät wird die Audioausgabe
möglicherweise vorübergehend deaktiviert, wenn der
Fernseher ein-/ausgeschaltet oder der Eingang
gewechselt wird.
≥ Wenn die HDMI(BD)- und die HDMI(TV)-Anzeige
leuchten und die AUX-Anzeige weiterhin blinkt, wird
HDCP 2.2 vom HDMI-Anschluss oder dem Setup des
Fernsehers nicht unterstützt. Details finden Sie in der
Bedienungsanleitung des TV-Geräts.
Lizenz
Die Bluetooth®-Wortmarke und -Logos sind eingetragene
Markenzeichen von Bluetooth SIG, Inc. und jede
Verwendung dieser Marken durch Panasonic Corporation
erfolgt unter Lizenz.
Andere Warenzeichen und Handelsnamen sind Eigentum
der jeweiligen Inhaber.
Die Begriffe HDMI und HDMI High-Definition Multimedia
Interface sowie das HDMI-Logo sind Marken oder
eingetragene Marken von HDMI Licensing Administrator,
Inc. in den Vereinigten Staaten und anderen Ländern.
HDAVI Control
Corporation.
Nur bei HDMI AV OUT (TV (ARC))
TM
ist ein Markenzeichen von Panasonic
Bluetooth
®
Die Kopplung kann nicht ausgeführt werden.
Überprüfen Sie den Zustand des Bluetooth®-Geräts.
Das Gerät kann nicht verbunden werden.
≥ Die Kopplung der Vorrichtung war nicht erfolgreich oder
die Aufzeichnung wurde ersetzt. Versuchen Sie, das
Gerät erneut zu koppeln.
≥ Dieses System ist unter Umständen mit einem anderen
Gerät verbunden. Trennen Sie die Verbindung des
anderen Geräts und versuchen Sie, das Gerät erneut
zu koppeln.
(> 11 )
Das Gerät ist angeschlossen, aber es ist kein
Ton über dieses System zu hören.
Bei einigen integrierten Bluetooth®-Geräten müssen Sie
den Audioausgang manuell auf "SC-SB1" einstellen.
Details dazu finden Sie in der Bedienungsanleitung des
Geräts.
Der Sound wird unterbrochen.
≥ Das Gerät befindet sich außerhalb des 10 m
Kommunikationsbereichs. Bringen Sie das Bluetooth
Gerät näher an dieses System heran.
≥ Entfernen Sie alle Hindernisse zwischen diesem
System und dem Gerät.
≥ Andere Geräte, die das 2,4 GHz-Frequenzband
verwenden (Wireless Router, Mikrowellen, drahtlose
Telefone, etc.), verursachen Störungen. Bringen Sie
das Bluetooth
erhöhen Sie die Entfernung zu anderen Geräten.
®
-Gerät näher an dieses System und
®
Informationen zu DTS-Patenten finden Sie unter
http://patents.dts.com. Mit Lizenz von DTS Licensing
Limited hergestellt. DTS, das Symbol sowie DTS und das
Symbol zusammen sind eingetragene Warenzeichen von
DTS, Inc. © DTS, Inc. Alle Rechte vorbehalten.
Dolby, Dolby Audio und das Doppel-D-Symbol sind
Warenzeichen von Dolby Laboratories.
-
14
(28)
TQBS0132

Referenz
Technische Daten
VERSTÄRKERTEIL
RMS-Ausgangsleistung (nicht gleichzeitiger Antrieb)
Frontkanal (L/R)
10 W pro Kanal (1 kHz, 10 %, 6 ≠)
Subwoofer-Kanäle
20 W (100 Hz, 10 %, 3 ≠)
Gesamte effektive Ausgangsleistung
LAUTSPRECHERTEIL
Frontlautsprecher (integriert, L/R)
Vollbereich
4 cm kegelförmig k 1/Kanal
Twe ete r
1,4 cm Kuppeltyp k 1/Kanal
Impedanz (gesamt)
Subwoofer (integriert)
Woofer
8 cm kegelförmig k 1
Impedanz (gesamt)
Passivstrahler
Bluetooth®-ABSCHNITT
Bluetooth®-Systemspezifikationen
Bluetooth
Klassifizierung von Drahtlosgeräten
Unterstützte Profile
Unterstützter Codec
Frequenzband
Reichweite
®
Version 2.1+EDR
2,4 GHz Band FH-SS
Ca. 10 m sichtlinie
ANSCHLUSS-ABSCHNITT
HDAVI Control
Dieses Gerät unterstützt die Funktion “HDAVI Control 5”.
HDMI AV-Eingang (BD/DVD) 1
Eingangsverbinder Typ A (19 Pin)
HDMI AV-Ausgang (TV (ARC)) 1
Ausgangsverbinder Typ A (19 Pin)
Nur für Updates 1
AUX-Eingang 1
Anschluss-Typ ‰
3,5 mm-Stereo-Ministecker
40 W
6 ≠
3 ≠
8cm k2
Klasse 1
A2DP
SBC
Abtastfrequenz
(HDMI ARC) 32 kHz, 44,1 kHz, 48 kHz
(HDMI) 32 kHz, 44,1 kHz, 48 kHz,
88,2kHz, 96kHz
176,4 kHz, 192 kHz
Audio-Format
(BD/DVD)
Linearer PCM (2 Kanal)
(TV (ARC))
Linearer PCM (2 Kanal),
Dolby Digital / DTS (Bitstream)
ALLGEMEIN
Stromversorgung
DC 12 V 4 A
Netzadapter
AC 220 V bis 240 V, 50/60 Hz
Stromverbrauch
Ca. 11 W
Stromverbrauch im Standby-Modus
Wenn "Netzwerk-Standby"* auf "OFF" eingestellt ist
Ca. 0,3 W
Wenn "Netzwerk-Standby"* auf "ON" eingestellt ist
Ca. 0,5 W
Abmessungen (BkHkT)
Ca. 430 k52 k130 mm
(Einschließlich der überstehenden Teile)
Ca. 431 k52 k132 mm
Gewicht
Ca. 1,8 kg
Betriebstemperaturbereich
von 0
o
C bis r40oC
Betriebsfeuchtigskeitsbereich
20 % bis 80 % RH (keine Kondensation)
* “Netzwerk-Standby” bezieht sich auf “Bluetooth® Standby”
und “VIERA Link”.
≥ Die technischen Daten können ohne Vorankündigung
Änderungen unterliegen.
≥ Bei den Angaben für Gewicht und Abmessungen handelt es
sich um Näherungswerte.
≥ Die harmonische Gesamtverzerrung wurde mit einem
digitalen Spektrumanalysator gemessen.
TQBS0132
(29)
15
Table des matières
Consignes de sécurité
AVERTISSEMENT
Appareil
≥ Pour réduire les risques d’incendie, d’électrocution ou
de dommages au produit,
j N’exposez pas cet appareil à la pluie, l’humidité,
l’égouttement ou l’éclaboussement.
j Ne placez pas d’objets remplis d’eau, tels que des
vases, sur l’appareil.
j Utiliser exclusivement les accessoires préconises.
j Ne retirez pas les caches.
j Ne réparez pas l’appareil vous-même. Confiez
l’entretien a un personnel qualifié.
Cordon d’alimentation secteur
≥ Pour réduire les risques d’incendie, d’électrocution ou
de dommages au produit,
j Assurez-vous que la puissance du voltage fourni
correspond au voltage inscrit sur l’appareil.
j Branchez la prise secteur dans la prise électrique.
j Ne pas tirer, plier ou placer des objets lourds sur le
cordon.
j Ne manipulez pas la prise avec les mains mouillées.
j Tenez le corps de la prise secteur en la débranchant.
j N’utilisez pas de prise secteur ni de prise de courant
endommagée.
≥ La fiche secteur est le dispositif de déconnexion.
Installez cet appareil de sorte que la fiche secteur
puisse être débranchée immédiatement de la prise de
courant.
Pile de type bouton (au Lithium)
≥ Risque d’incendie, d’explosion et de brûlures. Ne pas
recharger, démonter, chauffer à plus de 60 xC ou
incinérer.
AVERTISSEMENT
NE PAS INGÉRER DE BATTERIE,
RISQUE DE BRÛLURE CHIMIQUE
Ce produit contient une pile bouton. Si la pile bouton
est avalée, elle peut causer de graves brûlures internes
en seulement 2 heures et peut entraîner la mort.
Conservez les piles neuves et usagées hors de portée
des enfants. Si le compartiment à pile ne se ferme pas
correctement, arrêtez d'utiliser le produit et conservezle hors de portée des enfants. Si vous pensez que des
piles auraient pu être avalées ou placées à l'intérieur
d'une partie du corps, consultez immédiatement un
médecin.
TQBS0132
(30)
2
ATTENTION
Appareil
≥ Ne placez pas de sources de flammes vives telles que
bougies allumées sur cet appareil.
≥ Cet appareil peut être perturbé par des interférences
causées par des téléphones mobiles pendant
l’utilisation. En présence de telles interférences,
éloignez le téléphone mobile de cet appareil.
≥ Cet appareil est destiné aux climats tempérés.
≥ Le symbole d'identification du produit est situé à
l'arrière de l'appareil.
Emplacement
≥ Placez cet appareil sur une surface plane.
≥ Pour réduire les risques d’incendie, d’électrocution ou
de dommages au produit,
j N’installez pas et ne placez pas cet appareil dans
une bibliothèque, un placard ni dans aucun autre
espace réduit. Assurez-vous que l’appareil est bien
ventilé.
j Ne bouchez pas les ouvertures d’aération de cet
appareil avec des journaux, nappes, rideaux ou
objets similaires.
j N’exposez pas cet appareil directement aux rayons
du soleil, à des températures élevées, à une
humidité élevée ni à des vibrations excessives.
≥ Ne placez pas cet appareil et d'autres dispositifs
(enregistreur Blu-ray Disc, HDD externe, etc.)
directement l'un au-dessus de l'autre, car cela pourrait
causer une défaillance du HDD ou endommager les
données.
Pile de type bouton (au Lithium)
≥ Il y a un danger d’explosion si la pile n’est pas
correctement remplacée. Remplacez uniquement par
le type recommandé par le fabricant.
≥ Introduisez-la avec les pôles correspondant.
≥ Manipuler de façon incorrecte les piles peut causer
une fuite d’électrolyte ainsi qu’un incendie.
j Retirez la batterie si vous n’avez pas l’intention
d’utiliser la télécommande pendant un long moment.
Rangez-la dans un endroit frais et sombre.
j Ne chauffez pas et n’exposez pas les piles à une
flamme.
j Ne laissez pas la (les) pile(s) dans un véhicule
exposé directement aux rayons du soleil pendant un
long moment avec fenêtres et portières fermées.
≥ Pour jeter les piles, veuillez contacter les autorités
locales ou votre revendeur afin de connaître la
procédure d’élimination à suivre.
Adaptateur secteur
≥ L’adaptateur secteur fonctionne avec un courant
secteur entre 220 V et 240 V. Mais procurez-vous un
adaptateur pour fiche correspondant si la fiche n’entre
pas dans la prise secteur murale.
 Loading...