


SC-XH150
Owner’s Manual
DVD Home Theater Sound System
Model No. SC-XH150
[_P_] [PC]
RQTX1230-1P
Dear customer
Thank you for purchasing this product.
For optimum performance and safety, please read these instructions carefully.
If you have any questions contact
U.S.A. and Puerto Rico: 1-800-211-PANA (7262)
Canada:1-800-561-5505
Only for U.S.A. and Puerto Rico: The warranty can be found on page 24.
Only for Canada: The warranty can be found on page 25.
2
RQTX1230
≥ Before connecting, operating or adjusting this product,
please read the instructions completely. Please keep this
manual for future reference.
≥ The illustrations shown may differ from your unit.
≥ Operations in these instructions are described mainly with
the remote control, but you can perform the operations on
the main unit if the controls are the same.
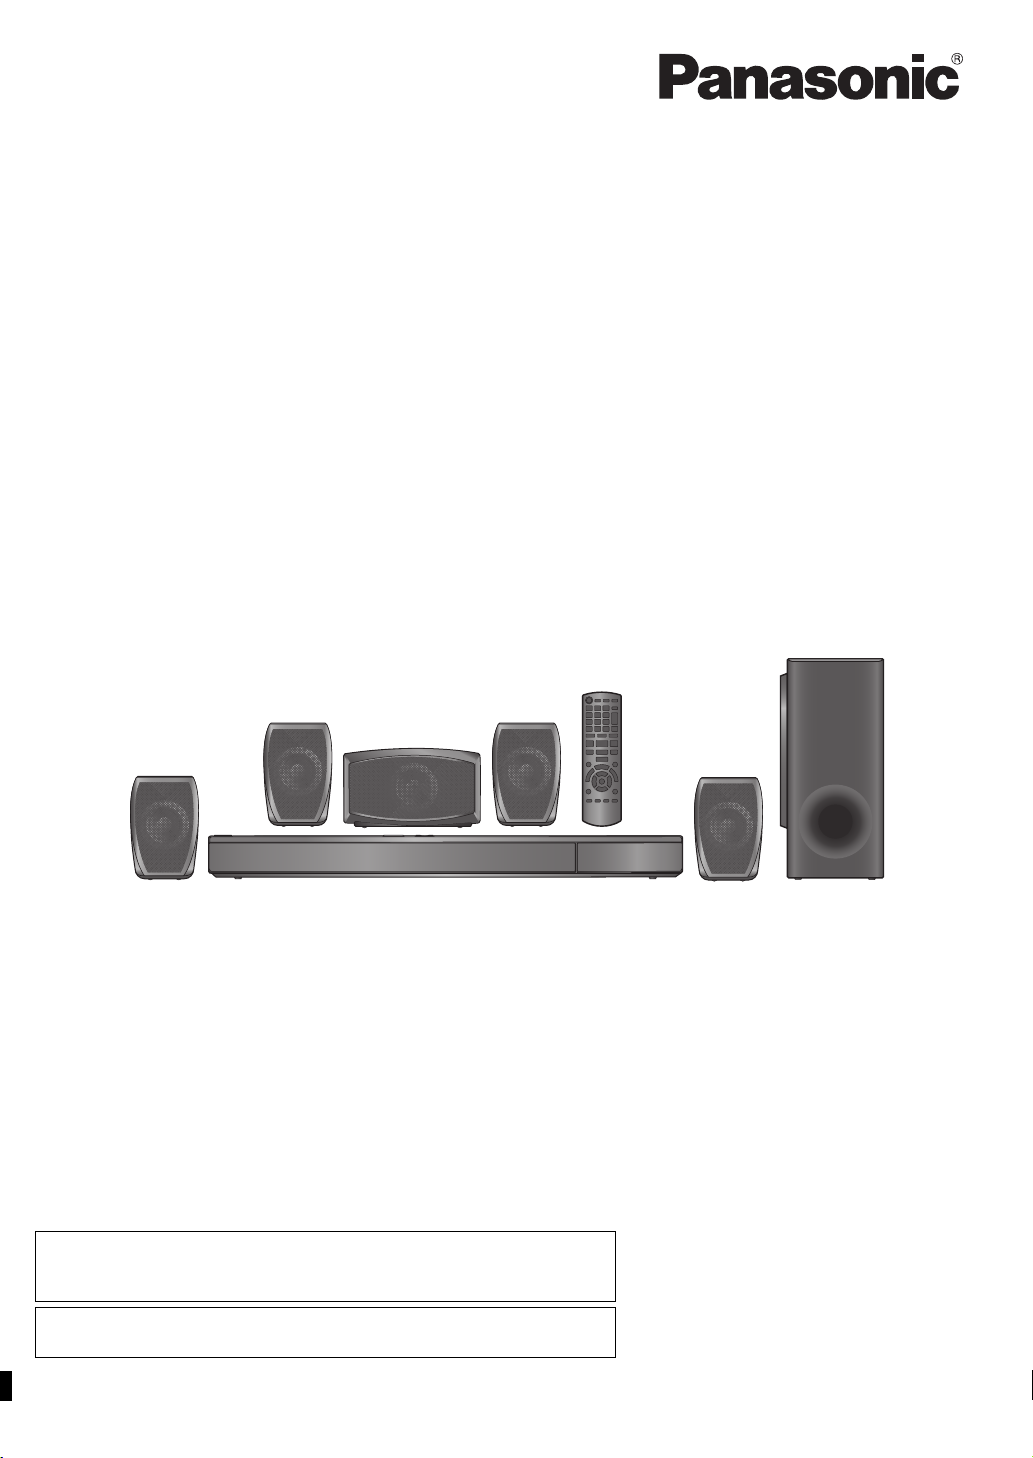
System SC-XH150
Main unit SA-XH150
Speaker
system
Front speakers SB-HF270
Center speaker SB-HC270
Surround speakers SB-HS270
Subwoofer SB-HW270
Accessories
Please check and identify the supplied accessories. Use numbers indicated in parentheses when asking for replacement
parts. (Product numbers are correct as of December 2010. These may be subject to change.)
Only for U.S.A. and Puerto Rico:
To order accessories, refer to “Accessory Purchases (United States and Puerto Rico)” on page 24.
For Canada: To order accessories, call the dealer from whom you made your purchase.
∏ 1 Remote control (N2QAYB000623)
∏ 2 Remote control batteries
∏ 1 FM indoor antenna (RSAX0002)
∏ 5 Speaker cables (REEX1266A (red), REEX1267A (white),
REEX1268 (green), REEX1269 (gray), REEX1270 (blue))
∏ 1 AC power supply cord (K2CB2CB00021)
∏ 1 Sheet of speaker cable stickers
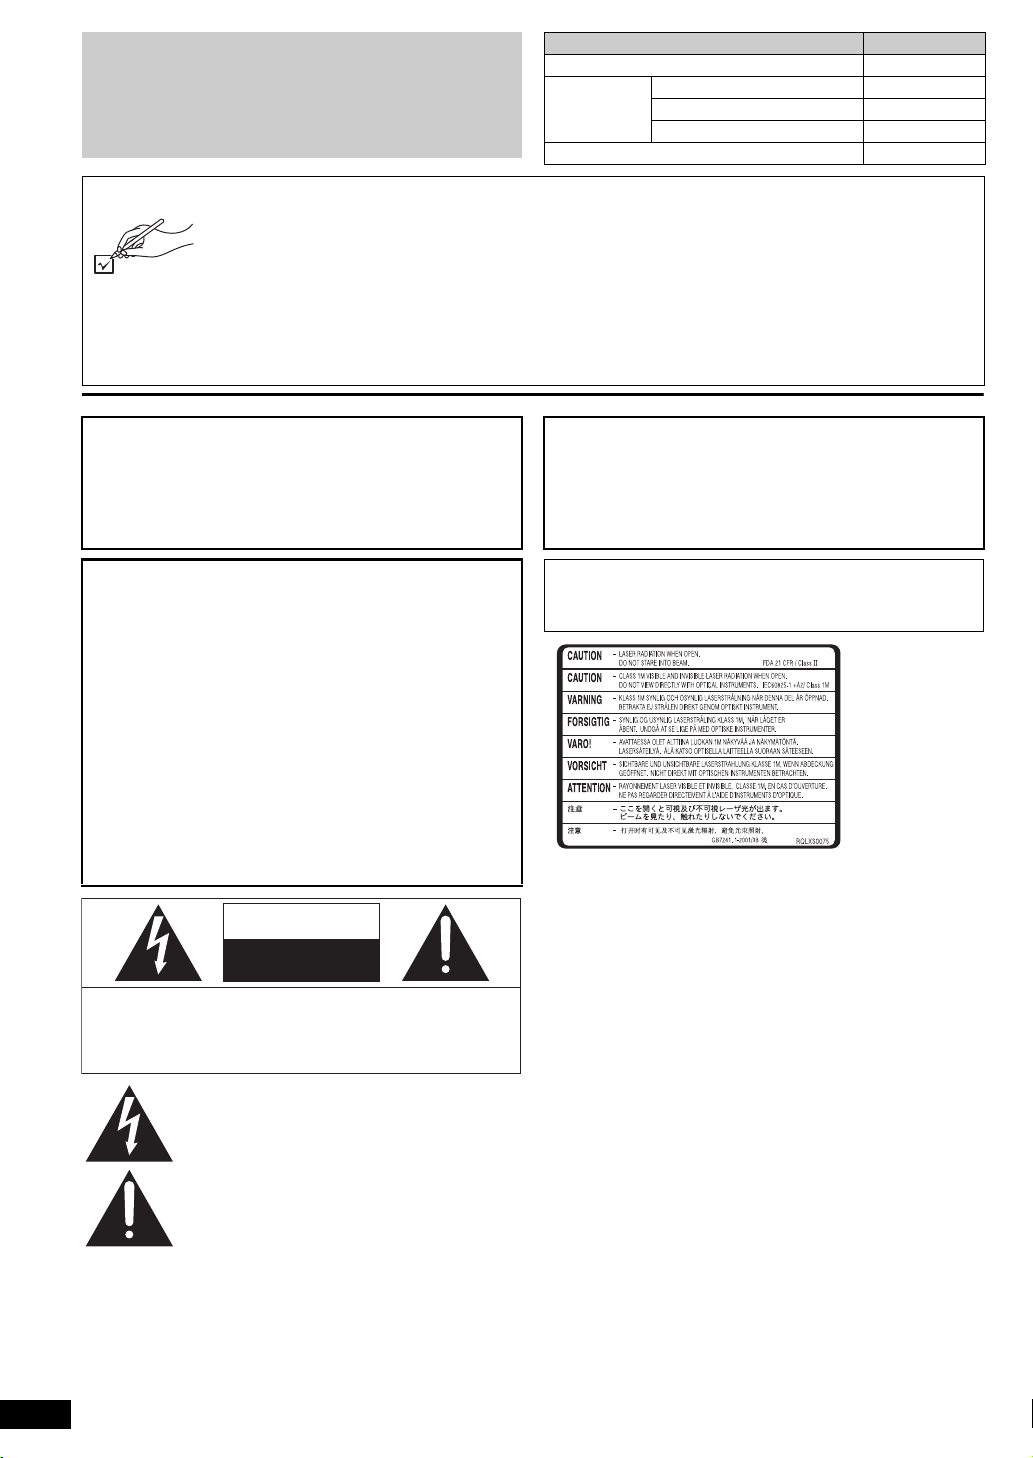
CAUTION!
THIS PRODUCT UTILIZES A LASER.
USE OF CONTROLS OR ADJUSTMENTS OR PERFORMANCE
OF PROCEDURES OTHER THAN THOSE SPECIFIED HEREIN
MAY RESULT IN HAZARDOUS RADIATION EXPOSURE.
DO NOT OPEN COVERS AND DO NOT REPAIR YOURSELF.
REFER SERVICING TO QUALIFIED PERSONNEL.
WARNING:
TO REDUCE THE RISK OF FIRE, ELECTRIC
SHOCK OR PRODUCT DAMAGE,
≥DO NOT EXPOSE THIS APPARATUS TO RAIN,
MOISTURE, DRIPPING OR SPLASHING AND
THAT NO OBJECTS FILLED WITH LIQUIDS,
SUCH AS VASES, SHALL BE PLACED ON THE
APPARATUS.
≥USE ONLY THE RECOMMENDED
ACCESSORIES.
≥DO NOT REMOVE THE COVER (OR BACK);
THERE ARE NO USER SERVICEABLE PARTS
INSIDE. REFER SERVICING TO QUALIFIED
SERVICE PERSONNEL.
The lightning flash with arrowhead symbol, within
an equilateral triangle, is intended to alert the user
to the presence of uninsulated “dangerous voltage”
within the product’s enclosure that may be of
sufficient magnitude to constitute a risk of electric
shock to persons.
CAUTION
CAUTION: TO REDUCE THE RISK OF ELECTRIC
SHOCK, DO NOT REMOVE SCREWS.
NO USER-SERVICEABLE PARTS INSIDE.
REFER SERVICING TO QUALIFIED
SERVICE PERSONNEL.
The exclamation point within an equilateral triangle
is intended to alert the user to the presence of
important operating and maintenance (servicing)
instructions in the literature accompanying the
appliance.
RISK OF ELECTRIC SHOCK
DO NOT OPEN
CAUTION!
DO NOT INSTALL OR PLACE THIS UNIT IN A BOOKCASE,
BUILT-IN CABINET OR IN ANOTHER CONFINED SPACE.
ENSURE THE UNIT IS WELL VENTILATED. TO PREVENT RISK
OF ELECTRIC SHOCK OR FIRE HAZARD DUE TO
OVERHEATING, ENSURE THAT CURTAINS AND ANY OTHER
MATERIALS DO NOT OBSTRUCT THE VENTILATION VENTS.
The unit should be installed near an accessible AC power outlet,
with the power cord connected directly to it.
To completely disconnect power from the unit, unplug the power
cord from the AC power outlet.
(Inside of product)
3
RQTX1230
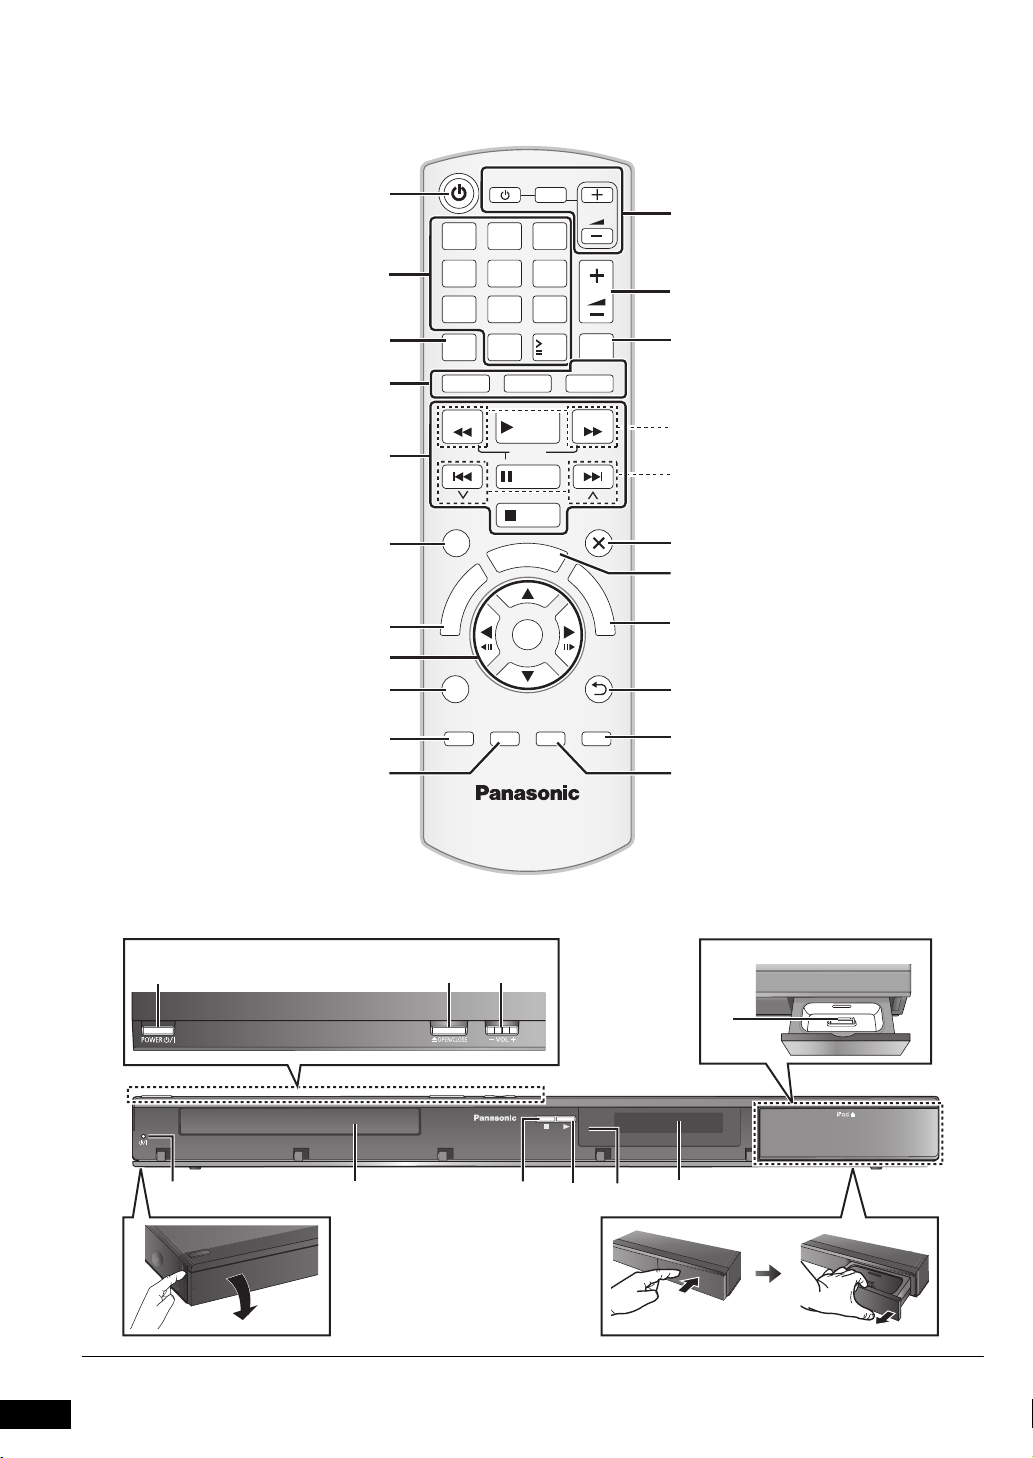
The circled numbers indicated in this Owner’s Manual (e.g. Press [Í]1) correspond to the circled numbers in the above.
RETURN
VOL
STOP
VOL
TV
INPUT
AV
SKIP
SLOW
PAUSE
SEARCH
SEARCH
PLAY
DVD
iPod
RADIO
EXT-IN
EXIT
–REPEAT
PLAY MODE
–CH SELECT
SOUND
SURROUND W.SRD FL DISPLAY
1 2 3
4 5 6
7 8
0
9
10
10
CANCEL
FUNCTIONS
MUTE
M
E
N
U
S
T
A
R
T
T
O
P
M
E
N
U
OK
SKIP
–SLEEP
4
RQTX1230
Getting StartedPlaying DiscsOther OperationsReference
Other Panasonic audio/video equipment may start functioning when you
operate the unit using the supplied remote control.
You can operate this unit in another mode by setting the remote control
operating mode to “REMOTE 2”.
The main unit and remote control must be set to the same mode.
1 Press [EXT-IN, RADIO]4 to select “AUX”.
2 Press and hold [1]8 on the main unit and [2] on the remote control
until the main unit’s display shows “REMOTE 2”.
3 Press and hold [OK]8 and [2] on the remote control for at least 2
seconds.
To change the mode back to “REMOTE 1”, repeat the steps above by
replacing [2] with [1].
Control reference guide
Remote control
1 Turn the main unit on/off (B 8)
2 Select channels and title numbers etc. / Enter numbers
(B 9, 11)
3 Cancel (B 12)
4 Source select
[DVD]: Select disc as the source (B 11)
[iPod]: Select iPod/iPhone as the source (B 15)
[EXT-IN, RADIO]: Select the FM tuner or the external audio
source (B 8, 9)
FM # AUX # ARC # D-IN
^-----------------------------------------------}
5 Basic operations for play (B 11 )
6 Show on-screen menu (B 13)
7 Show a disc top menu (B 12)
8 Select or confirm menu items / Frame-by-frame (B 11 )
9 Select the play mode / Set the repeat mode
(B 12, 13)
: Select sound mode / Select speaker channel (B 10, 11)
; Select surround sound effects (B 10)
or
Set the Sleep timer
Press and hold [jSLEEP].
While the time is shown on the main unit’s display, press
[jSLEEP] repeatedly.
Each time you press the button:
SLEEP 30 # SLEEP 60 # SLEEP 90 # SLEEP120
^-------------------------- OFF (Cancel) (------------------------}
≥ To confirm the remaining time, press and hold the button again.
< TV operations
Aim the remote control at the Panasonic TV and press the
button.
[TV, Í]: Turn the TV on/off
[INPUT, AV]: Change the TV’s video input mode
[r, VOL, s]: Adjust the TV volume
This may not work properly with some models.
= Adjust the volume of the main unit
> Mute the sound
≥ “MUTE” flashes on the main unit’s display while the function is on.
≥ To cancel, press the button again or adjust the volume.
≥ Muting is cancelled when you switch the unit to standby.
? Select radio stations manually (B 9)
@ Select preset radio stations (B 9)
A Exit the display
B Show START menu (B 9)
C Show a disc menu (B 12)
D Return to previous screen (B 12)
E Switch information on the main unit’s display (B 12)
F Turn Whisper-mode Surround on/off (B 11)
Avoiding interference with other Panasonic equipment
Main unit
1 Standby/on switch (POWER Í/I)
Press to switch the unit from on to standby mode or vice
versa. In standby mode, the unit is still consuming a small
amount of power.
2 Open/Close the disc tray (B 11 )
3 Adjust the volume of the main unit
4 Connect iPod/iPhone (B 15)
5 Power indicator
The indicator lights when this unit is turned on.
6 Disc tray
7 Stop
8 Start play
9 Remote control signal sensor
: Display (FL display)
POWER-SAVING FEATURES
The main unit is designed to conserve its power
consumption and save energy.
∫ Auto FL display turn-off function
The main unit's display is automatically turned off when the
volume is adjusted to “0”. (
B 18, “FL Control” in Others
menu.)
∫ Auto power-down function
The main unit will automatically switch to standby mode after
30 minutes of inactivity.
e.g.
– There is no audio signal from an external device.
– Disc playback is stopped/paused.
– iPod/iPhone playback is stopped/paused.
– The disc menu is displayed and play is not selected.
(This function may not work depending on the application
type of discs.)
5
Getting StartedPlaying DiscsOther OperationsReference
RQTX1230
TABLE OF CONTENTS
Getting Started
Accessories . . . . . . . . . . . . . . . . . . . . . . . . . . . . . . . . . . . .2
Control reference guide . . . . . . . . . . . . . . . . . . . . . . . . . . .4
IMPORTANT SAFETY INSTRUCTIONS. . . . . . . . . . below
Quick Start Guide
step 1 Positioning . . . . . . . . . . . . . . . . . . . . . . . . . . . 6
step 2 Connections . . . . . . . . . . . . . . . . . . . . . . . . . . 6
Speaker connections. . . . . . . . . . . . . . . . . . . . . .6
Radio antenna connections. . . . . . . . . . . . . . . . .6
Audio and video connections . . . . . . . . . . . . . . .7
step 3 AC power supply cord connection . . . . . . . . 8
step 4 Preparing the remote control . . . . . . . . . . . . 8
step 5 Easy setup . . . . . . . . . . . . . . . . . . . . . . . . . . . . 8
Listening to the radio . . . . . . . . . . . . . . . . . . . . . . . . . . . . .8
Presetting stations automatically . . . . . . . . . . . . . . . . . . . . . 8
Listening/confirming the preset channels . . . . . . . . . . . . . . . 9
Manual tuning . . . . . . . . . . . . . . . . . . . . . . . . . . . . . . . . . . . . 9
Using the START menu . . . . . . . . . . . . . . . . . . . . . . . . . . .9
Selecting the source using the remote control . . . . . . . . . . . 9
Listening to the TV or other device’s audio from this
unit’s speakers . . . . . . . . . . . . . . . . . . . . . . . . . . . . . . .10
Playing Discs
Basic play. . . . . . . . . . . . . . . . . . . . . . . . . . . . . . . . . . . . . 11
Playing from the selected item. . . . . . . . . . . . . . . . . . . . 12
Other modes of play . . . . . . . . . . . . . . . . . . . . . . . . . . . . 12
Program and Random play . . . . . . . . . . . . . . . . . . . . . . . . 12
Repeat play . . . . . . . . . . . . . . . . . . . . . . . . . . . . . . . . . . . . 13
Using on-screen menus . . . . . . . . . . . . . . . . . . . . . . . . . 13
Other Operations
Linked operations with the TV
(VIERA Link
TM
“HDAVI Control
TM
”) . . . . . . . . . . . . . . . 14
Setting the audio link . . . . . . . . . . . . . . . . . . . . . . . . . . . . . 14
Easy control only with VIERA remote control . . . . . . . . . . 15
Using the iPod/iPhone . . . . . . . . . . . . . . . . . . . . . . . . . . 15
Reference
Changing the player settings . . . . . . . . . . . . . . . . . . . . . 16
Discs that can be played. . . . . . . . . . . . . . . . . . . . . . . . . 18
Maintenance. . . . . . . . . . . . . . . . . . . . . . . . . . . . . . . . . . . 19
Speaker installation option. . . . . . . . . . . . . . . . . . . . . . . 19
Troubleshooting guide . . . . . . . . . . . . . . . . . . . . . . . . . . 20
Specifications . . . . . . . . . . . . . . . . . . . . . . . . . . . . . . . . . 22
Licenses . . . . . . . . . . . . . . . . . . . . . . . . . . . . . . . . . . . . . . 23
Limited Warranty (ONLY FOR U.S.A. AND PUERTO
RICO) . . . . . . . . . . . . . . . . . . . . . . . . . . . . . . . . . . . . . . 24
Limited Warranty (ONLY FOR CANADA). . . . . . . . . . . . 25
Read these operating instructions carefully before using the unit. Follow the safety instructions on the unit and the applicable safety instructions listed
below. Keep these operating instructions handy for future reference.
1) Read these instructions.
2) Keep these instructions.
3) Heed all warnings.
4) Follow all instructions.
5) Do not use this apparatus near water.
6) Clean only with dry cloth.
7) Do not block any ventilation openings. Install in accordance with the
manufacturer’s instructions.
8) Do not install near any heat sources such as radiators, heat registers,
stoves, or other apparatus (including amplifiers) that produce heat.
9) Do not defeat the safety purpose of the polarized or grounding-type
plug. A polarized plug has two blades with one wider than the other.
A grounding-type plug has two blades and a third grounding prong.
The wide blade or the third prong are provided for your safety. If the
provided plug does not fit into your outlet, consult an electrician for
replacement of the obsolete outlet.
10) Protect the power cord from being walked on or pinched particularly
at plugs, convenience receptacles, and the point where they exit from
the apparatus.
11) Only use attachments/accessories specified by the manufacturer.
12) Use only with the cart, stand, tripod, bracket, or table
specified by the manufacturer, or sold with the
apparatus. When a cart is used, use caution when
moving the cart/apparatus combination to avoid injury
from tip-over.
13) Unplug this apparatus during lightning storms or when
unused for long periods of time.
14) Refer all servicing to qualified service personnel. Servicing is
required when the apparatus has been damaged in any way, such as
power-supply cord or plug is damaged, liquid has been spilled or
objects have fallen into the apparatus, the apparatus has been
exposed to rain or moisture, does not operate normally, or has been
dropped.
POWER-SAVING FEATURES. . . . . . . . . . . . . . . . . . . . .4
Enjoying sound effects from all speakers
Enjoying surround sound effects. . . . . . . . . . . . . . . . 10
Selecting sound mode . . . . . . . . . . . . . . . . . . . . . . . . .10
Whisper-mode Surround . . . . . . . . . . . . . . . . . . . . . . .11
Adjusting the speaker level during playback . . . . . . 11
Adjusting the speaker balance during playback . . .11
IMPORTANT SAFETY INSTRUCTIONS
6
RQTX1230
How you set up your speakers can affect the bass and the sound field.
Note the following points:
≥ Place speakers on flat secure bases.
≥ Keep your speakers at least 10 mm (
13
/32q) away from the system for
proper ventilation.
≥ Placing speakers too close to floors, walls, and corners can result in
excessive bass. Cover walls and windows with thick curtains.
≥ For optional wall mount, refer to page 19.
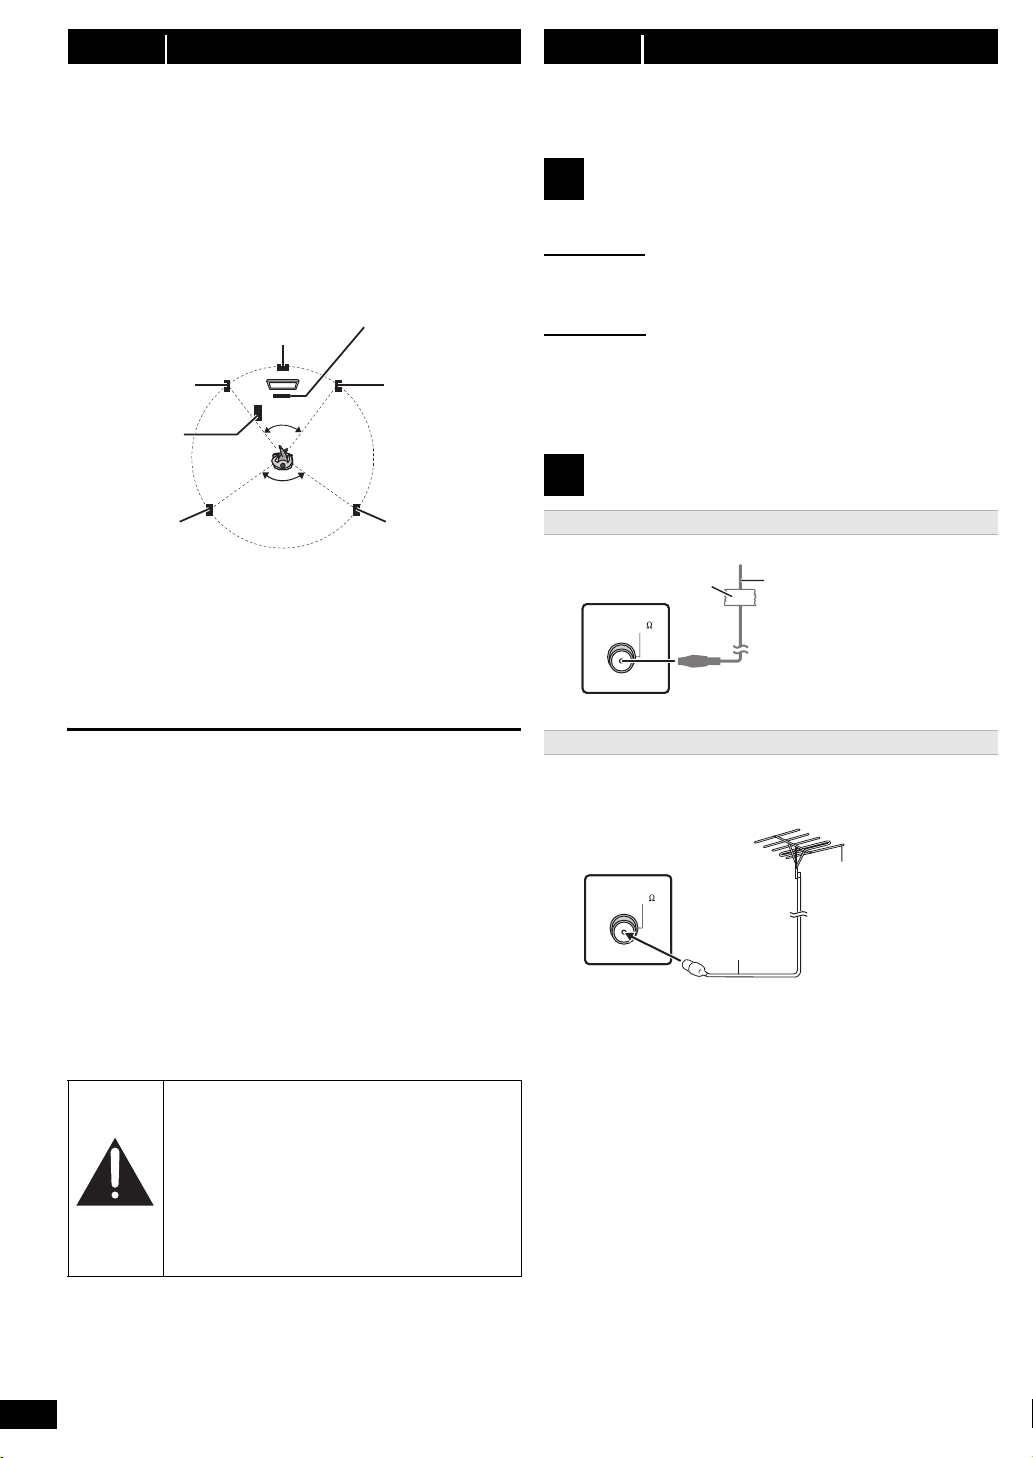
Setup example (“Surround layout (Recommended)”: Standard
surround placement)
Place the front, center, and surround speakers at approximately the same
distance from the seating position. The angles in the diagram are
approximate.
§1 Position with at least 5 cm (2q) of space on all sides for proper
ventilation.
§2 Put on a rack or shelf. Vibration caused by the speaker can disrupt
the picture if it is placed directly on the TV.
§3 Place to the right or left of the TV, on the floor or a sturdy shelf so that
it will not cause vibration. Leave about 30 cm (11
13
/16q) from the TV.
Depending on the room layout, you may like to use all the speakers at the
front (“Front layout (Alternative)”) (B 8, Easy setup).
Notes on speaker use
≥Use only supplied speakers
Using other speakers can damage the unit, and sound quality will be
negatively affected.
≥ You can damage your speakers and shorten their useful life if you play
sound at high levels over extended periods.
≥ Reduce the volume in the following cases to avoid damage:
– When playing distorted sound.
– When the speakers are reverberating due to a record player, noise
from FM broadcasts, or continuous signals from an oscillator, test
disc, or electronic instrument.
– When adjusting the sound quality.
– When turning the unit on or off.
If irregular coloring occurs on your TV
The center speaker is designed to be used close to a TV, but the picture
may be affected on some TVs and setup combinations.
If this occurs, turn the TV off for about 30 minutes.
The demagnetizing function of the TV should correct the problem. If it
persists, move the speakers further away from the TV.
Turn off all equipment before connection and read the appropriate
operating instructions.
Do not connect the AC power supply cord until all other
connections are completed.
Pay attention to the type of speaker and the connector color when you
place the speakers.
Main unit (rear)
Connect to the terminals of the same color.
Use of the speaker cable stickers is convenient when making cable
connections.
Speakers (rear)
Insert the wire fully, taking care not to insert beyond the wire insulation.
i: White
j: Blue line
≥ Be careful not to cross (short circuit) or reverse the polarity of the
speaker wires as doing so may damage the speakers.
step 1 Positioning
Caution
≥ The main unit and supplied speakers are to be
used only as indicated in this setup. Failure to do
so may lead to damage to the amplifier and/or the
speakers, and may result in the risk of fire.
Consult a qualified service person if damage has
occurred or if you experience a sudden change in
performance.
≥ Do not attempt to attach these speakers to walls
using methods other than those described in this
manual.
120°
60°
Center speaker
§2
Front speaker
(left)
Subwoofer
§3
Surround
speaker (left)
Surround
speaker (right)
Front speaker
(right)
Main unit
§1
step 2 Connections
1
Speaker connections
2
Radio antenna connections
Using an indoor antenna
Using an outdoor antenna
FM ANT
(75 )
Adhesive tape
Main unit (rear)
FM indoor antenna
(supplied)
Affix this end of the antenna
where reception is best.
FM ANT
(75 )
Use outdoor antenna if radio reception is poor.
≥ Disconnect the antenna when the unit is not in use.
≥ Do not use the outdoor antenna during an electrical storm.
Main unit
(rear)
75 ≠ coaxial
cable
(not supplied)
FM outdoor antenna
(Using a TV antenna
(not supplied))
The antenna should be
installed by a competent
technician.
7
RQTX1230
Getting Started
Quick Start Guide
≥ To listen to the TV audio on the sound system, connect the optical
digital audio cable, HDMI
§
cable or audio cable.
Refer to the operating instructions of the respective devices for the
settings necessary to output the audio.
§
Only when connecting to an ARC compatible TV.
Refer to “Connection with an ARC compatible TV” for details. (
B
below)
This connection provides the best picture and audio quality.
VIERA Link “HDAVI Control”
If your Panasonic TV is VIERA Link compatible, you can operate your TV
synchronizing with home theater operations or vice versa
(B 14, Linked operations with the TV).
≥
Please use High Speed HDMI Cables that have the HDMI logo (as shown on
the back cover)
.
≥ Non-HDMI-compliant cables cannot be utilized.
≥ It is recommended that you use Panasonic’s HDMI cable. Recommended
part number:
RP-CDHS15 (1.5 m/4.9 ft), RP-CDHS30 (3.0 m/9.8 ft), RP-CDHS50
(5.0 m/16.4 ft), etc.
≥ Do not make the video connections through the VCR.
Due to copy guard protection, the picture may not be displayed properly.
≥ After connecting with the optical digital audio cable or HDMI
§
cable, make
settings to suit the type of audio from your digital equipment (B 10).
(Only Dolby Digital and PCM can be played with this connection.)
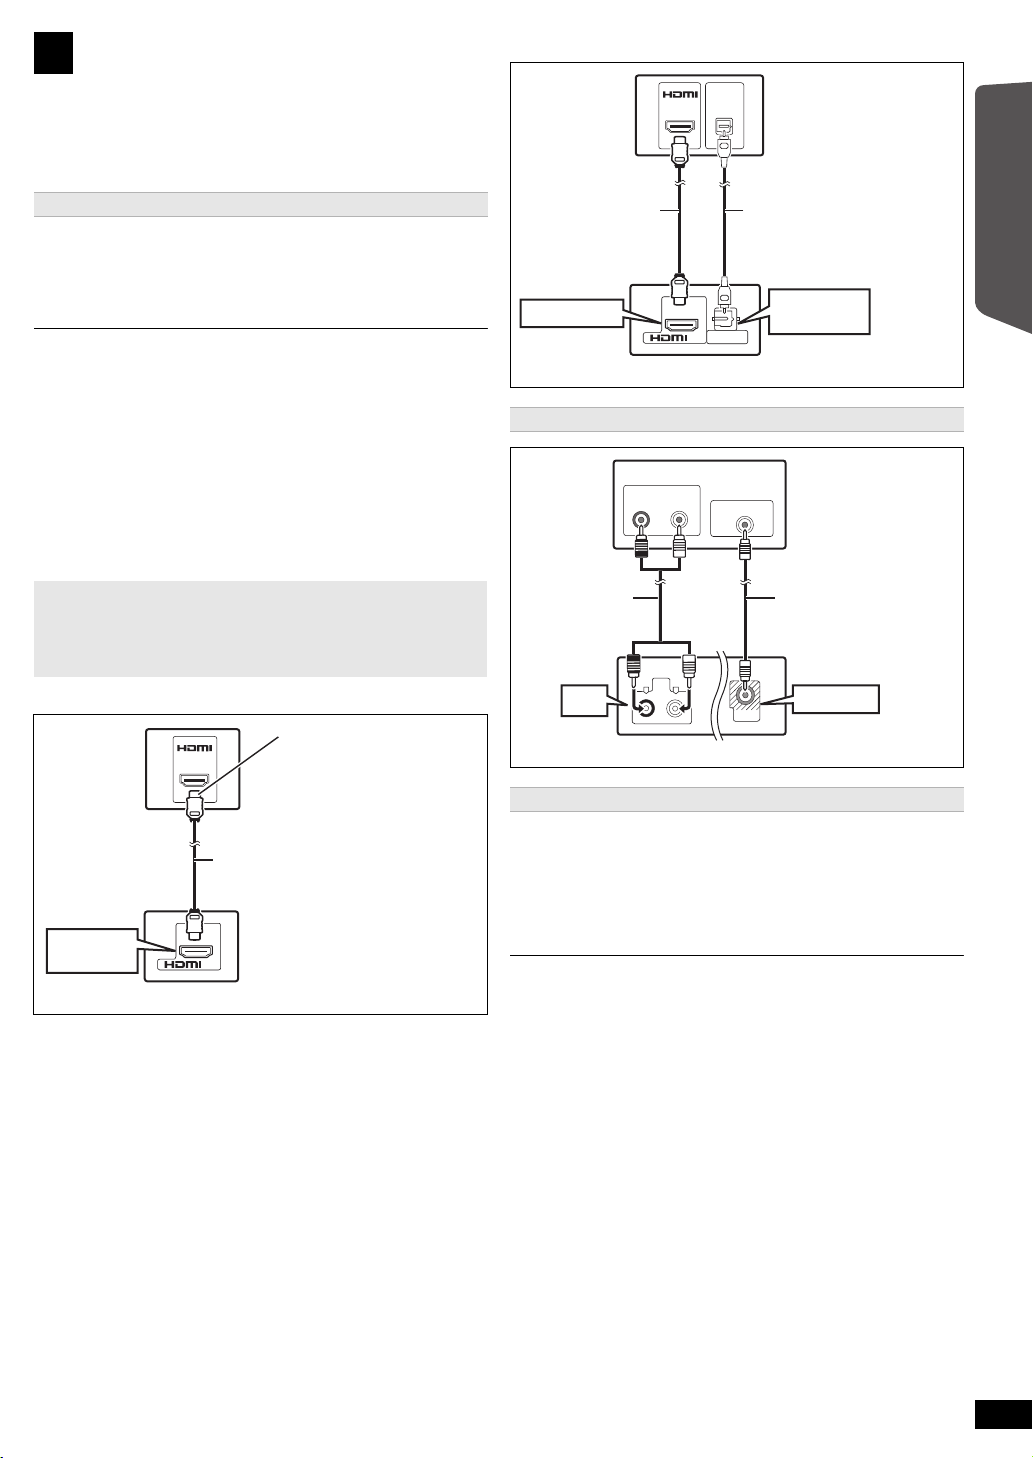
∫ Connection with an ARC compatible TV
≥ Refer to the operating instructions of the TV for details.
∫ Connection without an ARC compatible TV
Use this connection when you want to output the original surround audio
from your STB, etc. to this unit.
Connect the optical digital audio cable (not supplied) from the
DIGITAL AUDIO IN OPTICAL terminal on the main unit to the
OPTICAL OUT terminal on your STB.
≥ If the DIGITAL AUDIO IN OPTICAL terminal is already in use for the TV
audio, reconnect the TV audio to the AUX terminal using an audio
cable.
If you have various sound sources (such as Blu-ray Disc player, DVD recorder,
VCR, etc.), connect them to the available inputs on the TV and the TV output
should then be connected to the AUX, HDMI AV OUT
§
or DIGITAL AUDIO IN
OPTICAL terminal of the main unit.
3
Audio and video connections
Recommended connection to a TV
What is ARC?
ARC is an abbreviation of Audio Return Channel, also known as HDMI
ARC. It refers to one of the HDMI functions. If the TV is ARC
compatible, audio from the TV can be sent to this unit via the HDMI
cable without the need to make an extra audio connection.
AV
OUT
(ARC)
HDMI (ARC)
AV OUT
HDMI
(ARC)
TV
HDMI cable
(not supplied)
Main unit (rear)
Be sure to connect to the
TV’s ARC compatible
terminal. (Refer to the
operating instructions for
the TV.)
Alternative connection to a TV
Set Top Box (cable/satellite/Blu-ray Disc player, etc) connection
AV
OUT
DIGITAL AUDIO IN
OPTICAL
(ARC)
DIGITAL AUDIO
IN OPTICAL
HDMI AV OUT
AV IN
OPTICAL
OUT
TV
HDMI cable
(not supplied)
Optical digital audio
cable (not supplied)
Main unit (rear)
DIGITAL AUDIO IN
DIGITAL AUDIO IN
OPTICAL
OPTICAL
VIDEO OUT
L
R
AUX
VIDEO OUT
AUX
AUDIO OUT
VIDEO IN
R
L
TV
Video cable
(not supplied)
Audio cable
(not supplied)
Main unit (rear)

8
RQTX1230
Conserving power
The main unit consumes a small amount of power, even when it is in
standby mode (approx. 0.4 W). To save power when the unit is not to be
used for a long time, unplug it from the household AC outlet.
You will need to reset some memory items when plugging back the main
unit.
The supplied AC power supply cord is for use with the main unit only.
Do not use it with other equipment. Also, do not use cords for other equipment
with the main unit.
Do not:
≥ mix old and new batteries.
≥ use different types of batteries at the same time.
≥ take apart or short circuit.
≥ attempt to recharge alkaline or manganese batteries.
≥ use batteries if the covering has been peeled off.
Mishandling of batteries can cause electrolyte leakage which can
severely damage the remote control.
Remove the batteries if the remote control is not going to be used for a
long period of time. Store in a cool, dark place.
Aim at the remote control signal sensor (B 4), avoiding obstacles.
Distance: Within approx. 7 m (23 ft)
Angle: Within approx. 20° up and down, approx. 30° to the left and right
The Easy setup screen assists you in making necessary
settings.
≥ You can perform this setup anytime by selecting “Easy setup” in the Setup
menu. (B 17)
≥ If this unit is connected to a “HDAVI Control 3 or later” compatible TV via
HDMI cable, the menu language and TV aspect information will be retrieved
via VIERA Link.
≥ If this unit is connected to a “HDAVI Control 2” compatible TV via HDMI cable,
the menu language information will be retrieved via VIERA Link.
Up to 30 stations can be set.
≥ “SET OK” is displayed when the stations are set, and the radio tunes to
the last preset station.
≥ “ERROR” is displayed when auto presetting is unsuccessful. Preset the
stations manually (B 9).
step 3 AC power supply cord connection
step 4 Preparing the remote control
Batteries
CAUTION
Danger of explosion if battery is incorrectly replaced. Replace only with
the same or equivalent type recommended by the manufacturer.
Dispose of used batteries according to the manufacturer’s instructions.
≥ Use alkaline or manganese batteries.
≥ Do not heat or expose to flame.
≥ Do not leave the battery(ies) in an automobile exposed to direct
sunlight for a long period of time with doors and windows closed.
Use
AC IN
Main unit (rear)
AC power supply cord
(supplied)
To household AC outlet
(AC 120 V, 60 Hz)
R6/LR6, AA
Press in and lift up.
Replace the cover.
Insert so the poles (r and j) match those in the remote control.
step 5 Easy setup
Preparation
Turn on your TV and select the appropriate video input mode
(e.g. VIDEO 1, AV 1, HDMI, etc.) to suit the connection to this unit.
≥ To change your TV’s video input mode, refer to its operating
instructions.
≥ This remote control can perform some basic TV operations (B 4).
1
Press [Í]1 to turn on the unit.
≥ The Easy setup screen appears automatically.
2
Press [3, 4]8 to select “Yes” and press [OK]8.
3
Follow the messages and make the settings with
[3, 4, 2, 1]8 and [OK]8.
≥Language
Select the language used on menu screen.
≥TV aspect
Select the aspect to suit your TV.
≥Speaker layout
Select “Surround layout (Recommended)” mode or “Front layout
(Alternative)” mode according to your speaker layout (B 6,
Positioning).
≥Speaker check
Listen to speaker output to confirm speaker connections.
≥Speaker output
Make surround sound setting for speaker output.
≥TV audio
Select the audio input connection from your TV.
For AUX connection (B 7): Select “AUX”.
For HDMI connection (B 7): Select “ARC”.
For DIGITAL AUDIO IN OPTICAL connection (B 7): Select
“DIGITAL IN”.
This will be the TV audio setting for VIERA Link “HDAVI Control”.
(B 14)
4
Press [OK]8 to finish the “Easy setup”.
Listening to the radio
Presetting stations automatically
1
Press [EXT-IN, RADIO]4 to select “FM”.
2
Press [MENU]C.
Each time you press the button:
LOWEST (factory preset):
To begin auto preset with the lowest frequency.
CURRENT:
To begin auto preset with the current frequency.
§
§ To change the frequency, refer to “Manual tuning” (B 9).
3
Press and hold [OK]8.
Release the button when “FM AUTO” is displayed.
The tuner starts to preset all the stations it can receive into the
channels in ascending order.
 Loading...