


Operating Instructions
Compact Stereo System
Model No. SC-RS52
Thank you for purchasing this product.
Please read these instructions carefully before using this product, and save this manual for future use.
Model number suffix “EB” denotes UK model.
|
EG EB GN |
RQT0A76-B |
|

Safety precautions
WARNING
Unit
≥To reduce the risk of fire, electric shock or product damage,
–Do not expose this unit to rain, moisture, dripping or splashing.
–Do not place objects filled with liquids, such as vases, on this unit.
–Use only the recommended accessories.
–Do not remove covers.
–Do not repair this unit by yourself. Refer servicing to qualified service personnel.
–Do not let metal objects fall inside this unit.
–Do not place heavy items on this unit.
AC mains lead
≥To reduce the risk of fire, electric shock or product damage,
–Ensure that the power supply voltage corresponds to the voltage printed on this unit.
–Insert the mains plug fully into the socket outlet.
–Do not pull, bend, or place heavy items on the lead.
–Do not handle the plug with wet hands.
–Hold onto the mains plug body when disconnecting the plug.
–Do not use a damaged mains plug or socket outlet.
≥The mains plug is the disconnecting device.
Install this unit so that the mains plug can be unplugged from the socket outlet immediately.
CAUTION
Unit
≥This unit utilizes a laser. Use of controls or adjustments or performance of procedures other than those specified herein may result in hazardous radiation exposure.
≥Do not place sources of naked flames, such as lighted candles, on this unit.
≥This unit may receive radio interference caused by mobile telephones during use. If such interference occurs, please increase separation between this unit and the mobile telephone.
≥This unit is intended for use in moderate climates.
Placement
≥Place this unit on an even surface.
≥To reduce the risk of fire, electric shock or product damage,
–Do not install or place this unit in a bookcase, built-in cabinet or in another confined space. Ensure this unit is well ventilated.
–Do not obstruct this unit’s ventilation openings with newspapers, tablecloths, curtains, and similar items.
–Do not expose this unit to direct sunlight, high temperatures, high humidity, and excessive vibration.
Battery
≥Danger of explosion if battery is incorrectly replaced. Replace only with the type recommended by the manufacturer.
≥Mishandling of batteries can cause electrolyte leakage and may cause a fire.
–Remove the battery if you do not intend to use the remote control for a long period of time. Store in a cool, dark place.
–Do not heat or expose to flame.
–Do not leave the battery(ies) in a car exposed to direct sunlight for a long period of time with doors and windows closed.
–Do not take apart or short circuit.
–Do not recharge alkaline or manganese batteries.
–Do not use batteries if the covering has been peeled off.
≥When disposing of the batteries, please contact your local authorities or dealer and ask for the correct method of disposal.
Product Identification Marking is located on the bottom of the unit.
Legal notice
Recording and playback of content on this (or any other) device may require permission from the copyright owner. Panasonic has no authority to and does not grant you that permission and explicitly disclaims any right, ability or intention to obtain such permission on your behalf. It is your responsibility to ensure that your use of this or any other device complies with applicable copyright law in your country.
2
RQT0A76
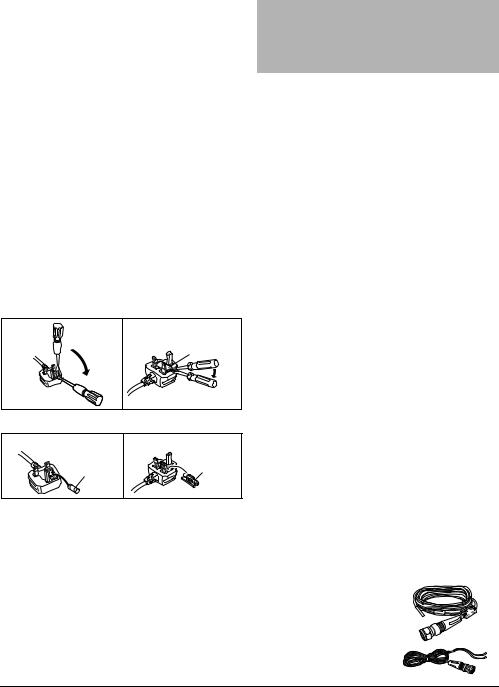
Caution for AC Mains Lead
(For the AC mains plug of three pins)
For your safety, please read the following text carefully.
This appliance is supplied with a moulded three pin mains plug for your safety and convenience.
A 5-ampere fuse is fitted in this plug.
Should the fuse need to be replaced please ensure that the replacement fuse has a rating of 5-ampere and that it is approved by ASTA or BSI to BS1362.
Check for the ASTA mark Ï or the BSI mark Ì on the body of the fuse.
If the plug contains a removable fuse cover you must ensure that it is refitted when the fuse is replaced.
If you lose the fuse cover the plug must not be used until a replacement cover is obtained.
A replacement fuse cover can be purchased from your local dealer.
Before use
Remove the connector cover.
How to replace the fuse
The location of the fuse differ according to the type of AC mains plug (figures A and B). Confirm the AC mains plug fitted and follow the instructions below. Illustrations may differ from actual AC mains plug.
1. Open the fuse cover with a screwdriver.
Figure A |
Figure B |
Fuse cover
2. Replace the fuse and close or attach the fuse cover.
Figure A |
|
Figure B |
|
Fuse |
Fuse |
|
(5 ampere) |
|
|
(5 ampere) |
|
|
|
About descriptions in these operating instructions
≥Pages to be referred to are indicated as “l ±±”.
≥Unless otherwise indicated, operations are described using the remote control. You can also use the controls on this unit if they are the same.
Table of contents |
|
Safety precautions ............................................ |
2 |
Legal notice ....................................................... |
2 |
Caution for AC Mains Lead .............................. |
3 |
Accessories....................................................... |
3 |
Control reference guide.................................... |
4 |
Using the remote control.................................. |
5 |
Licenses............................................................. |
5 |
Connections ...................................................... |
5 |
Inserting media.................................................. |
6 |
Bluetooth® operations ...................................... |
7 |
About Bluetooth® .............................................. |
8 |
Media playback controls .................................. |
8 |
Listening to FM radio...................................... |
11 |
Listening to DAB/DAB+ .................................. |
12 |
Recording a CD to the internal memory ....... |
14 |
Sound adjustment........................................... |
15 |
Clock and Timer .............................................. |
16 |
Others............................................................... |
17 |
Playable media ................................................ |
18 |
Unit and media care ........................................ |
18 |
Troubleshooting .............................................. |
19 |
Specifications.................................................. |
21 |
Limited Warranty (ONLY FOR AUSTRALIA) ..... |
23 |
Accessories
Check the supplied accessories before using this unit.
∏1 Remote control
(N2QAYB001073)
∏1 AC mains lead
For the United Kingdom and Ireland: (K2CT2YY00097)
For Continental Europe: (K2CQ2YY00119)
For Australia and New Zealand: (K2CJ2YY00101)
∏ 1 Battery for remote control
∏ 1 DAB indoor antenna
For the United Kingdom and Ireland: (RFA3669)
For others: (N1EYYY000015)
≥ |
Do not use AC mains lead with other equipment. |
3 |
≥ |
Product numbers provided in these operating instructions are correct as of January 2016. These may be subject to change. |
|
|
|
|
RQT0A76

Control reference guide
Top view |
|
|
|
|
|
1 |
19 |
|
|
|
|
|
|
||
|
|
|
|
|
|
|
|
1 |
2 |
3 |
4 |
5 |
6 |
|
20 |
|
|
|
|
|
|
|
|
|
|
|
|
15 |
12 |
|
|
|
|
|
|
|
|
|
|
|
|
16 |
21 |
|
|
|
|
|
|
|
|
|
|
|
|
2 |
|
|
|
|
|
|
11 |
|
|
|
|
|
|
5 |
|
|
|
|
|
|
4 |
22 |
7 |
8 |
9 |
|
14 7 |
|
23 |
|
|
|
|
|
17 |
24 |
|
|
|
|
|
|
25 |
|
|
|
|
|
18 |
DIMMER |
10 |
|
11 |
12 |
13 |
26 |
1Standby/on switch [Í], [Í/I]
Press to switch the unit from on to standby mode or vice versa. In standby mode, the unit is still consuming a small amount of power.
2Select the audio source
On this unit:
“CD” ---------- |
. “MEMORY” ---------- |
. “DAB+” |
: |
|
; |
“BLUETOOTH” (---- “USB”(---- |
“FM” |
|
≥Press and hold to enter pairing mode (l 7) or disconnect a Bluetooth® device (l 7).
On the remote control: [MEMORY]: “MEMORY”
[CD/ ]: “CD” ,. “BLUETOOTH”
[RADIO, USB]: “DAB+” -""-. “FM”
^" “USB”("}
3FAVOURITE buttons and indicators for favourite play / storing or selecting radio station ([1] to [5]) (l 9, 11, 12)
4This unit: Record button and indicator (l 14) Remote control: Record button (l 14)
5Start one-touch mix play (l 9)
6Open or close the disc tray
7Speakers
≥These speakers do not have magnetic shielding. Do not place them near a TV, personal computer or other magnetic devices.
8Display
9Disc tray
≥Do not put any object in front of the disc tray.
10Headphones jack ( )
)
≥Plug type: 3.5 mm stereo (not supplied)
≥Avoid listening for prolonged periods of time to prevent hearing damage.
≥Excessive sound pressure from earphones and headphones can cause hearing loss.
≥Listening at full volume for long periods may damage the user's ears.
11Basic playback control
12Adjust the volume (0 (min) to 50 (max))
13USB port (l 6)
14Remote control signal sensor
Distance: Within approx. 7 m directly in front Angle: Approx. 30o left and right
15Select number
≥To select a 2-digit number Example: 16: [S10] > [1] > [6]
≥To select a 3-digit number
Example: 124: [S10] > [S10] >[1] > [2]> [4]
16Set the programme function / Delete a programmed track
17Set the play menu item
18Change the displayed information
19Clock and timer operation
20Set favourite play (l 9)
21Mute the sound
Press again to cancel. “MUTE” is also cancelled when the volume is adjusted or the unit is turned off.
22Select recording mode (l 14)
23Enter sound menu
24Enter setup menu
25Selection/OK
26Dim the display panel and indicators
Press again to cancel.
4
RQT0A76

Using the remote control |
Connections |
Insert the battery so the terminals (i and j) match those in the remote control.
Connect the AC mains lead after all other connections are completed.
R6/LR6, AA
(Alkaline or manganese battery)
Point it at the remote control signal sensor on this unit.
≥To avoid interference, please do not put any objects in front of signal sensor.
Licenses
The Bluetooth® word mark and logos are registered trademarks owned by Bluetooth SIG, Inc. and any use of such marks by Panasonic Corporation is under license.
Other trademarks and trade names are those of their respective owners.
MPEG Layer-3 audio coding technology licensed from Fraunhofer IIS and Thomson.
∫ About recorded content
Please note that even if content is not recorded correctly due to any defects, Panasonic will not be responsible for compensation for such content, losses arising out of the recorded content, or any direct or indirect damage caused by such recording. The same also applies to repairing this unit.
21
1Connect the antenna.
This unit can receive DAB/DAB+ and FM stations with the DAB antenna.
≥Tape the antenna to a wall or column in a position with the least amount of interference.
≥If radio reception is poor, use a DAB outdoor antenna (not supplied).
Adhesive tape (not supplied)
Be sure to tighten the nut fully.
DAB indoor antenna (supplied)
2 Connect the AC mains lead.
To a mains socket
AC mains lead (supplied)
This unit consumes a small amount of AC power (l 21) even when turned off.
≥In the interest of energy conservation, if you will not be using this unit for an extended period of time, unplug it from the mains socket.
≥Some settings will be lost after you disconnect the system. You have to set them again.
5
RQT0A76

Inserting media
Inserting a disc
1 Press [<] on this unit to open the disc tray. 2 Put in a disc with the label facing up.
3 Press [<] again to close the disc tray.
Connecting a USB device
Insert the USB device directly. Do not use any USB extension cable.
≥Please disconnect the USB device if you finish using.
≥Before removing the USB device, select a source other than “USB”.
Charging a device
Charging starts when a device (rated value: DC 5 V/ 1.5 A) is connected to the USB port of this unit.
1 Turn the unit on.
2 Select a source other than “USB”.
3 Connect a device.
≥Confirm from the screen of the connected device, etc. to make sure charging has started.
≥After the device has started charging, you can turn the unit to standby mode.
–When charging a depleted device, do not turn the unit to standby mode until the device becomes operational.
USB cable (not supplied)
To the compatible device
≥A cable compatible with your device is required. Use the cable that comes with your device.
≥Even if you connect a cable compatible with the USB port of this unit, your device may not be charged. In that case, use the charger that comes with the device.
≥Depending on your device, using other chargers may not work. Check the operating instructions of your device before use.
≥Do not connect a device with a rated value higher than 5 V/ 1.5 A to this unit.
≥To check if charging is complete, look at the screen of the connected device, etc.
≥Once fully charged, remove the USB cable from the USB port.
≥ When moving this unit, be sure to remove all media and turn this unit to standby mode.
6
RQT0A76

Bluetooth® operations
You can listen to the sound from the Bluetooth® audio device from this unit wirelessly.
≥Refer to the operating instructions of the Bluetooth® device for details.
Connecting via Bluetooth® menu
Preparation
≥Turn on the Bluetooth® feature of the device and place the device near this unit.
∫ Pairing with Bluetooth® devices
1 Press [CD/ ] repeatedly to select “BLUETOOTH”.
≥ If “PAIRING” is indicated on the display, go to step 3.
2 Press [PLAY MENU] to select “PAIRING” and then press [OK].
≥Alternatively, press and hold [SELECTOR, s PAIRING] on the unit.
3 Select “SC-RS52” from the Bluetooth® device’s Bluetooth® menu.
≥ The MAC address (e.g., 6C:5A:B5:B3:1D:0F) may be displayed before “SC-RS52” is displayed.
≥ The name of the connected device is indicated on the display for a few seconds.
4 Start playback on the Bluetooth® device.
∫ Connecting a paired Bluetooth® device
1 Press [CD/ ] repeatedly to select “BLUETOOTH”.
≥ “READY” is indicated on the display.
2 Select “SC-RS52” from the Bluetooth® device’s Bluetooth® menu.
≥ The name of the connected device is indicated on the display for a few seconds.
3 Start playback on the Bluetooth® device.
≥If prompted for the passkey, input “0000”.
≥You can register up to 8 devices with this unit. If a 9th device is paired, the device that has not been used the longest will be replaced.
≥This unit can only be connected to one device at a time.
≥When “BLUETOOTH” is selected as the source, this unit will automatically try and connect to the last connected Bluetooth® device. (“LINKING” is indicated on the display during this process.) If the connection attempt fails, try to establish a connection again.
Bluetooth® transmission mode
You can change the transmission mode to prioritise transmission quality or sound quality.
Preparation
≥Press [CD/ ] repeatedly to select “BLUETOOTH”.
≥If a Bluetooth® device is already connected, disconnect it.
1 Press [PLAY MENU] repeatedly to select “LINK MODE”.
2 Press [2, 1] to select the mode and then press [OK].
MODE 1: Emphasis on connectivity MODE 2: Emphasis on sound quality
≥Select “MODE 1” if the sound is interrupted.
≥When enjoying video contents with this function, the video and audio output may not be synchronised. In this case, select “MODE 1”.
≥The factory default is “MODE 2”.
Bluetooth® input level
If the sound input level from the Bluetooth® device is too low, change the input level setting.
Preparation
≥ Connect a Bluetooth® device.
1 Press [PLAY MENU] repeatedly to select “INPUT LEVEL”.
2 Press [2, 1] to select the level and then press [OK].
“LEVEL 0” ,. “LEVEL i1” ,. “LEVEL i2”
^---------------------------------------------------------J
≥Select “LEVEL 0” if the sound is distorted.
≥The factory default is “LEVEL 0”.
Disconnecting a Bluetooth® device
1 While a Bluetooth® device is connected: Press [PLAY MENU] repeatedly to select “DISCONNECT?”.
2 Press [2, 1] to select “OK? YES” and then press [OK].
≥You can also disconnect the Bluetooth® device by pressing and holding [SELECTOR, s PAIRING] on the unit.
≥The Bluetooth® device will be disconnected if a different audio source (e.g., “CD”) is selected.
7
RQT0A76

About Bluetooth®
Panasonic bears no responsibility for data and/or information that is compromised during a wireless transmission.
∫ Frequency band used
≥ This system uses the 2.4 GHz frequency band.
∫ Certification of this device
≥This system conforms to frequency restrictions and has received certification based on frequency laws. Thus, a wireless permit is not necessary.
≥The actions below are punishable by law in some countries:
–Taking apart or modifying the system.
–Removing specification indications.
∫ Restrictions of use
≥Wireless transmission and/or usage with all Bluetooth® equipped devices is not guaranteed.
≥All devices must conform to standards set by Bluetooth SIG, Inc.
≥Depending on the specifications and settings of a device, it can fail to connect or some operations can be different.
≥This system supports Bluetooth® security features. But depending on the operating environment and/or settings, this security is possibly not sufficient. Transmit data wirelessly to this system with caution.
≥This system cannot transmit data to a Bluetooth® device.
∫ Range of use
≥Use this device at a maximum range of 10 m. The range can decrease depending on the environment, obstacles or interference.
∫ Interference from other devices
≥This system may not function properly and troubles such as noise and sound jumps may arise due to radio wave interference if this system is located too close to other Bluetooth® devices or the devices that use the 2.4 GHz band.
≥This system may not function properly if radio waves from a nearby broadcasting station, etc. is too strong.
∫ Intended usage
≥This system is for normal, general use only.
≥Do not use this system near an equipment or in an environment that is sensitive to radio frequency interference (example: airports, hospitals, laboratories, etc).
8
Media playback controls
The following marks indicate the availability of the feature.
[CD]: CD audio in CD-DA format or a CD that contains MP3 files (l 18)
[MEMORY]: Internal memory
(This unit is pre-recorded with a sample music under each (FAVOURITE) [1] to [5]. About recording to the internal memory, refer to page 14.)
[USB]: USB devices containing MP3 files (l 18) [BLUETOOTH]: Connected Bluetooth® device (l 7)
Basic play
([CD], [MEMORY], [USB], [BLUETOOTH])
Preparation
≥Turn the unit on.
≥Insert the media or connect the Bluetooth® device. (l 6, 7)
1 Select the audio source. For disc:
Press [CD/  ] repeatedly to select “CD”. For internal memory:
Press [MEMORY] to select “MEMORY”. For USB device:
Press [RADIO, USB] repeatedly to select “USB”. For Bluetooth® device:
Press [CD/  ] repeatedly to select “BLUETOOTH”.
(When selecting using this unit, press [SELECTOR, s PAIRING] repeatedly.)
2 Press [1/;] to start playback.
≥[MEMORY]: When you start play with [1/;], playback starts from the first track to the last track in the internal memory.
Basic controls
Stop |
Press [∫]. |
|
≥ [MEMORY], [USB]: The position is |
|
memorised and “RESUME” is displayed. |
|
≥ [MEMORY], [USB]: Press [∫] twice to stop |
|
the playback fully. |
|
– [MEMORY]: Favourite play and |
|
one-touch mix play will be cancelled. |
|
(l 9) |
Pause |
Press [1/;]. |
|
Press again to continue playback. |
Skip |
Press [:] or [9] to skip track. |
|
(This unit: [:/6] or [5/9]) |
|
|
|
[CD] (MP3), [MEMORY], [USB] |
|
Press [3] or [4] to skip the album. |
|
≥ [MEMORY]: When using the favourite play |
|
function, you can only skip track or album |
|
within the selected number for |
|
(FAVOURITE) [1] to [5]. |
Search |
During play or pause, press and hold |
|
[6] or [5]. |
|
(This unit: [:/6] or [5/9]) |
RQT0A76
 Loading...