


Operating Instructions Instrukcja obsługi Návod k obsluze
Wireless Speaker System Zestaw głośników bezprzewodowych Bezdrátová souprava reproduktorů
Model No. SC-UA30
Thank you for purchasing this product.
For optimum performance and safety, please read these instructions carefully.
Please keep this manual for future reference.
Dziękujemy za zakupienie tego produktu.
Proszę dokładnie zapoznać się z tą instrukcją obsługi, aby jak najlepiej wykorzystać to urządzenie i zapewnić jego bezpieczne użytkowanie.
Prosimy o zachowanie niniejszej instrukcji obsługi.
Děkujeme za zakoupení tohoto výrobku.
Pro dosažení optimálního výkonu a z bezpečnostních důvodu si pečlivě přečtěte tyto pokyny. Uschovejte si prosím tento návod k obsluze.
|
|
|
TQBJ2152 |
|
|
E |

Your system and the illustrations can look differently. The symbols on this product (including the accessories) represent the following:
 AC
AC
Class II equipment (The construction of the product is double-insulated.)
ON
 Standby
Table of contents
Safety precautions . . . . . . . . . . . . . . . . . . . . . . . . . . . . . 2 Caution for AC mains lead . . . . . . . . . . . . . . . . . . . . . . . 3 Sales and Support Information . . . . . . . . . . . . . . . . . . . . 3 Supplied accessories . . . . . . . . . . . . . . . . . . . . . . . . . . . 3 Transporting the unit. . . . . . . . . . . . . . . . . . . . . . . . . . . . 4 Maintenance . . . . . . . . . . . . . . . . . . . . . . . . . . . . . . . . . . 4 Preparing the remote control . . . . . . . . . . . . . . . . . . . . . 4 Making the connections . . . . . . . . . . . . . . . . . . . . . . . . . 5 Overview of controls . . . . . . . . . . . . . . . . . . . . . . . . . . . . 6 Preparing media . . . . . . . . . . . . . . . . . . . . . . . . . . . . . . . 7 Media playback. . . . . . . . . . . . . . . . . . . . . . . . . . . . . . . . 8 Radio. . . . . . . . . . . . . . . . . . . . . . . . . . . . . . . . . . . . . . . . 9 Sound effects . . . . . . . . . . . . . . . . . . . . . . . . . . . . . . . . 10 Illumination . . . . . . . . . . . . . . . . . . . . . . . . . . . . . . . . . . 10 Jukebox. . . . . . . . . . . . . . . . . . . . . . . . . . . . . . . . . . . . . 10 Using a microphone . . . . . . . . . . . . . . . . . . . . . . . . . . . 11 Karaoke. . . . . . . . . . . . . . . . . . . . . . . . . . . . . . . . . . . . . 11 Clock and timers. . . . . . . . . . . . . . . . . . . . . . . . . . . . . . 11 External equipment. . . . . . . . . . . . . . . . . . . . . . . . . . . . 12 Others. . . . . . . . . . . . . . . . . . . . . . . . . . . . . . . . . . . . . . 13 Troubleshooting . . . . . . . . . . . . . . . . . . . . . . . . . . . . . . 13 Specifications . . . . . . . . . . . . . . . . . . . . . . . . . . . . . . . . 15 References . . . . . . . . . . . . . . . . . . . . . . . . . . . . . . . . . . 16
Safety precautions
WARNING!
Unit
•To reduce the risk of fire, electric shock or product damage,
–Do not expose this unit to rain, moisture, dripping or splashing.
–Do not place objects filled with liquids, such as vases, on this unit.
–Use the recommended accessories.
–Do not remove covers.
–Do not repair this unit by yourself. Refer servicing to qualified service personnel.
–Do not let metal objects fall inside this unit.
CAUTION!
Unit
•To reduce the risk of fire, electric shock or product damage,
–Do not install or place this unit in a bookcase, built-in cabinet or in another confined space. Ensure this unit is well ventilated.
–Do not obstruct this unit’s ventilation openings with newspapers, tablecloths, curtains, and similar items.
–Do not place sources of naked flames, such as lighted candles, on this unit.
•This unit is intended for use in moderate climates.
•This unit may receive radio interference caused by mobile telephones during use. If such interference occurs, please increase separation between this unit and the mobile telephone.
•Set the unit up on an even surface away from direct sunlight, high temperatures, high humidity, and excessive vibration.
AC mains lead
•The mains plug is the disconnecting device. Install this unit so that the mains plug can be unplugged from the socket outlet immediately.
Battery
•Danger of explosion if battery is incorrectly replaced. Replace only with the type recommended by the manufacturer.
•When disposing of the batteries, please contact your local authorities or dealer and ask for the correct method of disposal.
•Do not heat or expose to flame.
•Do not leave the battery(ies) in a car exposed to direct sunlight for a long period of time with doors and windows closed.
•Do not break open or short-circuit the battery.
•Do not charge the alkaline or manganese battery.
•Do not use the battery if the cover has peeled off.
•Remove the battery if you do not use the remote control for a long period of time. Keep in a cool, dark area.
TQBJ2152
2
2
Caution for AC mains lead
(For the AC mains plug of three pins)
For your safety, please read the following text carefully.
This appliance is supplied with a moulded three pin mains plug for your safety and convenience.
A 5-ampere fuse is fitted in this plug.
Should the fuse need to be replaced please ensure that the replacement fuse has a rating of 5-ampere and that it is approved by ASTA or BSI to BS1362.
Check for the ASTA mark  or the BSI mark
  on the body of the fuse.
If the plug contains a removable fuse cover you must ensure that it is refitted when the fuse is replaced.
If you lose the fuse cover the plug must not be used until a replacement cover is obtained.
A replacement fuse cover can be purchased from your local dealer.
Before use
Remove the connector cover.
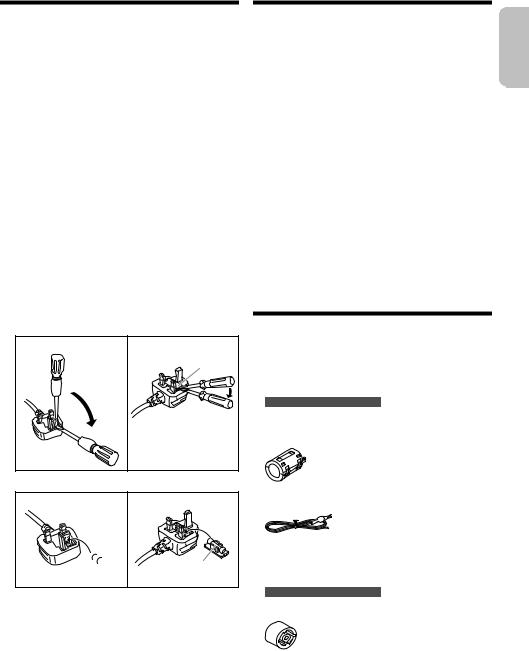
How to replace the fuse
The location of the fuse differ according to the type of AC mains plug (figures A and B). Confirm the AC mains plug fitted and follow the instructions below.
Illustrations may differ from actual AC mains plug. 1. Open the fuse cover with a screwdriver.
Figure A |
Figure B |
Fuse cover
2. Replace the fuse and close or attach the fuse cover.
Figure A |
Figure B |

 Fuse (5 ampere) Fuse (5 ampere)
Sales and Support Information
|
|
ENGLISH |
For the United Kingdom and Ireland |
|
|
Customer Communications Centre |
|
|
• For customers within the UK: 0344 844 3899 |
|
|
• For customers within Ireland: 01 289 8333 |
|
|
• Monday – Friday 9:00am – 5:00pm (Excluding public |
|
|
holidays). |
|
|
• For further support on your product, please visit our |
|
|
website: www.panasonic.co.uk |
|
|
Direct Sales at Panasonic UK
•Order accessory and consumable items for your product with ease and confidence by phoning our Customer Communications Centre Monday – Friday 9:00am – 5:00pm (Excluding public holidays).
•Or go on line through our Internet Accessory ordering application at www.pas-europe.com.
•Most major credit and debit cards accepted.
•All enquiries transactions and distribution facilities are provided directly by Panasonic UK.
•It couldn’t be simpler!
•Also available through our Internet is direct shopping for a wide range of finished products. Take a browse on our website for further details.
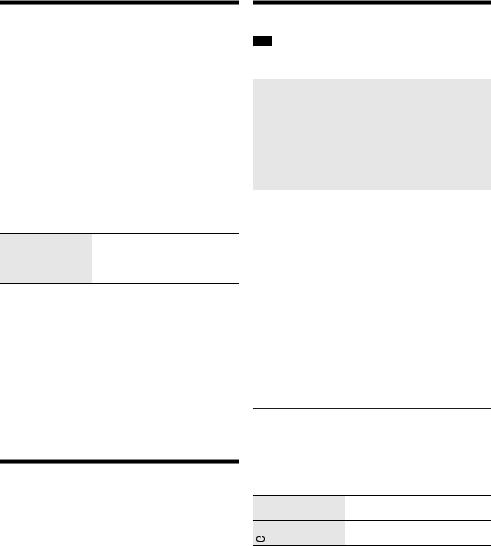
Supplied accessories
Check and identify the supplied accessories. Product numbers correct as of August 2018. These may be subject to change.
2 AC mains leads
For the United Kingdom and Ireland
(K2CT2YY00089)
1 Ferrite core
(J0KG00000037)
1 FM indoor antenna
(RSAX0002)
1 Remote control
(N2QAYB001215)
1 Remote control battery
For the United Kingdom and Ireland
1 Antenna plug adaptor
(K1YZ02000013)
Note:
Use the AC mains lead that is suitable for your household mains socket.
TQBJ2152
3
3

Transporting the unit
Preparation
Disconnect all connected devices and cables from the unit.
Maintenance
Disconnect the AC mains lead before maintenance. Clean this system with a soft, dry cloth.
•Never use alcohol, paint thinner or benzine to clean this system.
•Before using chemically treated cloth, read the instructions that came with the cloth carefully.
Preparing the remote control
Note:
•Keep the unit at least 10 mm away from other objects for proper ventilation.
•The speakers do not have magnetic shielding. Do not put them near PCs or other equipment easily influenced by magnetism.
•When you play at high levels for a long period, it can cause damage to the speakers and decrease the life of the speakers.
•Decrease the volume in these conditions to prevent damage:
–When the sound is distorted.
–When you adjust the sound quality.
CAUTION!
•Improper handling or transportation manner may cause the unit to fall, etc., resulting in damage and/or personal injury.
•Do not touch the speaker cone’s reverberating surfaces:
–This may damage the speaker cone.
–The speaker cone may be hot.
•Do not put the unit on a table or any elevated surface.
•Do not allow children to climb on the unit.
•Be careful when babies or children are near.
Use alkaline or manganese battery.
Install the battery so that the poles (+ and –) align with those in the remote control.
TQBJ2152
4
4

Making the connections
Connect the AC mains lead only after all the other connections have been made.
1Connect the FM indoor antenna.
Put the antenna where reception is best.
Adhesive tape (not supplied) 
For the United Kingdom and Ireland
Connect the FM outdoor antenna.
Use an outdoor antenna if reception is poor.

 FM outdoor antenna
  (not supplied)
 75 ȍ coaxial cable


 (not supplied) Antenna plug adaptor
CAUTION!
Keep the antenna plug adaptor out of reach of children to prevent swallowing.
Note:
•Do not use the outdoor antenna during a lightning storm.
•Disconnect the outdoor antenna if you do not use the system.
2Connect the AC mains lead.
Do not use any other AC mains leads except the supplied one.
(For the AC mains plug of three pins)
READ THE “Caution for AC mains lead” BEFORE CONNECTION.
Hold the unit when connecting or disconnecting the AC mains lead to prevent the unit from falling.
To household mains socket
Attaching the ferrite core near to the terminal
A Pull on the tabs (both sides) to open.
B Put the AC mains lead onto one of the concave surfaces.
C Coil the AC mains lead around the ferrite core and
onto the other concave surface.
D Close the ferrite core until it clicks.
Note:
Failure to attach the ferrite core to the AC mains lead may cause interference to other devices nearby.
CAUTION!
Keep the ferrite core out of reach of children to prevent swallowing.
Conserving power
The system consumes a small amount of power even when it is in standby mode. Disconnect the power supply if you do not use the system.
Some settings will be lost after you disconnect the system. You have to set them again.
Note:
Keep the antennas away from the AC mains lead to avoid picking up noise.
ENGLISH
TQBJ2152
5
5

Overview of controls
Do the procedures with the remote control. You can also use the buttons on the unit if they are the same.
AStandby/on switch [`], [1]
Press to switch the unit from on to standby mode or vice versa. In standby mode, the unit is still consuming a small amount of power.
BDecrease the brightness of the display panel
The illumination is also switched off. To cancel, press the button again.
CSelect the audio source
Press [SELECT <, >] (unit: [SELECT]) repeatedly to select the source:
USB  FM
FM  D-IN
D-IN
BLUETOOTH  AUX
AUX
On the unit:
To start Bluetooth® pairing, press and hold [  ].
].
DBasic playback control
EView the setup menu
FView the content information
GSelect or confirm the option
HSet the sleep timer
IAdjust the volume level
JMute the sound
To cancel, press the button again.
“MUTE” is also cancelled when you adjust the volume or when you switch off the system.
KView the play menu
LSelect the sound effects
MSelect the jukebox
NUSB port ( )
)
ODisplay panel
PRemote control sensor
Distance: Within approximately 7 m Angle: Approximately 20° up and down,
30° left and right
TQBJ2152
6
6

Preparing media
USB
Preparation
Before you connect a USB device to the system, make sure you do a backup of the data.
1Decrease the volume and connect the USB device to the USB port.
2Press [SELECT <, >] repeatedly to select “USB”.
Note:
•Do not use a USB extension cable. The system cannot recognise USB device connected through a cable.
•Some devices cannot be charged as the maximum USB charging current is 0.5 A only.
Bluetooth®
You can connect and play an audio device wirelessly through Bluetooth®.
Preparation
•Switch on the unit.
•Switch on the Bluetooth® feature of the device and put the device near the system.
•Read the operating instructions of the device for details.
█ Pairing a device
Preparation
If this system is connected to a Bluetooth® device, disconnect it (~7).
1Press [  ].
].
If “PAIRING” is shown, continue with step 3.
2Press [PLAY MENU] to select “PAIRING” and then press [OK].
3Select “SC-UA30” from the Bluetooth® menu of the
device.
If prompted for a passkey, input “0000” or “1234”. The device connects with this system automatically after pairing is complete.
The MAC address (example: 6C:5A:B5:B3:1D:0F) may be shown before “SC-UA30” is shown.
The name of the connected device is shown for a few seconds.
Using the unit |
|
|
|
1 Press and hold [ |
] until “PAIRING” is shown. |
ENGLISH |
|
Note: |
|
||
2 Select “SC-UA30” from the Bluetooth® menu of the |
|
||
|
device. |
|
|
• |
You can pair up to 8 devices with this system. If a 9th device |
|
|
|
is paired, the device that has not been used for the longest |
|
|
|
|
||
|
time will be replaced. |
|
|
• |
Depending on the searching functionality of the Bluetooth® |
|
|
|
device and the surrounding environment, if the product |
|
|
|
name is not shown on the Bluetooth® menu of the device, |
|
|
|
switch off and then switch on the Bluetooth® feature of the |
|
|
|
device repeatedly during the pairing process. |
|
|
█ Connecting a device
Preparation
If this system is connected to a Bluetooth® device, disconnect it (~7).
1 Press [  ].
].
“BLUETOOTH READY” is shown.
2Select “SC-UA30” from the Bluetooth® menu of the
device.
The name of the connected device is shown for a few seconds.
3Start playback on the device.
Note:
•A device must be paired to connect.
•This system can only connect to one device at a time.
•When “BLUETOOTH” is selected as the source, this system will automatically try to connect to the last connected device. (“LINKING” is shown during this process.)
█ Disconnecting a device
While a Bluetooth® device is connected
1Press [PLAY MENU] repeatedly to select “DISCONNECT?”.
2Press [R, T] to select “OK? YES” and then press
[OK].
“BLUETOOTH READY” is shown. To cancel, select “OK? NO”.
Using the unit
Press and hold [  ] until “PAIRING” is shown.
Note:
A device is disconnected when you:
•Select a different source.
•Move the device out of the maximum range.
•Disable the Bluetooth® transmission of the device.
•Switch off the system or the device.
TQBJ2152
7
7

Media playback
The following marks indicate the availability of the feature.
 : USB device with MP3 files. BLUETOOTH : Bluetooth® device.
Basic playback
BLUETOOTH
Play |
Press [4/9]. |
||
Stop |
Press [8]. |
||
|
|
|
position is memorised. |
|
|
The |
|
|
|
“RESUME” is shown. |
|
|
|
Press again to stop fully. |
|
Pause |
|
Press [4/9]. |
|
|
|
Press again to continue playback. |
|
Skip |
Press [2/3] or [5/6] to skip track. |
||
|
|
|
|
|
|
Press [R, T] to skip MP3 album. |
|
Search |
|
Press and hold [2/3] or [5/6]. |
|
Note:
Depending on the Bluetooth® device, some operations may not work.
Viewing available information
BLUETOOTH
You can view the available information, such as MP3 album and track number, on the display panel.
Press [DISPLAY] repeatedly.
Example: MP3 album and track number display.
Play menu
1Press [PLAY MENU] repeatedly to select “PLAYMODE”.
2Press [R, T] to select the setting and then press
[OK].
OFF PLAYMODE |
Cancel the setting. |
|
1-TRACK |
Play one selected track. |
|
1 |
|
Press [2/3] or [5/6] to |
|
|
select the track. |
1-ALBUM |
Play one selected MP3 album. |
|
1 |
|
Press [R, T] to select the MP3 |
|
|
album. |
RANDOM |
Play all tracks randomly. |
|
RND |
|
|
|
|
|
1-ALBUM |
Play all tracks in one selected MP3 |
|
RANDOM |
album randomly. |
|
1 |
RND |
Press [R, T] to select the MP3 |
|
|
album. |
ALL REPEAT |
Repeat all tracks. |
|
1-TRACK REPEAT Repeat 1-TRACK.
1 

1-ALBUM REPEAT Repeat 1-ALBUM.
1 

RANDOM REPEAT Repeat random playback.
RND 
1-ALBUM |
Repeat 1-ALBUM RANDOM. |
RANDOM REPEAT |
|
1 RND |
|
Note:
•During random playback, you cannot skip to tracks which have been played.
•The setting is cancelled when you disconnect the USB device.
Album Track number number
Note:
•Maximum characters that can be shown: Approximately 32
•This system supports ver. 1.0, 1.1 and 2.3 ID3 tags.
•Text data that the system does not support can show differently.
TQBJ2152
8
Link mode
BLUETOOTH
You can change the link mode to suit the connection type.
Preparation
If this system is connected to a Bluetooth® device, disconnect it (~7).
1Press [PLAY MENU] repeatedly to select “LINK MODE”.
2Press [R, T] to select the mode and then press
[OK].
MODE 1 |
Emphasis on connectivity. |
MODE 2 (default) |
Emphasis on sound quality. |
Note:
•When enjoying video contents with this function, the video and audio output may not be synchronised. In this case, select “MODE 1”.
•Select “MODE 1” if the sound is interrupted.
8

█ Note on USB device
•This system does not guarantee connection with all USB devices.
•This system supports USB 2.0 full speed.
•This system can support USB devices of up to 32 GB.
•Only FAT 12/16/32 file system is supported.
█ Note on MP3 file
•Files are defined as tracks and folders are defined as albums.
•Tracks must have the extension “.mp3” or “.MP3”.
•Tracks will not necessarily be played in the order you recorded them.
•Some files can fail to work because of the sector size.
MP3 file on USB device
•This system can access up to:
–800 albums (including root folder)
–8000 tracks
–999 tracks in one album
Radio
Preparation
Press [SELECT <, >] repeatedly to select “FM”.
Manual tuning
1Press [PLAY MENU] repeatedly to select
“TUNE MODE”.
Or press [8] on the unit to select “MANUAL”. Continue with step 3.
2Press [R, T] to select “MANUAL” and then press
[OK].
3Press [2/3] or [5/6] to tune in to the
station.
To tune automatically, press and hold the button until the frequency starts changing quickly.
Memory presetting
You can preset up to 30 FM stations.
█ Automatic presetting
1Press [PLAY MENU] to select “A.PRESET”.
2Press [R, T] to select “LOWEST” or “CURRENT” and then press [OK].
LOWEST |
Tuning begins from the lowest |
|
frequency. |
CURRENT |
Tuning begins from the current |
|
frequency. |
The tuner presets all the stations it can receive into the channels in ascending order.
To cancel, press [8].
█ Manual presetting
1Press [PLAY MENU] repeatedly to select
“TUNE MODE”.
Or press [8] on the unit to select “MANUAL”. Continue with step 3.
2Press [R, T] to select “MANUAL” and then press
[OK].
3Press [2/3] or [5/6] to tune in to the station.
4Press [OK].
5Press [R, T] to select a preset number and then
press [OK].
Do steps 3 through 5 again to preset more stations. The new station replaces any station that occupies the same preset number.
█ Selecting a preset station
1Press [PLAY MENU] repeatedly to select
“TUNE MODE”.
Or press [8] on the unit to select “PRESET”. Continue with step 3.
2Press [R, T] to select “PRESET” and then press
[OK].
3Press [2/3] or [5/6] to select the preset station.
RDS broadcasting
This system can show the text data transmitted by the radio data system (RDS) available in some areas.
Press [DISPLAY] repeatedly.
PS |
Programme service |
PTY |
Programme type |
FREQ |
Frequency |
Note:
RDS may not be available if reception is poor.
ENGLISH
TQBJ2152
9
9
Sound effects
Preset EQ
1Press [SOUND] to select “PRESET EQ”.
2Press [R, T] to select the setting and then press
[OK].
Preset EQ setting: “ROCK”, “POP”, “AFRO BEAT”, “ARABIC”, “PERSIAN”, “INDIA BASS”, “DANGDUT”, “MALAY POP”, “ELECTRONICA”, “REGGAETON”, “SALSA”, “SAMBA”, “KARAOKE” or “FLAT”.
Manual EQ
1Press [SOUND] repeatedly to select “MANUAL EQ”.
2Press [R, T] to select the sound effect.
3Press [2/3] or [5/6] to select the setting and then press [OK].
BASS/MID/TREBLE –4 to +4
Note:
These settings can change when you select a PRESET EQ setting.
D.Bass
1Press [SOUND] repeatedly to select “D.BASS” and
then press [R, T] to select “D.BASS LEVEL” or
“D.BASS BEAT”.
To cancel, select “OFF D.BASS”.
2Press [2/3] or [5/6] on the remote control to select the setting and then press [OK].
Note:
D.BASS BEAT: This function emphasises the attack level of the drumbeat and produces a punchy sound. Depending on the track, the effect may be small.
Illumination
You can switch on or switch off the illumination on the system.
1Press [SETUP] repeatedly to select “ILLUMINATION”.
2Press [R, T] to select “ON” and then press [OK].
To cancel, select “OFF”.
Note:
When the dimmer function is switched on, the illumination on the system will remain off even when you switch on the illumination function.
Jukebox
You can use the jukebox function to add cross-fade effect between songs.
Using the “Panasonic MAX Juke” app
You can download and install the free Android™ app “Panasonic MAX Juke” on Google Play™ for additional features, such as to request song playback from multiple devices simultaneously. You can also call up the tracks you want to play through the app. For details on the app, refer to the site below. http://av.jpn.support.panasonic.com/support/global/ cs/audio/app/
(This site is in English only.)
1Press [PLAY MENU] to select “JUKEBOX”.
2Press [R, T] to select the setting and then press
[OK].
Using the unit
Press [JUKEBOX] to select the setting.
OFF CROSSFADE |
Cancel cross-fading. |
ON CROSSFADE |
Add cross-fading. |
OFF |
Switch off the jukebox. |
Note:
•The system switches to repeat mode automatically when you switch on the jukebox.
•The jukebox is switched off when you switch off the system or change to another source.
•The cross-fade function may not work between songs that have different sampling frequencies.
Changing the repeat setting
1Press [PLAY MENU] repeatedly to select “PLAYMODE”.
2Press [R, T] to select the setting and then press
[OK].
RANDOM REPEAT Repeat random playback.
RND 
ALLTITLE REPEAT Repeat all tracks.
TQBJ2152
10
10
Using a microphone
Preparation
Decrease the volume of the system to its minimum before you connect or disconnect a microphone.
Rear panel of this unit
Microphone (not supplied)
1Connect a microphone (not supplied) to the
microphone jack.
Plug type: Ø 6.3 mm monaural
2Press [SOUND] repeatedly to select “MIC VOL”.
3Press [R, T] to adjust the volume of the microphone and then press [OK].
4If you want to sing with the background music,
play the music source and adjust the volume of the system.
Note:
•If a strange noise (howling) is emitted, move the microphone away from the speakers, or decrease the volume of the microphone.
•When you do not use the microphone, disconnect it from the microphone jack, and decrease the volume of the microphone to its minimum.
Karaoke
Preparation
Select the music source.
Note:
The Karaoke function is switched off when you switch off the system.
2 Press [R, T] to select the effect.
VOCAL |
|
Reduce the vocal level or change the |
|
CANCEL |
|
audio mode (depending on the source). |
|
ECHO |
|
Add an echo effect to the sound. |
|
KEY |
|
Change the key of a song. |
|
CONTROL |
|
Note: |
|
|
|
The setting is cancelled when you change |
|
|
|
to another source. |
|
TEMPO |
|
|
|
|
|
||
|
|
Change the speed of a song. |
|
BGM |
|
Change the background music level. |
|
MIC EQ |
|
Select a MIC EQ mode. |
|
OFF |
|
Cancel the effect. |
|
|
|
Press [OK] to confirm. |
|
To check the current setting, press [OK].
3Press [2/3] or [5/6] to select the setting and then press [OK].
VOCAL |
“OFF”, 1 to 3, “L”, “R”, “L+R” |
CANCEL |
When using stereo source not |
|
|
|
formatted for Karaoke |
|
It is recommended to use “2 VOCAL |
|
CANCEL” for most songs. |
|
When using Karaoke formatted |
|
source |
|
L: Only left channel sound |
|
(accompaniment only) |
|
R: Only right channel sound (vocals |
|
only) |
|
L+R: Left and right channel sounds are |
|
mixed |
ECHO |
“OFF”, 1 to 4 |
KEY |
–6 to +6 |
CONTROL |
|
TEMPO |
“OFF”, –2 to +2 |
BGM |
“OFF”, 1 to 3 |
MIC EQ |
“SINGING” or “SPEECH” |
Note:
To use Karaoke effect in D-IN or AUX source, set “D-IN MODE” or “AUX MODE” to “MODE 1” (~13).
ENGLISH
Karaoke effect
You can use the Karaoke effect function to add sound effects.
1Press [SOUND] repeatedly to select “KARAOKE EFFECT”.
Clock and timers
Setting the clock
This is a 24-hour clock.
1Press [SETUP] to select “CLOCK”.
2Press [R, T] to set the time and then press [OK].
TQBJ2152
11
11
To check the time
Press [SETUP] to select “CLOCK” and then press [OK].
In standby mode, press [DISPLAY].
Note:
Reset the clock regularly to maintain accuracy.
Sleep timer
The sleep timer switches off the system after the set time.
Press [SLEEP] to select the setting (in minutes).
To cancel, select “OFF”.
SLEEP 30  SLEEP 60
 SLEEP 90
 SLEEP120
 OFF
OFF 
To check the remaining time
Press [SLEEP].
Note:
•The remaining time is shown for a few seconds every minute. “SLEEP 1” is always shown when only 1 minute remains.
•The sleep timer always comes first. Be sure not to set an overlap of timers.
Play timer
(Except for Bluetooth®, D-IN and AUX source)
You can set the timer to come on at a certain time to wake you up.
Preparation
Set the clock.
1Press [SETUP] repeatedly to select “TIMER ADJ”.
2Press [R, T] to set the start time and then press
[OK].
3Do step 2 again to set the end time.
4Press [R, T] to select the source you want to play and then press [OK].
To start the timer
1Prepare the source you want to listen to (USB or radio) and set the volume.
2Press [SETUP] repeatedly to select “TIMER SET”.
3Press [R, T] to select “PLAY ON” and then press
[OK].
“#” is shown.
To cancel, select “PLAY OFF”.
The system must be switched off for the timer to operate.
TQBJ2152
12
To check the setting
Press [SETUP] repeatedly to select “TIMER ADJ” and then press [OK].
In standby mode, press [DISPLAY] two times.
Note:
•The timer starts at a low volume and increases gradually to the preset level.
•The timer comes on at the set time every day if the timer is on.
•If you switch off the system and then switch on again while a timer is in operation, the timer will not stop at the end time.
External equipment
Preparation
•Disconnect the AC mains lead.
•Switch off all equipment and read the appropriate operating instructions.
Note:
•Do not bend cables at sharp angles.
•Components and cables are sold separately.
•Sound distortion can occur when you use an adaptor.
•If you want to connect equipment other than those described, refer to the audio dealer.
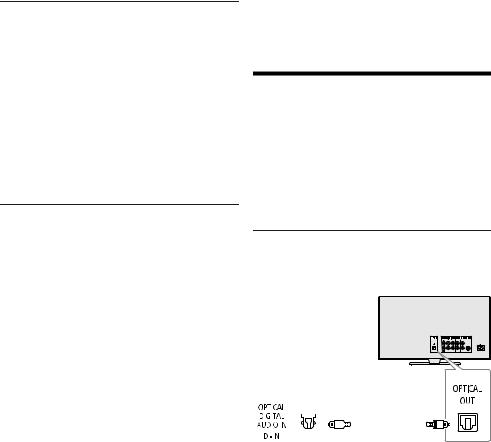
Using the optical input
You can connect a TV, VCR, DVD player etc., and listen to the audio through this system.
TV (not supplied)
Rear panel |
Optical digital |
|
|||||||||||||||
of this unit |
audio cable |
|
|||||||||||||||
|
|
|
|
|
|
|
|
|
|
|
|
|
|
|
(not supplied) |
|
|
|
|
|
|
|
|
|
|
|
|
|
|
|
|
|
|
|
|
|
|
|
|
|
|
|
|
|
|
|
|
|
|
|
|
|
|
|
|
|
|
|
|
|
|
|
|
|
|
|
|
|
|
|
|
1Connect the external equipment.
2Press [SELECT <, >] repeatedly to select “D-IN”.
3Play the external equipment.
Note:
•This system supports linear PCM signals.
•Multi-channel source will be converged to 2 channels.
•Sampling frequency: 32 kHz, 44.1 kHz, 48 kHz, up to 96 kHz
•The sound is muted if the signal format or frequency is not supported.
•If there are sounds coming from the TV’s speakers, decrease the volume of the TV to its minimum.
12

Using the auxiliary input
You can connect a VCR, DVD player etc., and listen to the audio through this system.
DVD player (not supplied)
Rear panel of this unit
Audio cable (not supplied)
1Connect the external equipment.
2Press [SELECT <, >] repeatedly to select “AUX”.
3Play the external equipment.
D-IN mode and AUX mode
1Press [SELECT <, >] repeatedly to select “D-IN” or “AUX”.
2Press [PLAY MENU] to select “D-IN MODE” or “AUX MODE”.
3Press [R, T] to select the mode and then press
[OK].
MODE 1 Select this mode to use the Karaoke effect function.
MODE 2 Select this mode when watching TV, movies (default) or using an external player with Karaoke
features.
Others
Auto off
This system automatically switches off when you do not use it for approximately 20 minutes.
1Press [SETUP] repeatedly to select “AUTO OFF”.
2Press [R, T] to select “ON” and then press [OK].
To cancel, select “OFF”.
Note:
•This function does not work when you are in radio source or when a Bluetooth® device is connected.
•This function may not work when a microphone is connected.
Bluetooth® standby |
|
|
|
|
ENGLISH |
||
This function automatically switches on the system when |
|
||
you establish a Bluetooth® connection from a paired |
|
|
|
device. |
|
|
|
1 |
Press [SETUP] repeatedly to select “BLUETOOTH |
|
|
2 |
STANDBY”. |
|
|
Press [R, T] to select “ON” and then press [OK]. |
|
|
|
To cancel, select “OFF”.
Note:
Some devices may take longer to respond. If you are connected to a Bluetooth® device before switching off the system, wait for a minimum of 5 seconds before connecting to this system from your Bluetooth® device again.
Software update
Occasionally, Panasonic may release updated software for this unit that may add or improve the way a feature operates. These updates are available free of charge. For more details, refer to the following website. http://panasonic.jp/support/global/cs/
(This site is in English only.)
█ Checking the software version
1Press [SETUP] repeatedly to select “SW VER.”
and then press [OK].
The software version is shown.
2Press [OK] again to exit.
Troubleshooting
Before requesting service, make the following checks. If you are in doubt about some of the check points, or if the solutions indicated do not solve the problem, consult your dealer for instructions.
█ Common problems
The unit does not work.
•The safety device has been activated. Do the following:
1.Press [1] on the unit to switch the unit to standby mode. If the unit does not switch to standby mode, disconnect the AC mains lead and then connect it again.
2.Press [1] again to switch on the unit. If the problem persists, consult your dealer.
The display panel lights up and changes continuously in standby mode.
• Press and hold [8] on the unit to select “DEMO OFF”.
No operations can be done with the remote control.
• Examine that the battery is installed correctly.
Sound is distorted or no sound.
• |
Adjust the volume of the system. |
|
• |
Switch off the system, determine and correct the cause, and |
|
|
then switch on again. It can be caused by straining of the |
|
|
speakers through excessive volume or power, and when |
TQBJ2152 |
|
using the system in a hot environment. |
|
|
|
|
|
|
13 |
13

A humming sound can be heard during playback.
•An AC mains lead or fluorescent light is near the cables. Keep other appliances and cords away from the cables of this system.
The sound level reduces.
•The protection circuit has been activated due to the continuous use at high volume output. This is to protect the system and maintain the sound quality.
█ USB
The USB device or the contents in it cannot be read.
•The format of the USB device or the contents in it are not compatible with the system.
•USB devices with storage capacity of more than 32 GB cannot work in some conditions.
Slow operation of the USB device.
•Large content size or large memory USB device takes longer time to read.
█ Bluetooth®
Pairing cannot be done.
•Check the Bluetooth® device condition.
•The device is out of the 10 m communication range. Move the device nearer to the system.
The device cannot be connected.
•The pairing of the device was unsuccessful. Do pairing again.
•The pairing of the device has been replaced. Do pairing again.
•This system might be connected to a different device. Disconnect the other device and try connecting the device again.
•The system may have a problem. Switch off the system and then switch on again.
•If “MODE 2” is selected in “LINK MODE”, select “MODE 1” (~8).
The device is connected but audio cannot be heard through the system.
•For some built-in Bluetooth® devices, you have to set the audio output to “SC-UA30” manually. Read the operating instructions of the device for details.
Sound from the device is interrupted.
•The device is out of the 10 m communication range. Move the device nearer to the system.
•Remove any obstacle between the system and the device.
•Other devices that use the 2.4 GHz frequency band (wireless router, microwaves, cordless phones, etc.) are interfering. Move the device nearer to the system and distance it from the other devices.
•Select “MODE 1” for stable communication (~8).
█ Radio
Sound is distorted.
•Use an optional FM outdoor antenna. The antenna should be installed by a competent technician.
A beat sound is heard.
•Switch off the TV or move it away from the system.
•Move mobile telephones away from the system if the interference is apparent.
TQBJ2152
14
█ D-IN, AUX
Playback image and sound are not synchronised.
•When in D-IN source, set “D-IN MODE” to “MODE 2”.
•When in AUX source, set “AUX MODE” to “MODE 2”.
Karaoke effect cannot be used.
•When in D-IN source, set “D-IN MODE” to “MODE 1”.
•When in AUX source, set “AUX MODE” to “MODE 1”.
█ Unit displays
“--:--”
•You connected the AC mains lead for the first time or there was a power failure recently. Set the clock.
•Track play time is more than 99 minutes.
“ADJUST CLOCK”
• The clock is not set. Adjust the clock.
“ADJUST TIMER”
• The play timer is not set. Adjust the play timer.
“AUDIO UNSUPPORTED”
•The signal format or frequency is not supported.
•This system does not support bitstream signals. Change the digital audio output setting on the external equipment to PCM.
•This system supports sampling frequencies of 32 kHz, 44.1 kHz, 48 kHz, up to 96 kHz. Select only the supported sampling frequencies on the connected equipment.
•Try connecting the external equipment by using the auxiliary input.
“AUTO OFF”
•The system has not been used for 20 minutes and will switch off within a minute. To cancel, press any button.
“ERROR”
•An incorrect operation was done. Read the instructions and try again.
“F” / “F” (“” represents a number.)
•The protection circuit has been activated and the system may be switched off automatically.
•Disconnect the AC mains lead and wait for a few seconds before connecting it again. If the problem persists, disconnect the AC mains lead and consult your dealer.
“NO PLAY” “UNSUPPORT”
•There is no album or track in the USB device.
•Examine the content. You can only play supported format.
•The system may have a problem. Switch off the system and then switch on again.
“NOT SUPPORTED”
•To use Karaoke effect in D-IN or AUX source, set “D-IN MODE” or “AUX MODE” to “MODE 1”.
“PLAYERROR”
•An unsupported MP3 file has been played. The system will skip that track and play the next one.
“REMOTE 1” “REMOTE 2”
•The remote control and the unit are using different codes. Change the code of the remote control.
– When “REMOTE 1” is shown, press and hold [OK] and [ ] on the remote control for a minimum of 4 seconds.
–When “REMOTE 2” is shown, press and hold [OK] and [<] for a minimum of 4 seconds.
“USB NO DEVICE”
• The USB device is not connected. Examine the connection.
14

“USB OVER CURRENT ERROR”
•The USB device is drawing too much power. Disconnect the USB device, switch off the system and then switch on again.
•Check the connection, it may be caused by a faulty USB cable.
“VBR”
•The system cannot show the remaining play time for variable bit rate (VBR) tracks.
Remote control code
When other Panasonic equipment responds to the remote control of this system, change the remote control code for this system.
Preparation
Press [SELECT] repeatedly on the unit to select “AUX”.
█ To set the code to “REMOTE 2”
1Press and hold [SELECT] on the unit and [<] until “REMOTE 2” is shown.
2Press and hold [OK] and [<] for a minimum of 4 seconds.
█ To set the code to “REMOTE 1”
1Press and hold [SELECT] on the unit and [  ] on the remote control until “REMOTE 1” is shown.
2Press and hold [OK] and [  ] on the remote control for a minimum of 4 seconds.
System memory reset
Reset the memory when the following situations occur:
•There is no response when buttons are pressed.
•You want to clear and reset the memory contents.
1Disconnect the AC mains lead.
2While you press and hold [1] on the unit,
connect the AC mains lead again.
Continue to press and hold the button until “– – – – – – – – –” is shown.
3Release [1].
All the settings are set back to the factory preset. It is necessary to set the memory items again.
Specifications
█ General
Power supply |
AC 220 V to 240 V, 50 Hz |
Power consumption |
51 W |
Power consumption in standby mode (approximate)
With “BLUETOOTH STANDBY” set to “OFF” |
0.5 W |
With “BLUETOOTH STANDBY” set to “ON” |
0.6 W |
Dimensions (W x H x D) 265 mm x 606 mm x 272 mm
Mass |
8 kg |
Operating temperature range |
0°C to +40°C |
Operating humidity range
20% to 80% RH (no condensation)
█ Amplifier section
RMS output power
Front Ch (x 2 channel)
150 W per channel (4 Ω), 1 kHz, 30% THD
Total RMS power |
300 W |
█ Tuner, terminals section |
|
Frequency modulation (FM) |
|
Preset memory |
30 stations |
Frequency range
87.50 MHz to 108.00 MHz (50 kHz step)
Antenna terminals |
75 Ω (unbalanced) |
Digital audio input |
|
Optical digital input |
Optical terminal |
Sampling frequency 32 kHz, 44.1 kHz, 48 kHz, 96 kHz
Audio format |
PCM |
Analog audio input |
|
Audio input |
Pin jack (1 system) |
Microphone |
|
Terminal |
Mono, 6.3 mm jack (2 system) |
█ USB section
USB port |
|
USB standard |
USB 2.0 full speed |
Media file format support |
MP3 (*.mp3) |
USB device file system |
FAT12, FAT16, FAT32 |
ENGLISH
TQBJ2152
15
15
 Loading...