


 Loading...
User’s Guide
Digital Audio Baby Monitor
MBP7
The features described in this User’s Guide are subject to modifications without prior notice.

Welcome...
to your new Motorola Digital Audio Baby Monitor!
Thank you for purchasing the Baby Monitor. Now you can hear your baby sleeping in another room.
Please retain your original dated sales receipt for your records. For warranty service of your Motorola product, you will need to provide a copy of your dated sales receipt to confirm warranty status. Registration is not required for warranty coverage.
For product-related questions, please call:
+44 (0) 844 557 0890 (UK only)*
*Calls cost 7p per minute plus your telephone company's access charge
+44 (0) 8187 62092 (ROI)
On the Web: www.motorolahome.com/support Email: support@motorolahome.com
This User's Guide provides you with all the information you need to get the most from your product.
Before you can use the baby monitor, please read the Safety Instructions on page 6 before you install the units.
Got everything?
•1 x Parent unit
•1 x Baby unit
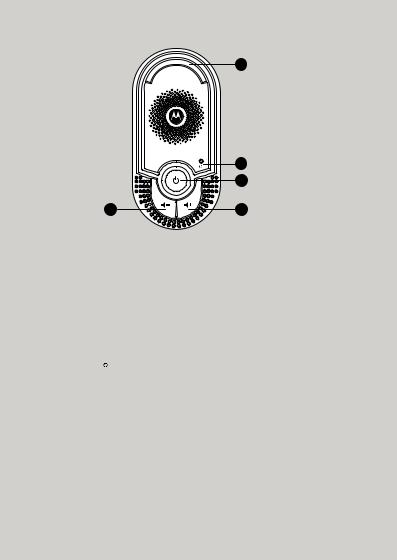
Overview of the Parent Unit
1
|
|
2 |
|
|
3 |
5 |
|
4 |
1. Sound Level Indicator |
4. |
Volume + + |
3 GREEN and 2 RED LEDs indicate |
|
Press to increase the speaker |
the audio level being picked up by |
|
volume. |
the microphone of baby unit. The |
5. |
Volume - - |
more LEDs that light up, the louder |
|
Press to decrease the speaker |
the sound is. If no LED lights up, the |
|
volume. |
sound level in the baby’s room is |
|
|
below the threshold for the parent unit. The LEDs are also used when adjusting the speaker volume setting on the parent unit, with more LEDs indicating a louder setting, from 0 to
5. 0
2.Link Indicator
On when the parent unit is powered on and linked to the baby unit. Flashes when the parent unit is out of range of the baby unit.
3.Power 0
Press and hold to power on/off the parent unit.
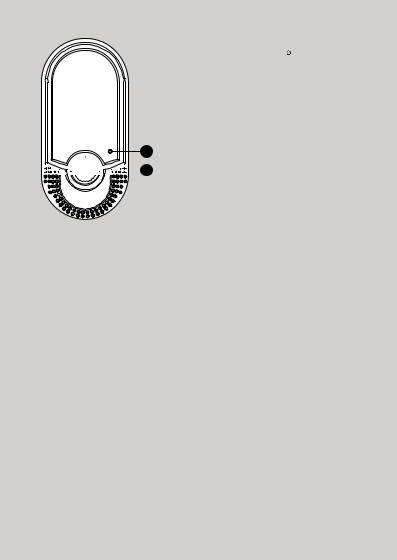
Overview of Your Baby Unit
1. |
Power Indicator |
|
On when the baby unit is switched on. |
2. |
Power 0 |
motorola |
Press and hold to power on/off the |
|
baby unit. |
1


 2
2
Important guidelines for installing your Digital Audio Baby Monitor
•To use your baby unit and parent unit together, you must be able to establish a radio link between them, and the range will be affected by environmental conditions.
•Any large metal object, like a refrigerator, a mirror, a filing cabinet, metallic doors or reinforced concrete, between the baby and parent unit may block the radio signal.
•The signal strength may also be reduced by other solid structures, like walls, or by radio or electrical equipment, such as TVs, computers, cordless or mobile phones, fluorescent lights or dimmer switches.
•Use of other wireless products, such as wireless networks, Bluetooth® systems or microwave ovens may cause interference with this product, so keep the baby monitor away from these types of products, or turn them off if they appear to be causing interference.
•If the signal is poor, try moving the parent and/or the baby unit to different positions in the rooms.
•It is recommended to place the baby unit about 1 metre from the cot to ensure sound can be received and heard.
•It is essential to ensure sufficient clear space around the baby unit.
Table of contents
1. |
Safety Instructions .................................................................................... |
6 |
|
2. |
Getting Started......................................................................................... |
7 |
|
|
2.1 |
Baby Unit Power Supply ............................................................................. |
7 |
3. |
Using the Digital Audio Baby Monitor ...................................................... |
8 |
|
|
3.1 |
Power on/off the parent unit ...................................................................... |
8 |
|
3.2 |
Power on/off the baby unit ........................................................................ |
8 |
|
3.3 |
Adjust speaker volume ............................................................................... |
8 |
4. |
Disposal of the Device (Environment) ..................................................... |
9 |
|
5. |
Cleaning .................................................................................................. |
10 |
|
6. |
Help |
......................................................................................................... |
11 |
7. |
General Information ............................................................................... |
12 |
|
8. |
Technical .........................................................................Specifications |
17 |
|
ENGLISH
Table of contents |
5 |
|
|
1. Safety Instructions
Presence of un-insulated "dangerous voltage" within the product’s enclosure that may be of sufficient magnitude to constitute a risk of electric shock to persons.
WARNING:
Presence of important operating and maintenance (servicing) instructions in the literature accompanying the appliance.
This digital audio baby monitor is compliant with all relevant standards regarding electromagnetic fields and is, when handled as described in the User’s Guide, safe to use. Therefore, always read the instructions in this User’s Guide carefully before using the device.
•The socket outlet shall be installed near the equipment and shall be easily accessible.
•Determine a location for the baby monitor that will provide the best audio reception of your baby in his cot.
•NEVER place the baby monitor within the cot.
•Adult assembly is required. Keep small parts away from children when assembling.
•This product is not a toy. Don’t allow children to play with it.
•This baby monitor is not a substitute for responsible adult supervision.
•Keep this User’s Guide for future reference.
•Do not cover the baby monitor with a towel or blanket.
•Test this monitor and all its functions so that you are familiar with it prior to actual use.
•Do not use the baby monitor near water.
•Do not install the baby monitor near a heat source.
CAUTION
In order to reduce the risk of fire or electrical shock, do not expose the device to water or humidity. Never disassemble the device. Opening the casing is dangerous and will invalidate the warranty.
Main plug is used as disconnect device and it should remain readily operable during intended use. In order to disconnect the apparatus from the mains completely, the mains plug should be disconnected from the mains socket outlet completely.
6 |
Safety Instructions |
|
|
Loading...