


USER’S GUIDE
0%3 0%3 0%3 0%3
BABY MONITOR
USER’S GUIDE
The features described in User's Guide are subject to modifications without prior notice.

Welcome...
to your new Motorola Baby Monitor!
Thank you for purchasing the MBP26, MBP26/2, MBP26/3, MBP26/4. Now you can see and hear your baby sleeping in another room or you can monitor your older children in their playroom.
Please retain your original dated sales receipt for your records. For warranty service of your Motorola product, you will need to provide a copy of your dated sales receipt to confirm warranty status. Registration is not required for warranty coverage.
For product related questions, please call:
U. 52,
This User's Guide provides you with all the information you need to get the most from your product.
Before you can use the baby monitor, we recommend you insert and fully charge the battery in the parent unit, so that it continues to work if you disconnect it from the power supply to carry it to another location. Please read the Safety Instructions on page 6 before you install the units.
Got everything?
•1 x Parent unit
•1 x Baby unit (camera)
•1 x Rechargeable Ni-MH battery pack for the Parent unit
•1 x Power adapter for the Parent unit
•1 x Power adapter for the Baby unit
In multi-camera packs, you will find one or more additional camera units with power adapter units.

Overview of the Parent Unit
8 |
9 |
|
|
10 |
|
|
|
|
1 |
|
14 |
|
11 |
|
|
|
|
|
|
|
|
<![if ! IE]> <![endif]>POWER |
|
|
2 |
|
13 |
6 |
7 |
15 |
|
|
5 |
12 |
|
|
|
||
4 |
3 |
|
|
1.Display (LCD screen)
2.Scroll Up/Volume+ Button 
3.Scroll Down/VolumeButton 
4.Return/Switch Camera Button  Press to return to previous menu level. Press to switch camera units
(if paired with more than one camera). Press to pan left in digital pan/tilt mode.
5.Menu/OK Button 
Press to open the menu options. Press to confirm a selection. Press to pan right in digital pan/tilt mode.
6.Digital Pan/Tilt 

Press to enter/exit digital pan/tilt mode
Parent unit display icons
7.Talk Key 
Press and hold to talk back through the camera.
8.Power indicator LED Blue when mains adaptor power ON.
9.Unit ON/OFF LED (Green)
10.Audio Level LED (Green, Orange, Red, Red)
11.Power / Video On-Off Button  Press and hold to turn the unit
ON or OFF.
In monitor mode, press to turn the display On/Off.
12.Battery cover
13.Stand
14.Speaker
15.Power Adapter Socket
|
Signal Level Indication (3 Levels) |
N |
Night Vision Mode (Video also changes to Black/White) |
Battery Level Indication (3 Levels)
*Volume Level Control (8 Levels)
Brightness Level Control (8 Levels)
Alarm Setting (6h, 4h, 2h, OFF)
Select Camera
Add Camera
Delete Camera
Digital Pan/Tilt mode On
Camera scan mode set
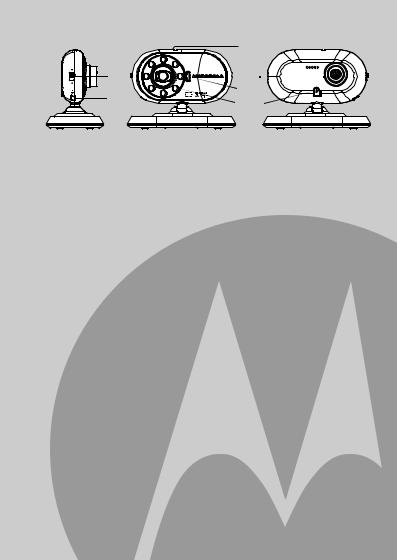
Overview of Your Baby Unit
|
1 |
|
|
5 |
2 |
9 |
|
|
|||
7 |
4 |
|
|
3 |
6 |
||
|
|||
|
8 |
|
1. |
Photo Sensor (Night Vision Mode) |
6. |
Power Adapter Socket |
2. |
Camera Lens |
7. |
Pair Key |
3. |
Infrared LEDs |
8. |
Microphone |
4. |
Power LED |
9. |
Speaker |
5. |
ON/OFF Switch |
|
|
Important guidelines for installing your Baby Monitor
•To use your Video Monitor Baby and Parent Units together, you must be able to establish a radio link between them, and the range will be affected by environmental conditions.
•Any large metal object, like a refrigerator, a mirror, a filing cabinet, metallic doors or reinforced concrete between the Baby and Parent Unit may block the radio signal.
•The signal strength may also be reduced by other solid structures, like walls, or by radio or electrical equipment, such as TVs, computers, cordless or mobile phones, fluorescent lights or dimmer switches.
•Use of other 2.4GHz products, such as wireless networks (Wi-Fi® routers), Bluetooth® systems, or microwave ovens, may cause
interference with this product, so keep the baby monitor away at least 5ft (1.5m) from these types of products, or turn them off if they appear to be causing interference.
•If the signal is weak, try moving the Parent and/or the Baby Unit to different positions in the rooms.

Table of contents
1. |
Safety Instructions ......................................................................... |
6 |
||
2. |
Getting Started ............................................................................... |
8 |
||
|
2.1 |
Baby Unit Power Supply................................................................. |
8 |
|
|
2.2 |
Parent Unit Battery Installation ....................................................... |
8 |
|
|
2.3 |
Parent Unit Power Supply .............................................................. |
9 |
|
|
2.4 |
Registration (Pairing).................................................................... |
11 |
|
3. |
Using the Baby Monitor ............................................................... |
12 |
||
|
3.1 |
Setting up ..................................................................................... |
12 |
|
|
3.2 |
Night Vision Mode ........................................................................ |
12 |
|
|
3.3 |
Video ON/OFF.............................................................................. |
12 |
|
|
3.4 |
Talk mode..................................................................................... |
12 |
|
4. |
Parent Unit Menu Options ........................................................... |
13 |
||
|
4.1 |
Volume |
......................................................................................... |
13 |
|
4.2 |
Brightness..................................................................................... |
13 |
|
|
4.3 |
Digital Pan ......................................................................and Tilt |
13 |
|
|
4.4 |
Alarm ............................................................................................ |
|
13 |
|
4.5 |
Camera ............................................................................Control |
13 |
|
|
|
4.5.1 .......................................................Add (pair) a camera |
13 |
|
|
|
4.5.2 ............................................................... |
View a camera |
14 |
|
|
4.5.3 ............................................................. |
Delete a camera |
14 |
|
|
4.5.4 .......................................................... |
Scan the cameras |
15 |
5. |
Disposal of .......................................The Device (environment) |
16 |
||
6. |
Cleaning ........................................................................................ |
|
17 |
|
7. |
Help |
................................................................................................ |
|
18 |
8. |
General Information ..................................................................... |
20 |
||
<![endif]>ENGLISH
Table of contents |
5 |
|
|

1. Safety Instructions
WARNING:
STRANGULATION HAZARD - Keep the unit and adapter cord more than 1 meter from the crib and out of the baby's reach. NEVER place the baby unit or cords within the cot.
Secure the cord more than 1 meter away from the baby's reach. Never use extension cords with the AC Adapters. Only use the AC Adapters provided.
CAMERA SET UP & USE:
Determine a location for the BABY UNIT that will provide the best view of your baby in his cot.
Place the BABY UNIT on a flat surface, such as a dresser, bureau,
or shelf, or wall mount it securely using the keyhole slots under the stand.
NEVER place the baby unit or cords within the cot.
WARNING
This baby monitor is compliant with all relevant standards regarding electromagnetic fields and is, when handled as described in the User's Guide, safe to use. Therefore, always read the instructions in this User's Guide carefully before using the device.
•Adult assembly is required. Keep small parts away from children when assembling.
•This product is not a toy. Do not allow children to play with it.
•This baby monitor is not a substitute for responsible adult supervision.
•Keep this user's guide for future reference.
•Do not place the baby unit or cords in the cot or within reach of the baby (the unit and cords should be more than 1 meter away).
•Keep the cords out of reach of children.
•Do not cover the baby monitor with a towel or blanket.
6 |
Safety Instructions |
|
|

• Test this monitor and all its functions so that you are familiar with it |
<![if ! IE]> <![endif]>ENGLISH |
|
prior to actual use. |
||
|
||
• Do not use the baby monitor in moist places or close to water. |
|
|
• Do not install the baby monitor in extreme cold or heat, or in direct |
|
|
sunlight, or close to a heat source. |
|
|
• Only use the chargers and power adapters provided. Do not use other |
|
|
chargers or power adapters as this may damage the device and |
|
|
battery pack. |
|
|
• Only insert a battery pack of the same type. |
|
|
• Do not touch the plug contacts with sharp or metal objects. |
|
|
• Connect the power adapters to easily accessible mains sockets. |
|
CAUTION
Risk of explosion if battery is replaced by an incorrect type. Dispose of used batteries according to their instructions.
Safety Instructions |
7 |
|
|
2. Getting Started
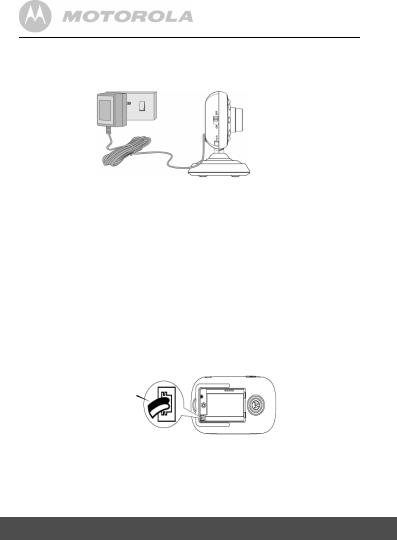
2.1Baby Unit Power Supply
1.Connect the small plug of the power adapter to the baby unit (camera) and the other end to the electrical outlet.
NOTE
Only use the enclosed power adapter (6V DC / 500mA) with the slightly larger DC plug.
2.Slide the ON/OFF switch to the ON position. The power LED will light up in orange.
3.Slide the ON/OFF switch to the OFF position to turn the Baby Unit off.
2.2Parent Unit Battery Installation
The supplied rechargeable battery pack should be fitted so the parent unit can be moved without losing the link with the camera. Charge the battery in parent unit before first time use or when the parent unit indicates the battery is low.
Black
Red

1.Insert the plug of the rechargeable battery pack into the small socket inside the battery compartment as shown above and fit the battery pack into the compartment.
8 |
Getting Started |
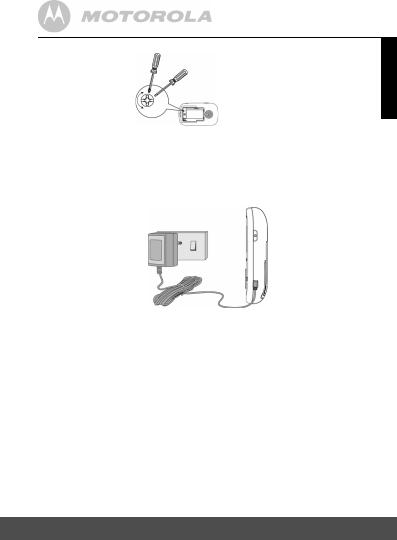
Small cross head or Flat end screw driver.
<![endif]>ENGLISH
2Place the battery cover over the compartment and gently tighten the screw in a clockwise direction using a Small cross head or Flat end screwdriver.
2.3Parent Unit Power Supply
IMPORTANT
Installing the rechargeable battery pack and charging it fully before use is recommended. This will allow the unit to operate on battery in the event of a power failure, or when moving to a different room.
1.Connect the small plug of the power adapter to the parent unit and the other end to the electrical outlet. Only use the enclosed power adapter (6V DC/500mA) with the slightly smaller DC plug.
2.Press and hold the P POWER ON/OFF button for 1 second to turn ON the parent unit.
3.Once the baby and parent units are switched on, the display on the parent unit will show the video captured by the baby unit.
Getting Started |
9 |
 Loading...