


Table of Contents |
|
GETTING STARTED |
|
Welcome .......................................................................................... |
1 |
Radio Operations .................................................................... |
1 |
Phone Operations ................................................................... |
1 |
Message Mail™ ...................................................................... |
1 |
Programming Menu ............................................................... |
1 |
Integrated Multi-Service Mobile .................................................. |
2 |
Display .................................................................................... |
4 |
Overview of Options .............................................................. |
5 |
Turning On/Off Your Mobile Unit ............................................... |
6 |
Automatic Turn On/Off ......................................................... |
6 |
Call-in-Progress Protection .................................................... |
6 |
Adjusting Volumes ......................................................................... |
7 |
Escalert .................................................................................... |
7 |
Microphone Mute ................................................................... |
7 |
Operating Your Mobile Unit .......................................................... |
8 |
Radio Calls .............................................................................. |
8 |
Phone Calls ............................................................................. |
8 |
GROUP CALL |
|
Group Call........................................................................................ |
9 |
Service Area Selection................................................................... |
10 |
Local Area ..................................................................................... |
10 |
Targeted Area ............................................................................... |
11 |
Wide Area ...................................................................................... |
13 |
Talkgroup Selection ..................................................................... |
14 |
Service Area Restriction................................................................ |
16 |
PTT - ID ....................................................................................... |
16 |
PRIVATE CALL™ |
|
Private Call .................................................................................... |
17 |
Making a Private Call ........................................................... |
17 |
Receiving a Private Call ....................................................... |
20 |
Call Alert™ .................................................................................... |
21 |
Sending a Call Alert ............................................................. |
21 |
Receiving a Call Alert .......................................................... |
23 |
Call Alert Stacking......................................................................... |
24 |
Receiving a Call Alert with Stacking ................................... |
24 |
Responding to a Call Alert with Stacking ........................... |
24 |
USER’S GUIDE LM2000/m
 370
370


Getting Started |
|
PHONE OPERATIONS |
|
Placing a Phone Call ..................................................................... |
25 |
Receiving a Phone Call ................................................................ |
30 |
DTMF Tones ............................................................................... |
30 |
Burst DTMF Sequence ............................................................... |
30 |
Last Number Redial ..................................................................... |
31 |
Automatic Redial .......................................................................... |
31 |
Displaying Your Own Number .................................................... |
31 |
Scratchpad ..................................................................................... |
31 |
Silent Scratchpad .......................................................................... |
31 |
Silent Memo Pad .......................................................................... |
32 |
Call Forwarding ............................................................................ |
33 |
Forward All Calls .......................................................................... |
33 |
Busy Transfer ................................................................................ |
36 |
No-Answer Transfer ..................................................................... |
36 |
No-Reach Transfer ....................................................................... |
36 |
Call Forwarding Recall ................................................................. |
39 |
Call Hold ....................................................................................... |
39 |
Call Waiting ................................................................................... |
41 |
MESSAGE MAIL™ |
|
Reviewing and Reading Messages .............................................. |
45 |
Message Mail Call Back ............................................................... |
47 |
Receiving New Mail ..................................................................... |
47 |
PROGRAMMING MENU |
|
Programming Menu Table .......................................................... |
49 |
Programming Menu Examples .................................................... |
55 |
ADDITIONAL INFORMATION |
|
FeaturesBenefits ........................................................................... |
71 |
Important General Safety Information ........................................ |
73 |
Cleaning Instructions ................................................................... |
76 |
Status Indicator Table................................................................... |
77 |
Error Message Table..................................................................... |
77 |
Index .............................................................................................. |
81 |
, Motorola, Call Alert, Message Mail, and |
|
Fast Access are trademarks of Motorola, Inc. |
|
Started Getting
LM2000/m
 370
370


 USER’S GUIDE

Getting Started
WELCOME
The iDEN Integrated Digital Mobile allows you to place and receive phone calls, make and receive person-to-person or group radio calls, and receive alphanumeric messages.
The large display and soft key driven interface makes it the most user-friendly communications product on the market today.
Before operating your unit, take time to read the Important General Safety Information on page 73.
There are four groups of capabilities explained in this guide:
Radio Operations
With Radio Operations, you can communicate with a group of individuals (Group Call mode) or privately with a single person (Private Call mode). You can also send a Call Alert™ to an individual, indicating that you want to speak with them.
Phone Operations
With Phone Operations, you can place and receive phone calls. You can place phone calls by dialing the number directly or by using one of the memory-calling features. A number of optional features, such as Call Waiting and Call Forwarding, are also available.
Message Mail™
With Message Mail, you can receive and store up to eight alphanumeric messages. You are notified when new messages are received, which can be read at your convenience. A phone number included within a message can be called automatically.
Programming Menu
A number of convenience features, such as a Signal Strength Indicator, Auto Answer, Phone-Call Timers, and Auto Lock are provided to you in an easy-to-use, self-prompting menu.
Started Getting
LM2000/m370 USER’S GUIDE |
1 |

Getting Started
Getting Started
INTEGRATED MULTI-SERVICE MOBILE
|
AS |
O.K. A |
|
MARKED |
|
LETTERING SIZE: |
ISS. |
REVISION |
|
|
|
REQUIRES: |
O |
|
|
|
19. Earpiece |
|
|
|
|
|
|
|
|
|
|
|
|
|
|
|
|
|
|
|
1. |
Status Indicators |
17-18. Reserved |
|
|
|
|
|
|
|
2. |
Mute Key |
|
|
|
|
|
|
|
|
3. |
Volume Control Keys |
||
|
|
|
|
|
|
|
|
|
||
16. Push-to-Talk |
|
|
|
|
|
|
|
4. |
Alphanumeric Display |
|
|
|
|
|
|
|
|
|
|
||
(PTT) Button |
|
|
|
|
|
|
|
|
5. |
Option Keys |
15. Active-Line Key |
|
|
|
|
|
|
|
6. |
Directional Keys |
|
|
|
|
|
|
|
|
|
|
||
14. Phone Mode Key |
|
|
|
|
|
|
|
7. |
Group Mode Key |
|
PHONE |
GROUP |
PRVT |
8. |
Private Mode Key |
||||||
|
|
|
|
|
|
|
|
|
||
|
|
1 QZ |
2 ABC |
3 DEF |
|
|
||||
|
|
4 GHI |
5 JKL |
6 MNO |
|
|
||||
|
|
7 PRS |
8 TUV |
9 WXY |
9. |
Alphanumeric Keypad |
||||
|
|
|
|
|||||||
13. Phone Control Keys |
|
0 |
|
|
|
|
|
|
|
|
|
|
|
|
|
|
|
|
|||
|
|
|
|
|
|
|
|
|||
|
|
|
|
|
|
|
|
|
||
|
|
SEND |
END |
PWR |
10. Power (On/Off) Key |
|||||
12. Microphone |
11. Speaker |
|
2 |
USER’S GUIDE LM2000/m370 |

Getting Started
1.Status Indicators—Solid or blinking lights indicate different conditions your unit may be in. (See the Additional Information section for Status Indicator Table.)
2.Mute Key—Used to enable and disable the microphone during telephone calls so that the other party cannot hear you. The solid yellow status indicator illuminates when the microphone is muted.
3.Volume Control Keys—Used to adjust volume levels of the earpiece, speaker, ringer, keypad, and message notification.
4.Alphanumeric Display—A three-line display, providing up to 11 characters per line. The display is backlit for ease of viewing.
5.Option Keys—Used to select the option that appears directly above the key on the third line of the display.
6.Directional Keys—Used to perform Memory Scrolling, option scrolling, and editing.
7.Group Mode Key—Used for one-to-many radio communication.
8.Private Mode Key—Used for one-to-one private radio communication.
9.Alphanumeric Keypad—Used for direct entry of radio IDs, service area IDs, talkgroup IDs, phone numbers, or names. All keys on the keypad are backlit for ease of nighttime viewing.
10.Power (On/Off) Key—Used to turn the mobile unit on and off.
11.Speaker—Used for hands-free communication; also produces ringer tones.
12.Microphone—Used for speaking during handset communication.
13.Phone Control Keys—Used to place ( SEN D ) or terminate ( EN D )telephone calls.
14.Phone Mode Key—Used for telephone communication.
15.Active-Line Key—Used to control the Active-Line Indicator ( ■ ) that appears on the display.
16.Push-to-Talk (PTT) Button—Used to transmit voice during Group Calls and Private Calls. Also used to send Call Alerts.
17-18. Reserved for future use.
19.Earpiece—Used for listening during handset communications.
Started Getting
LM2000/m370 USER’S GUIDE |
3 |

Getting Started
Getting Started
Display
The three-line display provides information to operate your mobile unit. There are three different modes your unit can be in: PHONE , GROUP , or PRVT . Each mode has a “home” or default screen. To help you become familiar with the display operation, shown below is the “home” screen for the Phone mode.
Active-Line
Indicator
Line 3—Options
•Line 1 displays the current mode you are in.
•Line 2 displays the Signal Strength and is also the number selection line.
•Line 3 displays the first pair of available options.
The Active-Line Indicator ( ■ ) points to the line you are working on. The ■ is always present on the display. The ■ can be moved up and down among the three lines by pressing the Active-Line Key (  ). Direct input from the keypad or scrolling using the
 keys is available on the line where the ■ appears.
The third line shows the immediately available options. To select an option, press the Option Key ( ) located directly below it. When the ■ is moved to the third line, the next pair of options is automatically presented. At this point, scrolling using the
 keys will cause any additional options to appear.
4 |
USER’S GUIDE LM2000/m370 |
Getting Started
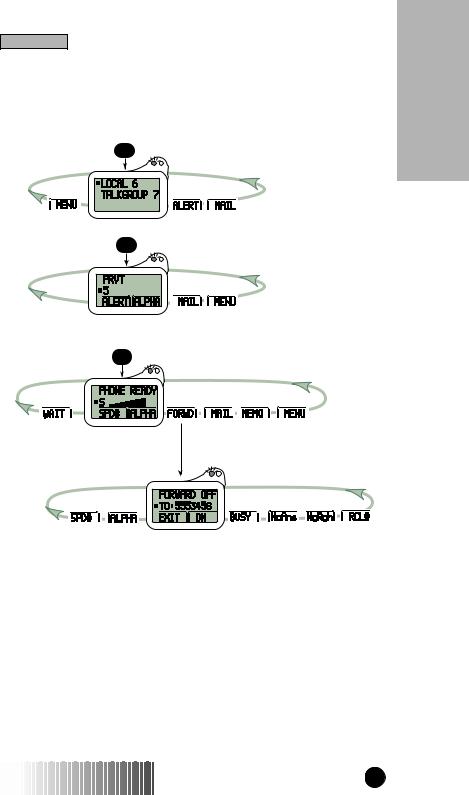
Overview of Options
The options presented on the third line of the display allow easy access to all of the advanced features. Below is an overview of the options available from within each mode.
GROUP
PRVT
PHONE
Started Getting
LM2000/m370 USER’S GUIDE |
5 |
Getting Started
Getting Started
TURNING ON/OFF YOUR MOBILE UNIT
The PWR key (located at the bottom of the handset keypad) turns the mobile unit both on and off. Press and hold the PWR key to turn the unit on or off. You may turn your mobile on or off at any time.
To prevent unauthorized use, your unit will automatically Lock when turned on using the PWR key (using the ignition switch will not automatically lock your unit). To unlock your unit, enter your passcode. See the “Programming Menu” section for further information on Locks.
Each time the mobile unit is turned on, it performs a self-check and system registration routine. Once completed, the unit will display the last mode it was in.
Automatic Turn On/Off
To enable Automatic Turn On/Off, leave the unit’s power on before turning the vehicle ignition off. Now your unit will automatically turn on every time your vehicle is turned on. Turning off your vehicle’s ignition automatically turns off your unit.
The display illuminates during the self-check routine to verify operation. Notify your service provider if any error messages are displayed.
When using your mobile unit while the engine is off, you are operating on your vehicle’s battery power, and may drain the battery.
Call-in-Progress Protection
This feature allows phone and radio calls in progress to continue after the vehicle’s ignition is turned off, without interrupting your conversation.
In Group or Private mode, you must be transmitting in order for Call-in-Progress Protection to operate.
6 |
USER’S GUIDE LM2000/m370 |

Getting Started
ADJUSTING VOLUMES
Press the Volume Control Keys ( VV ) to adjust:
•EARPIECE VOLUME
When engaged in a call, with the handset at the ear, pressing the Volume Control Keys adjusts the earpiece volume.
•SPEAKER VOLUME
When the handset is in the cradle, pressing the Volume Control Keys adjusts the speaker volume. Speaker volume can also be adjusted while your unit is idle.
•RINGER VOLUME
Pressing the Volume Control Keys while the phone is ringing adjusts the ringer volume.
Escalert
You can also adjust the Earpiece, Speaker, and Ringer volumes through the Programming Menu. In addition, the Keypad and Message Notification volumes can be set. Refer to the “Programming Menu” section for instructions on adjusting these volumes.
Your unit is equipped with the Escalert feature. Escalert ensures that alert tones are initially produced at non-intrusive levels. This feature reduces the initial volume of alert tones and automatically increases the volume to the level you have set.
Microphone Mute
This feature allows you to disable the microphone during phone calls, preventing the other party from hearing you. Microphone Mute also allows you to silence the keypad tones or disable sending the Dual-Tone Multi-Frequency (DTMF) tones when entering numbers during a phone call. After ending your current phone call, the entered number can be easily dialed by pressing
. To mute the microphone, press the Mute Key ( M ) located on the side of your unit. A solid yellow status indicator lights when the microphone is muted.
Started Getting
LM2000/m370 USER’S GUIDE |
7 |
Getting Started
Getting Started
OPERATING YOUR MOBILE UNIT
You can operate your unit in two ways: Hands-free and handset operation. Hands-free allows you to safely operate your mobile unit while driving. Handset operation allows you to privately make and receive calls with the handset at your ear. Hands-free and handset operation can be used when making phone calls.
Radio Calls
To make a radio call, after selecting the appropriate ID, lift the handset to your ear and press the PTT to talk. Wait for the chirp to begin speaking. Release the PTT to listen.
To respond to a radio call, lift the handset to your ear and press the PTT to talk. Wait for the chirp to begin speaking. Release the PTT to listen.
To use the Hands-Free upgrade, you must engage in a Private or Group Call by pressing the PTT and waiting for the chirp to begin speaking. You can then release the PTT - and your phone will continue transmitting until you stop speaking.
Phone Calls
To place a hands-free phone call, select a number and press while the handset remains in the cradle. Direct your conversation to the visor microphone. For handset operation, lift the handset to your ear after selecting a phone number and pressing .
To answer a phone call handsfree, press SEN D while the handset remains in the cradle. Direct your conversation to the visor microphone. For handset operation, lift the handset to your ear and begin talking.
Lifting the handset from the cradle automatically answers your call. You must press
EN D to terminate a phone call using hands-free and handset operation.
8 |
USER’S GUIDE LM2000/m370 |
Group Call
GROUP CALL GROUP
A Group Call consists of a service area and a talkgroup. Service areas are geographic areas of coverage for your radio. Your specific service areas are defined by your service provider. A talkgroup is an organization of radio users who communicate with each other.
In Group Calls, press and hold the PTT to talk and release it to listen.
Upon pressing PTT, you will hear one of the following alert tones:
•A high, chirp-like tone indicates that you have permission to talk. Begin speaking after the tone.
•A low, continuous tone indicates that you cannot talk at this time. Wait a moment and try again.
•A busy-like tone indicates that the system is busy. Wait for a call-back (highpitched) tone, then try again.
Your unit may be programmed with a courtesy tone. Upon releasing the PTT, a courtesy tone alerts listeners that you have completed your transmission.
A time-out timer limits the amount of time you can continuously talk. When the allotted time expires, you will hear a low-pitched cut-off tone.
Call Group
LM2000/m370 USER’S GUIDE |
9 |
Group Call
Group Call
Service Area Selection
When making outgoing Group Calls, you may choose from three different service area selections: Local Area, Targeted Area, and Wide Area. In each case, you are speaking with members of the talkgroup (shown on line 2 of the display) who are in that service area. Your unit is equipped with a pre-programmed list of service areas. You can add, edit, or erase areas. You can also assign names (aliases) to them. (See the “Programming Menu” section for programming information.)
Area selection only applies to Group Calls you initiate. Your last-selected area appears on your display, regardless of the origin of any incoming call.
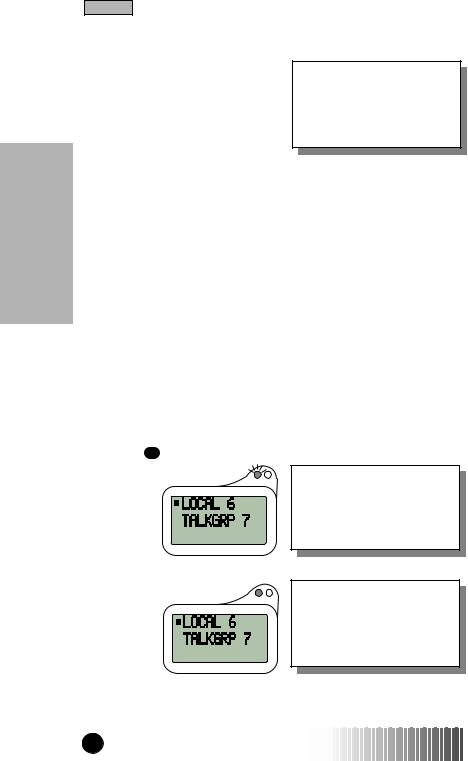
Local Area
A Local-Area Group Call allows you to communicate with talkgroup members located in the service area you are currently in. Your radio automatically updates your Local Area as you travel from one service area to another. Dispatchers are always included in a Local-Area call, regardless of their location.
(Example: Talk to Talkgroup 7 members in your Local Area. Area 6 is your current Local Area. Talkgroup 7 is your selected talkgroup.)
1. Press GROUP .
Local Area is at the beginning of your service area list. With the ■ appearing on the top line of the display, use the 
 to scroll to “LOCAL.”
2. Press PTT.
Pressing PTT allows you to talk with “TALKGRP 7”
members who are currently in your Local Area and your dispatcher.
10 |
USER’S GUIDE LM2000/m370 |
Group Call
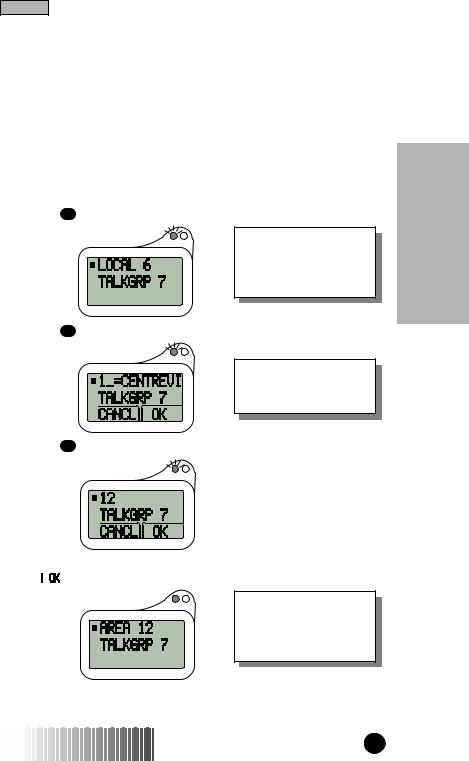
Targeted Area
A Targeted-Area Group Call allows you to communicate with talkgroup members in a specific service area. A Targeted Area can be selected by: Direct Entry or Memory Scroll.
•DIRECT ENTRY
Allows you to use the keypad to input service area IDs.
(Example: Select area ID #12 using the keypad. Centreville is service area 1. Area 6 is your current Local Area. Talkgroup 7 is your selected talkgroup.)
1. Press GROUP .
When in the Local Area, the word “LOCAL” appears before the service area ID or name.
2. Press 1 QZ .
Service area ID #1 has been programmed with a name, Centreville.
3. Press 2 ABC .
4.Press PTT or  .
.
The word “AREA” appears before the service area ID unless a name has been programmed.
Call Group
LM2000/m370 USER’S GUIDE |
11 |
Group Call
Group Call
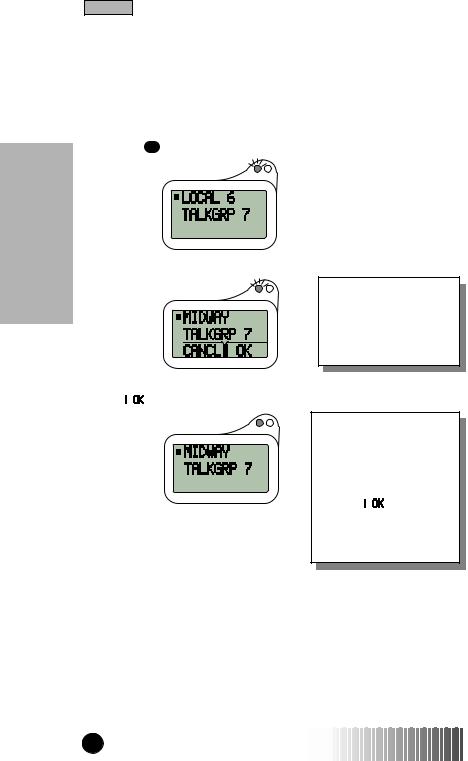
•MEMORY SCROLL
Allows you to use the 
 keys to scroll through memory for areas. When programmed, names appear in place of service area IDs.
(Example: Select “MIDWAY,” which is second in your service area list. Area 6 is your current Local Area. Talkgroup 7 is your selected talkgroup.)
1. Press GROUP .
2. Press  twice.
Press and hold the or
or  key to activate the Auto Scroll feature. Auto Scroll allows you to quickly scroll through your lists.
3.Press PTT or .
.
Pressing PTT allows you to talk with the “TALKGRP 7” members currently in the “MIDWAY” service area.
Pressing  confirms your service area selection without initiating a Group Call.
12 |
USER’S GUIDE |
LM2000/m370 |
|
Group Call
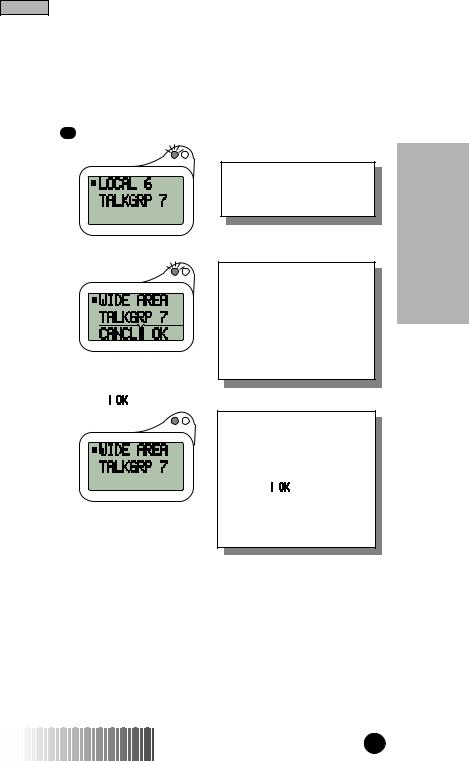
Wide Area
A Wide-Area Group Call allows you to talk with talkgroup members in all service areas and your dispatcher.
(Example: Select Wide Area. Area 6 is your current Local Area. Talkgroup 7 is your selected talkgroup.)
1. Press GROUP .
2. Press  .
.
3. Press PTT or .
.
When “LOCAL” appears on the display, press  once to locate Wide Area.
“WIDE AREA” is at the end of your service area list. With the ■ appearing on the top line of the display, use your 
 to scroll to “WIDE AREA.”
Pressing PTT allows you to talk with your dispatcher and the “TALKGRP 7” members in all service areas. Pressing  confirms your Wide Area selection without initiating a Group Call.
Call Group
LM2000/m370 USER’S GUIDE |
13 |
Group Call
Group Call
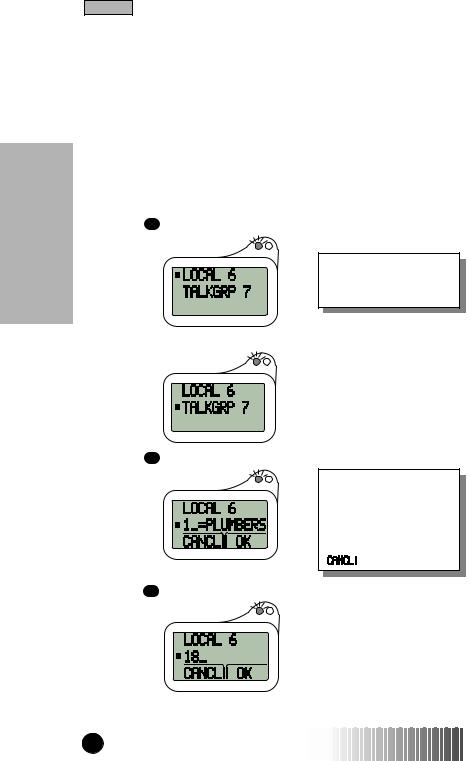
Talkgroup Selection
A talkgroup is an organization of radio users who communicate with each other. Your unit is equipped with a pre-programmed list of talkgroups. You can add, edit, or erase talkgroups. You can also assign names (aliases) to them. (See the “Programming Menu” section for programming information.) A talkgroup can be selected by: Direct Entry or Memory Scroll.
•DIRECT ENTRY
Allows you to use the keypad to input talkgroup IDs.
(Example: Select talkgroup 18. “PLUMBERS” is talkgroup 1.)
1. Press GROUP .
Talkgroup Selection is independent of Service Area Selection.
2. Press  .
.
3. Press 1 QZ .
To erase a digit, press  . To clear all digits, press and hold
  . To return to your previously selected talkgroup, press
  .
.
4. Press 8 TUV .
14 |
USER’S GUIDE |
LM2000/m370 |
|

Group Call
5. Press PTT or  .
.
To transmit, press PTT; to listen only, press .
.
The word “TALKGRP” appears before the talkgroup ID unless a name has been programmed.
•MEMORY SCROLL
Allows you to use the 
 keys to scroll through memory for talkgroups. When programmed, names appear in place of talkgroup IDs.
(Example: Select “PAINTERS,” which is eighth in the list. Talkgroup 7 is your selected talkgroup and is seventh in the list.)
1. Press GROUP .
2. Press  .
.
3. Press  .
.
4. Press PTT or .
.
Press and hold the or
or  keys to activate the Auto Scroll feature. Auto Scroll allows you to quickly scroll through your lists.
To transmit, press PTT; to listen only, press
 .
.
Call Group
LM2000/m370 USER’S GUIDE |
15 |

Group Call
Group Call
SERVICE AREA RESTRICTION
With the optional feature of Service Area Restriction, you will see a “GROUP SVC RESTRICTED” or “PRVT SVC RESTRICTED” message on the display of your mobile unit in either Group or Private mode when you travel outside an authorized service area. Phone mode will display “PHONE ONLY” and will be available even if you are outside an authorized service area.
PTT - ID
Once enabled, PTT-ID appears atuomatically on the display of your phone. No additional training or accessories are required.
PTT-ID is an optional feature which may be offered by your service provider. When enabled, PTT-ID permits you to view the radio ID or name of the talkgroup member (if the radio ID has been aliased in your programmed list) speaking in a Group Call. Once enabled, PTT-ID appears automatically on the display. No additional training or accessories are required.
16 |
USER’S GUIDE LM2000/m370 |
Private Call
PRIVATE CALL™ PRVT
A Private Call is a radio call between two individuals. No other radios can hear the conversation. A Private Call is placed by selecting the radio ID for the person you want to call. Your unit is equipped with a pre-programmed list of radio IDs. You can add, edit, or erase radio IDs. You can also assign names (aliases) to them. (See the “Programming Menu” section for programming information.) A radio ID can be selected by: Direct Entry, Memory Scroll, or Alpha Search.
Making a Private Call
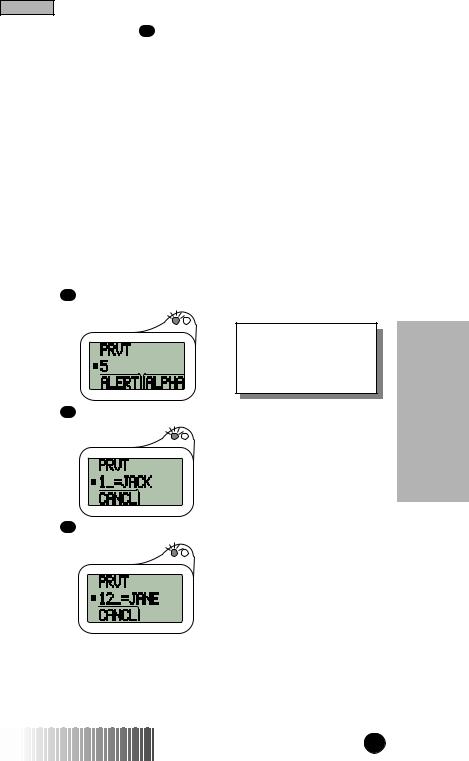
•DIRECT ENTRY
Allows you to use the keypad to input radio IDs.
(Example: Make a Private Call to Jane. Her radio ID is 12. Jack’s radio ID is 1. The last Private Call or Call Alert was with radio ID 5.)
1. Press PRVT .
When you enter the Prvt mode, the last sent or received radio ID or name appears.
2. Press 1 QZ .
3. Press 2 ABC .
Call Private
LM2000/m370 USER’S GUIDE |
17 |
Private Call
Private Call
4. Press PTT.
Upon pressing PTT, you will hear an alert tone. Refer to the “Group Call” section for a description of these tones.
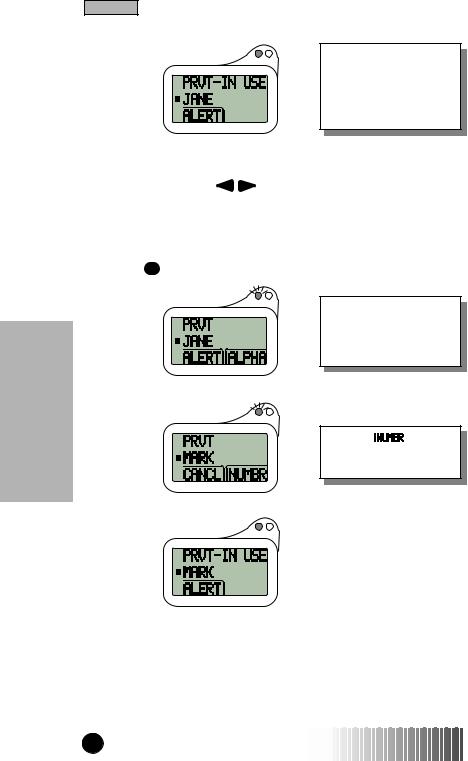
•MEMORY SCROLL
Allows you to use the 
 keys to scroll through memory for radio IDs. When programmed, names appear in place of radio IDs.
(Example: Call Mark who is the 13th entry in your radio ID list. Jane is 12th.)
1. Press PRVT .
When you enter the Prvt mode, the last sent or received radio ID or name appears.
2. Press  .
.
Select the option to view the radio ID associated with “MARK.”
3. Press PTT.
18 |
USER’S GUIDE LM2000/m370 |
Private Call
•ALPHA SEARCH
Alpha Search allows you to select a radio ID by entering the first letter of the name (alias) associated with it. If no name is stored under a letter, the unit automatically searches forward, alphabetically, until the next name is found.
(Example: Call Rob from your radio ID list. The 7 PRS key is for names beginning with P, R, and S.)
1. Press PRVT .
2. Press  .
.
3. Press 7 PRS twice.
To select a letter:
1st press = 1st letter; 2nd press = 2nd letter; 3rd press = 3rd letter.
|
|
If several names in the |
||
4. Press |
. |
list begin with the same |
||
letter, use the |
to |
|||
|
|
|||
|
|
view other names. |
|
|
Select the  option to see the radio ID associated with the displayed name.
Call Private
LM2000/m370 USER’S GUIDE |
19 |

Private Call
5. Press PTT.
Private Call
Receiving a Private Call
You may receive a Private Call from within any mode as long as your unit is idle (not active in any other call). Two alert tones signal that you have received a Private Call. In addition, the following message appears on the display, indicating the person calling you.
(Example: Mark is Private calling you.)
The person’s ID appearing on the display is stored as the last radio ID received. When programmed, names appear in place of radio IDs.
You will immediately begin hearing the voice of the person calling. To respond to the call, press and hold the PTT, then release to listen.
When idle in radio Group or Private modes (not talking or listening), you are able to receive incoming phone calls or Message Mail notifications. When talking or listening, however, phone calls and Message Mail notifiactions are not received.
20 |
USER’S GUIDE LM2000/m370 |

Private Call
CALL ALERT™ 
You can initiate a Call Alert from either GROUP or PRVT mode. An alert tone notifies the targeted person that you want to get in touch with them. A Call Alert is placed by selecting the radio ID for the person you want to alert. A radio ID can be selected by: Direct Entry, Memory Scroll, or Alpha Search.
Sending a Call Alert
•DIRECT ENTRY
Allows you to use the keypad to input radio IDs.
(Example: Send a Call Alert to Jane. Her radio ID is 12. Jack’s radio ID is
1. The last Private Call or Call Alert was with Mark.)
1. Press PRVT .
Call Alert can also be accessed by pressing GROUP and moving the ■ to line 3.
2. Press  .
.
3. Press 1 QZ .
Call Private
LM2000/m370 USER’S GUIDE |
21 |
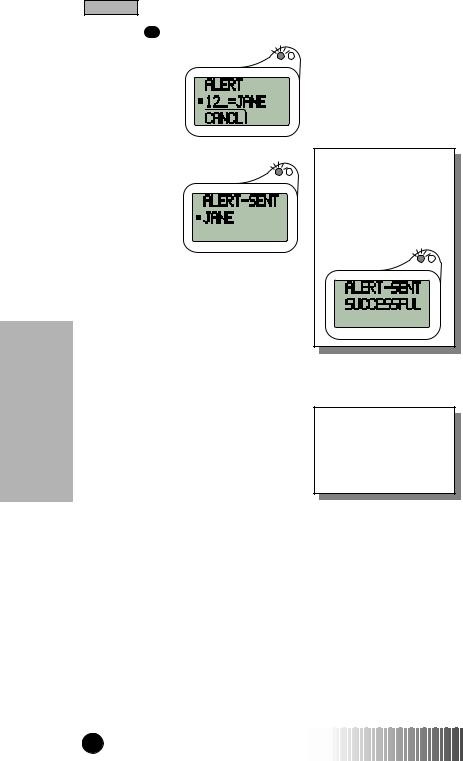
Private Call
Private Call
4. Press 2 ABC .
5. Press PTT.
If the targeted unit is out-of-range or turned off, an alert tone is heard and an error message is displayed. Refer to the “Additional Information” section for a description of all error messages.
An alert tone and the following message are presented when the Call Alert successfully reaches the targeted unit.
•MEMORY SCROLL AND ALPHA SEARCH
To send a Call Alert using the Memory Scroll or Alpha Search, use the same procedure described in the “Private Call” section.
The list of radio IDs and names used to initiate a Call Alert is the same list that is used in Private Conversation.
22 |
USER’S GUIDE LM2000/m370 |
Private Call
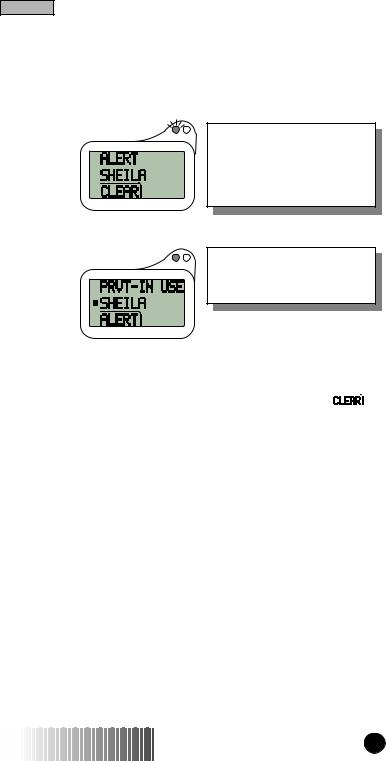
Receiving a Call Alert
Four recurring alert tones signal that you have received a Call Alert. In addition, the following message appears on the display, identifying the person attempting to contact you.
(Example: Sheila is alerting you.)
The person’s ID appearing on the display is stored as the last radio ID received. When programmed, names appear in place of radio IDs.
•To talk to the person:
You are always in Prvt mode when responding to a Call Alert.
Press PTT. |
|
|
|
|
|
Private |
|
clear the display and silence the recurring tones. |
|
|
|
• If you are unable to respond to the Call Alert, press |
|
to |
Call |
• To silence the recurring alert tones only, press any key |
|
||
(except PTT). |
|
|
|
|
|
|
|
LM2000/m370 USER’S GUIDE |
23 |

Private Call
Private Call
CALL ALERT STACKING
Call Alert Stacking is an optional feature that allows you to save up to 8 Call Alerts in a stack.
Receiving a Call Alert with Stacking
With Call Alert Stacking, you have the option to Clear a Call Alert or to save the Call Alert to the Queue for later recall.
To Clear a Call Alert, press  .
.
To place the Call Alert into the Queue, |
PostScrip |
||
press |
|
. Pressing a Mode key |
|
|
|
||
(PHONE, GROUP, PRVT) will also stack the Call Alert.
If you receive multiple Call Alerts, the last received Call Alert will be displayed and the remaining Call Alerts will be stacked at the beginning of the queue.
Responding to a Call Alert in the Stack
You can respond to the Call Alerts in any order. To select a Call Alert for response:
1.Press 

 under “Queue”.
2.Press  or
or  to scroll to the Call Alert to which you wish to respond.
3.Press the PTT to respond to the Call Alert. After responding to the Alert, it is removed from the Stack.
24 |
USER’S GUIDE LM2000/m370 |
Phone Operations
PHONE OPERATIONS PHONE
Phone mode allows you to place and receive phone calls. This mode also provides additional phone features, such as: Call Waiting, Call Forwarding, Call Hold, and Memo Pad.
You can select phone numbers by: Direct Dial, Speed Dial, Memory Scroll, or Alpha Search.
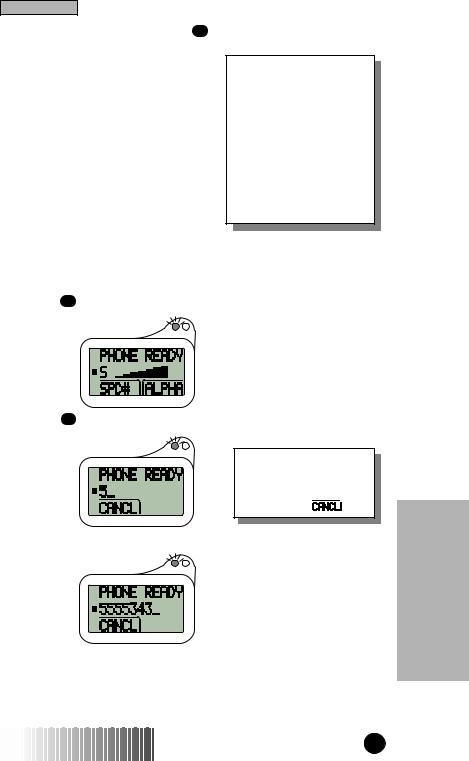
Placing a Phone Call
•DIRECT DIAL
When idle in phone mode, you are able to receive incoming radio calls (Group Calls, Private Calls, and Call Alerts). During a phone conversation, no radio calls are received. Message Mail notifications will still occur during a phone conversation.
Allows you to use the keypad to enter phone numbers.
(Example: Call 555-5343.)
1. Press PHONE .
2. Press 5 JKL .
To erase a digit, press the  . To clear all digits, press and hold
  or press
  .
.
3. Enter the remaining numbers.
Operations Phone
LM2000/m370 USER’S GUIDE |
25 |
 Loading...