


KOHLER K-1132, K-1145, K-1169, K-1193, K-1195 Installation Manual
...INSTALLATION
G U I D E
ACRYLIC
BATHS
K-1132, K-1145, K-1169, K-1193,
K-1195, K-1197, K-1199, K-1207,
K-1219, K-1222, K-1229, K-1242,
K-1245, K-1247, K-1247, K-1249,
K-1259, K-1262, K-1267, K-1377,
K-1417, K-1419, K-1449, K-1454,
K-1456, K-1468, K-1490, K-1510
Français, Page 9
Español, Página 19
1007260-2-B

RECOMMENDED TOOLS AND MATERIALS
|
|
|
S |
Drop Cloth |
|
Hammer |
|
S |
Common |
|
|
|
Woodworking Tools |
|
Drill |
and Nails |
Level |
|
|
|
S |
Water-Resistant |
||
|
|
|
||
|
|
|
Square |
Wall Material |
|
|
|
2x4’s |
|
|
|
|
S |
|
Plumbers |
Silicone |
Tape |
|
|
Putty |
Sealant |
Measure |
|
|
BEFORE YOU BEGIN
S Observe local plumbing codes.
SBaths are designed for a variety of installations, depending upon the model chosen.
SFollow only the steps that apply to your installation.
SUnpack and inspect the bath for damage. Then return the bath to the carton until you are ready to install it.
SInstall the unit to a level subfloor.
SThe basin area requires no additional support when the subfloor is level and square with respect to the stud framing. Consider using shims for additional support if the subfloor is uneven.
SA tiling-in bead may be optional and is recommended when wall material comes in contact with any top surface of the bath.
SSome K-1179 tiling-in beads may require trimming of the bottom edge for proper fit.
SProtect the bath floor during installation.
SProvide properly-dimensioned framing.
SFixture conforms to ANSI Standard Z124.1. All dimensions are nominal.
SBefore installation, ensure proper access to the final plumbing connections.
SCompare the roughing-in and room dimensions, and provide adequate space for the bath.
SOptional aprons must be installed before the finished floor and wall materials are installed.
1007260-2-B |
2 |
Kohler Co. |

1. PREPARE SITE
A. REMOVE OLD BATH
Disconnect the drain at the trap. |
|
Remove the old wall material. Slip |
|
boards under the old bath feet |
|
to protect the floor, and slide the |
|
old bath out of the recess as |
|
illustrated. |
|
Old Bath |
Floor Protection Boards |
|
B. PREPARE SUBFLOOR
Inspect the flooring under the bath, and make repairs as needed. Make sure the subfloor is level.
C. CONSTRUCT STUD FRAME
Possible stud frame arrangements are illustrated below. Use the stud construction appropriate for your particular bath model. Some modifications may be needed for other types of construction.
Construct the 2x4 stud frame according to the roughing-in information packed. Be sure the framing is square and plumb.
For an apron wall without a ledge, the finished apron wall surface must be at least 1/16” (2mm) under the bath rim.
CAUTION: Risk of product 

 damage. Do not hang the bath by the rim.
1. Recommended For Integral Flange Model installations:
Kohler Co. |
3 |
1007260-2-B |
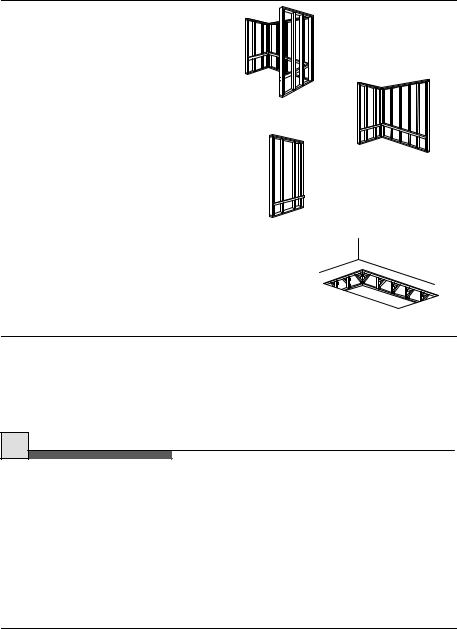
2. Recommended For Drop-In and Sunken Model installations:
Recess Installation
Corner Installation
Peninsular Installation
Sunken Installation
D. INSTALL ROUGH PLUMBING
Locate the rough plumbing according to the roughing-in dimensions. Cap the supplies, and check for leaks.
3. PREPARE BATH
A. INSTALL TILING-IN BEAD -
APPLICABLE DROP-IN
MODELS ONLY
We recommend an optional tiling-in bead for the side of the bath that contacts the wall. This bead prevents water from seeping between the bath and the wall.
Install this bead now. Refer to the installation instructions packed with the tiling-in bead.
B. PARTIALLY INSTALL DRAIN
Install the drain to the bath according to the drain manufacturer’s instructions.
1007260-2-B |
4 |
Kohler Co. |

C. PROTECT BATH SURFACE
Use a drop cloth or similar material to protect the bottom surface of the bath.
Clean the bath to reduce the risk of product damage.
4. INSTALL BATH
A. POSITION BATH
CAUTION: Risk of product

 damage. Do not hang the unit by the rim.
Apply a generous amount of construction adhesive to the support blocks. Carefully move the bath into the recess. Make sure the unit is level. Install shims between the bath and subfloor if necessary.
Insert the drain tailpiece into the trap.
Apply a bead of silicone sealant under the rim of the bath.
Apply construction adhesive to the support blocks
B. INTEGRAL FLANGE MODELS
Drill pilot holes through the |
Stud |
Furring Strip |
|
||
nailing-in flange at the stud centers. |
|
|
Add shims between the nailing-in |
|
|
flange and the studs as needed to |
|
Nailing-In |
eliminate gaps. |
|
Flange |
Use #6 large-head galvanized nails |
|
|
to secure the nailing-in flange to the |
|
|
studs. |
|
|
Install furring strips to the studs to |
|
Drill Pilot |
shim out to the edge of the |
|
|
|
Hole |
|
nailing-in flange. |
|
|
|
|
Kohler Co. |
5 |
1007260-2-B |
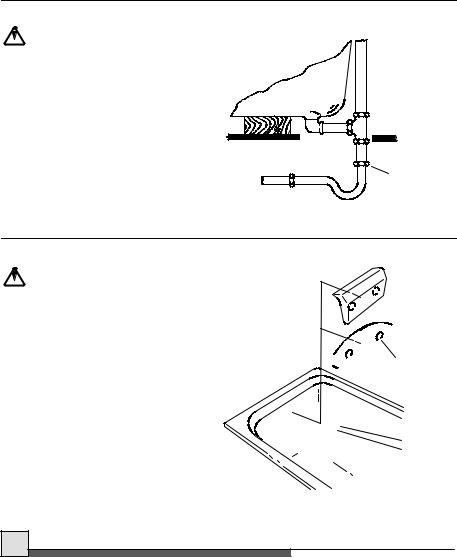
C. INSTALL PLUMBING
CAUTION: Risk of

 concealed leakage. Make sure a watertight seal exists on all bath drain connections.
Connect the drain to the trap.
Install the faucet valving according to the manufacturer’s instructions. Strap the supply connections to the stud framing. Open the hot and cold water valves, run water into the bath, and check for leaks. Cap the outlets.
Provide access to the plumbing connections for future plumbing maintenance.
Connect
Here
D.ATTACHREMOVABLEPILLOW
CAUTION: Risk of product

 damage. Do not submerge the pillow underwater or use it as a seat cushion.
NOTE: For best attachment to the bath surface, moisten the back surface of the pillow at the suction cup locations.
Clean the bath surface of any soap film or oils. Suction cups are located on the back side of the pillows.
Position the pillow as desired above the waterline by pressing down firmly with the heel of your hand. Check to make sure the pillow is attached firmly to the bath.
Detach the pillow by lifting it off the bath surface.
 Pillow
 Suction
Cup
5. INSTALL OPTIONAL APRON
To install an optional apron, refer to the installation instructions packed with the apron.
1007260-2-B |
6 |
Kohler Co. |

6. INSTALL FINISHED WALL
A. DROP-IN MODELS
Make sure the vinyl bead is securely attached to the bath apron where the bath surface will contact the finished wall.
Install water-resistant wall material.
Tape and mud the water-resistant wall material. Install the finished wall material.
Apply a bead of silicone sealant between the bath surface and the finished wall.
Finished Wall
Covering
Water-Resistant
Wall Material
Silicone Sealant
Vinyl Bead
2x4 Studding
Framing or
Ledger Strip
Bath
For installations that do not use a vinyl bead, cover the framing with
water-resistant wall material as Bath shown. Seal the joints between the
bath rim edge and the wall material
with silicone sealant.
Tape and mud the water-resistant wall material. Install the finished wall to the water-resistant wall material, as shown. Seal the joints between the bath rim and the finished wall material with silicone sealant.
Silicone Sealant
Finished Wall
Material
Water-Resistant
Wall Material
B. INTEGRAL FLANGE MODELS
Apply a bead of silicone sealant to the nailing-in flange. Install water-resistant wall material with the paperbound edge a maximum of 1/4” (6mm) above the bath deck.
Tape and mud the water-resistant wall material. Install the finished wall material.
Apply a bead of silicone sealant between the bath rim and the finished wall.
2x4 Studding
Water-Resistant
Wall Material
Finished Wall
Silicone
Sealant
Bath
Kohler Co. |
7 |
1007260-2-B |

7. COMPLETE INSTALLATION
Seal around the valving and outlets with silicone sealant or plumbers putty.
Install the faucet and drain trim according to the manufacturer’s instructions.
8. CLEAN-UP AFTER INSTALLATION
When cleaning up after installation, do not use abrasive cleansers as they may scratch and dull the surface. Use warm water and a liquid, non-abrasive detergent to clean the surface.
Remove stubborn stains, paint, or tar with turpentine or paint thinner.
Do not allow cleaners containing petroleum distillates to remain in contact with the bath surface for long periods of time.
Remove plaster by scraping with a wood edge. Do not use metal or wire tools. Use a powder-type detergent on a damp cloth to provide mild abrasive action to the residual plaster.
CALL US FOR HELP
Questions? Problems? First review the installation instructions to ensure correct installation. For additional assistance in the USA, call our Customer Service Department for direct help. You may also contact us at our web site listed below.
Call 1-800-4-KOHLER within the U.S.
Call 1-800-964-5590 within Canada
Call 001-877-680-1310 within Mexico
kohler.com
1007260-2-B |
8 |
Kohler Co. |

G U I D E
D’INSTALLATION
BAIGNOIRES
EN
ACRYLIQUE
K-1132, K-1145, K-1169, K-1193,
K-1195, K-1197, K-1199, K-1207,
K-1219, K-1222, K-1229, K-1242,
K-1245, K-1247, K-1247, K-1249,
K-1259, K-1262, K-1267, K-1377,
K-1417, K-1419, K-1449, K-1454,
K-1456, K-1468, K-1490, K-1510
Kohler Co. |
9 |
1007260-2-B |
 Loading...