


KOHLER K-136, K-576, K-577, K-581, K-582 Installation Manual
...Installation Guide
Whirlpool and Bath Undermount Kit
K-136, K-576, K-577,
K-581, K-582, K-583,
K-584, K-585, K-586,
K-587, K-588, K-589,
K-590, K-591, K-592
M product numbers are for Mexico (i.e. K-12345M) Los números de productos seguidos de
M corresponden a México (Ej. K-12345M)
Français, page “Français-1” Español, página “Español-1”
114753-2-CC
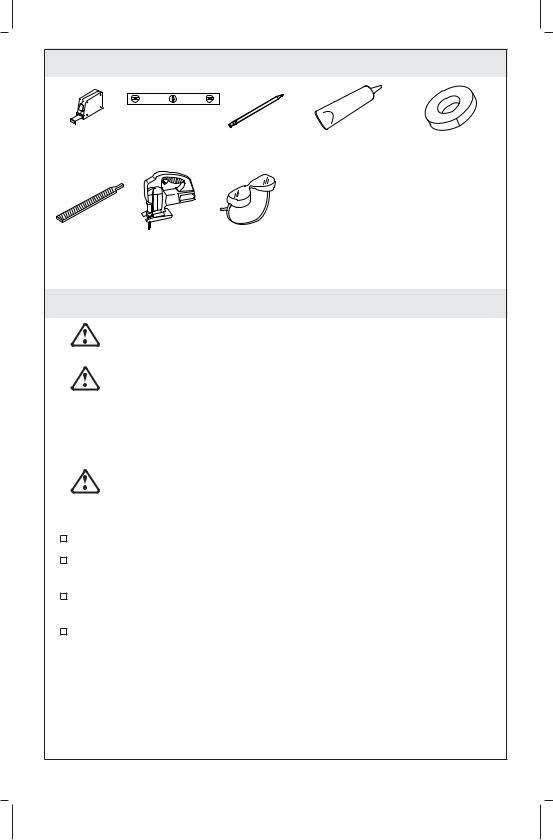
Tools and Materials
|
Level |
|
|
|
Tape |
|
Pencil |
Silicone Sealant Masking Tape |
|
Measure |
|
|
Plus: |
|
|
|
|
||
|
|
|
• Template (supplied) |
|
|
|
|
• Rags or Paper Toweling |
|
|
|
|
• Drop Cloth |
|
|
|
Safety |
• Router |
|
File |
Jigsaw |
• 2x4s or Other Bracing Material |
||
Glasses |
• Weights |
|||
|
|
Before You Begin
WARNING: Risk of eye injury. Always wear safety glasses when cutting the counter material.
CAUTION: Risk of property damage. Braces must be installed to support the weight of the counter from below. Do not rely on the bath alone to support this weight. Refer to any instructions supplied with the counter for proper bracing installation. If braces are not installed, the counter may flex and possibly damage the bath.
CAUTION: Risk of property damage. Refer to the instructions supplied with the counter for the proper cutting method. If the proper cutting method is not used, damage to the counter can occur.
Observe all local plumbing and building codes.
Carefully review this entire installation guide as well as the instructions packed with your bath and counter.
Consult with your local counter fabricator for instructions on cutting the counter properly.
Kohler Co. reserves the right to make revisions in the design of products without notice, as specified in the Price Book.
114753-2-CC |
2 |
Kohler Co. |

Inner Line
Cut along template inner cut line for this installation.
Recommended
Edge
Flush
Bath
Masking Opening
Tape
Counter Counter
Template
Counter
Bath Rim |
Bath Rim |
Outer Line
Cut along template outer cut line for this installation.
Offset

 Counter
Bath Rim
1. Prepare the Counter
With the edges of the template parallel with the edges of the counter, affix the template to the counter using masking tape.
NOTE: A counter with radius edges is recommended.
Determine the preferred edge treatment for the counter. Consult with your local counter fabricator for instructions on cutting the counter edges properly.
Determine which cutout line you will using. If the edge of the counter will be flush with the edge of the bath rim, you must cut the inner line. If the edge of the counter will be offset from the edge of the bath rim, you must cut the outer line.
Using the proper cutting method for your counter type, cut along the chosen edge of the template cutout line.
Remove the template when cutting is complete.
Smooth the edge of the counter as needed.
Carefully position the counter on top of the bath to ensure correct fit and appearance. Adjust as necessary.
CAUTION: Risk of property damage. Braces must be installed to support the weight of the counter from below. Do not rely on the bath alone to support this weight. Refer to any instructions supplied with the counter for proper bracing installation. If braces are not installed, the counter may flex and possibly damage the bath.
Kohler Co. |
3 |
114753-2-CC |

Prepare the Counter (cont.)
Using 2x4s or other bracing material, add braces (required) to the underside of the counter.
114753-2-CC |
4 |
Kohler Co. |

Inside Well |
Weights |
Apply silicone |
|
sealant or caulk. |
|||
Edge |
|
Apply silicone sealant.
2. Install the Counter
CAUTION: Risk of property damage. Do not use adhesive sealant to secure the counter material to the bath. Adhesive sealant will permanently bond the counter material to the bath making separation difficult and costly. Instead, use silicone sealant or caulk which will ease future maintenance or removal of the counter material.
Clean the bath rim.
NOTICE: The bead of silicone sealant must be placed a minimum of 2″ (5.1 cm) away from the inside well edge of the bath rim.
Apply a continuous bead of silicone sealant to all areas where the bath rim and counter material meet.
Align and properly position the counter material over the bath.
Press the counter firmly onto the bath.
Temporarily set weights on the counter material. This will hold the counter material in place while the silicone sealant dries.
Apply a continuous bead of silicone sealant where the bath rim and the counter material meet.
Kohler Co. |
5 |
114753-2-CC |
 Loading...