


 Loading...
HP StoreVirtual Storage User Guide
Abstract
This guide provides instructions for configuring individual storage systems, as well as for creating storage clusters, volumes, snapshots, and remote copies.
HP Part Number: AX696-96269
Published: March 2013
Edition: 10
© Copyright 2009, 2013 Hewlett-Packard Development Company, L.P.
Confidential computer software. Valid license from HP required for possession, use or copying. Consistent with FAR 12.211 and 12.212, Commercial Computer Software, Computer Software Documentation, and Technical Data for Commercial Items are licensed to the U.S. Government under vendor's standard commercial license.
The information contained herein is subject to change without notice. The only warranties for HP products and services are set forth in the express warranty statements accompanying such products and services. Nothing herein should be construed as constituting an additional warranty. HP shall not be liable for technical or editorial errors or omissions contained herein.
Acknowledgements
Microsoft, Windows, Windows XP, and Windows NT are U.S. registered trademarks of Microsoft Corporation.

Contents |
|
1 Getting started......................................................................................... |
14 |
Creating storage with HP StoreVirtual Storage............................................................................ |
14 |
Configuring storage systems..................................................................................................... |
15 |
Creating a storage volume using the Management Groups, Clusters, and Volumes wizard............... |
15 |
Enabling server access to volumes............................................................................................ |
16 |
Using the Map View............................................................................................................... |
17 |
Using the display tools....................................................................................................... |
17 |
Using views and layouts...................................................................................................... |
17 |
Setting preferences................................................................................................................. |
18 |
Setting the font size and locale............................................................................................ |
18 |
Setting naming conventions................................................................................................. |
18 |
Changing naming conventions........................................................................................ |
18 |
Troubleshooting...................................................................................................................... |
19 |
Storage systems not found................................................................................................... |
19 |
Configuring remote support for HP StoreVirtual Storage............................................................... |
19 |
2 Working with storage systems.................................................................... |
21 |
Identifying the storage system hardware..................................................................................... |
21 |
Storage system tasks............................................................................................................... |
22 |
Logging in to and out of storage systems .............................................................................. |
22 |
Logging out of a storage system ..................................................................................... |
22 |
Changing the storage system hostname................................................................................ |
22 |
Locating the storage system in a rack.................................................................................... |
22 |
Powering off or rebooting the storage system ............................................................................. |
23 |
Powering on or off, or rebooting storage systems with modular components............................... |
23 |
Rebooting the storage system............................................................................................... |
24 |
Powering off the storage system........................................................................................... |
24 |
Upgrading LeftHand OS on storage systems............................................................................... |
25 |
Registering advanced features for a storage system .................................................................... |
25 |
Determining volume and snapshot availability............................................................................ |
25 |
Checking status of dedicated boot devices ................................................................................ |
26 |
Checking boot device status................................................................................................ |
26 |
Getting there................................................................................................................ |
26 |
Replacing a dedicated boot device...................................................................................... |
27 |
3 Configuring RAID and Managing Disks....................................................... |
28 |
Getting there.......................................................................................................................... |
28 |
Configuring and managing RAID.............................................................................................. |
28 |
RAID Levels............................................................................................................................ |
28 |
Explaining RAID devices in the RAID setup report....................................................................... |
29 |
RAID devices by RAID type................................................................................................. |
29 |
Virtual RAID devices...................................................................................................... |
30 |
Planning the RAID configuration............................................................................................... |
30 |
Data protection.................................................................................................................. |
30 |
Using RAID for data redundancy..................................................................................... |
30 |
Using Network RAID in a cluster..................................................................................... |
31 |
Using disk RAID with Network RAID in a cluster..................................................................... |
31 |
Mixing RAID configurations................................................................................................. |
32 |
Setting RAID rebuild rate......................................................................................................... |
32 |
General guidelines for setting the RAID rebuild rate................................................................ |
32 |
Setting the RAID rebuild rate............................................................................................... |
32 |
Reconfiguring RAID................................................................................................................. |
33 |
Contents 3
To reconfigure RAID........................................................................................................... |
33 |
Reconfiguring RAID for a P4800 G2 with 2 TB drives............................................................. |
33 |
Monitoring RAID status............................................................................................................ |
34 |
Data reads and writes and RAID status................................................................................. |
34 |
Data redundancy and RAID status........................................................................................ |
34 |
Managing disks..................................................................................................................... |
35 |
Getting there..................................................................................................................... |
35 |
Reading the disk report on the Disk Setup tab........................................................................ |
35 |
Verifying disk status............................................................................................................ |
37 |
Viewing disk status for the VSA....................................................................................... |
37 |
Viewing disk status for the HP P4500 G2......................................................................... |
37 |
Viewing disk status for the HP P4300 G2......................................................................... |
38 |
Viewing disk status for the P4800 G2.............................................................................. |
39 |
Viewing disk status for the P4900 G2 ............................................................................. |
39 |
Viewing disk status for the HP StoreVirtual 4130................................................................ |
40 |
Viewing disk status for the HP StoreVirtual 4330................................................................ |
41 |
Viewing the disk status for the HP StoreVirtual 4530........................................................... |
41 |
Viewing the disk status for the HP StoreVirtual 4630.......................................................... |
42 |
Viewing the disk status for the HP StoreVirtual 4730........................................................... |
43 |
Replacing a disk..................................................................................................................... |
44 |
Using Repair Storage System............................................................................................... |
45 |
Replacing disks in hot-swap storage systems.......................................................................... |
45 |
Preparing for a disk replacement......................................................................................... |
46 |
Replacing a disk in a hot-swap storage system ...................................................................... |
47 |
Troubleshooting...................................................................................................................... |
48 |
4 Managing the network.............................................................................. |
49 |
Network best practices............................................................................................................ |
49 |
Changing network configurations............................................................................................. |
50 |
Managing settings on network interfaces................................................................................... |
50 |
TCP status tab.................................................................................................................... |
50 |
Changing speed and duplex settings.................................................................................... |
51 |
Changing NIC frame size................................................................................................... |
52 |
Jumbo frames............................................................................................................... |
52 |
Editing the NIC frame size.............................................................................................. |
53 |
Changing NIC flow control................................................................................................. |
53 |
The TCP/IP tab....................................................................................................................... |
54 |
Identifying the network interfaces......................................................................................... |
54 |
Pinging an IP address......................................................................................................... |
54 |
To ping an IP address.................................................................................................... |
55 |
Configuring the IP address manually......................................................................................... |
55 |
Using DHCP.......................................................................................................................... |
55 |
Configuring network interface bonds......................................................................................... |
56 |
Bonding with 10 GbE interfaces.......................................................................................... |
56 |
Supported bonds with 10 GbE........................................................................................ |
57 |
Unsupported bonds with 10 GbE.................................................................................... |
58 |
IP address for NIC bonds.................................................................................................... |
58 |
NIC bonding and speed, duplex, frame size, and flow control settings...................................... |
58 |
How Active-Passive bonding works....................................................................................... |
59 |
Physical and logical interfaces........................................................................................ |
59 |
Which physical interface is preferred............................................................................... |
60 |
Summary of NIC status during failover............................................................................. |
60 |
Example network cabling topologies with Active-Passive..................................................... |
60 |
How link aggregation dynamic mode bonding works............................................................. |
62 |
Which physical interface is preferred............................................................................... |
62 |
4Contents
Which physical interface is active.................................................................................... |
62 |
Summary of NIC states during failover............................................................................. |
63 |
Example network cabling topologies with link aggregation dynamic mode........................... |
63 |
How Adaptive Load Balancing works .................................................................................. |
64 |
Which physical interface is preferred............................................................................... |
64 |
Which physical interface is active.................................................................................... |
64 |
Summary of NIC states during failover............................................................................. |
65 |
Example network cabling topologies with Adaptive Load Balancing .................................... |
65 |
Creating a NIC bond......................................................................................................... |
66 |
Creating the bond......................................................................................................... |
67 |
Verify communication setting for new bond....................................................................... |
68 |
Viewing the status of a NIC bond........................................................................................ |
68 |
Deleting a NIC bond.......................................................................................................... |
70 |
Disabling a network interface................................................................................................... |
71 |
Configuring a disabled interface.......................................................................................... |
72 |
Using a DNS server................................................................................................................ |
72 |
Editing DNS settings........................................................................................................... |
72 |
Setting up routing................................................................................................................... |
73 |
Adding routing information................................................................................................. |
73 |
Editing routing information.................................................................................................. |
73 |
Deleting routing information................................................................................................ |
74 |
Configuring storage system communication................................................................................ |
74 |
Selecting the interface used by the LeftHand OS ................................................................... |
74 |
Updating the list of manager IP addresses............................................................................. |
75 |
Fibre Channel ....................................................................................................................... |
76 |
5 Setting the date and time.......................................................................... |
77 |
Management group time......................................................................................................... |
77 |
Getting there.......................................................................................................................... |
77 |
Refreshing the management group time..................................................................................... |
77 |
Using NTP............................................................................................................................. |
77 |
Editing NTP servers............................................................................................................ |
78 |
Deleting an NTP server....................................................................................................... |
78 |
Delete an NTP server..................................................................................................... |
78 |
Changing the order of NTP servers ..................................................................................... |
78 |
Editing the date and time......................................................................................................... |
79 |
Editing the time zone only........................................................................................................ |
79 |
6 Managing authentication.......................................................................... |
80 |
Managing administrative users................................................................................................. |
80 |
Adding an administrative user............................................................................................. |
80 |
Editing administrative users................................................................................................. |
80 |
Changing a user’s description......................................................................................... |
80 |
Changing a user’s password.......................................................................................... |
80 |
Adding group membership to a user................................................................................ |
80 |
Removing group membership from a user......................................................................... |
80 |
Deleting an administrative user....................................................................................... |
81 |
Managing administrative groups.............................................................................................. |
81 |
Default administrative groups............................................................................................... |
81 |
Adding administrative groups......................................................................................... |
82 |
Editing administrative groups............................................................................................... |
82 |
Changing the group description...................................................................................... |
82 |
Changing administrative group permissions...................................................................... |
82 |
Adding users to an existing group................................................................................... |
82 |
Removing users from a group.......................................................................................... |
82 |
Deleting administrative groups........................................................................................ |
82 |
Contents 5
Using Active Directory for external authentication........................................................................ |
83 |
Configuring external authentication...................................................................................... |
84 |
Associating the Active Directory group with the LeftHand OS group.......................................... |
84 |
Removing the Active Directory configuration.......................................................................... |
85 |
7 Monitoring the SAN................................................................................. |
86 |
Monitoring SAN status............................................................................................................ |
86 |
Customizing the SAN Status Page ....................................................................................... |
87 |
Using the SAN Status Page................................................................................................. |
88 |
Alarms and events overview..................................................................................................... |
88 |
Working with alarms............................................................................................................... |
90 |
Filtering the alarms list........................................................................................................ |
90 |
Viewing and copying alarm details...................................................................................... |
91 |
Viewing alarms in a separate window.................................................................................. |
91 |
Exporting alarm data to a .csv file....................................................................................... |
91 |
Configuring events.................................................................................................................. |
91 |
Changing the event retention period..................................................................................... |
91 |
Configuring remote log destinations..................................................................................... |
92 |
Viewing events in a separate window................................................................................... |
92 |
Working with events............................................................................................................... |
92 |
Viewing new events............................................................................................................ |
92 |
Filtering the events list......................................................................................................... |
92 |
Saving filter views......................................................................................................... |
93 |
Deleting custom filters.................................................................................................... |
93 |
Viewing event details.......................................................................................................... |
93 |
Copying events to the clipboard........................................................................................... |
94 |
Exporting event data to a .csv or .txt file............................................................................... |
94 |
Configuring email notification.................................................................................................. |
94 |
Configuring the email server................................................................................................ |
94 |
Configuring email recipients................................................................................................ |
95 |
Configuring SNMP................................................................................................................. |
95 |
Enabling SNMP agents....................................................................................................... |
96 |
Enabling the SNMP agent.............................................................................................. |
96 |
Configuring access control for SNMP clients..................................................................... |
96 |
Adding an SNMP client............................................................................................ |
96 |
Editing access control entries...................................................................................... |
97 |
Deleting access control entries.................................................................................... |
97 |
Disabling the SNMP agent............................................................................................. |
97 |
Disabling SNMP...................................................................................................... |
97 |
Adding SNMP traps........................................................................................................... |
97 |
Using the SNMP MIBs........................................................................................................ |
99 |
Troubleshooting SNMP..................................................................................................... |
100 |
Running diagnostic reports..................................................................................................... |
100 |
Generating a hardware information report............................................................................... |
101 |
Using log files...................................................................................................................... |
104 |
Saving log files locally...................................................................................................... |
104 |
Configuring a remote log and remote log destination........................................................... |
104 |
Editing remote log targets................................................................................................. |
104 |
Deleting remote logs........................................................................................................ |
105 |
Exporting the management group support bundle..................................................................... |
105 |
Exporting the storage system support bundle............................................................................ |
105 |
Exporting the System Summary............................................................................................... |
106 |
8 Working with management groups........................................................... |
107 |
Functions of management groups............................................................................................ |
107 |
Planning management groups................................................................................................ |
107 |
6Contents
Creating a management group.............................................................................................. |
108 |
Name the management group and add storage systems....................................................... |
108 |
Add administrative user.................................................................................................... |
109 |
Set management group time.............................................................................................. |
109 |
Set DNS server................................................................................................................ |
109 |
Set up email for notification............................................................................................... |
109 |
Create cluster and assign a VIP......................................................................................... |
109 |
Create a volume and finish creating management group....................................................... |
110 |
Logging in to a management group ................................................................................... |
110 |
Management group map view tab..................................................................................... |
110 |
Configuration Summary overview........................................................................................... |
110 |
Reading the configuration summary.................................................................................... |
111 |
Optimal configurations................................................................................................ |
111 |
Configuration warnings................................................................................................ |
111 |
Configuration errors..................................................................................................... |
112 |
Configuration guidance.................................................................................................... |
112 |
Best Practice summary overview.............................................................................................. |
113 |
Disk level data protection.................................................................................................. |
114 |
Disk protection using RAID........................................................................................... |
114 |
Large single-system SATA cluster.................................................................................... |
114 |
Disk RAID Consistency................................................................................................. |
114 |
Cluster-level data protection............................................................................................... |
114 |
Volume-level data protection.............................................................................................. |
115 |
Volume access................................................................................................................. |
115 |
Systems running managers................................................................................................ |
115 |
Network bonding............................................................................................................ |
115 |
Network bond consistency................................................................................................ |
115 |
Network flow control consistency....................................................................................... |
115 |
Network frame size consistency......................................................................................... |
115 |
Management group maintenance tasks................................................................................... |
115 |
Logging in to a management group.................................................................................... |
115 |
Choosing which storage system to log in to..................................................................... |
116 |
Logging out of a management group.................................................................................. |
116 |
Adding a storage system to an existing management group................................................... |
116 |
Starting and stopping managers........................................................................................ |
116 |
Starting additional managers........................................................................................ |
116 |
Stopping managers..................................................................................................... |
117 |
Implications of stopping managers............................................................................ |
117 |
Editing a management group............................................................................................ |
117 |
Setting or changing the local bandwidth priority............................................................. |
117 |
Saving the management group configuration information...................................................... |
118 |
Shutting down a management group....................................................................................... |
118 |
If volumes are still connected to servers or hosts................................................................... |
118 |
Restarting the management group...................................................................................... |
119 |
Restarted management group in maintenance mode........................................................ |
119 |
Manually changing the management group to normal mode............................................. |
119 |
Removing a storage system from a management group.............................................................. |
120 |
Deleting a management group............................................................................................... |
120 |
9 Working with managers and quorum........................................................ |
122 |
Managers overview.............................................................................................................. |
122 |
Best practice for managers in a management group............................................................. |
122 |
Managers and quorum..................................................................................................... |
123 |
Regular managers and specialized managers...................................................................... |
123 |
Failover Managers...................................................................................................... |
124 |
Contents 7
Virtual Managers........................................................................................................ |
124 |
Using the Failover Manager................................................................................................... |
125 |
Planning the virtual network configuration........................................................................... |
125 |
Using the Failover Manager on Microsoft Hyper-V Server...................................................... |
125 |
Installing the Failover Manager for Hyper-V Server........................................................... |
126 |
Uninstalling the Failover Manager from Hyper-V Server.................................................... |
126 |
Using the Failover Manager for VMware vSphere................................................................ |
127 |
Installing the Failover Manager for VMware vSphere....................................................... |
127 |
Installing the Failover Manager for other VMware platforms.............................................. |
128 |
Configuring the IP address and host name................................................................. |
128 |
Installing the Failover Manager using the OVF files with the VI Client................................. |
129 |
Configure the IP address and host name.................................................................... |
129 |
Finishing up with VI Client....................................................................................... |
129 |
Troubleshooting the Failover Manager on VMware vSphere.............................................. |
129 |
Uninstalling the Failover Manager from VMware vSphere................................................. |
130 |
Using a virtual manager........................................................................................................ |
130 |
Requirements for using a virtual manager............................................................................ |
131 |
Adding a virtual manager................................................................................................. |
132 |
Starting a virtual manager to regain quorum....................................................................... |
133 |
Verifying virtual manager status......................................................................................... |
134 |
Stopping a virtual manager............................................................................................... |
134 |
Removing a virtual manager from a management group....................................................... |
135 |
10 Working with clusters............................................................................ |
136 |
Clusters and storage systems.................................................................................................. |
136 |
Creating a cluster................................................................................................................. |
136 |
Cluster Map View............................................................................................................ |
137 |
Monitoring cluster usage....................................................................................................... |
137 |
Editing a cluster.................................................................................................................... |
137 |
Editing cluster properties................................................................................................... |
137 |
Editing iSNS servers......................................................................................................... |
137 |
Editing cluster VIP addresses.............................................................................................. |
138 |
Reconnecting volumes and applications after changing VIPs or iSNS servers............................ |
138 |
Maintaining storage systems in clusters.................................................................................... |
139 |
Adding a storage system to a cluster.................................................................................. |
139 |
Upgrading the storage systems in a cluster using cluster swap................................................ |
139 |
Reordering storage systems in a cluster............................................................................... |
140 |
Exchange a storage system in a cluster............................................................................... |
140 |
Removing a storage system from a cluster............................................................................ |
140 |
Troubleshooting a cluster....................................................................................................... |
141 |
Auto Performance Protection.............................................................................................. |
141 |
Auto Performance Protection and the VSA....................................................................... |
141 |
Auto Performance Protection and other clusters................................................................ |
141 |
Repairing a storage system................................................................................................ |
142 |
Deleting a cluster.................................................................................................................. |
143 |
11 Provisioning storage.............................................................................. |
144 |
Understanding how the capacity of the SAN is used................................................................. |
144 |
Provisioning storage.............................................................................................................. |
144 |
Provisioning volumes............................................................................................................. |
144 |
Full provisioning............................................................................................................... |
145 |
Thin provisioning............................................................................................................. |
145 |
Best practice for setting volume size............................................................................... |
145 |
Planning data protection................................................................................................... |
145 |
Former terminology in release 8.1 and earlier................................................................. |
145 |
Data protection level.................................................................................................... |
146 |
8Contents
How data protection levels work................................................................................... |
147 |
Network RAID-10 (2–Way Mirror)............................................................................. |
147 |
Network RAID-10+1 (3-Way Mirror).......................................................................... |
147 |
Network RAID-10+2 (4-Way Mirror).......................................................................... |
148 |
Network RAID-5 (Single Parity)................................................................................. |
148 |
Network RAID-6 (Dual Parity)................................................................................... |
149 |
Provisioning snapshots........................................................................................................... |
150 |
Snapshots versus backups................................................................................................. |
150 |
The effect of snapshots on cluster space.............................................................................. |
150 |
Managing capacity using volume size and snapshots........................................................... |
151 |
Volume size and snapshots........................................................................................... |
151 |
Schedules to snapshot a volume and capacity................................................................. |
151 |
Deleting snapshots...................................................................................................... |
151 |
Ongoing capacity management............................................................................................. |
151 |
Number of volumes and snapshots..................................................................................... |
151 |
Reviewing SAN capacity and usage................................................................................... |
151 |
Cluster use summary.................................................................................................... |
152 |
Volume use summary................................................................................................... |
153 |
System Use summary................................................................................................... |
154 |
Measuring disk capacity and volume size........................................................................... |
155 |
Block systems and file systems....................................................................................... |
155 |
Storing file system data on a block system...................................................................... |
155 |
Changing the volume size on the server.............................................................................. |
156 |
Increasing the volume size in Microsoft Windows............................................................ |
156 |
Increasing the volume size in other environments............................................................. |
156 |
Changing configuration characteristics to manage space...................................................... |
157 |
12 Using volumes...................................................................................... |
158 |
Volumes and server access.................................................................................................... |
158 |
Prerequisites.................................................................................................................... |
158 |
Planning volumes.................................................................................................................. |
158 |
Characteristics of volumes...................................................................................................... |
159 |
Creating a volume................................................................................................................ |
160 |
Viewing the volume map....................................................................................................... |
161 |
Editing a volume.................................................................................................................. |
161 |
To edit a volume.............................................................................................................. |
162 |
Deleting a volume................................................................................................................. |
163 |
To delete the volume........................................................................................................ |
164 |
13 Using snapshots.................................................................................... |
165 |
Types of snapshots................................................................................................................ |
165 |
Uses and best practices for snapshots................................................................................. |
165 |
Planning snapshots............................................................................................................... |
166 |
Prerequisites for application-managed snapshots.................................................................. |
167 |
Creating snapshots............................................................................................................... |
168 |
Editing a snapshot........................................................................................................... |
169 |
Scheduling snapshots............................................................................................................ |
169 |
Best practices for scheduling snapshots of volumes............................................................... |
169 |
Requirements for snapshot schedules.................................................................................. |
170 |
Scheduling snapshots for volume sets.................................................................................. |
170 |
Creating a schedule to snapshot a volume.......................................................................... |
171 |
Editing scheduled snapshots......................................................................................... |
172 |
Pausing and resuming scheduled snapshots.................................................................... |
172 |
Deleting schedules to snapshot a volume........................................................................ |
173 |
Scripting snapshots...................................................................................................... |
173 |
Mounting a snapshot............................................................................................................ |
173 |
Contents 9
Mounting the snapshot on a host....................................................................................... |
173 |
Making a Windows application-managed snapshot available............................................... |
174 |
Managing snapshot temporary space................................................................................. |
176 |
Convert the temporary space to access data................................................................... |
176 |
Delete the temporary space.......................................................................................... |
176 |
Rolling back a volume to a snapshot or clone point................................................................... |
177 |
Rolling back a volume to a snapshot or clone point.............................................................. |
177 |
Continue with standard roll back................................................................................... |
178 |
Create a new SmartClone volume from the snapshot........................................................ |
178 |
Roll back all associated volumes.................................................................................... |
179 |
Cancel the rollback operation....................................................................................... |
180 |
Deleting a snapshot.............................................................................................................. |
180 |
Troubleshooting snapshots..................................................................................................... |
181 |
14 SmartClone volumes.............................................................................. |
183 |
What are SmartClone volumes?............................................................................................. |
183 |
Prerequisites.................................................................................................................... |
183 |
SmartClone volume terminology......................................................................................... |
183 |
Example scenarios for using SmartClone volumes................................................................. |
184 |
Deploy multiple virtual or boot-from-SAN servers............................................................. |
184 |
Scenario: Computer training lab............................................................................... |
184 |
Safely use production data for test, development, and data mining.................................... |
185 |
Test and development............................................................................................. |
185 |
Data mining.......................................................................................................... |
185 |
Clone a volume.......................................................................................................... |
185 |
Planning SmartClone volumes................................................................................................ |
185 |
Space requirements.......................................................................................................... |
185 |
Naming convention for SmartClone volumes........................................................................ |
186 |
Naming and multiple identical disks in a server.............................................................. |
186 |
Server access.................................................................................................................. |
186 |
Defining SmartClone volume characteristics.............................................................................. |
186 |
Naming SmartClone volumes................................................................................................. |
187 |
Shared versus individual characteristics................................................................................... |
188 |
Clone point.......................................................................................................................... |
190 |
Shared snapshot .................................................................................................................. |
192 |
Creating SmartClone volumes................................................................................................ |
193 |
To create a SmartClone volume.............................................................................................. |
193 |
Viewing SmartClone volumes................................................................................................. |
195 |
Map view....................................................................................................................... |
195 |
Using views................................................................................................................ |
196 |
Viewing clone points, volumes, and snapshots................................................................ |
197 |
Editing SmartClone volumes................................................................................................... |
198 |
To edit the SmartClone volumes......................................................................................... |
199 |
Deleting SmartClone volumes................................................................................................. |
199 |
Deleting the clone point ................................................................................................... |
199 |
Deleting multiple SmartClone volumes................................................................................ |
200 |
15 Working with scripting.......................................................................... |
201 |
16 Controlling server access to volumes........................................................ |
202 |
Planning server connections to management groups.................................................................. |
203 |
Using Controlling IP addresses........................................................................................... |
203 |
Planning iSCSI server connections to management groups..................................................... |
203 |
Adding an iSCSI server connection.................................................................................... |
204 |
Editing an iSCSI server connection..................................................................................... |
205 |
Deleting an iSCSI server connection................................................................................... |
205 |
10 Contents
Completing the iSCSI Initiator and disk setup........................................................................... |
206 |
Persistent targets or favorite targets..................................................................................... |
206 |
HP StoreVirtual DSM for Microsoft MPIO settings.................................................................. |
206 |
Disk management............................................................................................................ |
206 |
Planning Fibre Channel server connections to management groups............................................. |
206 |
Adding a Fibre Channel server connection.......................................................................... |
206 |
Manually configuring a Fibre Channel initiator.................................................................... |
207 |
Deleting a manually configured Fibre Channel initiator.................................................... |
207 |
Editing a Fibre Channel server connection........................................................................... |
207 |
Deleting a Fibre Channel server connection......................................................................... |
208 |
Completing the Fibre Channel setup................................................................................... |
208 |
Clustering server connections................................................................................................. |
208 |
Requirements for clustering servers..................................................................................... |
208 |
Creating a server cluster................................................................................................... |
209 |
Viewing the relationship between storage systems, volumes, and servers................................. |
210 |
Editing a server cluster...................................................................................................... |
210 |
Deleting a server cluster.................................................................................................... |
210 |
Assigning iSCSI server connections access to volumes............................................................... |
211 |
Assigning server iSCSI connections from a volume................................................................ |
211 |
Assigning volumes from an iSCSI connection....................................................................... |
211 |
Assigning volumes to Fibre Channel servers............................................................................. |
212 |
Assigning Fibre Channel servers from a volume.................................................................... |
212 |
Assigning volumes from a Fibre Channel server................................................................... |
212 |
Assigning a boot volume to a Fibre Channel server.............................................................. |
213 |
Editing server connection and volume assignments.................................................................... |
213 |
17 Monitoring performance ....................................................................... |
214 |
Prerequisites......................................................................................................................... |
214 |
Introduction to using performance information.......................................................................... |
214 |
What can I learn about my SAN?...................................................................................... |
214 |
Current SAN activities example..................................................................................... |
215 |
Workload characterization example.............................................................................. |
215 |
Fault isolation example..................................................................................................... |
215 |
What can I learn about my volumes?...................................................................................... |
216 |
Most active volumes examples........................................................................................... |
216 |
Activity generated by a specific server example................................................................... |
217 |
Planning for SAN improvements............................................................................................. |
217 |
Network utilization to determine if NIC bonding could improve performance example.............. |
217 |
Load comparison of two clusters example............................................................................ |
218 |
Load comparison of two volumes example........................................................................... |
218 |
Accessing and understanding the Performance Monitor window................................................. |
219 |
Performance Monitor toolbar............................................................................................. |
220 |
Performance monitor graph............................................................................................... |
220 |
Performance monitor table................................................................................................ |
221 |
Understanding the performance statistics............................................................................. |
222 |
Monitoring and comparing multiple clusters............................................................................. |
224 |
Performance monitoring and analysis concepts......................................................................... |
224 |
Changing the sample interval and time zone............................................................................ |
225 |
Adding statistics................................................................................................................... |
225 |
Viewing statistic details..................................................................................................... |
226 |
Removing and clearing statistics............................................................................................. |
227 |
Removing a statistic.......................................................................................................... |
227 |
Clearing the sample data.................................................................................................. |
227 |
Clearing the display......................................................................................................... |
227 |
Resetting defaults............................................................................................................. |
227 |
Contents 11
Pausing and restarting monitoring........................................................................................... |
227 |
Changing the graph............................................................................................................. |
228 |
Hiding and showing the graph.......................................................................................... |
228 |
Displaying or hiding a line................................................................................................ |
228 |
Changing the color or style of a line.................................................................................. |
228 |
Highlighting a line........................................................................................................... |
228 |
Changing the scaling factor.............................................................................................. |
229 |
Exporting data..................................................................................................................... |
229 |
Exporting statistics to a CSV file......................................................................................... |
229 |
Saving the graph to an image file...................................................................................... |
230 |
18 Registering advanced features................................................................ |
231 |
Evaluation period for using advanced features.......................................................................... |
231 |
Starting the evaluation period............................................................................................ |
231 |
Backing out of Remote Copy evaluation.............................................................................. |
232 |
Scripting evaluation.............................................................................................................. |
232 |
Turn on scripting evaluation............................................................................................... |
232 |
Turn off scripting evaluation............................................................................................... |
233 |
Registering advanced features................................................................................................ |
233 |
Using license keys............................................................................................................ |
233 |
Registering available storage systems for license keys........................................................... |
233 |
Registering storage systems in a management group............................................................. |
234 |
Saving and editing your customer information.......................................................................... |
236 |
19 HP StoreVirtual Storage using iSCSI and Fibre Channel.............................. |
238 |
iSCSI and HP StoreVirtual Storage.......................................................................................... |
238 |
Number of iSCSI sessions................................................................................................. |
238 |
VIPs............................................................................................................................... |
238 |
iSNS server..................................................................................................................... |
238 |
iSCSI load balancing....................................................................................................... |
238 |
Authentication (CHAP)...................................................................................................... |
239 |
iSCSI and CHAP terminology............................................................................................ |
240 |
Example iSCSI configurations........................................................................................ |
240 |
Use the HP StoreVirtual DSM for Microsoft MPIO.................................................................. |
242 |
Fibre Channel and HP StoreVirtual Storage.............................................................................. |
242 |
Creating Fibre Channel connectivity................................................................................... |
243 |
Zoning....................................................................................................................... |
243 |
Using MPIO with Fibre Channel......................................................................................... |
243 |
Adding the MPIO Device Hardware ID.......................................................................... |
243 |
20 Using the Configuration Interface............................................................ |
244 |
Connecting to the Configuration Interface................................................................................ |
244 |
Establishing a terminal emulation session on a Windows system............................................. |
244 |
Establishing a terminal emulation session on a Linux/UNIX system.......................................... |
244 |
Opening the Configuration Interface from the terminal emulation session................................. |
245 |
Logging in to the Configuration Interface................................................................................. |
245 |
Configuring administrative users............................................................................................. |
245 |
Configuring a network connection.......................................................................................... |
245 |
Deleting a NIC bond............................................................................................................ |
246 |
Setting the TCP speed, duplex, and frame size.......................................................................... |
246 |
Removing a storage system from a management group.............................................................. |
247 |
Resetting the storage system to factory defaults......................................................................... |
247 |
21 Replacing hardware.............................................................................. |
248 |
Replacing disks and rebuilding data....................................................................................... |
248 |
Replacing disks............................................................................................................... |
248 |
Verify the storage system is not running a manager.......................................................... |
249 |
12 Contents
Repair the storage system............................................................................................. |
249 |
Rebuilding data............................................................................................................... |
250 |
Reconfigure RAID........................................................................................................ |
251 |
Returning the storage system to the cluster........................................................................... |
251 |
Restarting a manager.................................................................................................. |
251 |
Adding the repaired storage system to cluster................................................................. |
252 |
Rebuilding volume data.................................................................................................... |
252 |
Controlling server access.............................................................................................. |
253 |
Removing the ghost storage system..................................................................................... |
253 |
Returning the failed disk............................................................................................... |
253 |
Replacing the RAID controller................................................................................................. |
253 |
Verifying component failure............................................................................................... |
254 |
Removing the RAID controller............................................................................................ |
255 |
Installing the RAID controller.............................................................................................. |
258 |
Verifying proper operation................................................................................................ |
259 |
22 LeftHand OS TCP and UDP port usage.................................................... |
260 |
23 Third-party licenses............................................................................... |
263 |
24 Support and other resources.................................................................. |
264 |
Contacting HP...................................................................................................................... |
264 |
Subscription service.......................................................................................................... |
264 |
Rack stability........................................................................................................................ |
264 |
Customer self repair.............................................................................................................. |
264 |
HP Insight Remote Support Software........................................................................................ |
264 |
Related information............................................................................................................... |
265 |
HP websites.................................................................................................................... |
265 |
25 Documentation feedback....................................................................... |
266 |
Glossary.................................................................................................. |
267 |
Index....................................................................................................... |
273 |
Contents 13

1 Getting started
HP StoreVirtual Storage enables you to create a virtualized pool of storage resources and manage a SAN. The LeftHand OS software is installed on the HP StoreVirtual Storage and you use the HP StoreVirtual Centralized Management Console (CMC) to manage the storage. For a list of supported software and hardware, see the HP StoreVirtual 4000 Storage Compatibility Matrix at
http://www.hp.com/go/StoreVirtualcompatibility
Creating storage with HP StoreVirtual Storage
HP StoreVirtual Storage supports both iSCSI and Fibre Channel storage networks. Using the wizard on the Getting Started Launch Pad, work through these steps to create a management group, cluster and volume.
The following sections provide an overview of the steps required to set up and configure your storage.
Creating iSCSI storage
1.Install storage systems on network, assign IPs and change the hostname using the Configuration Interface. (See “Using the Configuration Interface” (page 244).)
Install an iSCSI Initiator on the application server.
2.Create a new management group or add storage systems to existing management group. (See “Creating a storage volume using the Management Groups, Clusters, and Volumes wizard” (page 15).)
3.Create an iSCSI server in CMC. (See “Enabling server access to volumes” (page 16))
4.Assign volumes to the iSCSI server. (See “Planning server connections to management groups” (page 203).)
5.Discover targets in the iSCSI Initiator.
6.Finish creating storage as necessary, for example, initialize and partition disks in Microsoft Windows.
Creating Fibre Channel storage
1.Install FC-enabled storage systems on network and fibre channel fabric, assign IPs and change the hostname using the Configuration Interface. (See “Using the Configuration Interface” (page 244).)
IMPORTANT: Do not zone storage systems until they have been put into a management group.
2.Ensure your initiator HBA driver is loaded and logged in to the Fibre Channel switches.
3.Ensure that appropriate MPIO support is loaded. For example, Microsoft Windows 2008 R2 or Windows 2012 uses the MS MPIO feature, configured for LEFTHANDP4000 disk
4.Configure storage systems by configuring 10 GbE NICs and appropriate bonding and SNMP. Change RAID if desired.
5.Create a new management group with two or more FC–enabled storage systems. (See “Creating a storage volume using the Management Groups, Clusters, and Volumes wizard” (page 15).)
NOTE: Adding two or more FC–enabled storage systems to an existing management group creates FC connectivity.
6.Optional: Configure zoning on the fibre channel switches. Zone the switch connections using either the port numbers or the WWNNs of the storage systems. Port-based zoning is
14 Getting started

recommended as the WWNNs based on the management group may change. (See the HP SAN Design Reference Guide.)
7.Create a Fibre Channel server in the CMC. (See “Planning Fibre Channel server connections to management groups” (page 206).)
8.Assign LUNs to the Fibre Channel server. (See “Assigning volumes to Fibre Channel servers” (page 212).)
9.Discover the LUNs in the OS.
Configuring storage systems
All systems, including Failover Managers, that have not been added to a management group appear in the list of Available Systems in the navigation window. If you plan to use multiple storage systems, they must all be configured before you use them for clustered storage.
The most important categories to configure are:
•RAID—The storage system is shipped with RAID already configured and operational. Find instructions for changing RAID, and for ensuring that drives in the storage system are properly configured and operating in “Configuring RAID and Managing Disks” (page 28).
•Network—Bond the NIC interfaces and set the frame size, NIC flow control, and speed and duplex settings. Read detailed network configuration instructions in “Managing the network” (page 49).
IMPORTANT: The network settings must be the same for the switches, clients, and storage systems. Set up the end-to-end network before creating storage volumes.
1.From the navigation window, select a storage system in the Available Systems pool.
2.Open the tree underneath the storage system.
3.In the list of configuration categories, select the Storage category.
4.Select the RAID Setup tab and verify the RAID settings or change the RAID level.
5.In the list of configuration categories, select the Network category and configure the network settings.
Creating a storage volume using the Management Groups, Clusters, and Volumes wizard
Select Getting Started in the navigation window to access the Getting Started Launch Pad. Select
Management Groups, Clusters, and Volumes Wizard to create storage volumes.
The wizard takes you through creating the tasks of creating a management group, a cluster, and a storage volume. This storage hierarchy is depicted in Figure 1 (page 16).
Configuring storage systems |
15 |
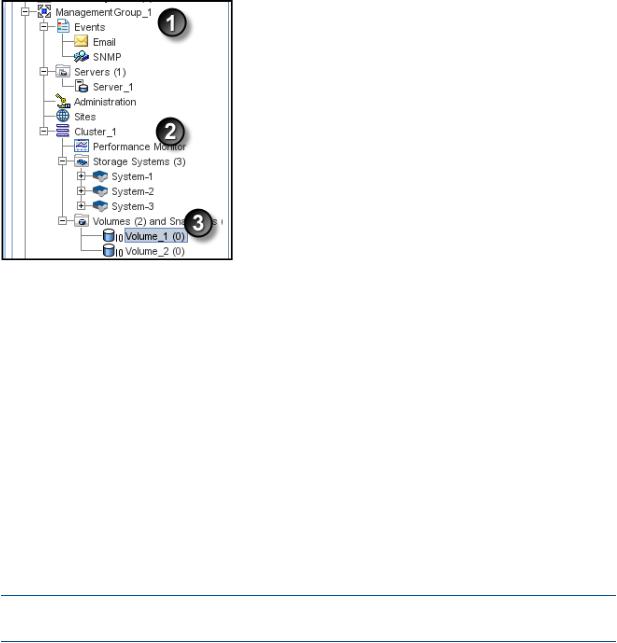
Figure 1 The LeftHand OS software storage hierarchy
1.Management group
2.Cluster
3.Volume
To complete this wizard, you will need the following information:
•A name for the management group.
•A storage system discovered on the network and then configured for RAID and the Network settings
•DNS domain name, suffix, and server IP address for email event notification
•IP address or hostname and port of your email (SMTP) server for event notification
•A name for the cluster
•Virtual IP address to use for the cluster
•A name for the volume
•The size of the volume
NOTE: Names of management groups, clusters, volumes, and snapshots cannot be changed in the future without deleting the management group.
Enabling server access to volumes
Create a server or server cluster to connect application servers to volumes. To create a server or server cluster, you must first have created a management group, a cluster, and at least one volume. You should also plan the following:
•The application servers that need access to volumes.
•The iSCSI initiator you plan to use. You need the server’s initiator name, and CHAP information if you plan to use CHAP.
•For Fibre Channel access, have two Fibre Channel-enabled storage systems in the management group.
See “Controlling server access to volumes” (page 202) for more information.
16 Getting started

Using the Map View
The Map View tab is available for viewing the relationships between management groups, servers, sites, clusters, volumes and snapshots. When you log in to a management group, there is a Map View tab for each of those elements in the management group. For example, when you want to make changes such as moving a volume to a different cluster, or deleting shared snapshots, the Map View allows you to easily identify how many snapshots and volumes are affected by such changes.
The Map View pane contains display tools to control and manipulate the view. The display tools are available from the Map View Tasks menu or from the tool bar across the top of the pane. The tools function the same from either the tool bar or the Map View tasks menu.
Using the display tools
Use these tools, described in Table 1 (page 17), to select specific areas of the map to view, zoom in on, rotate, and move around the window. If you have a complex configuration, use the Map View tools to easily view and monitor the configuration.
Table 1 Map View display tools
Tool Icon |
Function |
|
Zoom In—incrementally magnifies the Map View window. |
|
Zoom Out—incrementally reduces the Map View window. |
|
Magnify—creates magnification area, like a magnifying |
|
glass, that you can move over sections of the map view. |
|
Note that the magnify tool toggles on and off. You must |
|
click the icon to use it, and you must click the icon to turn |
|
it off. |
|
Zoom to Fit—returns the map view to its default size and |
|
view. |
|
Select to Zoom—allows you to select an area of the map |
|
view and zoom in on just that area. |
|
Rotate—turns the map view 90 degrees at a time. |
Click and drag |
You can left-click in the Map View window and drag the |
|
map around the window |
Using views and layouts |
|
The views and layouts differ for each element of your network that uses the map view. For views and layouts available, see:
•Working with management groups, “Management group map view tab” (page 110)
•Controlling server access to volumes, “Viewing the relationship between storage systems, volumes, and servers” (page 210)
•Sites, HP StoreVirtual Storage Multi-Site Configuration Guide
•Clusters, “Cluster Map View” (page 137)
•Volumes and Snapshots, “Viewing the volume map” (page 161)
•SmartClone volumes, “Using views” (page 196)
Using the Map View 17
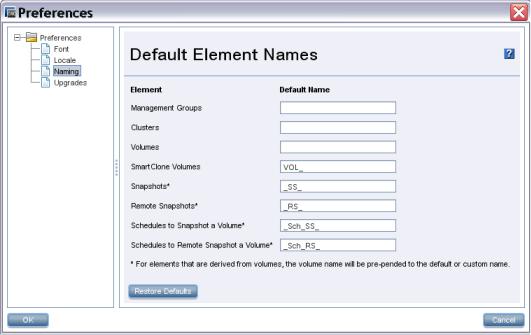
Setting preferences
Use the Preferences window to set the following:
•Font size in the CMC
•Locale for the CMC. The locale determines the language displayed in the CMC.
•Naming conventions for storage elements
•Online upgrade options.
Setting the font size and locale
Use the Preferences window, opened from the Help menu, to set font size and locale in the CMC. Font sizes from 9 through 16 are available.
The CMC obtains the locale setting from your computer. If you change the locale on your computer and open the CMC, it uses the new locale, if available in the CMC.
You can override the locale setting from your computer by selecting a different locale in the CMC. Changing the locale in the CMC affects the language of the text that appears in the CMC and in the online help.
After changing the locale, you must close and reopen the CMC to see the change.
Setting naming conventions
Use the Preferences window, opened from the Help menu, to set naming conventions for elements you create when building the HP StoreVirtual Storage. You can use the default values or create your own set of customized values.
When you install the CMC for the first time, or upgrade from release 7.0.x, default names are enabled for snapshots, including schedules to snapshot a volume, and for SmartClone volumes. No default names are provided for management groups, clusters, and volumes.
Figure 2 Default naming conventions for snapshots and SmartClone volumes
Changing naming conventions
Change the elements that use a default naming convention or change the naming convention itself.
18 Getting started

If you use the given defaults, the resulting names look like those in Table 2 (page 19). Notice that the volume name carries into all the snapshot elements, including SmartClone volumes, which are created from a snapshot.
Table 2 Example of how default names work
Element |
Default name |
Example |
SmartClone Volumes |
VOL_ |
VOL_VOL_ExchLogs_SS_3_1 |
Snapshots |
_SS_ |
VOL_ExchLogs_SS_1 |
Remote Snapshots |
_RS_ |
VOL_RemoteBackup_RS_1 |
Schedules to Snapshot a Volume |
_Sch_SS_ |
VOL_ExchLogs_Sch_SS_2.1 |
Schedules to Remote Snapshot a |
_Sch_RS_ |
VOL_ExchLogs_Sch_RS_2_Pri.1, |
Volume |
|
VOL_RemoteBackup_Sch_RS_1_Rmt.1 |
If you delete all the default names from the Preferences Naming window, the only automatically generated naming elements that remain will incrementally number a series of snapshots or SmartClone volumes.
Troubleshooting
Storage systems not found
If the network has a lot of traffic, or if a storage system is busy reading or writing data, it may not be found when a search is performed. Try the following steps to find the storage system.
1.If the storage system you are looking for does not appear in the navigation window, search again using the Find menu.
2.If you have searched using Auto Discover by Broadcast, try adding individual IP addresses and clicking Find.
3.If you have searched by individual IP addresses, try searching by Auto Discover by Broadcast instead.
4.If searching again does not work, try the following:
•Check the physical connection of the storage system.
•Wait a few minutes and try the search again. If activity to the storage system was frequent, the storage system might not have responded to the search.
Other problems can prevent the CMC from finding a storage system:
•Extremely high network traffic to and from the storage system.
•The IP address could have changed if the storage system is configured to use DHCP (not recommended).
•The storage system may have been rebooted and is not yet online.
•Power could have failed to a network switch to which the storage system is connected.
•The CMC might be running on a system that is on a different physical network than the storage system. Poor network routing performance at the site may severely affect performance of the CMC.
Configuring remote support for HP StoreVirtual Storage
If you are using HP remote support, Table 3 (page 20) lists the required configuration tasks.
Troubleshooting 19

Table 3 CMC setup for remote support
 Task
Task
Enable SNMP on each storage system
Set the SNMP trap recipient to IP address of the system where the remote support client is installed
 Open port 8959 (used for the CLI)
Set the management group login and password for a read-only (View_Only_Administrator group) user
 For more information, see
“Enabling SNMP agents” (page 96)
“Adding SNMP traps” (page 97)
 Your network administrator
“Adding an administrative user” (page 80)
20 Getting started

2 Working with storage systems
Storage systems displayed in the navigation window have a tree structure of configuration categories under them, as shown in Figure 3 (page 21). The configuration categories provide access to the configuration tasks for individual storage systems. You must configure some basic storage system parameters before using it in a cluster.
Figure 3 Storage system configuration categories
The configuration categories include the following:
•Diagnostics—Run hardware diagnostic tests, view current hardware status and configuration information, and save log files.
•Network—For each storage system, configure and manage the network settings, including network interface cards (NICs), the routing table, and which interface carries LeftHand OS communications.
•Storage—Manage disk RAID and the individual disks in the storage system.
Identifying the storage system hardware
Each HP StoreVirtual storage system is based on a specific HP platform. For general information about the underlying hardware of your HP StoreVirtual Storage model, such as LEDs, component identification, and replacing components, see the platform-specific documentation. Table 4 (page 21) identifies the HP platform used for each StoreVirtual model and a link to related information.
Table 4 HP platform identification
HP StoreVirtual model |
HP platform |
Documentation |
Link |
NSM 2120 |
ProLiant |
HP ProLiant DL320s User |
http://www.hp.com/support/DL320s_UG_en |
|
DL320s |
Guide |
|
HP LeftHand P4300 |
ProLiant |
HP ProLiant DL185 |
http://www.hp.com/support/ |
HP LeftHand P4500 |
DL185 G5 |
Generation 5 Maintenance |
DL185Gen5_MSG_en |
|
|
and Service Guide |
|
HP P4300 G2 |
SE1220 |
HP SE1220 Maintenance and |
Contact HP Support for more information as this |
HP P4500 G2 |
|
Service Guide |
guide is not publicly available. |
P4900 G2 |
|
|
|
P4800 G2 |
ProLiant |
HP P4800 G2 SAN Solution |
http://www.hp.com/support/ |
|
BL460c G7 |
for BladeSystem Maintenance |
HP_P4800_G2_SAN_Solution_BladeSystem_MG_en |
|
|
Guide |
http://www.hp.com/support/ |
|
|
|
|
|
|
HP ProLiant BL460c G7 |
BL460cG7_Server_Blade_MSG_en |
|
|
Server Blade Maintenance |
|
|
|
and Service Guide |
|
Identifying the storage system hardware |
21 |

Table 4 HP platform identification (continued)
 HP StoreVirtual model
  HP platform
  Documentation
  Link
Link
HP StoreVirtual 4130 |
ProLiant |
HP StoreVirtual 4330 |
DL360p |
HP StoreVirtual 4330 |
Gen8 |
FC |
|
HP StoreVirtual 4530 |
ProLiant |
HP StoreVirtual 4730 |
DL380p |
HP StoreVirtual 4730 |
Gen8 |
|
|
FC |
|
HP ProLiant DL360p Gen8 |
http://www.hp.com/go/proliantgen8/docs |
Server Maintenance and |
|
Service Guide |
|
HP ProLiant DL380p Gen8 |
http://www.hp.com/go/proliantgen8/docs |
Server User Guide |
|
HP ProLiant DL380p Gen8 |
|
Server Maintenance and |
|
Service Guide |
|
HP StoreVirtual 4630 ProLiant |
HP ProLiant BL460c Gen8 |
http://www.hp.com/go/proliantgen8/docs |
BL460c Gen8 |
Server Blade User Guide |
http://www.hp.com/support/ |
|
|
|
|
HP ProLiant BL460c Gen8 |
StoreVirtualManuals |
|
Server Blade Maintenance |
|
|
and Service Guide |
|
Storage system tasks
Logging in to and out of storage systems
When storage systems are in the Available pool, you log in without a user name or password. Simply click the link Log in to view. When you use the Management Group, Clusters and Volumes wizard, selecting a storage system to use automatically logs in to that storage system. You can find the link to log in at the following locations:
•From the Available systems list in the Navigation window
•On individual storage system Details tabs
Logging out of a storage system
1.Select a storage system in the navigation window.
2.Right-click and select Log Out.
NOTE: If you are logged in to multiple storage systems, you must log out of each storage system individually.
Changing the storage system hostname
The storage system arrives configured with a default hostname. Change the hostname as follows:
1.On the Details tab, click Storage System Tasks and select Edit Hostname, or right-click on the storage system and select Edit Hostname.
2.Enter the new name in the Edit Hostname window, and click OK.
3.Click Yes to confirm.
NOTE: Add the hostname and IP pair to the hostname resolution methodology employed in your environment, for example, DNS or WINS.
Locating the storage system in a rack
The Set ID LED illuminates lights on the physical storage system to aid in physically locating that storage system in a rack. The Set ID LED is available depending on the model of the storage system.
22 Working with storage systems

1.Select a storage system in the navigation window and log in.
2.Click Storage System Tasks on the Details tab and select Set ID LED On.
The ID LED on the front of the storage system is now a bright blue. Another ID LED is located on the back of the storage system.
When you click Set ID LED On, the status changes to On.
3.Select Storage System Tasks→Set ID LED Off when you have finished. The LED on the storage system turns off.
Powering off or rebooting the storage system
You can reboot or power off the storage system from the CMC. Set the amount of time before the process begins, to ensure that all activity to the storage system has stopped.
Powering off the storage system through the CMC physically powers it off. The CMC controls the power down process so that data is protected.
Powering off an individual storage system is appropriate for servicing or moving that storage system. However, if you want to shut down more than one storage system in a management group, you should shut down the management group instead of individually powering off the storage systems in that group. See “Shutting down a management group” (page 118).
IMPORTANT:
•Before powering off or rebooting the storage system, ensure that volumes will not go offline by checking the storage system Availability tab. See “Determining volume and snapshot availability” (page 25).
•You should also verify that you have the proper number of managers and possibly a Failover Manager to ensure that quorum is maintained. See “Managers and quorum” (page 123).
Powering on or off, or rebooting storage systems with modular components
Some storage systems are comprised of modular components, that may include:
•Disk enclosure
•Server blades enclosure
•System controller
The P4800 and the 4630 are examples of storage systems that are comprised of modular components.
Power on the components in the following order:
1.Disk enclosure.
2.Server blades enclosure or system controller.
Allow up to 6 minutes for the system controller to come up completely and be discovered by the CMC. If the CMC cannot find the storage system after 6 minutes, contact Customer Support.
3.If you do not power on the disk enclosure first, the Storage System Details tab shows the status with No Formatted Devices Available.
Powering off or rebooting the storage system |
23 |
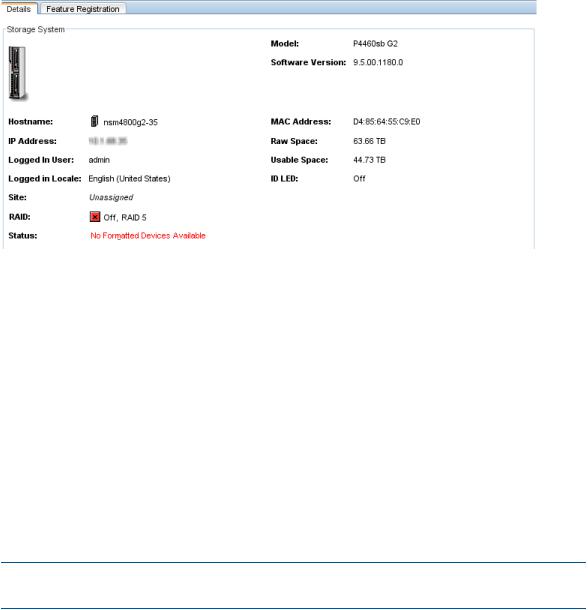
Figure 4 Disk enclosure not found as shown in Details tab
When powering off the storage system, be sure to power off the components in the following order:
1.Power off the server blades enclosure or system controller from the CMC as described in “Powering off the storage system” (page 24).
2.Manually power off the disk enclosure.
When you reboot the storage system, use the CMC, as described in “Rebooting the storage system” (page 24). This process reboots only the server blades enclosure or the system controller.
Rebooting the storage system
1.Select a storage system in the navigation window and log in.
2.Click Storage System Tasks on the Details tab and select Power Off or Reboot.
3.In the minutes field, enter the number of minutes before the reboot should begin.
Enter any whole number greater than or equal to 0. If you enter 0, the storage system reboots shortly after you confirm the reboot.
NOTE: If you enter 0 for the value when rebooting, you cannot cancel the action. Any value greater than 0 allows you to cancel before the reboot actually takes place.
4.Select Reboot to perform a software reboot without a power cycle.
5.Click OK.
The storage system starts the reboot in the specified number of minutes. The reboot may take several minutes.
6.Search for the storage system to reconnect the CMC to the storage system once it has finished rebooting.
Powering off the storage system
1.Log in to the storage system.
2.Select Storage System Tasks on the Details tab and select Power Off or Reboot.
3.Select Power Off.
The button changes to Power Off.
4.In the minutes field, enter the number of minutes before the powering off should begin.
Enter any whole number greater than or equal to 0. If you enter 0, the storage system powers off shortly after you confirm the power off.
24 Working with storage systems
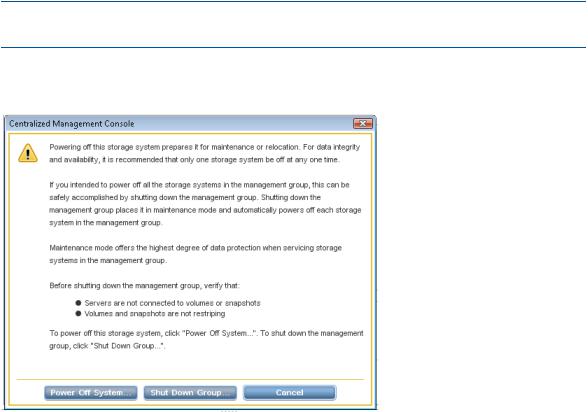
NOTE: If you enter 0 for the value when powering off, you cannot cancel the action. Any value greater than 0 allows you to cancel before the power off actually takes place.
5.Click Power Off.
Figure 5 Confirming storage system power off
Depending on the configuration of the management group and volumes, your volumes and snapshots can remain available.
Upgrading LeftHand OS on storage systems
The CMC enables online upgrades for storage systems, including the latest software releases and patches. See the HP StoreVirtual Storage Upgrade Guide.
Registering advanced features for a storage system
Using the Feature Registration tab, register individual storage systems for advanced features.
For more information about registering advanced features, see “Registering advanced features” (page 231).
Determining volume and snapshot availability
The Availability tab displays which volumes’ and snapshots’ availability depends on this storage system staying online. Details include the data protection level and what factors contribute to the availability status, such as the status of storage systems participating in any replication or a RAID restripe in progress. Quorum dependency is a critical indicator of volume availability and is reported here. For more information about quorum and managers, see “Managers and quorum” (page 123).
Upgrading LeftHand OS on storage systems 25
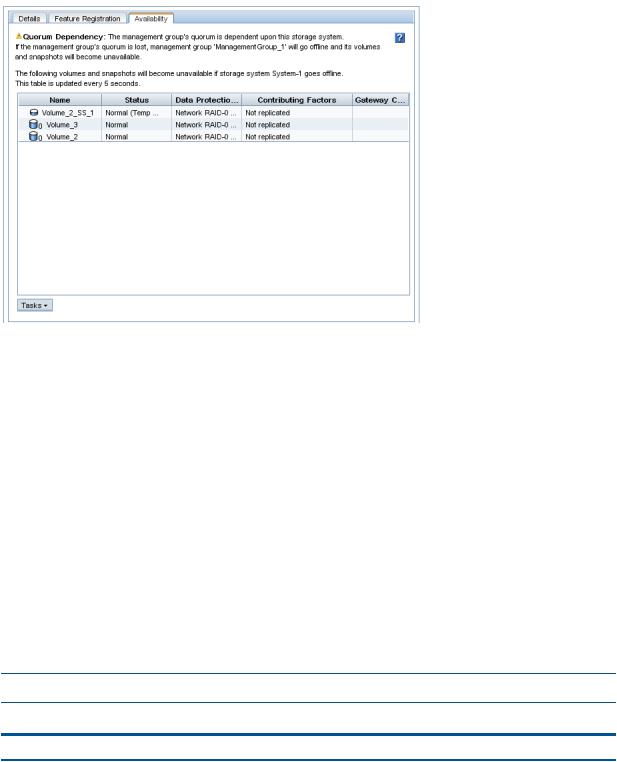
Figure 6 Availability tab
Checking status of dedicated boot devices
Some storage systems contain either one or two dedicated boot devices. In storage systems with two dedicated boot devices, both devices are active by default. If a storage system has dedicated boot devices, the Boot Devices tab appears in the Storage configuration category. Storage systems that do not have dedicated boot devices will not display the Boot Devices tab.
Checking boot device status
View dedicated boot device status in the Boot Devices tab window in the Storage category in the storage system tree. Boot device status and statistics are available in the hardware information, available from the Diagnostics category in the storage system tree.
Getting there
1.Select a storage system in the navigation window and log in if necessary.
2.Open the tree below the storage system and select Storage.
3.Select the Boot Devices tab.
The status of each dedicated boot device on the storage system is listed in the Status column. Table 5 (page 26) describes the possible status for boot devices.
NOTE: Some statuses only occur in a storage system with two boot devices.
Table 5 Boot device status
Boot device status |
Description |
Active |
The device is synchronized and ready to be used. |
Inactive |
The device is ready to be removed from the storage system. |
|
It will not be used to boot the storage system. |
Failed |
The device encountered an I/O error and is not ready to |
|
be used. |
Unformatted |
The device has not yet been used in a storage system. It is |
|
ready to be activated. |
26 Working with storage systems

Table 5 Boot device status (continued)
Boot device status |
Description |
Not Recognized |
The device is not recognized as a boot device. |
Unsupported |
The device cannot be used. (For example, the compact |
|
flash card is the wrong size or type.) |
:
When the status of a boot device changes, an event is generated. See “Alarms and events overview” (page 88).
Replacing a dedicated boot device
If a boot hard drive fails, you will see an event that the boot device is faulty. Replace it with a new drive, according to the hardware documentation that came with the storage system. The boot device drives support hot swapping and do not require activation. Refer to the hardware documentation for the storage system. See Table 4 (page 21) for links to the hardware documentation for HP StoreVirtual platforms.
Checking status of dedicated boot devices 27
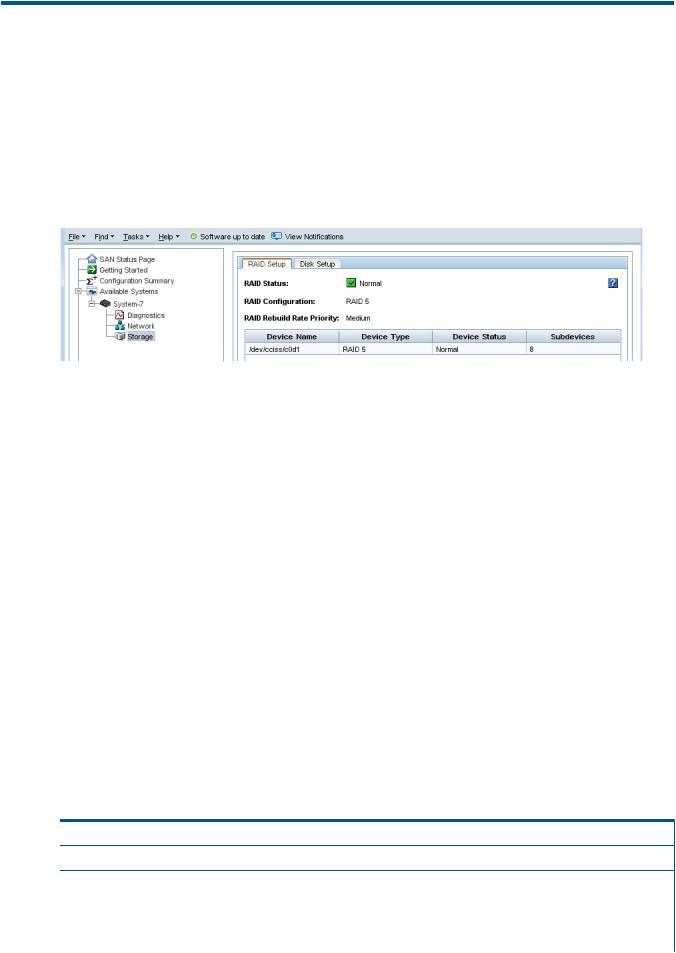
3 Configuring RAID and Managing Disks
For each storage system, you can select the RAID configuration and the RAID rebuild options, and monitor the RAID status. You can also review disk information and, for some models, manage individual disks.
Getting there
1.In the navigation window, select a storage system and log in if necessary.
2.Open the tree under the storage system and select the Storage category.
Figure 7 Viewing the storage configuration category for a storage system
Columns in the RAID Setup tab show four categories:
•Device Name
•Device Type or the RAID level
•Device Status
•Subdevices
NOTE: For hardware-specific LED information for your storage system, see “Identifying the storage system hardware” (page 21) for document titles and document links.
Configuring and managing RAID
Managing the RAID settings of a storage system includes:
•Choosing the right RAID configuration for your storage needs
•Setting or changing the RAID configuration, if necessary
•Setting the rate for rebuilding RAID
•Monitoring the RAID status for the storage system
•Reconfiguring RAID when necessary
RAID Levels
The availability of certain RAID levels is determined by the number of storage system hard drives.
Table 6 Descriptions of RAID levels
RAID level |
Description |
RAID 10 – Mirroring and Striping |
Offers the best combination of data protection and |
|
performance. RAID 1+0 or drive mirroring creates fault |
|
tolerance by storing duplicate sets of data on a minimum |
|
of four hard drives. There must be an even number of drives |
|
for RAID 1+0. RAID 1+0 is the most costly fault tolerance |
28 Configuring RAID and Managing Disks

 Table 6 Descriptions of RAID levels (continued)
RAID level |
Description |
|
method because it requires 50 percent of the drive capacity |
|
to store the redundant data. RAID 1+0 first mirrors each |
|
drive in the array to another, and then stripes the data |
|
across the mirrored pair. If a physical drive fails, the mirror |
|
drive provides a backup copy of the files and normal |
|
system operations are not interrupted. RAID 1+0 can |
|
withstand multiple simultaneous drive failures, as long as |
|
the failed drives are not mirrored to each other. |
RAID 5 |
Offers the best combination of data protection and usable |
|
capacity while also improving performance over RAID 6. |
|
RAID 5 stores parity data across all the physical drives in |
|
the array and allows more simultaneous read operations |
|
and higher performance. If a drive fails, the controller uses |
|
the parity data and the data on the remaining drives to |
|
reconstruct data from the failed drive. The system continues |
|
operating with a slightly reduced performance until you |
|
replace the failed drive. RAID 5 can only withstand the |
|
loss of one drive without total array failure. It requires an |
|
array with a minimum of three physical drives. Usable |
|
capacity is N-1 where N is the number of physical drives |
|
in the logical array. |
RAID 6 |
Offers the best data protection and is an extension of RAID |
|
5. RAID 6 uses multiple parity sets to store data and can |
|
therefore tolerate up to 2 drive failures simultaneously. |
|
RAID 6 requires a minimum of 4 drives. Performance is |
|
lower than RAID 5 due to parity data updating on multiple |
|
drives. RAID 6 uses two disk for parity; its fault tolerance |
|
allows two disks to fail simultaneously. Usable capacity is |
|
N-2 where N is the number of physical drives in the logical |
|
array. |
Explaining RAID devices in the RAID setup report
In the Storage category, the RAID Setup tab lists the RAID devices in the storage system and provides information about them. An example of the RAID setup report is shown in Figure 8 (page 29). Information listed in the report is described in Table 7 (page 30).
Figure 8 RAID setup report
RAID devices by RAID type
Each RAID type creates different sets of RAID devices. Table 7 (page 30) contains a description of the variety of RAID devices created by the different RAID types as implemented on various storage systems.
Explaining RAID devices in the RAID setup report 29

Table 7 Information in the RAID setup report
This item |
Describes this |
|
Device Name |
The disk sets used in RAID. The number and names of |
|
|
devices varies by storage system and RAID level. |
|
Device Type |
The RAID level of the device. For example, in a HP P4300 |
|
|
G2, RAID 5 displays a Device Type of RAID 5 and |
|
|
subdevices as 8. |
|
|
NOTE: On the 4730 and the 4630 with 25 drives, since |
|
|
the global hot spare is configured, each logical drive will |
|
|
show 13 subdevices (12 data drives plus 1 spare). |
|
Device Status |
The RAID status of the device. |
|
|
Status is one of the following: |
|
|
• |
Normal—green |
|
• |
Degraded—yellow |
|
• |
Off—red |
|
• |
Rebuilding—blue |
Subdevices |
The number of disks included in the device. |
|
Virtual RAID devices
If you are using the VSA, the only RAID available is virtual RAID. After installing the VSA, virtual RAID is configured automatically if you first configured the data disk in the VI Client.
HP recommends installing VSA for vSphere on top of a server with a RAID 5 or RAID 6 configuration.
Planning the RAID configuration
Plan the RAID configuration for storage systems based on a balance between data high availability or fault tolerance, I/O performance, and usable capacity.
CAUTION: Plan your RAID configuration carefully. After you have configured RAID and created a management group, you cannot change the RAID configuration without deleting all data on the storage system.
Data protection
Keeping multiple copies of your data ensures that data is safe and remains available in the case of disk failure. HP recommends using both disk RAID and Network RAID to insure high availability:
•Configure RAID 1+0, RAID 5, or RAID 6 within each storage system to ensure data redundancy.
•Always use Network RAID to mirror data volumes across storage systems in a cluster, regardless of RAID level, for added data protection and high availability.
Using RAID for data redundancy
Within each storage system, RAID 1+0 ensures that two copies of all data exist. If one of the disks in a RAID pair goes down, data reads and writes continue on the other disk. Similarly, RAID 5 or RAID 6 provides redundancy by spreading parity evenly across the disks in the set.
If one disk in a RAID 5 set, or two disks in a RAID 6 set goes down, data reads and writes continue on the remaining disks in the set.
RAID protects against failure of disks within a storage system, but not against failure of an entire storage system. For example, if network connectivity to the storage system is lost, then data reads and writes to the storage system cannot continue.
30 Configuring RAID and Managing Disks
Loading...