


 Loading...
HP Slate 21 All-in-One
User Guide
© 2013 Hewlett-Packard Development
Company, L.P.
The only warranties for HP products and services are set forth in the express warranty statements accompanying such products and services . Nothing herein should be construed as constituting an additional warranty. HP shall not be liable for technical or editorial errors or omissions contained herein.
This document contains proprietary information that is protected by copyright. No part of this document may be photocopied, reproduced, or translated to another language without the prior written consent of Hewlett-Packard Company.
First Edition (August 2013)
Document Part Number: 734558-001
Product notice
This guide describes features that are common to most models. Some features may not be available on your computer.

About This Guide
This guide provides information on setting up and using the HP Slate 21 All-in-One.
WARNING! Text set off in this manner indicates that failure to follow directions could result in bodily harm or loss of life.
CAUTION: Text set off in this manner indicates that failure to follow directions could result in damage to equipment or loss of information.
 NOTE: Text set off in this manner provides important supplemental information.
iii
iv About This Guide

Table of contents
1 Product features ............................................................................................................................................. |
1 |
Front components ................................................................................................................................ |
2 |
Rear components ................................................................................................................................. |
3 |
2 Setting up the hardware ................................................................................................................................. |
4 |
Preparing for desk use ......................................................................................................................... |
4 |
Preparing for wall mounting .................................................................................................................. |
4 |
Connecting the cables .......................................................................................................................... |
7 |
Adjusting the tilt .................................................................................................................................. |
10 |
Turning on the all-in-one for the first time ........................................................................................... |
11 |
Using the touchscreen ........................................................................................................................ |
12 |
One-finger slide ................................................................................................................. |
12 |
Tapping .............................................................................................................................. |
12 |
Pinching/stretching ............................................................................................................ |
12 |
Rotating ............................................................................................................................. |
13 |
Swipes ............................................................................................................................... |
13 |
Connecting to networks ...................................................................................................................... |
14 |
Connecting to wireless networks ....................................................................................... |
14 |
Connecting to wired networks ............................................................................................ |
15 |
Bluetooth ............................................................................................................................ |
15 |
3 Using the user interface ............................................................................................................................... |
16 |
Browsing the internet .......................................................................................................................... |
17 |
Playing media ..................................................................................................................................... |
17 |
Using the camera ............................................................................................................................... |
18 |
Printing ............................................................................................................................................... |
18 |
Adjusting the settings ......................................................................................................................... |
18 |
Date/time settings .............................................................................................................. |
18 |
Security settings ................................................................................................................ |
19 |
Screen lock ....................................................................................................... |
19 |
Encryption ......................................................................................................... |
19 |
Sound settings ................................................................................................................... |
19 |
Language ........................................................................................................................... |
20 |
Updating the software ........................................................................................................ |
20 |
Backup & reset ................................................................................................................................... |
20 |
Backup & restore ............................................................................................................... |
20 |
v
Factory data reset .............................................................................................................. |
21 |
Enabling input method editor (IME) .................................................................................................... |
21 |
4 Safety and Maintenance Guidelines ............................................................................................................ |
22 |
Important Safety Information .............................................................................................................. |
22 |
Maintenance guidelines ...................................................................................................................... |
22 |
Cleaning the all-in-one ....................................................................................................... |
23 |
Shipping the all-in-one ....................................................................................................... |
23 |
5 Frequently asked questions ........................................................................................................................ |
24 |
6 Product support ............................................................................................................................................ |
25 |
7 Technical specifications .............................................................................................................................. |
26 |
HP Slate 21 All-in-One ....................................................................................................................... |
26 |
Energy saver feature .......................................................................................................................... |
27 |
Appendix A Agency Regulatory Notices ....................................................................................................... |
28 |
Federal Communications Commission Notice ................................................................................... |
28 |
Modifications ...................................................................................................................... |
28 |
Cables ................................................................................................................................ |
28 |
Declaration of Conformity for Products Marked with the FCC Logo (United States Only) ................. |
28 |
Canadian Notice ................................................................................................................................. |
29 |
Avis Canadien .................................................................................................................................... |
29 |
European Union Regulatory Notice .................................................................................................... |
30 |
German Ergonomics Notice ............................................................................................................... |
30 |
Japanese Notice ................................................................................................................................. |
30 |
Korean Notice ..................................................................................................................................... |
30 |
Power Cord Set Requirements ........................................................................................................... |
31 |
Japanese Power Cord Requirements ................................................................................ |
31 |
Product Environmental Notices .......................................................................................................... |
31 |
ENERGY STAR® Qualification .......................................................................................... |
31 |
Materials Disposal ............................................................................................................. |
32 |
Disposal of Waste Equipment by Users in Private Household in the European Union ..... |
32 |
HP Recycling Program ...................................................................................................... |
32 |
Chemical Substances ........................................................................................................ |
32 |
Restriction of Hazardous Substances (RoHS) ................................................................... |
33 |
Turkey EEE Regulation ..................................................................................................... |
33 |
Ukraine Restriction of Hazardous Substances .................................................................. |
34 |
vi

1 Product features
The HP Slate 21 All-in-One provides easy, simple access to the internet, and streaming views of media content (video, audio, photos).
The all-in-one has an active matrix, thin-film transistor (TFT) panel. Features include:
●Android 4.2 operating system with multi-user support
●54.6 cm (21.5-inch) diagonal viewable area LED display with 1920 x 1080 resolution
●5 ms response time, 250 nits, 178/178 viewing angle, 1000:1 contrast ratio
●Tilt capability from 15 to 70 degrees
●2 point optical touchscreen that uses 3 cameras
●NvidiaTegra 4 Quad Core (T40S) processor
●8 GB flash memory storage
●3 USB 2.0 ports
●Secure Digital (SD) card reader
●HP TrueVision Webcam (720p HD) and microphone
●Ethernet jack
●Audio out ports
●Plug and play capability that lets the all-in-one automatically recognize hardware devices
●Wireless 802.11 a/b/g/n + Bluetooth 4.0
●Built-in stereo speakers
●Wired USB keyboard and mouse included with select models
●Video Electronics Standards Association (VESA) standard mounting holes for flexible mounting solutions, including wall-mounting
●Full Internet capability
1

Front components
Component |
Function |
|
|
|
|
(1) |
Webcam |
Records video and captures still photographs |
|
|
|
(2) |
Internal microphone |
Records sound |
|
|
|
(3) |
Webcam light |
On: The webcam is in use |
|
|
|
(4) |
Volume up button |
Increases volume |
|
|
|
(5) |
Volume down button |
Decreases volume |
|
|
|
(6) |
Brightness up button |
Increases display brightness |
|
|
|
(7) |
Brightness down button |
Decreases display brightness |
|
|
|
(8) |
Power button |
Turns the all-in-one on and off |
|
|
|
(9) |
Speakers |
Produce sound |
|
|
|
2 Chapter 1 Product features
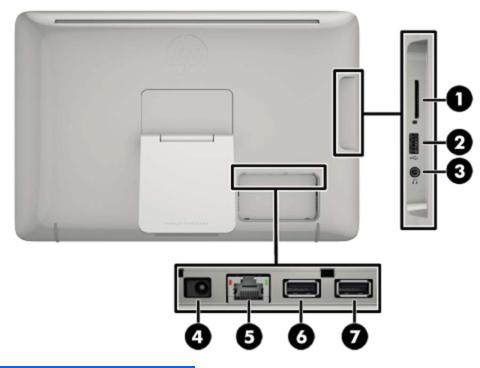
Rear components
Component |
Function |
|
|
|
|
(1) |
SD card reader |
Reads data from and writes data to Secure Digital (SD) |
|
|
memory cards |
|
|
|
(2) |
USB 2.0 connector |
Connects external USB devices to the all-in-one |
|
|
|
(3) |
Audio-out (headphone) jack |
Produces sound when connected to optional powered |
|
|
stereo speakers, headphones, earbuds, or a headset |
|
|
|
(4) |
DC power connector |
Connects the DC-in cable from the AC power adapter |
|
|
|
(5) |
Ethernet connector |
Connects an Ethernet cable to the all-in-one |
|
|
|
(6) |
USB 2.0 connector |
Connects external USB devices to the all-in-one |
|
|
|
(7) |
USB 2.0 connector |
Connects external USB devices to the all-in-one |
|
|
|
Rear components |
3 |

2 Setting up the hardware
You can install the all-in-one on a desktop or mount it to a mounting fixture such as a wall mount or swing arm. Be sure to place the all-in-one in a convenient, well-ventilated location. Connect the cables after you have installed the all-in-one to a mounting fixture.
To set up the all-in-one, ensure that the power is turned off to the all-in-one and all attached accessories, and then follow the instructions below for your configuration.
Preparing for desk use
To assemble the all-in-one for desktop use:
1.Set the all-in-one face down on a flat, soft, protected table or desk surface.
2.Pull the stand outward until you hear it click.
3.Lift the all-in-one to an upright position and place on a flat, stable surface.
Preparing for wall mounting
 NOTE: This all-in-one is intended to be supported by UL or CSA Listed wall mount bracket.
You can only VESA mount the all-in-one in landscape orientation with the rear ports facing down. Do not place in portrait orientation.
To attach the all-in-one to a mounting fixture:
1.Set the all-in-one face down on a flat, soft, protected table or desk surface.
4 |
Chapter 2 Setting up the hardware |

2.Lift and rotate the stand until it is positioned straight up so you can access the screw that secures the stand to the all-in-one.
3.Remove the two screws that secure the stand to the all-in-one (1), and then lift up the bottom of the stand slightly and remove it from the all-in one (2).
Preparing for wall mounting |
5 |

4.Align the screw holes on the mounting fixture with the VESA holes on the back of the all-in-one, and then insert four 10 mm screws (not provided) through the holes on the mounting fixture and into the mounting holes on the all-in-one.
CAUTION: This all-in-one supports the VESA industry standard 100 mm mounting holes. To attach a third-party mounting solution to the all-in-one, four 4 mm, 0.7 pitch, and 10 mm long screws are required. Longer screws must not be used because they may damage the all-in-one. It is important to verify that the manufacturer’s mounting solution is compliant with the VESA standard and is rated to support the weight of the all-in-one. For best performance, it is important to use the power and video cables provided with the all-in-one.
6 |
Chapter 2 Setting up the hardware |
Loading...