


 Loading...
Panasonic DP-150, DP-1810, DP-2000, DP-2010, DP-2500 Operation Manual
...
Software
Operating Instructions
(For Document Management System, Printer and Class 2 Fax Modem)
Model No. DP-130/150/1810/2000/2010/2500/3000
Before operating this software, please read these instructions completely and keep these operating instructions for future reference.
English
Before Use
System Section
Troubleshooting Document Management Printer Section
Section
Class 2 Fax Modem

The following trademarks and registered trademarks are used throughout this manual:
Microsoft, MS-DOS, Windows and Windows NT are registered trademarks of Microsoft Corporation in the USA and other countries.
i386, i486 and Pentium are trademarks of Intel Corporation.
Centronics is a registered trademark of Centronics Data Computer Corporation. TrueType is a registered trademark of Apple Computer, Inc.
All other trademarks identified herein are the property of their respective owners.
Copyright c 2000-2001 by Matsushita Graphic Communication Systems, Inc. All rights reserved. Unauthorized copying and distribution is a violation of law. Published in Japan.
The contents of these Operating Instructions are subject to change without notice.
2

Table of Contents |
|
Before Use |
|
Precautions..................................................................................................................... |
6 |
For User in USA ............................................................................................. |
6 |
External View and Control Panel .................................................................................. |
7 |
External View ................................................................................................. |
7 |
Control Panel.................................................................................................. |
10 |
Printer Section |
|
Installing the Printer Driver ......................................................................................... |
14 |
Windows 95/98/Me/NT/2000/XP .................................................................... |
14 |
Installing the LPR (Line Printer Remote) Monitor ....................................................... |
17 |
Windows 95/98/Me......................................................................................... |
17 |
Windows NT 4.0 ............................................................................................. |
21 |
Windows 2000/XP.......................................................................................... |
25 |
Configuring the Printer Driver Settings ....................................................................... |
29 |
Windows 95/98/Me......................................................................................... |
29 |
Windows NT 4.0 (Administrator) .................................................................... |
39 |
Windows NT 4.0 (User) .................................................................................. |
47 |
Windows 2000/XP (Administrator) ................................................................. |
53 |
Windows 2000/XP (User) ............................................................................... |
62 |
Print Operation ............................................................................................................... |
69 |
Printing from Windows Applications ............................................................... |
69 |
Printing on Network ........................................................................................ |
70 |
Document Management System Section |
|
Installing the Document Management System............................................................ |
72 |
Windows 95/98/Me/NT/2000 .......................................................................... |
72 |
Document Manager ........................................................................................................ |
77 |
Main Window.................................................................................................. |
77 |
Basic Operations ............................................................................................ |
79 |
Setting Plug-in ................................................................................................ |
81 |
File Menu........................................................................................................ |
82 |
Edit Menu ....................................................................................................... |
87 |
View Menu...................................................................................................... |
88 |
Document Menu ............................................................................................. |
89 |
Image Converter ............................................................................................................. |
91 |
General Description........................................................................................ |
91 |
Windows 95/98/Me......................................................................................... |
91 |
Windows NT 4.0 ............................................................................................. |
92 |
Windows 2000/XP.......................................................................................... |
93 |
Document Scanner......................................................................................................... |
94 |
Main Window.................................................................................................. |
94 |
Tool Menu ...................................................................................................... |
96 |
Image Scanning ............................................................................................. |
98 |
3

Table of Contents |
|
Document Management System Section |
|
Document Viewer ........................................................................................................... |
100 |
Main Window ................................................................................................. |
100 |
Basic Operations............................................................................................ |
102 |
Annotation Function ....................................................................................... |
103 |
File Menu ....................................................................................................... |
104 |
Edit Menu....................................................................................................... |
108 |
View Menu ..................................................................................................... |
109 |
Page Menu..................................................................................................... |
110 |
Annotation Menu............................................................................................ |
113 |
Window Menu ................................................................................................ |
122 |
Status Monitor ................................................................................................................ |
123 |
Task Bar Display............................................................................................ |
123 |
Task Bar Menu............................................................................................... |
124 |
Display Status Details .................................................................................... |
125 |
Configuration Editor ...................................................................................................... |
128 |
Main Window ................................................................................................. |
128 |
User Parameters Folder................................................................................. |
130 |
Fax Parameters Folder .................................................................................. |
131 |
General Functions Folder .............................................................................. |
132 |
Copier Setting Folder ..................................................................................... |
133 |
Journal Folder ................................................................................................ |
134 |
Phonebook Setting Shortcut Activation Folder .............................................. |
135 |
Phonebook Editor .......................................................................................................... |
136 |
Features......................................................................................................... |
136 |
Activation Procedure...................................................................................... |
137 |
Main Window (For DP-2500/3000) ................................................................ |
138 |
Main Window (For DP-130/150/1810/2000/2010) ......................................... |
139 |
Retrieve/Write ................................................................................................ |
141 |
Open/Save File .............................................................................................. |
143 |
Insert Entry..................................................................................................... |
145 |
Delete Entry ................................................................................................... |
146 |
Panafax Desktop ............................................................................................................ |
147 |
General Description ....................................................................................... |
147 |
Sending Document ........................................................................................ |
147 |
Managing the Personal Address Book........................................................... |
152 |
Managing the Personal Address Book........................................................... |
154 |
Receiving Document...................................................................................... |
156 |
Cover Sheet ................................................................................................... |
157 |
Tool Bar ......................................................................................................... |
160 |
Setup Menu.................................................................................................... |
161 |
Configuration Menu........................................................................................ |
163 |
Client and Server Setting ............................................................................... |
165 |
4

|
Table of Contents |
Troubleshooting |
|
Troubleshooting ............................................................................................................. |
167 |
Printing operation fails.................................................................................... |
167 |
Document is not printed correctly................................................................... |
168 |
Error messages displayed on the computer................................................... |
169 |
Appendix ......................................................................................................................... |
170 |
Printing/Scanning Area................................................................................... |
170 |
Parallel Interface Connector........................................................................... |
171 |
Class 2 Fax Modem Section |
|
Installing the Panasonic Class 2 Fax Modem.............................................................. |
173 |
Installation (Windows 95/98/Me) .................................................................... |
173 |
Installation (Windows NT 4.0) ........................................................................ |
179 |
Installation (Windows 2000/XP) ..................................................................... |
182 |
5

Precautions
For User in USA
This equipment has been tested and found to comply with the limits for a Class B digital device, pursuant to Part 15 of the FCC Rules. These limits are designed to provide reasonable protection against harmful interference in a residential installation. This equipment generates, uses and can radiate radio frequency energy and, if not installed and used in accordance with the instructions, may cause harmful interference to radio communications. However, there is no guarantee that interference will not occur in a particular installation. If this equipment does cause harmful interference to radio or television reception, which can be determined by turning the equipment off and on, the user is encouraged to try to correct the interference by one of the following measures:
1.Reorient or relocate the receiving antenna.
2.Relocate fax machine with respect to receiver or other equipment.
3.Connect fax machine into outlet on a circuit different from that to which the receiver is connected.
4.Consult the dealer or an experienced radio/TV technician for help.
Warning: To assure continued compliance, use only shielded interface cable when connecting the facsimile machine parallel interface port to host computer. Also, any changes or modifications not expressly approved by the party responsible for compliance could void the user's authority to operate this equipment.
This device complies with Part 15 of the FCC Rules. Operation is subject to the following two conditions: (1) This device may not cause harmful interference, and (2) this device must accept any interference received, including interference that may cause undesired operation.
Responsible Party: |
Matsushita Electric Corporation of America |
|
One Panasonic Way, Secaucus, NJ 07094 |
Technical Support: |
Panasonic Document Imaging Company/Technical Support Department |
|
Two Panasonic Way, Secaucus, NJ 07094 |
|
1-800-225-5329 |
|
Email: consumerproducts@panasonic.com |
•You need to read the software license agreement before setting up the Printer Driver.
•You need to read the following precautions which is described in the Machine’s Operating Instructions.
1.Installation
2.Ventilation
3.Handling
4.Toner and Paper
5.For your safety
6
External View and Control Panel
External View
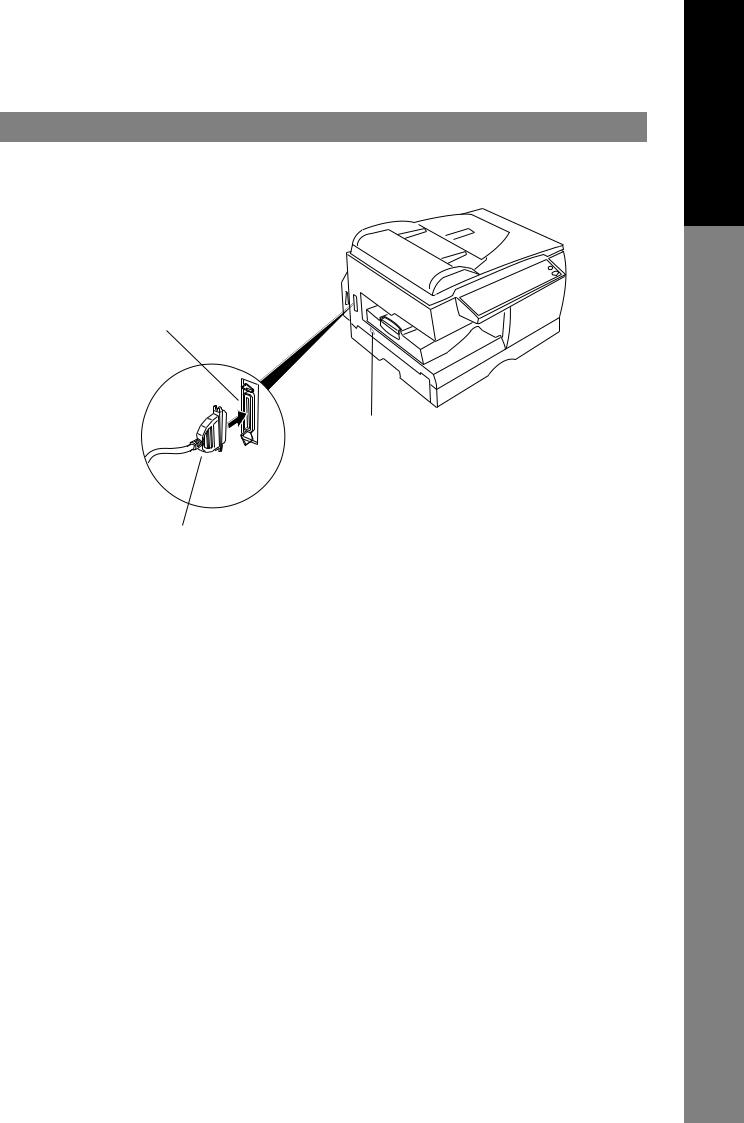
DP-130/150
Parallel interface connector
 Connect to the PC
Power Switch
 Usually set to (l) position.
Parallel interface cable
 (A cable does not come with the unit.) Use a cable of IEEE 1284 specifications, with a maximum length of 20 ft (6m). Consult a service provider for details.
Before Use
7

External View and Control Panel
External View
DP-1810/2010
Parallel interface connector
 Connect to the PC
Power Switch
 Usually set to (l) position.
Parallel interface cable
 (A cable does not come with the unit.) Use a cable of IEEE 1284 specifications, with a maximum length of 20 ft (6m). Consult a service provider for details.
8
External View and Control Panel
External View
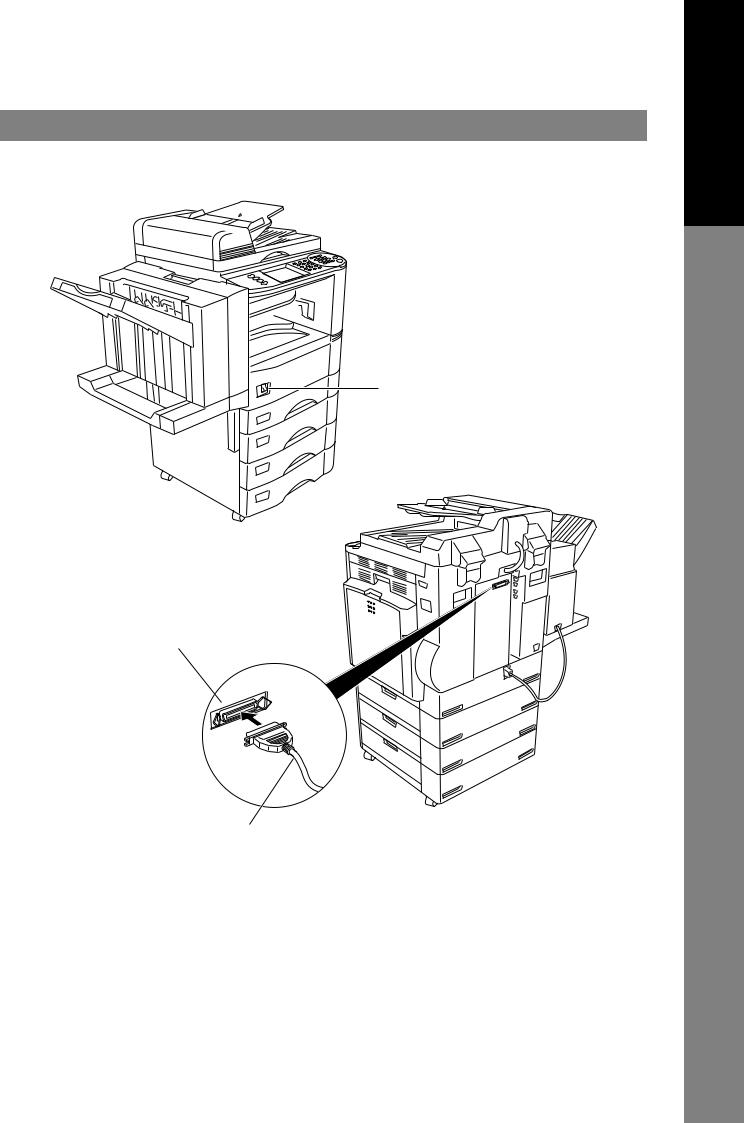
DP-2000/2500/3000
Power Switch
 Usually set to (l) position.
Parallel interface connector
 Connect to the PC
Parallel interface cable
 (A cable does not come with the unit.) Use a cable of IEEE 1284 specifications, with a maximum length of 20 ft (6m). Consult a service provider for details.
Before Use
9
External View and Control Panel
Control Panel
DP-130P/150P/150PA
|
|
|
|
ON LINE |
ENERGY |
CLEAR/STOP |
|
129% INVOICE |
LETTER |
|
|||
|
|
SAVER |
|
|||
PHOTO O |
|
100% |
|
|
|
|
AUTO |
79% |
LEGAL |
LETTER |
|
|
|
|
65% |
LETTER |
INVOICE |
|
|
START |
DARKER |
61% |
LEGAL |
INVOICE |
ZOOM |
|
|
|
|
|||||
|
|
|
|
(50~200%) |
|
|
LIGHTER |
|
|
|
10 |
1 |
|
For DP-150PA |
|
|
|
2 |
1 |
3 |
|
|
|
|
DP-135FP/150FP/150FX |
|
|
|
|
|
|
|
|
||
2SIDED |
|
SORT |
|
|
DP-150FX |
REDIAL/ |
|
|
ENERGY |
|
|
|
|
PAUSE |
|
|
SAVER RESET |
||||
2 SIDED |
|
|
|
|
|
|||||
COPY |
|
|
|
|
|
|
1 |
2 ABC |
3DEF |
|
|
|
|
|
|
|
|
|
|||
2 in 1 |
|
|
|
|
|
|
FLASH/ |
5 JKL |
6 MNO |
CLEAR/STOP |
FAX |
PHOTO |
|
|
|
|
|
SUB-ADDR 4 GHI |
|
||
|
ZOOM |
|
DIRECTORY |
|
|
|
|
|||
|
AUTO |
SELECT |
abc.. |
FUNCTION |
|
|
|
|||
DATA |
(50~200%) |
|
SEARCH |
|
|
|
|
|||
|
|
|
|
|
|
7PQRS |
8 TUV |
9WXYZ |
START |
|
|
|
|
|
|
|
|
||||
|
DARKER |
PAPER TRAY - |
|
+ |
SET |
MONITOR |
|
|
|
|
ON LINE |
|
TONE |
0 -/() |
|
|
|||||
|
|
|
|
|
|
|
|
|||
|
|
|
|
|
|
|
|
|
||
|
LIGHTER |
|
|
|
|
|
|
|
|
|
1 |
2 |
|
3 |
|
|
|
|
|
|
No. |
|
Name |
|
Function |
|
|
|
|
|
1 |
|
ON LINE LED |
Lit |
: Data is being received from the PC. |
|
|
Off |
: Printer is in standby. |
|
|
|
|
||
|
|
|
|
|
2 |
|
Paper Misfeed/ |
Paper is misfed. |
|
|
Add Paper LED |
Paper is empty. |
||
|
|
|||
|
|
|
|
|
3 |
|
3 Digits LED |
Displays Printer Condition |
|
|
(DP-130P/150P) |
If an error code/message is shown, please refer to the “Troubleshooting” |
||
|
|
|||
|
|
Message Display |
section for a corrective action. |
|
|
|
(DP-135FP/150FP/ |
|
|
|
|
150FX) |
|
|
|
|
|
|
|
10
External View and Control Panel
Control Panel
DP-1810P
DP-1810F
DP-2010E
|
|
|
|
|
|
|
|
|
|
|
|
|
|
|
|
|
|
|
|
|
|
|
|
|
|
|
|
|
|
|
|
|
|
|
|
|
|
|
|
|
|
|
|
|
|
|
|
|
|
|
|
|
|
|
|
|
|
|
|
|
|
|
|
|
|
|
|
|
|
|
|
|
|
|
|
|
|
|
|
|
|
|
|
|
|
|
|
|
|
|
|
|
|
|
|
|
|
|
|
|
|
|
|
|
|
|
|
|
|
|
|
|
|
|
|
|
No. |
Name |
|
|
Function |
||||||||
|
|
|
|
|
|
|
|
|
|
|
|
|
1 |
ON LINE LED |
Lit |
: Printer is operational online |
|||||||||
|
|
Off |
: Printer is offline |
|||||||||
|
|
|
||||||||||
|
|
|
|
|
|
|
|
|
|
|
|
|
2 |
STOP key |
Used to cancel the print job. |
||||||||||
|
|
|
|
|
|
|
|
|
|
|
|
|
|
|
|
|
|
|
|
|
|
|
|
|
|
Before Use
11

External View and Control Panel
Control Panel
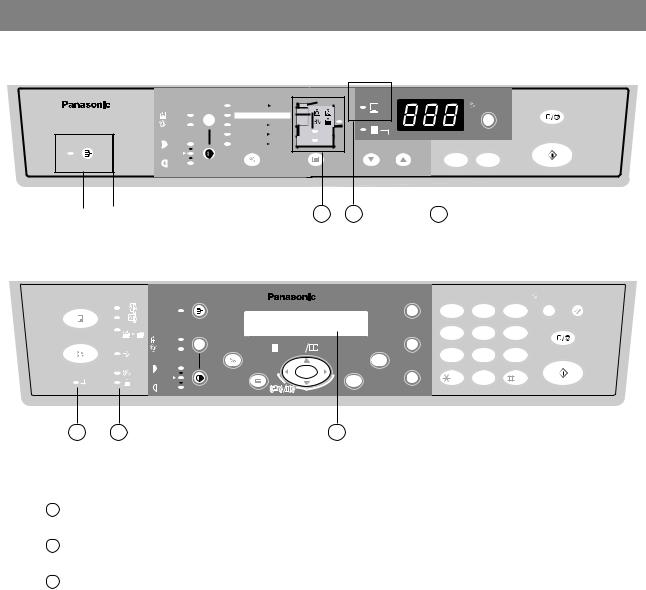
DP-2500/3000
|
|
|
ENERGY SAVER |
INTERRUPT |
FUNCTION |
RESET |
|
|
|
|
|
|
DP-2500 |
|
|
|
|
|
|
|
|
|
ORIGINAL |
COPY |
REDIAL/ |
|
|
|
CLEAR |
|
MULTI-SIZE |
COPY |
|
|
|
|
|||
SORT |
SIZE |
SIZE |
PAUSE |
|
|
|
|
||
FEED |
|
LEDGER |
|
|
ABC |
DEF |
|
||
|
|
ADD TONER |
|
1 |
2 |
3 |
|
||
|
|
|
|
FLASH/ |
|
||||
|
|
|
|
|
|
|
|
|
|
|
|
FAX |
|
|
SUB-ADDR |
|
|
|
STOP |
|
|
LEGAL |
|
GHI |
JKL |
MNO |
|||
LCD |
|
ON LINE |
|
|
LINE |
4 |
5 |
6 |
|
CONTRAST |
|
|
|
|
|
||||
|
|
|
|
|
SELECT |
|
|
|
|
|
|
INTERNET |
LETTER |
|
PQRS |
TUV |
WXYZ |
|
|
|
|
|
|
|
MONITOR |
7 |
8 |
9 |
|
|
|
PRINTER |
LETTER |
|
|
|
|
START |
|
|
|
|
|
SET |
|
0 |
|
|
|
|
|
ON LINE |
|
|
|
|
|
||
|
|
|
|
|
|
|
|
||
|
|
DATA |
INVOICE |
|
|
|
|
||
|
|
MON.VOL. |
|
|
|
|
|||
|
|
|
|
|
TONE |
|
|
|
|
ALARM ACTIVE
No. |
Name |
|
Function |
|
|
|
|
1 |
ON LINE |
Switch the printer from off-line status to on-line status. |
|
|
|
|
|
|
|
|
|
2 |
OFF LINE |
Switch the printer to off-line status. (The printer cannot be set off line |
|
|
when the data LED is blinking. |
||
|
|
||
|
|
|
|
3 |
SECURITY PRINT |
Used to print or delete the security print data. |
|
|
|
|
|
|
|
|
|
4 |
CANCEL |
Used to cancel the print job. |
|
|
|
|
|
|
|
|
|
5 |
ON LINE LED |
Lit |
: Printer is operational online |
|
Off |
: Printer is offline |
|
|
|
||
|
|
|
|
6 |
DATA LED |
Lit |
: Data is being received from the PC, or printing is under operation. |
|
Off |
: Printer is in standby or printing has been completed. |
|
|
|
||
|
|
|
|
12

External View and Control Panel
Control Panel
DP-2000 |
|
|
|
|
|
|
|
|
|
|
|
|
|
|
|
|
|
|
|
|
|
|
||
MULTI-SIZE FEED |
2SIDED |
1SIDED |
|
|
SORT |
|
|
|
|
|
|
|
|
ENERGY SAVER |
INTERRUPT |
FUNCTION |
RESET |
|
|
|
||||
COPY |
COPY |
|
|
|
|
|
|
|
|
|
|
|
|
|
||||||||||
|
|
|
|
|
|
|
|
STAPLE |
|
|
|
|
|
|
|
|
|
|
|
|
|
|
||
|
|
|
|
|
|
|
|
SHIFT |
|
|
|
|
|
|
DP-2000 |
|
|
|
|
|
|
|
|
|
COPIED |
|
BLANK |
|
MEMORY IN |
|
|
STAMP |
|
MEM XMT |
|
|
|
|
|
|
ORIGINAL |
COPY |
REDIAL / |
|
|
|
CLEAR |
||
|
OHP |
|
|
|
|
|
M1 |
|
|
M2 |
|
|
|
|
|
|
|
|
|
|
||||
|
|
|
|
|
|
|
|
|
COPY |
|
|
|
|
SIZE |
SIZE |
PAUSE |
|
|
|
|
||||
|
|
|
|
|
|
|
|
|
|
|
|
|
|
|
|
|
|
|
||||||
2 in 1 |
a |
2PAGE |
b |
BOOK |
c |
|
EDGE |
d |
|
MARGIN |
e |
|
|
|
|
|
LEDGER |
|
|
ABC |
DEF |
|
||
|
|
COPY |
|
|
|
|
|
|
|
|
|
|
|
|
|
|
|
|
1 |
2 |
3 |
|
||
|
f |
|
g |
|
|
h |
|
|
i |
|
|
j |
|
|
|
|
|
|
|
FLASH/ |
|
|||
01 |
02 |
03 |
|
04 |
|
05 |
|
|
|
|
|
PHOTO |
|
|
|
|
|
|
||||||
|
|
|
|
|
|
|
|
|
|
|
|
|
FAX |
|
|
|
|
|
SUB-ADDR |
|
|
|
STOP |
|
|
|
|
|
|
|
|
|
|
|
|
|
|
|
|
|
TEXT/ |
LEGAL |
|
GHI |
JKL |
MNO |
|||
|
k |
|
l |
|
|
m 09 |
|
n |
|
|
o |
|
|
|
|
PHOTO |
|
|
||||||
06 |
07 |
08 |
|
|
10 |
|
|
ON LINE |
|
|
|
|
|
4 |
5 |
6 |
|
|||||||
|
|
|
|
|
|
|
|
|
|
|
|
|
|
|
OUTPUT |
DIRECTORY |
TEXT |
|
|
|
|
|||
11 |
p |
12 |
q |
13 |
|
r |
14 |
|
s |
15 |
|
t |
|
|
TRAY |
SERCH |
|
|
|
ABBR |
|
|
|
|
|
|
|
INTERNET |
|
|
|
|
LETTER |
|
|
|
|
|
|||||||||||
|
|
|
|
|
|
|
|
|
|
|
|
|
|
|
|
|
|
PQRS |
TUV |
WXYZ |
|
|||
16 |
u |
17 |
v |
18 |
|
w |
19 |
|
x |
20 |
|
y |
|
|
|
|
|
|
|
MONITOR |
7 |
8 |
9 |
|
|
|
|
|
|
|
|
|
|
|
|
|
|
|
|
|
|
|
|
|
|
||||
P1 |
z |
P2 |
|
P3 |
SPACE |
P4 |
SYMBOLS P5 |
CAPS |
|
PRINTER |
|
PAPER |
LIGHTER |
DARKER |
LETTER |
|
|
|
|
START |
||||
|
|
|
|
|
|
|
|
|
|
|
|
|
ON LINE |
|
|
|
|
0 |
|
|
||||
|
|
|
|
FINE |
S-FINE |
|
|
|
|
|
|
|
DATA |
TRAY |
|
|
|
|
SET |
|
|
|
||
|
|
|
|
RESOLUTION |
|
LINE SELECT |
|
|
|
|
|
INVOICE |
|
|
|
|
||||||||
|
|
|
|
|
|
|
|
|
|
|
|
|
|
|
|
|
|
|
||||||
|
|
|
|
|
|
|
|
|
|
|
|
|
|
|
|
|
|
|
|
|
TONE |
|
|
|
|
|
|
|
|
|
|
|
|
|
|
|
|
|
|
|
ZOOM/VOL |
|
|
|
|
|
|
|
|
ALARM ACTIVE
OCT-12-2000 15:00
PRINTER ON LINE
No. |
Name |
|
Function |
|
|
|
|
1 |
ON LINE LED |
Lit |
: Printer is operational online |
|
Off |
: Printer is offline |
|
|
|
||
|
|
|
|
2 |
DATA LED |
Lit |
: Data is being received from the PC, or printing is under operation. |
|
Off |
: Printer is in standby or printing has been completed. |
|
|
|
||
|
|
|
|
3 |
STOP key |
Used to cancel the print job. |
|
|
|
|
|
|
|
|
|
Printer Status 1 1=On Line
2=Off Line
2 |
Printer Settings |
Security Print 3 1=Print
2=Delete
Before Use
13

Installing the Printer Driver
Windows 95/98/Me/NT/2000/XP
1
2
Insert the Panasonic Document Management
System CD-ROM.
Click on the desired language.
3 |
Click on the |
Next |
button. |
|
4 |
Click Printer Driver. |
|
|
|
Note: The Fax Gateway and Firmware Update |
|
Utility is only available on U.S.A. and |
|
Canada only. |
14

Installing the Printer Driver Windows 95/98/Me/NT/2000/XP
5 |
Click Install Printer Driver. |
|
6 |
Select your machine's model(s) and click the |
||
|
|||
|
|
|
button. |
|
|
Next |
|
7 |
Click the |
Yes |
button if you would like |
|
to change your current default printer to the one that you are installing.
8 |
Select your new default printer from the New |
||
|
|||
|
Printer List and click the |
|
button. |
|
Next |
||
Continued on the next page...
Printer Section
15

Installing the Printer Driver
Windows 95/98/Me/NT/2000/XP
9
10
The required files are copied.
When the setup process is completed, a message is displayed prompting you to restart your computer.
Click the |
Finish |
button to restart your |
computer.
The Panasonic/Panafax Printer Driver is installed, and the Panasonic/Panafax Printer icon(s) are added to the Printer folder.
If you are installing the Printer Driver for network printing, please contact your network administrator for the IP Address of the machine and proceed to the next section to install the LPR Monitor service after your computer has rebooted.
NOTE
1.When installing on Windows NT 4.0 and Windows 2000/XP, log onto the computer/network with an account rights of Administrator.
16

Installing the LPR (Line Printer Remote) Monitor
Windows 95/98/Me
1 |
Insert the Panasonic Document Management |
System CD-ROM. |
|
2 |
Click on the desired language. |
|
3 |
Click on the |
Next |
button. |
|
4 |
Click Printer Driver. |
|
|
|
Note: The Fax Gateway and Firmware Update Utility is |
|
only available on U.S.A. and Canada only. |
5 |
Click Install LPR Monitor. |
|
Continued on the next page...
Printer Section
17

Installing the LPR (Line Printer Remote) Monitor
Windows 95/98/Me
6
The Setup dialog box appears.
Click on the |
Next |
button. |
7
8
The setup program copies the necessary files onto your Hard Disk.
When the setup process is completed, a message is displayed prompting you to restart your computer.
It is recommended that you restart your computer now so that the LPR Monitor is started.
Click on the |
OK |
button. |
After your computer is rebooted, click the Start button, point to Settings, and then click Printers.
The Printers folder appears.
Right-click on your desired printer (Ex. Panasonic DP-3000) and select Properties from the pop-up menu.
18

Installing the LPR (Line Printer Remote) Monitor Windows 95/98/Me
9 |
The printer properties dialog box appears. |
|
|
|
The following step is to Register the LPR Port for |
|
network printing. |
|
Before proceeding, ensure that the Printer is |
|
installed, connected to the Network, is turned ON |
|
and operating properly. |
10 |
Select the |
Details tab and click on the |
||
|
||||
|
|
|
|
button. |
|
|
Add Port... |
|
|
11 |
The Add Port dialog box appears. Click the Other |
||
radio button, and select HLPRMON from "Click the |
|||
|
type of port you want to add:" and click on the |
||
|
|
|
button. |
|
|
OK |
|
|
|
|
|
Continued on the next page...
Printer Section
19

Installing the LPR (Line Printer Remote) Monitor
Windows 95/98/Me
12
The LPR Port Name dialog box appears.
Type the IP Address of the machine and "lp"as the queue name separated by a ":"
|
Ex: 10.74.229.105:lp |
|
|
|
|||
|
Click on the |
|
|
|
button. If an error occurs |
||
|
OK |
|
|||||
|
because the queue name was already used for the |
||||||
|
same IP Address, select a different unique name |
||||||
13 |
such as "lpr". |
|
|
|
|
|
|
The screen reverts to the Printer’s Properties. |
|||||||
|
|||||||
|
Check that the "Print to the following port:" was |
||||||
|
changed as entered, and click on the Apply button |
||||||
|
first and then on the |
|
|
button. |
|||
|
|
OK |
|||||
The printer properties dialog box is closed and you have now configured the printer as a network printer.
NOTE
1. The LPR Monitor is necessary to install your PC if printing a data via LAN.
20
Installing the LPR (Line Printer Remote) Monitor
Windows NT 4.0
Log in using an account with the administrator's right.
1
2
Click on the Start button, point to Settings, and click
Control Panel.
The Control Panel window appears.
Double-click on the Network applet.
The Network dialog box appears.
Click on the Services tab.
Verify whether the LPR Service is already installed. (Indicated by Microsoft TCP/IP Printing shown in the Network Services list.)
If it is already installed, skip over to Step 7. Otherwise continue installing the LPR Service.
3 |
Click on the |
|
|
button to display the |
|
|
Add... |
|
|||
|
|
|
|
|
|
|
Select Network Service dialog box, then select |
||||
|
Microsoft TCP/IP Printing. |
||||
|
Click on the |
|
|
button. |
|
|
|
OK |
|||
Printer Section
Continued on the next page... |
21 |
|

Installing the LPR (Line Printer Remote) Monitor
Windows NT 4.0
4 |
The Windows NT Setup dialog box appears. |
||
|
|||
|
Insert the Windows NT 4.0 CD-ROM, and type |
||
|
D:\i386 (where "D:" is your CD-ROM drive). |
||
|
Click on the |
|
button. |
|
Continue |
||
5 |
|
|
|
After the files are copied into your Hard Drive, the |
|||
display returns to the Network dialog box. Confirm |
|||
|
that the Microsoft TCP/IP Printing service was added |
||
|
to Network Services list. |
|
|
|
Click on the |
|
button. |
|
Close |
||
|
Note: |
Delete and Reinstall the Microsoft TCP/IP |
|
|
|
Printing if an error occurs, and the Microsoft |
|
TCP/IP Printing is displayed in the Network Services list, but, the OK button does not change into a Close button.
6 |
The Network Settings Change dialog box is |
||||
|
|||||
|
displayed, click on the |
|
|
|
button to confirm |
|
|
Yes |
|
||
|
|
|
|
||
|
whether to restart your computer now. |
||||
|
You have now completed the LPR Service |
||||
7 |
installation. |
|
|
|
|
After your computer is |
rebooted, |
click the Start |
|||
button, point to Settings, and then click Printers. |
|||||
The Printers folder appears.
Right-click on your desired printer (Ex. Panasonic DP-3000) and select Properties from the pop-up menu.
22

Installing the LPR (Line Printer Remote) Monitor
Windows NT 4.0
8 |
The following step is to Register the LPR Port for |
|||
network printing. |
||||
|
Before proceeding, ensure that the Printer is |
|||
|
installed, connected to the Network, is turned ON |
|||
|
and operating properly. |
|||
|
Select the |
Ports Tab and click on the |
||
|
|
|
|
button. |
|
|
Add Port... |
|
|
|
|
|
|
|
9 |
The Printer Ports dialog box appears. |
|
|
|
|
||
|
Select LPR Port and click the |
|
|
|
|
New Port |
|
|
button. |
|
|
10 |
The Add LPR compatible printer dialog box |
||
appears. |
|
|
|
|
Enter the IP Address of the Printer in the upper field, |
||
|
and "lp" for the print queue name in the lower field. |
||
|
Click on the |
|
button. |
|
OK |
||
|
(Please wait while the wizard verifies the IP Address |
||
|
and connectivity to the Network) |
||
Continued on the next page...
Printer Section
23

Installing the LPR (Line Printer Remote) Monitor
Windows NT 4.0
11
The Printer Ports dialog box appears.
Click on the |
Close |
button. |
12 |
Select the printer port and click the |
OK |
|
button.
The printer properties dialog box is closed and you have now configured the printer as a network printer.
24

Installing the LPR (Line Printer Remote) Monitor
Windows 2000/XP
Log in using an account with the administrator's right.
1
Open the Printers folder.
Right-click on your desired printer (Ex. Panasonic DP-3000) and select Properties from the pop-up menu.
The printer properties dialog box appears.
2 |
Select the |
Ports Tab and click on the |
||
|
||||
|
|
|
|
button. |
|
|
Add Port... |
|
|
|
|
|
|
|
Continued on the next page...
Printer Section
25

Installing the LPR (Line Printer Remote) Monitor
Windows 2000/XP
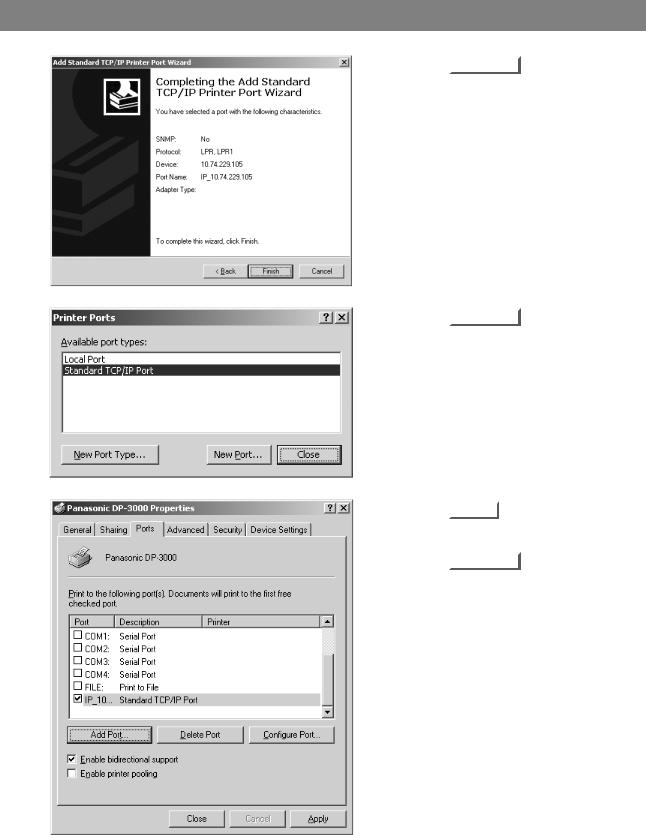
3 |
Select Standard TCP/IP Port and click the |
||
|
|||
|
|
|
button. |
|
|
New Port ... |
|
|
|
|
|
4 |
Click on the |
Next |
button. |
|
5 |
Enter the IP Address and the Port Name and |
||
|
|||
|
click the |
|
button. |
|
Next |
||
|
Note: |
|
|
|
The Port Name is automatically |
||
|
|
entered by Windows 2000/XP. You |
|
|
|
may change this as required. |
|
26

Installing the LPR (Line Printer Remote) Monitor
Windows 2000/XP
6 |
Select Custom and click the |
|
|
Settings... |
|
|
button. |
|
7 |
1. |
Under the Protocol, select LPR. |
||
2. |
Under the LPR Settings, enter the |
|||
|
|
Queue Name (Ex. LPR1) and check the |
||
|
|
LPR Byte Counting Enabled. |
||
|
3. |
Click on the |
|
button. |
|
OK |
|||
8 |
Click on the |
|
button. |
||
Next |
|||||
|
|||||
|
Click on the |
|
|
button. |
|
|
|
|
|||
|
|
OK |
|||
The printer properties dialog box is closed and you have now configured the printer as a network printer.
Continued on the next page...
Printer Section
27
Installing the LPR (Line Printer Remote) Monitor
Windows 2000/XP
9
Click on the |
Finish |
button. |
10
11
Click on the |
Close |
button. |
Click on the |
Apply |
button. |
|
Click on the |
|
|
button. |
OK |
|
||
The printer properties dialog box is closed and you have now configured the printer as a network printer.
28

Configuring the Printer Driver Settings
Windows 95/98/Me
To change the printer settings, open the dialog box for the printer properties by the following steps.
1 |
Click the Start button, point to Settings, and then click |
|
|
||
2 |
Printers. |
|
Right-click the desired printer icon in the printers folder, |
||
|
||
|
and select Properties in the pop-up menu. |
|
|
The printer properties dialog box appears. |
|
|
|
|
|
|
NOTE |
1. |
Upon printing, changing the properties of Paper/Layout, Handling, Quality and Device |
|
Options is allowed by clicking Properties in the print dialog box of an application. |
|
|
|
|
|
2. |
Sharing Tab in property dialog box is not displayed unless printer sharing has been specified. |
Printer Section
29
Configuring the Printer Driver Settings
Windows 95/98/Me
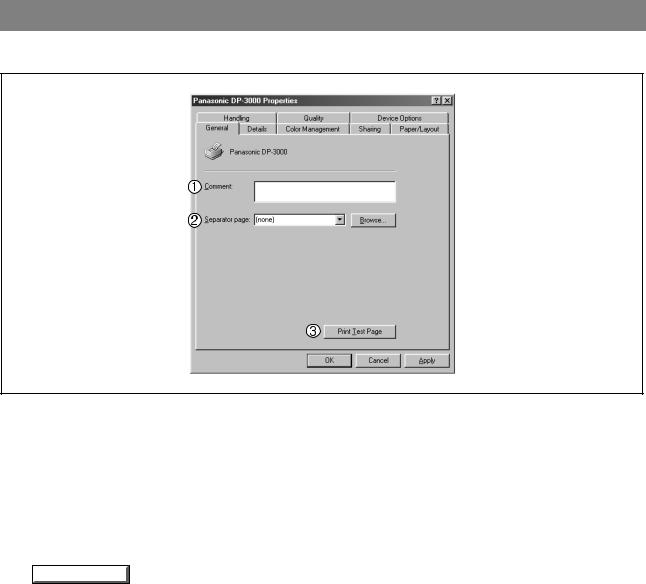
General Tab
1.Comment
Enter comments to the properties, if any.
If another user sets up this printer on his or her computer when sharing the printer, the comment specified here will also appear on that computer. However, the comment displayed for an already set-up user will remain unchanged even if the comment is modified later.
2.Separator page
This feature is not available on your machine.
3. Print Test Page button
Prints a test page. This allows the user to verify if the printer is installed properly.
30
Loading...