


Operating Instructions
DVD Recorder
Model No. DMR-EX95V
PAL NTSC
TM
This DVD Recorder is for viewing and recording free to view channels only, not pay TV or encrypted channels.
Read the operating instructions, the safety precautions, and the information on setting up the unit on page 3 thoroughly before you connect, operate or adjust any settings on the unit.
Trademark of the DVB Digital Video Broadcasting Project (1991 to 1996)
Declaration of Conformity No.3955, 12th January 2006
Table of contents
Safety precautions |
Page |
3 |
|
Information about the unit |
4 |
Licence information |
4 |
Before you start |
5 |
Included Accessories |
5 |
Inserting batteries |
5 |
Remote Control |
6-7 |
Front Panel, Display |
8 |
Rear Panel |
9 |
Connections |
10-17 |
Connection with 21-pin Scart cable |
10 |
DVB Auto-Setup (Tuning digital channels) |
11 |
Auto-Setup (Tuning analogue channels) |
11 |
TV Aspect |
11 |
Connecting to a television and |
|
satellite receiver |
12-13 |
Connection with Audio/Video cable |
14 |
Connection with S VIDEO cable |
15 |
Connection with HDMI cable |
16-17 |
External units |
18 |
Connecting an analogue amplifier |
18 |
Connecting a digital amplifier |
18 |
Connection to AV3 (Camcoder) |
18 |
Connection to DV input |
18 |
COMPONENT VIDEO OUT |
19 |
Connecting a TV with COMPONENT VIDEO |
|
input terminal |
19 |
Progressive television picture |
19 |
Profiles |
20 |
Status displays |
21 |
|
Page |
Delayed playback |
29 |
Quick View |
29 |
Simultaneous recording and playback |
29 |
Changing the audio channel |
29 |
Playback (VHS) |
30-31 |
Preparation |
30 |
Playing a video cassette |
30 |
Repeat playback |
30 |
Stopping playback |
30 |
Pausing playback |
30 |
Slow-motion playback, Frame playback |
30 |
Forwards or backwards search |
30 |
Fast forward / Jet rewind |
30 |
JET REW; VHS Index Search System (VISS) 30 |
|
S-VHS Quasi Playback (SQPB) |
31 |
Manual tracking |
31 |
Automatic tracking |
31 |
Handling video cassettes |
31 |
Write-protecting cassettes |
31 |
Cleaning video heads |
31 |
Recording |
32-34 |
Before recording |
32 |
Disc Protection, CPRM |
32 |
Formatting, For recording |
32 |
Remaining recording time on the hard disk |
32 |
Record, Pause the recording |
33 |
DVD/HDD recording of TV programmes |
33 |
Changing the recording mode |
33 |
VHS recording of TV programmes |
33 |
Timer recording with the television set |
33 |
Specifying a time as the recording duration |
34 |
DVD/HDD playback during recording |
34 |
Direct TV recording |
34 |
Recording from an external unit, e.g. a camera 34 Selecting the sound track to record for
programmes with dual-channel sound |
34 |
Recording in dual-channel audio |
34 |
Banner |
22 |
FUNCTIONS |
35-75 |
HDD |
|
Notes on the menus |
35 |
23 |
Entering text / Symbols |
36 |
|
Disc formats |
24-25 |
DIRECT NAVIGATOR |
37-39 |
Playback and recording discs |
24 |
Overview of DIRECT NAVIGATOR |
37 |
Playback discs |
25 |
Delete, Properties |
37 |
Handling discs |
25 |
Table Display/Thumbnail Display |
37 |
SD Card |
|
Album View, Sort, Title View |
37 |
26 |
Editing titles in the SUB MENU |
38 |
|
|
|
Editing chapters in the SUB MENU |
39 |
Playback (DVD/HDD) |
27-29 |
Preparation |
27 |
Playback |
27 |
Playing back a selected title |
27 |
Playback starts automatically |
27 |
Selecting programmes/titles for playback |
27 |
Auto finalize |
27 |
Pausing playback |
28 |
Stopping playback |
28 |
Saving the playback position |
28 |
Slow-motion playback |
28 |
Fast forward/rewind |
28 |
Dividing a recording into chapters |
28 |
Skipping, MANUAL SKIP |
28 |
Frame playback |
28 |
TIME SLIP |
29 |
DivX playback |
40 |
MP3 playback |
41 |
Picture Playback |
42-45 |
JPEG/TIFF playback of DVD-RAM/SD |
42-44 |
JPEG/TIFF playback of CD/DVD-R |
45 |
TV Guide |
46-48 |
Landscape view |
46 |
Additional information about a programme |
46 |
Changing between the views |
46 |
Portrait view |
47 |
Prog. Type Display according to topic areas |
47 |
Display according to Category |
47 |
Programming the timer in the TV Guide |
48 |
Deleting a Timer Recording |
48 |
|
Page |
Stopping a current Timer Recording |
48 |
Automatic title transfer |
48 |
Delete (DELETE Navigator) |
49 |
Copy (COPY Navigator) |
49 |
Timer Recording |
50 |
Manual programming |
50 |
Automatic SP/LP switching during a VHS |
|
recording, Change Profile |
50 |
Backup recording |
50 |
Checking or changing Timer Recordings 51
Timer Off/On, Delete, Stop Recording |
51 |
Drive space |
51 |
ShowView Record |
52 |
Timer Recording via external units |
52 |
Advanced Copy |
53-57 |
Information about high speed copying |
53 |
Recording and playback while copying in |
|
High Speed Mode |
53 |
Approximate copying time |
53 |
Copy titles and playlists with a copy list |
54-55 |
Time-triggered copying |
56 |
Copy pictures |
57 |
COPYING (front of unit) |
58 |
Playlists |
59-61 |
Creating a playlist |
59 |
Launching the Playlists menu |
60 |
Editing playlists in the SUB MENU |
60 |
Editing chapters in the SUB MENU |
61 |
Copy All Pictures |
62 |
Automatic detection of an SD Card |
62 |
Flexible Rec (FR) |
63 |
DV Auto Rec |
63 |
Automatic detection of a camcorder at DV IN 63
Setup |
64-72 |
Tuning |
64-65 |
Disc |
66 |
List of language codes |
67 |
Picture |
67 |
Sound |
68 |
Display |
68 |
Connection, AV-Link function |
69-70 |
VHS |
70 |
Q Link functions |
70 |
Others |
71-72 |
HDD Management |
73 |
Card Management |
73 |
DVD Management |
74-75 |
Picture and sound settings |
76-77 |
If you need help |
78-82 |
Specifications |
83 |
Index |
last page |
2

Safety Precautions
Inside of product
Back of product, see page 9.
If you see this symbol, read page 4.
Voltage: Only use power sources complying with the specifications for this device.
AC mains lead protection: Ensure the AC mains lead is connected correctly and not damaged. Poor connection and lead damage can cause fire or electric shock.
Service: Never attempt to repair this unit by yourself. If a problem occurs that is not described in these operating instructions, disconnect the power supply and contact your dealer or an authorised after sales service centre.
Install this device in a horizontal position.
Do not place anything heavy on it.
Keep this device away from high temperatures and avoid changes in temperatures.
Keep away from liquids, humidity and dust.
The socket outlet shall be installed near the equipment and easily accessible or the mains plug or an appliance coupler shall remain readily operable.
This product may receive radio interference caused by mobile telephones during use. If such interference is apparent, please increase separation between the product and the mobile telephone.
WARNING:
TO REDUCE THE RISK OF FIRE, ELECTRIC SHOCK OR PRODUCT DAMAGE, DO NOT EXPOSE THIS APPARATUS TO RAIN, MOISTURE, DRIPPING OR SPLASHING AND THAT NO OBJECTS FILLED WITH LIQUIDS, SUCH AS VASES, SHALL BE PLACED ON THE APPARATUS.
CAUTION!
!DO NOT INSTALL OR PLACE THIS UNIT IN A BOOKCASE, BUILT-IN CABINET OR IN ANOTHER CONFINED SPACE. ENSURE THE UNIT IS WELL VENTILATED. TO PREVENT RISK OF ELECTRIC SHOCK OR FIRE HAZARD DUE TO OVERHEATING, ENSURE THAT CURTAINS AND ANY OTHER MATERIALS DO NOT OBSTRUCT THE VENTILATION VENTS.
!DO NOT OBSTRUCT THE UNIT’S VENTILATION OPENINGS WITH NEWSPAPERS, TABLECLOTHS, CURTAINS, AND SIMILAR ITEMS.
!DO NOT PLACE SOURCES OF NAKED FLAMES, SUCH AS LIGHTED CANDLES, ON THE UNIT.
!DISPOSE OF BATTERIES IN AN ENVIRONMENTALLY FRIENDLY MANNER.
CAUTION!
THIS PRODUCT UTILIZES A LASER. USE OF CONTROLS OR ADJUSTMENTS OR PERFORMANCE OF PROCEDURES OTHER THAN THOSE SPECIFIED HEREIN MAY RESULT IN HAZARDOUS RADIATION EXPOSURE. DO NOT OPEN COVERS AND DO NOT REPAIR YOURSELF. REFER SERVICING TO QUALIFIED PERSONNEL.
THIS UNIT IS INTENDED FOR USE IN MODERATE CLIMATES.
The model and serial number of this product can be found on the back of the unit. Please note them and keep for future reference.
Model No. |
Serial No. |
3

Information about the unit
Menu FUNCTIONS |
35 |
||||
|
|
|
DVD-RAM |
FUNCTIONS |
Disc Protection Off |
|
|
|
|
||
|
|
|
|
Schreibschutz Aus |
|
|
|
|
Playback |
|
|
|
|
|
Recording |
|
|
|
|
|
Delete |
|
Timer Recording |
|
|
|
Copy |
|
|
|
|
|
|
ShowView Record |
|
|
|
|
To Others |
||
|
|
|
Advanced Copy |
||
|
|
|
|
ENTER |
|
|
|
|
|
Playlists |
|
|
|
|
|
RETURN |
Flexible Rec |
|
|
|
|
|
|
|
|
|
|
|
DV Auto Rec |
|
|
|
GUIDE |
|
Setup |
|
|
|
|
|
|
|
T |
O R |
|
F |
DVD Management |
|
|
|
U |
|
|
A |
|
|
N |
|
|
IG |
|
|
|
C |
|
V |
|
|
|
T |
|
A |
|
|
|
I |
|
N |
|
|
ENTER |
O |
|
T |
|
|
|
||
C |
|
|
N |
|
|
E |
|
|
OK |
S |
|
R |
|
|
|
|
|
I |
|
|
|
|
|
D |
|
|
|
||
!Press FUNCTIONS on the remote to start the FUNCTIONS menu.
!Select the unit menu with the navigation buttons 

 and ENTER.
!Press RETURN to leave the menu.
DVB-T


 This unit is a DVD Recorder with integrated tuner. You can receive and record both analog and terrestrial digital channels (DVB-T) without an additional reception unit (Set Top Box).
DivX-compatible
DivX files can be played back from CD-R/CD-RW and DVD-R.
GUIDE
The TV Guide gives you a preview of the TV programmes for the next 7 days from your digital stations. Simply select each programme to store it for Timer programming.
DV interface
You can connect your digital camcorder directly to this unit via the DV IN connection. This way it’s easy to copy your movies.
Licence information
This product incorporates copyright protection technology that is protected by U.S. patents and other intellectual property rights. Use of this copyright protection technology must be authorized by Macrovision, and is intended for home and other limited consumer uses only unless otherwise authorized by Macrovision. Reverse engineering or disassembly is prohibited.
Dolby Digital


 Method of encoding digital signals. The signals are very much compressed in the process to enable recordings of large volumes of data. Manufactured under license from Dolby Laboratories. Dolby and the double-D symbol are trademarks of Dolby Laboratories.
DTS (Digital Theater Systems)


 Sound system used in cinemas or movie theaters all over the world. "DTS" and "DTS 2.0 + Digital Out" are trademarks of Digital Theater Systems, Inc.
MP3 or MPEG 1 Audio Layer 3 is a file compression format used for digital audio files. It provides files of an extremely small size and may cause a consequential loss of quality. MPEG Layer-3 audio decoding technology licensed from Fraunhofer IIS and Thomson multimedia.
HDAVI ControlTM is a trademark of Matsushita Electric Industrial Co., Ltd.
SD Logo is a trademark.
miniSDTM is a trademark of SD Card Association.
HDMI, the HDMI logo and High-Definition Multimedia Interface are trademarks or registered trademarks of HDMI Licensing LLC.
The HDMI connection makes it easy to connect up your multimedia units. One single cable transmits both digital video data and digital audio data. HDMI is the world's first complete digital consumer AV interface complying with a non-compression standard.
-If you see this symbol-
Information on Disposal for Users of Waste Electrical & Electronic Equipment (private households)
This symbol on the products and/or accompanying documents means that used electrical and electronic products should not be mixed with general household waste. For proper treatment, recovery and recycling, please take these products to designated collection points, where they will be accepted on a free of charge basis. Alternatively, in some countries you may be able to return your products to your local retailer upon the purchase of an equivalent new product.
Disposing of this product correctly will help to save valuable resources and prevent any potential negative effects on human health and the environment which could otherwise arise from inappropriate waste handling.
Please contact your local authority for further details of your nearest designated collection point.
Penalties may be applicable for incorrect disposal of this waste, in accordance with national legislation.
For business users in the European Union
If you wish to discard electrical and electronic equipment, please contact your dealer or supplier for further information.
Information on Disposal in other Countries outside the European Union
This symbol is only valid in the European Union.
If you wish to discard this product, please contact your local authorities or dealer and ask for the correct method of disposal.
4

Before you start
Dear customer
Thank you for your trust and your decision to purchase this top-quality unit.
Panasonic is one of the leading manufacturers of entertainment electronics units.
We are sure that you will be completely satisfied with this unit.
Matsushita Electric Industrial Co., Ltd.
http://www.panasonic.co.jp/global/
Included Accessories
DVD/VHS
|
|
|
TV |
|
|
|
|
|
|
|
|
|
+ |
DRIVE |
|
|
CH |
VOLUME |
||
|
|
_ |
||||
SELECT |
AV |
|
|
|||
|
|
|
|
|
|
|
1 |
|
|
2 |
|
TRACKING/V-LOCK/PAGE |
|
|
|
|
3 + |
|||
4 |
|
|
5 |
|
6 |
CH |
|
|
|
- |
|||
7 |
|
|
8 |
|
9 |
ShowView |
|
|
|
|
|||
Ü |
|
|
0 |
|
INPUT |
DELETE |
|
|
|
SELECT |
|
||
RESET |
|
|
SLOW/SEARCH |
|||
SKIP/INDEX |
|
REW |
FF |
|||
STOP |
PAUSE |
PLAY |
||||
|
|
|
|
|
|
PROG/CHECK |
|
|
|
|
I |
|
|
|
|
|
U D |
|
||
|
|
|
G |
|
E |
|
T |
O |
R |
|
|
|
F |
|
|
|
|
|||
|
|
|
|
|
U |
|
A |
|
|
|
|
|
N |
G |
|
|
|
|
|
|
I |
|
|
|
|
|
C |
V |
|
|
ENTER |
|||
A |
|
|
T |
|||
N |
|
|
I |
|||
T |
|
|
|
|
O |
|
E |
|
|
|
N |
||
C |
|
|
|
S |
||
|
R |
|
|
|
||
|
|
I |
|
|
|
|
|
|
D |
|
|
|
|
SUB MENU |
|
|
|
RETURN |
||
S |
|
|
|
|
|
|
|
|
|
|
|
CREATE |
MANUAL SKIP |
|
|
|
|
|
CHAPTER |
|
REC |
|
|
REC MODE |
|
EXT LINK |
DIRECT TV REC |
AUDIO |
F Rec |
|
DISPLAY |
TIME SLIP |
||
|
|
|
|
|
|
JET REW |
DVD/TV
Remote Control |
AC mains lead |
EUR7659YP0 |
RJA0043-1C |
Batteries |
Audio/Video cable |
AA, UM3 or R6 |
K2KA6BA00003 |
Operating Instructions |
RF Coaxial cable |
Guarantee Card |
K1TWACC00001 |
|
Inserting batteries
! The batteries last for about a year, depending on how often you use the remote control unit.
! Do not mix old with new batteries, or batteries of different types.
!Only use batteries without any harmful substances (lead, cadmium, mercury).
!Do not use rechargeable type batteries.
R6/LR6, AA |
! Remove the batteries if the remote control unit will remain unused for longer |
|
periods of time. |
|
! Do not heat or short-circuit the batteries. Immediately remove used-up batteries |
|
and replace with batteries of type AA, UM3 or R6. |
|
! Be sure to put in the batteries the right way round + and -. |
|
Dispose of batteries, packaging material and the unit according to |
|
statutory regulations. They must not be thrown into the household refuse. |
5
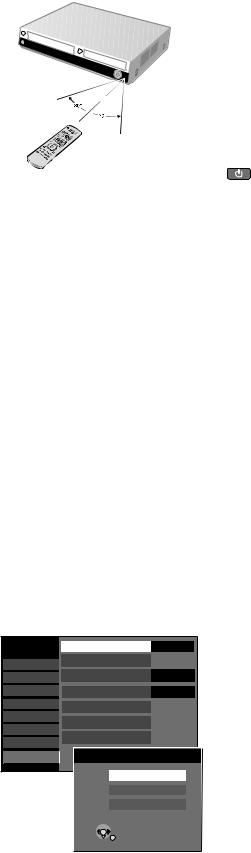
Remote Control
7 m
Remote control signal sensor
Setup |
Remote Control |
DVD 1 |
|
Tuning |
Clock |
Off |
|
Disc |
Power Save |
||
Picture |
Quick Start |
On |
|
Sound |
DivX Registration |
|
|
Display |
System Update |
|
|
Connection |
|
||
Initialize |
|
||
VHS |
|
||
Remote Control |
|||
Others |
|||
DVD 1
DVD 2
DVD 3
SELECT
ENTER 
RETURN
Point the remote control at the sensor of the unit. Avoid obstacles along the transmission path. The maximum reach of the remote control is 7 metres directly in front of the unit. Make sure that the transmission window and the sensor on the unit are clean. The process can be impaired by direct sunlight and glass cabinet doors.
Child protection
You can lock the buttons on the unit and the remote control.
!Press and hold the RETURN and ENTER buttons until [X HOLD] appears in the display. The buttons on the unit are locked.
!To unlock the child protection, repeat the process until [X HOLD] disappears.
Operating a television
Change the code on the remote control to control your TV.
!Press and hold the TV on and off button.
!Enter the two-digit code for your television.
Trademark |
Code |
Trademark |
Code |
Trademark |
|
Code |
Trademark |
Code |
Panasonic |
01-04,45 |
GOODMANS |
05,06,31 |
NOKIA |
|
25-27 |
SANYO |
21 |
AIWA |
35 |
GRUNDIG |
09 |
NORDMENDE |
10 |
SBR |
06 |
|
AKAI |
27,30 |
HITACHI 22,23,31,40-42 |
ORION |
|
37 |
SCHNEIDER 05,06,29-31 |
||
BLAUPUNKT |
09 |
INNO HIT |
34 |
PHILIPS |
|
05,06 |
SELECO |
06,25 |
BRANDT |
10,15 |
IRRADIO |
30 |
PHONOLA |
|
31,33 |
SHARP |
18 |
BUSH |
05,06 |
ITT |
25 |
PIONEER |
|
38 |
SIEMENS |
09 |
CURTIS |
31 |
JVC |
17,39 |
PYE |
|
05,06 |
SINUDYNE |
05,06,33 |
DESMET |
05,31,33 |
LOEWE |
07 |
RADIOLA |
|
05,06 |
SONY |
08 |
DUAL |
05,06 |
METZ |
28,31 |
SABA |
|
10 |
TELEFUNKEN |
10-14 |
ELEMIS |
31 |
MITSUBISHI |
06,19,20 |
SALORA |
|
26 |
THOMSON |
10,15,44 |
FERGUSON |
10 |
MIVAR |
24 |
SAMSUNG |
31,32,43 |
TOSHIBA |
16 |
|
GOLDSTAR/LG 31 |
NEC |
36 |
SANSUI |
05,31,33 |
WHITEWESTINGHOUSE 05,06 |
|||
Some television models of the listed brands (e.g. older Panasonic units) cannot be controlled via the remote control.
Switching to AV input on your Panasonic television
!Press AV.
Switches between TV reception and AV input each time the button is pressed.
Setting up the remote control
If you are using another Panasonic unit at the same location, change the setting of the remote control so that you can operate the units independently of each other.
Set up the remote control for the unit.
!Press FUNCTIONS.
!Select [To Others] with  and confirm with ENTER.
!Select [Setup] with  and confirm with ENTER.
!Select [Others] with  , [Remote Control] with
  and confirm with ENTER.
!Select [DVD 1, 2 or 3] with  and confirm with ENTER.
Apply the selected setting [DVD 1, 2 or 3] to the remote control.
!Press and hold ENTER and press the appropriate number button 1, 2 or 3 for at least 2 seconds.
!Exit the menu with RETURN.
If the remote control setting does not match that of the unit, DVD 1, 2 or 3 appears on the unit’s display.
!Press ENTER and press the appropriate number key 1, 2 or 3 simultaneously for at least 2 seconds.
If you want to operate two units independently of each other using the same remote control, then change the the remote control setting.
6

Remote Control
DVD/VHS Standby/on switch
Press to switch the unit from on to standby mode or vice versa. In standby mode, the unit is still consuming a small amount of power.
DRIVE
SELECT DRIVE SELECT
Select the DVD, HDD, SD or VHS drive.
Direct entry using the number buttons
Selection of channels, title numbers, etc.
VCD |
5: |
0 |
5 |
|
|
15: |
1 |
5 |
|
|
JPEG MP3 |
5: |
0 |
0 |
5 |
|
15: |
0 |
1 |
5 |
|
JPEG |
5: |
0 |
0 |
0 |
5 |
15: |
0 |
0 |
1 |
5 |
ÜDelete a function.
 RESET
RESET
VHS: RESET = Reset the tape counter.
SKIP = Skip chapters, titles or |
28 |
SKIP/INDEX pictures. |
|
VHS: INDEX = Find the beginning of a |
30 |
recording. |
|
STOP
Stop a recording or playback.
VHS: Stop jet rewind.
Press for more than 3 seconds to eject the cassette.
Detailed information appears on |
21 |
|
99 |
the screen. Status displays.
Direction buttons in the menu guide.
Select 

 groups or titles.
SUB MENU
S Launch the sub-menu.
DIRECT NAVIGATOR = Launch the Title View. |
37 |
RED button: Menu guide |
|
GREEN button: Menu guide |
|
REC |
|
Recording |
33 |
REC MODE Record mode button |
33 |
(XP, SP, LP, EP) |
|
AUDIO |
29 |
Select the audio channel/soundtrack. |
|
F Rec |
|
Flexible Recording |
63 |
DVD/VHS
|
|
|
TV |
|
|
|
|
|
|
|
|
|
+ |
DRIVE |
|
|
CH |
VOLUME |
||
|
|
_ |
||||
SELECT |
AV |
|
|
|||
|
|
|
|
|
|
|
1 |
|
|
2 |
|
TRACKING/V-LOCK/PAGE |
|
|
|
|
3 + |
|||
4 |
|
|
5 |
|
6 |
CH |
|
|
|
- |
|||
7 |
|
|
8 |
|
9 |
ShowView |
|
|
|
|
|||
Ü |
|
|
0 |
|
INPUT |
DELETE |
|
|
|
SELECT |
|
||
RESET |
|
|
SLOW/SEARCH |
|||
SKIP/INDEX |
|
REW |
FF |
|||
STOP |
PAUSE |
PLAY |
||||
|
|
|
|
|
|
PROG/CHECK |
|
|
|
|
I |
|
|
|
|
|
U D |
|
||
|
|
|
G |
|
E |
|
T |
O |
R |
|
|
|
|
|
|
|
|
U |
||
A |
|
|
|
|
|
F |
|
|
|
|
|
N |
|
G |
|
|
|
|
|
|
I |
|
|
|
|
|
C |
V |
|
|
ENTER |
|||
A |
|
|
T |
|||
N |
|
|
|
|
|
I |
T |
|
|
|
|
O |
|
E |
|
|
|
N |
||
C |
|
|
|
S |
||
R |
|
|
|
|||
|
|
I |
|
|
|
|
|
|
D |
|
|
|
|
SUB MENU |
|
|
|
RETURN |
||
S |
|
|
|
|
|
|
|
|
|
|
|
CREATE |
MANUAL SKIP |
|
|
|
|
|
CHAPTER |
|
REC |
|
|
REC MODE |
|
EXT LINK |
DIRECT TV REC |
AUDIO |
F Rec |
|
DISPLAY |
TIME SLIP |
||
|
|
|
|
|
|
JET REW |
DVD/TV
TV
AV
+
VOLUME
CH
_
TRACKING/V-LOCK/PAGE
Switch the TV on and off.
Select the AV input on the TV set.
CH = Select the programme position on the TV set.
VOLUME = TV volume control.
CH = Programme selection button
+
CH VHS: TRACKING/V-LOCK+/- = Optimise the 31
-
playback picture.
ShowView
ShowView Record menu. |
52 |
DELETE
Delete a title.
INPUT
SELECT Switch button to switch AV input between tuner, AV1, AV2, AV3 (front) and DV IN.
SLOW/SEARCH |
SLOW = Slow-motion playback. |
28 |
|
|
|
||
REW FF |
SEARCH = Search during playback. |
|
|
VHS: REW = Jet rewind |
30 |
|
|
|
FF = Fast forward from STOP mode. |
|
|
|
REW = Rewind |
|
|
|
FF = Forward search during playback. |
|
|
PAUSE |
Pause a recording or playback. |
28 |
99 |
VHS: Press and hold for more than 2 seconds |
30 |
|
|
for slow-motion playback. |
|
||
|
|
||
PLAY |
Start playback. |
|
27 |
|
HDD RAM Quick View: You can increase |
|
99 |
|
|
2 |
|
|
the playback speed. |
|
99 |
VHS: Playback or repeat playback |
30 |
|
|
PROG/CHECK |
Check or change a Timer Recording. |
|
|
|
|
51 |
|
|
|
|
|
I |
D |
|
|
|
|
U |
E |
||
|
|
|
G |
|
|
|
T |
O |
R |
|
|
|
|
|
|
|
|
U |
||
A |
|
|
|
|
|
F |
|
|
|
|
|
N |
|
G |
|
|
|
|
|
|
I |
|
|
|
|
|
C |
V |
|
|
|
ENTER |
||
A |
|
|
|
T |
||
N |
|
|
|
|
|
I |
T |
|
|
|
|
O |
|
E |
|
|
|
N |
||
C |
|
|
|
S |
||
|
R |
|
|
|
||
|
|
I |
|
|
|
|
|
|
D |
|
|
|
|
ENTER = Select or save a setting.


 = Frame or slowmotion playback.
RETURN
Return to the previous menu.
GUIDE = Launch the TV Guides. |
46 |
|
FUNCTIONS = Launch the selection menu. |
35 |
|
CREATE |
YELLOW button: Menu guide |
|
CHAPTER |
|
|
|
DVD/HDD: Divide a recording into chapters. 28 |
|
MANUAL SKIP |
BLUE button: Menu guide |
|
|
DVD/HDD: Jump ahead 30 seconds. |
28 |
EXT LINK |
Timer Recording with external recording |
52 |
|
control. |
|
DIRECT TV REC |
Direct TV recording to DVD, HDD, VHS. |
34 |
|
||
DISPLAY |
DVD/HDD: Picture and sound settings. |
76 |
|
||
TIME SLIP |
DVD/HDD: TIME SLIP = Select the |
29 |
|
||
JET REW |
time frame. |
|
|
VHS: JET REW = Jet rewind to the |
30 |
|
beginning of the tape. |
|
You can also switch on the unit from Standby mode using the PLAY  , GUIDE, DIRECT NAVIGATOR, PROG/CHECK and ShowView buttons.
7

Front Panel
Cassette Compartment |
Display |
SD Card slot |
Disc Tray |
|
|
|
|
|
|
|
|
|
RECORDING |
|
|
|
|
|
|
D |
DVD |
|
|
|
|
|
|
|
|
|
HDD |
|
|
|
|
|
|
|
|
|
|
SD |
VHS |
|
|
|
|
2 |
9 |
10 |
3 |
4 |
2 |
5 11 |
6 |
7 |
8 |
12 |
1Standby/on switch  /I : Press to switch the unit from on to standby mode or vice versa. In standby mode, the unit is still consuming a small amount of power. Switching this unit into standby mode does not disconnect it from the mains.
1 |
2 |
3 |
4 |
|
|
Standby/on switch |
EJECT: Eject the cassette. |
Forward/rewind |
|
|
OPEN/CLOSE: Open and |
|
Channel select button |
|
|
|
|
||
|
|
close the disc tray. |
Search during playback. |
|
|
|
|
|
|
5 DRIVE SELECT |
6 |
7 |
PLAY |
8 |
|
REC: Record |
|
Drive select |
STOP |
Playback |
|
||
|
|
|
RAM |
Quick View |
|
|
9 |
10 |
11 |
|
12 |
|
|
|
S VIDEO input AV3 |
AV3 input terminal |
DV input |
HDD |
|
|
|
COPYING |
Copy |
||||
|
|
|
|
VHS |
||
|
|
|
|
|
||
|
|
|
|
|
DVD |
|
Displays
Shows Timer mode or Timer recording.
HDD |
DVD |
XP, SP |
Recording mode / All on: FR mode |
|
VHS |
The selected drive is being displayed. |
LP, EP |
Flexible recordings/Timer Recordings. |
|
SD |
||||
|
|
The inserted medium is being shown. |
D |
Digital channel |
|
|
|||
|
SD |
|||
|
|
|
|
|
REC |
The selected drive is recording. |
EXT-L |
External-Link: A Timer Recording is being made from an |
|
|
|
Flashes shortly before a Timer Recording starts. |
|
external unit. |
|
|
|
|
|
PLAY |
The selected drive is playing. |
|
Current time, recording/playback counter, |
|
|
|
|
|
various messages. |
Other messages
PLEASE WAIT Please wait.
DVD 1, 2, 3 |
Wrong remote control code. |
SETUP |
You are in the Setup menu. |
READ |
Disc is being read. |
No READ |
Disc cannot be read. |
FINAL |
DVD is being finalized. |
No CASSETTE No cassette has been inserted. |
|
No DISC |
No disc has been inserted. |
PROTECT |
Disc is write-protected. |
JETREW |
A cassette is being jet-rewind. |
OFF0:30 |
The recording time is set to 30 minutes. |
REPEAT |
Repeat playback is on. |
START |
A function (copying) is beginning. |
To DVD |
Copying from VHS to DVD-RAM. |
COPY |
Copying is taking place. |
STOP |
A function has been stopped (copying). |
PROG FULL |
All 32 timer programme positions are full. |
UNSUPPORT |
Disc format is not supported. |
UNFORMAT |
Disc is unformatted. |
SW-DL |
Software Download. |
X HOLD |
Child protection is active. |
GUIDE |
EPG Download. |
99PER |
99 % - Copying is finished. |
SLIDE |
Slideshow running. |
No FIN |
Finalization not possible during the recording. |
HDMI |
HDMI unit is connected. |
Error messages |
78 |
8
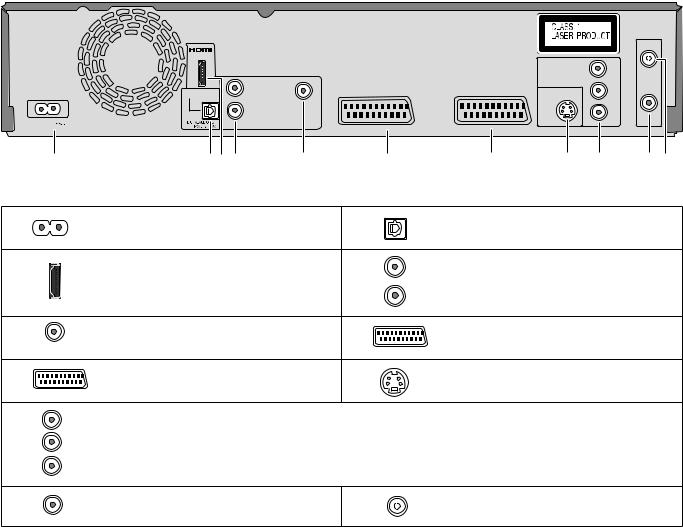
Rear Panel
RF IN
AV OUT
|
|
|
|
|
|
COMPONENT VIDEO OUT |
|
Y |
|
|
|
|
|
|
|
|
|
|
|
L |
|
|
|
S VIDEO OUT |
|
PB |
|
|
OPTICAL |
|
|
|
|
||
|
|
R |
VIDEO OUT |
|
|
|
|
PR |
|
|
|
|
|
|
|
||
|
AC IN |
AUDIO OUT |
|
|
|
|
|
RF OUT |
|
AV 2 (EXT) |
|
AV 1 (TV) |
|
|
|
||
|
|
|
|
|
|
|
||
|
1 |
2 3 4 |
5 |
6 |
7 |
8 |
9 |
10 11 |
1 |
|
AC IN~ = Power supply |
2 |
|
OPTICAL |
|
|
|
|
|
Connection for the AC mains lead. |
|
|
Digital audio output |
|
|
|
3 |
|
HDMI AV OUT |
4 |
L |
|
|
|
|
|
|
|
|
Audio output, right/left channel |
|
|||
|
|
Digital audio output |
|
|
|
|||
|
|
|
R |
|
|
|
|
|
|
|
|
|
|
|
|
|
|
|
|
|
AUDIO OUT |
|
|
|
|
|
5 |
|
Video output |
6 |
|
AV2 (EXT) = 21-pin Scart terminal |
|||
|
VIDEO OUT |
|
|
AV2 (EXT) |
External unit connection |
|
|
|
7 |
|
AV1 (TV) = 21-pin Scart terminal |
8 |
|
S VIDEO OUT |
|
|
|
|
AV1 (TV) |
TV connection |
|
|
S VIDEO output terminal |
|
|
|
9 |
Y |
COMPONENT VIDEO OUT |
|
|
|
|
|
|
|
PB |
Y = Luminance signal (brightness) |
|
|
|
|
|
|
|
PR |
PB = Chrominance signal (colour difference) |
|
|
|
|
|
|
|
PR = Chrominance signal (colour difference) |
|
|
|
|
|
||
10 |
|
RF OUT |
11 |
|
RF IN |
|
|
|
|
|
Aerial output |
|
|
Aerial input |
|
|
|
The outputs of 3, 4, 5, 8 and 9 are dedicated to modules of digital signal processing (DVD).
The video and audio outputs of 6 and 7 are dedicated to modules of digital (DVD) or analogue (VHS) signal processing.
Both groups of outputs are used for analogue and digital sources. But there are limitations, e.g.: During recording or scheduled recording on DVD, the VHS playback is only possible on outputs of 6 and 7.
For a conventional tube television, we recommend using the Scart terminal. You retain a high-quality RGB video picture with an RGB-compatible television.
!If you want to use a progressive-capable LCD/plasma television or LCD projector, connect it to COMPONENT VIDEO OUT to get a high quality progressive video picture.
9

Connections
Select the connection pattern that matches your environment from patterns A-E.
Choose from one of the connection types A-E that suits your requirement.
Before connection, turn off all connected equipment and read the appropriate operating instructions.
Use of the supplied RF coaxial cables
To prevent interference patterns from appearing on your TV, use only the supplied RF coaxial cables when you connect this unit to your TV and aerial outlet or aerial cable, as shown in connection types A-E.
!Keep the RF coaxial cables as far away as possible from other cables.
!Do not roll up the RF coaxial cables.
Connecting to a television only |
A |
Connection with 21-pin Scart cable (not provided)
You need a fully wired 21-pin Scart cable for this optimal connection type.
1Connect the aerial to RF IN (Aerial input) of the DVD Recorder.
2Connect RF OUT (Aerial output) of the DVD Recorder with the aerial input of the TV.
3Connect the AV1 terminal (21-pin Scart terminal) of the DVD Recorder with the Scart input of the TV.
4Connect the DVD Recorder and the television to the power supply system.
After completing the above connections, proceed to the Auto-Setup |
11 |
to tune in TV Channels. |
|
RF coaxial cable
1
This unit’s rear panel
RF IN
AV OUT
|
|
COMPONENT VIDEO OUT |
Y |
|
|
|
|
|
L |
S VIDEO OUT |
PB |
|
OPTICAL |
||
|
VIDEO OUT |
|
|
|
R |
|
PR |
AC IN |
AUDIO OUT |
|
RF OUT |
AV 1 (TV) |
|
||
|
AV 2 (EXT) |
|
To household mains socket |
|
|
|
|
|
(AC 220 V to 240 V, 50 Hz) |
|
3 |
2 |
|
|
|
|
Fully wired 21-pin |
RF coaxial cable |
||
4 |
AC mains lead |
Scart cable |
(included) |
||
(For Q Link functions) |
|
|
|
||
(included) |
17 |
|
|
|
|
|
Connect only after all other |
|
|
|
|
|
connections are complete. |
|
|
|
|
To household |
|
AV IN |
|
RF IN |
|
mains socket |
|
Television’s rear panel |
|
|
|
|
|
|
|
|
|
4
10
Auto Setup
Automatic setup of the unit
After being switched on for the first time, the unit proceeds with an automatic station search for digital channels. This is followed by the search for analogue channels.
!Turn on the television and select the AV input that this unit is connected to.
!Switch the unit on using the Standby/on-switch.
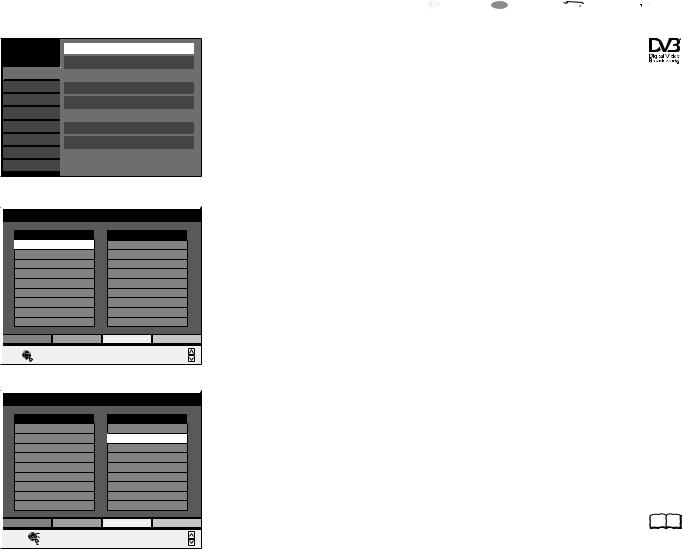
1 DVB Auto-Setup (Tuning digital channels)
|
|
DVB Auto-Setup |
|
|
Please wait ! |
Ch 5 |
|
69 |
|
Prog. Channel |
Service Name |
Net ID TS ID |
Quality |
|
1 |
23 |
ZDF |
12302 12289 |
9 |
2 |
23 |
Info/3sat |
12302 12289 |
9 |
3 |
23 |
Doku/KiKa |
12302 12289 |
9 |
4 |
23 |
RTL Television |
12305 11397 |
9 |
5 |
23 |
RTL2 |
12305 11397 |
9 |
RETURN : to cancel |
|
|
||
RETURN |
|
|
|
|
Depending on different countries or regions, the digital TV programme has its own selection of operating frequency channels, frequency bands, transmission parameters and frequencies, The unit automatically searches for all available digital television stations.
Active Antenna |
69 |
If an active aerial is connected to the unit, which is energised by the unit, no station was found during auto setup. Switch [Active Antenna] to [On] in the [Setup] menu.
Then repeat the auto setup. After the auto setup, you can check the signal
64
attributes in the [Setup] menu.
2 Auto-Setup (Tuning analogue channels)
Analogue Auto-Setup in progress.(without Q Link)
Datenübernahme von TV
Analogue Auto-Setup in progress. Please wait. RETURN : to cancel
Download in progress.(with Q Link)
Download in Progress. Please wait.
RETURN : to cancel
Checking Broadcaster's data. (with Q Link)
Checking Broadcaster's data. Please wait.
RETURN : to cancel
Clock
|
|
Automatic |
Off |
|
Time |
Date |
|
|
0 : 00 : 00 |
1 / 1 / |
2006 |
Number |
|
|
|
0 - - |
9 |
|
|
CHANGE |
Clock cannot be set automatically. |
|
|
SELECT Please set the clock manually. |
|
||
ENTER |
ENTER : store |
RETURN : leave |
|
|
|
|
|
RETURN
3 TV Aspect
Analogue Auto-Setup (without Q Link)
The auto setup saves all avaiable television stations and takes approx. 5 minutes. If the station also broadcasts Date and Time, the time will be set automatically. If the automatically set time is incorrect, you can set this manually.
Download from TV with 

 (Registered trademark of Panasonic)
If your television is equipped with the Q Link feature, the stations are downloaded through the transfer of the station table.
In order to be able to use Q Link, the unit must be connected to a TV with |
|
||
Q Link or a similar feature via a fully wired 21-pin Scart cable. |
70 |
||
Checking Broadcaster's data (with Q Link) |
|
||
Once the station data have been adopted from the television set, the analogue |
|
||
stations are sorted accordingly. |
|
||
You can repeat the station search again. |
64 |
||
Setting the date and time (if not found automatically) |
|
||
If the Date and Time are not transferred via a television station, the Clock menu |
|
||
appears. |
|
|
|
! Use |
or 0 |
9 and to select the Time and Date. |
|
! Confirm the change with ENTER.
An incorrect date or time affects the programmed recording of television programmes (note summer and winter time).
TV Aspect
16:9 WIDE TV
16:9
4:3 TV
4:3 Letterbox
SELECT 
ENTER
RETURN
! Select the desired screen format with  and confirm with ENTER.
Auto setup for your unit is complete.
The availability of stations may differ regionally.
You can now select your favourite stations and store them in the required 20  order in the profiles.
11

Connecting to a television and satellite receiver |
B |
Television’s rear panel
To household mains socket
AV IN
4
Fully wired 21-pin |
2 |
Scart cable |
(For Q Link functions)
This unit’s rear panel
RF IN
AV OUT
COMPONENT VIDEO OUT
Y
|
OPTICAL |
L |
S VIDEO OUT |
PB |
|
|
|||
|
|
VIDEO OUT |
|
|
|
|
R |
|
PR |
AC IN |
DIGITALAUDIOOUT |
AUDIO OUT |
|
RF OUT |
|
|
|||
(PCM/BITSTREAM) |
AV 2 (EXT) |
AV 1 (TV) |
|
To household mains socket
(AC 220 V to 240 V, 50 Hz)
4 |
AC mains lead (included) |
|
Connect only after all other |
|
|
|
connections are complete. |
3 |
|
Fully wired 21-pin |
|
|
Scart cable |
1 |
|
|
LNB IN
AV OUT
To household mains socket
Satellite receiver’s rear panel
4
12

Connecting to a television and satellite receiver |
B |
Auto-Setup Restart |
|
No stations found ! |
|
Please check aerial connection. |
|
Restart Auto-Setup ? |
|
Yes |
No |
SELECT |
|
ENTER |
|
RETURN |
|
Connection of Set Top Box or satellite receiver
If you receive your television programme via a satellite receiver (digital/analogue), connect your DVD Recorder as a downstream unit.
If your television supports Q Link, use a fully wired 21-pin Scart cable to connect it to
the TV. The stations automatically downloaded through [Download from TV]. |
|
If your television supports RGB, set the AV1 Output to RGB 1 or RGB 2 in the |
69 |
[Setup] menu. |
1Connect the aerial (SAT) to the LNB IN (aerial input) of the external unit.
2Connect the RF OUT (aerial output) of the external unit with the RF IN (aerial input) of the DVD Recorder.
3Connect the RF OUT (aerial output) of the DVD Recorders with the RF IN (aerial input) of the television unit.
4Connect the AV1 terminal (21-pin Scart terminal) of the DVD Recorder with the Scart input of the television unit.
5Connect the external unit with a 21-pin Scart cable to the Av2 connection of the DVD Recorder.
6Connect the DVD Recorder, the TV and the external unit to the power supply system.
7Switch on the external unit and the DVD Recorder.
!Turn on the television and select the AV input that this unit is connected to. [Auto-Setup] follows automatically and it ends with the note: [No stations found !].
!Select [No] with  and confirm with ENTER.
The available stations are downloaded from the external unit.
!Select with  the required TV picture format and confirm with ENTER.
!Switch the DVD Recorder to AV2 with CH  . You see the television picture from the external unit.
The date and time are not set automatically. Set them manually.
View / record satellite programmes
!Press INPUT SELECT to select the input channel AV2 or put this unit in standby mode.
The TV Guide does not show any information if you have connected the unit to a satellite receiver only.
13

Connection with Audio/Video cable C
You can use this frequently used standard connection with the provided accessories.
1Connect the aerial to RF IN (Aerial input) of the DVD Recorder.
2Connect RF OUT (Aerial output) of the DVD Recorder with the aerial input of the TV.
3Connect the AUDIO OUT (L/R) and VIDEO OUT of the DVD Recorder with the audio/video of the television.
4Connect the DVD Recorder and the television to the power supply system.
After completing the above connections, proceed to the Auto-Setup |
11 |
to tune in TV channels. |
|
1  RF coaxial cable
This unit’s rear panel
AC IN
To household
mains socket
(AC 220 V to 240 V, 50 Hz)
4
To household
mains socket
RF IN
OUT |
COMPONENT VIDEO OUT |
Y |
HDMI |
(PROGRESSIVE/ |
|
|
INTERLACE) |
|
L |
|
PB |
|
OUT |
|
AUDIO |
|
|
OPTICAL |
|
|
R |
S VIDEO |
PR |
VIDEO OUT |
|
RF OUT |
AV 1 (TV) |
|
|
AV 2 (EXT) |
|
3 |
Audio/Video cable (included) |
|
|
|
AC mains lead |
Video |
Yellow |
2 |
|
(included) |
L |
White |
RF coaxial cable |
|
Connect only after all other |
R |
Red |
(included) |
|
connections are complete. |
|
|
|
|
Audio/Video |
RF IN |
IN |
|
Television’s rear panel
4
14

Connection with S VIDEO cable |
D |
Depending on the television, the connection with the S VIDEO cable results in a higher quality picture than the connection with an Audio/Video cable.
1Connect the aerial to RF IN (Aerial input) of the DVD Recorder.
2Connect RF OUT (Aerial output) of the DVD Recorder with the aerial input of the TV.
3Connect AUDIO OUT (L/R) and S VIDEO OUT of the DVD Recorder with the S VIDEO and audio input of the TV.
4Connect the DVD Recorder and the television to the power supply system.
After completing the above connections, proceed to the Auto-Setup |
11 |
to tune in TV channels. |
|
1 |
RF coaxial cable |
This unit’s rear panel
AC IN
To household
mains socket
(AC 220 V to 240 V, 50 Hz)
4
To household
mains socket
RF IN
OUT |
COMPONENT VIDEO OUT |
Y |
HDMI |
(PROGRESSIVE/ |
|
|
INTERLACE) |
|
L |
|
PB |
|
OUT |
|
AUDIO |
|
|
OPTICAL |
|
|
R |
S VIDEO |
PR |
VIDEO OUT |
|
RF OUT |
AV 1 (TV) |
|
|
AV 2 (EXT) |
|
AC mains lead |
3 |
Audio cable |
S VIDEO cable |
3 |
2 |
RF coaxial cable |
|
(included) |
|
L |
White |
|
|
|
(included) |
Connect only after all other |
|
R |
Red |
|
|
|
|
connections are complete. |
|
|
|
|
|
|
|
Audio IN |
S Video |
RF IN |
|
IN |
|
Television’s rear panel
4
15

Connection with HDMI cable (not included) |
E |
The HDMI connection can be used only with units that are suited for HDMI. |
|
1Connect the aerial to RF IN (Aerial input) of the DVD Recorder.
2Connect RF OUT (Aerial output) of the DVD Recorder with the aerial input of the TV.
3Connect HDMI AV OUT of the DVD Recorder with the HDMI input of the TV.
4Connect the DVD Recorder and the television to the power supply system.
After completing the above connections, proceed to the Auto-Setup |
11 |
to tune in TV channels. |
|
1  RF coaxial cable
This unit’s rear panel
RF IN
AV OUT
|
COMPONENT VIDEO OUT |
Y |
|
|
|
L |
S VIDEO OUT |
PB |
OPTICAL |
||
VIDEO OUT |
|
PR |
|
|
|
AC IN |
|
RF OUT |
AV 1 (TV) |
|
|
AV 2 (EXT) |
|
To household
mains socket
(AC 220 V to 240 V, 50 Hz)
4
To household
mains socket
4
AC mains lead |
3 |
(included) |
Connect only after all other connections are complete.
HDMI IN
HDMI cable |
RF coaxial cable |
|
Only use fully wired HDMI cables showing the 2 |
||
(included) |
||
HDMI logo. Use cable of max. 5 m in length to |
|
|
avoid interference with the video signal. |
|
RF IN
Television’s rear panel
16
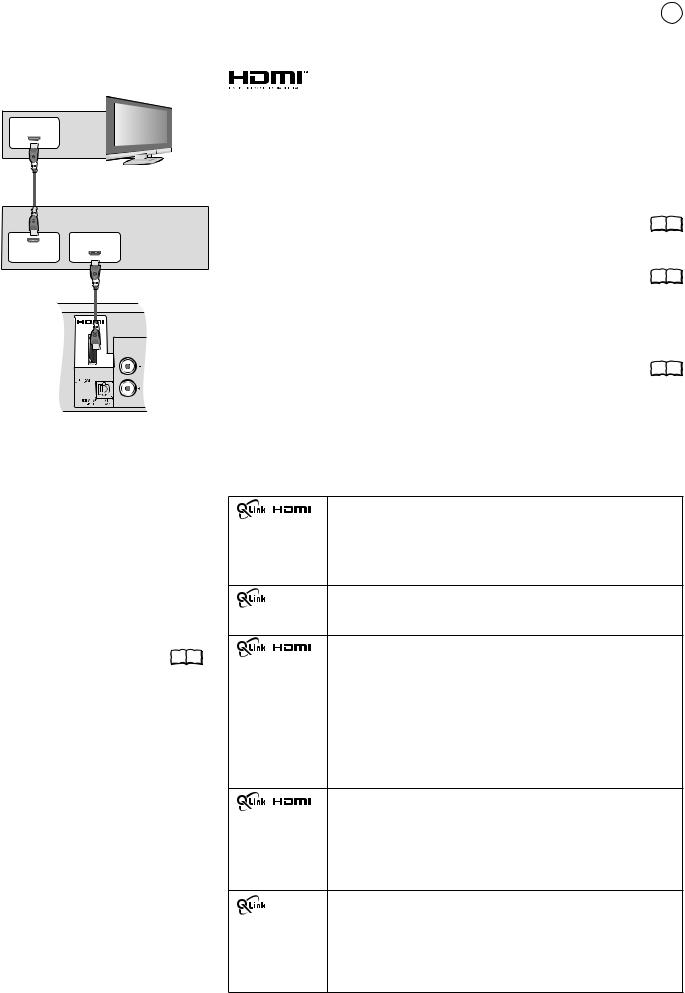
Connection with HDMI cable (not included) |
E |
Connection to an amplifier
Television set
HDMI IN
Amplifier
HDMI IN
HDMI OUT
AV OUT |
AUDIO OUT |
DVD Recorder
(High Definition Multimedia Interface)
If you connect the DVD Recorder to an HDMI-compatible unit, just one cable transfers a high quality digital audio and video signal without interference.
!Once an HDAVI Control compatible unit has been connected to the HDMI terminal, switch the units on and automatically selects the input channel for the DVD Recorder. Repeat the procedure if there is any change to the HDMI terminal.
The audio signal cannot be transmitted via HDMI if an externally connected unit does not support CPPM (Content Protection for Prerecorded Media), or when playing a
DVD audio with copy protection. In this case, use an audio cable. |
18 |
If a connected TV only supports dual-channel audio, then an audio signal with 3 or more channels is down-converted, with output through 2 audio channels.
It is not always possible to down-convert all discs. 68 Titles where down-converting is not possible can only be reproduced via HDMI through an amplifier which corresponds to the HDMI Ver. 1.1 standard or higher and is CPPM compatible.
Connect an amplifier complying with the HDMI Ver. 1.1 standard and adjust the |
|
setting in the [Setup] menu to [HDMI and Optical]. |
70 |
Now you can enjoy the full audio sound. |
For HDCP (High-Bandwidth Digital Content Protection) compatible units with DVI (Digital Visual Interface) connection (e.g. PC monitors): depending on the unit, it is possible that a DVI/HDMI adapter does not reproduce the video signal perfectly. The audio signal is not transmitted in this case.
If you connect this unit with an HDMI cable to a Panasonic television set with HDAVI control function, then both units can be controlled.
If you connect this unit with an fully wired 21 pin scart cable you can use the Q Link
functions to control the television and this unit. You can use both kinds of connection at the same time.
Settings for control with |
70 |
HDMI and Q Link: |
The following systems from other manufacturers have similar function to Q Link from Panasonic.
-Easy Link (Trademark of Philips)
-SMARTLINK (Trademark of Sony)
-DATA LOGIC (Trademark of Metz)
-Megalogic (Trademark of Grundig)
For details, refer to your television's operating instructions or consult your dealer.
A TV takes a certain time to change over the input channel for the DVD Recorder automatically. It is therefore possible that the television set does not display the playback at the start of the title. Press SKIP 


 or SLOW/SEARCH
 to return to the start of the playback.
Control via Q Link and HDMI (HDAVI Control)
Automatic input changeover (Easy Playback)
If you start the playback function or select a menu (e.g. Direct Navigator, Timer Recording), the TV automatically switches to the input channel for the DVD Recorder.
If you are recording on the DVD drive, the TV does not automatically change to the input channel.
Direct TV recording
Press DIRECT TV REC to directly record the programme you are currently watching. You do not need to enter anything else.
Power on link
If you start the playback function or e.g. select the menu Direct Navigator or Timer Recording or by inserting a disc, the television set switches on and automatically selects the input channel for the DVD Recorder.
If you are recording on the DVD drive, the TV does not automatically change to the input channel.
TV/DVD automatic switch-on
If the TV set and DVD Recorder are switched off (in standby), both units are switched on automatically by pressing PLAY, DIRECT NAVIGATOR, GUIDE,
ShowView or PROG/CHECK.
Power off link
If the television set is switched off, this unit automatically switches off as well. The unit also switches off while the menu FUNCTIONS, DISPLAY or status messages are being displayed, and even when a Timer-controlled recording has been programmed or during playback.
The unit does not switch off during a recording with the  REC button, the Copying function or while a disc is being finalized.
Download from TV (analogue channels only)
Station transfer from television set. During [data transfer from TV], data for the station list are automatically downloaded from the TV set. The stations are stored in the same presets of the DVD Recorder as on your TV set.
This unit allows for Timer Recordings using the programming function of the television (e.g. IDTV).
17

External units
Amplifier (example) |
|
|
AV OUT |
|
AUDIO IN |
L |
R |
|
AUDIO OUT |
|
Audio cable |
|
L - White |
|
R - Red |
AV OUT
Amplifier (example)
OPTICAL
AUDIO OUT
For all connections described:
Before you connect cables, make sure that all units are switched off.
Switch on the units after you have connected the cables.
Connecting an analogue amplifier or an analogue system component
In order to enjoy stereo or Dolby Pro Logic, connect a corresponding amplifier or an analogue audio component.
!Connect the AUDIO OUT (L/R) output e.g. with a Dolby Pro Logic amplifier.
!Connect the audio cable according to the colours and markings on the connection terminal (white/L, red/R).
Connecting a digital amplifier or a digital system component
If an amplifier equipped with Dolby Digital, DTS or an MPEG-decoder is connected, a DVD-Video-Disc with multi-channel surround sound can be played back.
!Connect an amplifier with a Dolby Digital, DTS or an MPEG decoder.
!Use an Optical digital audio cable.
! Change the [Digital Audio Output] setting in the Setup menu [Sound] |
68 |
according to your connected digital amplifier.
You cannot use DTS Digital Surround decoders that are not suitable for DVD.
Optical digital audio cable |
If the unit is connected to the television set with an HDMI cable and you are using the |
|
|
DIGITAL AUDIO OUT (Optical) for audio output, change the HDMI settings [Digital |
|
|
Audio Output] to [Optical Only] in the [Setup] menu. |
70 |
Push the jack all the way into the socket with this side facing up.
AV3  S VIDEO IN VIDEO IN L/MONO AUDIO IN R
Connect this unit to a device with a DTS decoder in order to be able to play DVDs with this symbol.
This unit can record and playback stereo sound in Dolby Digital (dual channel). DVD-Vs can be played back in multi-channel sound.
S VIDEO-cable
Audio cable
L - White
R - Red
AV3  S VIDEO IN VIDEO IN L/MONO AUDIO IN R
Audio/Video cable
Video - Yellow
L |
- White |
R |
- Red |
 DV IN
DV IN
It is not possible to copy to a VHS cassette via DV input.
Connection to AV3 (e.g. camcorder)
If the audio output of the other unit is mono, connect it to the L/MONO terminal. Both the left and the right channel will be recorded.
!Select one of the two connection options.
The connection with S VIDEO cable and audio cable (L/R) delivers the best quality.
Connection to DV input
DV means digital video and is a video standard.
You can connect a DV-compatible camcorder to the DVD Recorder. The DV IN connection is available for this purpose.
The DVD Recorder cannot be controlled via an external unit that is connected to the DV IN terminal.
Before you connect the DV cable, make sure that all units are switched off. After you have connected the cable, switch on the units.
!Connect the DV output of the DV unit (e.g. digital camcorder) with the DV input terminal of the DVD Recorder. Use a DV cable.
!After you have connected the cable, switch on both units.
The DV input of this unit is only intended for DV units. For example, a computer cannot be connected. Some DV units do not allow for proper input of the picture and sound signal.
18
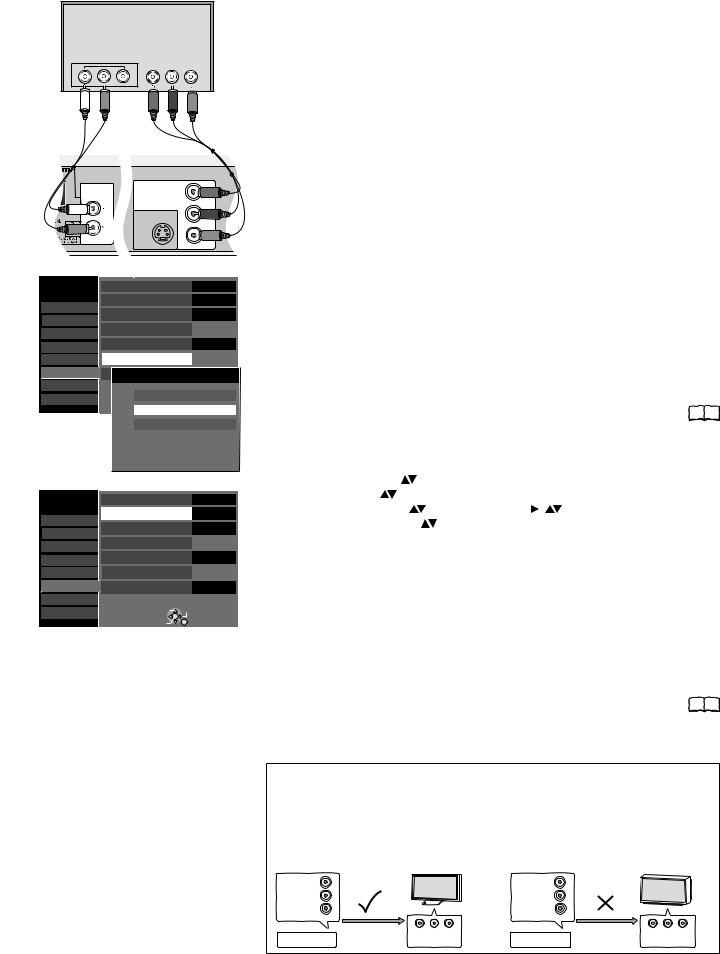
COMPONENT VIDEO OUT
TV
COMPONENT
VIDEO IN
Audioinput L/R
Y PB PR
Video cable
Audio cable |
Y |
- Green |
PB - Blue |
||
L - White |
PR - Red |
|
R - Red |
|
|
AV OUT |
|
|
COMPONENT VIDEO OUT |
Y |
|
S VIDEO OUT |
PB |
|
|
|
|
AUDIO OUT |
PR |
|
|
|
|
COMPONENT VIDEO OUT terminal
The terminals can be used for INTERLACE or PROGRESSIVE output and deliver a clearer picture than the S VIDEO OUT terminal.
Connections via these terminals output the colour difference signals (PB/PR) and the brightness signal (Y) separately.
Colours can be reproduced true to the original colour.
The properties of the COMPONENT VIDEO input terminal are dependent on the TV or screen.
!Connect the COMPONENT VIDEO OUT sockets of the unit with the COMPONENT VIDEO IN of the TV unit. Use a Video cable.
!Always connect terminals with the same colour.
!Connect the audio cables to the corresponding audio input terminal on the TV.
Setup |
TV Aspect |
4:3 |
||
Tuning |
Progressive |
On |
||
TV System |
PAL |
|||
Disc |
||||
HDMI Settings |
|
|
||
Picture |
Video |
|||
Sound |
AV1 Output |
|||
Display |
AV2 Settings |
|
|
|
Connection |
Active Antenna AV1 Output Off |
|||
VHS |
VideoSELECT( with componentTAB |
) |
||
Others |
||||
|
ENTER |
RETURN |
|
|
|
RGB 1 ( without component ) |
|||
|
RGB 2 ( without component ) |
|||
|
RGB output is available all the |
|||
|
time while this unit is on. |
|
||
|
|
|
||
Setup |
TV Aspect |
4:3 |
||
Tuning |
Progressive |
On |
||
TV System |
PAL |
|||
Disc |
||||
HDMI Settings |
|
|
||
Picture |
Video |
|||
Sound |
AV1 Output |
|||
Display |
AV2 Settings |
|
|
|
Connection |
Active Antenna |
Off |
||
VHS |
SELECT |
TAB |
|
|
Others |
|
|||
|
ENTER |
RETURN |
|
|
Connecting a TV with COMPONENT VIDEO input terminals
If your TV with LCD or plasma screen supports the progressive process, connect it to the COMPONENT VIDEO OUT terminal.
If you want to enjoy full progressive video, set Progressive to [On].
If the AV1 Output setting in the Setup menu is set to [RGB 1/2 ( without component )], there is no output to the COMPONENT VIDEO OUT terminal.
Set this option to [Video ( with component )].
If the unit is connected to the TV via the S VIDEO OUT or the AV1 terminal,
output is Interlace regardless of the settings. |
69 |
||
! |
Press FUNCTIONS. |
|
|
! |
Select [To Others] with |
and confirm with ENTER. |
|
! |
Select [Setup] with and confirm with ENTER. |
|
|
! |
Select [Connection] with |
, [Progressive] with , |
and confirm with ENTER. |
! |
Select the option [On] with |
and confirm with ENTER. |
|
! Press RETURN several times, in order to return to the television picture.
Progressive television picture
The progressive picture aspect ratio (height to width) is set to 16:9. DVD-Video with a picture aspect ratio of 16:9 is properly displayed. However, video material with an image page ratio of 4:3 is shown stretched from right to left. If it is possible to adjust the picture aspect ratio on your television, select the setting [Progressive - On].
With a normal television, the progressive output can cause the picture to flicker, even if the television is progressive-compatible.
Select the setting [Progressive - Off]. |
|
69 |
||
Progressive-compatible televisions (PAL) |
|
|
||
LCD/plasma television or LCD projector |
Conventional televisions |
|
||
If progressive output is used, videos can be viewed |
On a normal television, Progressive output can |
|||
in High Resolution, for example from DVD-Video. |
cause flickering even if the television is |
|||
COMPONENT VIDEO OUT on this unit is |
Progressive-compatible. Select the [Progressive |
|||
connected with the COMPONENT VIDEO IN on the |
- Off] setting. |
|
||
television. Select the [Progressive - On] setting. |
|
|
||
COMPONENT |
|
|
COMPONENT |
|
VIDEO OUT |
|
|
VIDEO OUT |
|
COMPONENT VIDEO OUT |
Y |
|
Y |
|
|
|
COMPONENT VIDEO OUT |
|
|
|
PB |
|
PB |
|
|
PR |
|
PR |
|
|
Progressive output |
COMPONENT |
Progressive output |
COMPONENT |
DVD Recorder |
|
DVD Recorder |
||
|
VIDEO IN |
VIDEO IN |
||
19
Profiles
Setup |
Edit Profiles |
Tuning |
Auto-Setup Restart |
Digital |
|
Disc |
Add New DVB Services |
Picture |
Signal Condition |
Sound |
Analogue |
Display |
Manual |
Connection |
Download from TV |
VHS |
|
|
|
Others |
|
|
|
|
Edit Profiles |
|
|
All Services |
Profile 1 |
|
|
1 |
Das Erste |
|
|
2 ZDF |
|
|
|
3 |
RTL Television |
|
|
4 |
SAT.1 |
|
|
5 VOX |
|
|
|
6 |
ProSieben |
|
|
7 RTL2 |
|
|
|
8 KABEL1 |
|
|
|
9 Super RTL |
|
|
|
|
Profile Select |
Add |
Add All |
SELECT |
RETURN |
|
Page - |
|
|
||
|
|
Edit Profiles |
|
|
All Services |
|
Profile 1 |
|
|
1 |
Das Erste |
|
1 Das Erste |
|
2 ZDF |
|
2 ZDF |
|
|
3 |
RTL Television |
3 ProSieben |
|
|
4 |
SAT.1 |
|
4 KABEL1 |
|
5 VOX |
|
|
|
|
6 |
ProSieben |
|
|
|
7 RTL2 |
|
|
|
|
8 KABEL1 |
|
|
|
|
9 Super RTL |
|
|
|
|
Profile Name |
Move |
Delete |
Delete All |
|
SELECT |
TO STORE, PRESS ENTER |
|
Page + |
|
|
JUMP |
|
|
Page - |
|
RETURN |
|
|
|
|
|
|
|
|
 DVD
DVD  HDD
HDD 
 VHS
VHS 
 SD
SD
Creating new profiles
You can create four different profiles where you can put together your favourite analog and digital TV stations (99 entries).
The profiles are stored in the TV Guide.
!Press FUNCTIONS.
!Select [To Others] with  and press ENTER to confirm.
!Select [Setup] with  and press ENTER to confirm.
!Select [Edit Profiles] with  and press ENTER to confirm. You will now see the menu Edit Profiles.
!Use PAGE  to scroll backwards or forwards page for page through the two tables.
Profile Select
Four different profiles are available.
! Use the GREEN button to select a profile.
Add
! Select the required station in the left table with  .
.
!Use the YELLOW button to accept the selected station. Every station can only be added to the profile once.
!Press ENTER to save the profile.
Add All
!Use the BLUE button to add all available stations to the profile.
!Press ENTER to save the profile.
Edit profile
!Use  to go to the column of the selected profile. Use the coloured buttons to edit the profiles.
Profile Name |
36 |
! Press the RED button to change the profile name. |
Move
You can change the order of stations in the selected profile.
!Select the required station with  .
.
!Use the GREEN button to mark the station.
! Move the station to the required position with  .
.
!Press the GREEN button again to insert the station.
!Press ENTER to save the profile.
Delete
!Select the required station with  .
.
!Use the YELLOW button to delete the station from the profile.
!Press ENTER to save the profile.
Delete All
!Use the BLUE button to delete all stations from the profile.
!Press ENTER to save the profile.
20
STATUS displays
|
|
DVD-RAM |
|
|
1:07 SP |
|
|
1 DVB |
|
|
ZDF |
|
|
LR |
1 ZDF |
17:11 |
All Services |
heute |
Change Category |
|
17:00–17:15 |
NOW |
info |
|
Multi-Audio |
|
Status display
DVD-RAM |
|
|
|
|
1 |
||
|
|
|
|
||||
1:07 SP |
|
|
|
2 |
|||
|
|
|
|||||
1 DVB |
|
|
|
3 |
|||
|
|
|
|||||
ZDF |
|
|
|
4 |
|||
|
|
|
|||||
L R |
|
|
5 |
||||
|
|
||||||
HDD REC 
 6
6
Status display of other media
7 |
8 |
 Detailed information
10:07:21 1.12. |
Remain 0:50 SP |
 T14 0:05.14 SP
  T10 0:05.14 SP
9 |
10 |
 DVD
DVD  HDD
HDD 
 VHS
VHS 
 SD
SD
 Screen information
Every time you change the station, a status display and banner appear automatically.
They disappear again after a short time. |
|
You can change how long they appear for in the setup menu. |
68 |
! Press  to show the screen information again.
Status displays |
|
You can switch off display of the screen information in the setup menu. |
68 |
1:Current medium
2:Current recording playback status and remaining time
3:Current station position. DVB shows a digital station.
4:Current station
5:Sound mode: LR,L,R: Soundtrack was changed with the AUDIO button.
6:Status display and recording status of other media.
REC |
Record |
Fast forward (5 stages) |
Rewind (5 stages) |
PAUSE |
Pause |
Slow motion (5 stages) |
Slow-motion rewind (5 stages) |
PLAY |
Playback |
PLAY/x1.3 Quick View |
Pause playback |
You can display detailed informationen only during playback or recording (VHS only recording). They are not recorded.
7:Current date and time
8:Available recording time and recording mode: e.g. 0:50 SP shows 50 minutes in SP mode.
9:Title number: shows the recording mode and the elapsed play time of the title.
VHS: Current tape counter.
10:Title number: shows the recording mode and the recording time of the title.
VHS |
L R |
SP |
|
0:21.29 |
|
VHS screen information
!Press  during playback. Each time the button is pressed, the display switches between tape counter and remaining tape time
VHS |
Current medium |
|
|
L R |
SP |
LR, L, R: The soundtrack can be changed with the AUDIO button. |
|
|
|
SP: Selected recording mode. |
|
REMAIN: 0:24 |
Remaining tape time: The display depends on the correct |
70 |
|
|
|
setting of the tape length. |
|
0:21.29 |
Tape counter: It is automatically set to 0:00.00 when a video |
||
cassette is inserted. |
|
||
|
|
|
|
|
|
Use / RESET to reset the counter to 0:00.00. |
|
R |
0:21.29 |
Repeat |
30 |
21

Banner |
|
|
2 ZDF |
17:11 |
Al Services |
heute |
Change Category |
|
17:00–17:30 |
NOW |
info |
|
Multi-Audio |
|
1 |
2 |
|
|
3 |
|
4 |
5 |
6 |
|||||||
|
|
|
|
|
|
|
|
|
|
|
|
|
|
|
|
2 ZDF |
|
|
No Signal |
17:11 |
All Services |
|
|||||||||
heute |
|
|
|
|
|
|
|
Change Category |
|
|
|||||
|
|
|
|
|
|
|
|
|
|||||||
17:00–17:30 |
|
|
|
|
|
|
NOW |
|
info |
|
|
||||
Encrypted |
|
|
Multi-Audio |
|
|
|
|
|
|||||||
|
|
|
|
|
|
|
|
|
|
|
|
|
|
||
11 |
|
10 |
9 |
8 |
|
|
|
7 |
|||||||
On selecting a radio station or if the banner shows [No Signal], [Bad Signal], [Encrypted] or [No Service], the banner cannot disappear and is included in any current recording.
 DVD
DVD  HDD
HDD 
 VHS
VHS 
 SD
SD
The banner contains information about the current (NOW) and following (NEXT) programme. It cannot be selected during playback or recording. Banners can only be selected for digital stations.
!Press  to display the banner.
!Use 
 to change between NOW and NEXT.
!Use CH  to select the available stations. The television picture of the selected station appears with the corresponding banner.
!Use  to select the banner of the available stations. The television picture does not change to the corresponding station. The current station is stored in yellow.
!Press ENTER to watch the selected station.
Additional information about a programme
For these programmes,  appears in the banner.
!Select the detailed programme information with 
!Move up and down in the text box with  .
.
This information remains visible until you press  again.
Change Category
!Press  to display the banner
!Press the BLUE button to change the category.
1Programme position and name of the current station.
2Title and airtime of the current programme.
3 |
Signal quality of the current station: No signal; Bad signal. |
64 |
|
No service = a programme is not transmitted at the moment. |
|
4 |
The current time. |
|
5 |
Selected Category: All Service, TV, Radio, Profile 1-4 |
20 |
6Press the BLUE button to change the category.
7Detailed information on the current programme.
8NOW: Information on the current programme. NEXT: Information on the next programme.
9 |
Programme is broadcast in multi-channel sound. |
77 |
|
Press DISPLAY. Select Audio - [DVD Multi Audio]. |
|
10Shows the progress of the current programme.
11Station with an encrypted signal.
All Services
Change Category
No banners with information are displayed for analogue stations.
!Press  to launch a banner to change the category.
!Press the BLUE button to change the category. The banner disappears after 5 seconds.
22

HDD
HDD
- - |
Hard disk drive (HDD) |
|
250 GB |
|
rewritable |
 HDD
HDD
Hard disk
The hard disk is only a temporary memory.
Your HDD (Hard disk drive) is a high-precision recording unit with a particularly long recording capacity and high recording speed.
The recording is made in DVD Video Recording format (VR). |
24 |
Films or parts of films can be edited and deleted. Deleting films releases previously used storage space. Creating playback lists does not take up any additional storage space.
As well as the TIME SLIP function, dual-channel sound and 16:9 format are also supported.
The hard disk automatically goes into the SLEEP mode if no function is selected for longer than 30 minutes and no disc is placed in the drive. An unexpected noise may be caused when switching on and off or during the SLEEP mode. The unit is working normally.
Your hard disk is a short-term memory medium. You should not use it for permanent data storage of recordings. Use your hard disk to view, edit and save recordings on a disc. If you encounter any problems, save the entire contents of your hard disk on another medium (disc). Please take the unit to your customer service. Recordings on a damaged hard disk cannot be rescued.
The unit must not be moved or exposed to vibrations or jolts because otherwise this would damage the hard disk.
Do not disconnect the mains plug during recording or playback. This can cause data loss.
Cigarette smoke, insect spray and other vapours must not penetrate the unit because otherwise this can cause faults.
Do not place the unit on any appliance which gives off heat. Do not erect the unit in places where condensation occurs, for example
-rooms with high humidity levels
-in the direct air flow of an air-conditioning system
-rooms with great fluctuations in temperature
Condensation forms as moisture on a cold surface which is exposed to a sudden extreme change in temperature. This condensation can damage the hard disk and other parts inside the unit.
In such cases, do not switch the unit on. Wait for approx. two to three hours for the moisture to evaporate.
When changing the location of the unit,
-switch the unit off. Wait until "BYE" goes off in the display.
-disconnect the mains plug from the terminal.
-do not lift the unit up until it has stopped completely (after
approx. 2 minutes), because the hard disk runs on for a brief period after switching off.
Panasonic does not assume any liability for direct or indirect problems resulting in the loss of recordings or edited contents (data) and does not guarantee that the recorded or edited contents will work perfectly. This also applies to any repairs to the unit (also refers to parts which are not linked to the hard disk). No compensation is made for lost recordings or discs which have become defective.
23

Disc formats
DVD-RAM: DVD Video Recording format
DVD-RAM RAM
4.7 GB 12 cm
9.4GB 12 cm
2.8GB 8 cm rewritable
DVD-R : DVD-Video format
+R : +VR format
|
DVD-R |
-R |
|
4.7 GB 12 cm |
|
|
1.4 GB 8 cm |
|
|
writable |
|
|
|
|
- - |
+R |
+R |
|
|
4.7 GB 12 cm writable
DVD-RW : DVD-Video format +RW : +VR format
DVD-RW(V) -RW(V)
4.7 GB, 12 cm
1.4 GB, 8 cm rewritable
- - |
+RW |
+RW |
4.7 GB, 12 cm
1.4 GB, 8 cm rewritable
DVD-R DL: DVD-Video format
+R DL |
: +VR format |
|
|
|
|
DVD-R DL |
|
|
|
|
-R DL |
|
||
R DL |
8.5 |
GB 12 cm, writable |
|
|
|
|
|
|
|
|
+R DL |
|
|
|
- - |
+R DL |
|
||
|
|
|||
|
8.5 |
GB 12 cm,writable |
|
|
 DVD
DVD
Playback and recording discs
DVD-RAM
The DVD-RAM can be compared with the hard disk and can be written to 100,000 times on average. The disc can only be played on DVD-RAM-compatible players.
The recording occurs in DVD Video Recording format (VR). Movies and parts of movies can be edited and deleted. The deletion of movies frees previously used storage space.
The creation of playlists does not require any additional storage space.
Dual-channel sound and 16:9 format are supported in addition to the TIME SLIP function.
DVD Video Recording format (VR)
This format enables recording and playback.
Digital programmes limited to "one-time recording" can be recorded to a CPRM-compatible disc. You can record to a CPRM-compatible DVD-RAM.
Playback is only possible with a compatible DVD player. Use a DVD-RAM to record in DVD Video Recording format.
DVD-R/+R (Recordable)
The DVD-R/+R can only be recorded once. Movies or parts of them can be deleted during processing, but storage space is still taken up and cannot be used for other movies. Through finalization, the DVD-R/+R becomes DVD-V that can be played on other units.
DVD-R/+R/-R DL/+R DL |
Finalization |
9975 |
-R +R -R DL +R DL |
On the recording unit |
|
The movies can no longer be edited after finalization.
Recording with this recorder |
Playback on another unit |
Recording with another unit |
Playback on this recorder |
DVD-RW(V)/+RW (Rewritable)
DVD-RW(V)/+RW is rewritable and erasable. You must format this disc to be able to rewrite it again. Through finalization, the DVD-RW(V) becomes a DVD-V that can be played on other units. A finalized DVD-RW(V) can be reformatted and rewritten.
Formatting deletes all data!
A +RW becomes a DVD-V by creating a Top Menu. |
|
9975 |
|
DVD-RW(V) |
Finalization |
Formatting |
DVD-RW(V) |
-RW(V) |
On the recording unit |
|
-RW(V) |
The movies can no longer be edited after finalization. |
|
|
|
Recording with this recorder |
Playback on another unit |
||
Recording with another unit |
Playback on this recorder |
||
DVD-R DL / +R DL (Double Layer DVD / Dual Layer DVD) |
2nd Layer |
|
|
The data are saved on two parallel layers. You have more |
|
space available. If the laser changes layers during playback, brief |
|
image and sound distortions may occur. |
|
If there is not enough capacity to record a title on the first layer, the rest is |
1st Layer |
recorded on the second layer. During the playback of a title recorded on two layers,
the unit automatically switches between the layers and plays the title back like a normal title.
You cannot record directly on a DVD-R DL/+R DL with this unit. You can record on the hard disc and then copy the recording to the DVD disc.
DVD-Video format (V)
This recording format is the standard DVD-Video. Digital programmes that are limited to "one-time recording" cannot be recorded. Not for recording and playback of still pictures.
+VR format
Digital programmes limited to "one-time recording" can not be recorded. Not for recording and playback of still pictures.
24

Disc formats |
DVD |
DVD-RW -RW(VR)
(DVD-VR format)
12 cm/ 8 cm, playable only
DVD-Video DVD-V
12 cm/ 8 cm, playable only
DVD-Audio DVD-A
12 cm/ 8 cm, playable only
CD |
CD |
CD-R/RW
- - 12 cm/ 8 cm, playable only
Video CD |
VCD |
CD-R/RW
12 cm/ 8 cm, playable only
Regional codes
2 |
2 |
3 |
ALL DVD-Video only |
|
4 |
DVD-Videos with the regional code 2 or ALL can be played with this unit. The code is listed on the backside of the unit. England and Continental Europe: 2.
Only play round discs.
Do not touch the disc recording surface.
Cartridge discs |
RAM |
With active write-protection, you can neither record to the disc nor edit or delete content.
Playback discs
A DVD-RW that was recorded on another DVD recorder is played back in DVD-RW (VR) format on this unit. Programmes limited on "one-time recording" can be played back. If you format the disc, you can record and play it in DVD-Video format with this unit.
High-quality video and music discs.
Digital-quality music discs. Playback in stereo.
Music and audio recordings, music in MP3 format, pictures in JPEG and TIFF format.
Music and video recordings.
SVCD in compliance with IEC62107.
DivX 
 MP3
MP3 
 JPEG You can play DivX, MP3 and JPEG/TIFF data from a finalized CD-R, CD-RW or DVD-R. Depending on the recording conditions, playback may nonetheless be faulty.
Some DVD-Audio discs with multi-channel sound are designed by the manufacturer to prevent inter-mixing on the entire disc or at certain places. Depending on the disc type, the regional code and the recording conditions, it may not be possible to play the discs in some cases.
See the jewel case for more information.
Non playable discs
-2.6 GB and 5.2 GB DVD-RAM, 12 cm.
-3.95 GB and 4.7 GB DVD-R for Authoring.
-DVD-R that was recorded in DVD Video Recording format (VR).
-DVD-R (V), DVD-R DL, DVD-RW (V), +R, +R DL that was recorded on another unit and not finalized.
-Blu-ray, DVD-ROM, +R (8 cm), CD-ROM, CDV, CD-G, photo CD, CVD, SACD, MV disc, PD, “Chaoji VCD” that can be purchased in stores, including CVD, DVCD and SVCD that are not IEC62107-compliant, etc.
Handling discs
If the surface of a disc, which has no Cartridge or was removed from one, is scratched, dirty, dusty or has finger prints, playback or processing can be impaired. Such impairments can also occur when the disc is placed back in the Cartridge.
Note: Only write on the label side of the disc. Use a soft, oil-based felt-tip pen. Do not use a ball-point pen or any other hard writing instrument. Do not affix stickers or labels to the disc. When not in use, put the disc in its case or Cartridge.
Cleaning the DVD-RAM
Clean the disc with a special DVD-RAM cleaner (optional) and read the cleaner instructions throughly before use. Bad scratches and stubborn dirt may not be able to be removed so that recording, editing or playback is still compromised even after cleaning. The disc should then no longer be used.
Do not use benzine, alcohol, water, cleaning sprays, household cleaners or other solvents.
Cartridge write-protection
Remove the 8-cm disc from the cartridge before using it with this unit.
DVD lens cleaner (RP-CL720E)
Compatible models: Only for Panasonic's DVD recorders.
Do NOT use this cleaner with any other Panasonic DVD products or with the DVD products of any other companies since doing so may damage the products.
Cleaning DVD-Videos, Video-CDs and CDs
Wipe with a moist and then with a dry cloth.
25

SD Card
- - |
SD Memory Card |
SD |
|
miniSDTMCard |
|
|
MultimediaCard |
|
8 MB to 2 GB (Maximum)
Pictures
Inserting the storage card
Removing the storage card
Write-protection
Use an appropriate adapter for miniSD™ cards.
Do not touch the memory card contacts.
 SD
SD
Use an SD card for playback and transfer (copying) pictures taken for example with a Digital Camera. MPEG2 moving pictures can be copied to the hard disk or DVDRAM. Direct playback of MPEG2 moving pictures from the SD card is not possible
If the SD Memory Card was formatted with another unit, under certain circumstances you may possibly not be able to use it with this unit.
In this case, reformat the card with this unit.
Caution! All saved data are deleted during formatting.
The usable memory can deviate from the card capacity.
Inserting the storage card
!Opening the cover. Press the protruding section to open the cover to the slot.
!Press on the centre of the card until it clicks into place. Insert the card label up with the cut-off corner on the right.
Removing the storage card
!Press on the centre of the card. Pull it straight out.
!Closing the cover. Press down.
Only insert or remove the SD card after turning the unit off.
When the card indicator SD on the unit’s display is flashing, the card is being read from or written to. Do not turn off the unit or remove the card.
Such action may result in malfunction or loss of the card’s contents.
When the write-protection device is activated, you can neither record nor edit or delete the contents of the SD Card.
This unit supports SD Memory Cards that are formatted with FAT 12 and FAT 16 systems (based on SD Memory Card spec.).
Additional information is available on the Internet
http://panasonic.co.jp/pavc/global/cs
Keep the small memory cards such as the SD Memory Card out of reach of children. If swallowed, seek medical advice immediately.
 SD Card

 DCIM (Subfolder)
 ***XXXXX (Picture folder)
XXXX***.JPG
XXXX***.TIF
SD_VIDEO
PRG *** (MPEG2 folder)
MOV *** MOD
MOV *** MOI
PRG *** PGI
MGR_INFO (MPEG2 information folder)
 IM***CDPF or IMEXPORT
XXXX***.JPG
XXXX***.TIF
This unit can display the following folders:
***: Numbers / XXX : Letterrs
SD Card folder structure
SD Card Slot |
SD Memory Card Slot 1pc |
Still Picture |
JPEG, TIFF |
Compatible media |
SD Memory Card (includes mini SDTM Cards), Multi Media Card |
Format |
FAT12, FAT16 |
Image File Format |
JPEG conform DCF (Design rule for Camera File system) |
|
TIFF (Uncompressed RGB chunky), DPOF Compatible |
Sub sampling |
4:2:2, 4:2:0 |
Number of pixels |
between 34x34 and 6144x4096 |
Thawing Time |
Approx. 3 sec (6M pixels) |
SD Video |
MPEG2 |
Compatible media |
SD Memory Card (includes mini SDTM Cards, |
Codec |
a mini SDTM Adaptor needs to be inserted) |
MPEG2 (SD-Video Entertainment Video Profile) |
|
File Format |
SD - Video format conforming |
|
Video Recording conversion and transfer is possible from card |
|
to HDD or DVD-RAM disc. After Video Recording conversion |
|
and transfer to HDD or DVD-RAM disc, the playback is possible. |
26
 Loading...