


Operating Instructions
(For Function Parameters)
Digital Color Imaging Systems
Model No. DP-C262/C322
Before operating this machine, please read this manual completely
and keep this manual for future reference. English (Illustration shows optional accessories that may not be installed on your machine.)

Operating Instructions
The following Operating Instruction manuals are included with this machine. Please refer to the appropriate manual and keep all manuals for future reference. If you lose the manual, contact the authorized Panasonic dealer.
|
Operating Instructions (For Setting Up) |
|
This manual contains essential information for setting |
|
up the machine. |
Accessories |
Operating Instructions (For Basic Operations) |
This manual contains essential information for proper |
|
|
operation of the machine. |
|
It describes basic Copy, Print, Facsimile/Internet Fax, |
|
Scan/Email, and other functions. |
|
For a more detailed explanation of each function, please |
|
refer to the Operating Instruction manuals included on |
|
two CD-ROM as illustrated below. |
|
Operating Instructions CD |
|
Contains manuals with detailed information for Copy, |
|
Facsimile/Internet Fax, Scan/Email Functions, Function |
|
Parameters and User Authentication. |
|
Document Management System CD |
|
Contains the PDMS Application Software, and manuals |
|
with detailed information for the Print function, and |
|
PDMS Application software. |
Operating Instructions CD
Copy Function
Describes how to make a Color Copy with creative features.
Facsimile and Internet Fax Function
(When the optional G3 Fax Board/ Internet Fax Module is installed.)
Describes how to send/receive a Facsimile/ Internet Fax, or describes the course of action to take when a trouble message appears, etc.
Scan and Email Function
(When the optional Network Scanner/ Email Module, Hard Disk Drive, Main Memory and Image Memory are installed.) Describes how to scan, send an Email.
Document Management System CD
Print Function
Describes how to print with color, change default printer settings, or describes the course of action to take when a problem message appears, etc.
Application Software
Describes how to use the application software.
Ex:Web Device Monitor, Panafax Desktop, Document Manager/ Viewer, Client Device Monitor, Network Config/Add Editor, Network Setup Tool, Embedded Web Launcher
Function Parameters
Describes how to change the default settings of each function using the Control Panel of the machine.
User Authentication
Describes how to enable and use the user authentication function.
2

Conventions
Icons
The following icons are used in this manual.
Icon |
Description |
|
|
Indicated important information that must be read in detail.
Indicates reference Information.
Notation
The following notations are used in this manual.
Notation |
Description |
|
|
For Keys and Buttons |
Hard buttons on the Control Panel are depicted as **** key, soft buttons on the Touch Panel are |
|
depicted as "xxx". |
|
Ex: |
|
Press the Start key and select "More Menus". |
|
|
3

Table of Contents |
|
Chapter 1 Before Starting |
|
Function Setup Outline............................................................................................................ |
6 |
Function Setup Menu Configuration.................................................................................... |
6 |
Using the Keyboard................................................................................................................. |
7 |
Basic Operations for Function Setup....................................................................................... |
8 |
Chapter 2 General Settings |
|
General Settings.................................................................................................................... |
10 |
General User..................................................................................................................... |
10 |
Key Operator..................................................................................................................... |
11 |
Example : Dept. Counter Mode ............................................................................................. |
18 |
Example : Departmental Counter .......................................................................................... |
25 |
Example : Date Time Setting................................................................................................. |
26 |
Chapter 3 Copier Settings |
|
Copier Settings ...................................................................................................................... |
28 |
Copier User ....................................................................................................................... |
28 |
Key Operator..................................................................................................................... |
32 |
Example : Digital Skyshot Mode............................................................................................ |
36 |
Example : Manual Skyshot Mode.......................................................................................... |
37 |
Chapter 4 Fax/Email Settings |
|
Fax/Email Settings................................................................................................................. |
38 |
Fax/Email Settings ............................................................................................................ |
38 |
Address Book.................................................................................................................... |
38 |
Program Keys ................................................................................................................... |
38 |
Key Operator Mode........................................................................................................... |
38 |
User Parameters ............................................................................................................... |
39 |
Fax Parameters................................................................................................................. |
42 |
Example : LDAP Server......................................................................................................... |
56 |
LDAP Server Name (User parameter 15) ......................................................................... |
56 |
LDAP Server IP (User parameter 16) ............................................................................... |
58 |
LDAP User Name (User parameters 17) .......................................................................... |
59 |
LDAP Password (User parameters 18)............................................................................ |
59 |
LDAP Search Base (User parameters 19) ........................................................................ |
59 |
Example : Receive to Memory............................................................................................... |
60 |
4

Example : Password-Transmit / Password-Receive.............................................................. |
62 |
Example : Select Receive...................................................................................................... |
64 |
Example : Initial Sending Station (LAN Relay) ...................................................................... |
66 |
LAN RLY XMT Request (Fax parameter 140)................................................................... |
66 |
Example : Relay Station (LAN Relay).................................................................................... |
68 |
Relay XMT (Fax parameter 142)....................................................................................... |
68 |
Relay XMT Report (Fax parameter 143) ........................................................................... |
69 |
Relay XMT Password (User parameter 36)....................................................................... |
70 |
Manager's Email Addr (User parameter 37)...................................................................... |
71 |
Relay Domain 01 to 10 (User parameters 40 to 49).......................................................... |
72 |
Chapter 5 Scanner Settings |
|
Scanner Settings ................................................................................................................... |
74 |
Scanner User..................................................................................................................... |
74 |
Key Operator ..................................................................................................................... |
75 |
Chapter 6 Printer Settings |
|
Printer Settings ...................................................................................................................... |
76 |
Printer User ....................................................................................................................... |
76 |
Key Operator ..................................................................................................................... |
78 |
Chapter 7 Counter View |
|
Counter View ......................................................................................................................... |
82 |
Example : Clear Toner Counter ............................................................................................. |
83 |
Chapter 8 Appendix
Glossary................................................................................................................................. |
84 |
5

Starting Before 1 Chapter
Chapter 1
Before Starting
Function Setup Outline
Use the function setting mode to change the Standard Settings of the machine. This section contains the menu and basic function setup operations.
Function Setup Menu Configuration
•The function setup operations are divided into General User Mode and Key Operator Mode. For Fax/Email Settings, the Address Book and Program Keys menus are also provided.
•The Key Operator Password is required before any changes can be made in the Key Operator Mode. For security, the Key Operator is advised to setup and manage the 4-digit identification code. To set the identification code, consult with the authorized Panasonic dealer. (Initial identification code :
0000)
Function Setting |
|
|
|
|
|
|
|
|
|
|
|
||||||
|
|
|
|
|
|
|
|
|
|
|
|
|
|
|
|
|
|
General Settings |
|
|
|
|
|
General User Mode |
|
|
|
|
|
||||||
|
|
|
|
|
|
|
|
|
|||||||||
|
|
|
|
|
|
|
|
|
|
|
|
|
|
||||
|
|
|
|
|
|
|
|
|
|
Key Operator Mode |
|
|
|
||||
|
|
|
|
|
|
|
|
|
|
|
|
|
|||||
|
|
|
|
|
|
|
|
|
|
|
|
|
|
|
|
|
|
Copier Settings |
|
|
|
|
|
|
General User Mode |
|
|
|
|
|
|||||
|
|
|
|
|
|
|
|
|
|
||||||||
|
|
|
|
|
|
|
|
|
|
|
|
|
|
|
|
|
|
|
|
|
|
|
|
|
|
|
|
Key Operator Mode |
|
|
|
||||
|
|
|
|
|
|
|
|
|
|
|
|
|
|||||
|
|
|
|
|
|
|
|
|
|
|
|
|
|
|
|
|
|
Fax/Email Settings |
|
|
|
Address Book |
|
|
Program Keys |
|
|
||||||||
|
|
|
|
|
|
||||||||||||
|
(Option) |
|
|
|
|
|
|
|
|
|
|
|
|||||
|
|
|
|
|
|
|
|
|
General User Mode |
|
|
|
|
|
|||
|
|
|
|
|
|
|
|
|
|
|
|
|
|
||||
|
|
|
|
|
|
|
|
|
|
Key Operator Mode |
|
|
|
||||
|
|
|
|
|
|
|
|
|
|
|
|
|
|||||
|
|
|
|
|
|
|
|
|
|
|
|
|
|
|
|
|
|
Scanner Settings |
|
|
|
General User Mode |
|
|
|
|
|
||||||||
|
|
|
|
|
|
|
|||||||||||
|
(Option) |
|
|
|
|
|
|
|
|
|
|
|
|||||
Printer Settings |
|
|
|
|
|
|
|
Key Operator Mode |
|
|
|||||||
|
|
|
|
|
|
|
|
||||||||||
|
|
|
|
|
|
|
|
|
|
|
|
|
|
|
|||
|
|
|
General User Mode |
|
|
|
|
|
|||||||||
|
|
|
|
|
|
|
|||||||||||
|
|
|
|
|
|
|
|
|
|
|
|
|
|
||||
Counter View |
|
|
|
Key Operator Mode |
|
|
|
||||||||||
|
|
|
|
|
|
||||||||||||
|
|
|
|
|
|
|
|
|
|
|
|||||||
|
|
|
|
|
|
|
|
|
|
|
|
|
|
|
|
|
|
|
|
|
|
|
|||||||||||||
|
Key Operator Mode |
Requires the Key Operator identification code (4-digit). |
|||||||||||||||
|
|
|
|
|
|
|
|
|
|
|
|
|
|
|
|
|
|
6

Using the Keyboard
Enter Letters in Uppercase / Lowercase
1Select “Caps” to shift the characters between uppercase / lowercase.
Ex :When setting "15 LDAP Server Name" in Fax/Email Settings (see pages 39, 56 and 57).
In the Standard Setting, lowercase is selected.
2Enter the characters, and then select “OK”.
To input a space between characters.
To move the cursor (_) to the left or right side.
To erase the character before the cursor.
Enter Numeric Characters and Symbols
1Select “Numeric/Symbols” to shift the characters between numbers / symbols.
Ex :When setting "15 LDAP Server Name" in Fax/Email Settings (see pages 39, 56 and 57).
2Enter the numbers or symbols, and then select “Close”.
To shift the entry screen between numbers / symbols.
Starting Before 1 Chapter
7

Starting Before 1 Chapter
8
Basic Operations for Function Setup
The following procedure is an example of setting up the function(s). To set the desired function, refer to the list of Function Parameters described later.
1Press the Function key.
2Select the desired setting.
3Select the desired tab.
4Select an item.
If a single tab has six or more items, a block number is displayed as “01/02”.
Select  or
or  to scroll items up or down on the screen.
When setting the Key Operator Mode, enter the identification code (4-digit), and then select “OK”.
5Change the settings by the following operations.
Selecting an item
Select a desired item, and then select “OK”. Ex :When setting "01 Density(HOME)" in Fax/ Email Settings (see page 42).
Entering the number
Select “Input” and enter the number, and then select “OK”.
Ex: When setting "14 Power Save Mode Timer" in General Settings (see page 11).
Entering a number by using |
or |
6 Select “Close”. |
Select  or
or  , and then select “OK”. Ex :When setting "40 Fold Position(A3/LDR)" in General Settings (see page 14).
After setting up the function(s), press the Reset key to return the machine to the initial screen of the current active mode.
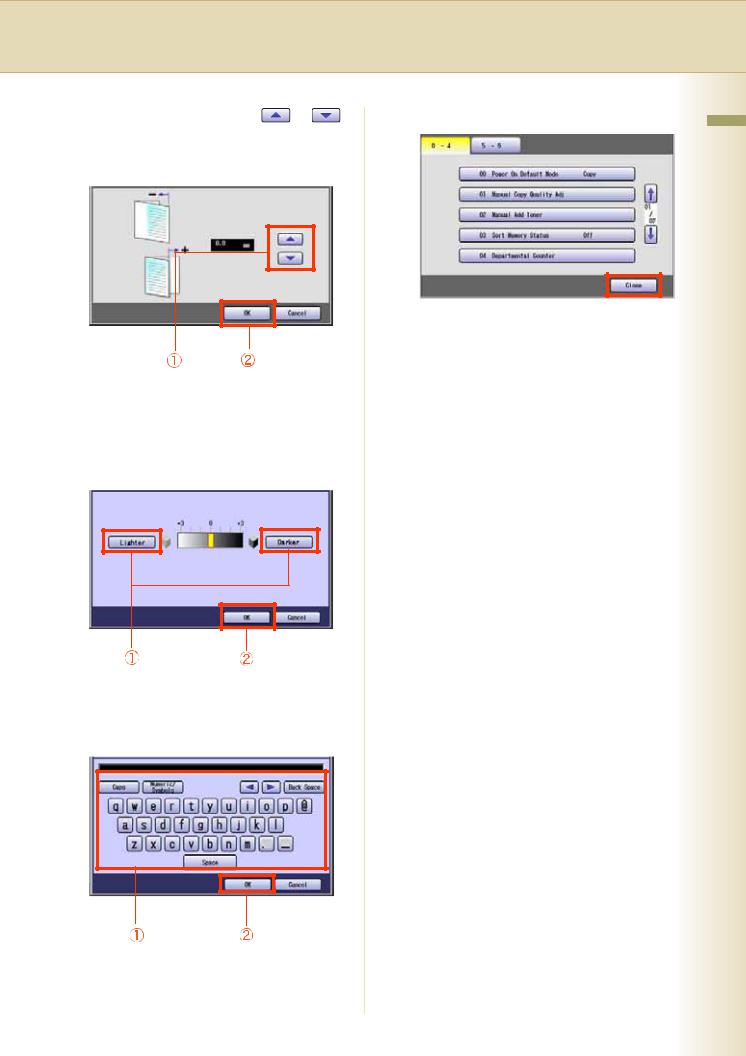
Selecting a value by using “Lighter” or “Darker”.
Select “Lighter” or “Darker”, and then select “OK”.
Ex :When setting "04 Text Density" in Copier Settings (see page 32).
Entering characters
Enter characters, and then select “OK”.
Ex :When setting "15 LDAP Server Name" in Fax/Email Settings (see pages 39, 56 and 57).
Starting Before 1 Chapter
9

Settings General 2 Chapter
Chapter 2
General Settings
General Settings
In General User Mode, the following items can be changed.
General User
No. |
|
Parameter |
Comments |
Selective Item |
Standard |
|||
|
|
|
|
|
|
|
|
Setting |
|
|
|
|
|
|
|
|
|
0-4 |
|
00 |
Power On Default |
Set the initial function screen when turning |
Copy, Fax, Print, |
Copy |
||
|
|
|
Mode |
on the machine. |
Scan |
|
||
|
|
|
|
|
|
|
|
|
|
|
01 |
Manual Copy Quality |
Set whether to adjust the copy density |
Off, On |
Off |
||
|
|
|
Adj |
manually. |
|
|
|
|
|
|
|
|
|
|
|
|
|
|
|
02 |
Manual Add Toner |
Set whether to darken the printing manually |
Off, On |
Off |
||
|
|
|
|
by using more toner. |
|
|
|
|
|
|
|
|
|
|
|
|
|
|
|
03 |
Sort Memory Status |
Set whether to display the percentage (%) |
Off, On |
Off |
||
|
|
|
|
of sorting memory used. |
|
|
|
|
|
|
|
|
|
|
|
|
|
|
|
04 |
Departmental |
Set whether to display departmental |
Consult with the authorized |
|||
|
|
|
Counter |
counters, limit counters, and total counters. |
Panasonic dealer on how to use |
|||
|
|
|
|
|
this item. |
|
||
|
|
|
|
|
|
|
|
|
5-9 |
|
05 |
Manual STR |
Set whether to clean the transfer roller |
Off, On |
Off |
||
|
|
|
Cleaning |
manually. |
|
|
|
|
|
|
|
|
|
|
|
|
|
|
|
09 |
Key Operator Mode |
Enter the key operator identification code to |
|
|
|
0000 |
|
|
|
|
display the Key Operator Mode (see page |
|
|
|
|
|
|
|
|
|
|
|
|
|
|
|
|
|
11). |
|
|
|
|
|
|
|
|
|
|
|
|
|
10
Key Operator
No. |
|
Parameter |
Comments |
Selective Item |
Standard |
||||
|
|
|
|
|
|
|
|
Setting |
|
|
|
|
|
|
|
|
|
|
|
0-19 |
|
00 |
Print General |
Print a list of General Settings. |
Stop, Start |
Start |
|||
|
|
|
Settings |
|
|
|
|
|
|
|
|
|
|
|
|
|
|
|
|
|
|
01 |
Paper Size |
Set the paper size and media type for |
“Change Size” |
|
|
|
|
|
|
|
|
Paper Trays 1-4. |
|
11x17 , Legal , |
|
|
|
|
|
|
|
Select the Paper Tray and the paper size, |
|
|
|
||
|
|
|
|
8.5x11 , 8.5x11 , |
|
|
|
||
|
|
|
|
and then select “Change Size / Media”. |
|
|
|
||
|
|
|
|
5.5x8.5 , A3 , |
|
|
|
||
|
|
|
|
Only 8.5x11 , A4 |
, B5 is selectable |
|
|
|
|
|
|
|
|
B4 , A4 , A4 , |
|
|
|
||
|
|
|
|
for Tray 1. |
|
|
|
|
|
|
|
|
|
|
B5 , B5 , A5 , |
|
|
|
|
|
|
|
|
For changing the preset paper size used |
|
|
|
||
|
|
|
|
8x13 , 8.5x13 |
|
|
|
||
|
|
|
|
in the Paper Tray, |
consult with the |
|
|
|
|
|
|
|
|
|
|
|
|
||
|
|
|
|
authorized Panasonic dealer. |
|
|
|
|
|
|
|
|
|
Select the paper type. |
“Change Type” |
|
|
|
|
|
|
|
|
|
|
|
|||
|
|
|
|
|
|
Plain, Glossy, |
|
|
|
|
|
|
|
|
|
Recycled |
|
|
|
|
|
|
|
|
|
|
|
|
|
|
|
02 |
A4R/A5 Size |
Set the smallest paper size that will be fed |
A4R, A5 |
A4R |
|||
|
|
|
Selection |
from the Sheet Bypass. |
|
|
|
|
|
|
|
|
|
|
|
|
|
|
|
|
|
04 |
Special Paper |
Set the paper tray which is not used as the |
None, Tray 1, |
None |
|||
|
|
|
Tray 1 |
automatic document feeder tray. |
Tray 2, Tray 3, Tray 4, |
|
|
|
|
|
|
|
|
Ex: |
|
Bypass |
|
|
|
|
|
05 |
Special Paper |
|
None |
||||
|
|
When you load color paper in Paper Tray 1, |
|
||||||
|
|
|
Tray 2 |
|
|
|
|
||
|
|
|
select “Tray 1" not to use the color paper |
|
|
|
|
||
|
|
|
|
|
|
|
|
||
|
|
06 |
Special Paper |
for automatic paper feed. |
|
None |
|||
|
|
Up to 4 paper trays can be selected for |
|
||||||
|
|
|
Tray 3 |
|
|
|
|
||
|
|
|
exclusion from automatic selection. |
|
|
|
|
||
|
|
|
|
|
|
|
|
||
|
|
07 |
Special Paper |
|
|
|
None |
||
|
|
|
Tray 4 |
|
|
|
|
|
|
|
|
|
|
|
|
|
|
|
|
|
|
09 |
Auto Paper Out |
Set whether to rotate the image and print |
Off, On |
Off |
|||
|
|
|
Rotate |
when the selected paper tray is empty. |
|
|
|
|
|
|
|
|
|
Ex: |
|
|
|
|
|
|
|
|
|
Printing on A4R paper when there is no A4- |
|
|
|
|
|
|
|
|
|
size paper |
|
|
|
|
|
|
|
|
|
|
|
|
|
|
|
|
|
10 |
Copy Output Tray |
Set an output tray for the copier function. |
Inner, Outer |
Inner |
|||
|
|
|
|
Outer is available when the optional |
|
|
|
|
|
|
|
|
|
Paper Transport Unit is installed. |
|
|
|
|
|
|
|
|
|
|
|
|
|
|
|
|
|
11 |
Printer Output |
Set an output tray for the printer function. |
Inner, Outer |
Inner |
|||
|
|
|
Tray |
Outer is available when the optional |
|
|
|
|
|
|
|
|
|
Paper Transport Unit is installed. |
|
|
|
|
|
|
|
|
|
|
|
|
|
|
|
|
|
12 |
Fax/Email Output |
Set an output tray for the Fax/Email function. |
Inner, Outer |
Inner |
|||
|
|
|
Tray |
Outer is available when the optional |
|
|
|
|
|
|
|
|
|
Paper Transport Unit is installed. |
|
|
|
|
|
|
|
|
|
|
|
|
|
|
|
|
|
13 |
Auto Reset Time |
If you do not select any key within a given |
None, 30 sec., |
1 min. |
|||
|
|
|
|
time period, the touch panel goes back to |
1 min., 2 min., |
|
|
|
|
|
|
|
|
the initial screen of the current active |
3 min., 4 min. |
|
|
|
|
|
|
|
|
function automatically. |
|
|
|
|
|
|
|
|
|
|
|
|
|
|
|
|
|
14 |
Power Save Mode |
If you do not select any key within a given |
1 to 240 (min.) |
15 (min.) |
|||
|
|
|
Timer |
time period, the machine is switched to |
|
|
|
|
|
|
|
|
|
power save mode automatically. |
|
|
|
|
|
|
|
|
|
|
|
|
|
|
|
Settings General 2 Chapter
11

Settings General 2 Chapter
Key Operator
No. |
|
Parameter |
Comments |
Selective Item |
Standard |
|||
|
|
|
|
|
|
|
Setting |
|
|
|
|
|
|
|
|
|
|
0-19 |
|
15 |
Sleep Timer |
If you do not select any key within a given |
None, |
22 (min.) |
||
|
|
|
|
time period, the machine is switched to |
1 to 240 (min.) |
|
|
|
|
|
|
|
sleep mode automatically. |
|
|
|
|
|
|
|
|
|
|
|
|
|
|
|
16 |
Language Sel. |
Set whether to give priority to the display |
Off, On |
Off |
||
|
|
|
Priority |
language. |
|
|
|
|
|
|
|
|
|
|
|
|
|
|
|
17 |
Language Default |
Set the display language. |
English, |
English |
||
|
|
|
|
If the language is changed, the system |
C. French, |
|
|
|
|
|
|
|
automatically returns to the initial function |
Spanish |
|
|
|
|
|
|
|
setup screen. |
|
|
|
|
|
|
|
|
|
|
|
|
|
|
|
18 |
Panel Beep |
Set the volume of Beep Sound when the |
Off, Soft, Loud |
Soft |
||
|
|
|
Sound |
panel is selected. |
|
|
|
|
|
|
|
|
|
|
|
|
|
|
|
19 |
Original Set Beep |
Set whether to sound a confirmation tone |
No, Yes |
No |
||
|
|
|
Sound |
when the original is placed on the Platen |
|
|
|
|
|
|
|
|
Glass. |
|
|
|
|
|
|
|
|
The volume level is the same as for |
|
|
|
|
|
|
|
|
Panel Beep Sound. |
|
|
|
|
|
|
|
|
When “18 Panel Beep Sound” is set to |
|
|
|
|
|
|
|
|
“Off”, the machine makes no sound. |
|
|
|
|
|
|
|
|
|
|
|
|
|
20-39 |
|
20 |
Orig. Set In ADF |
Set whether to sound a confirmation tone |
No, Yes |
Yes |
||
|
|
|
Sound |
when the original is placed on the ADF. |
|
|
|
|
|
|
|
|
The volume level is the same as for |
|
|
|
|
|
|
|
|
Panel Beep Sound. |
|
|
|
|
|
|
|
|
When “18 Panel Beep Sound” is set to |
|
|
|
|
|
|
|
|
“Off”, the machine makes no sound. |
|
|
|
|
|
|
|
|
|
|
|
|
|
|
|
21 |
Dept. Counter |
Set whether to display departmental |
Consult with the authorized |
|||
|
|
|
Mode |
counters, limit counters, and total counters. |
Panasonic dealer on how to use |
|||
|
|
|
|
|
this item. |
|
|
|
|
|
|
|
|
|
|
|
|
|
|
22 |
Date Time Setting |
Set the date and the time. |
Month, Day, Year, |
|
|
|
|
|
|
|
|
Time |
|
|
|
|
|
|
|
|
|
|
|
|
|
|
|
|
|
|
|
|
|
|
|
23 |
Weekly Timer |
Set the weekly On/Off timer using the |
Each day of the |
Off |
||
|
|
|
|
Keypad of the machine. At the selected |
week. |
|
|
|
|
|
|
|
time, the machine will be changed to/from |
|
|
|
|
|
|
|
|
sleep mode. |
|
|
|
|
|
|
|
|
|
|
|
|
|
|
|
24 |
Daylight Time |
Set Daylight Time. |
No, Yes |
Yes |
||
|
|
|
|
|
|
|
|
|
|
|
25 |
DHCP Default |
Select “Yes” when your network |
No, Yes |
Yes |
||
|
|
|
|
environment is based on DHCP Server. |
|
|
|
|
|
|
|
|
When using this machine as a network |
|
|
|
|
|
|
|
|
shared printer, select “No” and set “26 |
|
|
|
|
|
|
|
|
TCP/IP Address”, “27 TCP/IP Subnet |
|
|
|
|
|
|
|
|
Mask”, and “28 TCP/IP Default Gateway”. |
|
|
|
|
|
|
|
|
|
|
|
|
|
|
|
26 |
TCP/IP Address |
Set the IP address. |
3-digit x 4 |
0. 0. 0. 0 |
|
|
|
|
|
|
|
|
|
|
|
|
|
|
|
No.25 to 26 |
|
|
|
|
After setting, turn the machine's power switch Off, and then On again.
12

Key Operator
No. |
|
Parameter |
Comments |
Selective Item |
Standard |
|||||
|
|
|
|
|
|
|
|
Setting |
||
|
|
|
|
|
|
|
|
|
|
|
20-39 |
|
27 |
TCP/IP Subnet |
Set the subnet mask. |
3-digit x 4 |
0. 0. 0. 0 |
|
|||
|
|
|
Mask |
|
|
|
|
|
|
|
|
|
|
|
|
|
|
|
|
|
|
|
|
28 |
TCP/IP Default |
Set the default gateway. |
3-digit x 4 |
0. 0. 0. 0 |
|
|||
|
|
|
Gateway |
|
|
|
|
|
|
|
|
|
|
|
|
|
|
|
|
|
|
|
|
29 |
DNS Server |
Select “Yes”, and set the DNS Server |
No, Yes |
Yes |
||||
|
|
|
Address |
address (when using the optional Internet |
|
|
|
|
|
|
|
|
|
|
Fax/Email function). |
|
|
|
|
|
|
|
|
|
|
|
|
|
|
|
|
|
|
|
30 |
MAC Address |
Display the MAC address (Ethernet |
|
|
|
|
|
|
|
|
|
|
address). |
|
|
|
|
|
|
|
|
|
|
The MAC address is displayed only, but |
|
|
|
|
|
|
|
|
|
|
|
|
|
|
|
|
|
|
|
|
|
cannot be set. |
|
|
|
|
|
|
|
|
|
|
|
|
|
|
|
|
|
|
|
31 |
Routing Menu |
Set whether to use the Routing function. |
No, Yes |
No |
||||
|
|
|
Function |
When the optional software (Document |
|
|
|
|
|
|
|
|
|
|
Distribution System) is installed. |
|
|
|
|
|
|
|
|
|
|
|
|
|
|
|
|
|
|
|
32 |
Doc. Dist. Server |
When “29 DNS Server Address” is set to |
Up to 60 characters |
|
|
|
|
|
|
|
|
Name |
“Yes”, and "31 Routing Menu Function" is |
|
|
|
|
|
|
|
|
|
|
set to "Yes", enter the name of the |
|
|
|
|
|
|
|
|
|
|
distribution system routing Server. |
|
|
|
|
|
|
|
|
|
|
|
|
|
|
|
|
|
|
|
|
|
When the optional software (Document |
|
|
|
|
|
|
|
|
|
|
Distribution System) is installed. |
|
|
|
|
|
|
|
|
|
|
|
|
|
|
|
|
|
|
|
33 |
Doc. Dist. Server |
When “29 DNS Server Address” is set to |
3 digits x 4 |
0. 0. 0. 0. |
|
|||
|
|
|
IP |
“No” and “31 Routing Menu Function” is |
|
|
|
|
|
|
|
|
|
|
set to “Yes”, enter the IP address of the |
|
|
|
|
|
|
|
|
|
|
distribution system routing Server. |
|
|
|
|
|
|
|
|
|
|
When the optional software (Document |
|
|
|
|
|
|
|
|
|
|
Distribution System) is installed. |
|
|
|
|
|
|
|
|
|
|
When the optional Hard Disk is installed. |
|
|
|
|
|
|
|
|
|
|
|
|
|
|
|
|
|
|
|
34 |
Hard Disk |
Set the HDD format/deletion. |
Format : Stop, Start |
Format |
||||
|
|
|
Initialize |
When selecting "Deletion", set the deletion |
Deletion: Stop, |
(Stop) |
||||
|
|
|
|
security level of hard disk data. During the |
|
Medium, |
|
|
|
|
|
|
|
|
deletion time, the machine cannot be used. |
|
High |
|
|
|
|
|
|
|
|
• Stop |
|
|
|
|
|
|
|
|
|
|
Deletion is not executed. |
|
|
|
|
|
|
|
|
|
|
• Medium |
|
|
|
|
|
|
|
|
|
|
Deletion is completed within 2 hours. |
|
|
|
|
|
|
|
|
|
|
• High |
|
|
|
|
|
|
|
|
|
|
Deletion is completed within 3 hours. |
|
|
|
|
|
|
|
|
|
|
When the optional Hard Disk is installed. |
|
|
|
|
|
|
|
|
|
|
|
|
|
|
|
|
|
|
|
35 |
Hard Disk Error |
Set the hard disk error check. |
Stop, Start |
Start |
||||
|
|
|
Check |
Not required in copying mode, but |
|
|
|
|
|
|
|
|
|
|
needed when installing options with |
|
|
|
|
|
|
|
|
|
|
advanced functions. |
|
|
|
|
|
|
|
|
|
|
When the optional Hard Disk is installed. |
|
|
|
|
|
|
|
|
|
|
|
|
|
|
|
|
|
|
|
36 |
Address Book |
Set the Address Book Group ID. |
0-99 |
|
0 |
|
|
|
|
|
|
Group ID |
|
|
|
|
|
|
|
|
|
|
|
|
|
|
|
|
|
|
|
|
|
|
No.27 to 29 |
|
|
|
|
|
|
|
|
|
|
After setting, turn the machine's power switch Off, |
||||||
|
|
|
|
and then On again. |
|
|
|
|
||
Settings General 2 Chapter
13

Settings General 2 Chapter
Key Operator
No. |
|
Parameter |
Comments |
Selective Item |
Standard |
|
|
|
|
|
|
|
Setting |
|
|
|
|
|
|
|
20-39 |
|
37 |
Auto Reset |
Set whether to display the auto reset guide. |
No, Yes |
Yes |
|
|
|
Information |
|
|
|
|
|
|
|
|
|
|
|
|
38 |
Pap. Tray Priority |
Set the priority of paper tray for Black and |
S>C>B, C>S>B |
C>S>B |
|
|
|
(B/W) |
White. |
|
|
|
|
|
|
S: Optional paper feed unit |
|
|
|
|
|
|
C: Paper tray of the main unit |
|
|
|
|
|
|
B: Sheet bypass |
|
|
|
|
|
|
|
|
|
|
|
39 |
Pap. Tray Priority |
Set the priority of paper tray for color. |
S>C>B, C>S>B |
C>S>B |
|
|
|
(Col) |
S: Optional paper feed unit |
|
|
|
|
|
|
C: Paper tray of the main unit |
|
|
|
|
|
|
B: Sheet bypass |
|
|
|
|
|
|
|
|
|
40-59 |
|
40 |
Fold Position (A3/ |
Set the binding margin for booklet copy. |
-4.0 to +4.0 mm |
0.0 |
|
|
|
LDR) |
(A3/Ledger). |
|
|
A3 / Ledger(11"x17")
41 |
Fold Position (B4) Set the binding margin for booklet copy. |
-4.0 to +4.0 mm |
0.0 |
|
(B4). |
|
|
B4
42 |
Fold Position (A4/ |
Set the binding margin for booklet copy. |
-4.0 to +4.0 mm |
0.0 |
|
LTR-R) |
(A4/Letter-R). |
|
|
A4 / Letter-R(8.5"x11")
14

Key Operator
No. |
|
Parameter |
Comments |
Selective Item |
Standard |
|||
|
|
|
|
|
|
|
Setting |
|
|
|
|
|
|
|
|
|
|
40-59 |
|
44 |
Data Deletion of |
Set the deletion security level of hard disk |
Basic, Medium, High |
Basic |
||
|
|
|
HD |
data in every copy/print job. |
|
|
|
|
|
|
|
|
When the optional hard disk unit is |
|
|
|
|
|
|
|
|
installed, every copy/print job data is |
|
|
|
|
|
|
|
|
automatically deleted after each job is |
|
|
|
|
|
|
|
|
completed. |
|
|
|
|
|
|
|
|
For higher security select Medium and |
|
|
|
|
|
|
|
|
High, however, the deletion time |
|
|
|
|
|
|
|
|
increases with the increase in security |
|
|
|
|
|
|
|
|
level, and may take longer to erase the |
|
|
|
|
|
|
|
|
data. |
|
|
|
|
|
|
|
|
|
|
|
|
|
|
|
45 |
WINS Server 1 IP |
Set the IP address of WINS Server 1. |
3 digits x 4 |
0. 0. 0. 0. |
|
|
|
|
|
|
|
|
|
|
|
|
|
46 |
WINS Server 2 IP |
Set the IP address of WINS Server 2. |
3 digits x 4 |
0. 0. 0. 0. |
|
|
|
|
|
|
|
|
|
|
|
|
|
47 |
Scope ID |
Set the Net Bios Scope ID. |
Up to 223 characters |
|
|
|
|
|
|
|
|
|
|
|
|
|
|
48 |
IP Filter |
Set the IP filter to provide security to |
Off, On |
Off |
||
|
|
|
|
network function such as printer or |
|
|
|
|
|
|
|
|
scanner. |
|
|
|
|
|
|
|
|
|
|
|
|
|
|
|
49 |
IP Filter Mode |
By setting "50 IP Filter Address", |
Allow, Deny |
Allow |
||
|
|
|
|
allow or deny the network function of |
|
|
|
|
|
|
|
|
registered IP filter address. |
|
|
|
|
|
|
|
|
|
|
|
|
|
|
|
50 |
IP Filter Address |
Set the IP filter address. |
3 digits x 4 |
0. 0. 0. 0. |
|
|
|
|
|
|
Up to 4 addresses can be set. |
|
|
|
|
|
|
|
|
When setting only one IP filter address, |
|
|
|
|
|
|
|
|
input the same IP address for both "Start |
|
|
|
|
|
|
|
|
Address" and "End Address". |
|
|
|
|
|
|
|
|
|
|
|
|
|
|
|
51 |
Community Name |
Set the SNMP community name (1). |
Up to 15 characters |
public |
||
|
|
|
(1) |
|
|
|
|
|
|
|
|
|
|
|
|
|
|
|
|
52 |
Community Name |
Set the SNMP community name (2). |
Up to 15 characters |
public |
||
|
|
|
(2) |
|
|
|
|
|
|
|
|
|
|
|
|
|
|
|
|
54 |
SysContact |
Set the system management name. |
Up to 31 characters |
|
|
|
|
|
|
|
|
|
|
|
|
|
|
55 |
SysName |
Set the system name. |
Up to 31 characters |
Panasonic |
||
|
|
|
|
|
|
DP-C262/ |
||
|
|
|
|
|
|
322 |
|
|
|
|
|
|
|
|
|
|
|
|
|
56 |
SysLocation |
Set the system installation place. |
Up to 31 characters |
|
|
|
|
|
|
|
|
|
|
|
|
|
|
|
|
|
|
|
|
|
|
|
59 |
SMB |
Set “On” when using the machine for |
Off, On |
Off |
||
|
|
|
|
Microsoft Network (SMB). |
|
|
|
|
|
|
|
|
|
|
|
|
|
60-79 |
|
60 |
SMB Master |
Set “On” when using SMB Master |
Off, On |
Off |
||
|
|
|
Browse |
Browse. |
|
|
|
|
|
|
|
|
|
|
|
|
|
No. 45 to 60
After setting, turn the machine's power switch Off, and then On again.
Settings General 2 Chapter
15
Settings General 2 Chapter
Key Operator
No. |
|
Parameter |
Comments |
Selective Item |
|
Standard |
||||
|
|
|
|
|
|
|
|
Setting |
||
|
|
|
|
|
|
|
|
|
|
|
60-79 |
|
61 |
SMB Device |
Set the device name for Microsoft |
Up to 15 characters |
|
|
|
|
|
|
|
|
Name |
Network (SMB). |
|
|
|
|
|
|
|
|
|
|
|
|
|
|
|
||
|
|
|
|
|
|
|
|
|
|
|
|
|
62 |
SMB Workgroup |
Set the working group name for |
Up to 15 characters |
|
|
|
|
|
|
|
|
Name |
Microsoft Network (SMB). |
|
|
|
|
|
|
|
|
|
|
|
|
|
|
|
||
|
|
|
|
|
|
|
|
|
|
|
|
|
63 |
SMB Comment |
Set comments about the machine |
Up to 48 characters |
|
|
|
|
|
|
|
|
|
used for Microsoft Network (SMB). |
|
|
|
|
|
|
|
|
|
|
|
|
|
|
|
|
|
|
|
64 |
Bonjour |
Set the Bonjour. |
Off, On |
|
Off |
|||
|
|
|
|
When the optional Printer Controller |
|
|
|
|
|
|
|
|
|
|
Module (for Adobe® PostScript® 3™ ) is |
|
|
|
|
|
|
|
|
|
|
installed. |
|
|
|
|
|
|
|
|
|
|
|
|
|
|
|
|
|
|
|
65 |
Bonjour Name |
Set the name of Bonjour. |
Up to 31 characters |
|
|
|
|
|
|
|
|
|
When the optional Printer Controller |
|
|
|
|
|
|
|
|
|
|
|
|
|
|
|
|
|
|
|
|
|
Module (for Adobe® PostScript® 3™ ) is |
|
|
|
|
|
|
|
|
|
|
installed. |
|
|
|
|
|
|
|
|
|
|
|
|
|
|
|
|
|
|
|
66 |
IPv6 |
Set “On” when using the machine for |
Off, On |
|
Off |
|||
|
|
|
|
IPv6. |
|
|
|
|
|
|
|
|
|
|
For details about setting IPv6, refer to |
|
|
|
|
|
|
|
|
|
|
Embedded Web Server in the |
|
|
|
|
|
|
|
|
|
|
Document Management System (For |
|
|
|
|
|
|
|
|
|
|
Embedded Web Launcher and Web |
|
|
|
|
|
|
|
|
|
|
Server) on the provided CD-ROM. |
|
|
|
|
|
|
|
|
|
|
|
|
|
|
|
|
|
|
|
70 |
Auto Tone Adjust |
If the colored image tone has deviated, set |
Stop, Start |
Stop |
||||
|
|
|
|
the automatic tone adjustment. |
|
|
|
|
|
|
|
|
|
|
<Procedure> |
|
|
|
|
|
|
|
|
|
|
1. Execute this mode to print the calibration |
|
|
|
|
|
|
|
|
|
|
sheet. |
|
|
|
|
|
|
|
|
|
|
2. Place the calibration sheet on the platen |
|
|
|
|
|
|
|
|
|
|
and execute this mode again. |
|
|
|
|
|
|
|
|
|
|
|
|
|
|
|
|
|
|
|
71 |
Tone Adjust Reset |
If "70 Auto Tone Adjust" has made the |
Stop, Start |
|
Stop |
|||
|
|
|
|
original tone unidentifiable, execute this |
|
|
|
|
|
|
|
|
|
|
mode to reset the machine to the original |
|
|
|
|
|
|
|
|
|
|
tone at shipping. |
|
|
|
|
|
|
|
|
|
|
|
|
|
|
|
|
|
|
|
73 |
Administrator |
When "75 User Authentication" is set to |
Up to 40 characters |
|
|
|
|
|
|
|
|
Name |
"On" and selecting Local Machine as |
|
|
|
|
|
|
|
|
|
|
domain, set administrator's name and |
|
|
|
|
|
|
|
|
|
|
|
|
|
|
|
|
|
|
|
|
|
password for authentication. |
|
|
|
|
|
|
|
|
|
|
|
|
|
|
|
|
|
|
|
74 |
Authentication |
When "75 User Authentication" is set to |
NTLM, Clr Text |
|
NTLM |
|||
|
|
|
Method |
“On”, set the authentication method. |
|
|
|
|
|
|
|
|
|
|
|
|
|
|
|
|
|
|
|
75 |
User |
Set the User Authentication, and then |
Copy, Fax, Print, |
|
|
|
|
|
|
|
|
Authentication |
select “Off” or “On” for selected function. |
Scan |
|
|
|
|
|
|
|
|
|
|
|
|
|
|||
|
|
|
|
|
(Off, On) |
|
|
|
|
|
|
|
|
|
|
|
|
|
|
|
|
|
|
|
|
No.61 to 66 |
|
|
|
|
|
|
|
|
|
|
After setting, turn the machine's power switch Off, |
||||||
|
|
|
|
and then On again. |
|
|
|
|
|
|
16

Key Operator
No. |
|
Parameter |
Comments |
Selective Item |
|
Standard |
||
|
|
|
|
|
|
|
Setting |
|
|
|
|
|
|
|
|
|
|
60-79 |
|
76 |
ID Timeout |
When “75 User Authentication” is set to |
Auto Rst, Every Job |
Auto Rst |
||
|
|
|
|
“On”, set when the machine requires the |
|
|
|
|
|
|
|
|
authentication. |
|
|
|
|
|
|
|
|
|
|
|
|
|
|
|
77 |
Logon Attempts |
When "75 User Authentication" is set to |
0 to 9 |
0 |
|
|
|
|
|
|
“On”, set the number of logon attempts. |
|
|
|
|
|
|
|
|
(Set "0" for unlimited attempts.) |
|
|
|
|
|
|
|
|
|
|
|
|
|
|
|
78 |
User Auth. Domain |
When "75 User Authentication" is set to |
No.00 to 09 |
|
|
|
|
|
|
|
|
||||
|
|
|
|
"On", set domain for authentication. |
|
|
|
|
|
|
|
|
|
|
|
|
|
|
|
79 |
Lockout Time |
When "75 User Authentication" is set to |
1 to 60 (min.) |
5 (min.) |
||
|
|
|
|
“On”, set the lockout time. |
|
|
|
|
|
|
|
|
If you failed to log on specified times, you |
|
|
|
|
|
|
|
|
cannot log on again during the lockout time. |
|
|
|
|
|
|
|
|
|
|
|
|
|
Settings General 2 Chapter
17

Settings General 2 Chapter
18
Example : Dept. Counter Mode
Registering passwords (department codes) of departments using the Dept. Counter Mode allows you to manage the copy, print, and scan counts by department. Up to 1000 departments can be managed.
Let's take a look at how to register/change passwords (department codes), clear the total counter, print a departmental list or report such as a departmental counter list, and change a departmental limit of copy count.
To use the Dept. Counter Mode, a special service setting is required. Contact your authorized Panasonic dealer.
When the departmental counter function is enabled, the password (department code) entry screen appears on the touch panel display. If you do not enter the password (department code), you cannot use the Copy, Fax, and Scan functions.
1 Press the Function key. |
3 Select "5-9". |
The password (department code) entry screen appears on the touch panel display. Press the Function key on the Control Panel without entering any code.
4 Select "09 Key Operator Mode".
2Select "General Settings".
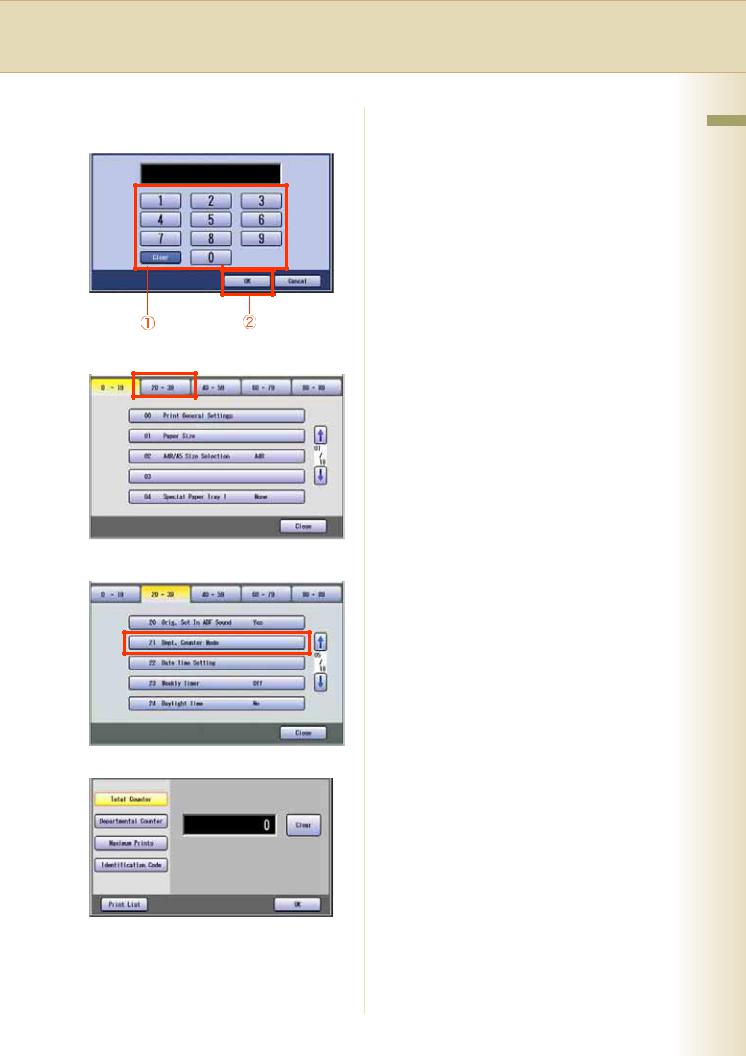
5Enter the identification code (4-digit), and then press "OK".
6Select "20-39".
7Select "21 Dept. Counter Mode".
The Dept. Counter Mode screen appears.
For the subsequent steps, refer to the relevant section.
Registering/Changing the Password (Department Code)
You can register/change the password (department code) of each department.
Refer to Registering/Changing the Password (Department Code) (see page 20).
Clearing the Total Counter
You can clear the total departmental counter.
Refer to Clearing the Total Counter (see page 21).
Printing a Departmental List or Report
You can print a departmental counter list, a user settings list, or a management settings list by user.
Refer to Printing a Departmental List or Report (see page 22).
Changing the Departmental Count
You can change the departmental counter.
Refer to Changing the Departmental Counter (see page 22).
Changing the Departmental Limit
You can change the departmental limit.
Refer to Changing the Maximum Prints (see page 24).
Settings General 2 Chapter
19

Settings General 2 Chapter
20
Registering/Changing the Password |
(Department |
Code) |
1 Select "Identification Code". |
|
Enter the department name (up to 24 |
4 |
||
|
|
characters), and then select "OK". |
2 Select the department number subject |
|
to password (department code) |
|
registration/change, and then press |
5 Select "OK". |
"Input". |
6 Select "Close".
3Enter the department code (up to 8- digit), and then select “OK”.
After setting up the function(s), press the Reset key to return the machine to the initial screen of the current active mode.
Clearing the Total Counter |
|
|
||
1 If the total counter is not displayed, |
|
Select "Close". |
||
5 |
||||
select "Total Counter". |
|
|
||
|
|
|
|
|
|
|
|
|
|
2 Select "Clear". |
|
|
|
|
|
After setting up the function(s), press the |
|||
|
|
Reset key to return the machine to the initial |
||
|
|
screen of the current active mode. |
||
|
|
|
|
|
|
|
|
|
|
3Select "Yes" to clear the counter.
4Select "OK".
Settings General 2 Chapter
21

Printing a Departmental List or Report
1Select "Print List".
2 Chapter |
|
|
|
|
|
|
|
|
|
|
|
|
|
|
|
|
|
|
|
|
|
|
|
||
|
|
|
|
|
|
|
|
|
|
|
|
|
SettingsGeneral |
2 Select the list or report you want to |
|||||||||||
print, and then select "OK". |
||||||||||||
|
||||||||||||
|
|
|
|
|
|
|
|
|
|
|
||
|
|
|
|
|
|
|
|
|
|
|||
|
|
|
|
|
|
|
|
|||||
|
|
|
|
|
|
|
|
|
||||
|
|
|
|
|
|
|||||||
|
|
|
|
|||||||||
|
Printing of the selected list or report starts. |
|||||||||||
3When printing is completed, select "OK".
4Select "Close".
After setting up the function(s), press the Reset key to return the machine to the initial screen of the current active mode.
22
Changing the Departmental Counter
1Select "Departmental Counter".
2Select the department number subject to departmental count change, and then select "Input".
3Select the count you want to change.
4Select the color you want to change.
If you selected "Scanner Count" in step 3, the color selection screen is not displayed.

5
6
7
8
Select "Input", input a count (up to 7 |
9 Select "Close". |
digits) from the keypad, and then |
|
select "OK". |
|
After setting up the function(s), press the Reset key to return the machine to the initial screen of the current active mode.
Select "Close".
Select "Close".
Select "OK".
Settings General 2 Chapter
23

|
Changing the Maximum Prints |
|||||||||
|
||||||||||
2 Chapter |
1 |
Select "Maximum Prints". |
||||||||
2 |
|
|
|
|
|
|
|
|
|
|
|
|
|
|
|
|
|
|
|
||
|
|
|
|
|
|
|
|
|
||
SettingsGeneral |
Select the department number subject |
|||||||||
|
to departmental limit change, and then |
|||||||||
|
|
|||||||||
|
|
select "Input". |
||||||||
|
3 |
|
|
|
|
|
|
|
|
|
|
|
|
|
|
|
|
|
|
||
|
|
|
|
|
|
|
||||
|
|
|
|
|
|
|||||
|
Select the count limit you want to |
|||||||||
|
|
change. |
||||||||
|
|
|
|
|
|
|
|
|
|
|
|
|
|
|
|
|
|
|
|
|
|
4Select "Input", input a new limit (up to 7 digits) from the keypad, and then select "OK".
24
If you input "9999999", the copy count limit becomes infinite.
If the set limit is exceeded, the machine stops automatically.
5Select "Close".
6Select "OK".
7Select "Close".
After setting up the function(s), press the Reset key to return the machine to the initial screen of the current active mode.
Example : Departmental Counter
When the Dept. Counter Mode is selected, you can display your selected departmental counter.
To use the Dept. Counter Mode, a special service setting is necessary. Contact your authorized Panasonic dealer.
For instruction on how to set departmental counters, refer to Example : Dept. Counter Mode (see page 18).
When the departmental counter function is enabled, the password (department code) entry screen appears on the touch panel display. If you do not enter the password (department code), you cannot use the Copy, Fax, and Scan functions.
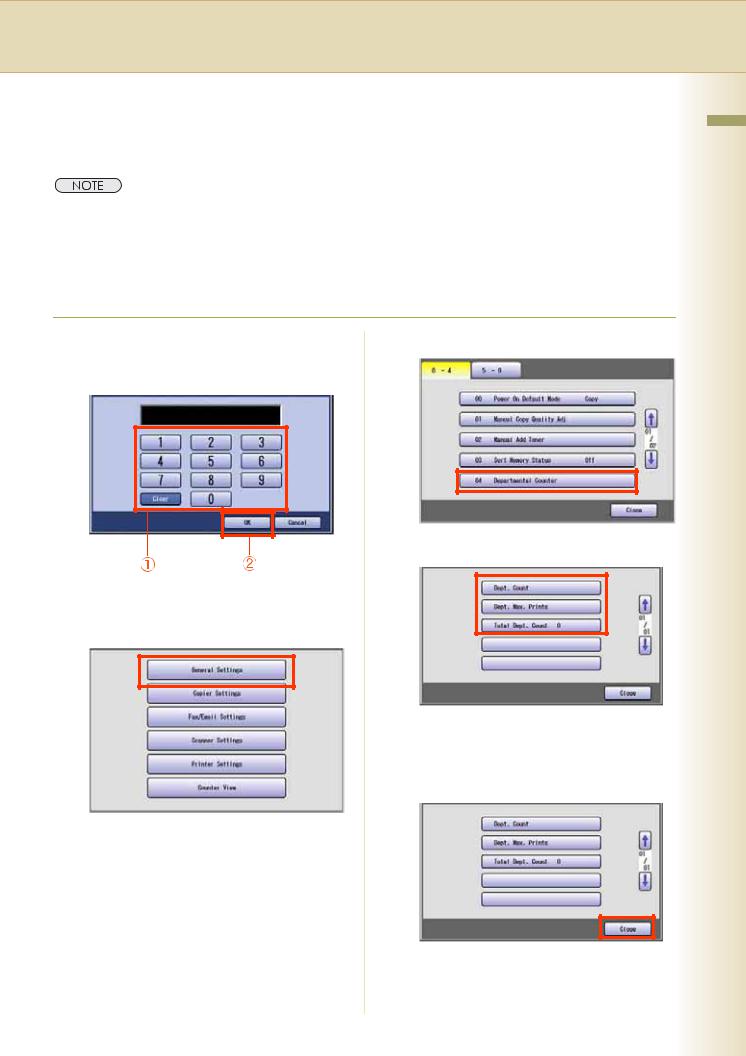
1 Enter the password (department code) |
4 Select "04 Departmental Counter". |
of the department subject to count |
|
display, and then select "OK". |
|
5 Select the counter you want to display.
2Press the Function key.
3Select "General Settings".
The total departmental counter is displayed on the button. You cannot select this button.
6 After displaying the counter or copy
limit, select "Close".
After setting up the function(s), press the Reset key to return the machine to the initial screen of the current active mode.
Settings General 2 Chapter
25

Settings General 2 Chapter
26
Example : Date Time Setting
The clock of your machine is equipped with D.S.T. (Daylight Saving Time) system. So, your clock will automatically set the time forward from 2:00 AM to 3:00 AM on the first Sunday of April and set the time back from 2:00 AM to 1:00 AM on the last Sunday of October. For setting the Daylight Time, refer to “24 Daylight Time” in General Settings (see page 10).
The current Date & Time must be set because it is required by the Telephone Consumer Act of 1991.
1 |
Press the Function key. |
5 Enter the identification code (4-digit), |
|||||||
2 |
Select “General Settings”. |
and then select “OK”. |
|||||||
|
|
|
|
|
|
|
|||
|
|
|
|
|
|
|
|
|
|
|
|
|
|
|
|
|
|
|
|
|
|
|
|
|
|
|
|
|
|
|
|
|
|
|
|
|
|
|
|
|
|
|
|
|
|
|
|
|
|
|
|
|
|
|
|
|
|
|
|
3 Select "5-9". |
For details on how to set the identification |
||||
|
|
|
code, consult with the authorized Panasonic |
||
|
|
|
dealer. |
||
|
|
6 |
Select "20-39". |
||
|
|
||||
|
|
|
|
|
|
|
|
|
|
|
|
4Select "09 Key Operator Mode".
7 Select "22 Date Time Setting".
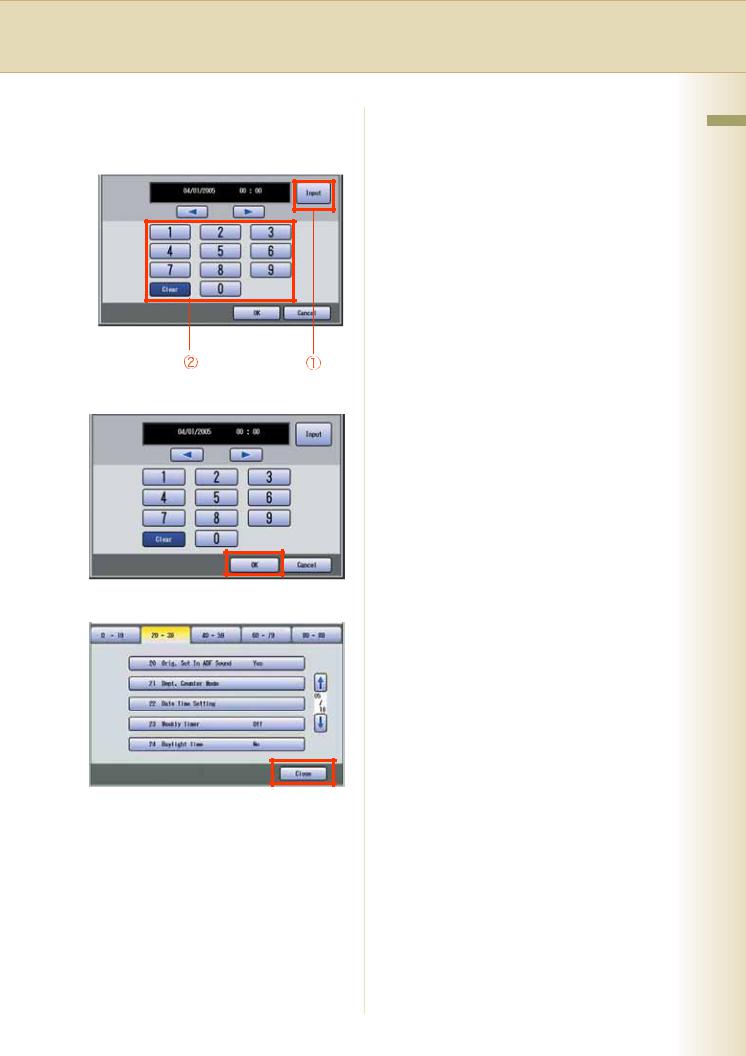
8Select "Input", and then enter the Date and Time.
Ex: April/1st/2005 00:00
9Select "OK".
10 Select "Close".
After setting up the function(s), press the Reset key to return the machine to the initial screen of the current active mode.
Settings General 2 Chapter
27
Settings Copier 3 Chapter
Chapter 3
Copier Settings
Copier Settings
In Copier User Mode, the following items can be changed.
Copier User
No. |
|
Parameter |
|
|
|
|
|
|
Comments |
|
|
Selective Item |
Standard |
|||||||||||||||||||
|
|
|
|
|
|
|
|
|
|
|
|
|
|
|
|
|
|
|
|
|
|
|
|
|
|
|
|
|
|
|
|
Setting |
|
|
|
|
|
|
|
|
|
|
|
|
|
|
|
|
|
|
|
|
|
|
|
|
|
|
|
|
|
|
|
|
|
0-4 |
|
00 |
Margin Value |
Set the default margin. |
|
5 mm, 10 mm, 15 |
10 mm |
|||||||||||||||||||||||||
|
|
|
Default |
|
|
|
|
|
|
|
|
|
|
|
|
|
|
|
|
|
mm, 20 mm |
|
||||||||||
|
|
|
|
|
|
|
|
|
|
|
|
|
|
|
|
|
|
|
|
|
|
|
|
|
|
|
|
|
|
|
|
|
|
|
01 |
Edge Value |
Set the default edge. |
|
5 mm, 10 mm, 15 |
5 mm |
|||||||||||||||||||||||||
|
|
|
Default |
|
|
|
|
|
|
|
|
|
|
|
|
|
|
|
|
|
mm, 20 mm |
|
||||||||||
|
|
|
|
|
|
|
|
|
|
|
|
|
|
|
|
|
|
|
|
|
|
|
|
|
|
|
|
|
|
|
|
|
|
|
02 |
Book Value |
Set the default book. |
|
15 mm, 20 mm, 25 |
20 mm |
|||||||||||||||||||||||||
|
|
|
Default |
|
|
|
|
|
|
|
|
|
|
|
|
|
|
|
|
|
mm, 30 mm |
|
||||||||||
|
|
|
|
|
|
|
|
|
|
|
|
|
|
|
|
|
|
|
|
|
|
|
|
|
|
|
|
|
|
|
|
|
|
|
03 |
Margin Reduction |
To copy with the binding margin, set |
|
No, Yes |
No |
|||||||||||||||||||||||||
|
|
|
Def. |
whether to reduce the copy image. |
|
|
|
|
|
|
|
|
|
|
|
|
|
|||||||||||||||
|
|
|
|
• No |
|
|
|
|
|
|
|
|
|
|
|
|
|
|||||||||||||||
|
|
|
|
|
|
|
|
|
|
|
|
|
|
|
|
|
||||||||||||||||
|
|
|
|
The copy image is not reduced. |
|
|
|
|
|
|
|
|
|
|
|
|
|
|||||||||||||||
|
|
|
|
When copying with wide margin, a part of the image may not be |
|
|||||||||||||||||||||||||||
|
|
|
|
copied.. |
|
|
|
|
|
|
|
|
|
|
|
|
|
|||||||||||||||
|
|
|
|
|
|
|
|
|
|
|
|
|
|
|
|
|
|
|
|
|
|
|
|
|
|
|
|
|
|
|
|
|
|
|
|
|
|
|
|
|
|
|
|
|
|
|
|
|
|
|
|
|
|
|
|
|
|
|
|
|
|
|
|
|
|
|
|
|
|
|
|
|
|
|
|
|
|
|
|
|
|
|
|
|
|
|
|
|
|
|
|
|
|
|
|
|
|
|
|
|
|
|
|
|
|
|
|
|
|
|
|
|
|
|
|
|
|
|
|
|
|
|
|
|
|
|
|
|
|
|
|
|
|
|
|
|
|
|
|
|
|
|
|
|
|
|
|
|
|
|
|
|
|
|
|
|
|
|
|
|
|
|
|
|
|
|
|
|
|
|
|
|
|
|
|
|
|
|
|
|
|
|
|
|
|
|
|
|
|
|
|
|
|
|
|
|
|
|
|
|
|
|
|
|
|
|
|
|
|
|
|
|
|
|
|
|
|
|
|
|
|
|
|
|
|
|
|
|
|
|
|
|
|
|
|
|
|
|
|
|
|
|
|
|
|
|
|
|
|
|
|
|
|
|
|
|
|
|
|
|
|
|
|
• Yes
The copy image is reduced according to the binding margin.
|
|
|
|
|
|
|
|
|
|
|
|
|
|
|
|
|
|
|
|
|
|
|
|
|
|
|
|
|
|
|
|
|
|
|
|
|
|
|
|
|
|
|
|
|
|
|
|
|
|
|
|
|
|
|
|
|
|
|
|
|
|
|
|
|
|
|
|
|
|
|
|
|
|
|
|
|
|
|
|
|
|
|
|
|
|
|
|
|
|
|
|
|
|
|
|
|
|
|
|
|
|
|
|
|
|
|
|
|
|
|
|
|
|
|
|
|
|
|
|
|
|
|
|
|
|
|
|
|
|
|
|
|
|
|
|
|
|
|
|
|
|
|
|
|
|
|
|
|
|
|
|
|
|
|
|
|
|
|
|
|
|
|
|
|
|
|
|
|
|
|
|
|
|
|
|
|
|
|
|
|
|
|
|
|
|
|
|
|
|
|
|
|
|
|
|
|
|
|
|
|
|
|
|
|
|
|
|
|
|
|
|
|
|
|
|
|
|
|
|
|
|
|
|
|
|
|
|
|
|
|
|
|
|
|
|
|
|
|
|
|
|
|
|
|
|
|
|
|
|
|
|
|
|
|
|
|
|
|
|
|
|
|
|
|
|
|
|
|
|
|
|
|
|
|
|
|
|
|
|
|
|
|
|
|
|
|
|
|
|
|
|
|
|
|
|
|
|
|
|
|
|
|
|
|
|
|
|
|
|
|
|
|
|
|
|
|
|
|
|
|
|
|
|
|
|
|
|
|
|
|
|
|
|
|
|
|
|
|
|
|
|
|
|
|
|
|
|
|
|
|
|
|
|
|
|
|
|
|
|
|
|
|
|
|
|
|
|
|
|
|
|
|
|
|
04 |
2-Sided Mode |
Set the default 2-sided Mode. |
|
No, 1 to 2, 2 to 2, |
No |
|||||||||||||||||||||||||||
|
|
Default |
No |
: Single-sided copy |
|
B to 2 |
|
||||||||||||||||||||||||||
|
|
|
1 to 2 |
: 1 -> 2 Copy |
|
|
|
|
|
|
|
|
|
|
|
|
|
|
|
||||||||||||||
|
|
|
2 to 2 |
: 2 -> 2 Copy |
|
|
|
|
|
|
|
|
|
|
|
|
|
|
|
||||||||||||||
|
|
|
B to 2 |
: Book -> 2 Copy |
|
|
|
|
|
|
|
|
|
|
|
|
|
|
|
||||||||||||||
|
|
|
|
|
|
|
|
|
|
|
|
|
|
|
|
|
|
|
|
|
|
|
|
|
|
|
|
|
|
|
|
|
|
5-9 |
05 |
N in 1 Default |
Set the default N in 1 Mode. |
|
2 in 1, 4 in 1, 6 in 1 |
2 in 1 |
|||||||||||||||||||||||||||
|
|
Mode |
|
|
|
|
|
|
|
|
|
|
|
|
|
|
|
|
|
|
|
|
|
|
|
|
|
|
|
|
|
|
|
|
|
|
|
|
|
|
|
|
|
|
|
|
|
|
|
|
|
|
|
|
|
|
|
|
|
|
|
|
|
|
|
|
|
28
 Loading...