


 Loading...
DV STUDIO Version 3.1E
DV STUDIO Version 3.1E-LE
DV STUDIO Version 3.1E-SE
Operating Instructions
As well as reading this manual carefully, please use it properly.
If required, please take a printout.
VQT9885

<Contents> |
|
DV STUDIO 3 |
|
Before starting DV STUDIO 3 ............................................................................ |
3 |
Enjoying the DV STUDIO 3 ..................................................................................................... |
3 |
Connecting .............................................................................................................................. |
4 |
Starting the DV STUDIO 3 ...................................................................................................... |
5 |
Closing the DV STUDIO 3 ....................................................................................................... |
5 |
DV STUDIO 3 screen .............................................................................................................. |
6 |
Operation (Picture acquisition)....................................................................... |
7 |
Play Mode ............................................................................................................................... |
7 |
Acquiring still pictures ............................................................................................................. |
9 |
Automatically acquiring still pictures ..................................................................................... |
10 |
Setting up Autoacquire .......................................................................................................... |
11 |
Camera Mode ....................................................................................................................... |
12 |
Acquiring still pictures from movie camera ............................................................................ |
13 |
Automatically acquiring still pictures from movie camera ...................................................... |
14 |
Card Playback Mode ............................................................................................................. |
15 |
Acquiring pictures from Memory Card ................................................................................... |
16 |
Automatically acquiring pictures from Memory Card ............................................................. |
17 |
Simple pictures ...................................................................................................................... |
18 |
Search ................................................................................................................................... |
19 |
Operation (Image Operation and Editing).................................................... |
20 |
Image display ........................................................................................................................ |
20 |
Working with pictures ............................................................................................................ |
22 |
DV Image Setup .................................................................................................................... |
24 |
Changing the picture format .................................................................................................. |
25 |
Enlarging picture ................................................................................................................... |
26 |
Search ................................................................................................................................... |
27 |
Slide Show ............................................................................................................................ |
29 |
Print ....................................................................................................................................... |
31 |
Useful information ............................................................................................ |
33 |
Display bar ............................................................................................................................ |
33 |
Context menu ........................................................................................................................ |
35 |
Menu screen ......................................................................................................................... |
36 |
Troubleshooting (Q&A) ......................................................................................................... |
38 |
Others ................................................................................................................................... |
39 |
2

Before starting DV STUDIO 3
DV STUDIO 3
Enjoying the DV STUDIO 3
|
|
|
|
|
|
|
|
|
|
|
|
|
|
|
|
DV STUDIO 3 |
|
|
|
|
|
|
|
|
|
||
|
|
|
|
|
|
|
|
|
|
|
|||
|
|
Before starting DV STUDIO 3 |
|
|
|
|
|
|
|
|
|
||
|
|
|
|
|
|
|
|
|
|
|
|||
|
|
|
|
|
|
|
|
|
|
|
|||
|
|
Enjoying the DV STUDIO 3 |
|
|
|
|
|
|
|
|
|
||
|
|
|
|
|
|
3 |
|
|
|
||||
|
|
|
|
|
|
|
|
|
|||||
|
|
Before using the DV STUDIO 3, the sequence of operations |
|
|
|
|
|
|
|
||||
|
|
|
|
|
|
|
|
|
|||||
|
|
is briefly explained. |
|
|
|
|
|
|
|
||||
|
|
1. Connecting the personal computer and movie |
|
|
|
|
|
|
|
|
|
||
|
|
|
|
|
|
|
|
|
|
|
|||
|
|
|
|
|
|
|
|
|
|
|
|||
|
|
|
|
|
|
|
|
|
|
|
|||
|
|
|
camera (P4) |
|
|
1 |
|
2 |
|
|
|
||
|
|
|
|
|
|
|
|
|
|
|
|||
|
|
2. Acquiring pictures from movie camera into |
|
|
|
|
|
||||||
|
|
|
|
|
|
|
|||||||
|
|
|
|
|
|
|
|
|
|
||||
|
|
|
|
|
|
|
|
||||||
|
|
|
|
|
|
|
|
|
|
|
|||
|
|
|
personal computer (P7, 12, 15) |
|
|
|
|
|
|
|
|
|
|
|
|
|
|
|
|
|
|
|
|
|
|
|
|
|
|
3. Activate DV STUDIO 3 (P20 ~ 32) |
|
|
|
|
|
|
|
|
|
||
|
|
|
|
|
|
|
|
|
|
|
|||
|
|
|
|
|
|
|
|
|
|
|
|||
|
|
|
|
|
|
|
|
|
|
|
|||
|
|
|
|
|
|
|
|
|
|
|
|
|
|
|
|
Select the method of picture acquisition based on the |
|
|
|
|
|
|
|
|
|
||
|
|
|
|
|
|
|
|
|
|
|
|||
|
|
|
|
|
|
|
|
|
|
|
|||
|
|
|
|
|
|
|
|
|
|
|
|||
|
|
|
|
|
|
|
|
|
|
|
|||
|
|
|
|
A |
B |
|
|
||||||
|
|
movie camera mode |
|
|
|
|
|||||||
|
|
• Play Mode (P7) |
|
|
|
|
|||||||
|
|
|
|
|
|
|
|
|
|
|
|||
|
|
|
|
|
|
|
|
|
|
|
|||
|
|
|
|
|
|
|
|
|
|
|
|||
|
|
• Camera Mode (P12) |
|
|
|
|
|
|
|
|
|
||
|
|
• Card Playback Mode 1 (P15) |
|
|
|
|
|
|
|
|
|
||
|
|
|
|
|
|
|
|
|
|
|
|||
|
|
A Displayed message content varies |
|
|
|
|
|
|
|
|
|
||
|
|
|
|
|
|
|
|
|
|
|
|||
|
|
|
|
|
|
|
|
|
|
|
|||
|
|
|
with the mode |
|
|
|
|
|
|
|
|
|
|
|
|
B Display the acquired picture |
|
|
|
|
|
|
|
|
|
||
|
|
|
|
|
|
|
|
|
|
|
|||
|
|
|
|
|
|
|
|
|
|
|
|||
|
|
With Autoacquire function, the following type of picture |
|
|
|
|
|
|
|
|
|
||
|
|
|
|
|
|
|
|
|
|
|
|||
|
|
|
|
|
|
|
|
|
|
|
|||
|
|
acquisition is possible 2 |
|
|
|
|
|
|
|
|
|
||
|
|
|
|
|
|
|
|
|
|
|
|||
|
|
• Acquiring Photoshot picture (P11) |
|
|
|
|
|
|
|
|
|
||
|
|
|
|
|
|
|
|
|
|
|
|||
|
|
• Acquiring at regular intervals (P11) |
|
|
|
|
|
|
|
|
|
||
|
|
|
|
|
|
|
|
|
|
|
|||
|
|
• Acquiring with [Fast Preview Mode] (P18) |
|
|
|
|
|
|
|
|
|
||
|
|
Acquired picture can be activated as follows |
|
|
|
|
|
|
|
|
|
||
|
|
|
|
|
|
|
|
|
|
|
|||
|
|
• Picture can be converted into JPEG or BMP format, edited |
|
|
|
|
|
|
|
|
|
||
|
|
|
|
|
|
|
|
|
|
|
|||
|
|
|
|
|
|
|
|
|
|
|
|||
|
|
and processed. (P25) |
|
|
|
|
|
|
|
|
|
||
|
|
• Picture displayed can be enjoyed in slide show. 2 (P29) |
|
|
|
|
|
|
|
|
|
||
|
|
• Picture or folder index can be printed. (P31, 32) |
|
|
|
|
|
|
|
|
|
||
|
|
|
|
|
|
|
|
|
|
|
|||
|
|
• Picture can also be activated as tape or Memory Card |
|
|
|
|
|
|
|
|
|
||
|
|
index. (P19) |
|
|
|
|
|
|
|
|
|
||
|
|
1 In DV STUDIO Version 3.1E-SE, image cannot be |
|
|
|
|
|
|
|
|
|
||
|
|
|
|
|
|
|
|
|
|
|
|||
|
|
|
|
|
|
|
|
|
|
|
|||
|
|
|
|
|
|
|
|
|
|
|
|||
|
|
|
acquired in Card Playback Mode. |
|
|
|
|
|
|
|
|
|
|
|
|
2 In DV STUDIO Version 3.1E-LE, Auto Acquire feature |
|
|
|
|
|
|
|
|
|
||
|
|
|
and SlideShow feature are not available. |
|
|
|
|
3 |
|
|
|||
|
|
|
|
|
|
|
|
||||||
|
|
|
|
|
|
|
|
|
|
|
|||
|
|
|
|
|
|
|
|
|
|
|
|||
|
|
|
|
|
|
|
|
|
|
|
|||
|
|
|
|
|
|
|
|
|
|
|
|
|
|
|
|
|
|
|
|
|
|
|
|
|
|
|
|
|
|
|
|
|
|
|
|
|
|
|
|
|
|
|
|
|
|
|
|
|
|
|
|
|
|
|
|
|
|
|
|
|
|
|
|
|
|
|
|
|
|
Before starting DV STUDIO 3
Connecting
DV STUDIO 3
 Connecting
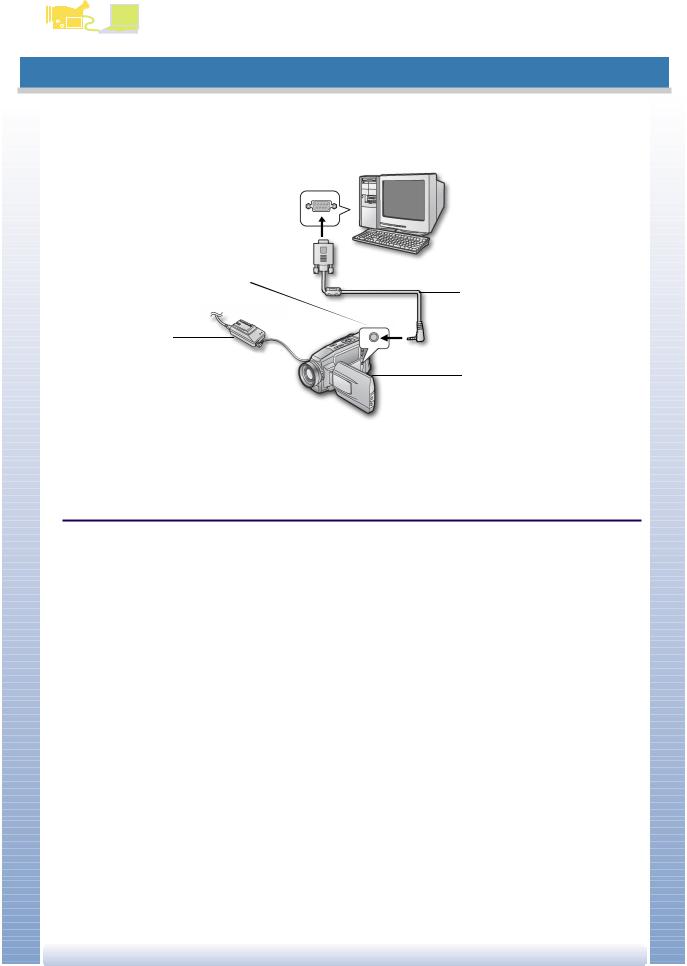
Your movie camera can be connected to a personal computer having a serial port (D-sub 9-pin RS-232C connector). |
Before making these connections, turn off all of the devices which are to be connected. |


Serial port (D-sub 9-pin RS-232C connector) |
Interface cable (4-9 pins) |
Digital still picture terminal |
Movie camera |
AC adaptor |
|
Personal computer |
|
1. Personal computer and the movie camera are set up as shown in the picture |
• Please do not remove the interface cable when DV STUDIO 3 is being used. The software may not function properly. Further, there is also the risk of causing damage to the transmitted data.
• When using DV STUDIO 3, it is recommended to use AC adaptor (sold separately) as power source for movie camera. Furthermore, even when connecting to the Notebook personal computer, please do not use battery, but use only the AC adaptor.
• When the movie camera and the personal computer can not be connected read [Troubleshooting (Q&A)]. (P38)
• For the operating environment, please see Installation Manual.
4

Before starting DV STUDIO 3
DV STUDIO 3
Starting the DV STUDIO 3
|
|
|
|
|
|
|
|
|
|
|
|
|
|
|
|
Starting the DV STUDIO 3 |
|
Closing the DV STUDIO 3 |
|
|
|
||||
|
|
|
|
|
|
|
||||||
|
|
|
Before starting the DV STUDIO 3, establish the connection |
|
1. Click on [File] >>> [Exit] |
|
|
|
||||
|
|
|
|
|
|
|
||||||
|
|
|
between movie camera and personal computer. For details, |
|
|
|
|
|||||
|
|
|
please refer to P4. |
|
|
|
|
|
|
|
||
|
|
|
|
|
DV STUDIO 3 may also be closed by clicking on the [ x ] |
|
|
|
||||
|
|
|
When personal computer and movie camera have been |
|
|
in the top right-hand corner. |
|
|
|
|||
|
|
|
connected, please perform the operations as indicated |
|
|
|
|
|
||||
|
|
|
below. |
|
|
|
|
|
|
|
||
|
|
|
1. Click on [Start] >>> [Programs] >>> |
|
|
|
|
|
|
|
||
|
|
|
|
|
|
|
|
|
|
|||
|
|
|
|
|
|
|
|
|
|
|||
|
|
|
|
[Panasonic] >>> [DV Studio3] >>> [DV |
|
|
|
|
|
|
|
|
|
|
|
|
Studio3] |
|
|
|
|
|
|
|
|
|
|
|
|
■ For Windows XP |
|
|
|
|
|
|
|
|
|
|
|
|
|
|
|
|
|
|
|
||
|
|
|
|
|
|
|
|
|
|
|||
|
|
|
|
Click on [Start] >>> [All Programs] >>> |
|
|
|
|
|
|
|
|
|
|
|
|
[Panasonic] >>> [DV Studio3] >>> [DV |
|
|
|
|
|
|
|
|
|
|
|
|
Studio3] |
|
|
|
|
|
|
|
|
|
|
|
|
|
|
|
|
|
|
|
|
|
|
|
|
|
Before using for the first time, click on [Start] >>> |
|
|
|
|
|
|
|
|
|
|
|
|
[Programs] >>> [Panasonic] >>> [DV Studio3] >>> |
|
|
|
|
|
|
|
|
|
|
|
|
|
|
|
|
|
|
|||
|
|
|
|
[Readme], and please read supplementary instructions |
|
|
|
|
|
|
|
|
|
|
|
|
or update information. |
|
|
|
|
|
|
|
|
|
|
|
|
■ For Windows XP |
|
|
|
|
|
|
|
|
|
|
|
|
|
|
|
|
|
|
|
||
|
|
|
|
Before using for the first time click on [Start] >>> [All |
|
|
|
|
|
|
|
|
|
|
|
|
|
|
|
|
|
|
|||
|
|
|
|
Programs] >>> [Panasonic] >>> [DV Studio3] >>> |
|
|
|
|
|
|
|
|
|
|
|
|
[Readme], and please read supplementary instructions |
|
|
|
|
|
|
|
|
|
|
|
|
or update information. |
|
|
|
|
|
|
|
|
|
|
|
|
|
|
|
|
|
|
|||
|
|
|
|
• During initial Start up, error messages may appear. |
|
|
|
|
|
|
|
|
|
|
|
|
|
|
|
|
|
|
|
||
|
|
|
|
|
|
|
|
|
|
|
||
|
|
|
|
|
|
|
|
|
|
|
||
|
|
|
|
|
|
|
|
|
|
|
||
|
|
|
|
|
|
|
|
|
|
|
||
|
|
|
|
|
|
|
|
|
|
|
||
|
|
|
|
|
|
|
|
|
|
|
||
|
|
|
|
|
|
|
|
|
|
|
||
|
|
|
|
|
|
|
|
|
|
|
||
|
|
|
|
|
|
|
|
|
|
|
||
|
|
|
|
|
|
|
|
|
|
|
||
|
|
|
|
|
|
|
|
|
|
|
||
|
|
|
|
|
|
|
|
|
|
|
||
|
|
|
|
|
|
|
|
|
|
|
||
|
|
|
|
|
|
|
|
|
|
|
||
|
|
|
|
|
|
|
|
|
|
|||
|
|
|
|
Click on [Yes], and continue with the start up |
|
|
|
|
|
|
|
|
|
|
|
|
operation. |
|
|
|
|
|
|
|
|
|
|
|
|
• It is also possible to start by double clicking on the DV |
|
|
|
|
|
|
|
|
|
|
|
|
Studio3 shortcut icon in the Desktop. |
|
5 |
|
|
|
|
||
|
|
|
|
|
|
|
|
|||||
|
|
|
|
|
|
|
|
|
|
|
||
|
|
|
|
|
|
|
|
|
|
|
||
|
|
|
|
|
|
|
|
|
|
|
||
|
|
|
|
|
|
|
|
|
|
|
||
|
|
|
|
|
|
|
|
|
|
|
||
|
|
|
|
|
|
|
|
|
|
|
||
|
|
|
|
|
|
|
|
|
|
|
||
|
|
|
|
|
|
|
|
|
|
|
||
|
|
|
|
|
|
|
|
|
|
|
||
|
|
|
|
|
|
|
|
|
|
|
||
|
|
|
|
|
|
|
|
|
|
|
||
|
|
|
|
|
|
|
|
|
|
|
||
|
|
|
|
|
|
|
|
|
|
|
||
|
|
|
|
|
|
|
|
|
|
|
||
|
|
|
|
|
|
|
|
|
|
|
||
|
|
|
|
|
|
|
|
|
|
|
||
|
|
|
|
|
|
|
|
|
|
|
||
|
|
|
|
|
|
|
|
|
|
|
||
|
|
|
|
|
|
|
|
|
|
|
||
|
|
|
|
|
|
|
|
|
|
|
||
|
|
|
|
|
|
|
|
|
|
|
||
|
|
|
|
|
|
|
|
|
|
|
||
|
|
|
|
|
|
|
|
|
|
|||
|
|
|
|
|
|
|
|
|
|
|
|
|
|
|
|
|
|
|
|
|
|
|
|
|
|
|
|
|
|
|
|
|
|
|
|
|
|
|
|
|
|
|
|
|
|
|
|
|
|
|
|
|
|
|
|
|
|
|
|
|
|
|
|
|
Before starting DV STUDIO 3
DV STUDIO 3
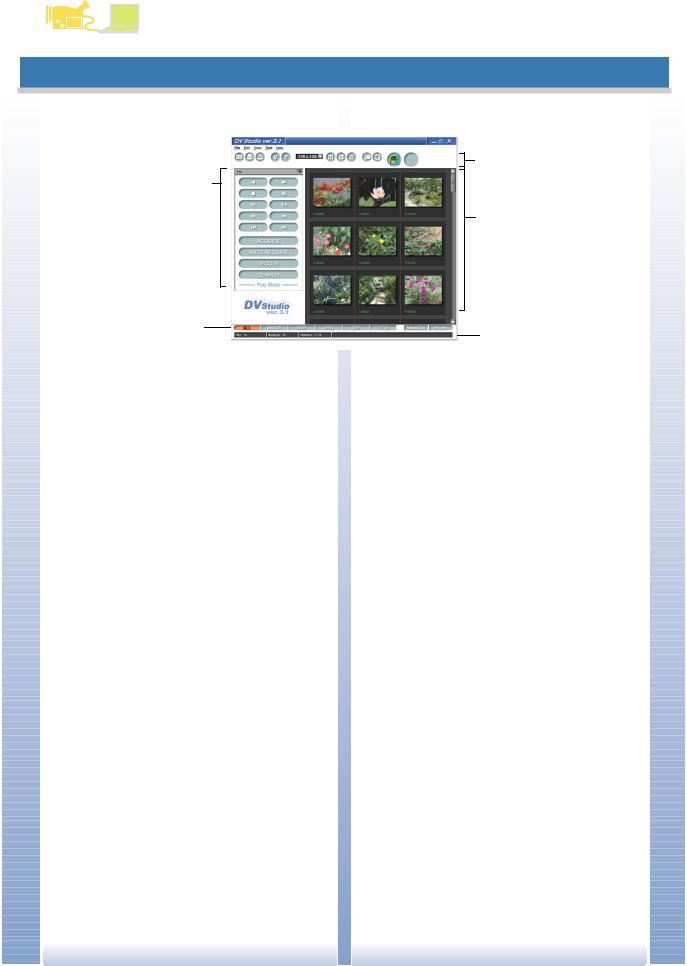
DV STUDIO 3 screen |
|
|
DV STUDIO 3 screen |
|
|
|
|
3 |
|
1 |
|
|
|
4 |
|
2 |
5 |
|
|
|
1 |
[DV Control Bar] |
|
|
Operates the connected movie camera. Picture |
|
|
acquisition, or zooming of acquired picture and |
|
|
searching are done. (P7, 12, 15) |
|
2 |
[View Type Bar] |
|
|
The type of picture displayed in the picture display |
|
|
section can be selected. Only the selected type of |
|
|
picture is displayed. (P34) |
|
3 |
[Toolbar] |
|
|
Various types of operations can be performed by |
|
|
clicking on relevant buttons. (P33) |
|
4 |
Picture display section |
|
|
BMP, JPEG, DVF, TITLE files in the folder are displayed |
|
|
by thumbnail. Other files are displayed as icons. It is |
|
|
also possible to display file data. |
|
|
• If there are many files in the folder, it may take time till |
|
|
the thumbnails are displayed. |
|
5 |
[Status Bar] |
|
|
Information such as the registered picture files number, |
|
|
display number, currently selected file number etc. is |
|
|
displayed. (P34) |
|
• Apart from picture display section, it is possible to select |
|
|
|
Display/Hide from the [View] menu. |
|
• Depending on the personal computer used, there may be |
|
|
|
instances where scrolling with the mouse wheel may not |
|
|
be possible in the picture display section. |
|
6 |
|
|

Operation (Picture acquisition)
DV STUDIO 3
Play Mode
|
|
|
|
|
|
|
|
|
|
|
|
|
|
|
|
|
|
|
|
|
|
|
|
|
|
|
|
|
|
|
Operation (Picture acquisition) |
|
|
|
|
|
|
|
|
|
|
|
|
|
|
|
|
|
|
|
|
|
|||
|
|
|
|
|
|
|
|
|
|
|
|
|
|
|
|
|
|
|
|
|
|
|
|
||||
|
|
|
Play Mode |
|
|
|
|
|
|
|
|
|
|
|
|
|
|
|
|
|
|
|
|
|
|
|
|
|
|
|
|
|
|
|
|
|
|
|
|
|
|
|
|
|
|
|
|
|
|
|
|
|
|
||
|
|
|
|
|
|
|
|
|
|
|
|
|
|
|
|
|
|
|
|
|
|
|
|
|
|
||
|
|
|
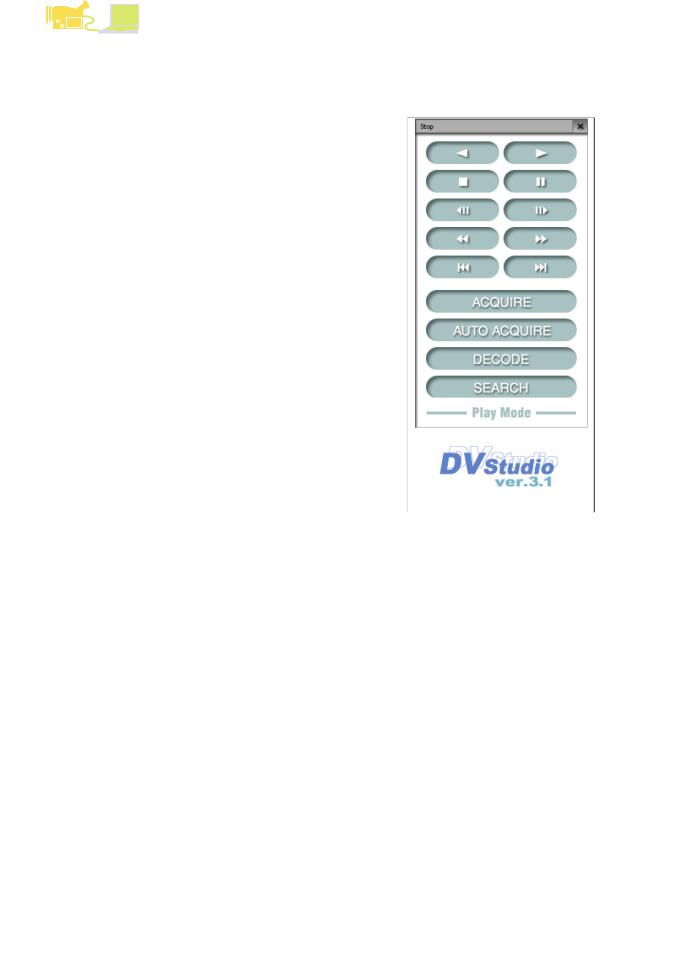
Operation |
|
|
|
1 |
|
|
|
|
|
|
|
|
|
|
|
|
|
|
|
2 |
|
|
|
|
|
|
|
|
|
|
|
|
|
|
|
|
|
|
|
|
|
|
|
|
|
|
|
|
||||
|
|
|
A feature that does not correspond to the connected movie |
|
|
|
|
|
|
|
|
|
|
|
|
|
|
|
|
|
|
|
|||||
|
|
|
|
|
|
|
|||||||||||||||||||||
|
|
|
camera cannot be used. |
|
|
|
3 |
|
|
|
|
|
|
|
|
|
|
|
|
|
|
|
4 |
|
|
|
|
|
|
|
1 |
Reverse Playback button [ 2 ] |
|
|
|
|
|
|
|
|
|
|
|
|
|
|
|
|
|
|
|
|
|||
|
|
|
|
|
5 |
|
|
|
|
|
|
|
|
|
|
|
|
|
|
6 |
|
|
|
||||
|
|
|
|
|
|
|
|
|
|
|
|
|
|
|
|
|
|
|
|
|
|||||||
|
|
|
2 |
Playback button [ 1 ] |
|
|
|
|
|
|
|
|
|
|
|
|
|
|
|
|
|
|
|||||
|
|
|
|
|
|
7 |
|
|
|
|
|
|
|
|
|
|
|
|
|
8 |
|
|
|
||||
|
|
|
|
|
|
|
|
|
|
|
|
|
|
|
|
|
|||||||||||
|
|
|
|
|
|
|
|
|
|
|
|
|
|
|
|||||||||||||
|
|
|
|
|
|
|
|
||||||||||||||||||||
|
|
|
3 |
Stop button [ ■ ] |
|
|
|
9 |
|
|
|
|
|
|
|
|
|
|
|
|
10 |
|
|
|
|||
|
|
|
|
|
|
|
|
|
|
|
|
|
|
|
|||||||||||||
|
|
|
|
|
|
|
|
|
|
|
|
|
|
||||||||||||||
|
|
|
4 |
Still button [ ;] |
|
|
|
|
|
|
|
|
|
|
|
|
|
|
|
|
|
|
|
|
|
|
|
|
|
|
|
|
|
|
|
|
|
|
|
|
|
|
|
|
|
|
|
|
|
|
|
|
|
||
|
|
|
|
|
|
|
|
|
|
|
|
|
|
|
|
|
|
|
|
|
|
|
|
|
|||
|
|
|
|
Stops the Tape Mode, and changes to Still Picture |
|
|
|
|
|
|
|
|
|
|
|
|
|
|
|
|
|
|
|
|
|
||
|
|
|
5 |
Playback Mode. |
|
|
|
|
|
|
|
|
|
|
|
|
|
|
|
|
|
|
|
|
|
|
|
|
|
|
|
|
|
|
|
|
|
|
|
|
|
|
|
|
|
|
|
|
|
|
|
|
|
||
|
|
|
Reverse Still Advance button [ |
] |
|
|
|
|
|
|
|
|
|
|
|
|
|
|
|
|
|
|
|
|
|
||
|
|
|
|
|
|
|
|
|
|
|
|
|
|
|
|
|
|
|
|
|
|
|
|
||||
|
|
|
|
|
|
|
|
|
|
|
|
|
|
|
|
|
|
|
|
|
|
|
|
||||
|
|
|
|
|
|
|
|
|
|
|
|
|
|
|
|
|
|
|
|
|
|
|
|||||
|
|
|
|
If pressed during still picture playback, the picture can |
|
|
|
|
|
|
|
|
|
|
|
|
|
|
|
|
|
|
|
|
|
||
|
|
|
|
|
|
|
|
|
|
|
|
|
|
|
|
|
|
|
|
|
|
|
|
|
|||
|
|
|
6 |
be made to go back by one frame. |
|
|
|
|
|
|
|
|
|
|
|
|
|
|
|
|
|
|
|
|
|
|
|
|
|
|
Still Advance button [ |
] |
|
|
|
|
|
|
|
|
|
|
|
|
|
|
|
|
|
|
|
|
|
|
|
|
|
|
|
|
|
|
|
|
|
|
|
|
|
|
|
|
|
|
|
|
|
|
|
|
|||
|
|
|
|
|
|
|
|
|
|
|
|
|
|
|
|
|
|
|
|
|
|
|
|
|
|||
|
|
|
|
|
|
|
|
|
|
|
|
|
|
|
|
|
|
|
|
|
|
|
|
||||
|
|
|
|
If pressed during still picture playback, the picture can |
|
|
|
|
|
|
|
|
|
|
|
|
|
|
|
|
|
|
|
|
|
||
|
|
|
|
|
|
|
|
|
|
|
|
|
|
|
|
|
|
|
|
|
|
|
|
|
|||
|
|
|
7 |
be made to advance by one frame. |
|
|
|
|
|
|
|
|
|
|
|
|
|
|
|
|
|
|
|
|
|
|
|
|
|
|
Rewind button [ 6 ] |
|
|
|
|
|
|
|
|
|
|
|
|
|
|
|
|
|
|
|
|
|
|
|
|
|
|
|
|
|
|
|
|
|
|
|
|
|
|
|
|
|
|
|
|
|
|
|
|
|
|
||
|
|
|
|
|
|
|
|
|
|
|
|
|
|
|
|
|
|
|
|
|
|
|
|
|
|||
|
|
|
|
Rewinds the tape. |
|
|
|
|
|
|
|
|
|
|
|
|
|
|
|
|
|
|
|
|
|
|
|
|
|
|
|
|
|
|
|
|
|
|
|
|
|
|
|
|
|
|
|
|
|
|
|
|
|
|
|
|
|
|
|
If pressed during playback, the tape will rewind and |
|
|
|
|
|
|
|
|
|
|
|
|
|
|
|
|
|
|
|
|
|
||
|
|
|
8 |
playback. |
|
|
|
|
|
|
|
|
|
|
|
|
|
|
|
|
|
|
|
|
|
|
|
|
|
|
|
|
|
|
|
|
|
|
|
|
|
|
|
|
|
|
|
|
|
|
|
|
|
||
|
|
|
Fast Forward button [ 5 ] |
|
|
|
|
|
|
|
|
|
|
|
|
|
|
|
|
|
|
|
|
|
|
||
|
|
|
|
|
|
|
|
|
|
|
|
|
|
|
|
|
|
|
|
|
|
|
|
|
|||
|
|
|
|
|
|
|
|
|
|
|
|
|
|
|
|
|
|
|
|
|
|
|
|
||||
|
|
|
|
Advances the tape forward. |
|
|
|
|
|
|
|
|
|
|
|
|
|
|
|
|
|
|
|
|
|
|
|
|
|
|
|
|
|
|
|
|
|
|
|
|
|
|
|
|
|
|
|
|
|
|
|
|
|
|
|
|
|
|
|
If pressed during playback, the tape is made to |
|
|
|
|
|
|
|
|
|
|
|
|
|
|
|
|
|
|
|
|
|
||
|
|
|
|
|
|
|
|
|
|
|
|
|
|
|
|
|
|
|
|
|
|
|
|
|
|||
|
|
|
9 |
advance, and playback. |
|
|
|
|
|
|
|
|
|
|
|
|
|
|
|
|
|
|
|
|
|
|
|
|
|
|
Reverse Photoshot Search button [ : ] |
|
|
|
|
|
|
|
|
|
|
|
|
|
|
|
|
|
|
|
|
|
|||
|
|
|
|
|
|
|
|
|
|
|
|
|
|
|
|
|
|
|
|
|
|
|
|
||||
|
|
|
|
|
|
|
|
|
|
|
|
|
|
|
|
|
|
|
|
|
|
|
|||||
|
|
|
|
Searches for the Photoshot recorded picture towards |
|
|
|
|
|
|
|
|
|
|
|
|
|
|
|
|
|
|
|
|
|
||
|
|
|
|
the start. |
|
|
|
|
|
|
|
|
|
|
|
|
|
|
|
|
|
|
|
|
|
|
|
|
|
|
|
|
|
|
|
|
|
|
|
|
|
|
|
|
|
|
|
|
|
|
|
|
|
|
|
|
|
|
10 Photoshot Search button [ 9] |
|
|
|
|
|
|
|
|
|
|
|
|
|
|
|
|
|
|
|
|
|
|
||
|
|
|
|
|
|
|
|
|
|
|
|
|
|
|
|
|
|
|
|
|
|
|
|
|
|||
|
|
|
|
|
|
|
|
|
|
|
|
|
|
|
|
|
|
|
|
|
|
|
|
|
|||
|
|
|
|
Searches for the Photoshot recorded picture towards |
|
|
|
|
|
|
|
|
|
|
|
|
|
|
|
|
|
|
|
|
|
||
|
|
|
|
the end. |
|
|
|
|
|
|
|
7 |
|
|
|
||||||||||||
|
|
|
|
|
|
|
|
|
|
|
|
|
|
|
|||||||||||||
|
|
|
|
|
|
|
|
|
|
|
|
|
|
|
|||||||||||||
|
|
|
|
|
|
|
|
|
|
|
|
|
|
|
|||||||||||||
|
|
|
|
|
|
|
|
|
|
|
|
|
|
|
|||||||||||||
|
|
|
|
|
|
|
|
|
|
|
|
|
|
|
|||||||||||||
|
|
|
|
|
|
|
|
|
|
|
|
|
|
|
|||||||||||||
|
|
|
|
|
|
|
|
|
|
|
|
|
|
|
|||||||||||||
|
|
|
|
|
|
|
|
|
|
|
|
|
|
|
|||||||||||||
|
|
|
|
|
|
|
|
|
|
|
|
|
|
|
|||||||||||||
|
|
|
|
|
|
|
|
|
|
|
|
|
|
|
|||||||||||||
|
|
|
|
|
|
|
|
|
|
|
|
|
|
|
|||||||||||||
|
|
|
|
|
|
|
|
|
|
|
|
|
|
|
|||||||||||||
|
|
|
|
|
|
|
|
|
|
|
|
|
|
|
|||||||||||||
|
|
|
|
|
|
|
|
|
|
|
|
|
|
|
|||||||||||||
|
|
|
|
|
|
|
|
|
|
|
|
|
|
|
|||||||||||||
|
|
|
|
|
|
|
|
|
|
|
|
|
|
|
|||||||||||||
|
|
|
|
|
|
|
|
|
|
|
|
|
|
|
|
|
|
|
|
|
|
|
|
|
|
|
|
|
|
|
|
|
|
|
|
|
|
|
|
|
|
|
|
|
|
|
|
|
|
|
|
|
|
|
|
|
|
|
|
|
|
|
|
|
|
|
|
|
|
|
|
|
|
|
|
|
|
|
|
|
|
|
|
|
|
|
|
|
|
|
|
|
|
|
|
|
|
|
|
|
|
|
|
|
|
|
|
|
|
|
|
|
|
|
|
|
|
|
|
|
|
|
|
|
|
|
|
|
|
|
|
|
|
|
|
|
|
|
|
Operation (Picture acquisition)
DV STUDIO 3
|
|
|
Play Mode |
|
|
|
|
|
|
|
|
|
|
|
|
|
|
|
|
|
|
|
|
|
|
|
|
|
|
|
|
|
|
|
|
|
|
|
|
|
|
|
|
|
|
|
|
|
|
|
|
|
|
|
11 [ACQUIRE] button |
|
|
|
|
|
|
|
|
|
|
|
|
|
|
|
|
|
|
|
|
|
|
|
|
|
|
|
|
|
|
|
|
|
|
|
|
|
|
|
|
|
|
|
|
|
|
|
|
|
|
|
|
|
|
|
|
|
|
|
|
|
|
|
|
|
|
|
|
|
|
|
|
|
|
|
|
|
Acquires picture from tape. |
|
|
|
|
|
|
|
|
|
|
|
|
12 [AUTO ACQUIRE] button |
|
|
|
|
|
|
|
|
|
|
|
|
|
|
|
|
|
|
|
|
|
|
|
|
|
|
|
|
|
|
|
|
|
|
|
|
|
|
Based on [Auto Acquire Settings], picture from tape is |
|
15 |
|
|
|
||||
|
|
|
|
|
|
|
|
|
|
|
|
|
|
|
|
acquired automatically. (P11) |
|
|
|
|
|
|
|
|
|
|
|
|
(This is not displayed in DV STUDIO Version 3.1E- |
|
|
|
|
|
|
|
|
|
|
|
|
LE) |
|
|
|
|
|
|
|
|
|
|
|
|
|
|
|
|
|
|
|
|
|
|
|
|
|
13 [DECODE] button |
|
11 |
|
|
|
|
|
|
|
|
|
|
|
|
|
|
|
|
|
|
||
|
|
|
|
|
|
|
|
|
|
|
||
|
|
|
Picture is magnified and displayed. (P26) |
|
|
|
|
|
|
|
|
|
|
|
|
(For magnification of simple pictures, please see P18) |
|
12 |
|
|
|
|
|
|
|
|
|
|
|
|
|
|
|
|
|
|
||
|
|
|
It is also possible to magnify a picture by double |
|
|
|
|
|
|
|
|
|
|
|
|
|
|
|
|
|
|
|
|
||
|
|
|
clicking the picture. (Pictures in BMP, JPEG etc. |
|
13 |
|
|
|
|
|
|
|
|
|
|
formats are enlarged by relevant applications and |
|
|
|
|
|
|
|
|
|
|
|
|
|
|
|
|
|
|
|
|
||
|
|
|
displayed) |
|
14 |
|
|
|
|
|
|
|
|
|
|
14 [SEARCH] button |
|
|
|
|
|
|
|
|
|
|
|
|
|
|
|
|
|
|
|
|
|
|
|
|
|
|
|
|
|
|
|
|
|
|
|
|
|
|
Finds the recorded location in the tape for the picture |
|
|
|
|
|
|
|
|
|
|
|
|
|
|
|
|
|
|
|
|
|
|
|
|
|
that has been acquired to the personal computer. |
|
|
|
|
|
|
|
|
|
|
|
|
(Please insert the tape containing the recorded |
|
|
|
|
|
|
|
|
|
|
|
|
picture to be searched for in the movie camera) |
|
|
|
|
|
|
|
|
|
|
|
|
|
|
|
|
|
|
|
|
|
|
|
|
|
Begin tape playback from the picture location found. |
|
|
|
|
|
|
|
|
|
|
|
|
|
|
|
|
|
|
|
|
|
|
|
|
|
About the method of searching, please see P19. |
|
|
|
|
|
|
|
|
|
|
|
|
15 Movie camera status display |
|
|
|
|
|
|
|
|
|
|
|
|
|
|
|
|
|
|
|
|
|
|
|
|
|
|
|
|
|
|
|
|
|
|
|
|
|
|
Displays the status of the connected movie camera. |
|
|
|
|
|
|
|
|
|
|
|
|
• The power supply to the movie camera is automatically cut |
|
|
|
|
|
|
|
|
|
|
|
|
|
|
|
|
|
|
|
|
|
|
|
|
|
|
|
|
|
|
|
|
|
|
|
|
|
|
off after a given time. Even if the power supply is replaced, |
|
|
|
|
|
|
|
|
|
|
|
|
when movie camera and personal computer can not be |
|
|
|
|
|
|
|
|
|
|
|
|
|
|
|
|
|
|
|
|
|
|
|
|
|
connected read [Troubleshooting (Q&A)]. (P38) |
|
|
|
|
|
|
|
|
|
|
|
|
8 |
|
|
|
|
|
|
|
|
|
|
|
|
|
|
|
|
|
|
|
|
|
|
|
|
|
|
|
|
|
|
|
|
|
|
|
|
|
|
|
|
|
|
|
|
|
|
|
|
|
|
|
|
|
|
|
|
|
|
|
|
|
|
|
|
|
|
|
|
|
|
|
|
|
|
|
|
|
|
|
|
|
|
|
|
|
|
|
|
|
|
|
|
|
|
|
|
|
|
|
|
|
|
|
|
|
|
|
|
|
|
|
|
|
|
|
|
|
|
|
|
|
|
|
|
|
|
|
|
|
|
|
|
|
|
|
|
|
|
|
|
|
|
|
|
|
|
|
|
|
|
|
|
|
|
|
|
|
|
|
|
|
|
|
|
|
|
|
|
|
|
|
|
|
|
|
|
|
|
|
|
|
|
|
|
|
|
|
|
|
|
|
|
|
|
|
|
|
|
|
|
|
|
|
|
|
|
|
|
|
|
|
|
|
|
|
|
|
|
|
|
|
|
|
|
|
|
|
|
|
|
|
|
|
|
|
|
|
|
|
|
|
|
|
|
|
|
|
|
|
|
|
|
|
|
|
|
|
|
|
|
|
|
|
|
|
|
|
|
|
|
|
|
|
|
|
|
|
|
|
|
|
|
|
|
|
|
|
|
|
|
|
|
|
|
|
|
|
|
|
|
|
|
|
|
|
|
|
|
|
|
|
|
|
|
|
|
|
|
|
|
|
|
|
|
|
|
|
|
|
|
|
|
|
|
|
|
|
|
|
|
|
|
|
|
|
|
|
|
|
|
|
|
|
|
|
|
|
|
|
|
|
|
|
|
|
|
|
|
|
|
|
|
|
|
|
|
|
|
|
|
|
|
|
|
|
|
|
|
|
|
|
|
|
|
|
|
|
|
|
|
|
|
|
|
|
|
|
|
|
|
|
|
|
|
|
|
|
|
|
|
|
|
|
|
|
|
|
|
|
|
|
|
|
|
|
|
|
|
|
|
|
|
|
|
|
|
|
|
|
|
|
|
|
|
|
|
|
|
|
|
|
|
|
|

Operation (Picture acquisition)
DV STUDIO 3
Acquiring still pictures
|
|
|
|
|
|
|
|
|
|
|
|
|
|
|
Acquiring still pictures |
|
3. The picture that is to be acquired is searched |
|
|
|
|||
|
|
|
|
|
|
|
|||||
|
|
|
(Play Mode) |
|
|
for with the operation button, and set to still |
|
|
|
||
|
|
|
|
|
|
||||||
|
|
|
|
|
picture playback (P7) |
|
|
|
|||
|
|
|
The pictures which are recorded in the movie camera tape |
|
|
• The tape is played by clicking on the Playback button [ |
|
|
|
||
|
|
|
are acquired into the personal computer as still pictures. The |
|
|
1 ], and at the location of the picture to be acquired, |
|
|
|
||
|
|
|
picture acquisition methods include the [ACQUIRE] method |
|
|
|
|
|
|||
|
|
|
of acquiring and [AUTO ACQUIRE] method of automatic |
|
|
click on the still button [ ; ] and set to still picture |
|
|
|
||
|
|
|
acquire for the selected picture. |
|
|
playback. |
|
|
|
||
|
|
|
|
|
|
|
|
|
|||
|
|
|
Beforehand, please load the tape (which contains the |
|
|
|
|
|
|
||
|
|
|
picture to be acquired) into the movie camera, and connect |
|
|
|
|
|
|
||
|
|
|
|
|
|
|
|
|
|||
|
|
|
to the personal computer. |
|
|
|
|
|
|
||
|
|
|
1. Set the movie camera to Play Mode, and start |
|
|
|
|
|
|
||
|
|
|
|
|
|
|
|
|
|||
|
|
|
|
|
|
|
|
|
|||
|
|
|
|
the DV STUDIO 3 |
|
4. Click on the [ACQUIRE] button |
|
|
|
||
|
|
|
|
|
|
|
|
|
|
||
|
|
|
|
|
|
|
|
|
|
||
|
|
|
|
|
|
|
|
|
|
||
|
|
|
|
|
|
|
|
|
|
||
|
|
|
|
|
|
|
|
|
|
||
|
|
|
|
|
|
|
|
|
|
||
|
|
|
|
|
|
|
|
|
|
||
|
|
|
|
|
|
|
|
|
|
||
|
|
|
|
|
|
|
|
|
|
||
|
|
|
|
|
|
|
|
|
|||
|
|
|
|
|
|
|
|
|
|
|
|
|
|
|
|
|
|
|
|
Picture acquisition begins. |
|
|
|
|
|
|
|
|
|
|
|
|
|||
|
|
|
|
|
|
|
|
If acquisition is finished, the acquired picture is |
|
|
|
|
|
|
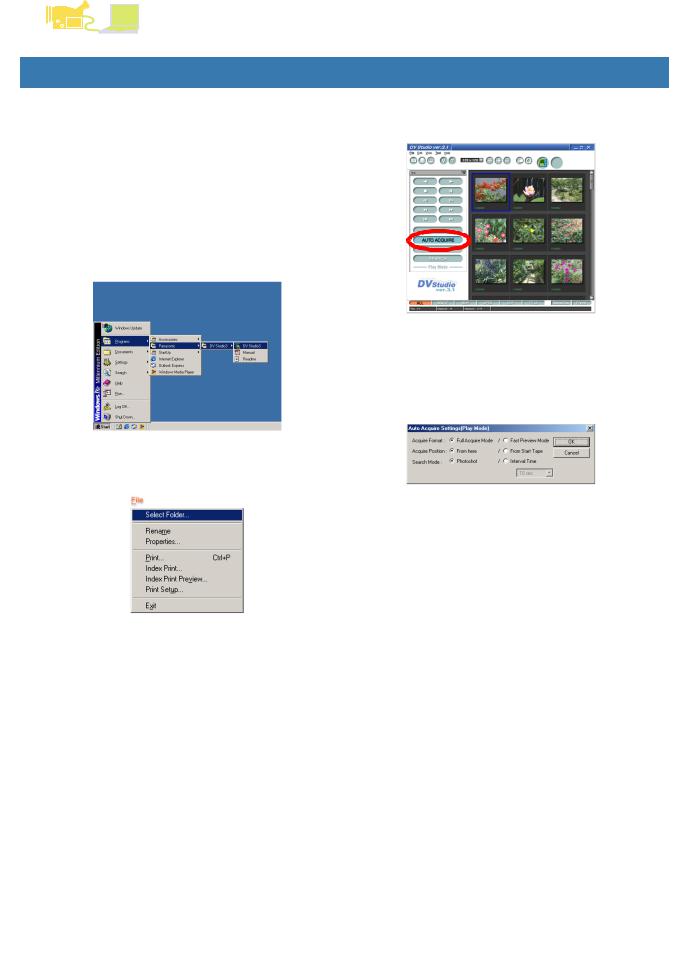
2. Click [File] >>> [Select Folder] in the menu, |
|
|
displayed in the picture display section. |
|
|
|
||
|
|
|
|
|
|
|
|
|
|||
|
|
|
|
|
|
|
|
|
|||
|
|
|
|
|
|
|
|
|
|||
|
|
|
|
|
|
|
|
|
|||
|
|
|
|
and select the folder in which the picture is to |
|
|
|
|
|
|
|
|
|
|
|
be saved |
|
|
• To cancel acquisition, click on [Cancel]. |
|
|
|
|
|
|
|
|
|
|
|
|
|
|
|
|
|
|
|
|
In the picture display section, the pictures in the |
|
|
|
|
|
||
|
|
|
|
|
|
|
|
|
|||
|
|
|
|
|
|
|
|
|
|||
|
|
|
|
|
|
|
|
|
|||
|
|
|
|
|
|
|
|
|
|||
|
|
|
|
|
|
|
|
|
|||
|
|
|
|
|
|
|
|
|
|||
|
|
|
|
|
|
|
|
|
|||
|
|
|
|
|
|
|
|
|
|||
|
|
|
|
|
|
|
|
|
|||
|
|
|
|
|
|
|
|
|
|||
|
|
|
|
|
|
|
|
|
|||
|
|
|
|
|
|
|
|
|
|||
|
|
|
|
|
|
• Information such as Date etc. in movie camera is not |
|
|
|
||
|
|
|
|
selected folder are displayed. |
|
|
|
|
|
||
|
|
|
|
• When the DV STUDIO 3 is started, select the previous |
|
|
displayed. |
|
|
|
|
|
|
|
|
|
|
• Acquisition of picture containing digital playback effect |
|
|
|
||
|
|
|
|
opened folder. The pictures in the folder are displayed |
|
|
is not possible. |
|
|
|
|
|
|
|
|
in the picture display section. |
|
|
|
|
|
||
|
|
|
|
• To create a new folder, please see P22. |
|
|
• Even with movie cameras provided with title function, |
|
|
|
|
|
|
|
|
|
|
|
|
acquisition is not possible for pictures in which title or |
|
|
|
|
|
|
|
|
|
|
|
illustration frame have been added to the picture in the |
|
|
|
|
|
|
|
|
|
|
|
tape. |
|
|
|
|
|
|
|
|
|
|
|
|
|||
|
|
|
|
|
|
|
In DV STUDIO 3, playback picture is not displayed. |
|
|
|
|
|
|
|
|
|
|
|
|
|
|
||
|
|
|
|
|
|
|
|
|
|||
|
|
|
|
|
|
|
Please check with the finder or monitor in the movie |
|
|
|
|
|
|
|
|
|
|
|
camera. |
|
|
|
|
|
|
|
|
|
|
|
9 |
|
|
|
|
|
|
|
|
|
|
|
|
|
|
||
|
|
|
|
|
|
|
|
|
|
||
|
|
|
|
|
|
|
|
|
|
||
|
|
|
|
|
|
|
|
|
|
||
|
|
|
|
|
|
|
|
|
|
||
|
|
|
|
|
|
|
|
|
|
||
|
|
|
|
|
|
|
|
|
|
||
|
|
|
|
|
|
|
|
|
|
||
|
|
|
|
|
|
|
|
|
|
||
|
|
|
|
|
|
|
|
|
|
||
|
|
|
|
|
|
|
|
|
|
||
|
|
|
|
|
|
|
|
|
|
|
|
|
|
|
|
|
|
|
|
|
|
|
|
|
|
|
|
|
|
|
|
|
|
|
|
|
|
|
|
|
|
|
|
|
|
|
|
|
|
|
|
|
|
|
|
|
|
|
|
Operation (Picture acquisition)
DV STUDIO 3
Automatically acquiring still pictures
|
|
|
|
|
|
|
|
|
|
|
|
|
|
|
|
Automatically acquiring still pictures |
|
3. Click on [AUTO ACQUIRE] button |
|
|
|
||||
|
|
|
|
|
|
|
||||||
|
|
|
(Play Mode) |
|
|
|
|
|
|
|
||
|
|
|
|
|
[Auto Acquire Settings(Play Mode)] screen is displayed. |
|
|
|
||||
|
|
|
|
|
|
|||||||
|
|
|
Picture can be acquired in the format set. |
|
|
|
|
|
|
|
||
|
|
|
|
|
|
|
|
|
|
|||
|
|
|
Beforehand, please load the tape (which contains the |
|
|
|
|
|
|
|
||
|
|
|
picture to be acquired) into the movie camera, and connect |
|
|
|
|
|
|
|
||
|
|
|
to the personal computer. |
|
|
|
|
|
|
|
||
|
|
|
(This feature is not available in DV STUDIO Version 3.1E- |
|
|
|
|
|
|
|
||
|
|
|
LE) |
|
|
|
|
|
|
|
||
|
|
|
1. Set the movie camera to Play Mode, and start |
|
|
|
|
|
|
|
||
|
|
|
|
|
|
|
|
|
|
|||
|
|
|
|
|
|
|
|
|
|
|||
|
|
|
|
|
|
|
|
|
|
|||
|
|
|
|
the DV STUDIO 3 |
|
4. Set up the automatic acquire (P11), click on |
|
|
|
|||
|
|
|
|
|
|
|
|
|
|
|||
|
|
|
|
|
|
|
|
|
|
|||
|
|
|
|
|
|
|
|
|
|
|||
|
|
|
|
|
|
|
|
|
|
|||
|
|
|
|
|
|
|
|
|
|
|||
|
|
|
|
|
|
|
|
|
|
|||
|
|
|
|
|
|
|
|
|
||||
|
|
|
|
|
|
|
|
[OK] button |
|
|
|
|
|
|
|
|
|
|
|
|
|
|
|
|
|
|
|
|
|
|
|
|
|
As per the selection, the picture is automatically |
|
|
|
|
|
|
|
|
|
|
|
|
acquired. |
|
|
|
|
|
|
|
|
|
|
|
|
The acquired picture is added in order to the picture |
|
|
|
|
|
|
|
|
|
|
|
|
|
||||
|
|
|
2. Click [File] >>> [Select Folder] in the menu, |
|
|
display section. |
|
|
|
|||
|
|
|
|
|
|
|
|
|
|
|||
|
|
|
|
|
|
|
|
|
|
|||
|
|
|
|
|
|
|
|
|
|
|||
|
|
|
|
|
|
|
|
|
|
|||
|
|
|
|
and select the folder in which the picture is to |
|
|
|
|
|
|
|
|
|
|
|
|
be saved |
|
|
• During automatic acquire set up, if [From here] is to be |
|
|
|
||
|
|
|
|
|
|
|
|
|
|
|
||
|
|
|
|
|
|
|
|
|
|
|
||
|
|
|
|
|
|
|
|
|
|
|
||
|
|
|
|
|
|
|
|
|
||||
|
|
|
|
|
|
|
|
chosen in [Acquire Position], first please play back the |
|
|
|
|
|
|
|
|
|
|
|
|
Still Picture to the location from where the acquisition |
|
|
|
|
|
|
|
|
|
|
|
|
|
||||
|
|
|
|
|
|
|
|
will begin. |
|
|
|
|
|
|
|
|
|
|
|
|
• To cancel acquisition, click on [Cancel]. |
|
|
|
|
|
|
|
|
|
|
|
|
|
||||
|
|
|
|
|
|
|
|
• During the interval time slight errors may occur. |
|
|
|
|
|
|
|
|
|
|
|
|
• On starting the automatic acquire, it is possible that the |
|
|
|
|
|
|
|
|
|
|
|
|
first picture cannot be acquired. |
|
|
|
|
|
|
|
|
|
|
|
|
|
||||
|
|
|
|
In the picture display section, the pictures in the |
|
|
• Acquisition of picture containing digital playback effect |
|
|
|
||
|
|
|
|
|
|
is not possible. |
|
|
|
|||
|
|
|
|
selected folder are displayed. |
|
|
|
|
|
|||
|
|
|
|
• When the DV STUDIO 3 is started, select the previous |
|
|
|
|
|
|
|
|
|
|
|
|
opened folder. The pictures in the folder are displayed |
|
|
|
|
|
|
|
|
|
|
|
|
in the picture display section. |
|
|
|
|
|
|
|
|
|
|
|
|
|
|
|
|
|
|
|||
|
|
|
10 |
• To create a new folder, please see P22. |
|
|
|
|
|
|
|
|
|
|
|
|
|
|
|
|
|
|
|
|
|
|
|
|
|
|
|
|
|
|
|
|
|
|
|
|
|
|
|
|
|
|
|
|
|
|
|
|
|
|
|
|
|
|
|
|
|
|
|
|
|
|
|
|
|
|
|
|
|
|
|
|
|
|
|
|
|
|
|
|
|
|
|
|
|
|
|
|
|
|
|
|
|
|
|
|
|
|
|
|
|
|
|
|
|
|
|
|
|
|
|
|
|
|
|
|
|
|
|
|
|
|
|
|
|
|
|
|
|
|
|
|
|
|
|
|
|
|
|
|
|
|
|
|
|
|
|
|
|
|
|
|
|
|
|
|
|
|
|
|
|
|
|
|
|
|
|
|
|
|
|
|
|
|
|
|
|
|
|
|
|
|
|
|
|
|
|
|
|
|
|
|
|
|
|
|
|
|
|
|
|
|
|
|
|
|
|
|
|
|
|
|
|
|
|
|
|
|
|
|
|
|
|
|
|
|
|
|
|
|
|
|
|
|
|
|
|
|
|
|
|
|
|
|
|
|
|
|
|
|
|
|
|
|
|
|
|
|
|
|
|
|
|
|
|
|
|
|
|
|
|
|
|
|
|
|
|
|
|
|
|
|
|
|
|
|
|
|
|
|
|
|||
|
|
|
|
|
|
|
|
|
|
|
|
|
|
|
|
|
|
|
|
|
|
|
|
|
|
|
|
|
|
|
|
|
|
|
|
|
|
|
|
|
|
|
|
|
|
|
|
|
|
|
|
|
|
|
|
|
|
|
|
|
|
|
|
|
Operation (Picture acquisition)
DV STUDIO 3
Setting up Autoacquire
|
|
|
|
|
|
|
|
|
|
|
|
Setting up Autoacquire |
|
[Search Mode]: |
|
|
|
|
|
|
|
|
|
|
||
|
|
|
(Play Mode/Camera Mode/Card Playback |
|
(This function is not available in Card Playback Mode) |
|
|
|
|
|
|
|
[Photoshot] |
|
|
|
|
|
|
|
Mode) |
|
Searches for the picture taken by Photoshot, or the still |
|
|
|
|
|
|
|
|
|
|||
|
|
|
|
|
picture copied to the tape from the Memory Card, and |
|
|
|
|
|
|
|
|
performs acquisition. |
|
|
|
|
|
|
|
|
[Interval Time] |
|
|
|
|
|
|
|
|
At intervals specified by clicking on [ ▼ ], acquisition of |
|
|
|
|
|
|
|
|
picture occurs. |
|
|
|
|
|
|
|
|
Play Mode can be selected from 10 seconds, 20 |
|
|
|
|
|
|
|
|
|
|
||
|
|
|
|
|
seconds, 30 seconds, 1 minute, 2 minutes, 3 minutes, 5 |
|
|
|
|
|
|
|
|
minutes. |
|
|
|
|
|
|
|
|
Camera Mode can be selected from 1 minute, 2 |
|
|
|
|
|
|
|
|
|
|
||
|
|
|
Based on the movie camera mode, the selectable items may |
|
minutes, 3 minutes, 5 minutes, 10 minutes. |
|
|
|
|
|
|
|
(Slight errors may occur during interval time) |
|
|
|
|
|
|
|
be different. |
|
• Please set the [Counter Mode] in the movie camera menu |
|
|
|
|
|
|
|
|
|
|
||
|
|
|
[Acquire Format]: |
|
|
|
|
|
|
|
|
|
|
|
|||
|
|
|
|
to other than [Counter memory]. If it is in [Counter Mode], |
|
|
|
|
|
|
|
[Full Acquire Mode] |
|
the tape may stop during acquire when the counter is at |
|
|
|
|
|
|
Acquires the still picture standard data. Extension is |
|
[0:00.00]. |
|
|
|
|
|
|
.dvf. |
|
|
|
|
|
|
|
|
[Fast Preview Mode] |
|
|
|
|
|
|
|
|
Acquires brief picture data for display. Extension is .dcf. |
|
|
|
|
|
|
|
|
|
|
|
|
|
|
|
|
|
For simple picture details, please see P18. |
|
|
|
|
|
|
|
|
• Regarding simple picture formats, it is possible to |
|
|
|
|
|
|
|
|
acquire picture in shorter time as simple image data for |
|
|
|
|
|
|
|
|
|
|
|
|
|
|
|
|
|
the purpose of display. |
|
|
|
|
|
|
|
|
• If thumbnail picture is displayed in 96x96 or 128x128 |
|
|
|
|
|
|
|
|
size, the simple picture displayed is smaller than the |
|
|
|
|
|
|
|
|
|
|
|
|
|
|
|
|
|
other pictures. |
|
|
|
|
|
|
|
|
|
|
|
|
|
|
|
|
|
[Acquire Position]: |
|
|
|
|
|
|
|
|
|
|
|
|
|
|
|
|
|
[From here] |
|
|
|
|
|
|
|
|
Autoacquiring of picture will start from the current tape |
|
|
|
|
|
|
|
|
|
|
|
|
|
|
|
|
|
position. |
|
|
|
|
|
|
|
|
In Card Playback Mode, autoacquiring will start from the |
|
|
|
|
|
|
|
|
currently displayed picture. |
|
|
|
|
|
|
|
|
[From Start Tape/From Start Card] |
|
|
|
|
|
|
|
|
|
|
|
|
|
|
|
|
|
After rewinding the tape fully, automatic acquire of |
|
|
|
|
|
|
|
|
|
|
|
|
|
|
|
|
|
picture begins. |
|
|
|
|
|
|
|
|
In Card Playback Mode, automatic acquire begins |
|
|
|
|
|
|
|
|
starting from the first picture recorded in the Memory |
|
|
|
|
|
|
|
|
Card. |
|
11 |
|
|
|
|
|
|
|
|
|
|
||
|
|
|
|
|
|
|
|
|
|
|
|
|
|
|
|
|
|
|
|
|
|
|
|
|
|
|
|
|
|
|
|
|
|
|
|
|
|
|
|
|
|
|
|
|
|
|
|
|
|
|
|
|
|
|
|
|
|
|
|
|
|
|
|
|
|
|
|
|
|
|
|
|
|
|
|
|
|
|
|
|
|
|
|
|
|
|
|
|
|
|
|
|
|
|
|
|
|
|
|
|
|
|
|
|
|
|
|
|
|
|
|
|
|
|
|
|
|
|
|
|
|
|
|
|
|
|
|
|
|
|
|
|
|
|
|
|
|
|
|
|
|
|
|
|
|
|
|
|
|
|
|
|
|
|
|
|
|
|
|
|
|
|
|
|
|
|
|
|
|
|
|
|
|
|
|
|
|
|
|
|
|
|
|
|
|
|
|
|
|
|
|
|
|
|
|
|
|
|
|
|
|
|
|
|
|
|
|
|
|
|
|
|
|
|
|
|
|
|
|
|
|
|
|
|
|
|
|
|
|
|
|
|
|
|
|
|
|
|
|
|
|
|
|
|
|
|
|
|
|
|
|
|
|
|
|
|
|
|
|
|
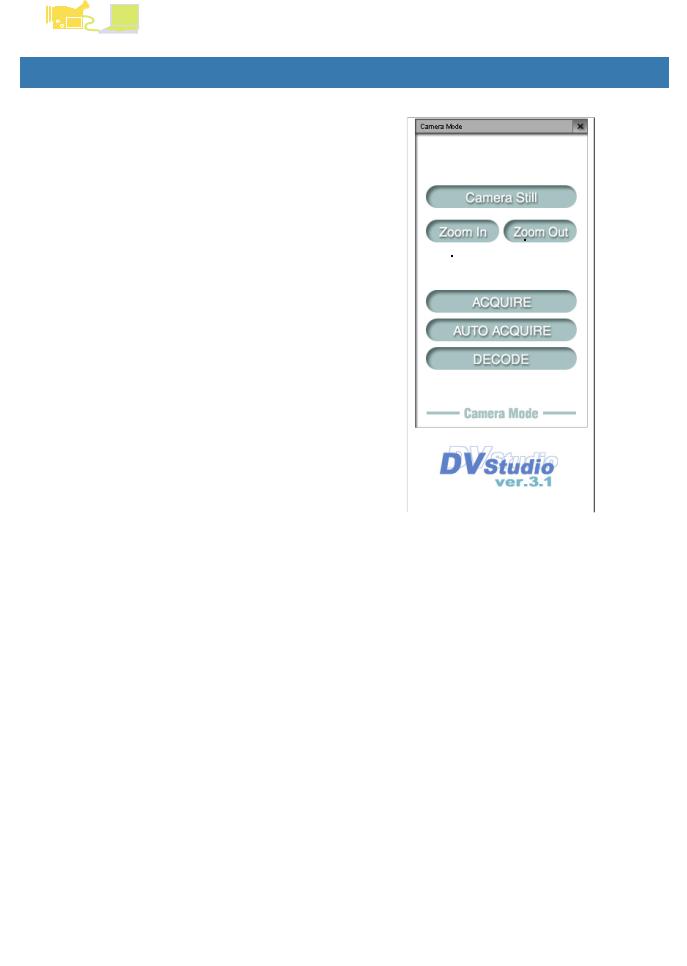
Operation (Picture acquisition)
DV STUDIO 3
Camera Mode
|
|
|
|
|
|
|
|
|
|
|
|
|
|
|
|
|
|
|
|
Camera Mode |
|
|
|
|
|
|
|
|
|
|
|
|
|
|
|
|
|
|
|
|
|
|
|
|
|
|
|
|
|
|
|
|
|
Operation |
|
|
|
|
|
|
|
|
|
|
|
|
|
|
|
|
|
|
|
|
|
|
|
|
|
|
|
|
|
|
|
|
|
|
|
|
|
|
|
|
|
|
|
|
|
|
|
|
|
|
1 [Camera Still] button |
|
|
|
|
|
|
|
|
|
|
|
|
|
|
|
|
|
|
|
|
|
|
|
|
|
|
|
|
|
|
|
|
|
|
|
|
|
|
|
|
|
|
|
|
|
|
|
|
|
|
Set the movie camera to Still Picture status. |
|
1 |
|
|
|
|
7 |
|
|
|
|||
|
|
|
On clicking again, returns to the shooting mode. |
|
|
|
|
|
|
|
|
|||||
|
|
|
|
|
|
|
|
|
||||||||
|
|
|
2 [Zoom In] button |
|
2 |
|
|
|
|
|
|
|
|
|
|
|
|
|
|
|
|
|
|
|
|
|
|
|
|
|
|
||
|
|
|
|
|
|
|
|
|
|
|
|
|
||||
|
|
|
On clicking, the picture displayed is enlarged. |
|
3 |
|
|
|
|
|
|
|
|
|
|
|
|
|
|
|
|
|
|
|
|
|
|
|
|
|
|
||
|
|
|
3 [Zoom Out] button |
|
|
|
|
|
|
|
|
|
|
|
|
|
|
|
|
|
|
|
|
|
|
|
|
|
|
|
|
|
|
|
|
|
|
|
|
|
|
|
|
|
|
|
|
|
|
|
|
|
|
On clicking, the picture is displayed in wide angle. |
|
4 |
|
|
|
|
|
|
|
|
|
|
|
|
|
|
|
|
|
|
|
|
|
|
|
|
||||
|
|
|
4 [ACQUIRE] button |
|
5 |
|
|
|
|
|
|
|
|
|
|
|
|
|
|
|
|
|
|
|
|
|
|
|
|
|
|
||
|
|
|
|
|
|
|
|
|
|
|
|
|
|
|
||
|
|
|
|
|
|
|
|
|
|
|
|
|
|
|||
|
|
|
Picture taken with movie camera is acquired. |
|
6 |
|
|
|
|
|
|
|
|
|
|
|
|
|
|
5 [AUTO ACQUIRE] button |
|
|
|
|
|
|
|
|
|
|
|
|
|
|
|
|
|
|
|
|
|
|
|
|
|
|
|
|
||
|
|
|
|
|
|
|
|
|
|
|
|
|
|
|
|
|
|
|
|
Based on the [Auto Acquire Settings], the picture taken |
|
|
|
|
|
|
|
|
|
|
|
|
|
|
|
|
in the movie camera is automatically acquired. (P11) |
|
|
|
|
|
|
|
|
|
|
|
|
|
|
|
|
|
|
|
|
|
|
|
|
|
|
|
|
|
|
|
|
|
(This is not displayed in DV STUDIO Version 3.1E-LE) |
|
|
|
|
|
|
|
|
|
|
|
|
|
|
|
|
|
|
|
|
|
|
|
|
|
|
|
|
|
|
|
|
|
6 [DECODE] button |
|
|
|
|
|
|
|
|
|
|
|
|
|
|
|
|
|
|
|
|
|
|
|
|
|
|
|
|
|
|
|
|
|
|
|
|
|
|
|
|
|
|
|
|
|
|
|
|
|
|
Picture is magnified and displayed. (P26) |
|
|
|
|
|
|
|
|
|
|
|
|
|
|
|
|
It is also possible to magnify a picture by double clicking |
|
|
|
|
|
|
|
|
|
|
|
|
|
|
|
|
the picture. (Pictures in BMP, JPEG etc. formats are |
|
|
|
|
|
|
|
|
|
|
|
|
|
|
|
|
|
|
|
|
|
|
|
|
|
|
|
|
|
|
|
|
|
enlarged by relevant applications and displayed) |
|
|
|
|
|
|
|
|
|
|
|
|
|
|
|
|
It is not possible to magnify simple pictures in Camera |
|
|
|
|
|
|
|
|
|
|
|
|
|
|
|
|
Mode. |
|
|
|
|
|
|
|
|
|
|
|
|
|
|
|
|
|
|
|
|
|
|
|
|
|
|
|
|
|
|
|
|
|
7 Movie camera status display |
|
|
|
|
|
|
|
|
|
|
|
|
|
|
|
|
|
|
|
|
|
|
|
|
|
|
|
|
|
|
|
|
|
|
|
|
|
|
|
|
|
|
|
|
|
|
|
|
|
|
|
|
|
|
|
|
|
|
|
|
|
|
|
|
|
|
|
Displays the status of the connected movie camera. |
|
|
|
|
|
|
|
|
|
|
|
|
|
|
|
|
• When acquiring pictures in this mode, please remove the |
|
|
|
|
|
|
|
|
|
|
|
|
|
|
|
|
|
|
|
|
|
|
|
|
|
|
|
|
|
|
|
|
|
|
|
|
|
|
|
|
|
|
|
|
|
|
|
|
|
|
tape and Memory Card from the movie camera. |
|
|
|
|
|
|
|
|
|
|
|
|
|
|
|
|
|
|
|
|
|
|
|
|
|
|
|
|
|
|
|
|
|
If tape or Memory Card is present, the power supply to the |
|
|
|
|
|
|
|
|
|
|
|
|
|
|
|
|
movie camera is automatically cut off after a given time. |
|
|
|
|
|
|
|
|
|
|
|
|
|
|
|
|
Even if the power supply is replaced, after being |
|
|
|
|
|
|
|
|
|
|
|
|
|
|
|
|
automatically cut off after a given time, when movie |
|
|
|
|
|
|
|
|
|
|
|
|
|
|
|
|
|
|
|
|
|
|
|
|
|
|
|
|
|
|
|
|
|
camera and personal computer can not be connected read |
|
|
|
|
|
|
|
|
|
|
|
|
|
|
|
|
[Troubleshooting (Q&A)]. (P38) |
|
|
|
|
|
|
|
|
|
|
|
|
|
|
|
|
|
|
|
|
|
|
|
|
|
|
|
|
|
|
|
|
|
• In this mode, please set the Demo mode in the movie |
|
|
|
|
|
|
|
|
|
|
|
|
|
|
|
|
camera to [OFF]. |
|
|
|
|
|
|
|
|
|
|
|
|
|
|
|
|
(Note) |
|
|
|
|
|
|
|
|
|
|
|
|
|
|
|
|
|
|
|
|
|
|
|
|
|
|
|
|
|
|
|
|
|
|
|
|
|
|
|
|
|
|
|
|
|
|
|
|
|
|
• Depending on the type of the movie camera, acquiring |
|
|
|
|
|
|
|
|
|
|
|
|
|
|
|
|
|
|
|
|
|
|
|
|
|
|
|
|
|
|
|
|
|
image in Camera Mode may not be possible, or [Zoom In]/ |
|
|
|
|
|
|
|
|
|
|
|
|
|
|
|
|
[Zoom Out] feature may not function. |
|
|
|
|
|
|
|
|
|
|
|
|
|
|
|
|
12 |
|
|
|
|
|
|
|
|
|
|
|
|
|
|
|
|
|
|
|
|
|
|
|
|
|
|
|
|
|
|
|
|
|
|
|
|
|
|
|
|
|
|
|
|
|
|
|
|
|
|
|
|
|
|
|
|
|
|
|
|
|
|
|
|
|
|
|
|
|
|
|
|
|
|
|
|
|
|
|
|
|
|
|
|
|
|
|
|
|
|
|
|
|
|
|
|
|
|
|
|
|
|
|
|
|
|
|
|
|
|
|
|
|
|
|
|
|
|
|
|
|
|
|
|
|
|
|
|
|
|
|
|
|
|
|
|
|
|
|
|
|
|
|
|
|
|
|
|
|
|
|
|
|
|
|
|
|
|
|
|
|
|
|
|
|
|
|
|
|
|
|
|
|
|
|
|
|
|
|
|
|
|
|
|
|
|
|
|
|
|
|
|
|
|
|
|
|
|
|
|
|
|
|
|
|
|
|
|
|
|
|
|
|
|
|
|
|
|
|
|
|
|
|
|
|
|
|
|
|
|
|
|
|
|
|
|
|
|
|
|
|
|
|
|
|
|
|
|
|
|
|
|
|
|
|
|
|
|
|
|
|
|
|
|
|
|
|
|
|
|
|
|
|
|
|
|
|
|
|
|
|
|
|
|
|
Loading...