


Operating Instructions
HDD Recorder
Model No. DMR-HW220
Thank you for purchasing this product.
For optimum performance and safety, please read these instructions carefully. Please keep this manual for future reference.
•This HDD Recorder is for viewing and recording free to view channels only. It does not receive pay TV or encrypted channels.
|
|
GL |
VQT4G61 |

Safety precautions
WARNING
Unit
•To reduce the risk of fire, electric shock or product damage,
-Do not expose this unit to rain, moisture, dripping or splashing.
-Do not place objects filled with liquids, such as vases, on this unit.
-Use only the recommended accessories.
-Do not remove covers.
-Do not repair this unit by yourself. Refer servicing to qualified service personnel.
-Do not let metal objects fall inside this unit.
-Do not place heavy items on this unit.
AC mains lead
•To reduce the risk of fire, electric shock or product damage,
-Ensure that the power supply voltage corresponds to the voltage printed on this unit.
-Insert the mains plug fully into the socket outlet.
-Do not pull, bend, or place heavy items on the lead.
-Do not handle the plug with wet hands.
-Hold onto the mains plug body when disconnecting the plug.
-Do not use a damaged mains plug or socket outlet.
•Install this unit so that the AC mains lead can be unplugged from the socket outlet immediately if any problem occurs.
SD card
•Keep the Memory Card out of reach of children to prevent swallowing.
CAUTION
Unit
•Do not place sources of naked flames, such as lighted candles, on this unit.
•This unit may receive radio interference caused by mobile telephones during use. If such interference occurs, please increase separation between this unit and the mobile telephone.
•This unit is intended for use in moderate climates.
Placement
•Place this unit on an even surface.
•To reduce the risk of fire, electric shock or product damage,
-Do not install or place this unit in a bookcase, built-in cabinet or in another confined space. Ensure this unit is well ventilated.
-Do not obstruct this unit’s ventilation openings with newspapers, tablecloths, curtains, and similar items.
-Do not expose this unit to direct sunlight, high temperatures, high humidity, and excessive vibration.
2 VQT4G61

Batteries
•Danger of explosion if battery is incorrectly replaced. Replace only with the type recommended by the manufacturer.
•Mishandling of batteries can cause electrolyte leakage and may cause a fire.
-Do not mix old and new batteries or different types at the same time.
-Do not heat or expose to flame.
-Do not leave the battery(ies) in a car exposed to direct sunlight for a long period of time with doors and windows closed.
-Do not take apart or short circuit.
-Do not recharge alkaline or manganese batteries.
-Do not use batteries if the covering has been peeled off.
-Remove batteries if you do not intend to use the remote control for a long period of time. Store in a cool, dark place.
•When disposing the batteries, please contact your local authorities or dealer and ask for the correct method of disposal.
Supplied accessories
Please check and identify the supplied accessories.
(Product numbers correct as of May 2012. These may be subject to change.)
Remote control (N2QAYB000781): |
1 pc. |
Batteries for remote control: |
2 pcs. |
AC mains lead: |
1 pc. |
RF coaxial cable: |
1 pc. |
Audio/Video cable: |
1 pc. |
• Do not use AC mains lead with other equipment.
Indemnity concerning recorded content
Panasonic does not accept any responsibility for damages directly or indirectly due to any type of problems that result in loss of recording or edited content (data), and does not guarantee any content if recording or editing does not work properly. Likewise, the above also applies in a case where any type of repair is made to the unit (including any other non-HDD related component).
VQT4G61 3
Table of contents
Safety precautions . . . . . . . . . . . . . . . . . . . . . .2 Supplied accessories . . . . . . . . . . . . . . . . . . . .3
Getting started |
|
|
HDD and media information . . . . . . . . . . . . . . |
.6 |
|
- |
Recordable/playable contents . . . . . . . . . . . . . . . . |
.6 |
- Notes . . . . . . . . . . . . . . . . . . . . . . . . . . . . . . . |
.7 |
|
Unit care . . . . . . . . . . . . . . . . . . . . . . . . . . . . . |
.9 |
|
Control reference guide . . . . . . . . . . . . . . . . . |
10 |
|
Connection . . . . . . . . . . . . . . . . . . . . . . . . . . . |
12 |
|
- |
Basic connections . . . . . . . . . . . . . . . . . . . . . . . |
12 |
- Other TV connection. . . . . . . . . . . . . . . . . . . . . . |
13 |
|
- |
Amplifier/receiver connections . . . . . . . . . . . . . . . |
14 |
- Network connection . . . . . . . . . . . . . . . . . . . . . . |
16 |
|
Settings . . . . . . . . . . . . . . . . . . . . . . . . . . . . . . |
17 |
|
- |
TV operation buttons . . . . . . . . . . . . . . . . . . . . . |
17 |
- |
Easy Setting . . . . . . . . . . . . . . . . . . . . . . . . . . . |
18 |
- Easy Network Setting . . . . . . . . . . . . . . . . . . . . . |
19 |
|
FUNCTION MENU screen . . . . . . . . . . . . . . . |
21 |
|
Watching broadcasts
Watching broadcasts . . . . . . . . . . . . . . . . . . .22 - Using Channel List . . . . . . . . . . . . . . . . . . . . . . .22 - Using TV Guide system. . . . . . . . . . . . . . . . . . . .23
- Using channel information . . . . . . . . . . . . . . . . . .23 - Operations while watching broadcast . . . . . . . . . . .24 - REWIND LIVE TV/PAUSE LIVE TV . . . . . . . . . . . .24
Recording
Recording TV programmes. . . . . . . . . . . . . . .26
- Operation during Recording . . . . . . . . . . . . . . . . .27 Timer recording. . . . . . . . . . . . . . . . . . . . . . . .28
- Manually programming timer recording . . . . . . . . . .28 - Timer recording options. . . . . . . . . . . . . . . . . . . .29 - Timer recording from channel information . . . . . . . .29 - Notes on timer recording . . . . . . . . . . . . . . . . . . .29 - To confirm and edit a timer programme . . . . . . . . . .30
Playing back video
Playing titles on the HDD . . . . . . . . . . . . . . . .31
- DIRECT NAVIGATOR (VIDEO) screen . . . . . . . . . .31 Playing titles on the media . . . . . . . . . . . . . . .34 Operation during play . . . . . . . . . . . . . . . . . . .35 - General operations. . . . . . . . . . . . . . . . . . . . . . .35 - 3D video playback . . . . . . . . . . . . . . . . . . . . . . .37
Editing video
Deleting recorded titles . . . . . . . . . . . . . . . . . .38 Editing recorded titles . . . . . . . . . . . . . . . . . . .39
Copying video
Copying titles . . . . . . . . . . . . . . . . . . . . . . . . .42
Photo
Playing photos . . . . . . . . . . . . . . . . . . . . . . . .44
- DIRECT NAVIGATOR (PHOTO) screen . . . . . . . . .44
- Photo play option. . . . . . . . . . . . . . . . . . . . . . . .45 - Slideshow Settings. . . . . . . . . . . . . . . . . . . . . . .45 Editing photos . . . . . . . . . . . . . . . . . . . . . . . . .46 Copying photos. . . . . . . . . . . . . . . . . . . . . . . .47
- Selecting and copying the photos . . . . . . . . . . . . .47
- Copying automatically. . . . . . . . . . . . . . . . . . . . .47
Music
Playing music . . . . . . . . . . . . . . . . . . . . . . . . .48 - Copying music to HDD . . . . . . . . . . . . . . . . . . . .48
- Playing music recorded on HDD . . . . . . . . . . . . . .49 - Operations during music play . . . . . . . . . . . . . . . .50 Editing music/playlist . . . . . . . . . . . . . . . . . . .51
With Other Equipment
Copying the HD Video or the SD Video . . . . .52
- Copying HD Video (AVCHD) . . . . . . . . . . . . . . . .52 - Copying SD Video (MPEG2) . . . . . . . . . . . . . . . .53 Smart Home Networking (DLNA) . . . . . . . . . .54
- Using this unit as Server . . . . . . . . . . . . . . . . . . .54 - Using this unit as Client. . . . . . . . . . . . . . . . . . . .55 - Using this unit as Media Renderer . . . . . . . . . . . . .56
Convenient functions |
|
Format SD card . . . . . . . . . . . . . . . . . . . . . . . |
57 |
Registering the external HDD (USB HDD) . . . |
58 |
- Connecting the USB HDD . . . . . . . . . . . . . . . . . . |
58 |
- Disconnecting the USB HDD . . . . . . . . . . . . . . . . |
58 |
- Registering the USB HDD . . . . . . . . . . . . . . . . . . |
59 |
VIERA Link functions . . . . . . . . . . . . . . . . . . . |
60 |
VIERA Connect (Enjoying Internet Service) . . . . . |
61 |
- To enjoy video communication (e.g., SkypeTM) . . . . . |
61 |
Playback menu . . . . . . . . . . . . . . . . . . . . . . . . |
62 |
Changing the unit’s settings (Setup). . . . . . . . |
64 |
- Common procedures . . . . . . . . . . . . . . . . . . . . . |
64 |
- Digital TV Tuning. . . . . . . . . . . . . . . . . . . . . . . . |
66 |
- HDD / USB HDD . . . . . . . . . . . . . . . . . . . . . . . . |
68 |
- Picture . . . . . . . . . . . . . . . . . . . . . . . . . . . . . . |
69 |
- Sound. . . . . . . . . . . . . . . . . . . . . . . . . . . . . . . |
69 |
- Display . . . . . . . . . . . . . . . . . . . . . . . . . . . . . . |
70 |
- Connection . . . . . . . . . . . . . . . . . . . . . . . . . . . |
70 |
- Network. . . . . . . . . . . . . . . . . . . . . . . . . . . . . . |
71 |
- Others . . . . . . . . . . . . . . . . . . . . . . . . . . . . . . |
73 |
4 VQT4G61

Software (Firmware) Update . . . . . . . . . . . . . 76 Other operations . . . . . . . . . . . . . . . . . . . . . . 77 - Entering text . . . . . . . . . . . . . . . . . . . . . . . . . . 77
- Switching the aspect ratio of the screen . . . . . . . . . 77
- HOLD function. . . . . . . . . . . . . . . . . . . . . . . . . 77
Troubleshooting |
|
|
Troubleshooting guide. . . . . . . . . . . . . . . . . . |
78 |
|
- |
General operation. . . . . . . . . . . . . . . . . . . . . . . |
78 |
- |
Displays . . . . . . . . . . . . . . . . . . . . . . . . . . . . . |
79 |
- TV screen and video . . . . . . . . . . . . . . . . . . . . . |
79 |
|
- Sound . . . . . . . . . . . . . . . . . . . . . . . . . . . . . . |
80 |
|
- |
Recording, timer recording and copying . . . . . . . . . |
80 |
- |
Play . . . . . . . . . . . . . . . . . . . . . . . . . . . . . . . |
81 |
- |
Edit . . . . . . . . . . . . . . . . . . . . . . . . . . . . . . . . |
81 |
- Photo . . . . . . . . . . . . . . . . . . . . . . . . . . . . . . |
81 |
|
- USB . . . . . . . . . . . . . . . . . . . . . . . . . . . . . . . |
81 |
|
- TV Guide . . . . . . . . . . . . . . . . . . . . . . . . . . . . |
81 |
|
- |
Broadcast. . . . . . . . . . . . . . . . . . . . . . . . . . . . |
82 |
- VIERA Link . . . . . . . . . . . . . . . . . . . . . . . . . . . |
82 |
|
- Network . . . . . . . . . . . . . . . . . . . . . . . . . . . . . |
82 |
|
- Reset . . . . . . . . . . . . . . . . . . . . . . . . . . . . . . |
83 |
|
- |
Messages on the unit’s display . . . . . . . . . . . . . . |
83 |
- When you experience problems with |
|
|
|
Easy Network Setting . . . . . . . . . . . . . . . . . . . . |
85 |
Reference
Specifications . . . . . . . . . . . . . . . . . . . . . . . . 87
Licenses . . . . . . . . . . . . . . . . . . . . . . . . . . . . 90
Limited Warranty . . . . . . . . . . . . . . . . . . . . . . 92
Index . . . . . . . . . . . . . . . . . . . . . . . . . . . . . . . 93
About descriptions in these operating instructions
• Pages to be referred to are indicated as “> ±±”.
Getting started
Watching broadcasts
Recording
Playing back video
Editing video
Copying video
Photo
Music
With Other Equipment
Convenient functions
Troubleshooting
Reference
VQT4G61 5

Getting started
Getting started HDD and media information
Recordable/playable contents
|
|
Media type |
Standard symbol |
Playable contents |
Recordable |
||||||
|
|
contents |
|||||||||
|
|
|
|
|
|
|
|
|
|
|
|
|
|
|
|
|
|
|
|
|
• Video |
|
|
|
|
Built-in hard disk drive |
|
|
|
|
|
|
• AVCHD/AVCHD 3D |
|
|
|
|
|
|
|
|
|
[HDD] |
• JPEG |
|
|
|
|
|
(HDD) |
|
|
|
|
|
|
|
||
|
|
|
|
|
|
|
|
• MPO (3D photo) |
|
||
|
|
|
|
|
|
|
|
|
|
||
|
|
|
|
|
|
|
|
|
• MP3 |
|
|
|
|
External HDD (> 58)§1, 2 |
|
|
|
|
|
[USB_HDD] |
• Video |
|
|
|
|
|
|
|
|
|
|
|
|
||
|
|
|
|
|
|
|
|
|
|
|
|
|
|
SD Cards |
|
|
|
|
|
|
• AVCHD/AVCHD 3D§3 |
• JPEG |
|
|
|
|
|
|
|
|
|
[SD] |
• SD Video (MPEG2)§4 |
• MPO (3D photo) |
|
|
|
|
|
|
|
|
|
• JPEG |
• MP4 |
|
|
|
|
|
|
|
|
|
|
|
|
||
|
|
|
|
|
|
|
|
|
• MPO (3D photo) |
|
|
|
|
|
|
|
|
|
|
|
• AVCHD/AVCHD 3D§3, 5 |
|
|
|
|
|
|
|
|
|
|
|
• SD Video (MPEG2)§4 |
|
|
|
|
USB memories |
|
|
|
|
|
[USB] |
• MPEG2 |
• MP4 |
– |
|
|
|
|
|
|
|
• MKV |
• DivX® |
|||
|
|
|
|
|
|
|
|
|
|
||
|
|
|
|
|
|
|
|
|
|
||
|
|
|
|
|
|
|
|
|
• JPEG |
• MP3 |
|
|
|
|
|
|
|
|
|
|
• MPO (3D photo) |
|
|
|
|
|
|
|
|
|
|
|
|
|
|
§1 Referred to as “USB HDD” in these operating instructions.
§2 It cannot be recorded directly. (Only compatible with copying from the built-in HDD)
§3 Recorded with AVCHD format compatible devices (Panasonic video camera, etc.). It may not be able to play back depending on the device.
§4 Recorded with SD-Video format compatible devices (Panasonic video camera, etc.). It can be played back only after copying to HDD. (> 53)
§5 It cannot be played back directly from the USB memory. Playback is possible by copying to the HDD. (> 52)
•[USB] Video images of the copyright-protected DivX contents stored on USB device can be output only through the HDMI output terminal.
•With certain recording states and folder structures, the play order may differ or playback may not be possible.
Playable contents on a DLNA server
When this unit works as a DLNA client (> 55), following contents are playable.
• Recorded video§ |
• AVCHD§ |
• MP4 |
• MPEG2 |
• JPEG |
• MPO (3D photo) |
• MP3 |
• FLAC |
§Only when the server is another DIGA. (> 54)
•Depending on the server, the contents other than stated above can be played back.
6 VQT4G61

Getting started
Notes
About extension of files
File format |
|
|
|
Extension |
|
|
|
JPEG |
“.JPG” |
“.jpg” |
|
|
|
|
|
MPO (3D photo) |
“.MPO” |
“.mpo” |
|
|
|
|
|
MP3 |
“.MP3” |
“.mp3” |
|
|
|
|
|
DivX |
“.DIVX” |
“.divx” |
“.AVI” |
“.avi” |
|
|
|
Subtitle text files§ |
“.SRT” |
“.srt” |
“.SUB” |
“.sub” |
“.TXT” |
“.txt” |
|
MKV |
“.MKV” |
“.mkv” |
|
|
|
|
|
Subtitle text files§ |
“.SRT” |
“.srt” |
“.SSA” |
“.ssa” |
“.ASS” |
“.ass” |
“.SUB” |
|
“.sub” |
“.TXT” |
“.txt” |
|
|
|
|
MPEG2 |
“.MPG” |
“.mpg” |
“.MPEG” |
“.mpeg” |
“.M2TS” |
“.m2ts” |
“.MTS” |
|
“.mts” |
“.TS” |
“.ts” |
|
|
|
|
MP4 |
“.MP4” |
“.mp4” |
“.MOV” |
“.mov” |
|
|
|
§The video file and subtitles text files are inside the same folder, and the file names are the same except for the file extensions.
• Some files may not be played back even if they have these extensions.
VQT4G61 7

Getting started
HDD and media information
Notes for the USB devices
•This unit does not guarantee connection with all USB devices.
•This unit supports USB 2.0 High Speed.
•Although this unit can use USB 3.0 devices as USB 2.0 devices, in certain cases USB 3.0 devices cannot be used due to differing connector shape, larger current ratings, etc. (Use of USB 2.0 devices is recommended.)
•USB memories support FAT12, FAT16 and FAT32 file systems.
•USB memories support DivX and MKV files less than 4 GB.
Notes for the SD cards
•Compatible SD card
-SD Memory Card
(from 8 MB to 2 GB, FAT12 and FAT16 formats)
-SDHC Memory Card
(from 4 GB to 32 GB, FAT32 format)
-SDXC Memory Card
(48 GB, 64 GB, exFAT format)
•Using miniSD card or microSD card
Mini-type and micro-type cards can also be used, but must be used with adaptor cards (optional).
To format an SD card
Refer to “Format SD card”. (> 57)
•Usable memory is slightly less than the card capacity.
•If the SD card is formatted on other equipment, the time necessary for recording may be longer or the card may not be able to be used on this unit. In these cases, format the card on this unit.
•SDHC Memory Cards and SDXC Memory Cards can be used in equipment that is compatible with the appropriate cards. (SDHC Memory Cards can also be used in equipment compatible with SDXC Memory Cards.)
Media handling
•Do not touch the terminal surface of the SD cards.
DO NOT
•Do not expose the terminals of the SD card to water, garbage or other strange things.
•Do not place in the following areas:
-In hot places, such as under the direct sunlight.
-In very dusty or humid areas.
-Locations susceptible to significant difference in temperature (condensation can occur).
-Where static electricity or electromagnetic waves occur.
8 VQT4G61

Unit care
HDD/USB HDD handling care
•The HDD is a high precision device
The HDD is a high precision recording instrument and is easily susceptible to damage. Therefore, be careful of the following points while the unit is turned on, especially during operation, otherwise the HDD and the recorded content may be damaged:
-Do not subject the unit to any vibration and shock.
-Do not remove the AC mains lead from the household mains socket.
•The HDD is a temporary storage device
This unit cannot save (backup) the HDD titles to media. You have to be very careful when handling the unit and editing the title.
•If the HDD or USB HDD is damaged, the recorded content cannot be recovered.
Setup precautions
•Place the unit on a surface that is flat and not subject to vibration or impact.
•Do not place on anything that generates heat like a Set Top Box, etc.
•Place in an area where condensation does not occur. Conditions where condensation may occur
-When there is an extreme change in temperature (e.g., when subjected to an air conditioner or when cooled air directly impacts the unit).
-When there is high humidity or a lot of steam in the room.
In the above situation, without turning the unit on, let the unit adjust to the room temperature and wait 2–3 hours until condensation is gone.
•Do not block the cooling fan on the rear of the unit.
•The unit may breakdown if cigarette smoke or bug spray/vapour, etc. gets inside the unit.
Getting started
When moving the unit
1Switch the unit to standby mode. (Wait until “BYE” disappears from the display.)
2Remove the AC mains lead from the household mains socket.
3Move only after the unit has come to a complete stop (approx. 3 minutes) in order to avoid subjecting to vibration and shock. (Even after the unit is switched to standby mode, the HDD continues operating for a short time.)
Cleaning
•Wipe with a soft, dry cloth.
•Never use alcohol, paint thinner or benzine to clean this unit.
•Before using chemically treated cloth, carefully read the instructions that came with the cloth.
When requesting this unit for repair
The registration of the USB HDD may be cancelled in the process of repairing this unit. You can use the USB HDD again by re-registering, but all recorded content already on the USB HDD will be lost. In such cases, the recorded content (data) cannot be recovered.
VQT4G61 9

Getting started
Control reference guide
Instructions for operations are generally described using the remote control.
Remote control |
|
|
1 Transmit the remote control signal
•Point it at remote control signal sensor on this unit. (> 11)
2Switch the unit from on to standby mode or vice versa
3 Select drive (HDD, SD or USB)
4Select channels and title numbers, etc./Enter numbers or characters
5Switch to the previously watched channel (> 22)
6Basic operations for recording and play, REWIND LIVE TV/PAUSE LIVE TV (> 24)
7 Show Information (> 23, 32, 35)
8 Selection/OK, Frame-by-frame (> 35)
9Show DIRECT NAVIGATOR (> 31)
:Show OPTION menu (> 39, 46, 51)
;Colour buttons (red, green, yellow, blue) (Use in accordance with instruction on the screen.)
< Start recording (> 26) = Select audio (> 24, 36)
> Show the Timer Recording screen (> 28)
?Create chapter (> 36)
@Show Setup menu (> 64)
ATo delete unwanted recorded titles, timer programmes, photos or music (> 38)
B TV operation buttons (> 17)
CChannel select (> 22)/Change pages in the DIRECT NAVIGATOR screen etc.
D Show the VIERA Connect screen (> 61) E Switching to the radio channel list (> 22) F Start up a video communication (> 61)
G Exit the menu screen
H Show the TV Guide screen (> 23)
I Show the FUNCTION MENU screen (> 21) J Return to previous screen
K Show subtitles (> 24, 36) L Show Teletext (> 24)
M Show Playback Menu (> 62) N Skip the specified time (> 36)
O Skip approx. 1 minute forward (> 35)
P Skip approx. 10 seconds backward (> 35)
|
|
TV |
|
|
|
|||
|
|
|
|
|||||
|
DRIVE |
INPUT |
VOL |
CH |
|
|||
|
SELECT |
AV |
|
|
|
|||
|
|
|
|
|
|
|
||
|
|
|
|
|
|
|
|
|
|
1 |
|
|
|
2 |
3 |
PAGE |
|
|
|
|
|
|
|
|||
|
|
|
|
|
abc |
def |
CH |
|
|
4 |
|
|
|
5 |
6 |
||
ghi |
|
|
||||||
|
jkl |
mno |
|
|
||||
|
|
p |
8tuv |
w |
INTERNET |
|
||
|
7qrs |
9xyz |
|
|
||||
|
|
|
|
|
0 |
RADIO/ |
|
|
|
|
|
|
|
|
|
||
|
|
|
|
TV |
|
|||
|
LASTVIEW |
|
SLOW/SEARCH |
|
||||
|
|
|
|
SKIP |
REWINDLIVETV |
|
||
|
STOP |
PAUSE PLAY/x1.3 |
|
|||||
|
STATUS |
PAUSE LIVE TV |
EXIT |
|
||||
|
|
|
|
GUIDE |
|
|||
|
|
|
|
|
|
|
||
|
|
|
R |
|
|
|
||
|
|
|
|
|
|
N |
|
|
|
|
|
O |
|
|
|
F |
|
|
|
T |
|
|
|
|
U |
|
|
|
|
|
|
|
C |
|
|
|
A |
|
|
|
|
T |
|
|
|
IG |
|
|
|
|
|
I |
|
A |
|
|
|
|
|
O |
|
|
|
V |
|
|
|
|
|
N |
|
|
T |
|
|
|
|
|
||
|
N |
|
|
|
OK |
M |
|
|
|
E |
|
|
|
|
|||
|
C |
|
|
|
|
|
E |
|
|
R |
|
|
|
|
|
|
|
|
D |
|
|
|
|
N |
|
|
|
I |
|
|
|
|
|
U |
|
|
|
|
|
|
|
|
|
|
OPTION |
|
|
RETURN |
|
|
|
|
R |
G |
Y |
B |
|
REC |
AUDIO |
TEXT STTL |
|
|
|
PROG/CHECK CHAPTER TIMESLIP DISPLAY |
|
|||
|
|
||||
|
|
|
|||
|
SETUP |
DEL |
MANUALSKIP |
|
|
|
|
|
-10s +60s |
|
|
|
|
|
|
||
|
|
|
Insert batteries
Insert so the poles (i and j) match those in the remote control.
R6/LR6, AA
(Alkaline or manganese batteries)
10 VQT4G61
Getting started
Main unit
|
|
|
|
|
|
|
|
|
|
|
|
|
|||
USB memory |
|
|
|
|
Pull to flip down |
|
|
|
|||
|
|
|
|
the front panel.
SD card 
1Standby/on switch (Í/I)
Press to switch the unit from on to standby mode or vice versa. In standby mode, the unit is still consuming a small amount of power.
2Recording indicator
•The indicator will light up while recording.
•The indicator will blink while recording is paused and before recording starts.
3CALL LED
•The LED will light up when this unit receives incoming call etc. of the video communication. (> 61)
4Remote control signal sensor
•Angle: Approx. 20° up and down, 30° left and right
•Distance: Within approx. 7 m in front of the unit
5 Start PAUSE LIVE TV (> 24)
6 USB port
7SD card slot
•When removing the SD card, press on the centre of the card and pull it straight out.
8 Channel select (> 22)
9 Start recording (> 26) : Stop
; Start play
< Display
|
|
1 |
|
2 |
|
HDDSD |
|
|
COPY |
|
|
|
SD USB |
|
|||
|
|
|
|
||
|
|
|
PLAY |
|
|
3 |
4 |
5 |
6 |
7 |
8 |
1SD card slot indicator
2Copying indicator
3Drive (HDD or SD) indicator
4Remote control signal indicator
5Main display section indicator
-Current time
-Playback counter
-Various messages (> 83)
6Playback indicator
7USB port indicator
8Timer recording indicator
• This indicator lights up when the timer recording standby is activated.
•While writing to/reading from the media, do not switch the unit to standby mode or remove the media. Such action may result in loss of the media contents.
VQT4G61 11

Getting started
Connection
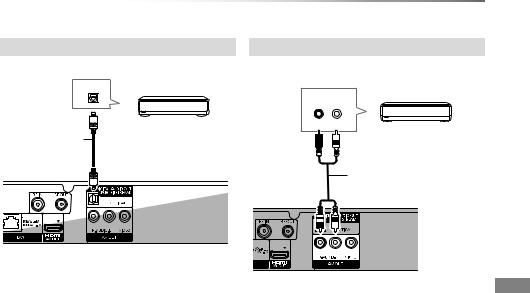
Basic connections
3D programmes can be played back when this unit is connected to a 3D compatible TV.
• Before connection, turn off all equipment and read the appropriate operating instructions.
To the aerial
Aerial cable
Cooling fan
AC mains lead (supplied)
•Connect only after all other connections are complete.
Household mains socket (AC 220 to 240 V, 50 Hz)
HDMI cable
HDMI |
VHF/UHF |
|
RF IN |
TV’s rear panel
RF coaxial cable (supplied)
This unit’s rear panel
If the TV does not have the HDMI terminal
Connect the TV with the Audio/Video cable. (> 13)
To connect and register the USB HDD (optional)
Refer to “Registering the external HDD (USB HDD)”. (> 58)
To connect the Communication Camera (optional)
Refer to “VIERA Connect (Enjoying Internet Service)”. (> 61)
About HDMI cable
•Use the High Speed HDMI cables. Non-HDMI-compliant cables cannot be utilized.
•When outputting 1080p signal, please use HDMI Cables 5.0 meters or less.
•Recommended Panasonic HDMI cable part number:
RP-CDHS15 (1.5 m), RP-CDHS30 (3.0 m), RP-CDHS50 (5.0 m), etc.
12 VQT4G61

Getting started
When the unit is not to be used for a long time
To save power, unplug it from the household mains socket. This unit consumes a small amount of power, even when the unit is in standby mode.
[approx. 0.2 W (“Power Save in Standby” is activated and “RF OUT ( Aerial Signal )” is set to “Off”)]
•The HDMI connection supports VIERA Link “HDAVI Control” (> 60).
•You cannot connect this unit to DVI devices that are incompatible with HDCP.
Depending on the device, images may not display properly or at all when connecting with a DVI/HDMI switching cable. (Audio cannot be output.)
•If you are connecting to a TV that is only compatible with 2 channel audio output, audio with 3 channels or more will be down mixed and output as 2 channels, even if connecting with an HDMI cable.
Other TV connection
• Connect to terminals of the same colour.
AUDIO IN VIDEO IN
R L
TV
Audio/Video cable (supplied)
•3D video playback is not possible with this connection.
•Do not connect video signals through a video recorder. Due to copy guard protection the picture may not be displayed properly.
VQT4G61 13

Getting started
Connection
Amplifier/receiver connections
HDMI terminal
3D programmes can be played back when this unit is connected to a 3D compatible amplifier/receiver and a 3D compatible TV.
•You will not be able to view 3D programmes with this connection if your amplifier/receiver is not 3D compatible.
TV
HDMI
(ARC compatible)
HDMI cable
Amplifier/ receiver
HDMI OUT |
HDMI IN |
(ARC compatible)
HDMI cable
∫ Amplifier/receiver not compatible with 3D
3D programmes can be played back when this unit is connected to a 3D compatible TV.
• This connection only supports up to 5.1ch.
Amplifier/receiver
TV
HDMI IN
(ARC compatible)
HDMI cable
HDMI |
HDMI |
(ARC compatible)
HDMI cable
•VIERA Link function is possible by connecting to a TV or amplifier/receiver compatible with VIERA Link.
•When using a TV or an amplifier/receiver that does not display “ARC compatible” on the HDMI terminal, it is necessary to connect the TV and the amplifier/receiver with a digital audio cable to enjoy the TV audio on the amplifier/receiver.
14 VQT4G61
DIGITAL AUDIO OUT terminal
OPTICAL IN |
Amplifier/receiver |
Optical digital audio cable
Getting started
AUDIO OUT terminal
• Connect to terminals of the same colour.
Amplifier/receiver
AUDIO IN
R L
Audio cable
•When you do not want the audio to be output from the TV, set “HDMI Audio Output” to “Off” (> 64, 71).
VQT4G61 15

Getting started
Connection
Network connection
Following functions will be available when this unit is connected to the network.
•Smart Home Networking (DLNA) (> 54)
•VIERA Connect (Enjoying Internet Service) (> 61)
•Updating the software (firmware) of this unit from Internet (> 76)
For details about connection method, refer to the instructions supplied with the connected equipment.
After you make the LAN cable/Wireless LAN connection, the network setting is needed. (> 19, Easy Network Setting)
LAN cable connection
LAN (ethernet) cable
 Broadband router, etc.
Internet
•Use category 5 or above straight LAN cables (STP) when connecting to peripheral devices.
•Inserting any cable other than a LAN cable in the LAN terminal can damage the unit.
Wireless LAN connection
Wireless router, etc.
Internet
•For up-to-date compatibility information on your Wireless router refer to
http://panasonic.jp/support/global/cs/ (This site is in English only.)
•The unit is not compatible with public wireless LAN services.
∫ Precautions of Wireless LAN connection
The following limits are in place regarding the usage of this unit. You must be aware of these limits before using this unit.
Panasonic will in no way be responsible for any incidental damage which may arise due to a failure to obey these limits, or to any condition of use or disuse of this unit.
•Data transmitted and received over radio waves may be intercepted and monitored.
•This unit contains delicate electronic components.
Please use this unit in the manner in which it was intended and follow the following points:
-Do not expose this unit to high temperatures or direct sunlight.
-Do not bend, or subject this unit to strong impacts.
-Keep this unit away from moisture.
-Do not disassemble or alter this unit in any way.
16 VQT4G61

Settings
|
TV |
|
|
|||
|
|
|
||||
DRIVE |
INPUT |
VOL |
CH |
|||
SELECT |
AV |
|
|
|||
1 |
|
|
|
2abc |
3def |
PAGE |
|
|
|
CH |
|||
4 |
|
|
|
5 |
6 |
|
ghi |
|
|||||
|
jkl |
mno |
|
|||
|
p |
8tuv |
w |
INTERNET |
||
7qrs |
9xyz |
|
||||
|
|
|
|
0 |
TV |
|
|
|
|
|
|
RADIO/ |
|
LASTVIEW |
|
SLOW/SEARCH |
||||
|
|
|
SKIP |
REWINDLIVETV |
||
STOP |
PAUSE PLAY/x1.3 |
|||||
STATUS |
PAUSE LIVE TV |
EXIT |
||||
|
|
|
|
GUIDE |
|
|
|
|
|
R |
|
|
U |
|
T |
O |
|
|
|
F |
|
|
|
|
N |
||
|
|
|
|
|
C |
|
A |
|
|
|
|
T |
|
IG |
|
|
|
|
|
I |
V |
|
|
|
|
|
O |
A |
|
|
|
|
|
|
N |
|
|
|
|
|
N |
T |
|
|
|
OK |
||
E |
|
|
|
M |
||
C |
|
|
|
|
|
E |
R |
|
|
|
|
|
|
D |
|
|
|
|
N |
|
I |
|
|
|
|
|
U |
|
|
|
|
|
|
|
OPTION |
|
|
RETURN |
|||
R |
|
|
G |
Y |
B |
|
REC |
AUDIO |
TEXT |
STTL |
|||
PROG/CHECK CHAPTER |
TIMESLIP DISPLAY |
|||||
SETUP |
DEL |
MANUALSKIP |
||||
|
|
|
|
|
-10s |
+60s |
TV operation buttons (> right)
To exit the screen
Select and enter buttons
FUNCTION MENU (> 21)
To return to the previous screen
Setup (> 64)
Getting started
TV operation buttons
The TV can be operated from the TV operation buttons of the remote control.
•Perform the setting if you cannot operate the TV with the TV operation buttons.
While pressing [TV Í], enter the code with the number buttons.
Manufacturer and Code No.
Brand |
Code |
Brand |
Code |
|
|
Panasonic |
01/02/03/04 |
NEC |
36 |
|
|
AIWA |
35 |
NOBLEX |
33 |
|
|
AKAI |
27/30 |
NOKIA |
25/26/27/60/61 |
|
|
BEKO |
05/71/72/73/74 |
NORDMENDE |
10 |
|
|
BENQ |
58/59 |
OLEVIA |
45 |
|
|
BRANDT |
10/15 |
ONWA |
30/39/70 |
|
|
BUSH |
05 |
ORION |
05 |
|
|
|
|||||
CENTREX |
66 |
PEONY |
49/69 |
|
|
CURTIS |
05 |
PHILCO |
41/48/64 |
|
|
DAEWOO |
64/65 |
PHILIPS |
05/06/46 |
|
|
DESMET |
05 |
PHONOLA |
05 |
|
|
DUAL |
05 |
PIONEER |
37/38 |
|
|
ELEMIS |
05 |
PROVIEW |
52 |
|
|
FERGUSON |
10/34 |
PYE |
05 |
|
|
FINLUX |
61 |
RADIOLA |
05 |
|
|
FISHER |
21 |
SABA |
10 |
|
|
FUJITSU |
53 |
SALORA |
26 |
|
|
FUNAI |
63/67 |
SAMSUNG |
32/42/43/65/68 |
|
|
GOLDSTAR |
05/50/51 |
SANSUI |
05 |
|
|
GOODMANS |
05 |
SANYO |
21/54/55/56 |
|
|
GRADIENTE |
36 |
SCHNEIDER |
05/29/30 |
|
|
GRUNDIG |
09 |
SEG |
05/69/75/76/77/78 |
|
|
HITACHI |
05/22/23/40/41 |
SELECO |
05/25 |
|
|
IRRADIO |
30 |
SHARP |
18 |
|
|
ITT |
25 |
SIEMENS |
09 |
|
|
JVC |
17/30/39/70 |
SINUDYNE |
05 |
|
|
KDS |
52 |
SONY |
08 |
|
|
KOLIN |
45 |
TCL |
31/33/66/67/69 |
|
|
KONKA |
62 |
TELEFUNKEN |
10/11/12/13/14 |
|
|
LG |
05/50/51 |
TEVION |
52 |
|
|
LOEWE |
07/46 |
THOMSON |
10/15/44 |
|
|
MAG |
52 |
TOSHIBA |
16/57 |
|
|
|
|
|
|
||
METZ |
05/28/79 |
WHITE |
05 |
|
|
MITSUBISHI |
05/19/20/47 |
WESTINGHOUSE |
|
|
|
MIVAR |
24 |
YAMAHA |
18/41 |
|
|
•If the brand of your TV is not listed or the code number is invalid for the TV, this remote control is not compatible with your TV.
•If your TV brand has more than one code listed, select the
one that allows correct operation.
VQT4G61 17

Getting started
Settings
Easy Setting
1 Turn on the TV, then select the appropriate AV input to suit the connections to this unit.
2 Press [Í] on the remote control or [Í/I] on this unit.
•The Easy Setting will start at the initial power on.
3 Follow the on-screen instructions and perform the settings.
•When the Download from TV screen appears, the setting information on the TV is acquired by this unit. (> 60)
•When the Auto Setup screen appears, the unit searches for the terrestrial digital channels. It takes about 3 minutes.
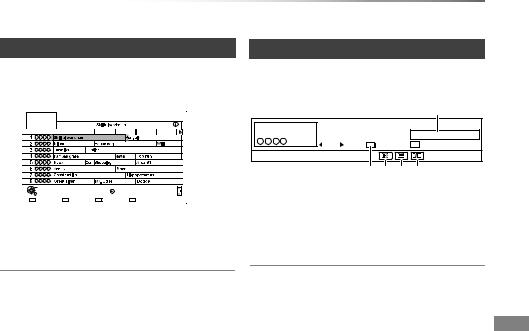
Digital TV Auto Tuning
Progress |
CH 6 |
|
69 |
This will take about 3 minutes. |
Type |
|
|
RF Ch |
Channel Name |
Quality |
|
35 |
|
Digital TV |
10 |
35 |
|
Digital TV |
10 |
Digital TV: 2
Searching
 RETURN
After tuning has been completed, clock will be set automatically.
If the clock setting screen appears, set the time manually (> 74, Clock).
4 Set “Power Save” to “On”, “On Timer” or “Off”, then press [OK].
Power Save in Standby
|
|
|
Power Save |
|
||
|
|
|
|
|
On |
|
From |
|
To |
|
|||
12 |
|
AM |
|
6 |
|
AM |
•On
It will go into the Power Save in Standby mode.
•On Timer
Set the start and stop time and then press [OK].
•“Power Save in Standby” is activated when the set time comes.
•Off
It is possible to start quickly from standby mode. (Quick Start mode)
•If you use Home Network function (> 72), select “Off”. This function is not available with other settings.
When “Easy Setting has been completed.” appears, Easy Setting is complete.
To stop partway
Press [RETURN  ].
].
To restart setup
1Press [SETUP]. (> 17)
2Select “Auto Setup” in “Digital TV Tuning”, then press [OK].
3Select “Yes”, then press [OK].
If the TV aspect setting screen appears
Refer to “TV Aspect”. (> 70)
To confirm that channels have been tuned correctly
Refer to “Using Channel List”. (> 22)
•If tuning is cancelled partway through, it may not be possible to receive the channels. Restart setup again.
18 VQT4G61

Getting started
Easy Network Setting
After completing “Easy Setting”, you can continue with “Easy Network Setting”.
Preparation
•Before beginning wireless connection setup Obtain your Network name (SSID).
An SSID (Service Set IDentification) is a name used by wireless LAN to identify a particular network. Transmission is possible if the SSID matches for both devices.
1 Select “Wired” or “Wireless”, then press [OK].
Easy Network Setting
Settings and tests for connection required for home network and the Internet will be conducted.
First, please select a connection mode.
Current setting |
: Wired |
LAN cable connection:
Connect a LAN cable to the unit and select “Wired”.
Wireless LAN connection:
Select “Wireless”.
Wired
Wireless
 OK
OK
 RETURN
2 Follow the on-screen instructions and make the following confirmation and settings.
“Wired” connection:
-Home Network Connection Check
-Home Network function
-Internet Connection Test
“Wireless” connection:
-Wireless Settings
-Home Network Connection Check
-Home Network function
-Internet Connection Test
3 When “Easy Network Setting is finished.” appears.
Press [OK].
Connection method to wireless access point
Search for wireless network:
1Select “Search for wireless network”, then press [OK].
2The available wireless networks will be displayed. Select your network name and press [OK].
-If your Network name is not displayed search again by pressing the red button on the remote control.
-Stealth SSID will not be displayed. Enter manually by using “Wireless Settings”. (> 64, 71)
•If your wireless network is encrypted, Encryption Key Input Screen will be displayed.
Input the encryption key of your network.
WPS (PUSH button):
If your Wireless router supports WPS (PUSH button), you can easily perform the settings by pressing WPS button on it.
WPS (Wi-Fi Protected Setup™) is a standard that facilitates settings relating to the connection and security of wireless LAN devices.
1Select “WPS (PUSH button)”, then press [OK].
2Press WPS button or corresponding button of Wireless router until the lamp starts flashing.
e.g.,
•Wi-Fi Protected Setup™-compatible Wireless router may have the mark.
•For details, refer to the operating instruction of Wireless router.
3 Press [OK].
VQT4G61 19

Getting started
Settings
When you experience problems
Refer to “When you experience problems with Easy Network Setting”. (> 85)
To restart Easy Network Setting
1Press [SETUP]. (> 17)
2Select “Easy Network Setting” in “Network”, then press [OK].
To redo settings individually
If “Easy Network Setting” did not work properly or when you change the settings individually, perform the following steps:
1Press [SETUP]. (> 17)
2Select “Network Settings” in “Network”, then press [OK].
3Refer to “Network Settings”. (> 71)
Check security before using Home Network function
If you set “Home Network function” to “On”, all connected devices on the same network can access this unit. Ensure that the router for your home network has adequate security system to prevent unauthorized access.
•Refer to the operating instructions of the hub or router.
•Home Network function setting can be set only when you selected “Off” for “Power Save in Standby” in “Easy Setting”. (> 18, step 4)
•Even if you set “Home Network function” to “Off”, it is possible to set to “On” later. (> 64, 72)
•Do not use this unit to connect to any wireless network for which you do not have usage rights.
During automatic searches in a wireless network environment, wireless networks (SSID) for which you do not have usage rights may be displayed; however, using these networks may be regarded as illegal access.
•After performing network settings on this unit, the settings (encryption level, etc.) of the Wireless router might change. When you have trouble getting online on your PC, perform the network settings on your PC in accordance with the settings of Wireless router.
•Please be aware that connecting to a network without encryption may result in the content of the communication being illegitimately viewed by a third party, or the leaking of data such as personal or secret information.
20 VQT4G61
Getting started
FUNCTION MENU screen
You can easily access the desired functions, such as playback, timer recording, the unit’s settings etc. via the FUNCTION MENU.
1 |
Press [FUNCTION MENU]. |
|
FUNCTION MENU |
|
HDD |
|
Playback Contents |
|
TV Guide |
|
Timer Recording |
|
Network |
|
Setup |
|
Drive Select |
|
SD Card / USB / USB HDD |
|
OK |
|
RETURN |
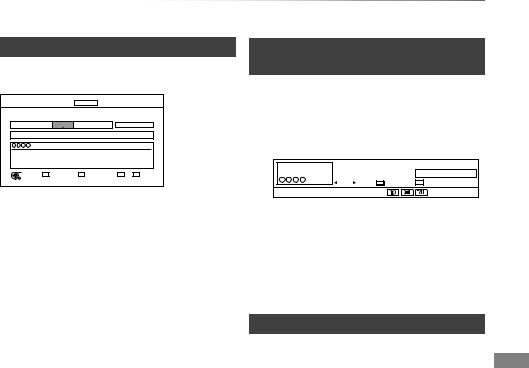
2 Select the item, then press [OK]
e.g.,
|
|
|
|
Press OK |
|
|
|
Playback Contents |
|
||
|
|
|
|
|
|
|
|
TV Guide |
|
|
|
|
|
|
|
|
|
|
|
|
|
|
|
|
|
Timer Recording |
|
|
|
|
|
|
|
|
|
|
|
|
|
|
|
|
|
RETURN |
|
Video |
|
|
|
|
|
|
|
|
Photo |
|
|||
|
|
Press |
|
|
|
|
Music |
|
|||
|
|
|
|
|
|
FUNCTION MENU list
FUNCTION MENU Playback Contents
Video (> 31)
Video (AVCHD) (> 34) Video (MP4) (> 34) Photo (> 44)
Music (> 48)
TV Guide (> 23)
Timer Recording (> 28) Network
Home Network (DLNA Client) (> 55) Home Network (Media Renderer) (> 56) Network Service (> 61)
(When the SD card drive is selected) Others
Copy Video ( AVCHD ) (> 52)
Copy Video ( MPEG2 ) (> 53) Copy New Photos (> 47)
SD Card Management (> 57) Setup (> 64)
•You can change the unit’s settings of Digital TV Tuning, Sound, Display, Connection, Network etc. in the Setup menu.
(When the SD card drive is not selected) Setup (> 64)
Drive Select
HDD SD Card
USB Device
USB HDD
•Selectable items will change depending on the type and status of the media.
VQT4G61 21

|
Watching broadcasts |
|
|
Watching |
Watching broadcasts |
|
|
|
|
|
|
broadcasts |
|
|
|
|
|
|
|
|
Instructions for operations are generally |
|
Using Channel List |
|
described using the remote control. (> 10) |
You can select from the list of channel names. |
|
|
|
||
|
Press [CH W X] to select the channel. |
1 Press [OK]. |
|
|
|
|
HDD |
All Digital Channels |
|
|
|
Remain 71:20 |
1 |
|
|
|
1 |
2 |
|
|
|
|
|
|
|
|
|
3 |
|
|
|
|
4 |
|
|
|
|
5 |
|
|
|
|
6 |
|
|
|
|
7 |
1 |
NEWS |
|
10:30 AM |
Select |
|
View |
|||
9:00 AM - 11:00 AM |
|
All Digital Channels |
||
|
Now |
Set timer |
Change category |
|
Rating: G |
Dolby D |
|
|
RETURN |
|
|
|
|
Channel information (> 23) |
|
|
|
|
|
|
|
|
|
|
|
|
|
|
|
|
|
|
|
|
|
|
|
|
|
|
|
|
|
|
|
|
|
|
|
|
|
|
|
|
|
|
|
|
|
Channel names |
|||||||||
|
|
|
|
|
|||||||||
• You can also select the channel by the |
2 Select the channel, then press [OK]. |
||||||||||||
following operations |
|||||||||||||
-Using number buttons.
-Using Channel List (> right)
|
- Using TV Guide system (> 23) |
To edit the Channel List |
|
- Using channel information (> 23) |
Refer to “Channel List”. (> 66) |
|
||
|
|
|
To switch to the channel you have previously watched
Press [LAST VIEW  ].
].
•This function does not work correctly depending on the situations.
To switch to the radio channels or the all channels
Press [RADIO/TV].
•If you have set a ratings level, you may be asked to enter the PIN to start viewing the broadcast. (> 67, Child Lock ( Parental Rating ))
•When you are watching the 3D programme, subtitles and TV Guide, etc., may not display correctly depending on the settings. (> 37, 3D video playback)
22 VQT4G61
Watching broadcasts
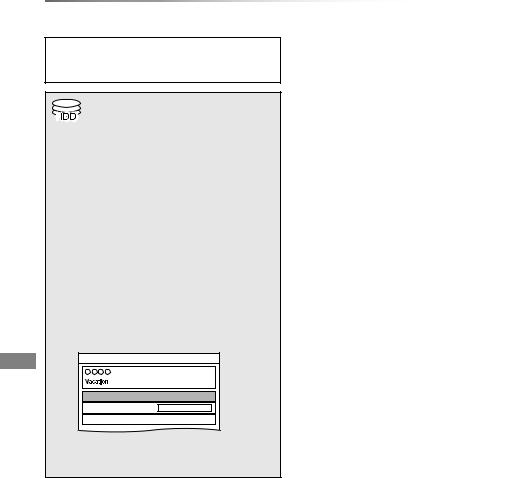
Using TV Guide system
1 Press [GUIDE].
TV Guide screen appears.
|
TV Guide |
Sat 01.01.2012 |
8:05 AM |
Category: All Digital Channels |
||||
|
8:00 AM - 9:45 AM |
|
|
|
|
|
||
SUN 01.01 |
8:00 AM |
8:30 |
AM |
9:00 |
AM |
9:30 AM |
10:00 AM |
10:30 AM |
OK |
|
|
|
|
|
Information |
|
Page Up |
RETURN |
|
|
|
|
|
|
Page Down |
|
|
|
|
|
|
|
|
||
Timer Rec. |
|
-24hrs |
|
|
+24hrs |
Category |
|
|
2 Select the programme, then press [OK].
3 Select “View”, then press [OK].
Page up/down
Press [CH W X].
To view a programme list for another day
Press the green button (Previous) or the yellow button (Next).
To see programme information
Press [STATUS  ].
].
To retrieve the programme data for the area where data have not been acquired
Select the area, then press [STATUS  ].
].
•Some broadcasters may not send the programme data. You cannot retrieve the data from them.
To set a timer Recording using the TV Guide System
Refer to “Timer recording”. (> 28)
•Selection of channel is made easy by creating a Favourite of the channels you watch often. (> 66, Favourites Edit)
Using channel information
While watching a programme
Press [STATUS  ].
].
e.g., |
|
|
|
1 |
NEWS |
|
10:30 AM |
9:00 AM - 11:00 AM |
|
All Digital Channels |
|
|
|
||
|
Now |
Set timer |
Change category |
Rating: G |
Dolby D |
|
|
1 Current Category
2 Set timer (> 29)
3 Subtitle
4 Teletext
5 Multiple audio
To show detailed information
Press [STATUS  ] again.
To hide the information screen
Press [EXIT  ].
].
To change Category
Press the blue button.
•To register your favourite channels
1 Press [OPTION].
2 Select “Digital TV Menu”, then press [OK].
3 Select “Favourites Edit”, then press [OK].
4 Refer to “Favourites Edit”. (> 66)
To switch between the current programme and the next programme
Press [2, 1].
To switch to another channel
Press [3, 4], then press [OK].
VQT4G61 23

Watching broadcasts
Watching broadcasts
Operations while watching broadcast
To show subtitle
When “  ” appears in channel information (> 23)
Press [STTL  ].
].
• Press again to hide subtitle.
Switching audio
Press [AUDIO].
•Audio will switch according to the contents of the programme every time it is pressed.
To show Teletext
When “  ” appears in channel information (> 23)
1Press [TEXT  ].
].
2Use [3, 4, 2, 1], number buttons or colour buttons, etc. according to on-screen instructions.
• You can change the display mode. (> 64, 70, Teletext)
Aspect
You can switch the screen mode.
Refer to “Switching the aspect ratio of the screen”. (> 77)
REWIND LIVE TV/PAUSE LIVE TV
This unit temporarily saves a live TV programme you are watching with this unit’s tuner on HDD.
REWIND LIVE TV
You can rewind live TV programme to the point where temporary save has started (up to
1.5 hours).
PAUSE LIVE TV
You can pause live TV programme and restart watching from the paused position.
1 While watching TV
REWIND LIVE TV:
Press [SLOW/SEARCH 6] to rewind.
PAUSE LIVE TV:
Press [PAUSE ;] to pause.
•The maximum amount of the temporary save is 1.5 hours.
2 When you want to resume: Press [PLAY/a1.3 1].
•You can perform search or Quick View, etc.
•If temporary save stops (> 25), playback will be performed by that point.
24 VQT4G61

Display information
While pausing or rewinding a broadcast: Press [STATUS  ].
].
Watching broadcasts
•The unit cannot rewind and play more than 1.5 hours prior to the current time.
•Temporary save stops in the following cases:
- When switching to other channels or other screen
Pause |
8:05 AM |
9:35 AM |
8:50 AM
|
|
• Press [STATUS  ] again.
8:50:55 AM 01.01.2012
Play 8:50.50 AM
1The time that you can rewind the live programme.
2The amount of time temporarily saved on HDD.
3 The time of the current playback position.
To stop REWIND LIVE TV or PAUSE LIVE TV
1Press [STOP ∫].
2Select “Yes”, then press [OK].
To hide the display information
Press [EXIT  ].
].
-When recording of the watching programme is started
-When two programmes simultaneous recording is started
-When performing PAUSE LIVE TV or REWIND LIVE TV for more than 8 hours (This may vary depending on the HDD free space.)
•These functions do not work in the following cases:
-When the clock is not set
-While recording two programmes simultaneously
-While copying
-While watching a programme being recorded
-When a radio programme is selected
-REWIND LIVE TV:
When “REWIND LIVE TV” is set to “Off” (> 68)
•PAUSE LIVE TV:
You can operate this unit with the TV remote control by using VIERA Link (> 60).
Refer to the TV operating instructions.
VQT4G61 25
Recording
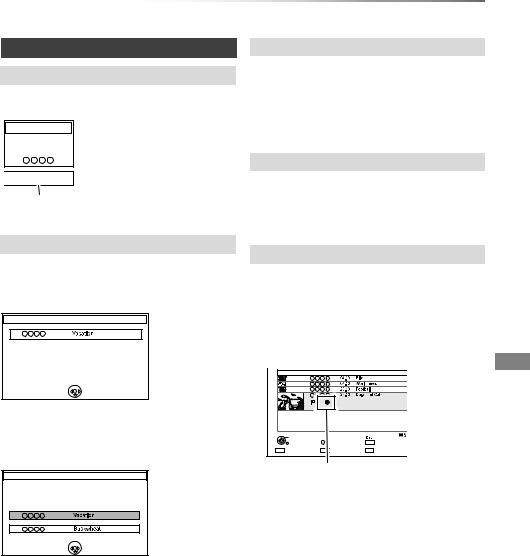
Recording Recording TV programmes
The titles can only be recorded to built-in HDD and cannot be copied from built-in HDD to the media other than USB HDD.
•This unit can record two programmes being broadcasted at the same time.
1 Select the channel to record.
2 Press [REC ¥].
Recording starts.
•“REC1” or “REC2” will light on the unit’s display.
3 Select “Automatic Stop”, then press [OK].
•One touch recording (OTR)
Recording stops automatically when the programme ends.
REC1/OTR
8:00 AM - 8:45 AM
Automatic Stop at 8:45 AM
Recording Time 30 min
Continuous recording
•You can also select “Recording Time” or “Continuous recording”. (> right)
To set the recording time
1Select “Recording Time” or “Continuous recording” in step 3 (> left).
Recording Time:
You can set the length of recording time from 30 minutes to 4 hours.
•You can select the recording time with [2, 1].
Continuous recording:
The recording is continued until you press [STOP ∫].
2 Press [OK].
•One recording will terminate when simultaneous recording is being done and timer recording starts.
•Teletext will not be recorded.
•Following contents or media cannot be played back while recording.
-DivX and MKV file
-photo
-USB memory
•Copying cannot be performed while recording.
•When “Automatic Standby after OTR” is set to “On” (> 73), this unit is turned to standby mode if this unit is not operated for approximately 5 minutes after completing “Automatic Stop” or “Recording Time”.
26 VQT4G61
Operation during Recording
To check the recording programme
Press [STATUS  ].
].
e.g., While recording two programmes simultaneously
HDD
REC1/OTR AUTO  Recording programme
  displayed on the TV


 REC2
REC2
Recording programme not displayed on the TV
To stop recording
Press [STOP ∫].
When recording one programme:
If the following screen appears
Stop Recording
1
Recording of this programme is in progress.
Stop this recording ?
Yes |
|
No |
 OK
OK
 RETURN
Select “Yes”, then press [OK].
When recording two programmes:
If the following screen appears
Stop Recording
2 recordings are in progress.
Which recording would you like to stop ?
1
2
 OK
OK
 RETURN
1Select the programme, then press [OK].
2Select “Yes”, then press [OK].
Recording
To pause recording
After displaying the recording programme, press [PAUSE ;].
•Press again to restart recording.
(A title is not split into separate titles.)
•Timer recording programme cannot be paused.
To record two programmes simultaneously
While recording, perform steps 1–3 on page 26.
•Channel can only be switched between the recording programmes.
Simultaneous rec and play
You can play the recording title from the beginning or the titles previously recorded to the HDD.
1Press [DIRECT NAVIGATOR].
•If the DIRECT NAVIGATOR screen of music is displayed, press the red button, then select “VIDEO”.
Channel |
Date |
Title Name |
|
|
Start Time |
9:00 AM |
Rec time 0:01 |
|
Prog.Type: |
Movies |
|
Play |
|
|
Page |
OPTION |
|
Delete |
|
RETURN |
|
||
PHOTO / MUSIC |
|
|
Select |
“[” is displayed on the recording programme.
2 Select the title, then press [OK].
VQT4G61 27

Recording
Timer recording
•This operation will only record to built-in HDD.
•This unit can record two programmes being broadcasted at the same time.
1 Press [GUIDE].
TV Guide screen appears.
|
TV Guide |
Sat 01.01.2012 |
8:05 AM |
Category: All Digital Channels |
||||
|
8:00 AM - 9:45 AM |
|
|
|
|
|
||
SUN 01.01 |
8:00 AM |
8:30 |
AM |
9:00 |
AM |
9:30 AM |
10:00 AM |
10:30 AM |
OK |
|
|
|
|
|
Information |
|
Page Up |
RETURN |
|
|
|
|
|
|
Page Down |
|
|
|
|
|
|
|
|
||
Timer Rec. |
|
-24hrs |
|
|
+24hrs |
Category |
|
|
2 Select the programme, then press the red button.
The timer icon “F” (red) is displayed.
To use TV Guide system
Refer to “Using TV Guide system”. (> 23)
To edit the timer recording on the TV Guide screen
1Select the programme to edit, then press the red button.
2Select “Timer Rec Edit”, then press [OK].
3Select the items and change the items. (> 29, Timer recording options)
To select the programmes of a specific category
1On the TV Guide screen: Press the blue button.
2Select the item, then press [OK].
To return to the previous TV Guide list
Select “All Digital Channels” in step 2.
•Category may not be assigned correctly depending on the programme information.
Manually programming timer recording
1 Press [PROG/CHECK].
Timer Recording |
|
Remain HDD |
30:30 |
|
SUN 01.01.2012 8:05 AM |
|
Channel Name |
|
Schedule |
Space |
|
|
|
New Timer Programme |
|
||
OK |
Total |
0/32 |
Delete |
Info |
Page Up |
Turn |
|
|
|
||
|
|
|
Page Down |
||
RETURN |
Timer Off |
|
|
||
|
|
|
|
||
2 Select “New Timer Programme”, then press [OK].
3 Select the items and change the items. (> 29, Timer recording options)
4 Press [OK].
The timer programme is stored.
To cancel a timer recording on the TV Guide screen
1Select the programme to cancel, then press the red button.
2Select “Timer Rec Cancel”, then press [OK]. (“F” disappears)
Operation during Recording
Refer to “Operation during Recording”. (> 27)
•Some broadcast may not send programme information. When programme information is not displayed correctly, use manual timer recording. (> right)
•You can set the start and finish time to make the timer recording work successfully. (> 64, 68, Timer Record Start Buffer, Timer Record Stop Buffer)
Timer Recording |
Remain HDD |
30:30 |
SUN 01.01.2012 8:05 AM |
|
|
Channel Name |
|
Schedule |
Space |
Programme Name |
|
SAT 01.01 |
OK |
|
|
8:00 AM - 9:00 AM |
|
||
|
New Timer Programme |
|
||
To confirm and edit the timer programme
Refer to “To confirm and edit a timer programme”. (> 30)
Operation during Recording
Refer to “Operation during Recording”. (> 27)
28 VQT4G61
Recording
Timer recording options
Select the items and change the items.
e.g., |
|
|
|
|
Timer Recording |
Remain HDD |
30:24 |
SUN 01.01.2012 8:05 AM |
|
Channel |
Day/Date |
Start |
Stop |
|
1 |
SAT 01.01 |
8:00 |
9:00 |
Title Name |
OK |
|
Category |
Date/ |
|
RETURN |
|
Weekly |
|
|
Channel |
|
|
|
|
• You can select Category with the red button.
Day/Date
•You can select “Date” or “Weekly” by pressing the green button.
Start/Stop
•Press and hold [3, 4] to alter in 15-minute increments.
Auto Renewal Recording
(Only daily/weekly timer recording)
The unit will record the new programme over the old one.
1Select “Renew”.
2Select “ON”.
Title Name
1Select “Title Name”, then press [OK].
2Refer to “Entering text”. (> 77)
Timer recording from channel information
You can make timer recording of the current or next programme.
1 While watching a programme Press [STATUS  ].
].
e.g.,
1 |
NEWS |
|
10:30 AM |
9:00 AM - 11:00 AM |
|
All Digital Channels |
|
|
|
||
|
Now |
Set timer |
Change category |
Rating: G |
Dolby D |
|
|
2 Display the channel information of a programme to record.
• Switch the programme with [2, 1].
3 Press the yellow button.
4
Notes on timer recording
•You can enter up to 32 programmes within a month in advance. (Each daily or weekly programme is counted as one programme.)
•Even if you switch the unit to standby mode during the timer recording, the recording is continued.
•When you programme successive timer recordings to start, about last 1 minute of earlier programme will not be recorded.
•Timer recording will not start while:
-copying HD Video (AVCHD) from USB device or SD card
-copying photos/music
-formatting
VQT4G61 29
 Loading...