


 RQT7772-B.fm Page 1 Friday, November 19, 2004 3:43 PM
Operating Instructions
DVD/CD PLAYER
Model No. DVD-S29
Dear customer
Thank you for purchasing this product. For optimum performance and safety, please read these instructions carefully before connecting, operating or adjusting this product. Please keep this manual for future reference.
Region number
The player plays DVD-Video marked with labels containing the region number or “ALL”.
|
|
Region |
Number |
|
|
The United Kingdom, |
|
|
|
Continental Europe, |
2 |
|
|
the Middle East and |
|
|
|
|
|
|
|
South Africa |
|
|
|
|
|
|
|
Asia |
3 |
|
|
Australia and N.Z. |
4 |
|
|
|
|
|
|
|
|
Example:
[The\United\Kingdom\and\Continental\Europe[
2 ALL 235
EB 
 E
E 
 GN
GN 
 GC
GC 
 GCA
GCA 
 GCS
GCS 
 GCU
GCU
®
Table of contents
|
|
|
|
|
started |
|
|
||||
Getting started |
|
|
|
|
|
|
|||||
|
|
|
|
|
|
|
|
|
|
|
|
Caution for AC Mains Lead/Accessories . . . . . . . . . . . . . . . |
. . . . . . . . . |
2. |
|
|
|
|
|
|
|
|
|
Discs that can be played. . . . . . . . . . . . . . . . . . . . . . . . . . . . . |
. . . . . . . . . |
3. |
|
Getting |
|
|
|||||
|
|
|
|
|
|
|
|||||
. . . . . . . . . . . . . . .STEP 1 Connection to a television |
. . . . . . . . |
4 |
|
|
|
|
|
|
|
|
|
STEP 2 The remote control . . . . . . . . . . . . . . . . . . . . . |
. . . . . . . . |
5 |
|
|
|
|
|
|
|
|
|
STEP 3 QUICK SETUP . . . . . . . . . . . . . . . . . . . . . . . . . |
. . . . . . . . |
5 |
|
|
|
|
|
|
|
|
|
|
|
|
|
|
|
|
|
|
|
|
|
Operations |
|
|
|
|
|
|
|
|
|
|
|
|
|
|
|
|
|
|
|
|
|
|
|
Basic play. . . . . . . . . . . . . . . . . . . . . . . . . . . . . . . . . . . . . . . . . |
. . . . . . . . . |
6. |
|
|
|
|
|
|
|
|
|
. . . . . . . . . . . . . . . . . . . . . . . . . . . . . . .Convenient functions |
. . . . . . . . . |
.7 |
|
Operations |
|
|
|||||
Displaying current playback condition (Quick On Screen Display)/ |
|
|
|
|
|
|
|
|
|
|
|
Reviewing titles/programs to play (Advanced Disc Review)/ |
|
|
|
|
|
|
|
|
|
|
|
Enjoying clear sound (Sound Enhancement) . . . . . . . . . . . . . . . . . . |
. . . . . . . . . . |
7. |
|
|
|
|
|
|
|
|
|
Recalling recommended audio/video setting (AV Enhancer)/ |
|
|
|
|
|
|
|
|
|
|
|
Enjoying virtual surround (Advanced Surround)/ |
|
|
|
|
|
|
|
|
|
|
|
Picture Mode/Changing play speed/ |
|
|
|
|
|
|
|
|
|
|
|
Skipping 30 seconds forward/Zoom/Starting play from a selected group. . . . . . . |
8. |
|
|
|
|
|
|
|
|
||
Changing soundtracks/Changing subtitles/Angle select/Still picture rotation/ |
|
|
|
|
|
|
|
|
|
|
|
Program/Random play/Quick replay . . . . . . . . . . . . . . . . . . . . . . . . . |
. . . . . . . . . . |
9. |
|
|
|
|
|
|
|
|
|
|
|
|
|
|
|
|
|
||||
Using navigation menus . . . . . . . . . . . . . . . . . . . . . . . . . . . . . |
. . . . . . . . . |
10 |
|
|
|
|
|
|
|
|
|
Playing WMA/MP3/JPEG discs. . . . . . . . . . . . . . . . . . . . . . . . . . . . . . |
. . . . . . . . . . |
10 |
|
|
|
|
|
|
|
|
|
Playing CD/Playing HighMATTM discs/Playing RAM discs . . . . . . . . . |
. . . . . . . . . . |
11 |
|
Reference |
|
|
|||||
Using On-Screen Menus |
|
12 |
|
|
|
||||||
. . . . . . . . . |
|
|
|
|
|
|
|
|
|||
Main menus/Other settings . . . . . . . . . . . . . . . . . . . . . . . . . . . . . . . . . |
. . . . . . . . . . |
12 |
|
|
|
|
|
|
|
|
|
Changing the player settings . . . . . . . . . . . . . . . . . . . . . . . . . |
. . . . . . . . . |
14 |
|
|
|
|
|
|
|
|
|
|
|
|
|
|
|
|
|
|
|
|
|
Reference |
|
|
|
|
|
|
|
|
|
|
|
Troubleshooting guide . . . . . . . . . . . . . . . . . . . . . . . . . . . . . . |
. . . . . . . . . |
16 |
|
|
|
|
|
|
|
|
|
Maintenance. . . . . . . . . . . . . . . . . . . . . . . . . . . . . . . . . . . . . . . |
. . . . . . . . . |
17 |
|
|
|
|
|
|
|
|
|
Specifications/Safety precautions . . . . . . . . . . . . . . . . . . . . . |
. . . . . . . . . |
18 |
|
|
|
|
|
|
|
|
|
Main feature index . . . . . . . . . . . . . . . . . . . . . . . . . . . . . . . . . . |
. . . . . . . . . |
20 |
|
|
|
|
|
|
|
|
|
[Note] |
|
|
|
|
|
|
|
|
|
|
|
“EB” on the packaging indicates the United Kingdom. |
RQT7772-B |
|
|
|
|
|
|
|
|||
|
|
|
|
|
|
|
|
|
|
|
|
|
|
|
|
|
|
|
|
|
|
|
|
|
|
|
|
|
|
|
|
|
|
|
|
|
|
|
|
|
|
|
|
|
|
|
|
|
|
|
|
|
|
|
|
|
|
|
|
 RQT7772-B.fm Page 2 Friday, November 19, 2004 3:43 PM
Caution for AC Mains Lead
(For United Kingdom and Middle East |
The wire which is coloured Brown must be connected to |
|
except United Arab Emirates) |
the terminal which is marked with the letter L or coloured |
|
Brown or Red. |
||
|
(“EB” or “GC” area code model only)
Caution for AC Mains Lead/Accessories
RQT7772
2
For your safety, please read the following text carefully. This appliance is supplied with a moulded three pin mains plug for your safety and convenience.
A 5-ampere fuse is fitted in this plug.
Should the fuse need to be replaced please ensure that the replacement fuse has a rating of 5-ampere and that it is approved by ASTA or BSI to BS1362.
Check for the ASTA mark Ï or the BSI mark Ì on the body of the fuse.
If the plug contains a removable fuse cover you must ensure that it is refitted when the fuse is replaced.
If you lose the fuse cover the plug must not be used until a replacement cover is obtained.
A replacement fuse cover can be purchased from your local dealer.
CAUTION!
IF THE FITTED MOULDED PLUG IS UNSUITABLE FOR THE SOCKET OUTLET IN YOUR HOME THEN THE FUSE SHOULD BE REMOVED AND THE PLUG CUT OFF AND DISPOSED OF SAFELY.
THERE IS A DANGER OF SEVERE ELECTRICAL SHOCK IF THE CUT OFF PLUG IS INSERTED INTO ANY 13-AMPERE SOCKET.
If a new plug is to be fitted please observe the wiring code as stated below.
If in any doubt please consult a qualified electrician.
IMPORTANT
The wires in this mains lead are coloured in accordance with the following code:
Blue: Neutral, Brown: Live.
As these colours may not correspond with the coloured markings identifying the terminals in your plug, proceed as follows:
The wire which is coloured Blue must be connected to the terminal which is marked with the letter N or coloured Black or Blue.
WARNING: DO NOT CONNECT EITHER WIRE TO THE EARTH TERMINAL WHICH IS MARKED WITH THE LETTER E, BY THE EARTH SYMBOL Ó OR COLOURED GREEN
OR GREEN/YELLOW.
THIS PLUG IS NOT WATERPROOF—KEEP DRY.
Before use
Remove the connector cover.
How to replace the fuse
The location of the fuse differ according to the type of AC mains plug (figures A and B). Confirm the AC mains plug fitted and follow the instructions below.
Illustrations may differ from actual AC mains plug.
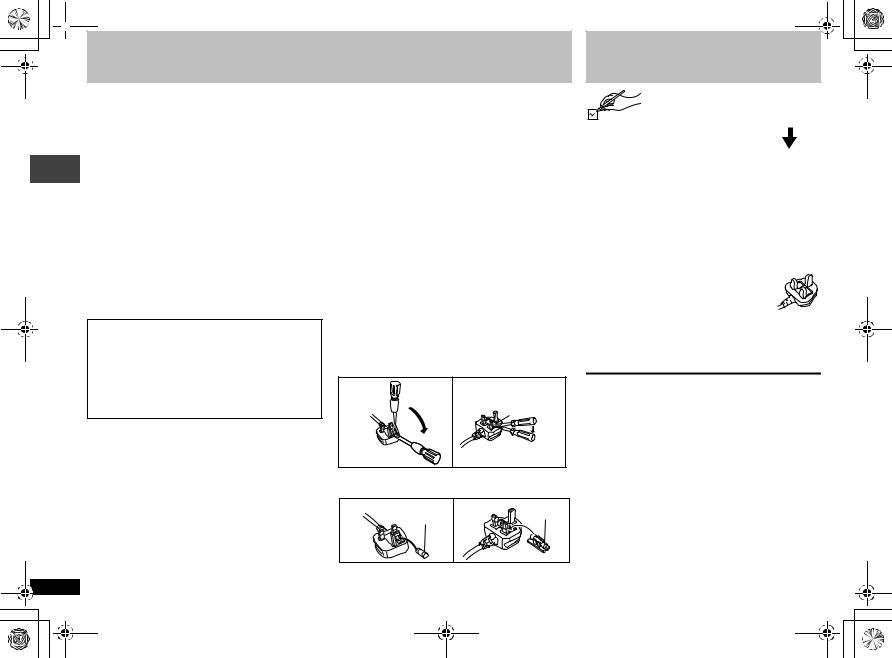
1. Open the fuse cover with a screwdriver.
Figure A |
Figure B |
Fuse cover
2. Replace the fuse and close or attach the fuse cover.
Figure A |
Fuse |
Figure B |
Fuse |
(5 ampere) |
|||
|
(5 ampere) |
|
|
Accessories
Use numbers when asking for replacement parts.
(Product numbers correct as of December 2004. These may be subject to change.)
∏ 1 Remote control |
(EUR7631110) |
∏ 1 AC mains lead
\The\United\Kingdom\ (RJA0053-3X)
\Continental\Europe,\United\Arab\Emirates,\
\South\Africa\and\Asia\ (RJA0019-2X) \Australia\and\N.Z.\ (K2CJ2DA00008)
∏2 AC mains leads
\The\Middle\East\except\United\Arab\Emirates\
(RJA0053-3X)
(RJA0019-2X)
[For\Saudi[Arabia[
∏ 1 |
Audio/video cable |
(JAC3315N) |
∏ 2 |
Remote control batteries |
|
[Note] |
|
|
The included AC mains lead is for use with this unit only. Do not use it with other equipment.
\The\United\Kingdom\and\Republic\of\Ireland\
∫ Sales and Support Information
Customer Care Centre
≥For UK customers: 08705 357357
≥For Republic of Ireland customers: 01 289 8333 ≥Visit our website for product information
≥E-mail: customer.care@panasonic.co.uk
Direct Sales at Panasonic UK
≥Order accessory and consumable items for your product with ease and confidence by phoning our Customer Care Centre Monday-Friday 9:00am-5:30pm. (Excluding public holidays)
≥Or go on line through our Internet Accessory ordering application at www.panasonic.co.uk
≥Most major credit and debit cards accepted.
≥All enquiries transactions and distribution facilities are provided directly by Panasonic UK Ltd.
≥It couldn’t be simpler!
≥Also available through our Internet is direct shopping for a wide range of finished products, take a browse on our website for further details.
 RQT7772-B.fm Page 3 Friday, November 19, 2004 3:43 PM
Discs that can be played
These operating instructions use the following icons such as [RAM].
DVD-RAM [RAM] [JPEG]
≥[RAM] Recorded with devices using Version 1.1 of the Video Recording Format (a unified video recording
standard), such as DVD video recorders, DVD video cameras, personal computers, etc.
≥[JPEG] Recorded using the DCF (Design rule for Camera File system) Standard Version 1.0. To play JPEG files, select “Play as Data Disc” ( page 13, Other Menu).
DVD-Video [DVD-V]
You can play discs in stereo with these symbols.
DVD-R/DVD-RW [DVD-V]
The following discs are played as DVD-Video on this unit. ≥Panasonic DVD-R recorded and finalized§ on a
Panasonic DVD-Video recorders or DVD-Video cameras.
≥DVD-RW recorded with video format and finalized§ on a DVD-Video recorders.
Video CD [VCD]
Including SVCD (Conforming to IEC62107)
≥Menu screen may appear during skip or search, but this is normal for Video CDs.
CD [CD] [WMA] [MP3] [JPEG] [VCD]
≥This unit can play CD-R/RW recorded with the above formats. Close the sessions or finalize§ the disc after recording.
≥[WMA] [MP3] [JPEG] This unit also plays HighMAT discs.
§A process that allows play on compatible equipment.
≥It may not be possible to play the above discs in all cases due to the type of disc or condition of the recording.
∫ Discs that cannot be played
DVD-Audio, DVD-ROM, CD-ROM, CDV, CD-G, DVDiR, iRW, DVD-RW (VR format), SACD, Divx Video Discs and Photo CD, DVD-RAM that cannot be removed from their cartridge, 2.6-GB and 5.2-GB DVD-RAM, and “Chaoji VCD” available on the market including CVD, DVCD and SVCD that do not conform to IEC62107.
∫ Handling precautions
≥Do not attach labels or stickers to discs (This may cause disc warping, rendering it unusable).
≥Do not write on the label side with a ball-point pen or other writing instrument.
≥Do not use record cleaning sprays, benzine, thinner, static electricity prevention liquids or any other solvent.
≥Do not use scratch-proof protectors or covers.
≥Do not use the following discs:
–Discs with exposed adhesive from removed stickers or labels (rented discs etc).
–Discs that are badly warped or cracked.
–Irregularly shaped discs, such as heart shapes.
∫ Tips for making WMA/MP3 and JPEG discs (For CD-R/CD-RW)
≥Discs must conform to ISO9660 level 1 or 2 (except for extended formats).
≥This unit is compatible with multi-session but if there are a lot of sessions it takes more
time for play to start. Keep the number of sessions to a minimum to avoid this. ≥When there are more than 8 groups, the eighth group onwards will be displayed on
one vertical line in the menu screen.
≥There may be differences in the display order on the menu screen and computer screen. ≥This unit cannot play files recorded using packet write.
Naming folders and files |
e.g. [MP3] |
|
|
|
|||||
(Files are treated as content and folders are treated as |
root |
|
|
|
|||||
groups on this unit.) |
|
|
001 group |
|
|
|
|||
At the time of recording, prefix folder and file names. This |
|
|
001 |
|
|
|
|
|
|
|
|
|
|
|
|
|
|||
should be with numbers that have an equal number of digits, |
|
|
|
|
|
001 track.mp3 |
|||
and should be done in the order you want to play them (this |
|
|
|
|
|
002 track.mp3 |
|||
|
|
|
|
|
003 track.mp3 |
||||
may not work at times). |
|
|
|
|
|
002 group |
|||
|
|
|
|
|
|
|
|
|
|
Files must have the extension: |
|
|
|
|
|
|
|
|
|
“.WMA” or “.wma” |
|
|
|
|
|
|
|
|
001 track.mp3 |
|
|
|
|
|
|
|
|||
“.MP3” or “.mp3” |
|
|
003 group |
|
|
002 track.mp3 |
|||
|
|
|
|
||||||
|
|
|
|
003 track.mp3 |
|||||
|
|
|
|
|
|
|
|
||
“.JPG”, “.jpg”, “.JPEG” or “.jpeg” |
|
|
|
|
|
|
|
|
004 track.mp3 |
|
|
|
|
|
001 track.mp3 |
||||
[WMA] |
|
|
|
|
|
||||
|
|
|
|
|
|||||
|
|
|
|
|
002 track.mp3 |
||||
≥You cannot play WMA files that are copy protected. |
|
|
|
|
|
003 track.mp3 |
|||
|
|
|
|
|
|||||
|
|
|
|
|
|
|
|
|
|
≥This unit is not compatible with Multiple Bit Rate (MBR: a
file that contains the same content encoded at several different bit rates).
[MP3]
≥This unit is not compatible with ID3 tags.
≥Compatible sampling rate: 8, 11.02, 12, 16, 22.05, 24, 32, 44.1, and 48 kHz
[JPEG]
≥To view JPEG files on this unit:
–Take them on a digital camera that meets the DCF Standard Version 1.0. Some digital cameras have functions that are not supported by the DCF Standard Version 1.0 like automatic picture rotation which may render a picture unviewable.
–Do not alter the files in any way or save them under a different name.
≥This unit cannot display moving pictures, MOTION JPEG and other such formats, still pictures other than JPEG (e.g. TIFF) or play pictures with attached audio.
Discs that can be played
RQT7772
3

 RQT7772-B.fm Page 4 Friday, November 19, 2004 3:43 PM
STEP 1 Connection to a television
Connection to a television
RQT7772
4
≥Do not place the unit on amplifiers or equipment that may become hot. The heat can damage the unit.
≥Do not connect through the video cassette recorder. Due to copy guard protection, the picture may not display properly.
≥Turn off all equipment before connection and read the appropriate operating instructions.
≥Connect the terminals of the same color.
≥Unless otherwise indicated, illustrations are of the models for areas except the United Kingdom and Continental Europe. (\The\United\Kingdom\and\Continental\Europe\ :There is no S VIDEO OUT terminal on the unit.)
Television
|
|
\The\United\Kingdom\and\Continental\Europe\ |
With VIDEO IN or S VIDEO IN |
With COMPONENT VIDEO IN |
With SCART (AV) IN |
AUDIO IN |
VIDEO |
or |
S VIDEO |
|
R |
L |
IN |
|
IN |
 S video cable§
Audio/video cable (included)
Y
 PB
PB
L
 PR
PR
Please connect directly to TV.
§When using this connection, the audio cable (red and white plugs) should also be connected.
You can connect the audio cable to the 2- channel audio input terminals of an analog amplifier or system component to enjoy stereo sound.
AUDIO IN |
COMPONENT |
|
R |
L |
VIDEO IN |
Audio/ |
Not used |
Video |
|
cables |
|||
video |
|
||
|
|
||
cable |
|
|
|
(included) |
|
|
PB
L
PR
R |
Please connect directly to TV. |
To enjoy progressive video
Connect to a progressive output compatible television.
1\The\United\Kingdom\and\Continental\Europe]
Select “Video/YPbPr” for the component terminals in
QUICK SETUP ( page 5).
2Set “Video Output Mode” to “525 (480)p” or “625 (576)p”, then follow the instructions on the menu screen
( page 13, Picture Menu).
\The\United\Kingdom\and\Continental\Europe]
Panasonic televisions with 625 (576)/50i · 50p, 525 (480)/ 60i · 60p input terminals are progressive compatible.
SCART (AV) IN
21-pin SCART cable
 AV
AV
≥If the television is compatible with S- video, select “S-Video/YPbPr”, or compatible with RGB, select “RGB/ No Output” for the AV terminals in QUICK SETUP ( page 5).
Back of the unit
 RQT7772-B.fm Page 5 Friday, November 19, 2004 3:43 PM
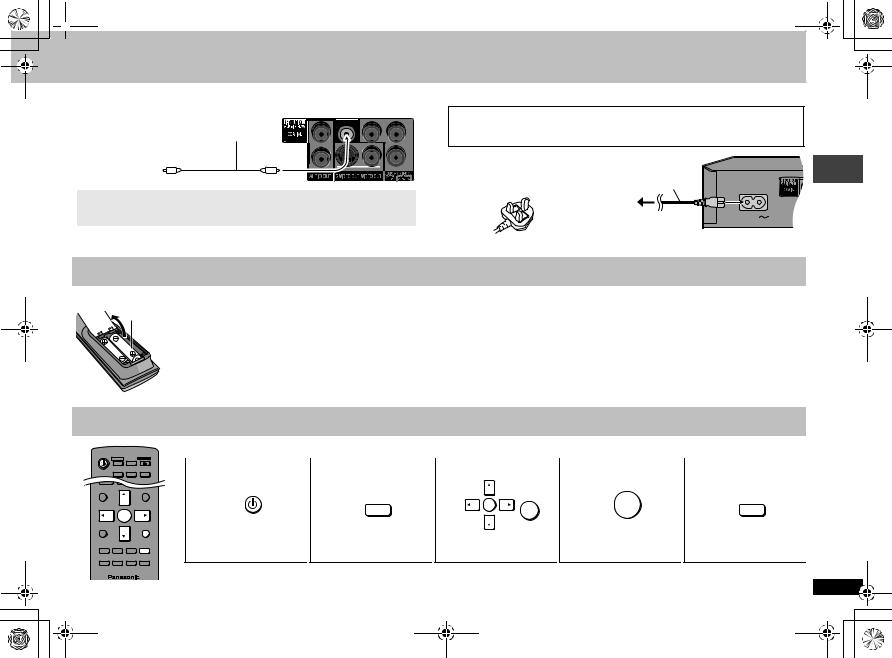
∫ Enjoying multi-channel surround sound
|
|
Y |
PB |
Amplifier with a built-in |
Coaxial cable |
|
|
L |
|
|
|
decoder or a decoder- |
|
|
PR |
|
|
|
|
amplifier combination |
|
|
|
COAXIAL IN |
R |
Please connect directly to TV. |
|
Change “PCM Digital Output”, “Dolby Digital”, “DTS Digital Surround” and “MPEG [Except[Asia[” ( page 15, “Audio” tab).
∫ Connect the AC mains lead last
FOR THE UNITED KINGDOM AND THE MIDDLE EAST ONLY (EXCEPT UNITED ARAB EMIRATES) READ THE CAUTION FOR AC MAINS LEAD ON PAGE 2 BEFORE CONNECTION.
\The\Middle[East[except\United\Arab[Emirates[
Use the AC mains lead
that matches the socket AC mains lead (included) for the area you live in.
|
To household |
|
L |
\Saudi[Arabia[ |
|
|
|
|
mains socket |
AC IN |
R |
|
|
|
STEP 2 The remote control
∫ Batteries |
≥Insert so the poles (i and j) match those in the remote control. |
R6/LR6, AA, UM-3 |
≥Do not use rechargeable type batteries. |
Do not: |
|
|
≥mix old and new batteries. |
|
≥use different types at the same time. |
|
≥heat or expose to flame. |
|
≥take apart or short circuit. |
|
≥attempt to recharge alkaline or manganese batteries. |
|
≥use batteries if the covering has been peeled off. |
Mishandling of batteries can cause electrolyte leakage which can damage items the fluid contacts and may cause a fire.
Remove if the remote control is not going to be used for a long period of time. Store in a cool, dark place.
∫ Use
Aim at the remote control sensor ( page 6), avoiding obstacles, at a maximum range of 7 m directly in front of the unit.
STEP 3 QUICK SETUP
Turn on the television and select the appropriate video input on the television.
QUICK OSD |
FL SELECT OPEN/CLOSE |
1 |
2 |
3 |
4 |
5 |
|
ADVANCED |
AV |
ADVANCED |
|||||
DISC REVIEW ENHANCER SURROUND |
|||||||
DIRECT NAVIGATOR |
|
PLAY LIST |
|
SETUP |
RETURN |
|
SETUP |
|
|
|
|
ENTER |
|||
TOP MENU |
|
MENU |
|
ENTER |
|||
|
|
|
|
||||
|
|
|
|
|
|
|
|
ENTER |
|
|
|
|
|
|
|
FUNCTIONS |
|
RETURN |
|
|
|
|
|
SUBTITLE AUDIO |
ANGLE/PAGE SETUP |
Power ON. |
Shows QUICK SETUP |
Follow the message |
Press to finish |
Press to exit. |
|
|
screen. |
and make the settings. |
QUICK SETUP. |
|
|||
PLAY MODE PLAY SPEED ZOOM |
GROUP |
|
|
||||
To change these settings later
RQT7772 Connection to a television/The remote control/QUICK SETUP
Select “QUICK SETUP” ( page 15, “Others” tab). |
5 |
|

 RQT7772-B.fm Page 6 Friday, November 19, 2004 3:43 PM
Basic play
1Power ON. |
2Open the disc tray. |
Stop Pause
3Load the disc. |
4Start play. |
≥Load double-sided discs so the label for the side you want to play is facing up. |
|
≥[RAM] Remove discs from their cartridges before use. |
|
Remote control sensor
Displaying current playback condition page 7
Basic play
Skip
≥[RAM] Can also skip to the markers.
Stop
The position is memorized when “!” flashes on the display.
≥Press [1] (PLAY) to resume.
≥Press [∫] to clear the position.
1 |
QUICK OSD FL SELECT OPEN/CLOSE |
2 |
||
ADVANCED AV |
ADVANCED |
|||
|
DISC REVIEW ENHANCER SURROUND |
|
||
|
|
|
SOUND |
Search (during play) |
|
|
|
ENHANCEMENT |
|
1 |
2 |
3 |
|
Slow-motion (during pause) |
4 |
5 |
6 |
PICTURE MODE |
|
|
|
|
MANUAL SKIP |
≥Up to 5 steps |
7 |
8 |
9 |
|
≥Press [1] (PLAY) to restart play. |
CANCEL |
|
|
QUICK REPLAY |
|
|
0 |
10 |
|
≥[VCD] Slow-motion, forward direction only |
SKIP |
SLOW/SEARCH |
|
||
STOP |
|
PAUSE |
PLAY |
4 |
DIRECT NAVIGATOR |
|
PLAY LIST |
Pause |
|
≥Press [1] (PLAY) to restart play.
TOP MENU |
MENU |
RQT7772
6
Standby/on switch (Í/I)
Press to switch the unit from on to standby mode or vice versa. In standby mode, the unit is still consuming a small amount of power.
Standby/on indicator (Í)
When the unit is connected to the AC mains supply, this indicator lights up in standby mode and goes out when the unit is turned on.
[Note]
Discs continue to rotate while menus are displayed. Press [∫] when you finish to preserve the unit’s motor and your television screen.
If you are experiencing problems, refer to troubleshooting guide ( page 16, 17).
 Loading...