


 Loading...
Operating Instructions
DVD Recorder
Model No. DMR-EZ485V
DMR-EZ48V
P15 Basic Operations
Dear customer
Thank you for purchasing this product.
For optimum performance and safety, please read these instructions carefully.
Before connecting, operating or adjusting this product, please read the instructions completely.
Please keep this manual for future reference.
Region number supported by this unit
Region numbers are allocated to DVD players and DVD-Video according to where they are sold. Example: |
|
|
|
|
The region number of this unit is “1”. |
|
|
12 |
|
The unit will play DVDs marked with labels containing “1” or “ALL”. |
1 |
ALL |
|
|
|
4 |
|||
|
|
|
|
|
If you have any questions contact
In the U.S.A.: 1-800-211-PANA(7262)
In Canada: 1-800-561-5505
[For\U.S.A.]only]
The warranty can be found on page 94.
[For\Canada]only]
The warranty can be found on page 95.
La referencia rápida en español se encuentra en la página 96−99.
|
|
P |
|
PC |
RQT9056-P |
|
|||||
|
|
|
|
|
|
Precautions
CAUTION!
THIS PRODUCT UTILIZES A LASER.
USE OF CONTROLS OR ADJUSTMENTS OR PERFORMANCE OF PROCEDURES OTHER THAN THOSE SPECIFIED HEREIN MAY RESULT IN HAZARDOUS RADIATION EXPOSURE.
DO NOT OPEN COVERS AND DO NOT REPAIR YOURSELF. REFER SERVICING TO QUALIFIED PERSONNEL.
WARNING:
TO REDUCE THE RISK OF FIRE, ELECTRIC SHOCK OR PRODUCT DAMAGE,
DO NOT EXPOSE THIS APPARATUS TO RAIN, MOISTURE, DRIPPING OR SPLASHING AND THAT NO OBJECTS FILLED WITH LIQUIDS, SUCH AS VASES, SHALL BE PLACED ON THE APPARATUS.
USE ONLY THE RECOMMENDED ACCESSORIES.
DO NOT REMOVE THE COVER (OR BACK); THERE ARE NO USER SERVICEABLE PARTS INSIDE. REFER SERVICING TO QUALIFIED SERVICE PERSONNEL.
CAUTION!
DO NOT INSTALL OR PLACE THIS UNIT IN A BOOKCASE, BUILT-IN CABINET OR IN ANOTHER CONFINED SPACE. ENSURE THE UNIT IS WELL VENTILATED. TO PREVENT RISK OF ELECTRIC SHOCK OR FIRE HAZARD DUE TO OVERHEATING, ENSURE THAT CURTAINS AND ANY OTHER MATERIALS DO NOT OBSTRUCT THE VENTILATION VENTS.
CAUTION
RISK OF ELECTRIC SHOCK
DO NOT OPEN
CAUTION: TO REDUCE THE RISK OF ELECTRIC
SHOCK, DO NOT REMOVE SCREWS.
NO USER-SERVICEABLE PARTS
INSIDE.
REFER SERVICING TO QUALIFIED
SERVICE PERSONNEL.
The lightning flash with arrowhead symbol, within an equilateral triangle, is intended to alert the user to the presence of uninsulated “dangerous voltage” within the product’s enclosure that may be of sufficient magnitude to constitute a risk of electric shock to persons.
The exclamation point within an equilateral triangle is intended to alert the user to the presence of important operating and maintenance (servicing) instructions in the literature accompanying the appliance.
CAUTION
Danger of explosion if battery is incorrectly replaced. Replace only with the same or equivalent type recommended by the manufacturer. Dispose of used batteries according to the manufacturer’s instructions.
2
THE FOLLOWING APPLIES ONLY IN THE U.S.A.
Note to CATV system installer:
This reminder is provided to call the CATV system installer’s attention to Article 820-40 of the NEC that provides guidelines for proper grounding and, in particular, specifi es that the cable ground shall be connected to the grounding system of the building, as close to the point of cable entry as practical.
The socket outlet shall be installed near the equipment and easily accessible. The mains plug of the power supply cord shall remain readily operable. To completely disconnect this apparatus from the AC Mains, disconnect the power supply cord plug from AC receptacle.
THE FOLLOWING APPLIES ONLY IN THE U.S.A.
FCC Note:
This equipment has been tested and found to comply with the limits for a Class B digital device, pursuant to Part 15 of the FCC Rules. These limits are designed to provide reasonable protection against harmful interference in a residential installation. This equipment generates, uses, and can radiate radio frequency energy and, if not installed and used in
accordance with the instructions, may cause harmful interference to radio communications. However, there is no guarantee that interference will not occur in a particular installation. If this equipment does cause harmful interference to radio or television reception, which can be determined by turning the equipment off and on, the user is encouraged to try to correct the interference by one or more of the following measures:
Reorient or relocate the receiving antenna.
Increase the separation between the equipment and receiver.
Connect the equipment into an outlet on a circuit different from that to which the receiver is connected.
Consult the dealer or an experienced radio/TV technician for help.
FCC Caution: To assure continued compliance, follow the attached installation instructions and use only shielded interface cables when connecting to peripheral devices.
Any changes or modifi cations not expressly approved by the party responsible for compliance could void the user’s authority to operate this equipment.
This device complies with Part 15 of the FCC Rules. Operation is subject to the following two conditions: (1) This device may not cause harmful interference, and (2) this device must accept any interference received, including interference that may cause undesired operation.
Declaration of Conformity
Trade Name: Panasonic
Model No.: DMR-EZ485V
DMR-EZ48V
Responsible Party:
Panasonic Corporation of North America
One Panasonic Way
Secaucus, NJ 07094
Support Contact:
Panasonic Consumer Electronics Company
Telephone No.: 1-800-211-7262
(Inside of product)
RQT9056
IMPORTANT SAFETY INSTRUCTIONS
Read these operating instructions carefully before using the unit. Follow the safety instructions on the unit and the applicable safety instructions listed below. Keep these operating instructions handy for future reference.
1)Read these instructions.
2)Keep these instructions.
3)Heed all warnings.
4)Follow all instructions.
5)Do not use this apparatus near water.
6)Clean only with dry cloth.
7)Do not block any ventilation openings. Install in accordance with the manufacturer’s instructions.
8)Do not install near any heat sources such as radiators, heat registers, stoves, or other apparatus (including amplifi ers) that produce heat.
9)Do not defeat the safety purpose of the polarized or grounding-type plug. A polarized plug has two blades with one wider than the other. A grounding-type plug has two blades and a third grounding prong. The wide blade or the third prong are provided for your safety. If the provided plug does not fi t into your outlet, consult an electrician for replacement of the obsolete outlet.
10)Protect the power cord from being walked on or pinched particularly at plugs, convenience receptacles, and the point where they exit from the apparatus.
11)Only use attachments/accessories specifi ed by the manufacturer.
12)Use only with the cart, stand, tripod, bracket, or table
specifi ed by the manufacturer, or sold with the apparatus. When a cart is used, use caution when moving the cart/apparatus combination to avoid injury from tip-over.
13)Unplug this apparatus during lightning storms or when unused for long periods of time.
14)Refer all servicing to qualifi ed service personnel. Servicing is required when the apparatus has been damaged in any way, such as power-supply cord or plug is damaged, liquid has been spilled or objects have fallen into the apparatus, the apparatus has been exposed to rain or moisture, does not operate normally, or has been dropped.
Unit Care
The precision parts in the unit are readily affected by the environment, especially temperature, humidity, and dust. Cigarette smoke also can cause malfunction or breakdown.
The unit should not be installed or operated near large magnets or electromagnetic devices. Such devices can damage pre-recorded VHS recordings.
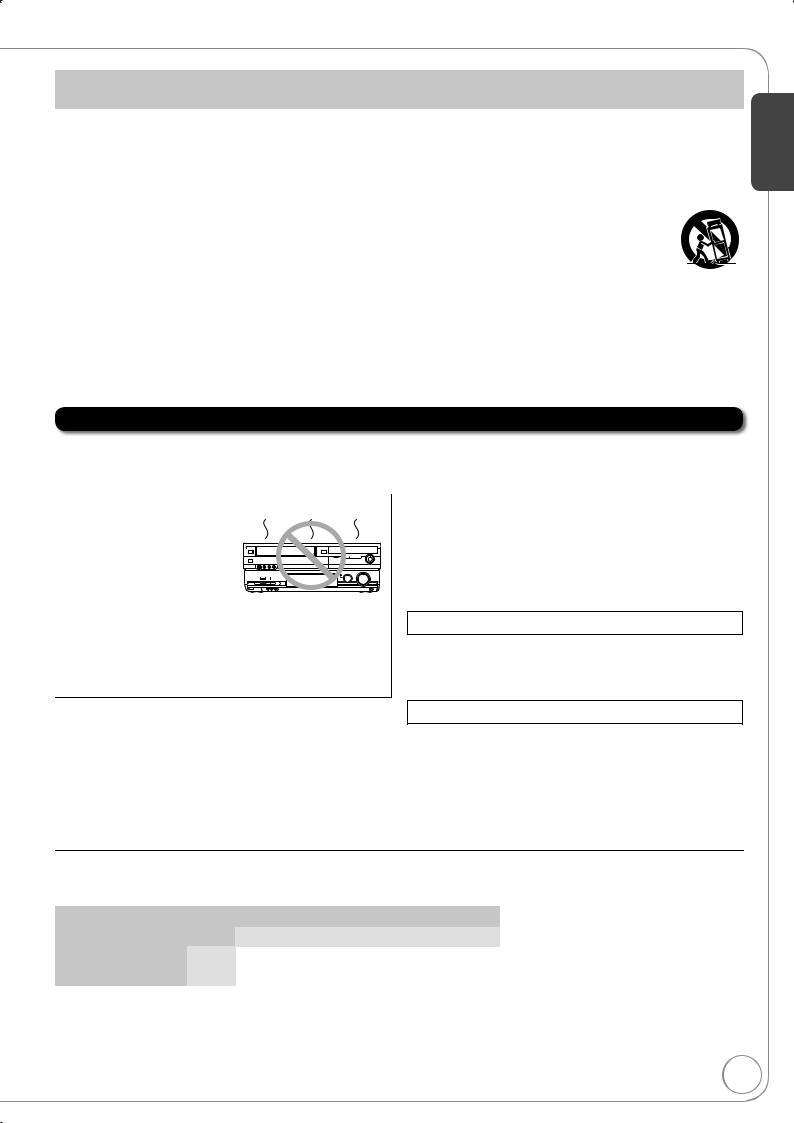
Do not place any heavy objects on top of the unit.
The unit should not be mounted in a vertical position. It’s designed to operate in the horizontal position.
Before moving the unit, ensure the disc tray and cassette compartment are empty. Failure to do so will risk severely damaging the disc, tape and the unit.
 Cautions about condensation
Condensation can cause unreliable playback of recordings. Condensation may form in the following cases,
The unit is brought from cold surroundings into a well-heated room.The unit is suddenly brought from cool surroundings, such as an air-
conditioned room or car, to a place which is hot and humid.During rainy seasons.
In any of the above-mentioned conditions, do not operate the unit for at least 2 hours. The unit is not equipped with a moisture sensor.
 Maintenance
To clean the unit
Wipe with a soft, dry cloth.
Never use alcohol, thinner or benzine to clean the unit.
Before using chemically treated cloth, carefully read the instructions that came with the cloth.
To clean the DVD lens
Dust and dirt may adhere to the unit’s lens over time, possibly making it impossible to record or play discs.
Use the DVD lens cleaner about once every year, depending on frequency of use and the operating environment.
Carefully read the lens cleaner’s instructions before use.
DVD lens cleaner: RP-CL720PP
To clean the video heads
Dirt on the video heads can cause poor recording and play.
If the picture does not improve, use a head-cleaning cassette. If the problem persists, seek advice from a qualifi ed service person.
Head-cleaning cassette: NV-TCL30PT (Only for U.S.A.)
Getting Started
 When the unit is not to be used for a long time
To save power, unplug the AC power supply cord from the household AC outlet. The unit consumes a small amount of power even when it is turned off.
Standby power consumption
|
|
Front Display ( |
63) |
|
|
|
|
|
|
|
|
Automatic |
|
Bright |
|
|
|
|
|
Quick Start ( 58) |
On |
Approx. 17.6 W |
|
Approx. 17.6 W |
|
|
|
|
|
Off |
Approx. 1.7 W |
|
Approx. 3.5 W |
|
|
|
|||
|
|
|
|
|
RQT9056

Table of Contents, Accessories
Getting Started |
|
|
Precautions............................................................................... |
|
2 |
IMPORTANT SAFETY INSTRUCTIONS .................................. |
3 |
|
Unit Care........................................................................................ |
|
3 |
Accessories ................................................................................... |
|
5 |
Remote Control Information........................................................... |
|
5 |
Control Reference Guide.......................................................... |
|
6 |
Main Unit........................................................................................ |
|
6 |
The Unit’s Display .......................................................................... |
|
6 |
Remote Control.............................................................................. |
|
7 |
Rear Panel ..................................................................................... |
|
7 |
Basic Connection...................................................................... |
|
8 |
Connecting to a Television with Direct Cable or Antenna |
|
|
(No Cable Box or Satellite Receiver) ........................................ |
8 |
|
Connecting to a Television and a Cable Box.................................. |
9 |
|
Connecting to a Television and a Satellite Receiver .................... |
10 |
|
Connecting to a TV with an HDMI (High Defi nition Multimedia |
|
|
Interface) Cable ...................................................................... |
|
11 |
Setting the Channels and Clock |
............................................. |
12 |
Acquiring the setting information from the TV (VIERA)................ |
14 |
|
Basic Operations |
|
|
Media Handling .................................................................. |
|
15 |
Inserting Discs........................................................................ |
|
15 |
Inserting a Video Cassette ..................................................... |
|
15 |
Inserting USB memory ........................................................... |
|
15 |
Inserting an SD Card.............................................................. |
|
15 |
Watching Television............................................................ |
|
16 |
Playback............................................................................. |
|
17 |
Playing a Disc......................................................................... |
|
17 |
Playing a Video Cassette........................................................ |
|
17 |
Recording Television Programs.......................................... |
18 |
|
Scheduled Recording......................................................... |
|
19 |
Copying Recordings........................................................... |
|
20 |
Copying Recordings (VHS |
DVD) ....................................... |
20 |
Copying Recordings (DVD |
VHS)........................................ |
21 |
Deleting Recordings........................................................... |
|
22 |
Delete Navigator..................................................................... |
|
22 |
Deleting Recordings During Playback .................................... |
22 |
|
Advanced Features |
|
|
Important Notes for Recording ............................................... |
|
23 |
Advanced Recording .............................................................. |
|
24 |
DVD Recording Modes and Estimated Disc Recording Time ...... |
24 |
|
VHS Recording Modes and Estimated Recording Time .............. |
24 |
|
When the format confi rmation screen is displayed ...................... |
25 |
|
When removing a recorded disc .................................................. |
25 |
|
Selecting Audio Channels to record............................................. |
25 |
|
Specifying the Recording Time |
.................................................... |
26 |
Flexible Recording ....................................................................... |
|
26 |
Playing while you are recording ................................................... |
26 |
|
Advanced Scheduled Recording ............................................ |
27 |
|
To cancel a scheduled recording in progress............................... |
27 |
|
Check, Change, or Delete Programs ........................................... |
27 |
|
To release the unit from recording standby |
|
|
(Before recording starts) ......................................................... |
|
27 |
Recording from an External Device........................................ |
28 |
|
Recording from a VCR, etc. ......................................................... |
|
28 |
Recording from a DV Camcorder................................................. |
29 |
|
Advanced Disc Playback ........................................................ |
|
30 |
Zoom in on video ......................................................................... |
|
30 |
Menu Screens on the TV ............................................................. |
|
30 |
Selecting Recordings to Play ....................................................... |
|
30 |
Search.......................................................................................... |
|
30 |
Skip.............................................................................................. |
|
30 |
Direct Play.................................................................................... |
|
30 |
Quick View (Play 1.3)................................................................ |
|
31 |
Slow-motion Play ......................................................................... |
|
31 |
Frame-by-Frame Viewing ............................................................. |
|
31 |
Time Slip...................................................................................... |
|
31 |
CM Skip ....................................................................................... |
|
31 |
Create Chapters........................................................................... |
|
31 |
Changing Audio during Playback................................................. |
31 |
|
Playing Playlists...................................................................... |
|
32 |
Playlist Properties ........................................................................ |
|
32 |
View Chapters.............................................................................. |
|
32 |
Playing MP3s.......................................................................... |
33 |
Playing Still Pictures (JPEG) .................................................. |
34 |
Playing DivX ........................................................................... |
36 |
Advanced Video Cassette Playback ....................................... |
37 |
Zoom in on video ......................................................................... |
37 |
Fast-forward/Rewind .................................................................... |
37 |
Slow playback .............................................................................. |
37 |
Cue/Review.................................................................................. |
37 |
Jet Search.................................................................................... |
37 |
Jet Rewind ................................................................................... |
37 |
VHS Index Search System (VISS)............................................... |
37 |
S-VHS Quasi Playback (SQPB)................................................... |
38 |
Repeat Playback.......................................................................... |
38 |
Changing Audio during Playback................................................. |
38 |
Adjusting the playback picture ..................................................... |
38 |
Status Messages.................................................................... |
39 |
On-screen Display Indicators for Video Cassette Playback ......... |
39 |
Linked Operations with the TV |
|
(VIERA Link TM “HDAVI Control TM”) ................................... |
40 |
Easy control only with VIERA Remote Control...................... |
41 |
FUNCTIONS Window........................................................ |
42 |
Entering Text........................................................................... |
42 |
Advanced Editing |
|
Recordings−Editing ................................................................ |
43 |
Accessing the Recording View..................................................... |
43 |
Editing Operations to Recordings ................................................ |
43 |
Chapters−Creating, Editing .................................................... |
45 |
Accessing the Chapter View ........................................................ |
45 |
Chapter Operations...................................................................... |
45 |
Still Pictures−Editing .............................................................. |
46 |
Accessing the Album/Picture View............................................... |
46 |
Album/Picture Operations ............................................................ |
46 |
Copying Still Pictures.............................................................. |
48 |
Importing Still Pictures from an SD card or USB memory ........... |
48 |
Copying Still Pictures via the Album View Screen ....................... |
48 |
Deleting Still Pictures.............................................................. |
49 |
Delete Navigator .......................................................................... |
49 |
Setting Menus |
|
Setting DVD On-Screen Menus.............................................. |
50 |
Accessing the DVD On-Screen Menus ........................................ |
50 |
DVD and Card Management .................................................. |
52 |
Accessing the Management Menus............................................. |
52 |
Setup Menus .......................................................................... |
55 |
Set Channels Automatically ......................................................... |
55 |
Set Channels Manually................................................................ |
55 |
Surf Mode .................................................................................... |
56 |
Parental Rating ............................................................................ |
56 |
Off Timer ...................................................................................... |
57 |
Remote Control............................................................................ |
57 |
Clock Settings .............................................................................. |
57 |
Quick Start ................................................................................... |
58 |
DivX Registration ......................................................................... |
58 |
Restore Default Settings .............................................................. |
59 |
Settings for Playback ................................................................... |
59 |
Settings for Recording ................................................................. |
60 |
Still Mode (paused video) ............................................................ |
60 |
Black Level Control ...................................................................... |
60 |
Dynamic Range Compression ..................................................... |
60 |
Multi-channel TV Sound (Analog) ................................................ |
61 |
Multi-channel TV Sound (Digital) ................................................. |
61 |
Digital Audio Output ..................................................................... |
61 |
Select Audio Channel For DV Input ............................................. |
62 |
Status Messages ......................................................................... |
62 |
On-screen Language ................................................................... |
62 |
Black Background (Analog) ......................................................... |
62 |
Front Display ................................................................................ |
63 |
Closed Caption ............................................................................ |
63 |
TV Aspect .................................................................................... |
64 |
4:3 TV settings for DVD-Video ..................................................... |
64 |
4:3 TV settings for DVD-RAM ...................................................... |
64 |
Component Output Signal............................................................ |
64 |
Functions of HDMI ....................................................................... |
65 |
Select Tape Length ...................................................................... |
66 |
Jet Search.................................................................................... |
66 |
Parental Rating List ................................................................ |
67 |
Other Settings |
|
Other Settings......................................................................... |
68 |
Using the Unit’s Remote Control to Operate the TV and the Set |
|
Top Box (Cable Box, Satellite Receiver, etc.).......................... |
68 |
RQT9056
Reference
Connection Options for Improved Playback Quality ............... |
|
70 |
DVD output and DVD/VHS output................................................ |
|
70 |
Using an S Video Cable for Better Video |
|
|
(S Video Cable not included) .................................................. |
|
70 |
Using Component Video Cables for Better Video |
|
|
(Component Video Cables not included) ................................ |
|
71 |
Using an Audio Cable for Better Sound |
|
|
(Audio Cable not included)...................................................... |
|
72 |
Using an Optical Digital Audio Cable for Better Sound |
|
|
(Optical Digital Audio Cable not included) .............................. |
|
72 |
Using an HDMI (High Defi nition Multimedia Interface) Cable ..... |
72 |
|
SD Card and USB Memory Information................................... |
|
73 |
USB memories you can use with this unit.................................... |
|
73 |
SD Cards Usable with this Unit.................................................... |
|
73 |
Disc Information...................................................................... |
|
74 |
Usable Discs for Recording and Playback ................................... |
|
74 |
Play-only Discs ............................................................................ |
|
75 |
Discs that Cannot be Played........................................................ |
|
75 |
Media Care .................................................................................. |
|
75 |
MP3s, DivX and Still Pictures (JPEG) .................................... |
|
76 |
MP3 File Information.................................................................... |
|
76 |
Still Picture (JPEG) Information ................................................... |
|
76 |
DivX File Information.................................................................... |
|
76 |
Frequently Asked Questions .......................................... |
77 |
|
Setup ........................................................................................... |
|
77 |
Discs ............................................................................................ |
|
77 |
Recording..................................................................................... |
|
78 |
USB.............................................................................................. |
|
78 |
(U.S.A. only) Product Registration Card
Error Messages ............................................................. |
|
79 |
On the Unit’s Display.................................................................... |
|
79 |
On the TV..................................................................................... |
|
80 |
Troubleshooting Guide ................................................... |
|
81 |
If the Antenna Connector doesn’t Match ..................................... |
|
81 |
Changing RF Output Channel...................................................... |
|
81 |
To Reset This Unit........................................................................ |
|
81 |
General Issues: Power ................................................................. |
|
82 |
General Issues: Displays ............................................................. |
|
82 |
General Issues: Operation ........................................................... |
|
83 |
General Issues: VIERA Link......................................................... |
|
84 |
General Issues: USB.................................................................... |
|
84 |
Playback Issues: Picture .............................................................. |
|
85 |
Playback Issues: Sound............................................................... |
|
86 |
Playback Issues: Operation.......................................................... |
|
87 |
Playback Issues: VHS .................................................................. |
|
88 |
Recording Issues: DVD Recording/Scheduled Recording/ |
|
|
Copying/External Input ........................................................... |
|
88 |
Recording Issues: VHS Recording............................................... |
|
90 |
Editing Issues: DVD & SD............................................................ |
|
90 |
Editing Issues: Still Pictures......................................................... |
|
90 |
Glossary ................................................................................. |
|
91 |
Specifi cations ......................................................................... |
|
92 |
Product Service ...................................................................... |
|
93 |
Product information...................................................................... |
|
93 |
Limited Warranty (ONLY FOR U.S.A.) .................................... |
|
94 |
Limited Warranty (ONLY FOR CANADA)................................ |
|
95 |
Referencia rápida en español (Spanish Quick Reference) |
..... 96 |
|
Index.......................................................................... |
Back cover |
|
1 HDMI cable (DMR-EZ485V only) (K1HA19DA0007)
Please complete and return the included product registration card, or register via the Internet at: http://www.prodreg.com/panasonic/
(Canada only)
The enclosed Canadian French label sheet corresponds to the English display on the front and back sides of the unit.
Remote Control Information
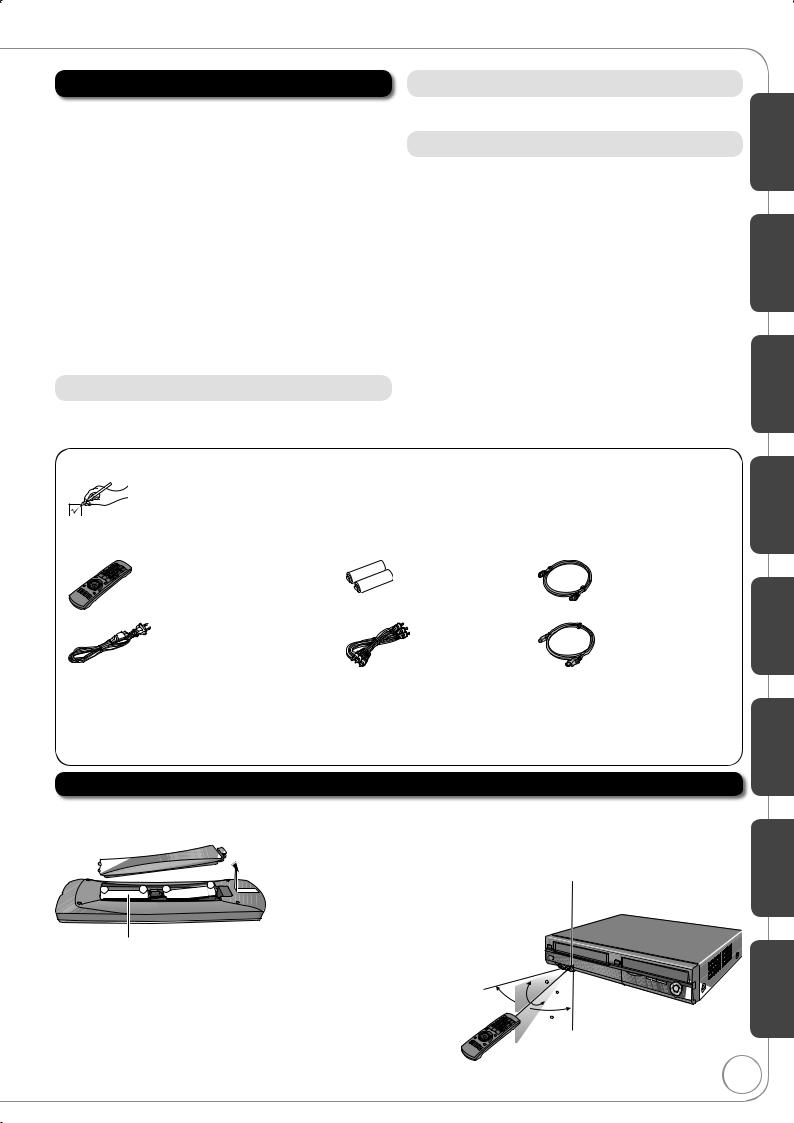
About batteries |
Remove if the remote control is not going to be used for a long period |
||||||||||||
Insert so the poles ( and ) match those in the remote control. |
of time. Store in a cool, dark place. |
||||||||||||
Do not use rechargeable type batteries. |
Using the remote control |
||||||||||||
|
|
|
|
|
|
|
|
|
|
|
|
|
Aim at the sensor, avoiding obstacles, up to a maximum range of |
|
|
|
|
|
|
|
|
|
|
|
|
|
7 m (23 feet) directly in front of the unit. |
|
|
|
|
|
|
|
|
|
|
|
|
|
|
Other Settings Setting Menus Advanced Editing Advanced Features Basic Operations Getting Started
Reference
R6/LR6, AA
Do not mix old and new batteries.
Do not use different types at the same time.Do not heat or expose to fl ame.
Do not leave the battery(ies) in an automobile exposed to direct sunlight for a long period of time with doors and windows closed.
Do not take apart or short circuit.
Do not attempt to recharge alkaline or manganese batteries.Do not use batteries if the covering has been peeled off. Mishandling of batteries can cause electrolyte leakage which can damage items the fl uid contacts and may cause a fi re.
30
20 |
Español |
20 |
|
30 |
|
RQT9056
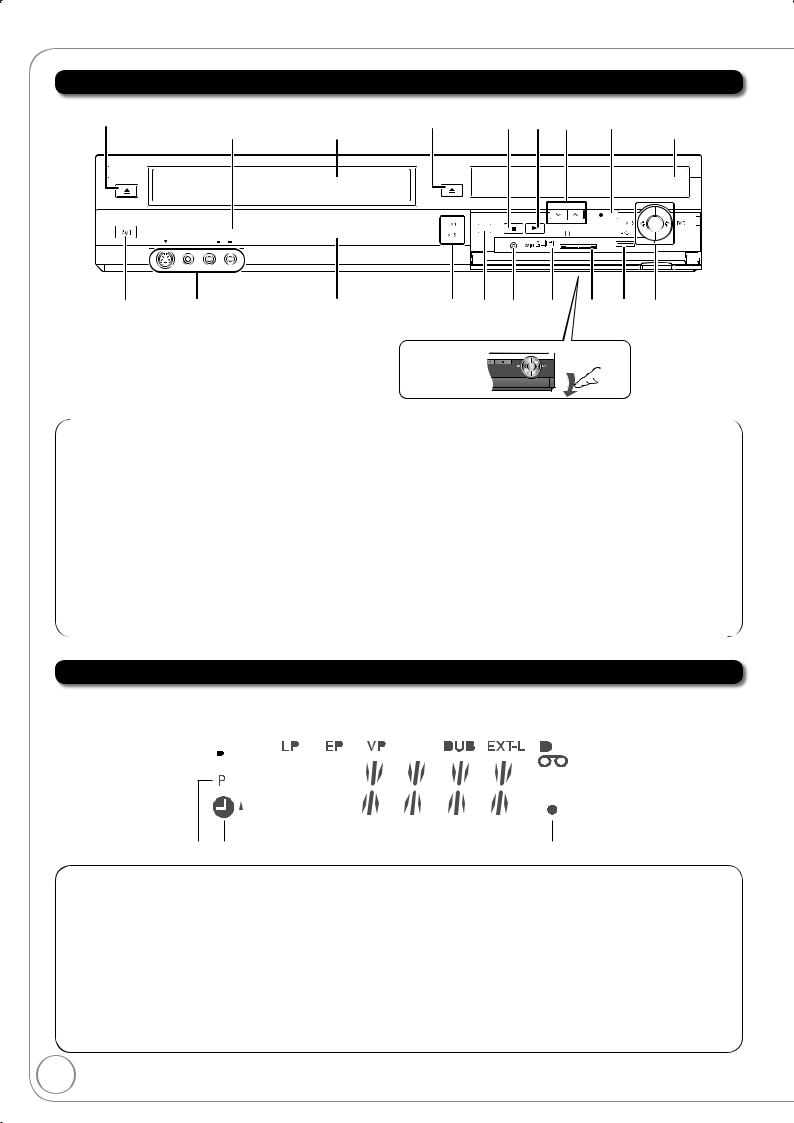
Control Reference Guide
Main Unit
|
Remote Control |
Cassette |
|
Disc tray |
signal sensor |
compartment |
EJECT
POWER
IN 2 |
S VIDEO VIDEO |
L/MONO AUDIO R |
OPEN/CLOSE
REC |
DRIVE SELECT |
SD CARD |
RESET |
|
The unit’s display |
Opening |
CH REC |
the front panel
Pull down.
The Unit’s Display
|
|
|
|
||||||
|
|
|
|
|
|
|
|
|
|
|
|
|
|
|
|
|
|
|
|
|
|
|
|
|
|
|
|
|
|
|
|
|
|
|
|
|
|
|
|
|
|
|
|
|
|
|
|
|
|
|
|
|
|
|
|
|
|
|
|
|
|
|
|
|
|
|
|
|
|
|
|
|
|
|
|
|
|
|
|
|
|
|
|
|
|
|
|
|
|
|
|
RQT9056

Remote Control
DVD/VHS
POWER
DRIVE |
TV/VIDEO |
CH |
VOL |
|||||
SELECT |
|
|||||||
1 |
2 |
|
3 |
TRACKING/V-LOCK |
||||
|
CH |
|||||||
4 |
5 |
|
6 |
|||||
|
|
|||||||
7 |
8 |
|
9 INPUT SELECT |
|||||
DELETE |
0 |
|
|
|
FAVORITE |
|||
|
|
|
|
|||||
RESET |
|
|
SLOW/SEARCH |
|||||
SKIP/INDEX |
|
REW |
FF |
|||||
STOP |
PAUSE |
|
PLAY |
|||||
TIME SLIP/ |
JET REW |
|
|
CM SKIP |
||||
|
|
|
|
|
ED |
UL |
|
|
|
|
|
|
CH |
E |
|
||
|
|
|
|
S |
|
|
|
|
|
T |
O |
R |
|
|
|
|
F |
|
|
|
|
|
|
|||
|
|
|
|
|
|
|
U |
|
A |
|
|
|
|
|
|
N |
|
IG |
|
|
|
|
|
|
|
C |
V |
|
|
|
|
|
|
|
T |
A |
|
|
|
|
|
|
|
I |
N |
|
|
|
|
|
|
|
O |
T |
|
|
|
|
OK |
|
|
|
C |
|
|
|
|
|
|
N |
|
E |
|
|
|
|
|
|
S |
|
R |
|
|
|
|
|
|
|
|
I |
|
|
|
|
|
|
|
|
D |
|
|
|
|
|
|
|
|
SUB MENU |
|
|
|
|
RETURN |
|||
AUDIO |
|
CREATE |
VCR/TV |
|||||
DISPLAY CHAPTER |
||||||||
A |
B |
|
|
|
|
|||
REC |
REC MODE |
F Rec |
STATUS |
|||||
Getting Started
Rear Panel
RF |
DVD/VHS COMMON OUT |
COMPONENT VIDEO OUT |
||
IN |
R-AUDIO-L VIDEO |
Y |
PB |
PR |
|
|
|
S VIDEO |
|
S VIDEO |
|
RF |
AV OUT |
|
|
|
|
|
OUT |
|
|
|
|
OPTICAL |
|
AC IN |
R-AUDIO |
-L |
VIDEO |
R-AUDIO-L VIDEO |
DIGITAL AUDIO OUT |
|
VHF/ UHF |
||||||
|
|
IN1 |
DVD PRIORITY OUT |
(PCM/BITSTREAM) |
|
|
RQT9056
Basic Connection
The connection diagrams represent typical installations. These diagrams may not work with certain inhouse cable systems, master antenna installations, or situations where TV programming is delivered using methods that differ from industry accepted practices. If you require assistance with connections, please contact Panasonic at 1-800-211-7262 (for U.S.A.) or 1-800-561-5505 (for Canada).
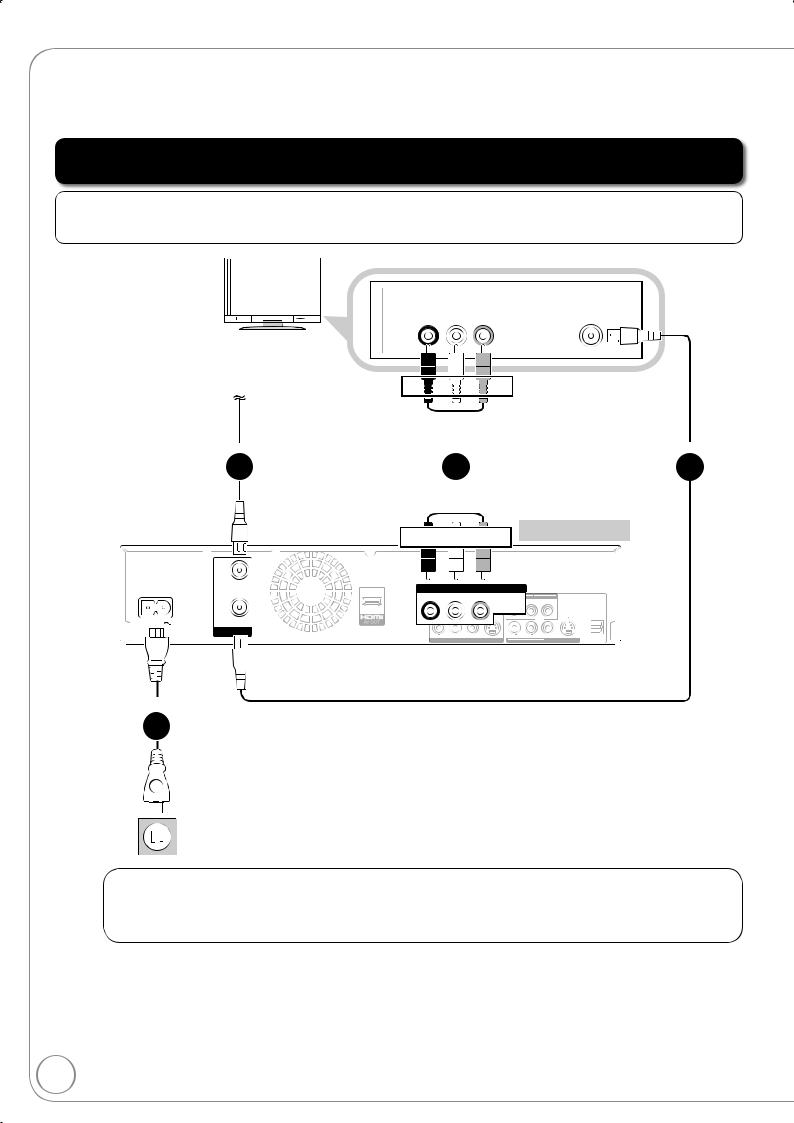
Connecting to a Television with Direct Cable or Antenna (No Cable Box or Satellite Receiver)
|
|
|
|
|
|
|
|
|
|
|
|
|
|
|
|
|
|
|
|
|
|
|
|
|
|
|
|
|
|
|
Rear of TV |
|
|
|
|
|
|
|
|
|
|
|
|
|
|
|
|
|
|
|
|
|
|
|
|
|
|
|
|
|
|
|
|
|
|
|
|
||||||
|
|
|
|
|
|
|
|
|
|
|
|
|
|
|
|
|
|
|
|
|
|
|
|
|
|
|
|
|
|
|
||||||
|
|
|
|
|
|
|
|
|
|
|
|
|
|
|
|
|
|
|
|
|
|
|
|
|
|
|
|
|
|
|
|
|
|
|
|
|
|
|
|
|
|
|
|
|
|
|
|
|
|
|
|
|
|
|
|
|
|
|
|
|
|
|
|
|
|
|
|
|
|
|
|
|
|
|
|
|
|
|
|
|
|
|
|
|
|
|
AUDIO IN |
VIDEO |
VHF/UHF |
|
|
|
|
|
||||||||||||||||
|
|
|
|
|
|
|
|
|
|
|
|
|
|
R |
|
|
|
|
L |
|
|
IN |
RF IN |
|
|
|
|
|
||||||||
|
|
|
|
|
|
|
|
|
|
|||||||||||||||||||||||||||
|
|
|
|
|
|
|
|
|
|
|||||||||||||||||||||||||||
|
|
|
|
|
|
|
|
|
|
|
|
|
|
|
|
|
|
|
|
|
|
|
|
|
|
|
|
|
|
|
|
|
|
|
|
|
Cable from the wall |
|
|
|
|
|
|
|
|
|
|
|
|
|
|
|
|
|
|
|
|
|
|
|
|
|
|
|
|
|
|||||||
|
|
|
|
|
|
|
|
|
|
|
|
|
|
|
|
|
|
|
|
|
|
|
|
|
|
|
|
|
||||||||
|
|
|
|
|
|
|
|
|
|
|
|
|
|
|
|
|
|
|
|
|
|
|
|
|
|
|
|
|
||||||||
|
|
|
|
|
|
|
|
|
|
|
|
|
|
|
|
|
|
|
|
|
|
|
|
|
|
|
|
|
||||||||
|
|
|
|
|
|
|
|
|
|
|
|
|
|
|
|
|
|
|
|
|
|
|
|
|
|
|
|
|
||||||||
or antenna signal |
|
|
|
|
|
|
|
|
|
|
|
|
|
|
|
|
|
|
|
|
|
|
|
|
|
|
|
|
||||||||
|
|
|
|
|
Red |
White |
Yellow |
|
|
|
|
|
|
|
||||||||||||||||||||||
|
|
|
|
|
|
|
|
|
|
|
|
|
|
|
|
|
|
|
|
|
|
|
|
|
|
|
|
|
|
|
|
|
|
|
||
|
|
|
|
|
|
|
|
|
|
|
|
|
|
|
|
|
|
|
|
|
|
|
|
|
|
|
|
|
|
|
|
|
|
|
|
|
|
|
|
|
|
|
|
|
|
|
|
|
|
|
|
|
|
|
|
|
|
|
|
|
|
|
|
|
|
|
|
|
|
|
|
||
|
|
|
|
|
|
|
|
|
|
|
|
|
|
|
|
|
|
|
|
|
|
|
|
|
|
|
|
|
|
|||||||
|
|
|
|
|
|
|
|
|
|
|
|
|
|
|
|
|
|
|
|
|
|
|
|
|
|
|
|
|
|
|
||||||
|
|
|
|
|
|
|
|
|
|
|
|
|
|
|
|
step |
|
|
|
|
|
|
|
|
|
|
|
step |
|
|||||||
|
|
|
step |
|
|
|
|
|
|
|
|
|
|
|
|
|
|
|
|
|
|
|
|
|
|
|||||||||||
|
|
|
|
|
|
|
|
|
|
|
|
|
|
3 |
|
|
|
|
|
|
|
|
|
|
|
|
||||||||||
|
1 |
|
|
|
|
|
|
|
|
|
|
|
|
|
|
|
|
|
|
|
|
|
|
|
|
|
||||||||||
|
|
|
|
|
|
|
|
|
|
|
|
|
|
|
|
|
|
|
|
|
|
|
2 |
|
||||||||||||
|
|
|
|
|
|
|
|
|
|
|
|
|
|
|
|
|
|
|
|
|
|
|
|
|
|
|
|
|
|
|
|
|
|
|
|
|
|
|
|
|
|
|
|
|
|
|
|
|
|
|
|
|
|
|
|
|
|
|
|
|
|
|
|
|
|
|
|
|
|
|
|
|
|
|
|
|
|
|
|
|
|
|
|
|
|
|
|
|
|
|
|
|
|
|
|
|
|
|
|
|
|
|
|
|
|
|
|
|
|
|
|
|
|
|
|
|
|
|
|
|
|
|
|
|
|
|
|
|
|
|
|
|
|
|
|
|
|
|
|
|
|
|
|
|
|
|
|
|
|
|
|
|
|
|
|
|
|
|
|
|
|
|
|
|
|
|
|
|
|
|
|
|
|
|
|
|
|
|
|
|
|
|
|
|
|
|
|
|
|
|
|
|
|
|
|
|
|
|
|
|
|
|
|
|
|
|
|
|
|
|
|
|
|
|
|
|
|
|
|
|
|
|
|
|
|
|
|
|
|
|
|
|
|
|
|
|
|
|
|
|
|
|
|
|
|
|
|
|
|
|
|
|
|
|
|
|
|
|
|
|
|
|
|
|
|
|
|
|
|
|
|
|
|
|
|
|
|
|
|
|
|
|
|
|
|
|
|
|
|
|
|
|
|
|
|
|
|
|
|
|
|
|
|
|
|
|
|
|
|
|
|
|
|
|
|
|
|
|
|
|
|
|
|
|
|
|
|
|
|
|
|
|
|
|
|
|
|
|
|
|
|
|
|
|
|
|
|
|
|
|
|
|
|
|
|
|
|
|
|
|
|
|
|
|
|
|
|
|
|
|
|
|
|
|
|
|
|
|
|
|
|
|
|
|
|
|
|
|
|
|
|
|
|
|
|
|
|
|
|
|
|
|
|
|
|
|
Red White Yellow Rear of this unit
step
4
To a household AC outlet (AC 120 V, 60 Hz)
75 coaxial cable from the wall or antenna signal to the “RF IN” on the unit.
75 coaxial cable (included) from the “RF OUT” on the unit to the “VHF/UHF RF IN” on the TV.
Audio/video cable (included) from the “DVD/VHS COMMON OUT” on the unit to the “AV IN” on the TV.
AC power supply cord (included) from the “AC IN ” on the unit to a household AC outlet.
RQT9056
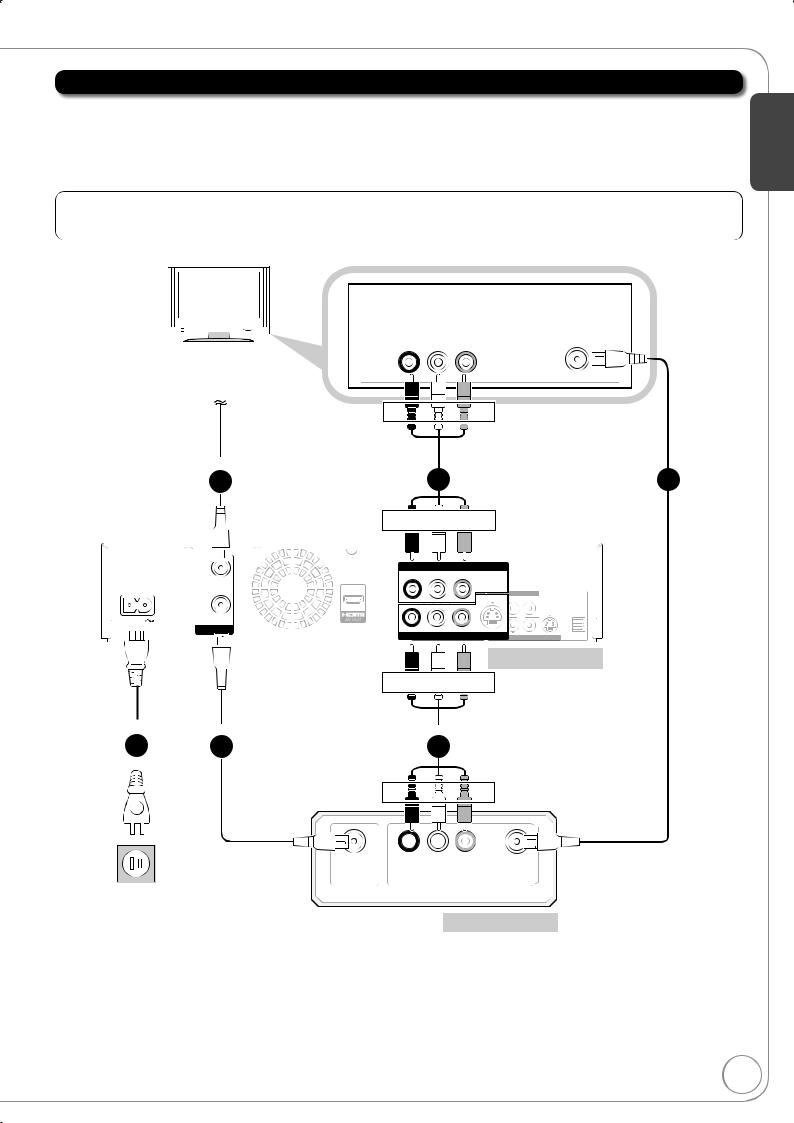
Connecting to a Television and a Cable Box
Please check with your Cable Service Provider to verify whether the coaxial cable from the Cable Wall Jack must be connected to your Cable Box first, before connecting to other devices.
Consult your cable service provider about the appropriate cable box to use.
Additional coaxial cable and audio/video (AV) cable are required.
Getting Started
|
|
|
|
|
|
|
|
|
|
|
|
|
|
|
|
|
|
|
|
|
|
|
|
|
|
|
|
|
|
|
|
|
|
|
|
|
|
|
|
|
|
|
|
|
|
|
|
|
|
|
|
|
|
|
|
|
|
|
|
|
|
|
|
|
|
|
|
|
|
|
|
|
|
|
|
|
|
|
|
|
|
|
|
|
|
|
|
|
|
|
|
|
|
|
|
|
|
|
|
|
|
|
|
|
|
|
|
|
|
|
|
|
|
|
|
|
|
|
|
|
|
|
|
|
|
|
|
|
AUDIO IN |
VIDEO |
VHF/UHF |
|
|
|
|
|
|
|
|||||||||||||
|
|
|
|
|
|
|
|
|
|
|
|
|
|
|
|
|
|
|
|
|
|
||||||||||||||||
|
|
|
|
|
|
|
|
|
|
|
|
|
|
|
RF IN |
|
|
|
|
|
|
|
|||||||||||||||
|
|
|
|
|
|
|
|
|
|
|
|
|
|
|
R |
|
|
|
L |
|
|
IN |
|
|
|
|
|
|
|
||||||||
|
|
|
|
|
|
|
|
|
|
|
|
|
|
|
|
|
|
|
|
||||||||||||||||||
|
|
|
|
|
|
|
|
|
|
|
|
|
|
|
|
|
|
|
|
|
|
|
|
|
|
|
|
||||||||||
Cable from the wall |
|
|
|
|
|
|
|
|
|
|
|
|
|
|
|
|
|
|
|
|
|
|
|
|
|
||||||||||||
|
|
|
|
|
|
|
|
|
|
|
|
|
|
|
|
|
|
|
|
|
|
|
|
|
|||||||||||||
|
|
|
|
|
|
|
|
|
|
|
|
|
|
|
|
|
|
|
|
|
|
|
|
|
|||||||||||||
|
|
|
|
|
|
|
|
|
|
|
|
|
|
|
|
|
|
|
|
|
|
|
|
|
|||||||||||||
|
|
|
|
|
|
|
|
|
|
|
|
|
|
|
|
|
Rear of TV |
|
|
|
|
|
|||||||||||||||
|
|
|
|
|
|
|
|
|
|
|
|
|
|
|
|
|
|
|
|
|
|
|
|
|
|
|
|
|
|
|
|
|
|
|
|||
|
|
|
|
|
|
|
|
|
|
|
|
|
|
|
Red White Yellow |
|
|
|
|
|
|
||||||||||||||||
|
|
|
|
|
|
|
|
|
|
|
|
|
|
|
|
|
|
|
|
|
|
|
|
||||||||||||||
|
|
|
|
|
|
|
|
|
|
|
|
|
|
|
|
|
|
|
|
|
|
|
|
|
|
|
|
|
|
|
|
||||||
|
|
|
|
|
|
|
|
|
|
|
|
|
|
|
|
|
|
|
|
|
|
|
|
|
|
|
|
|
|
|
|
|
|
|
|
|
|
|
|
|
|
|
|
|
|
|
|
|
|
|
|
|
|
|
|
|
|
|
|
|
|
|
|
|
|
|
|
|
|||||||
|
|
|
|
|
|
|
|
|
|
|
|
|
|
|
|
|
|
|
|
|
|
|
|
|
|||||||||||||
|
|
|
|
|
|
|
step |
|
|
|
|
|
|
|
|
|
|
step |
|||||||||||||||||||
|
|
|
|
|
step |
|
|
|
|
|
|
|
|
|
|
|
|
|
|
|
|
||||||||||||||||
|
|
|
|
|
|
|
|
|
|
|
|
|
|
4 |
|
|
|
|
|
|
|
|
|
|
|
3 |
|
||||||||||
|
1 |
|
|
|
|
|
|
|
|
|
|
|
|
|
|
|
|
|
|
|
|||||||||||||||||
|
|
|
|
|
|
|
|
|
|
|
|
|
|
|
|
|
|
|
|
|
|
|
|
|
|
|
|
|
|
|
|
|
|
|
|
|
|
|
|
|
|
|
|
|
|
|
|
|
|
|
|
|
|
|
|
|
|
|
|
|
|
|
|
|
|
|
|
|
|
|
|
|
|
|
|
|
|
|
|
|
|
|
|
|
|
|
|
|
|
|
|
|
|
|
|
|
|
|
|
|
|
|
|
|
|
|
|
|
|
|
|
|
|
|
|
|
|
|
|
|
|
|
|
|
|
|
|
|
|
|
|
|
|
|
|
|
|
|
|
|
|
|
|
|
|
|
|
|
|
|
|
|
|
|
|
|
|
|
|
|
|
|
|
|
|
|
|
|
|
|
|
|
|
|
|
|
|
|
|
|
|
|
|
|
|
|
|
|
|
|
|
|
|
|
|
|
|
|
|
|
|
|
|
|
|
|
|
|
|
|
|
|
|
|
|
|
|
|
|
|
|
|
|
|
|
|
|
|
|
|
|
|
|
|
|
|
|
|
|
|
|
|
|
|
|
|
|
|
|
|
|
|
|
|
|
|
|
|
|
|
|
|
|
|
|
Red White Yellow |
DVD/VHS COMMON OUT
R-AUDIO-L VIDEO
S VIDEO
R-AUDIO -L VIDEO
IN1
Rear of this unit
Red White Yellow |
|
|
|
|
|
|
|
|
|
|
|
|
|
|
|
|
|
|
|
|
|
|
|
|
|
|
|
|
|
|
|
|
|
|
|
|
|
|
|
|
|
|
|
|
|
|
|
|
|
|
|
|
|
|
|
|
|
|
|
|
|
|
|
|
|
|
|
|
|
|
|
|
|
|
|
|
|
|
|
|
|
|
|
|
|
|
|
|
|
|
|
|
|
|
step |
|
step |
|
|
|
|
|
|
|
|
|
step |
|
|
|
|
|||||||||||||
6 |
|
2 |
|
|
|
|
5 |
|
|
|
|
|
|
|
|
|
|
|||||||||||||
|
|
|
|
|
|
|
|
|
|
|
|
|
|
|
|
|
|
|
|
|
|
|
|
|
|
|
|
|
|
|
|
|
|
|
|
|
|
|
|
|
|
|
|
|
|
|
|
|
|
|
|
|
|
|
|
|
|
|
|
|
|
|
|
|
|
|
|
|
|
|
|
|
|
|
|
|
|
|
|
|
|
|
|
|
|
|
|
|
|
|
|
|
|
|
|
|
|
|
|
|
|
|
|
|
|
|
|
|
|
|
|
|
|
|
|
|
|
|
|
|
|
|
|
|
|
|
|
|
|
|
|
|
|
Red |
|
White |
|
|
|
|
Yellow |
|
|
|
||||||||||
|
|
|
|
|
|
|
|
|
|
|
|
|
|
|
|
|
|
|
|
|
|
|
|
|
|
|
|
|
|
|
|
|
|
|
|
|
|
|
|
|
|
|
|
|
|
|
|
|
|
|
|
|
|
|
|
|
|
|
|
|
|
|
|
|
|
|
|
|
|
|
|
|
|
|
|
|
|
|
|
|
|
|
|
|
|
|
|
|
|
|
|
|
|
|
|
|
|
|
|
|
|
|
|
|
|
|
|
|
|
|
|
|
|
|
|
|
|
|
|
|
|
|
|
|
|
|
|
|
|
|
|
|
|
|
|
|
|
|
|
|
|
|
|
|
|
|
|
|
|
|
|
|
|
|
|
|
|
|
|
|
|
|
|
|
|
|
|
|
|
|
|
|
|
|
|
|
|
|
|
|
|
|
|
|
|
|
|
|
AUDIO OUT VIDEO |
RF OUT |
|
|
RF IN |
|
|||
|
|
R |
L OUT |
|
|
|
|
||||
To a household AC outlet (AC 120 V, 60 Hz)
Rear of cable box
75 coaxial cable from the wall to the “RF IN” on the unit.
75 coaxial cable (included) from the “RF OUT” on the unit to the “RF IN” on the cable box.
75 coaxial cable from the “RF OUT” on the cable box to the “VHF/UHF RF IN” on the TV.
Audio/video cable (included) from the “DVD/VHS COMMON OUT” on the unit to the “AV IN” on the TV.
Audio/video cable from the “AV OUT” on the cable box to the “IN1” on the unit.
AC power supply cord (included) from the “AC IN ” on the unit to a household AC outlet.
RQT9056
Basic Connection
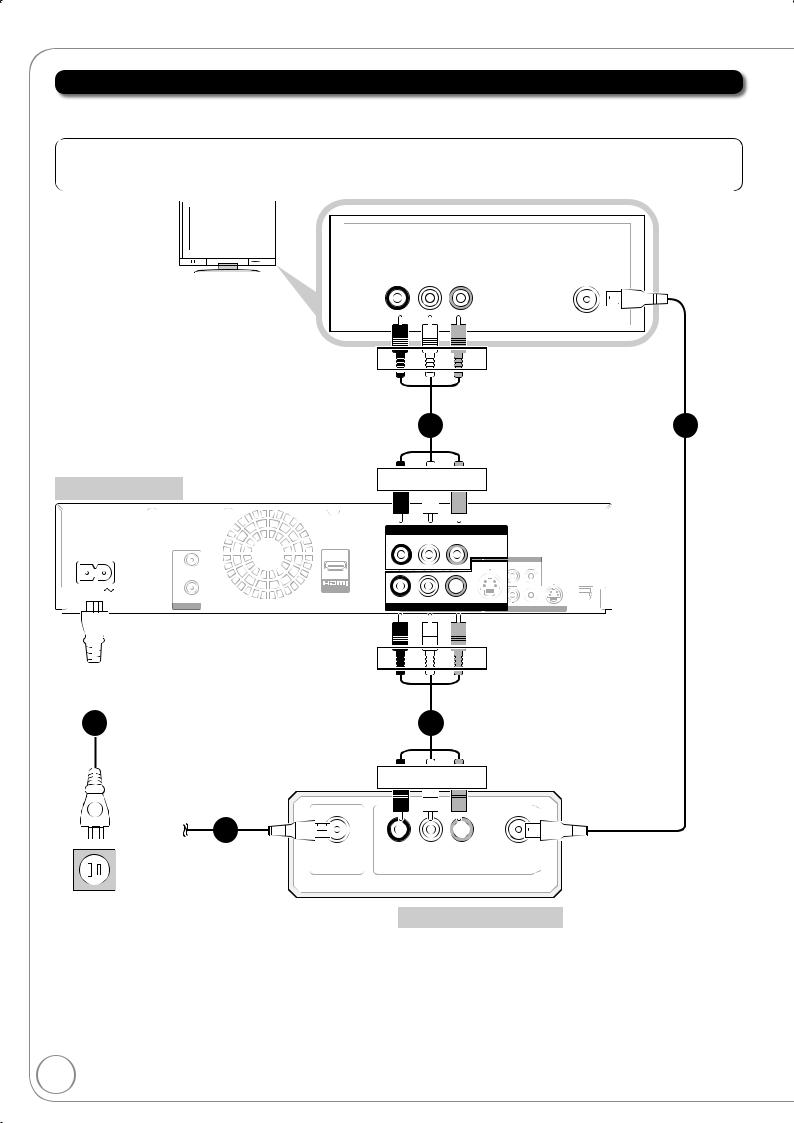
Connecting to a Television and a Satellite Receiver
Consult your satellite service provider about the appropriate satellite receiver to use.
Additional coaxial cable and audio/video (AV) cable are required.
|
|
|
|
|
|
|
|
|
|
|
|
|
|
|
|
|
|
|
|
|
|
|
|
|
|
|
|
|
|
|
|
|
|
|
|
|
|
|
|
|
|
|
|
|
|
AUDIO IN |
VIDEO |
VHF/UHF |
|
|
|
|
|
|
|
|
|
|
|
|
||||
|
|
|
|
|
|
|||||||
|
|
|
|
|
|
|||||||
|
|
|
|
|
|
|
R |
L |
IN |
RF IN |
|
|
|
|
|
|
|
|
|
|
|
||||
|
|
|
|
|
|
|
|
|
|
|
|
|
|
|
|
|
|
|
|
|
|
|
|
|
|
|
|
|
|
|
|
|
|
|
|
|
|
|
|
|
|
|
|
|
|
|
|
|
|
|
|
|
|
|
|
|
|
|
|
|
|
|
|
|
|
Rear of TV |
|
|
|
|
Red |
White |
Yellow |
|
|
|
|
|
|||||||||||
|
|
|
|
|
|
|||||||||||||
|
|
|
|
|
|
|
|
|
|
|
|
|
|
|
|
|
|
|
|
|
|
|
|
|
|
|
|
|
|
|
|
|
|
|
|
|
|
|
|
|
|
|
|
|
|
|
|
|
|
|
|
|
|
|
||
|
|
|
|
|
|
|
|
|
|
|
||||||||
|
|
|
step |
|
|
|
step |
|||||||||||
|
|
|
3 |
|
|
|
|
|
|
|
|
2 |
|
|||||
|
|
|
|
|
|
|
|
|
|
|
|
|
|
|
|
|
|
|
|
|
|
|
|
|
|
|
|
|
|
|
|
|
|
|
|
|
|
|
|
|
|
|
|
|
|
|
|
|
|
|
|
|
|
|
|
|
|
|
|
|
|
|
|
|
|
|
|
|
|
|
|
|
|
|
|
|
|
|
|
|
|
|
|
|
|
|
|
|
|
|
|
|
|
|
|
|
|
|
|
|
|
|
|
|
|
|
|
|
|
|
|
|
|
|
|
|
|
|
|
|
|
|
|
|
|
|
|
|
|
|
|
|
Red White Yellow
Rear of this unit
DVD/VHS COMMON OUT
R-AUDIO-L VIDEO
S VIDEO
AV OUT
R-AUDIO -L VIDEO
IN1
|
|
|
|
|
|
|
|
|
|
|
|
|
|
|
|
|
|
|
|
|
|
|
|
|
|
|
|
|
|
|
|
|
|
|
|
|
|
|
|
|
|
|
|
|
|
|
|
|
|
|
|
|
Red |
White |
Yellow |
||||||||||
|
|
|
|
|
|
|
|
|
|
|
|
|
|
|
|
|
|
|
|
|
|
|
|
|
|
|
|
|
|
|
|
|
|
|
|
|
|
||||||
|
|
|
|
|
|
|
|
|
|
|
|
||||||||||
|
step |
|
|
|
|
|
|
step |
|
|
|||||||||||
|
|
|
|
4 |
|
||||||||||||||||
5 |
|
|
|
|
|
|
|
|
|
|
|
|
|||||||||
|
|
|
|
|
|
|
|
|
|
|
|
|
|
|
|
|
|
|
|
|
|
|
|
|
|
|
|
|
|
|
|
|
|
|
|
|
|
|
|
|
|
|
|
|
|
|
|
|
|
|
|
|
|
|
|
|
|
|
|
|
|
|
|
|
|
|
|
|
|
|
|
|
|
|
|
|
|
|
|
|
|
|
|
|
|
|
|
|
|
|
|
|
|
|
|
|
|
|
|
|
|
|
|
|
|
|
|
|
|
|
|
Red White Yellow |
|
|||
|
step |
|
|
|
|
|
Satellite |
1 |
|
|
|
|
|
antenna |
|
|
|
|
||
SATELLITE |
AUDIO OUT VIDEO |
RF OUT |
||||
|
||||||
|
IN |
R |
L |
OUT |
|
|
To a household AC outlet |
Rear of satellite receiver |
(AC 120 V, 60 Hz) |
75 coaxial cable from the satellite antenna to the “SATELLITE IN” on the satellite receiver.
75 coaxial cable (included) from the “RF OUT” on the satellite receiver to the “VHF/UHF RF IN” on the TV.
Audio/video cable (included) from the “DVD/VHS COMMON OUT” on the unit to the “AV IN” on the TV.
Audio/video cable from the “AV OUT” on the satellite receiver to the “IN1” on the unit.
AC power supply cord (included) from the “AC IN ” on the unit to a household AC outlet.
RQT9056
You can enjoy high-quality picture and audio by changing the audio/video (AV) cable connection between this unit and your TV as shown on pages 8 to 10 and by doing the following.
Connecting to a TV with an HDMI (High Definition Multimedia Interface) Cable
When connected to an HDMI compatible unit, an uncompressed digital audio and video signal is transmitted, enabling you to enjoy high quality digital video and audio with just one cable. When connecting to an HDMIcompatible HDTV (High Defi nition Television), the output can be switched to 1080p, 1080i or 720p HD video.
Rear of TV
|
|
|
|
HDMI IN |
INPUT 1 |
||
|
|
|
|
AUDIO IN VIDEO |
|||
|
|
|
|
|
|
|
|
|
|
|
|
|
|
|
|
|
|
|
|
|
|
|
|
RedWhiteYellow |
HDMI cable
(Only included in Audio/video cable DMR-EZ485V) (included)
Getting Started
|
|
RedWhiteYellow |
|
|
|
RF |
OUT |
COMPONENT VIDEO OUT |
|
|
IN |
VIDEO |
Y PB PR |
|
|
|
S VIDEO |
|
S VIDEO |
AC IN |
RF |
AV OUT |
|
|
OUT |
|
|
OPTICAL |
|
|
|
|
||
|
VHF/ UHF |
R-AUDIO -L VIDEO |
R-AUDIO-L VIDEO |
DIGITAL AUDIO OUT |
|
IN1 |
DVD PRIORITY OUT |
(PCM/BITSTREAM) |
|
|
|
Rear of this unit |
|
|
Set “HDMI Priority” and “HDMI Audio Output” to “On” ( |
65, 66). (The default setting is “On”.) |
|
||
Notes
If connecting to equipment that is only compatible with 2 channels output, audio with 3 channels or more will be down-mixed ( 91) and output as 2 channels (some discs cannot be down-mixed).
For display units compatible with HDCP (High bandwidth Digital Content Protection) that are equipped with a digital DVI input terminal (PC monitors, etc.):
Depending on the unit, images may not display properly or at all when connecting with a DVI/HDMI switching cable (audio cannot be output).
Usually you can watch video from HDMI input on TV. When you want to play back VHS while recording on DVD, switch to input 1 on TV.
RQT9056
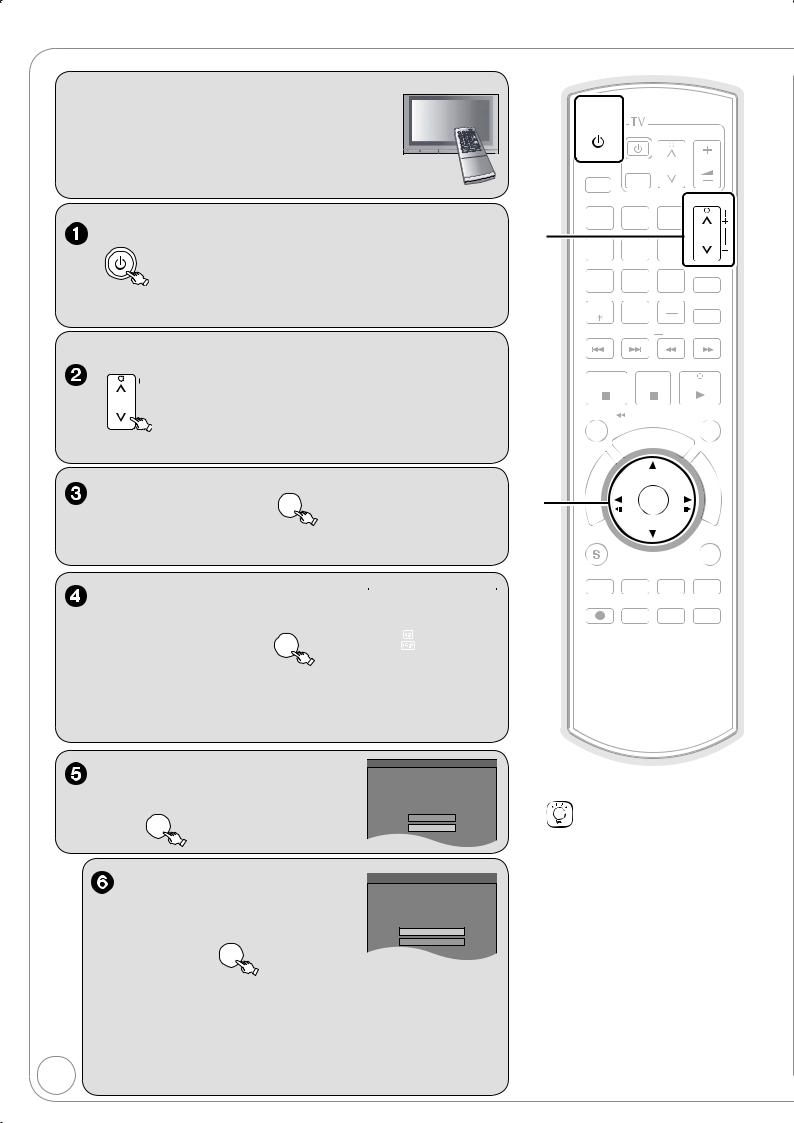
Setting the Channels and Clock
Preparation:
Turn on the TV and select the appropriate video input to suit the connections to the unit. (Example: AV input, CH3 or CH4)
These are the first settings you make upon buying the unit. You don’t need to make these settings again.
DVD/VHS to turn the unit on.
POWER “HELLO” appears on the unit’s display.
When this unit is connected to a Panasonic TV (VIERA) supporting HDAVI Control 3 via an HDMI cable ( 11), it acquires the setting information from the TV. When the Quick Start Setting screen appears ( 14, Step 1)
When this unit is connected to a TV via an HDMI cable, this step is not required.
TRACKING/V-LOCK to select an RF output channel number.
|
|
|
Connection (without HDMI cable or Audio/Video cable): While |
|||||||
|
|
|
||||||||
CH |
|
|
viewing the unit’s front display, select “CH3” or “CH4”. If the |
|||||||
|
|
|
selection is appropriate, then the step 3 screen will appear. |
|||||||
|
|
|
||||||||
|
|
|
Connection (with Audio/Video cable): While viewing the |
|||||||
|
|
|
unit’s front display, select “OFF”. |
|
|
|
|
|
|
|
Language: |
|
|
|
|
|
|
|
|||
|
|
|
|
|
|
|
||||
|
|
|
Seleccione el idioma |
|
||||||
|
|
|
|
|
|
|
Select Language |
|
||
, to select, then |
OK |
|
|
Sélection de langue |
|
|||||
|
|
|
|
|
|
|
||||
|
|
|
|
English |
|
|
||||
When the Quick Start Setting screen |
|
|
|
Español |
|
|
||||
|
|
|
Français |
|
|
|||||
appears after this step ( |
14, Step 1) |
|
|
|
|
|
|
|||
|
|
Press OK |
|
|||||||
|
|
|
|
|
|
|
|
|
||
TV Aspect Ratio: |
|
|
Aspect Ratio Selection |
|||||||
|
|
(Please refer to Operation Instruction |
||||||||
|
|
|
|
|
|
Select TV type and press OK. |
||||
, to select “4:3 TV” or “16:9 |
|
|
|
for details) |
||||||
|
|
|
|
|
|
|||||
Widescreen TV”, then |
|
|
|
|
4:3 TV |
|
|
|||
OK |
|
|
|
16:9 Widescreen TV |
|
|
||||
|
|
|
|
|
|
|
|
|
|
|
When connecting to a 4:3 standard aspect |
TV: |
|||||||||
Select “4:3 TV”. |
|
|
|
|
|
|
|
|||
When connecting to a 16:9 widescreen TV: |
|
|
|
|
|
|
||||
Select “16:9 Widescreen TV”. |
|
|
|
|
|
|
||||
Quick Start Function:
, to select “On” or “Off”, then OK
Automatic Clock and Channel Settings:
, to select “Yes” or “No”, then OK
Quick Start Setting
The unit can be turned on faster, in about 1 second. Please note that Quick Start mode slightly increases power consumption when the unit is off.
(See Operation Instructions for details) Turn Quick Start on ?
On
Off
Automatic Clock and Channel Settings
Does this unit get its TV signal via RF IN? Example: Antenna, Cable TV or Cable Box connected to the
unit’s RF IN.
Yes
No
|
When connecting the cable from the wall (cable TV or |
|
|
antenna) to the unit’s RF IN: Select “Yes”. |
|
|
The unit then displays the source selection screen ( |
13). |
|
When not connecting the cable from the wall (cable TV or |
|
|
antenna) to the unit’s RF IN: Select “No”. |
|
12 |
The unit then displays “Set Clock Manually” screen ( |
13, |
Manual Clock Setting). |
|
|


SELECT |
TV/VIDEO CH |
VOL |
|
|
1 2 3
4 5 6
6
7 8 9
DELETE |
0 |
FAVORITE |
|
 RESET SLOW/SEARCH
 SKIP/INDEX
 REW FF
STOP PAUSE PLAY
TIME SLIP/ |
JET REW |
CM SKIP |
|
|
|
|
|
|
|
|
|
|
|
|
|
|
|
|
|
|
|
H |
E |
D |
U |
|
|
|
|
|
|
|
|
|
|
|
|
|
|
|
|
|
|
|
|
||
|
|
|
|
|
|
|
|
|
|
|
|
|
|
|
|
|
|
|
|
L |
|
|
|
|
|
|
|
|
|
|
|
|
|
|
|
|
|
|
||||||
|
|
|
|
|
|
|
|
|
|
|
|
|
|
S |
|
C |
|
E |
|
|
|
|
|
|
|
|
|
|
|
|
|
|
|
|
||||||||||
|
|
|
|
|
|
|
|
|
|
|
|
|
|
|
|
|
|
|
|
|
|
|
|
|
|
|
|
|
|
|
|
|
|
|
|
|
||||||||
|
|
|
|
|
|
|
|
|
|
|
|
|
|
|
|
|
|
|
|
|
|
|
|
|
|
|
|
|
|
|
|
|
|
|
|
|
|
|
|
|
|
|
||
|
|
|
|
|
|
|
|
|
|
|
|
|
|
|
|
|
|
|
|
|
|
|
|
|
|
|
|
|
|
|
|
|
|
|
|
|
|
|
|
|
|
|
|
|
|
|
|
|
|
|
O |
|
|
|
|
|
|
|
|
|
|
|
|
|
|
|
|
|
|
|
|
|
|
|
|
|
|
|
|
|
|
|
|
|
|
|
|||
|
|
|
|
|
|
|
|
|
|
|
|
|
|
|
|
|
|
|
|
|
|
|
|
|
|
|
|
|
|
|
|
|
|
|
|
|
|
|||||||
|
|
|
|
|
|
|
|
|
|
|
|
|
|
|
|
|
|
|
|
|
|
|
|
|
|
F |
|
|
|
|
|
|
||||||||||||
|
|
|
|
|
|
|
|
T |
|
|
|
|
|
|
|
|
|
|
|
|
|
|
|
|
|
|
|
|
|
|
|
|
|
|
|
|
|
|
|
|
|
|
|
|
|
|
|
|
|
|
|
A |
|
|
|
|
|
|
|
|
|
|
|
|
|
|
|
|
|
|
|
|
|
|
|
|
|
|
|
|
|
|
|
|
|
|
|
|
|
|
|
|
|
|
|
|
|
|
|
|
|
|
|
|
|
|
|
|
|
|
|
|
|
|
|
|
|
|
|
|
|
|
|
N |
|
|
|
|
||||||
|
|
|
|
G |
|
|
|
|
|
|
|
|
|
|
|
|
|
|
|
|
|
|
|
|
|
|
|
|
|
|
U |
|
|
|
|
|||||||||
|
|
|
A |
|
|
|
|
|
|
|
|
|
|
|
|
|
|
|
|
|
|
|
|
|
|
|
|
|
|
|
|
|
I |
|||||||||||
|
|
|
|
|
|
I |
|
|
|
|
|
|
|
|
|
|
|
|
|
|
|
|
|
|
|
|
|
|
|
|
|
|
|
|
|
C |
|
|
|
|
||||
|
|
|
|
|
|
V |
|
|
|
|
|
|
|
|
|
|
|
|
|
|
|
|
|
|
|
|
|
|
|
|
|
|
|
|
|
|
|
|
|
|
|
|
|
|
|
|
|
|
|
|
|
|
|
|
|
|
|
|
|
|
|
|
|
|
|
|
|
|
|
|
|
|
|
|
|
|
|
|
|
|
|
T |
|
|
|
|
|||
|
|
|
|
|
N |
|
|
|
|
|
|
|
|
|
|
|
|
|
|
|
|
|
|
|
|
|
|
|
|
|
|
|
|
|
|
|
|
|
|
|||||
|
|
|
|
|
|
|
|
|
|
|
|
|
|
|
|
|
|
|
|
|
|
|
|
|
|
|
|
|
|
|
|
|
|
|
|
|
|
|
|
|
|
|
||
|
|
|
|
|
|
|
|
|
|
|
|
|
|
|
|
|
|
|
|
|
|
|
|
|
|
|
|
|
|
|
|
|
|
|
|
|
|
|
|
|||||
|
|
|
|
|
|
|
|
|
|
|
|
|
|
|
|
|
|
|
|
|
|
|
|
|
|
|
|
|
|
|
|
|
|
|
|
O |
|
|
||||||
|
|
|
T |
|
|
|
|
|
|
|
|
|
|
|
|
|
|
|
|
|
|
|
|
|
|
|
|
|
|
|
|
|
|
|
|
|||||||||
|
|
R |
|
|
|
|
|
|
|
|
|
|
|
|
|
|
|
|
|
|
|
|
|
|
|
|
|
|
|
|
|
|
|
S |
|
|
|
|||||||
|
|
|
|
|
|
|
|
|
|
|
|
|
|
|
|
|
|
|
|
|
|
|
|
|
|
|
|
|
|
|
|
|
|
|
|
|
|
N |
|
|
||||
|
|
|
|
|
E |
|
|
|
|
|
|
|
|
|
|
|
|
|
|
|
|
|
|
|
|
|
|
|
|
|
|
|
|
|
|
|
|
|
|
|
|
|
|
|
|
|
|
|
|
|
|
|
|
|
|
|
|
|
|
|
|
|
|
|
|
|
|
|
|
|
|
|
|
|
|
|
|
|
|
|
|
|
|
|
|
|
|
|
|
|
|
|
|
|
|
|
|
|
|
|
|
|
|
|
|
|
|
|
|
|
|
|
|
|
|
|
|
|
|
|
|
|
|
|
|
|
|
|
|
|
|
|
|
|
|
|
|
|
I |
|
|
|
|
|
|
|
|
|
|
|
|
|
|
|
|
|
|
|
|
|
|
|
|
|
|
|
|
|
|
|
|
|
|
|
|
|
|
||
|
|
|
D |
|
|
|
|
|
|
|
|
|
|
|
|
|
|
|
|
|
|
|
|
|
|
|
|
|
|
|
|
|
|
|
|
|
|
|
|
|
||||
|
|
|
|
|
|
|
|
|
|
|
|
|
|
|
|
|
|
|
|
|
|
|
|
|
|
|
|
|
|
|
|
|
|
|
|
|
|
|
|
|
|
|
||
|
|
|
|
|
|
|
|
|
|
|
|
|
|
|
|
|
|
|
|
|
|
|
|
|
|
|
|
|
|
|
|
|
|
|
|
|
|
|
|
|
||||
SUB MENU |
|
|
|
|
|
|
|
|
|
|
|
|
|
|
|
RETURN |
||||||||||||||||||||||||||||
|
|
|
|
|
|
|
|
|
|
|
|
|
|
|
|
|
|
|
||||||||||||||||||||||||||
|
|
|
|
|
|
|
|
|
|
|
|
|
||||||||||||||||||||||||||||||||
|
|
|
|
|
|
|
|
|
|
|
|
|
|
|
|
|
|
|
|
|
|
|
|
|
|
|
|
|
|
|
|
|
|
|
||||||||||
|
|
|
|
|
|
|
|
|
|
|
|
|
|
|
|
|
|
|
|
|
|
|
|
|
|
|
|
|
|
|
|
|
|
|
|
|
|
|
|
|
|
|
|
|
|
|
|
|
|
|
|
|
|
|
|
|
|
|
|
|
|
|
|
|
|
|
|
|
|
|
|
|
|
|
|
|
|
|
|
|
|
|
|
|
|
|
|
|
|
|
|
|
|
|
|
|
|
|
|
|
|
|
|
|
|
|
|
|
|
|
|
|
|
|
|
|
|
|
|
|
|
|
|
|
|
|
|
|
|
|
|
|
|
|
|
|
|
|
|
|
|
|
|
|
|
|
|
|
|
|
|
|
|
|
CREATE |
|
|
|
|
|
|
|
|
|
|
|
|
|
|
|
|||||||||
|
|
|
|
|
|
|
|
|
|
|
|
|
|
|
|
|
|
|
|
|
|
|
|
|
|
|||||||||||||||||||
|
|
|
|
|
AUDIO |
|
DISPLAY |
|
CHAPTER |
|
VCR/TV |
|
||||||||||||||||||||||||||||||||
A B
REC |
REC MODE |
F Rec |
STATUS |
Tips
“Quick Start” function ( 58)
If you set Quick Start to on, you can start recording to DVD-RAM about 1 second after you press [ DVD/VHS POWER] to turn the unit on and then sequentially press
[ REC].
The following happens when you have selected “On”.
–Power consumption in standby mode increases because power is supplied to the unit.
To return to the previous screen
Press [RETURN].
RQT9056


 to start automatic channel/ clock setting.
Tips
If the unit displays “No channels were found.”, turn off the unit and confi rm the cable or antenna input is connected to the RF IN
terminal. Restart the set up again ( below).
If “Auto Clock Setting is incomplete.” is displayed, press [OK] and set the clock manually ( right).
If the clock is not correct, set the clock with “Adjust Time Zone” ( 58) or “Set Clock Manually” ( 58).
You can delete channels you don’t need after completing Auto Channel Setting ( 55).
Restarting the Auto-Setup
(after relocation, for example)
1.When the unit is on and stopped, press and hold [CH ] and [CH ] on the main unit at the same time for about 5 seconds. The unit turns off.
2.Press [ DVD/VHS POWER] to turn the unit on.
(The signal source and channel captions revert to their default values. All scheduled recordings are cleared.)
To cancel in the middle
Press [RETURN].
Notes
Conditions of the received channel may cause automatic channel/ clock setting to take extra time.
Perform steps 1–6 on page 12. Started  Getting
 to confi rm new date and time.
– The clock starts.
Notes
The automatic clock setting can take a few minutes.
The channel and clock settings apply to both DVD and VHS drives.
Time Zone |
|
EST (Eastern Standard Time) |
GMT 5 |
CST (Central Standard Time) |
GMT 6 |
MST (Mountain Standard Time) |
GMT 7 |
PST (Pacifi c Standard Time) |
GMT 8 |
AST (Alaska Standard Time) |
GMT 9 |
HST (Hawaii Standard Time) |
GMT 10 |
For other areas: xx hr |
|
DST (Daylight Saving Time)
If you select “On”, the clock is advanced one hour beginning at
2 a.m. on the second Sunday in March and ending at 2 a.m. on the fi rst Sunday in November.
Set the DST period manually when it varies according to regions ( below).
To set the DST period manually
1.Press [FUNCTIONS].
2.Press [ , ] to select “Other Functions” then press [OK].
3.Press [ , ] to select “Setup” then press [OK].
4.Press [ , ] to select “Setup” then press [ ].
5.Press [ , ] to select “Clock Settings” then press [OK].
6.Press [ , ] to select “Set the time change dates for DST” then press [OK].
7.Press [ , , ] to set the “Month”, “Day”, “Hour”, and “Minute” then press [OK].
|
Set the time change dates for DST |
|||||||
Channel |
Beginning |
|
|
|
|
|
|
|
Month |
|
Day |
Hour |
|
Minute |
|
||
Setup |
|
|
|
|||||
3 |
2nd |
SUN |
2 |
: |
00 |
AM |
||
Disc |
||||||||
End |
|
|
|
|
|
|
||
Video |
|
|
|
|
|
|
||
Month |
|
Day |
Hour |
|
Minute |
|
||
Audio |
|
|
|
|||||
11 |
1st |
SUN |
2 |
: |
00 |
AM |
||
Display |
||||||||
|
|
|
|
|
|
Reinitializes the |
||
TV Screen |
|
|
|
Restore Default |
||||
VHS |
|
|
|
settings. |
||||
OK |
|
|
|
|
|
|||
RQT9056
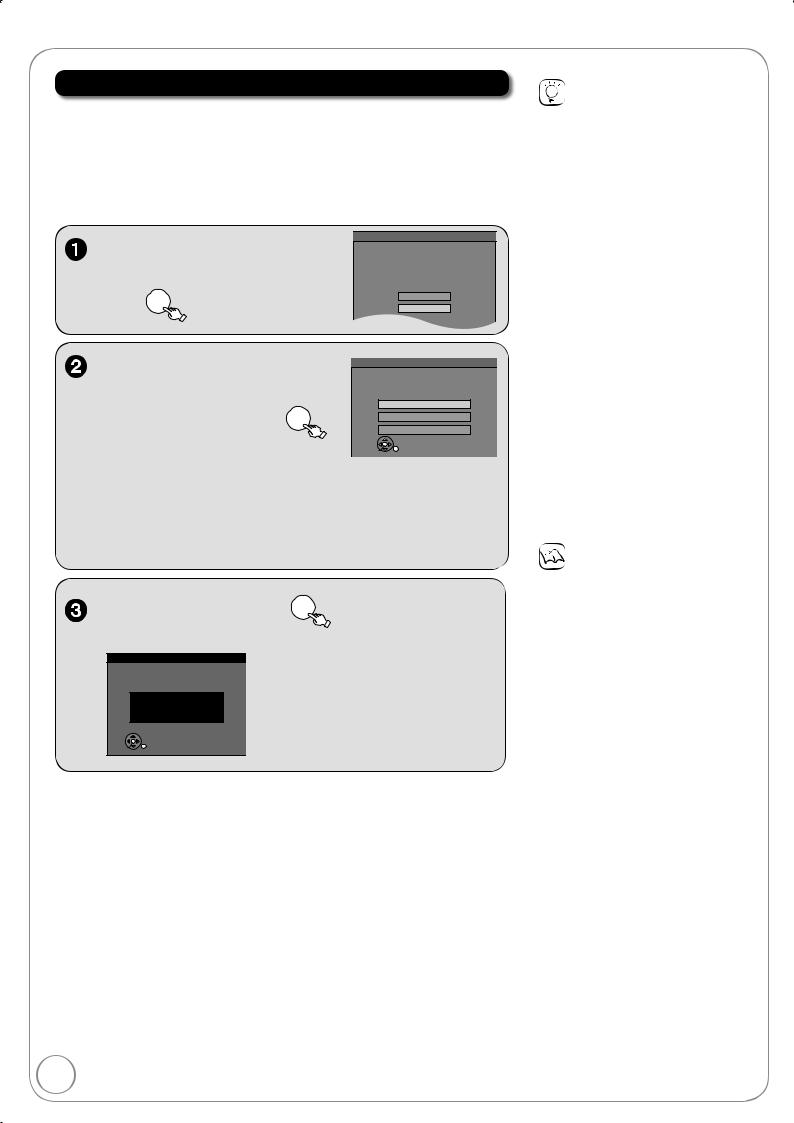
Setting the Channels and Clock
Acquiring the setting information from the TV (VIERA)
If this unit is connected to a Panasonic TV (VIERA) supporting HDAVI Control 3 via an HDMI cable, then the setting information on the TV is acquired by this unit when the unit is turned on for the fi rst time. Please proceed to the following steps.
The following screen is displayed in the language set on the VIERA television. –The language setting screen may be displayed depending on the usage
environment. Press [ , ] to select language, then press [OK].
Acquires the following information from the TV (VIERA).
–The types of transmission
–Channel Map
–Closed caption
When the settings are complete, the time confi rmation screen is displayed.
Tips
If you do not want to acquire the setting information from the VIERA television
Press [ , ] to select “Set Channels without VIERA Link” or “Set No Channels with this unit”, then press [OK] in step 2.
–When connecting the cable from the wall (cable TV or antenna) to the unit’s RF IN:
Select “Set Channels without VIERA Link”.
The unit then displays the source selection screen ( 13, left column, step 7).
–When not connecting the cable from the wall (cable TV or antenna) to the unit’s RF IN:
Select “Set No Channels with this unit”.
The unit then displays “Set Clock Manually” screen ( 13, Manual Clock Setting).
If “Automatic Clock and Channel Settings” screen on page 12 is displayed, the channel information could not be acquired from the TV (VIERA). Please go to step 6 on page 12.
To return to the previous screen
Press [RETURN].
Notes
Acquisition of the setting information is not supported by all Panasonic TVs (VIERA).
The acquisition may take some time depending on the VIERA setting information.
RQT9056

Media Handling
Inserting Discs
Notes
When using 8 cm (3 ) DVD-RAM or 8 cm (3 ) DVD-R, remove the disc from the cartridge.
It is not possible to record or play continuously from one side of a double sided disc to the other. You will need to eject the disc and turn it over.
The unit may take some time to respond to [ OPEN/CLOSE].
Inserting a Video Cassette
To eject:
From the main unit:
or
From the remote control
Press and hold for 3 or  more seconds.
Video Cassette Information
Break off the video cassette’s tab to  prevent accidental erasure. Cover the
 hole with a double layer of adhesive Tab
tape when you want to use the video cassette for recording again.
You can use video cassettes with the VHS and S-VHS marks, but the unit is unable to make full use of the characteristics of S-VHS video cassettes.
Inserting USB memory
You can insert the USB memory directly into the USB port.
Preparation
Before inserting any USB memory to this unit, ensure that the data stored in it has been backed up.
Opening
the front panel
REC
VHS
DVD 
Pull down.
Inserting the USB memory
Check the orientation of the USB connector and insert it straight in.
CH |
REC |
|
|
SD |
VHS |
CARD |
DVD
Removing the USB memory
Complete all USB memory-related operations and pull the USB memory straight out.
When “uSb”(USB) is fl ashing on the unit’s display, do not turn off the unit or remove the USB memory.
Notes
There are few USB memory devices that cannot be connected.
Some USB devices inserted into this unit may cause this unit to stop operating. Such USB devices cannot be used on this unit.
Confirm that “uSb”(USB) appears on the unit’s display when a compatible USB memory is inserted while stopped.
If a USB memory being accessed is pulled out, then the data may be damaged.
Inserting an SD Card
Opening
the front panel
REC
VHS
DVD 
Pull down.
Inserting the card
Press on the center of the
 card
card until
until it clicks into place.
Insert the card label up with the cut-off corner on the right.
If you are using a miniSD card/microSD card, insert it into the miniSD
card adaptor that comes
ADAPTER
with the card. Insert and remove this adaptor from the unit.
Removing the card
Press on the center of the card and pull it straight out.
Notes
When “SD” is fl ashing or when copying a picture or displaying the Album in the SD card, do not turn off the unit or remove the SD card.
Such action may result in malfunction or loss of the card’s contents.
Basic Operations Getting Started
RQT9056
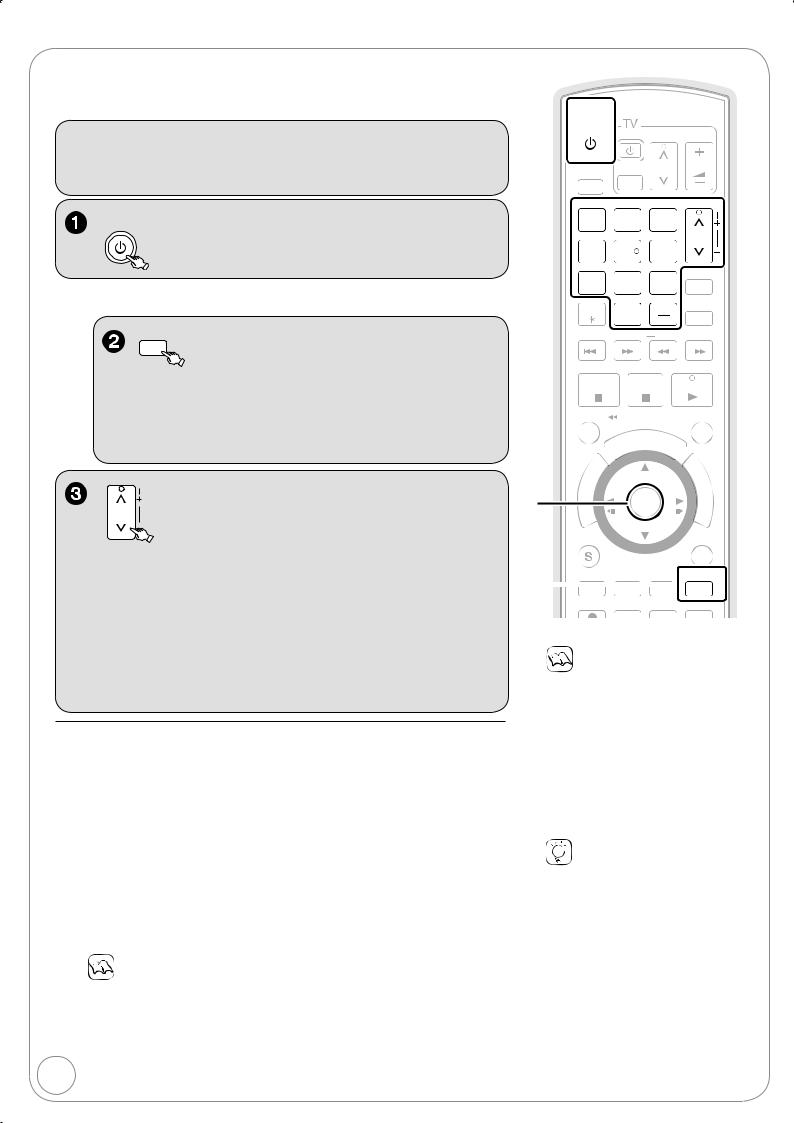
Watching Television
This DVD recorder has a tuner which allows it to directly receive and record analog and terrestrial digital channels. High Defi nition (HD) programming is “down-converted” and recorded in Standard Defi nition (SD).
Preparation:
Turn on the television and select the appropriate video input to suit the connections to this unit (Example: AV input, CH3 or CH4).
DVD/VHS
POWER to turn the unit on.
– “HELLO” appears on the unit’s display.
If you connected this unit and a TV without an audio/video cable or an HDMI Cable
VCR/TV
to watch video from this unit.
–The TV indicator on this unit’s display does not light up.
–By pressing [VCR/TV] again, the TV indicator on this unit’s display will light up, and you can watch TV directly without passing the signal through this unit (TV mode).
TRACKING/V-LOCK
to select desired channel.
CH
You can also select channels with the numbered buttons.
To directly enter channels for analog and digital broadcasts:
Antenna Mode: |
|
|
Cable TV Mode: |
|
|
|
||
e.g., “3”: |
[0] |
[3] |
[OK] |
e.g., “5”: |
[0] |
[0] |
[5] |
[OK] |
“13”: |
[1] |
[3] |
[OK] |
“15”: |
[0] |
[1] |
[5] |
[OK] |
To enter the sub channel number for a digital broadcast:
Antenna Mode: |
|
|
|
Cable TV Mode: |
|
|
|
||
e.g., “3-1”: |
[3] |
[−] |
[1] |
[OK] |
e.g., “1-1”: |
[1] |
[−] |
[1] |
[OK] |
“13-1”: |
[1] |
[3] |
[1] |
[OK] |
“15-1”: |
[1] |
[5] |
[−] |
[1] [OK] |
The hyphen appears automatically on “Antenna Mode” if you enter two numbers.
To set Favorite Channels
You can defi ne a Favorite list containing your favorite channels only. (Up to 30 channels)
1.After selecting the desired channel to set Press [SUB MENU].
2.Press [ , ] to select “Set Favorite”, then press [OK].
3.Press [ , ] to select the position on the list, then press [OK]. −Press [ , ] to change between pages.
−You can also select a list number (1-9 and 0) with the numbered buttons.
To delete the favorite channels registered
Press [ , ] to select the channel on the list, then press [OK].
To select a channel from the Favorite list
1.Press [FAVORITE].
2.Press [ , ] to select a channel, then press [OK].
−Press [ , ] to change between pages.
−You can also select a channel with the numbered buttons.
Notes
It is possible to select a channel from the Favorite list for instant or scheduled recording. ( 18, 19)
If you set “Surf Mode” to “Favorite” ( 56), then only the Favorite channels can be selected using [CH , ].
You can register channels in the Favorite list from Channel Setting list. ( 55, Setting favorite channels)
16


SELECT |
TV/VIDEO CH |
VOL |
|
|

 RESET SLOW/SEARCH
 SKIP/INDEX
 REW FF
STOP PAUSE PLAY
TIME SLIP/ |
JET REW |
CM SKIP |
|
|
|
|
|
|
|
|
|
|
|
|
|
|
|
|
|
|
|
H |
E |
D |
U |
|
|
|
|
|
|
|
|
|
|
|
|
|
|
|
|
|||
|
|
|
|
|
|
|
|
|
|
|
|
|
|
|
|
|
|
|
|
L |
|
|
|
|
|
|
|
|
|
|
|
|
|
|
|||||||
|
|
|
|
|
|
|
|
|
|
|
|
|
|
|
S |
|
C |
|
E |
|
|
|
|
|
|
|
|
|
|
|
|
||||||||||
|
|
|
|
|
|
|
|
|
|
|
|
|
|
|
|
|
|
|
|
|
|
|
|
|
|
|
|
|
|
|
|
|
|
|
|
||||||
|
|
|
|
|
|
|
|
|
|
|
|
|
|
|
|
|
|
|
|
|
|
|
|
|
|
|
|
|
|
|
|
|
|
|
|
|
|
|
|||
|
|
|
|
|
|
|
|
|
|
|
|
|
|
|
|
|
|
|
|
|
|
|
|
|
|
|
|||||||||||||||
|
|
|
|
|
|
|
|
|
|
|
|
|
|
|
|
|
|
|
|
|
|
|
|
|
|
|
|
|
|
|
|
|
|
|
|
|
|
|
|
|
|
|
|
|
|
|
|
|
|
|
|
|
|
|
|
|
|
|
|
|
|
|
|
|
|
|
|
|
|
|
|
|
|
|
|
|
|
|
|
|
|
|
|
|
|
|
|
|
|
|
|
|
O |
R |
|
|
|
|
|
|
|
|
|
|
|
|
|
|
|
|
|
|
|
|
|
|
|
|
|
|
|
|
|
|
|
|
|
|
|
|
|
|
|
|
|
|
|
|
|
|
|
|
|
|
|
|
|
|
|
|
|
|
|
|
|
|
|
|
|
|
|
|
|
|
|
||
|
|
|
|
|
|
|
|
|
|
|
|
|
|
|
|
|
|
|
|
|
|
|
|
|
|
|
|
|
|
|
|
|
|
|
|
|
|
|
|
||
|
|
|
|
|
|
|
|
|
|
|
|
|
|
|
|
|
|
|
|
|
|
|
|
|
|
|
|
|
|
|
|
|
|
|
|
|
|
|
|
|
|
|
|
|
|
|
|
|
|
|
|
|
|
|
|
|
|
|
|
|
|
|
|
|
|
|
|
|
|
|
|
|
|
|
|
|
|
|
|
|
|
|
|
|
|
|
|
|
|
|
T |
|
|
|
|
|
|
|
|
|
|
|
|
|
|
|
|
|
|
|
|
|
|
|
|
|
F |
|
|
|
|
||||
|
|
|
|
|
|
A |
|
|
|
|
|
|
|
|
|
|
|
|
|
|
|
|
|
|
|
|
|
|
|
|
|
|
N |
|
|
|
|||||
|
|
|
|
G |
|
|
|
|
|
|
|
|
|
|
|
|
|
|
|
|
|
|
|
|
|
|
|
|
|
|
|
U |
|
|
|
||||||
|
|
|
|
I |
|
|
|
|
|
|
|
|
|
|
|
|
|
|
|
|
|
|
|
|
|
|
|
|
|
|
|
|
C |
|
|
|
|||||
|
|
|
|
V |
|
|
|
|
|
|
|
|
|
|
|
|
|
|
|
|
|
|
|
|
|
|
|
|
|
|
|
|
|
|
|
||||||
|
|
|
|
A |
|
|
|
|
|
|
|
|
|
|
|
|
|
|
|
|
|
|
|
|
|
|
|
|
|
|
|
|
|
|
I |
|
|
|
|||
|
|
|
|
|
|
|
|
|
|
|
|
|
|
|
|
|
|
|
|
|
|
|
|
|
|
|
|
|
|
|
|
|
|
|
|
||||||
|
|
N |
|
|
|
|
|
|
|
|
|
|
|
|
|
|
|
|
|
|
|
|
|
|
|
|
|
|
|
|
|
|
T |
|
|
|
|||||
|
|
|
|
|
|
|
|
|
|
|
|
|
|
|
|
|
|
|
|
|
|
|
|
|
|
|
|
|
|
|
|
|
|
|
|
|
|||||
|
|
|
|
|
|
|
|
|
|
|
|
|
|
|
|
|
|
|
|
|
|
|
|
|
|
|
|
|
|
S |
|
||||||||||
|
E |
|
|
|
|
|
|
|
|
|
|
|
|
|
|
|
|
|
|
|
|
|
|
|
|
|
|
|
|
|
|
|
|
||||||||
|
|
|
T |
|
|
|
|
|
|
|
|
|
|
|
|
|
|
|
|
|
|
|
|
|
|
|
|
|
|
|
|
|
|
O |
|
||||||
|
|
|
C |
|
|
|
|
|
|
|
|
|
|
|
|
|
|
|
|
|
|
|
|
|
|
|
|
|
|
|
|
|
|
|
N |
|
|||||
|
|
|
|
|
|
|
|
|
|
|
|
|
|
|
|
|
|
|
|
|
|
|
|
|
|
|
|
|
|
|
|
|
|
|
|
|
|
|
|
|
|
|
|
|
|
|
|
|
|
|
|
|
|
|
|
|
|
|
|
|
|
|
|
|
|
|
|
|
|
|
|
|
|
|
|
|
|
|
|
|
|
|
|
|
|
|
R |
|
|
|
|
|
|
|
|
|
|
|
|
|
|
|
|
|
|
|
|
|
|
|
|
|
|
|
|
|
|
|
|
|
|
|
|
||
|
|
|
|
|
|
|
|
|
|
|
|
|
|
|
|
|
|
|
|
|
|
|
|
|
|
|
|
|
|
|
|
|
|
|
|
|
|
|
|||
|
|
|
|
I |
|
|
|
|
|
|
|
|
|
|
|
|
|
|
|
|
|
|
|
|
|
|
|
|
|
|
|
|
|
|
|
|
|
|
|
||
|
|
|
|
D |
|
|
|
|
|
|
|
|
|
|
|
|
|
|
|
|
|
|
|
|
|
|
|
|
|
|
|
|
|
|
|
|
|
|
|
||
|
|
|
|
|
|
|
|
|
|
|
|
|
|
|
|
|
|
|
|
|
|
|
|
|
|
|
|
|
|
|
|
|
|
|
|
|
|
|
|||
|
|
|
|
|
|
|
|
|
|
|
|
|
|
|
|
|
|
|
|
|
|
|
|
|
|
|
|
|
|
|
|
|
|
|
|
|
|
|
|
|
|
|
|
SUB MENU |
|
|
|
|
|
|
|
|
|
|
|
|
|
|
|
|
|
|
|
|
RETURN |
||||||||||||||||||
|
|
|
|
|
|
|
|
|
|
|
|
|
|
|
|
|
|
|
|
|
|
|
|
|
|
||||||||||||||||
|
|
|
|
|
|
|
|
|
|
|
|
|
|
|
|
|
|
|
|
|
|
CREATE |
|||||||||||||||||||
|
|
|
AUDIO |
|
|
|
DISPLAY |
|
CHAPTER |
|
|||||||||||||||||||||||||||||||
|
|
|
|
|
|
|
|
|
|
|
|
|
|
|
|
|
|
|
|
|
|
|
|
|
|
|
|
|
|
|
|
|
|
|
|
|
|
|
|
|
|
|
|
|
|
A |
|
|
|
|
|
|
B |
|
|
|
|
|
|
|
|
|
|
|
|
|
|
|
|
|
|
|
|
|
|
|
|
||||||
REC |
REC MODE |
F Rec |
Notes
This unit can receive most Basic Cable television channels. It cannot receive Premium Services that require additional fees or a separate decoder.
This unit can receive music channels from digital broadcasters, but you cannot record them. Data broadcasts are not for viewing or recording.
Multi-channel surround broadcast is output in stereo (on 2 channels).
Tips
To zoom in on video 1. Press [SUB MENU].
2. Press [ , ] to select “Zoom In”, then press [OK].
RQT9056
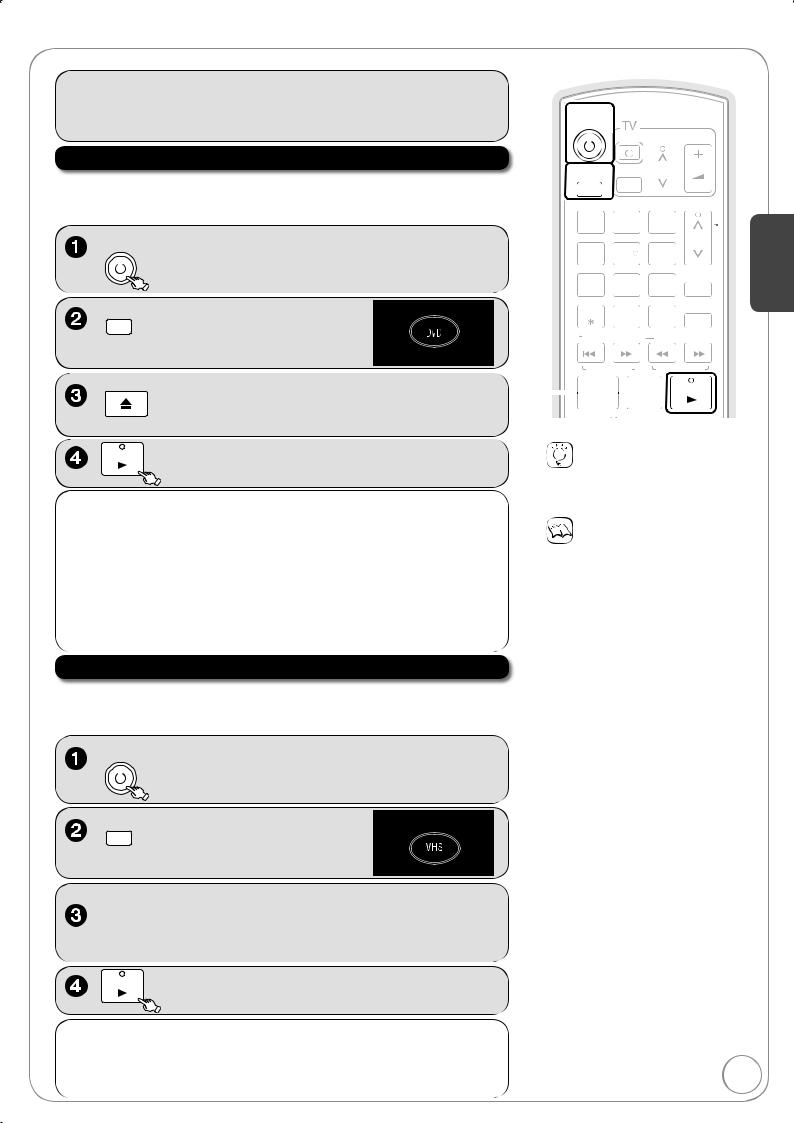
Playback
Playing a Disc
Refer to “Advanced Disc Playback” ( 30–31) for detailed information on playback of discs.
[RAM] [-R] [-R]DL] [-RW‹V›] [+R] [+R]DL] [+RW] [DVD-V] [-RW‹VR›] [CD]
to turn the unit on.
– “HELLO” appears on the unit’s display.
 –The DVD indicator lights up on the unit.
to open the tray (Button located on front of the unit).
 –Insert a disc.
–The tray closes and play begins.
Playing a Video Cassette
Refer to “Advanced Video Cassette Playback” ( 37–38) for detailed information on playback of video cassette.
[VHS]
to turn the unit on.
– “HELLO” appears on the unit’s display.
 – The VHS indicator lights up on the unit.
DVD/VHS
POWER
|
|
|
|
|
|
|
|
|
|
|
|
|
|
|
|
|
|
|
|
|
|
|
|
|
|
|
|
|
|
|
|
|
|
|
|
|
|
|
|
|
|
|
|
|
|
|
|
|
|
|
||
|
|
|
|
|
|
|
|
|
|
|
|
|
|
|
|
|
|
|
|
|
|
|
|
|
|
|
|
|
|
|
|
|
|
|
|
|
|
|||||||||||||||
|
|
|
|
|
|
|
|
|
|
|
|
|
|
|
|
POWER |
|
|
|
|
|
|
|
|
|
|
|
|
|
|
|
|
|
|
|
|
|
|
||||||||||||||
|
|
|
|
|
|
|
|
|
|
|
|
|
|
|
|
|
|
|
|
|
|
|
|
|
|
|
|
|
|
|
|
|
|
|
|
|
|
|||||||||||||||
|
|
|
|
|
|
DRIVE |
|
|
|
|
|
|
|
|
|
|
|
|
|
|
|
|
|
|
|
|
|
|
|
|
|
|
|
|
|
|
|
|
|
|
||||||||||||
|
|
|
|
|
|
|
|
|
|
|
|
|
|
|
|
|
|
|
|
|
|
|
|
|
|
|
|
|
|
|
||||||||||||||||||||||
|
|
|
|
|
|
|
|
|
|
|
|
|
|
|
|
|
|
|
CH |
|
|
|
|
VOL |
|
|||||||||||||||||||||||||||
|
|
|
|
|
|
TV/VIDEO |
|
|
||||||||||||||||||||||||||||||||||||||||||||
|
|
|
|
|
|
|
|
|
|
|
|
|
|
|
|
|||||||||||||||||||||||||||||||||||||
|
|
|
|
|
|
SELECT |
|
|
|
|
|
|
|
|
|
|
|
|
|
|
|
|
|
|
|
|
|
|
|
|
|
|
|
|
|
|
|
|
|
|
||||||||||||
|
|
|
|
|
|
|
|
|
|
|
|
|
|
|
|
|
|
|
|
|
|
|
|
|
|
|
|
|
|
|
|
|
|
|
|
|
|
|
|
|
|
|
|
|
|
|
|
|
|
|
|
|
|
|
|
|
|
|
|
|
|
|
|
|
|
|
|
|
|
|
|
|
|
|
|
|
|
|
|
|
|
|
|
|
|
|
|
|
|
|
|
|
TRACKING/V-LOCK |
|
|||||||||||
|
|
|
|
|
|
|
|
|
|
|
|
|
|
|
|
|
|
|
|
|
|
|
|
|
|
|
|
|
|
|
|
|
|
|
|
|
|
|
|
|
|
|||||||||||
|
|
|
|
|
|
|
|
|
|
|
|
|
|
|
|
|
|
|
|
|
|
|
|
|
|
|
|
|
|
|
|
|
|
|
|
|
|
|
|
|
|
|
|
|
|
|
|
|
|
|
|
|
|
|
|
|
|
|
|
|
|
|
|
|
|
|
|
|
|
|
|
|
|
3 |
|
|
|
|
|
|
|
|
|
|
|
|
|||||||||||||||||||
|
|
|
|
|
|
|
|
|
|
|
|
|
|
|
|
|
|
|
|
|
2 |
|
|
|
|
|
|
|
|
|
|
|
|
|
|
|
|
|
|
|
|
Operations |
||||||||||
|
|
|
|
|
|
|
|
|
|
|
|
|
|
|
|
|
|
|
|
|
|
|
|
|
|
|
|
|
|
|
|
|
|
|
|
|
|
|
|
|
|
|
|
|
|
|
|
|
|
|
|
|
|
|
|
|
|
|
|
|
|
|
|
|
|
|
|
|
|
|
|
|
|
|
|
|
|
|
|
|
|
|
|
|
|
|
|
|
|
|
|
|
|
|
|
|
|
CH |
|
|
|
|
|||
|
|
|
|
|
|
|
|
|
|
|
|
|
|
|
|
|
|
|
|
|
|
|
|
|
|
|
|
|
|
|
|
|
|
|
|
|
|
|
|
|
|
|
|
|
|
|
||||||
|
|
|
|
|
|
|
|
|
6 |
|
|
|
|
|
|
|
|
|
|
|
|
|
|
|||||||||||||||||||||||||||||
|
|
|
|
4 |
|
|
|
|
|
5 |
|
|
|
|
|
|
|
|
|
|
|
|
|
|
|
|
|
|
|
|
|
|
|
|||||||||||||||||||
|
|
|
|
|
|
|
|
|
|
|
|
|
|
|
|
|
|
|
|
|
|
|
|
|
|
|
|
|
|
|
|
|
|
|
|
|
|
|
|
|
|
|
||||||||||
|
|
|
|
|
|
|
|
|
|
|
|
|
|
|
|
|
|
|
|
|
|
|
|
|
|
|
|
|
|
|
INPUT SELECT |
|
||||||||||||||||||||
|
|
|
|
|
|
|
|
|
9 |
|
|
|
|
|
||||||||||||||||||||||||||||||||||||||
|
|
|
|
|
|
|
8 |
|
|
|
|
|
|
|
|
|
|
|
||||||||||||||||||||||||||||||||||
|
|
|
|
7 |
|
|
|
|
|
|
|
|
|
|
|
|
|
|
|
|
|
|
|
Basic |
||||||||||||||||||||||||||||
|
|
|
|
|
|
|
|
|
|
|
|
|
|
|
|
|
|
|
|
|
|
|
|
|
|
|
|
|
|
|
|
|
|
|
|
|
|
|
|
|
|
|
|
|
|
|
|
|
|
|
|
|
|
|
|
|
|
|
|
|
|
|
|
|
|
|
|
|
|
|
|
|
|
|
|
|
|
|
|
|
|
|
|
|
|
|
|
|
|
|
|
|
|
|
|
|
|
|
|
|
|
|
|
|
|
|
|
|
|
|
|
|
|
|
|
|
|
|
|
|
|
|
|
|
|
|
|
|
|
|
|
|
|
|
|
|
|
|
|
|
|
|
|
|
|
|
|
|
FAVORITE |
|
|
|||||||
|
|
|
|
|
|
|
|
|
|
|
|
|
|
|
|
|
|
|
|
|
|
|
|
|
|
|
|
|
|
|
|
|
|
|
|
|
|
|
|
|
|
|
|
|
||||||||
|
|
|
|
|
|
|
DELETE |
|
|
|
|
|
|
0 |
|
|
|
|
|
|
|
|
|
|
|
|
|
|
|
|||||||||||||||||||||||
|
|
|
|
|
|
|
|
|
|
|
|
|
|
|
|
|
|
|
|
|
|
|
|
|
|
|
|
|
|
|
|
|
|
|
|
|
|
|||||||||||||||
|
|
|
|
|
|
|
|
|
|
|
|
|
|
|
|
|
|
|
|
|
|
|
|
|
|
|
|
|
|
|
|
|
|
|
|
|
||||||||||||||||
|
|
|
|
|
|
|
|
|
|
|
|
|
|
|
|
|
|
|
|
|
|
|
|
|
|
|
|
|
|
|
|
|
|
|
|
|
|
|
|
|
|
|
|
|||||||||
|
|
|
|
|
|
|
RESET |
|
|
|
|
|
|
|
|
|
|
|
|
|
SLOW/SEARCH |
|
|
|
|
|||||||||||||||||||||||||||
|
|
|
|
|
|
|
|
|
|
|
|
|
|
|
|
|
|
|
|
|
|
|
|
|
||||||||||||||||||||||||||||
|
|
|
|
|
|
|
|
|
|
|
|
|
|
|
|
|
|
|
|
|
|
|
|
|
|
|
|
|
|
|
|
|||||||||||||||||||||
|
|
|
|
|
|
|
|
|
|
|
SKIP/INDEX |
|
|
|
|
|
|
|
|
|
|
|
|
|
REW |
|
|
|
|
FF |
|
|||||||||||||||||||||
|
|
|
|
|
|
|
|
|
|
|
|
|
|
|
|
|
|
|
|
|
|
|
|
|
|
|
|
|
|
|
|
|
|
|
|
|
|
|
|
|
|
PLAY |
|
|||||||||
|
|
|
|
|
|
|
|
|
|
|
|
|
|
|
|
|
|
|
|
|
|
|
|
|
|
|
|
|
|
|
|
|
|
|
|
|
|
|
|
|
|
|
||||||||||
|
|
|
STOP |
|
|
|
|
|
|
|
PAUSE |
|
||||||||||||||||||||||||||||||||||||||||
|
|
|
|
|
|
|
|
|
|
|
|
|
|
|
|
|
|
|
|
|
|
|
|
|
|
|
|
|
|
|
|
|
|
|
|
|
|
|
|
|
|
|
|
|
|
|
|
|
||||
|
|
|
|
|
|
|
|
|
|
|
|
|
|
|
|
|
|
|
|
|
|
|
|
|
|
|
|
|
|
|
|
|
|
|
|
|
|
|
|
|
|
|
|
|
|
|
|
|
||||
|
|
|
|
|
|
|
|
|
|
|
|
|
|
|
|
|
|
|
|
|
|
|
|
|
|
|
|
|
|
|
|
|
|
|
|
|
|
|
|
|
|
|
|
|
|
|
|
|
|
|
|
|
|
|
|
|
|
|
|
|
|
|
|
|
|
|
|
|
|
|
|
|
|
|
|
|
|
|
|
|
|
|
|
|
|
|
|
|
|
|
|
|
|
|
|
|
|
|
|
|
|
|
|
|
|
Tips
Icons such as “ [RAM] ” indicate usable discs. Refer to pages 74 and 75.
Notes
[DVD]
[RAM] [-R] [-R]DL] [-RW‹V›] [+R] [+R]DL]
[+RW] [-RW‹VR›]
Playback starts from the most recent recording.
[DVD-V] [CD]
Playback starts from the beginning of the disc.
DivX
DivX Menu screen appears ( 36).The unit takes some time to read the
disc before play starts.
Discs continue to rotate while menus are displayed. Press [ STOP] when you fi nish to preserve the unit’s motor and your television screen.
[VHS]
Tapes are automatically rewound once they reach the end (except during scheduled recording, fast forwarding, etc.).
Viewing pause or using slow playback in VP mode may result in a distorted image.
You may have to adjust the tracking for tapes recorded on other VCRs
( 38). In some cases, the picture quality may still be inferior; this is due to format constraints.
RQT9056
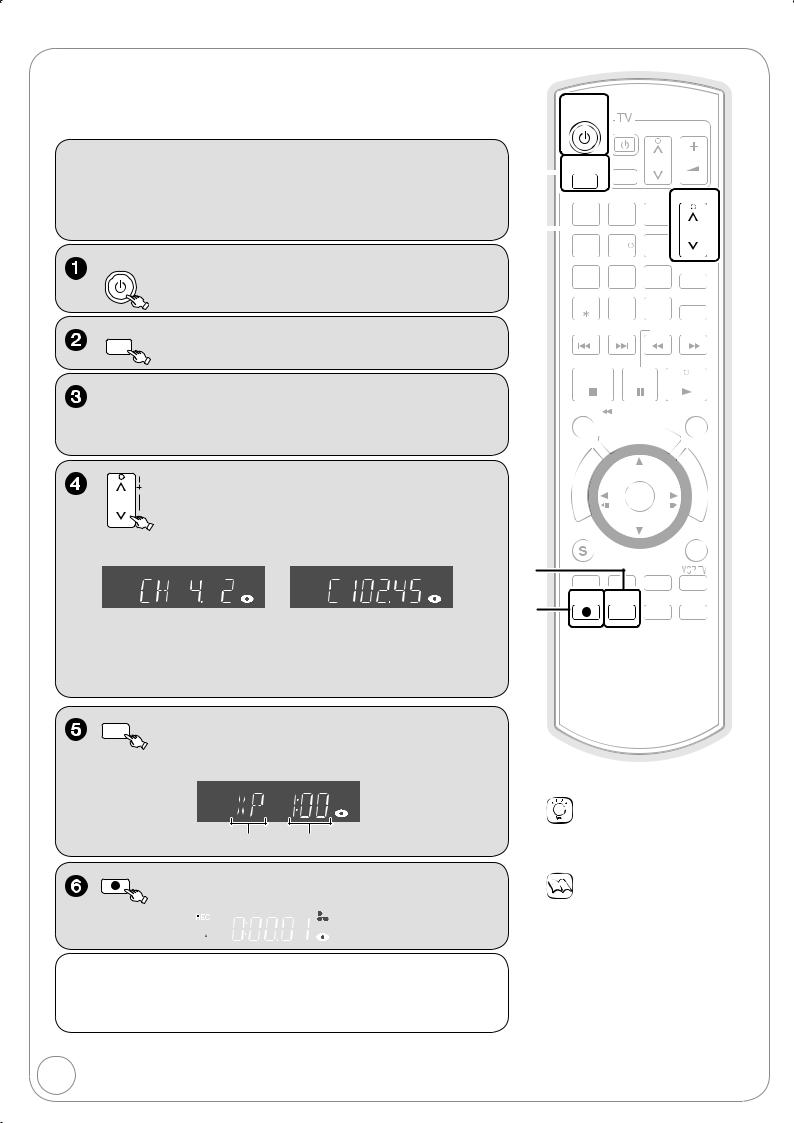
Recording Television Programs
Refer to “Important Notes for Recording” ( 23) and “Advanced Recording” ( 24–26) for detailed information on recording.
[RAM] [-R] [-R]DL] [-RW‹V›] [+R] [+R]DL] [+RW] [VHS]
Digital broadcasts cannot be recorded to video tape.
Preparation:
Turn on the television and select the appropriate video input to suit the connections to this unit (Example: AV input, CH3 or CH4).
[RAM] If the disc is protected, release protection ( 52).[VHS] Ensure accidental erasure tab is intact.
DVD/VHS
POWER
to turn the unit on.
– “HELLO” appears on the unit’s display.
DRIVE
SELECT
to select the drive (DVD or VHS).
Insert a disc or VHS cassette.
–Insert a disc or VHS cassette with enough remaining blank space ( 15).
TRACKING/V-LOCK
to select desired channel. |
|
CH |
|
Antenna Mode: |
Cable TV Mode: |
e.g. channel 4-2 |
e.g. channel 102-45 |
– To select with the numbered buttons ( 16).
–When no channel setting is performed on the unit and broadcast is recorded directly from the cable box or satellite receiver, select a channel on the connected equipment and press [INPUT SELECT] to select “IN1” or “IN2”.
REC MODE
to select the recording mode.
– Recording mode should be determined by program length and available time on selected media ( 24)
DVD/VHS

|
|
|
|
|
|
|
|
|
|
|
|
|
|
|
|
|
|
|
CH |
|
|
VOL |
|
|
|
|
|||||||||
|
|
|
|
|
|
|
|
|
TV/VIDEO |
||||||||||||||||||||||||||
|
|
|
|
|
|
|
|
|
|
|
|
||||||||||||||||||||||||
|
|
|
|
|
|
|
|
|
|
|
|||||||||||||||||||||||||
|
|
|
|
|
|
|
|
|
|
|
|
|
|
|
|
|
|
|
|
|
|
|
|
|
|
|
|
|
|
|
|
|
|
||
|
|
|
|
|
|
|
|
|
|
|
|
|
|
|
|
|
|
|
|
|
|
|
|
|
|
|
|
|
|
|
|
|
|||
|
|
|
|
|
|
|
|
|
|
|
|
|
|
|
|
|
|
|
|
|
|
|
|
|
|
|
|
|
|
|
|
|
|
||
|
|
|
|
|
|
|
|
|
|
|
|
|
|
|
|
|
|
|
|
|
|
TRACKING/V-LOCK |
|||||||||||||
|
|
|
|
|
|
|
|
|
|
|
|
|
|
|
|
|
|
|
|
|
|
|
|
|
|||||||||||
|
|
|
|
|
|
|
|
|
|
|
|
|
|
|
|
|
|
|
|
|
|
|
|
|
|
|
|
|
|
|
|
|
|
|
|
|
|
|
|
3 |
|||||||||||||||||||||||||||||||
|
|
|
|
|
|
1 |
|
|
|
|
2 |
|
|
|
|
|
|
|
|
|
|
|
|
|
|
|
|
|
|||||||
|
|
|
|
|
|
|
|
|
|
|
|
|
|
|
|
|
|
|
|
|
|
|
|
|
|
|
|||||||||
|
|
|
|
|
|
|
|
|
|
|
|
|
|
|
|
|
|
|
|
|
|
|
|
|
|
||||||||||
|
|
|
|
|
|
|
|
|
|
|
|
|
|
|
|
|
|
|
|
|
|
|
|
|
|
|
|
|
|
|
|
|
|
|
|
|
|
|
|
|
4 |
|
|
|
|
|
|
|
|
|
|
6 |
|
|
|
|
|
|
|
|
|
|
|
|
|
||||||
|
|
|
|
|
|
|
|
|
|
5 |
|
|
|
|
|
|
|
|
|
|
|
|
|
|
|
|
|
|
|||||||
|
|
|
|
|
|
|
|
|
|
|
|
|
|
|
|
|
|
|
|
|
|
|
|
|
|
|
|
||||||||
|
|
|
|
|
|
|
|
|
|
|
|
|
|
|
|
|
|
|
|
|
|
|
|
|
|
|
|
|
|
|
|||||
|
|
|
|
|
|
|
|
|
|
|
|
|
|
|
|
|
|
|
INPUT SELECT |
||||||||||||||||
|
|
|
|
9 |
|||||||||||||||||||||||||||||||
|
|
|
8 |
|
|
|
|
||||||||||||||||||||||||||||
|
|
|
7 |
|
|
|
|
|
|
|
|
||||||||||||||||||||||||
|
|
|
|
|
|
|
|
|
|
|
|
|
|
|
|
|
|
|
|
|
|
|
|
||||||||||||
|
|
|
|
|
|
|
|
|
|
|
|
|
|
|
|
|
|
|
|
|
|
|
|
|
|
|
|
|
|
|
|
|
|
|
|
|
|
|
|
|
|
|
|
|
|
|
|
|
|
|
|
|
|
|
|
|
|
|
|
|
|
FAVORITE |
|||||||||
|
|
|
|
DELETE |
|
|
|
|
0 |
|
|
|
|
|
|
|
|
|
|
||||||||||||||||
|
|
|
|
|
|
|
|
|
|
|
|
|
|
|
|
|
|
|
|
|
|
|
|
|
|
|
|
||||||||
|
|
|
|
|
|
|
|
|
|
|
|
|
|
|
|
|
|
|
|
|
|
|
|
|
|
|
|||||||||
 RESET SLOW/SEARCH
 SKIP/INDEX
 REW FF
STOP PAUSE PLAY
TIME SLIP/ |
JET REW |
CM SKIP |
|
|
|
|
|
|
|
|
|
|
|
|
|
|
|
H |
E |
D |
U |
|
|
|
|
|
|
|
|
|
|
|
|
|
|
|
|
|
|
|
|
|
|
|
|
|
|
|
|
|
|
|
L |
|
|
|
|
|
|
|
|
|
|
|
|
|||||
|
|
|
|
|
|
|
|
|
|
|
|
S |
|
C |
|
E |
|
|
|
|
|
|
|
|
|
|
|||||||
|
|
|
|
|
|
|
|
|
|
|
|
|
|
|
|
|
|
|
|
|
|
|
|
|
|
|
|
|
|||||
|
|
|
|
|
|
|
|
|
|
|
|
|
|
|
|
|
|
|
|
|
|
|
|
|
|
|
|
|
|
|
|||
|
|
|
|
|
|
|
|
|
|
|
|
|
|
|
|
|
|
|
|
|
|
|
|
|
|
|
|
|
|
|
|
||
|
|
|
|
|
|
O |
R |
|
|
|
|
|
|
|
|
|
|
|
|
|
|
|
|
|
|
|
|
|
|
|
|
||
|
|
|
|
|
|
|
|
|
|
|
|
|
|
|
|
|
|
|
|
|
|
|
|
|
|
|
|
|
|
|
|
||
|
|
|
|
|
|
|
|
|
|
|
|
|
|
|
|
|
|
|
|
|
|
|
|
|
|
|
|
|
|
|
|
||
|
|
|
|
|
|
|
|
|
|
|
|
|
|
|
|
|
|
|
|
|
|
|
|
|
|
|
|
|
|
|
|
|
|
|
|
|
|
|
|
|
|
|
|
|
|
|
|
|
|
|
|
|
|
|
|
|
|
|
|
|
|
|
|
|
|
|
|
|
|
|
|
|
T |
|
|
|
|
|
|
|
|
|
|
|
|
|
|
|
|
|
|
|
|
F |
|
|
|
|
|||
|
|
|
|
|
A |
|
|
|
|
|
|
|
|
|
|
|
|
|
|
|
|
|
|
|
|
N |
|
|
|
||||
|
|
|
G |
|
|
|
|
|
|
|
|
|
|
|
|
|
|
|
|
|
|
|
|
|
U |
|
|
|
|||||
|
|
|
I |
|
|
|
|
|
|
|
|
|
|
|
|
|
|
|
|
|
|
|
|
|
|
C |
|
|
|
||||
|
|
|
V |
|
|
|
|
|
|
|
|
|
|
|
|
|
|
|
|
|
|
|
|
|
|
|
|
|
|||||
|
|
|
|
|
|
|
|
|
|
|
|
|
|
|
|
|
|
|
|
|
|
|
|
|
|
|
|
|
|
|
|
||
|
|
A |
|
|
|
|
|
|
|
|
|
|
|
|
|
|
|
|
|
|
|
|
|
|
|
I |
|
|
|
||||
|
|
N |
|
|
|
|
|
|
|
|
|
|
|
|
|
|
|
|
|
|
|
|
|
|
|
T |
|
|
|
||||
|
|
|
|
|
|
|
|
|
|
|
|
|
|
|
|
|
|
|
|
|
|
|
|
|
|
|
|
|
|
|
|||
|
|
|
|
|
|
|
|
|
|
|
|
|
|
|
|
|
|
|
|
|
|
|
O |
|
|||||||||
|
|
T |
|
|
|
|
|
|
|
|
|
|
|
|
OK |
|
|
|
|
|
|
|
|
|
|
|
|||||||
|
|
E |
|
|
|
|
|
|
|
|
|
|
|
|
|
|
|
|
|
|
|
|
|
|
S |
|
|
||||||
|
|
C |
|
|
|
|
|
|
|
|
|
|
|
|
|
|
|
|
|
|
|
|
|
|
|
|
N |
|
|||||
|
|
|
|
|
|
|
|
|
|
|
|
|
|
|
|
|
|
|
|
|
|
|
|
|
|
|
|
|
|
|
|
|
|
|
|
R |
|
|
|
|
|
|
|
|
|
|
|
|
|
|
|
|
|
|
|
|
|
|
|
|
|
|
|
|
|
||
|
|
|
|
|
|
|
|
|
|
|
|
|
|
|
|
|
|
|
|
|
|
|
|
|
|
|
|
|
|
|
|||
|
|
I |
|
|
|
|
|
|
|
|
|
|
|
|
|
|
|
|
|
|
|
|
|
|
|
|
|
|
|
|
|
||
|
|
D |
|
|
|
|
|
|
|
|
|
|
|
|
|
|
|
|
|
|
|
|
|
|
|
|
|
|
|
|
|
||
|
|
|
|
|
|
|
|
|
|
|
|
|
|
|
|
|
|
|
|
|
|
|
|
|
|
|
|
|
|
|
|
|
|
SUB MENU |
|
|
|
|
|
|
|
|
|
|
|
|
|
|
RETURN |
||||||||||||||||||
|
AUDIO |
CREATE |
DISPLAY CHAPTER |
||
|
A |
B |
|
F Rec |
STATUS |
|
|
Recording mode Remaining time
REC
to start recording.
|
|
|
|
|
|
|
|
|
|
|
|
|
|
|
|
|
|
Pausing Recording |
Stopping Recording |
||||
Press [ PAUSE]. |
Press [ STOP]. |
||||
– Press again to restart recording. |
|
|
|||
18
Tips
Icons such as “ [RAM] ” indicate usable discs. Refer to pages 74 and 75.
Notes
[-R] [-R]DL] [-RW‹V›] [+R] [+R]DL] [+RW]
It takes about 30 seconds for the unit to complete recording management information after recording fi nishes.
You cannot change the channel or recording mode during recording.
Simultaneous recording to both DVD and VHS is not possible.
RQT9056

Scheduled Recording
Refer to “Advanced Scheduled Recording” ( 27) for detailed information on scheduled recording.
[RAM] [-R] [-R]DL] [-RW‹V›] [+R] [+R]DL] [+RW] [VHS]
Digital broadcasts cannot be recorded to video tape.
Preparation:
Turn on the television and select the appropriate video input to suit the connections to this unit (Example: AV input, CH3 or CH4).
[RAM] If the disc is protected, release protection ( 52).[VHS] Ensure accidental erasure tab is intact ( 15).
Insert a disc or VHS cassette with enough remaining blank space.
Confirm that the clock on the unit’s display is set to the correct time.
If connected via a cable box or satellite receiver, set channel on that equipment before scheduled recording starts.
Schedule List |
Remaining Recording Time VHS 2:00 SP |
DVD 0:33 XP |
|
5/ 4 Fri |
6:11 PM |
No |
Channel |
Date |
On |
Off |
Drive |
Mode |
Check |
|
|
New Scheduled Recording |
|
|
|
||
Press OK to set new schedule.
 OK
OK
, to select “New Scheduled Recording”, then OK
, to move through the items and , to set the items.
Channel/Input |
– TV Station/External Input |
To select a favorite channel
(To set Favorite Channels, see page 16)
1.Press [SUB MENU].
2.Press [ , ] to select “Change Surf Mode”, then press [OK].
3.Press [ , ] to select “Favorite”, then press [OK].
Date/Frequency |
– You can set a daily or weekly program. |
|
||||
On (start time) / Off (end time) |
|
|
|
|
|
|
|
– Hold button to change in 30-minute increments. |
|||||
Drive |
– DVD or VHS |
|
|
|
|
|
Mode |
– Recording mode, see page 24 |
|
|
|
|
|
Name (only for discs) |
|
|
|
|
|
|
|
– Press [OK], see |
SCHEDULED |
Remaining Recording Time |
VHS 2:00 SP |
DVD 0:33 XP |
|
|
RECORDING |
|
|
5/ 4 Fri |
6:11 PM |
|
|
page 42. |
Channel/ |
Date/ |
On |
Off Drive |
Mode |
|
Input |
Frequency |
||||
|
|
|
|
|||
|
4-1 |
|
: |
: |
|
|
|
|
|
|
|||
|
|
Surf Mode : All |
|
|
|
|
|
Channel, Caption |
|
|
|
|
Name |
|
4-1 KPO-SD |
|
|
|
||
|
|
|
Set Channel/Input. |
|||
|
Preview of selected |
|
|
|||
|
OK |
SUB MENU |
|
Cancel |
Number |
|
|
channel |
|
||||
|
|
|
||||
|
|
|
|
|
|
|
To delete all items
1.Press [SUB MENU].
2.Press [ , ] to select “Delete”, then press [OK].
OK |
− Repeat steps 2−4 to program other recordings. |
|
|
DVD/VHS |
|
POWER |
when you have fi nished programming. |
|
|
|
− “ ” lights on the unit’s display. |
|
− Scheduled recording can be started only when the |
|
unit is turned off. |

|
DRIVE |
|
|
|
|
|
|
|
|
|
|
|
CH |
|
|
|
|
VOL |
|
|
|
|
|
|||||||||||||||||
TV/VIDEO |
|
|||||||||||||||||||||||||||||||||||||||
SELECT |
|
|
|
|
|
|
|
|
|
|||||||||||||||||||||||||||||||
|
|
|
|
|
|
|
||||||||||||||||||||||||||||||||||
|
|
|
|
|
|
|
|
|
|
|
|
|
|
|
|
|
|
|
|
|
|
|
|
|
|
|
|
|
|
|
||||||||||
|
|
|
|
|
|
|
|
|
|
|
|
|
|
|
|
|
|
|
|
|
|
|
|
|
|
|
|
|
|
|||||||||||
|
|
|
|
|
|
|
|
|
|
|
|
|
|
|
|
|
|
|
|
|
|
|
|
|
|
|
|
|
|
|
|
|
|
|
|
|||||
|
|
|
|
|
|
|
|
|
|
|
|
|
|
|
|
|
|
|
|
|
|
|
|
|
|
|
TRACKING/V-LOCK |
|
||||||||||||
|
|
|
|
|
|
|
|
|
|
|
|
|
|
|
|
|
|
|
|
|
|
|
|
|
|
|
|
|
|
|
|
|
|
|
|
|
|
|
|
|
|
3 |
|
|
|
|
|
|
|
|
|
|
|
|
|
|
|||||||||||||||||||||||||
|
|
|
|
1 |
|
|
|
|
|
|
|
2 |
|
|
|
|
|
|
|
|
|
|
|
|
|
|
|
|
|
|
|
Operations |
||||||||
|
|
|
|
|
|
|
|
|
|
|
|
|
|
|
|
|
|
|
|
|
|
|
|
|
|
|
|
|
|
|||||||||||
|
|
|
|
|
|
|
|
|
|
|
|
|
|
|
|
|
|
|
|
|
|
|
|
|
|
|
|
|
|
|
CH |
|
|
|
|
|
|
|||
|
|
|
|
|
|
|
|
|
|
|
|
|
|
|
|
|
|
|
|
|
|
|
|
|
|
|
|
|
|
|
|
|
|
|
|
|
||||
|
6 |
|
|
|
|
|
|
|
|
|
|
|
|
|
|
|||||||||||||||||||||||||
|
|
|
4 |
|
|
|
|
|
|
|
|
5 |
|
|
|
|
|
|
|
|
|
|
|
|
|
|
|
|
|
|
|
|
|
|||||||
|
|
|
|
|
|
|
|
|
|
|
|
|
|
|
|
|
|
|
|
|
|
|
|
|
|
|
|
|
|
|
|
|||||||||
|
|
|
|
|
|
|
|
|
|
|
|
|
|
|
|
|
|
|
|
|
|
|
|
|
|
|
|
|
|
|
|
|
|
|||||||
|
|
|
|
|
|
|
|
|
|
|
|
|
|
|
|
|
|
|
|
INPUT SELECT |
|
|||||||||||||||||||
|
9 |
|
||||||||||||||||||||||||||||||||||||||
8 |
|
|
|
|
|
|
|
|
||||||||||||||||||||||||||||||||
7 |
|
|
|
|
|
|
|
|
|
|
|
|
|
Basic |
||||||||||||||||||||||||||
|
|
|
|
|
|
|
|
|
|
|
|
|
|
|
|
|
|
|
|
|
|
|
|
|
|
|
|
|
|
|
|
|||||||||
|
|
|
|
|
|
|
|
|
|
|
|
|
|
|
|
|
|
|
|
|
|
|
|
|
|
|
|
|
|
|
|
|
|
|
|
|
|
|
|
|
|
|
|
|
|
|
|
|
|
|
|
|
|
|
|
|
|
|
|
|
|
|
|
|
|
|
|
|
|
FAVORITE |
|
|
|
||||||||
|
|
DELETE |
|
|
|
|
|
|
0 |
|
|
|
|
|
|
|
|
|
|
|
|
|
|
|
||||||||||||||||
|
|
|
|
|
|
|
|
|
|
|
|
|
|
|
|
|
|
|
|
|
|
|
|
|
|
|
|
|
|
|||||||||||
|
|
|
|
|
|
|
|
|
|
|
|
|
|
|
|
|
|
|
|
|
|
|
|
|
|
|
|
|
||||||||||||
 RESET SLOW/SEARCH
 SKIP/INDEX
 REW FF
STOP PAUSE PLAY
TIME SLIP/ |
JET REW |
CM SKIP |
|
|
|
|
|
|
|
T |
O |
F |
|
A |
|
||
|
|
N |
||
|
G |
|
|
U |
A |
|
|
I |
|
|
I |
|
|
C |
|
V |
|
|
T |
|
N |
|
|
|
|
|
|
O |
|
|
T |
|
|
|
|
C |
|
|
N |
|
E |
|
|
S |
|
R |
|
|
|
|
I |
|
|
|
D |
|
|
||
|
|
|
||
SUB MENU |
RETURN |
CREATE
AUDIO DISPLAY CHAPTER VCR/TV
Tips
Icons such as “ [RAM] ” indicate usable discs. Refer to pages 74 and 75.
Notes
To prevent recording errors:
Set a scheduled recording period slightly longer than the actual program (to make sure the program is recorded in full).
Be sure to perform step 5 before the scheduled recording time. When the unit is turned off, “ ” lights on the unit’s display to indicate scheduled recording standby has been activated.
“ ” fl ashes when the unit cannot go to scheduled recording standby. (e.g., a recordable disc is not in the disc tray) It does not fl ash if Quick Start is off.
When scheduled recordings are set to start one immediately after another, the unit cannot record the beginning of the later program.
If two scheduled recording times overlap, the recording that started fi rst always has priority. The second recording will start only after the fi rst recording has fi nished.
Scheduled recording cannot be executed on both DVD and VHS drives at the same time.
When starting time for a scheduled recording is the same, the recording that you programmed later has priority.
Depending on the Daylight Savings Time (DST) settings for this unit,
scheduled recordings may be 19 affected when the seasons change.
RQT9056

Copying Recordings
Copying Recordings (VHS DVD)
When copying begins, the VHS tape is played back starting at the tape’s current position, and recorded to the disc.
[VHS] |
[RAM] [-R] [-R]DL] [-RW‹V›] [+R] [+R]DL] [+RW] |
Press and hold for about

 3 seconds.
[-R] [-R]DL] [-RW‹V›] [+R] [+R]DL]
to copy and automatically fi nalize
 when done
− If you press [ STOP], you can cancel copying.
− or −
to copy without fi nalizing.
 − If you press [ STOP], you can cancel copying.
−COPY will appear in the unit’s display when the copying process begins.
−Copying is automatically stopped when the tape reaches its end or the disc becomes full.
Tips
Additional navigation
You can begin the same kind of copy by using COPY Navigator. Use the operations listed below instead of step 1 shown above.
1.Press [FUNCTIONS].
2.Press [ , ] to select “Copy” then press [OK]. COPY Navigator screen appears.
3.Press [ , ] to select “VHS to DVD” then press [OK].
Segmenting a recording to be copied
When copying from VHS to DVD, recordings on the DVD are divided according to index signals detected on the tape.
−Recordings that are too short may not be divided correctly.
−The time it takes to record may become longer than the original recording depending on the number of index signals.
To cancel copying in the middle
Press [ STOP].
−You can also press and hold [RETURN] for about 3 or more seconds to cancel copying in the middle.
However, you cannot stop fi nalizing after it has started.
When copying multilingual broadcast program
[-R] [-R]DL] [-RW‹V›] [+R] [+R]DL] [+RW]
Before starting copy, try playing the VHS and pressing [AUDIO], and then select audio track that you want to copy. Audio can also be switched during copy.
CH |
REC |
|
COPYING |
COPYING indicator
|
|
|
|
|
|
|
|
|
|
|
|
|
|
|
|
|
|
|
|
|
|
|
|
|
|
|
|
|
|
|
|
FAVORITE |
|
DELETE |
|
|
0 |
|
|
||||
|
|
|
|
|
|
|
||||
|
|
|
|
|
|
|||||
 RESET SLOW/SEARCH
SKIP/INDEX |
REW |
FF |
2 |
|
STOP |
|
PAUSE |
|
||||
|
|
|
|
|
|
|
|
|
|
|
|
|
|
|
|
|
|
|
|
|
|
|
|
|
|
|
|
|
|
TIME SLIP/ |
JET REW |
CM SKIP |
|
|
|
|
|
|
|
|
|
|
|
|
|
|
|
|
|
|
|
H |
E |
D |
U |
|
|
|
|
|
|
|
|
|
|
|
|
|
|
|
|
|
|
|
|
||||
|
|
|
|
|
|
|
|
|
|
|
|
|
|
|
|
|
|
|
|
L |
|
|
|
|
|
|
|
|
|
|
|
|
|
|
|
|
|
|
||||||||
|
|
|
|
|
|
|
|
|
|
|
|
|
|
S |
|
C |
|
E |
|
|
|
|
|
|
|
|
|
|
|
|
|
|
|
|||||||||||||
|
|
|
|
|
|
|
|
|
|
|
|
|
|
|
|
|
|
|
|
|
|
|
|
|
|
|
|
|
|
|
|
|
|
|
|
|
|
|
||||||||
|
|
|
|
|
|
|
|
|
|
|
|
|
|
|
|
|
|
|
|
|
|
|
|
|
|
|
|
|
|
|
|
|
|
|
|
|
|
|
|
|
|
|
||||
|
|
|
|
|
|
|
|
|
|
|
|
|
|
|
|
|
|
|
|
|
|
|
|
|
|
|
|
|
|
|
|
|
|
|
|
|
|
|
|
|||||||
|
|
|
|
|
|
|
|
|
|
|
|
|
|
|
|
|
|
|
|
|
|
|
|
|
|
|
|
|
|
|
|
|
|
|
|
|
|
|
|
|
|
|
|
|
|
|
|
|
|
|
|
|
|
|
|
|
|
|
|
|
|
|
|
|
|
|
|
|
|
|
|
|
|
|
|
|
|
|
|
|
|
|
|
|
|
|
|
|
|
|
|
||
|
|
|
|
|
|
O |
R |
|
|
|
|
|
|
|
|
|
|
|
|
|
|
|
|
|
|
|
|
|
|
|
|
|
|
|
|
|
|
|
|
|
|
|
|
|
||
|
|
|
|
|
|
|
|
|
|
|
|
|
|
|
|
|
|
|
|
|
|
|
|
|
|
|
|
|
|
|
|
|
|
|
|
|
|
|
|
|
|
|
|
|
||
|
|
|
|
|
|
|
|
|
|
|
|
|
|
|
|
|
|
|
|
|
|
|
|
|
|
|
|
|
|
|
|
|
|
|
|
|
|
|
|
|
|
|
|
|
||
|
|
|
|
|
|
|
|
|
|
|
|
|
|
|
|
|
|
|
|
|
|
|
|
|
|
|
|
|
|
|
|
|
|
|
|
|
|
|
|
|
|
|
|
|
|
|
|
|
|
|
|
|
|
|
|
|
|
|
|
|
|
|
|
|
|
|
|
|
|
|
|
|
|
|
|
|
|
|
|
|
|
|
|
|
|
|
|
|
|
|
|
|
|
|
|
|
|
|
T |
|
|
|
|
|
|
|
|
|
|
|
|
|
|
|
|
|
|
|
|
|
|
|
|
|
|
|
|
|
|
|
|
F |
|
|
|
|
|
|||
|
|
|
|
|
A |
|
|
|
|
|
|
|
|
|
|
|
|
|
|
|
|
|
|
|
|
|
|
|
|
|
|
|
|
|
|
|
|
N |
|
|
|
|
||||
|
|
|
G |
|
|
|
|
|
|
|
|
|
|
|
|
|
|
|
|
|
|
|
|
|
|
|
|
|
|
|
|
|
|
|
|
|
U |
|
|
|
|
|||||
|
|
I |
|
|
|
|
|
|
|
|
|
|
|
|
|
|
|
|
|
|
|
|
|
|
|
|
|
|
|
|
|
|
|
|
|
|
C |
|
|
|
|
|||||
|
|
V |
|
|
|
|
|
|
|
|
|
|
|
|
|
|
|
|
|
|
|
|
|
|
|
|
|
|
|
|
|
|
|
|
|
|
|
|
|
|
||||||
|
|
|
|
|
|
|
|
|
|
|
|
|
|
|
|
|
|
|
|
|
|
|
|
|
|
|
|
|
|
|
|
|
|
|
|
|
|
|
|
|
|
|
|
|
|
|
|
|
A |
|
|
|
|
|
|
|
|
|
|
|
|
|
|
|
|
|
|
|
|
|
|
|
|
|
|
|
|
|
|
|
|
|
|
|
I |
|
|
|
|
||||
|
|
N |
|
|
|
|
|
|
|
|
|
|
|
|
|
|
|
|
|
|
|
|
|
|
|
|
|
|
|
|
|
|
|
|
|
|
|
T |
|
|
|
|
||||
|
|
|
|
|
|
|
|
|
|
|
|
|
|
|
|
|
|
|
|
|
|
|
|
|
|
|
|
|
|
|
|
|
|
|
|
|
|
|
|
|
|
|
|
|||
|
|
|
|
|
|
|
|
|
|
|
|
|
|
|
|
|
|
|
|
|
|
|
|
|
|
|
|
|
|
|
|
|
|
|
O |
|
||||||||||
|
|
T |
|
|
|
|
|
|
|
|
|
|
|
|
|
|
|
OK |
|
|
|
|
|
|
|
|
|
|
|
|
|
|
|
|
||||||||||||
|
|
E |
|
|
|
|
|
|
|
|
|
|
|
|
|
|
|
|
|
|
|
|
|
|
|
|
|
|
|
|
|
|
|
S |
||||||||||||
|
|
C |
|
|
|
|
|
|
|
|
|
|
|
|
|
|
|
|
|
|
|
|
|
|
|
|
|
|
|
|
|
|
|
|
|
|
|
|
N |
|
|
|
||||
|
|
|
|
|
|
|
|
|
|
|
|
|
|
|
|
|
|
|
|
|
|
|
|
|
|
|
|
|
|
|
|
|
|
|
|
|
|
|
|
|
|
|
|
|
|
|
|
|
|
|
|
|
|
|
|
|
|
|
|
|
|
|
|
|
|
|
|
|
|
|
|
|
|
|
|
|
|
|
|
|
|
|
|
|
|
|
|
|
|
|
|
|
|
|
|
R |
|
|
|
|
|
|
|
|
|
|
|
|
|
|
|
|
|
|
|
|
|
|
|
|
|
|
|
|
|
|
|
|
|
|
|
|
|
|
|
|
|
|
||
|
|
|
|
|
|
|
|
|
|
|
|
|
|
|
|
|
|
|
|
|
|
|
|
|
|
|
|
|
|
|
|
|
|
|
|
|
|
|
|
|
|
|
|
|||
|
|
I |
|
|
|
|
|
|
|
|
|
|
|
|
|
|
|
|
|
|
|
|
|
|
|
|
|
|
|
|
|
|
|
|
|
|
|
|
|
|
|
|
|
|
||
|
|
D |
|
|
|
|
|
|
|
|
|
|
|
|
|
|
|
|
|
|
|
|
|
|
|
|
|
|
|
|
|
|
|
|
|
|
|
|
|
|
|
|
|
|
||
|
|
|
|
|
|
|
|
|
|
|
|
|
|
|
|
|
|
|
|
|
|
|
|
|
|
|
|
|
|
|
|
|
|
|
|
|
|
|
|
|
|
|
|
|
|
|
SUB MENU |
|
|
|
|
|
|
|
|
|
|
|
|
|
|
|
|
|
|
|
|
|
|
|
|
|
RETURN |
||||||||||||||||||||
|
|
|
|
|
|
|
|
|
|
|
|
|
|
|
|
|
|
|
|
|
|
|
|
|
|
|
|
|
|
|
|
|
|
|
|
|
|
|||||||||
|
|
|
|
|
|
|
|
|
|
|
|
|
|
|
|
|
|
|
|
|
|
|
CREATE |
|
|
|
|
|
|
|
|
|
|
|
|
|||||||||||
|
|
AUDIO |
|
|
|
|
DISPLAY |
|
|
|
|
|
|
|
|
|
|
|
|
|
|
|
VCR/TV |
|
||||||||||||||||||||||
|
|
|
|
|
CHAPTER |
|
||||||||||||||||||||||||||||||||||||||||
|
|
|
|
|
|
|
|
|
|
|
|
|
|
|
|
|
|
|
|
|
|
|
|
|
|
|
|
|
|
|
|
|
|
|
|
|
|
|
|
|
|
|||||
|
|
|
A |
|
|
|
|
|
|
|
|
|
|
|
|
|
|
|
|
|
|
|
|
|
|
|
|
|
|
|
|
|
|
|
|
|||||||||||
|
|
|
|
|
|
|
B |
|
|
|
|
|
|
|
|
|
|
|
|
|
|
|
|
|
|
|
|
|
|
|
|
|
|
|
|
|
|
|||||||||
|
|
|
|
|
|
|
|
|
|
|
|
|
|
|
|
|
|
|
|
|
|
|
|
|
|
|
|
|
||||||||||||||||||
|
|
|
|
|
|
|
|
|
|
|
|
REC MODE |
|
|
|
|||||||||||||||||||||||||||||||
|
|
|
|
|
|
|
|
|
|
|
|
|
|
|
|
|
F Rec |
|
|
|
STATUS |
|||||||||||||||||||||||||
2
Tips
Icons such as “ [RAM] ” indicate usable discs. Refer to pages 74 and 75.
Notes
If copying doesn’t complete due to shortage of remaining time, disc space, or other reasons, fi nalizing won’t start.
When copying doesn’t start, the “COPYING” indicator on the main unit blinks for about 7 seconds. Check if the unit is properly prepared.
If a part of a tape recorded in VP mode is copied to disc, noise may appear at the beginning of the copied part.
RQT9056
Copying Recordings (DVD VHS)
All recordings on the disc are automatically copied onto the tape.
If you start copying when the resume function is activated, the DVD is copied from the beginning of the recording where you previously stopped.
To copy a whole disc, press [ STOP] to deactivate it before copying ( 17).
[RAM] [-R] [-R]DL] [-RW‹V›] [-RW‹VR›] [+R] [+R]DL] [+RW] [VHS]
Finalized discs or DVD-Video cannot be copied on this unit.
Press and hold for about 3 seconds.
−COPY will appear in the unit’s display when the copying process begins.
−Copying automatically stops when playback of the disc fi nishes or the tape reaches its end.
Tips
Additional navigation
You can begin the same kind of copy by using COPY Navigator. Use the operations listed below instead of step shown above.
1.Press [FUNCTIONS].
2.Press [ , ] to select “Copy” then press [OK]. COPY Navigator screen appears.
3.Press [ , ] to select “DVD to VHS” then press [OK].
When you start copying from the selected recording
1.Press [DRIVE SELECT] to select the DVD drive.
2.Press [DIRECT NAVIGATOR].
[RAM] When the Album View screen is displayed, press [A] to switch to the Recordings screen.
3.Press [ , , , ] to select the recording you want to start, then press [OK].
4. Go to step “Copying Recordings (DVD VHS)” shown above.
Index signals are automatically recorded on the tape according to the division of recordings on the DVD [ 37, VHS Index Search System (VISS)].
To cancel copying in the middle
Press [ STOP].
−You can also press and hold [RETURN] for about 3 or more seconds to cancel copying in the middle.
CH REC
COPYING
Tips |
Operations |
COPYING indicator |
|
discs. Refer to pages 74 and 75. |
Basic |
Icons such as “ [RAM] ” indicate usable |
|
|
|
Notes
When copying doesn’t start, the “COPYING” indicator on the main unit blinks for about 7 seconds. Check if the unit is properly prepared.
RQT9056
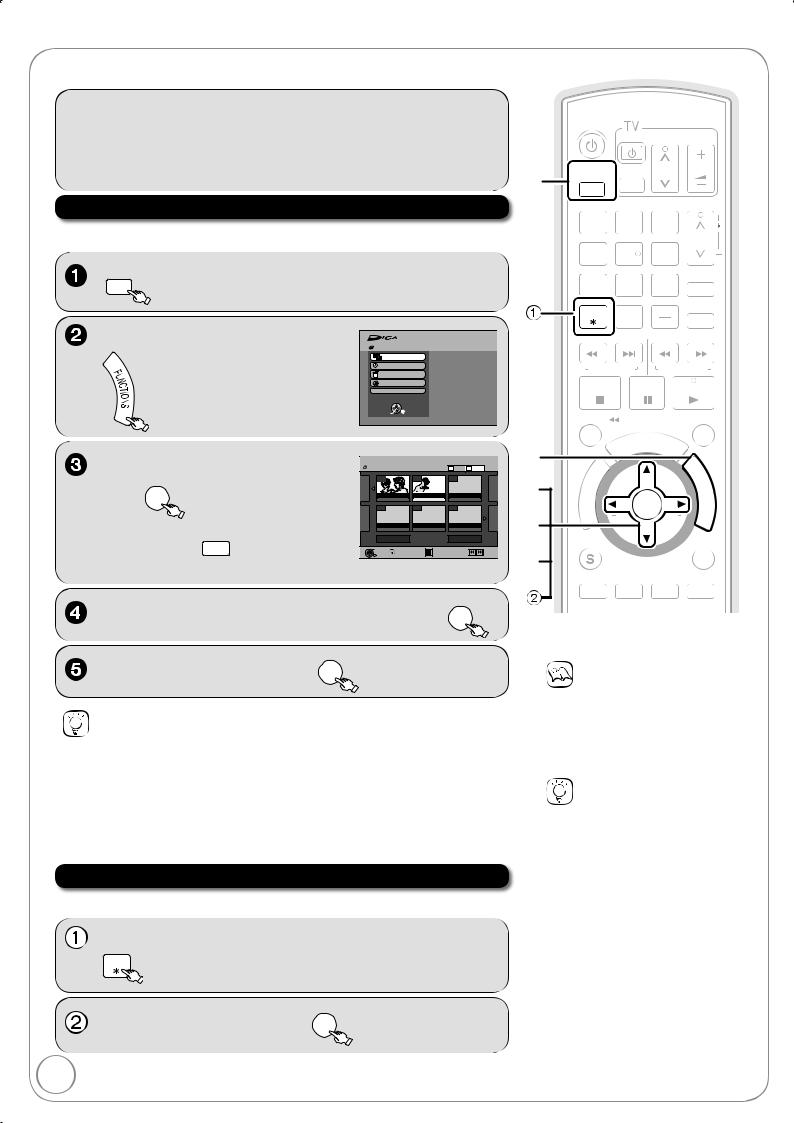
Deleting Recordings
Important: Once deleted, contents cannot be recovered.
|
|
DVD/VHS |
|
|
|
|
|
|
|||
|
|
POWER |
|
|
|
|
|
|
|||
|
|
|
|
|
|
TV/VIDEO |
CH |
VOL |
|||
|
|
|
|
|
|
|
|
|
|
|
|
Delete Navigator |
|
1 |
|
2 |
3 |
TRACKING/V-LOCK |
|||||
[RAM] [-R] [-R]DL] [-RW‹V›] [+R] [+R]DL] [+RW] |
|
|
CH |
||||||||
|
4 |
5 |
6 |
||||||||
|
|
|
|||||||||
to select the DVD drive. |
|
7 |
8 |
9 INPUT SELECT |
|||||||
|
|
|
|
|
|
0 |
|
|
|
FAVORITE |
|
|
|
|
|
|
|
|
|
|
|
||
|
|
|
|
|
|
|
|
SLOW/SEARCH |
|||
|
|
SKIP/INDEX |
|
|
REW |
FF |
|||||
|
|
STOP |
|
PAUSE |
|
|
PLAY |
||||
|
|
TIME SLIP/ |
JET REW |
|
|
|
CM SKIP |
||||
|
|
|
|
|
|
|
HEDU |
L |
E |
|
|
|
|
|
|
|
|
C |
|
|
|||
|
|
|
|
|
|
S |
|
|
|
|
|
|
|
|
|
|
|
|
|
|
|
|
|
|
|
|
T |
O |
R |
|
|
|
|
|
|
|
|
|
|
|
|
|
|
|
|
||
|
|
|
|
|
|
|
|
|
|
|
|
|
|
A |
|
|
|
|
|
|
|
|
|
|
|
IG |
|
|
|
|
|
|
|
|
|
|
A |
|
|
|
|
|
|
|
|
|
|
|
|
V |
|
|
|
|
|
|
|
|
|
|
|
N |
|
|
|
|
|
|
|
|
|
|
|
T |
|
|
|
|
|
|
|
|
|
|
|
C |
|
|
|
|
|
|
|
|
|
|
|
E |
|
|
|
|
|
|
|
|
|
|
|
R |
|
|
|
|
|
|
|
|
|
|
|
I |
|
|
|
|
|
|
|
|
|
|
D |
|
|
|
|
|
|
|
|
||
|
|
|
|
|
|
|
|
|
|
||
to switch to the |
|
SUB MENU |
|
|
|
|
|
RETURN |
|||
|
|
|
|
|
|
|
|
|
|
|
|
Recordings screen. |
|
|
|
|
|
CREATE |
|
||||
|
|
AUDIO |
|
VCR/TV |
|||||||
|
|
DISPLAY CHAPTER |
|||||||||
|
|
A |
B |
|
|
|
|
||||
|
|
REC |
REC MODE |
F Rec |
STATUS |
||||||
Tips
To return to the previous screen
Press [RETURN].
To view other pages
Press [ , , , ] to select “Previous” or “Next”, then press [OK].You can also press [ , ] to view other pages.
Multiple editing
Select with [ , , , ], then press [ PAUSE]. (Repeat.)A checkmark appears. Press [ PAUSE] again to cancel.
Deleting Recordings During Playback
[RAM] [-R] [-R]DL] [-RW‹V›] [+R] [+R]DL] [+RW]
Notes
You cannot delete while recording or copying.
[+R] [+R]DL] [+RW] Even if you have set protection on other equipment, such recordings are deleted.
Tips
Icons such as “ [RAM] ” indicate usable discs. Refer to pages 74 and 75.
[RAM] Deleting an item increases the available disc space, for the amount of space taken up by the item being deleted.
[-R] [-R]DL] [+R] [+R]DL] Available disc space does not increase after deletion.
[-RW‹V›] [+RW] Available disc space increases when you delete the last recording (the recording space may increase slightly when other recordings are deleted).
RQT9056
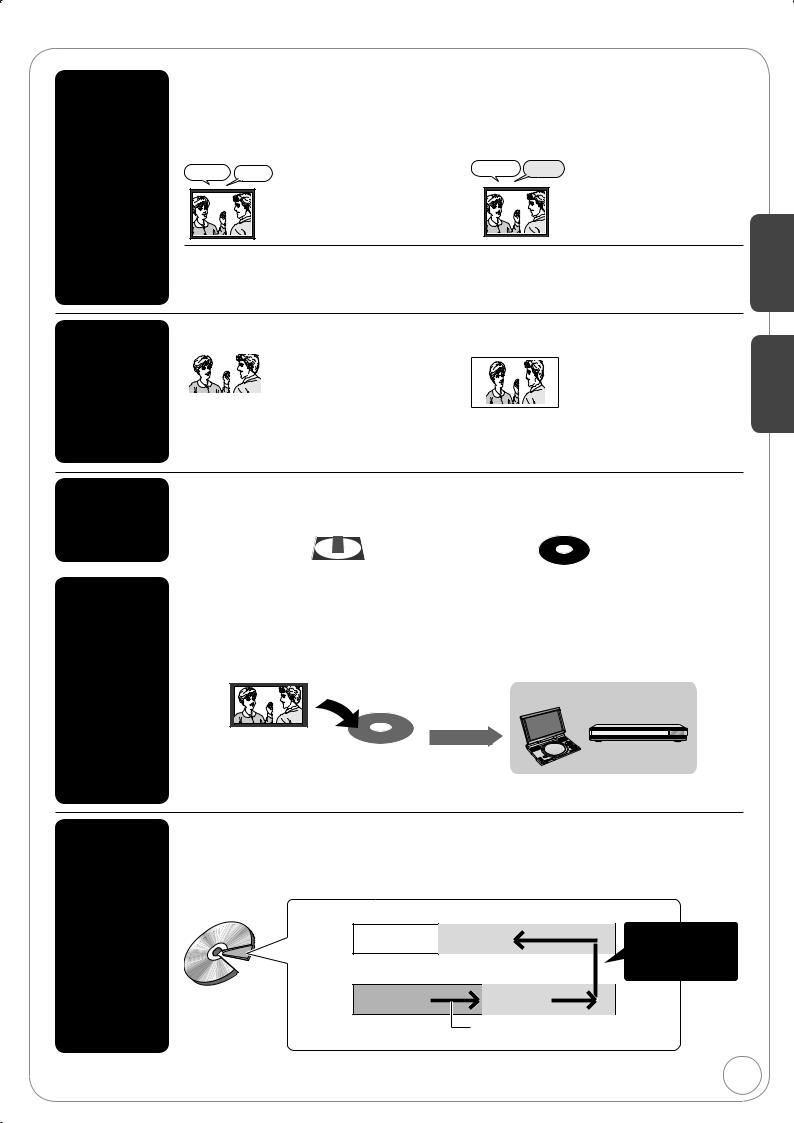
Important Notes for Recording
Recording of multilingual broadcasts
Analog broadcasts:
[RAM] [VHS]
Both Main and SAP audio are recorded.
You can change the audio during playback ( 31, 38
Changing Audio during Playback).
Main |
SAP |
If you record from external |
|
Hello |
Hola |
||
equipment ( 28) |
|||
|
|
Select both “Main” and “SAP” on |
|
|
|
the external equipment. |
[-R] [-R]DL] [-RW‹V›] [+R] [+R]DL] [+RW]
Select the Main or SAP audio before recording.
[ 61, Multi-channel TV Sound (Analog)] The selected audio only is recorded.
Main |
If you record from external |
Hello |
equipment ( 28) |
|
Select “Main” or “SAP” on the |
|
external equipment. |
Digital broadcasts:
Press [AUDIO] to switch audio ( 25). The selected audio only is recorded.
[VHS] Digital broadcasts cannot be recorded to video tape.
Basic Operations
Recording of Widescreen broadcasts
[RAM] |
[-R] [-R]DL] [-RW‹V›] [+R] [+R]DL] [+RW] |
||||||
Recorded in 16:9 aspect (Widescreen) |
Recorded in 4:3 aspect |
||||||
|
|
|
|
|
|
|
|
|
|
|
|
|
|
|
|
|
|
|
|
|
|
|
|
If you have a regular 4:3 aspect TV and you receive 16:9 aspect images from a digital broadcast, they will appear in letterbox format ( 91, Letterbox).
[VHS] Digital broadcasts cannot be recorded to video tape.
|
It is not possible to record digital broadcasts that allow “One time only recording” onto DVD-R, DVD-R DL, DVD-RW, |
|||||
Copy-once |
+R, +R DL, +RW or 8 cm (3 ) DVD-RAM discs. Use the CPRM ( 91) compatible DVD-RAM. |
|||||
[RAM] CPRM compatible discs only |
[-R] [-R]DL] [-RW‹V›] [+R] [+R]DL] [+RW] |
|||||
Recording |
||||||
When purchasing discs, check that they support CPRM. |
||||||
|
|
|||||
|
12 cm (5 ) |
|
|
Yes |
No |
|
|
|
|
|
|
|
|
Playing the disc on other DVD players
[-R] [-R]DL] [-RW‹V›] [+R] [+R]DL]
The disc must be fi nalized after recording ( 54).
All DVD-R, etc. discs recorded on this unit must be fi nalized before they can be played on other DVD players. Once
finalized, DVD-R, etc. become “read-only” and can no longer be used for recording. DVD-RW can be reused after
finalizing.
Whether DL discs recorded on this unit can be played on other DVD players will depend entirely on the capabilities of that player. 100% compatibility is not guaranteed.
Record to DVD-R, etc.
Finalize
[+RW] We recommend you create the menu before playing a +RW disc on other equipment ( 54).
[RAM] DVD-RAM can be played back on Panasonic DVD recorders and DVD-RAM compatible DVD players.
|
DVD-R DL and +R DL discs have two layers of recording surface on one side. |
Recording to |
[-R]DL] Recordings are divided when recording changes from the fi rst layer to the second. Some images and audio |
may be lost at this point. |
|
DVD-R DL |
[+R]DL] Recordings continue through the layer change with only a slight pause similar to what you will see with |
and +R DL |
commercial DVD-Video discs. Any recording exceeding 8 hours in length is automatically divided whether a layer |
change is required or not. |
DVD-R DL |
The second layer |
|
|
|
The available |
Recording 3 |
Layer change: |
|
space |
Recording divided, |
|
|
|
||
(Disc inner |
|
|
some images and |
side) |
The fi rst layer |
|
audio lost. |
|
Recording 1 |
Recording 2 |
(Disc outer |
|
side) |
||
|
|
|
|
|
|
Recording/Playback direction |
|
Advanced Features
23
RQT9056
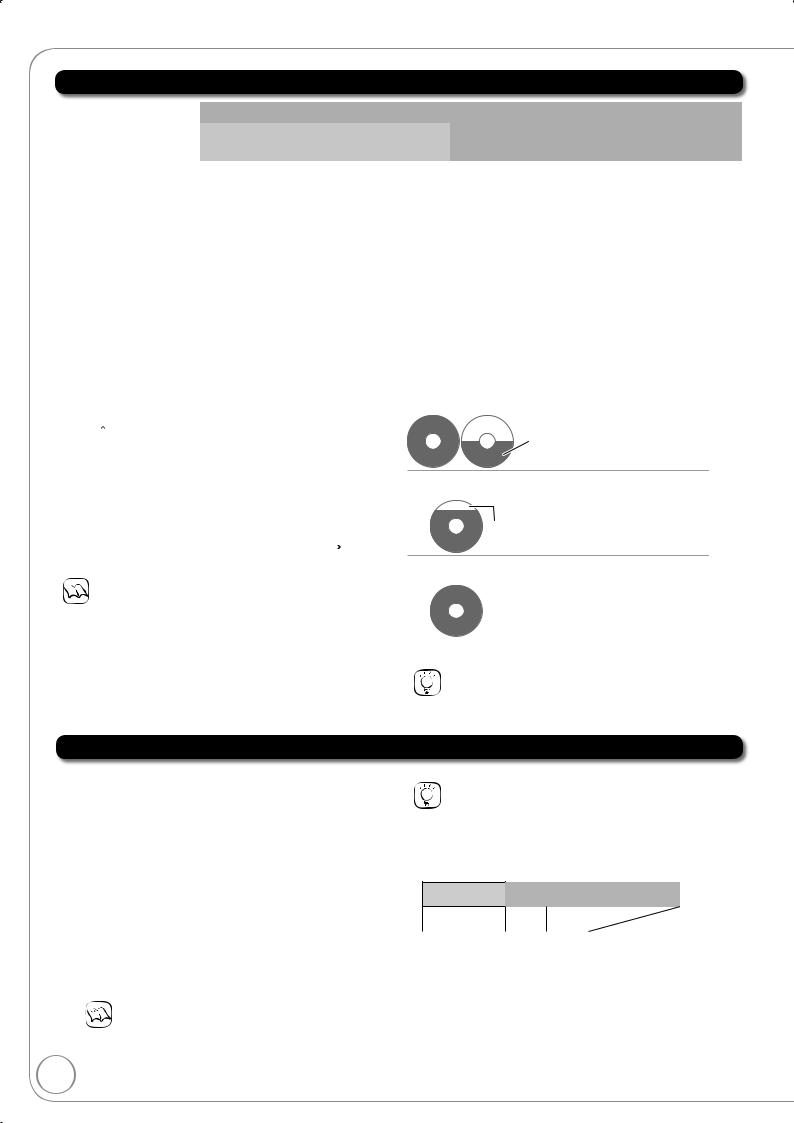
Advanced Recording
DVD Recording Modes and Estimated Disc Recording Time
|
|
|
DVD-RAM |
|
|
DVD-R,DVD-RW, |
DVD-R DL 3, |
||||
|
|
|
|
|
|
|
|||||
Recording Mode |
Single-sided |
Double-sided 1 |
+R, +RW |
+R DL 3 (8.5 GB) |
|||||||
|
(4.7 GB) |
(9.4 GB) |
(4.7 GB) |
|
|||||||
|
|
|
|
|
|||||||
XP (High quality) |
1 hour |
2 hours |
1 hour |
1 hour 45 minutes |
|||||||
|
|
|
|
|
|||||||
SP (Standard play) |
2 hours |
4 hours |
2 hours |
3 hours 35 minutes |
|||||||
|
|
|
|
|
|||||||
LP (Long play) |
4 hours |
8 hours |
4 hours |
7 hours 10 minutes |
|||||||
|
|
|
|
|
|
|
|
|
|
|
|
EP (Extra long play) |
8 (6 |
2 |
) hours |
16 (12 |
2 |
) hours |
8 (6 |
2 |
) hours |
14 hours 20 minutes |
|
|
|
|
(10 hours 45 minutes 2) |
||||||||
FR |
8 hours maximum |
8 hours maximum |
8 hours |
14 hours 20 minutes |
|||||||
(Flexible Recording) |
for one side |
maximum |
maximum |
||||||||
|
|
|
|||||||||
|
|
|
|
|
|
|
|
|
|
|
|
1 |
It is not possible to record or play continuously from one side of a |
|||||||||
|
double sided disc to the other. |
|||||||||
2 |
When “Recording Time in EP Mode” has been set to “EP−Extended |
|||||||||
|
Play (6H)” in the Setup menu ( 60). |
|||||||||
|
The sound quality is better when using “EP−Extended Play (6H)” |
|||||||||
|
than when using “EP−Extended Play (8H)”. |
|||||||||
3 |
Refer to “Recording to DVD-R DL and +R DL” ( 23). |
|||||||||
|
|
|
|
|
|
|
|
|
|
|
|
|
|
|
|
|
|
|
|
|
|
|
|
|
|
|
||||||
|
ualityq |
|
XP |
|
|
|||||
|
|
|
|
|
|
|
|
|
|
|
|
|
LP |
|
|
||||||
|
|
|
SP |
|
|
|||||
|
Picture |
|
|
|
|
|
|
|
|
|
|
|
|
|
|
|
|
|
|
|
|
|
|
EP (8H) |
|
|
|
|||||
|
|
|
EP (6H) 2 |
|
|
|
||||
|
|
|
|
|
|
|
|
|
|
|
|
|
|
|
|
|
|
|
|
|
|
|
|
|
|
|
|
|
|
|
|
|
|
|
|
|
|
|
|
|
|
|
|
|
|
|
|
|
Recording time |
|||||
Notes
This unit uses variable bit rate (VBR) recording which varies the amount of data recorded to suit the images, so actual recording times and remaining recording times shown by the unit will
be different. ([-R]DL] [+R]DL] The difference will be especially noticeable.) Use a disc with plenty of remaining time to be sure.
When recording to DVD-RAM using EP (8H) mode, play may not be possible on DVD players, even if they are compatible with DVD-RAM. In this case use EP (6H) mode.
FR (Flexible recording mode)
Using “Flexible Recording” is convenient in these kinds of situations: −When the amount of free space on the disc makes selecting an
appropriate recording mode diffi cult
−When you want to record a long program with the best picture quality possible
e.g., Recording a 90 minutes program to 4.7 GB DVD-RAM disc: − If you select XP mode, the program will not fi t on one disc.
|
A second disc is necessary for |
|
30 minutes of the program. |
4.7 GB |
4.7 GB |
DVD-RAM |
DVD-RAM |
− If you select SP mode, the program will fi t on one disc.
However there will be 30 minutes
4.7 GB
DVD-RAM remaining disc space.
−If you select “Flexible Recording” the program will fi t on one disc perfectly.
4.7 GB
DVD-RAM
You can set FR mode when programming scheduled recordings and fl exible recording ( 26).
Tips
Maximum number of recordings recorded to a disc
[RAM] [-R] [-R]DL] [-RW‹V›] 99 recordings on a disc
[+R] [+R]DL] [+RW] 49 recordings on a disc
VHS Recording Modes and Estimated Recording Time
Digital broadcasts cannot be recorded directly to video tape. To record digital broadcasts, use an external connection to a set-top-box or other equipment ( 28).
Recording |
Durations |
|
Mode |
||
|
||
SP |
You can record the length shown on |
|
the tape. |
||
|
||
|
|
|
EP |
3 times the length of SP mode. |
|
|
|
|
VP |
5 times the length of SP mode. |
|
|
|
|
|
Automatically switches the recording |
|
AUTO |
mode to EP mode during a scheduled |
|
recording if there is not enough tape |
||
|
||
|
left to record the program in SP mode. |
|
|
|
Notes
A tape recorded in VP mode by the unit cannot be played back by other VCRs.
It takes more time for automatic tracking to work when playing tapes recorded with VP mode, and it may not work at all with some tapes. Do tracking manually if this is the case ( 38).
Tips
If the image quality is important to you or if you wish to store the tape for a long period, select “SP”.
The unit can play tapes recorded in LP mode on other equipment.
AUTO Mode
Scheduled recording
1st program
2nd program (60 min)
(30 min)
30 min at SP |
15 min |
45 min |
|
at SP |
at EP |
||
|
Video tape (e.g.: 60-minute cassette)
– It is not possible to automatically activate VP mode.
– The tape length must be set correctly ( 66, Select Tape Length).
–Picture distortion may occur when SP switches to EP.
–AUTO Mode may not function on some tapes.
RQT9056

When the format confirmation screen is displayed
Important:
Formatting permanently deletes all disc contents (including computer data), regardless of protection status of disc.
[RAM] [-RW‹V›] [+RW]
The following screen may appear when inserting a new disc, etc.
Only format the disc if you intend to use it for recording.
OK |
Do not format if you intend to
view pre-recorded material from the disc.
Tips
Refer to “Formatting Discs or Cards” ( 53) for more details on formatting.
It will take several minutes to format the disc. (DVD-RAM may take up to a maximum of 70 minutes.)
When removing a recorded disc
[-R] [-R]DL] [-RW‹V›] [+R] [+R]DL]
After recording, if you |
|
|
Finalize |
|
|
|
|
|
|
press [ OPEN/CLOSE] |
Finalizing is necessary to enable playback |
|||
of the disc on compatible DVD players. |
||||
to eject the disc, the |
Once finalized, recordings cannot be added to the disc. |
|||
It will take approximately minutes. Start? |
||||
following screen may |
|
|
Press “REC” to start finalizing. |
|
appear. |
|
|
Press the OPEN/CLOSE button to postpone |
|
|
|
finalizing. The disc can be played only on |
|
|
|
|
|
this unit. You can Finalize it later. |
|
|
|
|
|
|
to eject the disc without fi nalizing.
Notes
You cannot stop fi nalizing once you have started it.
Tips
If you want to provide the disc with a name or set play menu select, select “Disc Name” ( 52) or “Playback will start with:” ( 54) in “DVD Management” before fi nalizing.
Refer to “Finalizing” ( 54) for more details about fi nalizing.
It will take a few minutes to fi nalize the disc. (some discs may take up to a maximum of 60 minutes.)
Selecting Audio Channels to record
Refer to “Recording of multilingual broadcasts” for detailed information ( 23).
[-R] [-R]DL] [-RW‹V›] [+R] [+R]DL] [+RW]
Select the audio (Main or SAP) in “Multi-channel TV Sound (Analog)” in the Setup menu ( 61).
[RAM]
Changing during recording changes the recorded sound.
Stereo: |
Main audio (stereo) |
Features |
|
||
|
If the broadcast is “Mono SAP”, audio will be monaural |
|
|
even if you select Stereo mode. |
Advanced |
|
|
|
SAP: |
such cases, recorded SAP and main audio become |
|
Secondary audio program (SAP). |
|
|
|
When you record SAP, main audio is also recorded. In |
|
|
monaural. |
|
|
|
|
Mono: |
Main audio (monaural). |
|
|
Select “Mono” if reception is poor during a stereo |
|
|
broadcast. |
|
|
|
|
DVD-RAM
e.g., “Stereo” is selected
“((” appears when the unit is receiving CH 12
(( Stereo
the audio type you selected.
Notes
You cannot change the audio type in the following case.
−While a disc other than DVD-RAM is inserted when selecting an analog broadcast
|
|
|
DVD-RAM |
e.g., “English” is selected |
|
|
CH 12-1 |
|
|
English |
|
|
|
||
|
|
|
|
Notes
You cannot change the audio type in the following case.
− When there is no choice of languages in a digital broadcastBefore scheduled recording of a digital broadcast with more than one language channel, set the language in “Multi-channel TV
Sound (Digital)” in the Setup menu ( 61).
When broadcast offers no language data, such displays as “Audio 1 of 3” may appear. In such cases, recording may not be possible in the language selected through the “Multi-channel TV Sound (Digital)” in the Setup menu ( 61).
RQT9056
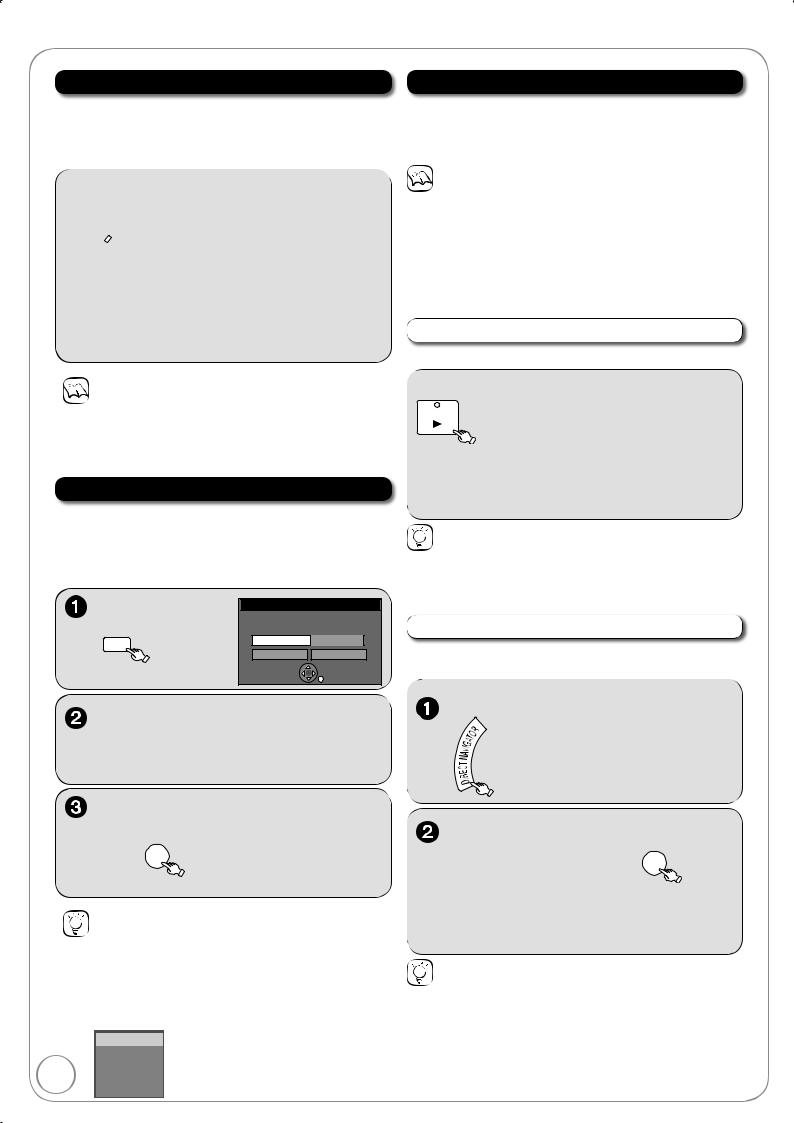
Advanced Recording
Specifying the Recording Time
[RAM] [-R] [-R]DL] [-RW‹V›] [+R] [+R]DL] [+RW] [VHS]
Digital broadcasts cannot be recorded to video tape.
This function allows specifying the length of recording time up to 4 hours.
 repeatedly until the desired time is reached.
−The recording time and the unit’s display changes as follows:
Counter (Cancel) OFF 0:30 OFF 1:00
|
|
OFF 4:00 |
OFF 1:30 |
|
OFF 3:00 OFF 2:00 |
Playing while you are recording
You can play DVD or VHS while recording to the other drive. The recording will not be affected
− DVD playback ( |
17) |
− VHS playback ( |
17) |
Notes
During playing while you are recording, you cannot edit or delete recordings.
You cannot play a tape with the DVD PRIORITY output terminals or HDMI AV OUT terminal while recording or making a scheduled
recording on a disc ( 70).
Closed captions will not appear during simultaneous recording and playback.Use caution while operating the controls for playback. Pressing [ STOP] when the recording device is selected will cancel the
recording in progress.
[RAM] Allows playback from the beginning of what you are recording.
Notes
This function does not work during scheduled recording or Flexible Recording.
Recording stops and the set time is cleared if you press [ STOP].The unit turns off automatically when the time to stop recording is
reached as long as you do not operate the unit.
Flexible Recording
[RAM] [-R] [-R]DL] [-RW‹V›] [+R] [+R]DL] [+RW]
The unit sets the best possible picture quality that fi ts the recording within the remaining disc space.
The recording mode becomes FR mode. Refer to “FR (Flexible Recording)” ( 24).
−Recording starts.
Tips
To exit the screen
Press [RETURN].
To stop recording partway
Press [ STOP].
To show the remaining recording time
Press [STATUS] to show the remaining recording time.
DVD-RAM
Rec. 0:59  Remaining time
CH 20
Stereo
(at least 20 seconds after recording starts).
− If the “Status Messages” in the Setup menu is set to “Automatic” ( 62), both “Play” and “Rec.”
indicators will be displayed on the status message screen for several seconds.
Tips
To stop play
Press [ STOP] once.
To stop recording
Press [ STOP], at least 2 seconds after chasing playback stops.
[RAM] Allows playback of a previous recording, while recording something else.
− If the “Status Messages” in the Setup menu is set to “Automatic” ( 62), both “Play” and
“Rec.” indicators will be displayed on the status message screen for several seconds.
Tips
To stop play
Press [ STOP].
To exit the DIRECT NAVIGATOR screen
Press [DIRECT NAVIGATOR].
To stop recording
After play stops
1.Press [DIRECT NAVIGATOR] to exit the screen.
2.Press [ STOP].
RQT9056

Advanced Scheduled Recording
To cancel a scheduled recording in progress
to select the drive.
–Confi rmation screen appears.
Notes
Recording stops and ‘one-time’ programs are deleted from the Schedule List. Programs scheduled to record ‘Daily’ and ‘Weekly’ remain on the Schedule List and are set to begin at the next scheduled time.
Check, Change, or Delete Programs
The scheduled recording list can be viewed even when the unit is in “recording standby” mode.
Notes
If the program schedule is changed by the TV station, then this unit will not be able to detect the change.
The password screen appears when setting parental ratings ( 56). Unless you enter the correct password, recording a program with parental ratings may fail.
– See “Tips” ( right) for explanation of icons displayed.
Advanced Features
to delete.
–You cannot delete programs that are currently recording.
–“ ” lights on the unit’s display.
To release the unit from recording standby
(Before recording starts)
– The unit turns on and “ ” on the unit’s display goes out.
Be sure to press [ DVD/VHS POWER] to return the unit to standby mode before the scheduled recording time. Scheduled recording will work only if “ ” is displayed.
RQT9056
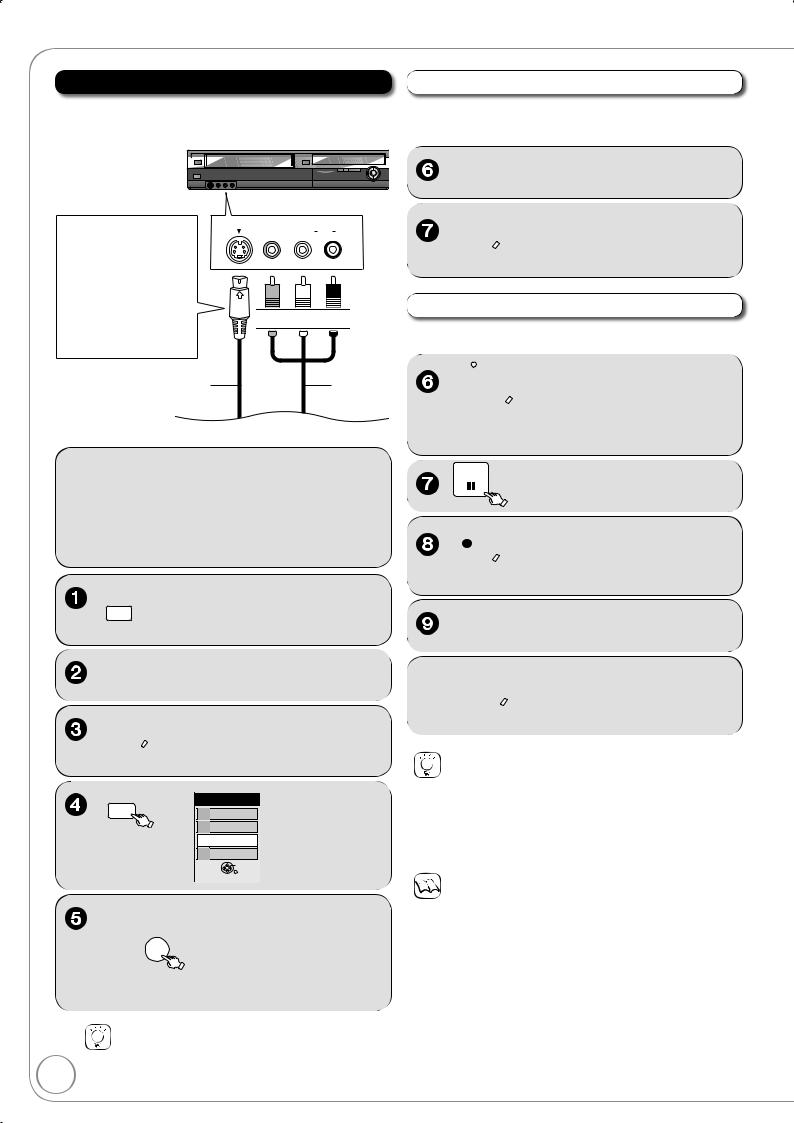
Recording from an External Device
Recording from a VCR, etc.
Connect cables while the power to both the unit and the external device is off.
Front of the unit
[RAM] [-R] [-R]DL] [-RW‹V›] [+R] [+R]DL] [+RW]
Perform steps 1−5 left.
You can get a sharper, clearer picture by connecting with an S Video cable instead of the yellow video cable.
S Video cable
2 |
S VIDEO VIDEO |
L/MONO AUDIO R |
 Yellow White Red
Audio/video cable
You can also connect to the IN1 on the rear.
to select the drive (DVD or  VHS).
VHS).
 to select the recording mode ( 24).
 to start recording the program from an external device.
Perform steps 1−5 left.
 to locate the point on the tape where you want to insert the recording.
when you reach that point.
 to put the unit in recording standby.

 to start recording the program from the external device.
Tips
To skip unwanted parts
Press [ PAUSE] to pause recording. (Press again to restart recording.)
To stop recording
Press [ STOP].
Notes
If video is copied from another piece of equipment to this unit, then the video quality will be degraded.
–Rear Panel inputs are IN1. –Front Panel inputs are IN2.
Tips
If the external equipment only has a single audio output, connect it to the L/MONO (white) IN2 terminal.
RQT9056
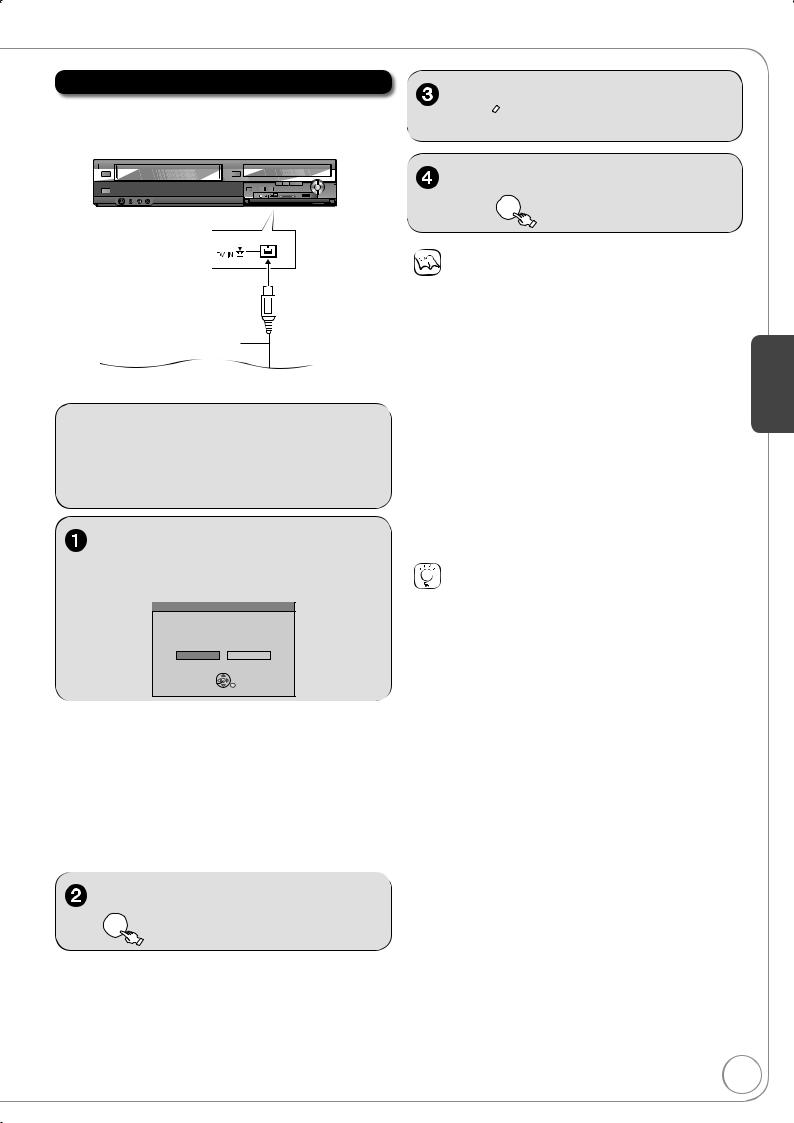
Recording from a DV Camcorder
Connect the cable while the power to both the unit and the external device is off.
Front of the unit
4-pin DV Cable
[RAM] [-R] [-R]DL] [-RW‹V›] [+R] [+R]DL] [+RW]
When “DV camcorder connection” screen does not appear
After performing step 1 ( above).
1.Press [DRIVE SELECT] to select the DVD drive. –External DV cannot be recorded to VHS.
2.With the unit stopped Press [FUNCTIONS].
3.Press [ , ] to select “Other Functions” then press [OK].
4.Press [ , ] to select “DV Camcorder Rec.” then press [OK].
You can proceed to step 4 ( right).
 to select the recording mode for the disc ( 24).
Notes
If the desired audio is not recorded, select the kind of audio for “Select Audio Channel For DV Input” in the Setup menu ( 62).
[RAM] Programs are recorded as a single item; breaks in the images create chapters.
Compatibility with video camcorders from other manufacturers is |
Features |
|
not guaranteed. |
||
|
||
It is not possible to operate the unit from the connected DV |
|
|
equipment. |
Advanced |
|
The DV equipment name may not be shown correctly. |
||
|
||
Date and time information is not recorded, even if displayed on the |
|
|
camcorder. |
|
|
The DV IN terminal is not meant to be connected to a computer. |
|
|
This unit uses a 4-pin “DV IN” connector; |
|
|
Your DV camcorder may use a 4-pin or 6-pin external connector. |
|
|
Please consult your DV camcorder’s manufacturer to confi rm |
|
|
correct external connection. |
|
|
You cannot record discs and play discs simultaneously. |
|
If video is copied from another piece of equipment to this unit, then the video quality will be degraded.
Tips
When recording finishes
The confi rmation screen appears.
Press [OK] to fi nish DV camcorder recording.
To stop recording
Press [ STOP].
The confi rmation screen appears. Press [OK].
If the DV camcorder recording function does not work properly, check the connections and DV equipment settings, and turn the unit off and back on. If that does not work, follow the instructions
for “Recording from a VCR, etc.” ( 28).
RQT9056
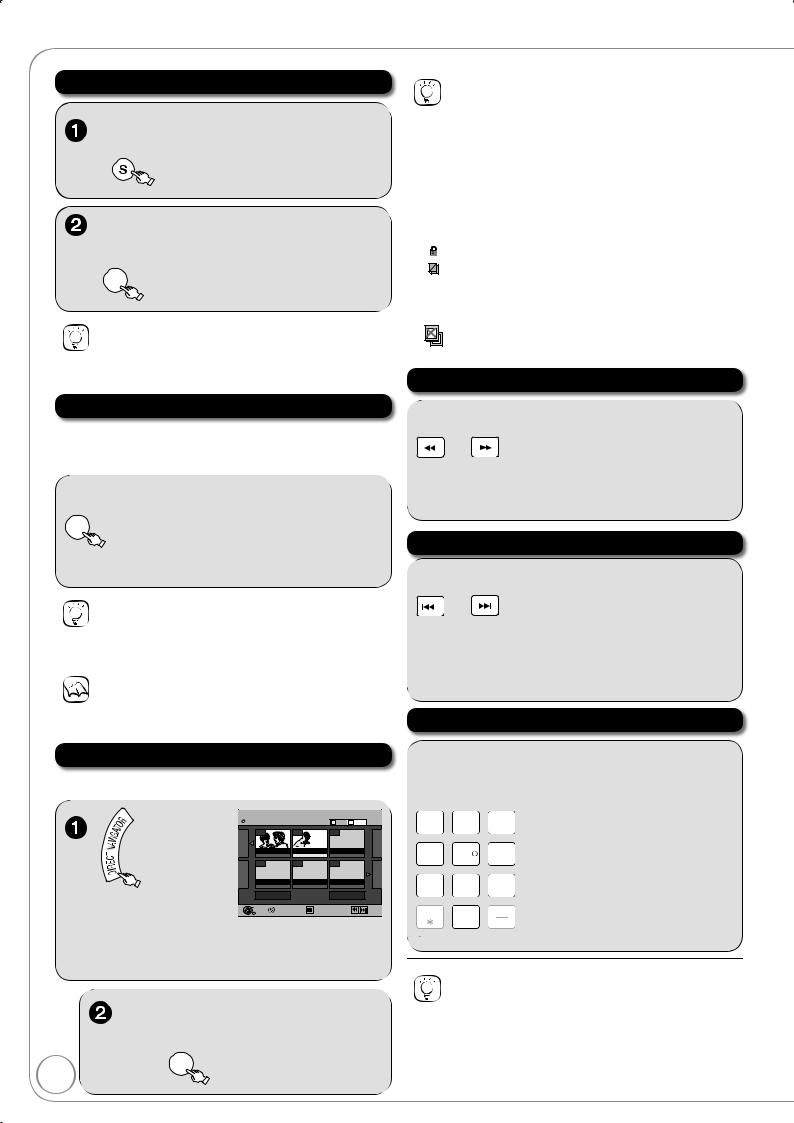
Advanced Disc Playback
Zoom in on video
Tips
To return the picture to its original size
Press [ , ] to select “Zoom out” in step 2, then press [OK].
Menu Screens on the TV
[DVD-V]
Generally, menu screens that appear on the TV may be navigated as follows:
Tips
To select the recording with the numbered buttons
e.g., |
“5”: |
[0] |
[5] |
|
“15”: |
[1] |
[5] |
To view other pages
Press [ , , , ] to select “Previous” or “Next”, then press [OK].
– You can also press [ , ] to view other pages.
To exit the DIRECT NAVIGATOR screen
Press [DIRECT NAVIGATOR].
DIRECT NAVIGATOR screen icons
Protected.
Not recorded due to recording protection (Digital broadcasts, etc.)
It cannot be played because data is damaged.
Currently recording.
“One time only recording” restriction ( 91, CPRM)
Search
–There are 5 search speeds. Each press increases the search speed.
–Press [ PLAY] to restart normal playback.
You can sometimes use the numbered buttons to select an item.
Tips
To return to the menu screen
Press [DIRECT NAVIGATOR].
Notes
If “ ” appears on the TV, the operation is prohibited by the unit or disc.
Selecting Recordings to Play
[RAM] [-R] [-R\DL] [-RW‹V›] [+R] [+R]DL] [+RW] [-RW‹VR›]
 to switch to the
Recordings screen.
Skip
–Each press increases the number of skips.
–DivX: Backward direction [ ] only.
Press [ ] to return only to the beginning of the program being played back.
Direct Play
Tips
Depending on the disc, some operations may not be possible.
RQT9056
Loading...