


 Loading...
Operating Instructions
(For Facsimile and Internet Fax)
Digital Color Imaging Systems
Model No. DP-C405 / C305 / C265
Before operating this machine, please carefully read this manual,
and keep this documentation in a safe place for future reference. English (Illustration shows optional accessories that may not be installed on your machine.)

Operating Instructions
The following Operating Instruction manuals are included with this machine. Please refer to the appropriate manual and keep all manuals for future reference. If you lose the manual, contact the authorized Panasonic dealer.
|
|
Operating Instructions (For Setting Up) |
|
|
This manual contains essential information for setting |
|
|
up the machine. |
Accessories |
|
Operating Instructions (For Basic Operations) |
|
||
|
This manual contains essential information for proper |
|
|
|
operation of the machine. |
|
|
It describes basic Copy, Print, Facsimile/Internet Fax, |
|
|
Scan/Email, and other functions. |
|
|
For a more detailed explanation of each function, please |
|
|
refer to the Operating Instruction manuals included on |
|
|
two CD-ROM as illustrated below. |
|
|
Operating Instructions CD |
|
|
Contains manuals with detailed information for Copy, |
|
|
Facsimile/Internet Fax, Scan/Email functions, Function |
|
|
Parameters and User Authentication. |
|
|
Document Management System CD |
|
|
Contains the Panasonic Document Management |
|
|
System Application software, and manuals with detailed |
|
|
information for the Print function, and Panasonic |
|
|
Document Management System Application software. |
Operating Instructions CD
Copy Function
Describes how to make a Color Copy with creative features.
Facsimile and Internet Fax Function
(The Facsimile function is available when the optional G3 Fax Communication Board is installed.)
Describes how to send/receive a Facsimile/Internet Fax, and describes the course of action to take when a trouble message appears, etc.
Scan and Email Function
Describes how to scan and how to send
Email through the machine.
Function Parameters
Describes how to change the default settings of each function using the Control Panel of the machine.
User Authentication
Describes how to enable and use the
User Authentication function.
Document Management System CD
Print Function
Describes how to print with color and change the default printer settings, and describes the course of action to take when a problem message appears, etc.
Application Software
Describes how to use the application software.
Ex:Panafax Desktop, Fax Driver, Quick Image Navigator, Device Monitor/ Device Explorer, Network Config/ Add Editor
2
Conventions
Icons
The following icons are used in this manual.
Icon |
Description |
|
|
Indicates important information that must be read in detail.
Indicates reference information.
Notation
The following notations are used in this manual.
Notation |
Description |
|
|
For Keys and Buttons |
Hard buttons on the Control Panel are depicted as **** key, and soft buttons on the Touch |
|
Panel Display are depicted as “xxx”. |
|
Ex: |
|
Press the Start key and select “More Menus”. |
|
|
3

Table of Contents |
|
|
Chapter 1 Getting To Know Your Machine |
|
|
Menu Map............................................................................................................................ |
|
10 |
Chapter 2 Basic Fax Transmission |
|
|
Fax Transmission Procedure............................................................................................... |
|
14 |
Entering a Destination ......................................................................................................... |
|
16 |
Manual Dialing ................................................................................................................ |
|
16 |
Using the Address Book.................................................................................................. |
|
18 |
Searching for a Destination............................................................................... |
“Search” |
20 |
Redialing ............................................................................................................ |
“Redial” |
23 |
Preventing Accidental Transmission to Multiple Destinations.................. |
“Multi Station” |
24 |
Confirming the Destination.............................................................. |
“Destinations: ###” |
25 |
Transmission with Destination Monitoring............................................................ |
“Monitor” |
28 |
Talking to the Remote Party Before Transmission.............................................................. |
|
29 |
Setting Original Quality.................................................................................. |
“Quality Adj.” |
30 |
Setting the Original Size.............................................................................. |
“Original Size” |
34 |
Transmitting 2-Sided Originals ............................................................... |
“2-Sided Original” |
36 |
Verification Stamp .............................................................................. |
“Verification Stamp” |
38 |
Transmitting a Document Stored in Memory....................................................... |
“Memory” |
40 |
Job Build and SADF ........................................................................ |
“Job Build and SADF” |
42 |
Direct Transmission................................................................................................. |
“Direct” |
44 |
Verifying Communication Status ............................................................... |
“Comm. Status” |
46 |
Rotated Transmission.......................................................................................................... |
|
47 |
Batch Transmission............................................................................................................. |
|
48 |
Getting an Outside Line Using PIN Code Access ............................................................... |
|
49 |
Using Program Keys................................................................................ |
“Program/Group” |
50 |
Canceling a Communication................................................................................................ |
|
52 |
To Cancel Memory Transmission: .................................................................................. |
|
52 |
To Cancel Direct Transmission: ...................................................................................... |
|
53 |
Dial Prefix ............................................................................................................................ |
|
54 |
Chapter 3 Convenient Fax Features |
|
|
Time Controlled Communication (Deferred)........................................................................ |
|
56 |
Deferred Transmission................................................................................... |
“Transmit” |
56 |
Deferred Polling ................................................................................................ |
“Polling” |
58 |
Polling.................................................................................................................................. |
|
60 |
Polling ............................................................................................................... |
“Polling” |
60 |
4

Storing Documents to be Polled......................................................................... |
“Polled” |
62 |
Using a Mailbox (Confidential Communication).................................................. |
“Mail Box” |
64 |
What is Confidential Communication?............................................................................. |
|
64 |
Confidential Transmission ............................................................................................... |
|
65 |
Confidential Polling.......................................................................................................... |
|
66 |
Storing Documents for Confidential Polling..................................................................... |
|
67 |
Printing a Received Confidential Document.................................................................... |
|
68 |
Deleting a Confidential Document................................................................................... |
|
70 |
Sub-Address Communication ..................................................... |
“Sub Address Transmit” |
72 |
What is Sub-Addressing?................................................................................................ |
|
72 |
Sub-Addressed Transmission Using Address Book........................................................ |
|
73 |
Sub-Addressed Transmission Using Manual Dialing ...................................................... |
|
75 |
Password Communication ....................................................................... |
“Password XMT” |
76 |
What is Password Communication?................................................................................ |
|
76 |
Password Transmission .................................................................................................. |
|
77 |
Setting Password-Protected Transmission...................................................................... |
|
78 |
Printing Communication Journal.............................................................. |
“Comm. Journal” |
80 |
Transmitting a Document with a Cover Sheet .............................................. |
“Cover Sheet” |
82 |
Chapter 4 Fax Reception |
|
|
Receiving Documents.......................................................................................................... |
|
84 |
Automatic Reception ....................................................................................................... |
|
84 |
Manual Reception............................................................................................................ |
|
85 |
Print Reduction and Duplex Recording................................................................................ |
|
86 |
Print Reduction................................................................................................................ |
|
86 |
Duplex Recording............................................................................................................ |
|
87 |
Substitute Memory Reception.............................................................................................. |
|
88 |
Convenient Reception Features .......................................................................................... |
|
90 |
Selective Reception......................................................................................................... |
|
90 |
Fax Forwarding................................................................................................................ |
|
91 |
Password-Reception ....................................................................................................... |
|
92 |
Junk Fax Filter................................................................................................................. |
|
93 |
Receive to Memory........................................................................... |
“Receive to Memory” |
94 |
What is Memory Reception? ........................................................................................... |
|
94 |
Programming Memory Reception.................................................................................... |
|
95 |
Printing a Document Received in Memory ...................................................................... |
|
96 |
Chapter 5 Internet Fax |
|
|
What is Internet Fax?........................................................................................................... |
|
98 |
What is Internet Fax? ...................................................................................................... |
|
98 |
Using the Internet Fax Feature........................................................................................ |
|
99 |
5

What Internet Fax Can Do................................................................................................... |
100 |
Sending Email ................................................................................................................. |
100 |
Receiving Email .............................................................................................................. |
101 |
Inbound Routing.............................................................................................................. |
101 |
Relay Transmission......................................................................................................... |
102 |
Message Delivery Notice (MDN)..................................................................................... |
103 |
Direct Internet Fax Transmission (Using Direct SMTP) .................................................. |
104 |
Tips for Internet Fax ............................................................................................................ |
106 |
Preparing to Use Internet Fax ............................................................................................. |
108 |
Program Network Parameters......................................................................................... |
108 |
Sending an Email Procedure............................................................................................... |
110 |
Entering an Email Address.................................................................................................. |
112 |
Using the Onscreen Keyboard ........................................................................................ |
112 |
Using the Address Book.................................................................................................. |
114 |
Searching for Destinations ................................................................................ |
“Search” 116 |
Using Cc, Bcc and From...................................................................................................... |
120 |
Setting Cc and Bcc.......................................................................................................... |
121 |
Setting From Field........................................................................................................... |
122 |
Setting Subject ................................................................................................................ |
123 |
Confirming the Destination.............................................................................................. |
123 |
Setting a File Type and a File Name ................................................ |
“File Type and Name” 124 |
Emailing a Ledger-Sized Document................................................... |
“Ledger Email XMT” 126 |
Setting Message Delivery Notice (MDN)................................................. |
“Delivery Notice” 128 |
When Email Transmission Fails .......................................................................................... |
130 |
Using a Completion Notice................................................................ |
“Completion Notice” 131 |
Receiving an Email.............................................................................................................. |
132 |
Configuring to Receive Email.......................................................................................... |
132 |
Receiving Email Automatically ........................................................................................ |
132 |
Receiving Email Manually ............................................................................ |
“Get Email” 133 |
Receiving Email with the Program Key ........................................................................... |
134 |
Receiving an Email on a Computer..................................................................................... |
136 |
Receiving Email on Your Computer ................................................................................ |
136 |
Opening Email................................................................................................................. |
137 |
Inbound Routing .................................................................................................................. |
138 |
What is Inbound Routing?............................................................................................... |
138 |
Routing Setup Flow......................................................................................................... |
139 |
Settings for Inbound Routing........................................................................................... |
140 |
Programming the Address Book for Inbound Routing..................................................... |
141 |
Using the Relay Feature...................................................................................................... |
144 |
What is the Relay Feature?............................................................................................. |
144 |
Setting up a Relayed Transmission Network .................................................................. |
146 |
Example of a Relayed Transmission Network ................................................................ |
147 |
Sample Entries in Address Book..................................................................................... |
148 |
6

Function Parameters for Relay Stations.......................................................................... |
|
150 |
Settings for Initial Sending Station................................................................................... |
|
151 |
Adding End Receiving Stations for Relayed Transmission ............................................. |
152 |
|
Relayed Transmission from Internet Fax................................................. |
|
“Lan Relay XMT” 154 |
Relayed Transmission from PC ........................................................................................... |
|
156 |
Requesting a Relayed Transmission from a Computer................................................... |
|
157 |
Convenient Application Software..................................................................................... |
|
158 |
Result of Relayed Transmission .......................................................................................... |
|
160 |
Useful Terms to Remember................................................................................................. |
|
162 |
DHCP (Dynamic Host Configuration Protocol) ................................................................ |
|
162 |
SMTP Authentication....................................................................................................... |
|
162 |
Chapter 6 Handling Communication Reservation Files |
|
|
Editing a Communication Reservation File.......................................................... |
|
“File List” 164 |
Displaying a Communication Reservation File List ......................................................... |
|
164 |
Reading the Reservation Report ..................................................................................... |
|
165 |
Editing Communication Reservations............................................... |
|
“Change Time/Stn” 166 |
Deleting a Communication Reservation File ............................................... |
|
“Delete File” 168 |
Printing a Communication Reservation File .................................................. |
|
“Print File” 169 |
Adding Documents to a Communication Reservation File .................. |
“Add Document” 170 |
|
Resending an Incomplete Document ............................................. |
|
“Retry Incomp. File” 171 |
Chapter 7 Program Destinations/Program Keys |
|
|
Address Book ...................................................................................................................... |
|
172 |
What is Address Book? ................................................................................................... |
|
172 |
Items Allowed for Entry in the Address Book .................................................................. |
|
172 |
Adding a Fax Number into the Address Book .................. |
“01 Add Telephone Number” 173 |
|
Adding an Email Address to Address Book............................. |
|
“02 Add Email Address” 175 |
Editing Address Book ...................................................................... |
|
“03 Modify Station” 177 |
Deleting a Destination from Address Book....................................... |
|
“04 Delete Station” 178 |
Printing the Address Book List ........................................ |
“00 Print Address Book List” 179 |
|
Program Keys ...................................................................................................................... |
|
180 |
What is Program Key?..................................................................................................... |
|
180 |
Programmable Items ....................................................................................................... |
|
180 |
Setting for Program Dialing ............................................................... |
|
“02 Program Dial” 181 |
Setting for Group Dialing ....................................................................... |
|
“01 Group Dial” 183 |
Editing a Group Dialing.............................................................. |
|
“03 Modify Group Dial” 185 |
Deleting the Program Key Setting ......................................... |
|
“04 Delete Program/GRP” 187 |
Printing the Program List.......................................................... |
|
“00 Print Program List” 188 |
Programming Email Manual Reception on Program Keys ......... |
“05 Manual POP RCV” 189 |
|
7

Chapter 8 Reading Reports/Lists |
|
Transaction Journal.............................................................................................. |
“Journal” 192 |
Printing Transaction Journal ........................................................................................... |
192 |
Viewing Communication Results on Touch Panel Display.............................................. |
193 |
Reading Transaction Journal .......................................................................................... |
194 |
Communication Journal........................................................................... |
“Comm. Journal” 196 |
Address Book List.............................................................................. |
“Address Book List” 200 |
Printing Address Book List .............................................................................................. |
200 |
Reading Address Book List............................................................................................. |
201 |
Program List ................................................................................................ |
“Program List” 202 |
Printing Program List....................................................................................................... |
202 |
Reading Program List ..................................................................................................... |
203 |
Fax Parameter List ............................................................................ |
“Fax Parameter List” 204 |
Printing Fax Parameter List............................................................................................. |
204 |
Reading Fax Parameter List ........................................................................................... |
205 |
Individual XMT Journal........................................................................ |
“IND. XMT Journal” 206 |
Printing Individual XMT Journal ...................................................................................... |
206 |
Reading Individual XMT Journal ..................................................................................... |
207 |
Chapter 9 Solving Problems |
|
Tips for Solving Problems.................................................................................................... |
210 |
Information Codes ............................................................................................................... |
212 |
Power Failure ...................................................................................................................... |
218 |
Checking the Telephone Line.............................................................................................. |
219 |
Chapter 10 Appendix |
|
Replacing the Verification Stamp ........................................................................................ |
220 |
Index.................................................................................................................................... |
222 |
8

Memo
9

Machine Your Know To Getting 1 Chapter
Chapter 1
Menu Map
The main screen and menu for Fax features are as follows.
Address Book Screen
Number Pad Screen |
Search Screen |
Getting To Know Your Machine
Basic Menu:
See page 11.
More Menus:
See page 12.
Redial:
See page 23.
Monitor:
See page 28.
Refer to Manual Dialing (see page 16).
Refer to Searching for a Destination
(see page 20).
Email Screen
Refer to Sending an Email Procedure
(see page 110).
10
Basic Menu Screen
•Quality Adj. (Setting Original Quality : See page 30)
•File Type and Name (Setting a File Type and a File Name : See page 124)
•Original Size (Setting the Original Size : See page 34)
•2-Sided Original (Transmitting 2-Sided Originals : See page 36)
•Job Build and SADF (Job Build and SADF : See page 42)
•Verification Stamp (Verification Stamp : See page 38)
•Memory (Transmitting a Document Stored in Memory : See page 40)
•Direct (Direct Transmission : See page 44)
•Comm. Status (Verifying Communication Status : See page 46)
•Completion Notice (Using a Completion Notice : See page 131)
•Get Email (Receiving an Email : See page 132)
Machine Your Know To Getting 1 Chapter
11
Machine Your Know To Getting 1 Chapter
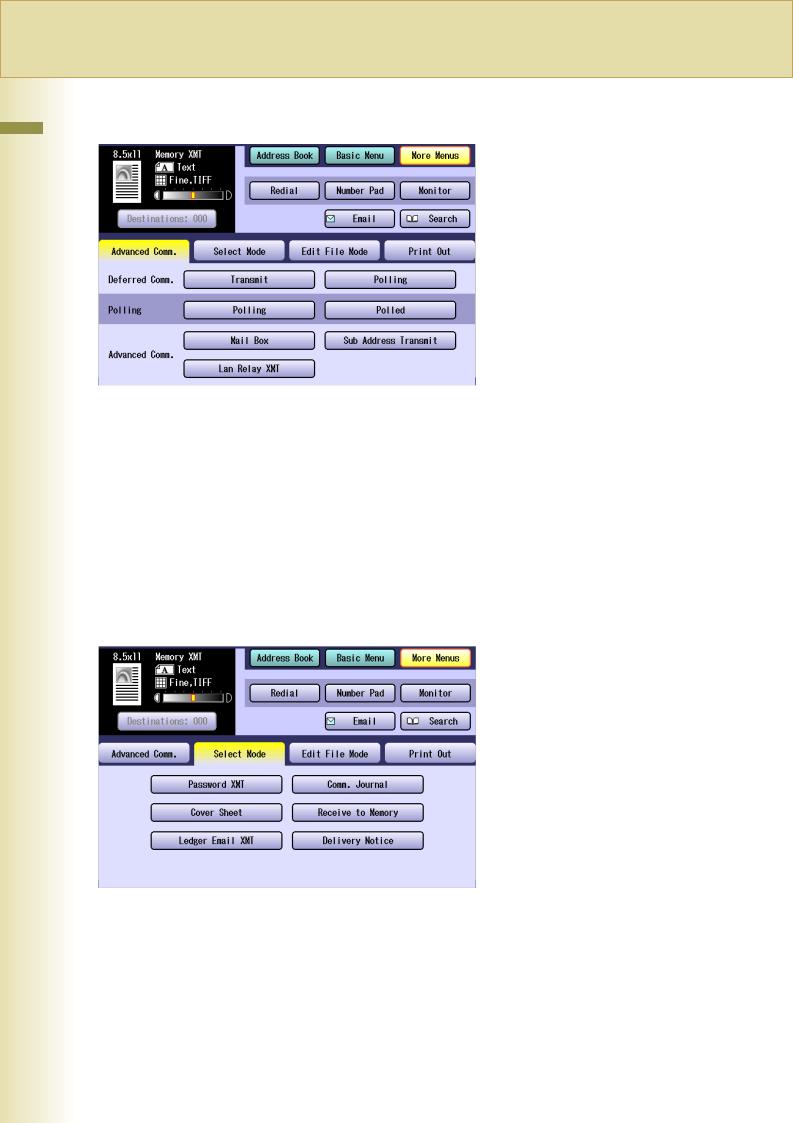
More Menus > Advanced Comm. Screen
•Deferred Transmit (Deferred Transmission : See page 56)
Comm.
Polling (Deferred Polling : See page 58)
•Polling Polling (Polling : See page 60)
Polled (Storing Documents to be Polled : See page 62)
•Advanced Mail Box (Using a Mailbox (Confidential Communication) : See page 64)
Comm.
Sub Address Transmit (Sub-Address Communication : See page 72)
Lan Relay XMT (Relayed Transmission from Internet Fax : See page 154)
More Menus > Select Mode Screen
•Password XMT (Password Transmission : See page 77)
•Comm. Journal (Printing Communication Journal : See page 80)
•Cover Sheet (Transmitting a Document with a Cover Sheet : See page 82)
•Receive to Memory (Receive to Memory : See page 94)
•Ledger Email XMT (Emailing a Ledger-Sized Document : See page 126)
•Delivery Notice (Setting Message Delivery Notice (MDN) : See page 128)
12

More Menus > Edit File Mode Screen
•File List (Displaying a Communication Reservation File List : See page 164)
•Change Time/Stn (Editing Communication Reservations : See page 166)
•Delete File (Deleting a Communication Reservation File : See page 168)
•Print File (Printing a Communication Reservation File : See page 169)
•Add Document (Adding Documents to a Communication Reservation File : See page 170)
•Retry Incomp. File (Resending an Incomplete Document : See page 171)
More Menus > Print Out Screen
•Journal (Transaction Journal : See page 192)
•Address Book List (Address Book List : See page 200)
•Program List (Program List : See page 202)
•Fax Parameter List (Fax Parameter List : See page 204)
•IND. XMT Journal (Individual XMT Journal : See page 206)
Machine Your Know To Getting 1 Chapter
13

Transmission Fax Basic 2 Chapter
14
Chapter 2 |
Basic Fax Transmission |
Fax Transmission Procedure |
|
|
The basic procedure of transmitting a fax on this machine is as follows.
1 Place original(s). |
Select “Basic Menu” if additional |
|
settings are required. |
|
Used memory |
Face up. Up to 100 sheets (20 lb/Letter)
|
zSetting Original Quality (See page 30) |
|
|
zSetting the Original Size (See page 34) |
|
|
zTransmitting 2-Sided Originals (See page |
|
|
36) |
|
|
zJob Build and SADF (See page 42) |
|
Face down. Align with the top |
zVerification Stamp (See page 38) |
|
zTransmitting a Document Stored in |
||
left corner. Close ADF. |
||
Memory (See page 40) |
||
|
||
zRefer to Placing Originals (Facsimile/ |
zDirect Transmission (See page 44) |
|
Internet Fax) in the Operating Instructions |
zVerifying Communication Status (See |
|
(For Basic Operations) of provided booklet. |
page 46) |
zIf the available memory is not sufficient, Memory transmission may not be possible. If this happens, use Direct transmission instead. Refer to Direct Transmission (see page 44).
2 Press the Fax key to open the Fax screen.
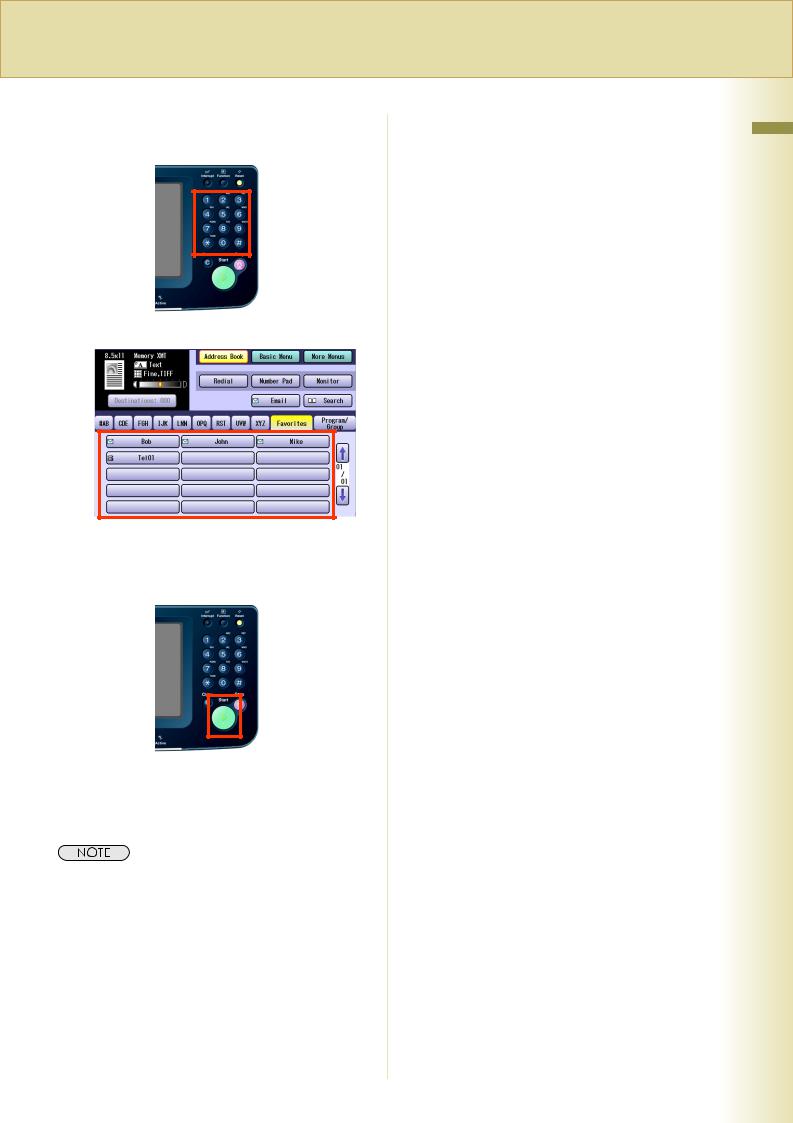
3 Enter the fax number using the
Keypad, or select a destination.
or
zRefer to Entering a Destination (see page 16).
4 Press the Start key.
The original(s) are stored into memory with a file number. Then starts dialing the telephone number.
zFor instructions on how to cancel a transmission, refer to Canceling a Communication (see page 52).
zWhen sending from the Platen Glass, place the next original and follow the instructions displayed on the Touch Panel Display.
zA communication journal is printed if the transmission fails (Ex: Remote station is busy).
zPress the Reset key to return the machine to the initial screen of the currently active mode.
zIf the line is busy, the number is automatically redialed. The call waiting message appears on the display while auto-dialing.
Transmission Fax Basic 2 Chapter
15
Transmission Fax Basic 2 Chapter
16
Entering a Destination
Stations can be entered by using the following methods or a combination of these:

 Enter the telephone number directly. (See below)
Using the Address Book Use the pre-programmed Address Book.
Use a Key Name (See page 18)
Select from “Favorites” (See page 18)
Use Group Dialing (See page 19)
Searching for a Destination Search the Address Book or the Global directory service (LDAP).
Search through the Address Book (Local Search) (See page 20)
Search through the LDAP Server (LDAP Search) (See page 21)
Redialing |
Use the last dialed remote station. (See page 23) |
|
|
Manual Dialing
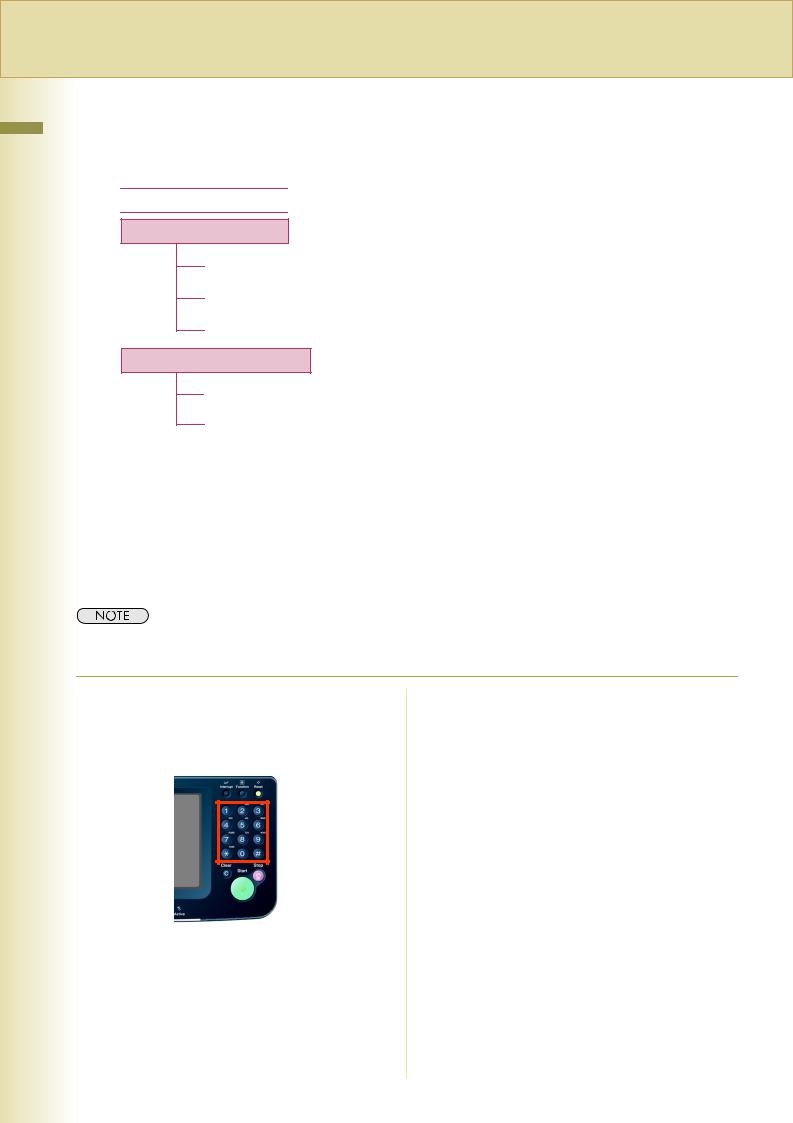
To enter a destination telephone number, follow the steps below.
zThis function is not available when the Function Parameter “136 Restrict Direct Dial” (Fax/Email Settings > Fax Parameters) is set to “Valid”. 

1 Follow the step 1 and 2 on page 14.
2 Enter the fax number using the Keypad.
The Number Pad screen opens automatically.
zTelephone number field is limited to 36-digit in length.
zFor transmission to additional destinations, enter their fax numbers, and then select “Set” after each destination. When you finish entering the last destination’s fax number, select “OK”. (Do not select “Set” at this time.)
zWhen the Function Parameter “137 Reenter Direct Dial” (Fax/Email Settings > Fax Parameters) is set to “Valid”, enter the fax number twice for manual dialing. For more details, refer to Fax/Email Settings in the Operating Instructions (For Function Parameters) of provided CD-ROM.
zTo confirm the destinations, select “Destinations: ###” on the upper left corner of the screen.
zIf you make a mistake, select “Clear” to delete entries one digit at a time.
zFax number entry is also possible from the “Number Pad” in the Address Book screen, instead of the Control Panel Keypad.
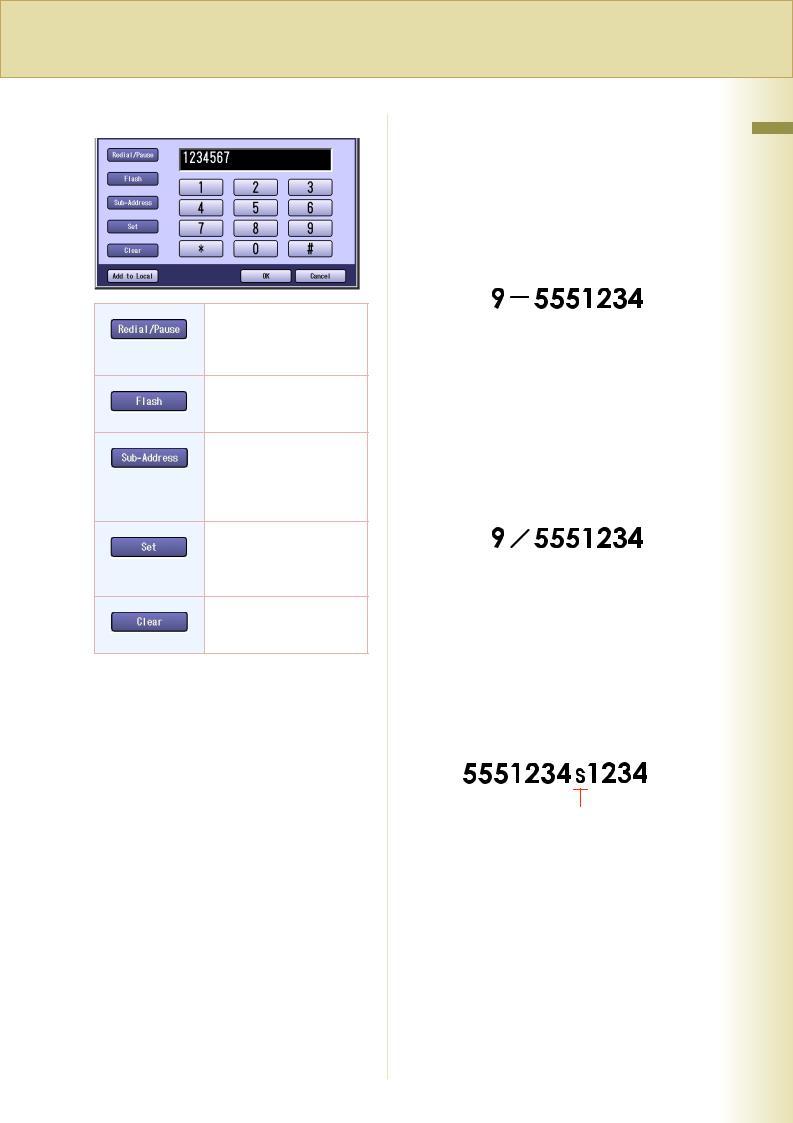
Number Pad Screen
Inserts a pause each time it is selected. The pause is represented by a “-” symbol.
Used to access some features of your PBX.
Select when entering a sub-address number.
The sub-address is represented by an “s” symbol.
Select when entering additional destinations.
zDo not select “Set” for a single destination.
Select “Clear” to delete an erroneous entry, one digit at a time.
Using “Redial/Pause”
zIf you are using a PBX, enter the external |
|
||||
access number first, and then select |
Chapter |
||||
fax number. |
|||||
“Redial/Pause” before entering the fax |
|
||||
number. |
|
||||
Ex: |
|
||||
Enter 9 for the outside access number, |
|
||||
select “Redial/Pause”, and then enter the |
|
||||
|
|
|
|
2 |
|
|
|
|
|
Basic |
|
|
|
||||
Pause symbol |
|||||
changed to “Pulse” in “06 Dialing Method”. |
|||||
Using “ ” |
|
||||
zA “/” symbol appears when “Tone” is |
|
||||
zThe standard setting for “06 Dialing |
Fax |
||||
Method” is “Tone”. |
|||||
|
|||||
Ex: |
Transmission |
||||
After entering 9, select “ ” to switch to tone |
|||||
dialing. |
|||||
|
|||||
|
|
|
|
||
|
|
|
|||
Tone symbol |
|
||||
Using “Sub-Address” |
|
||||
zSelect “Sub-Address” to enter a sub- |
|
||||
address destination after the fax number. |
|
||||
Refer to Sub-Address Communication |
|
||||
(see page 72). |
|
||||
Ex: |
|
||||
After entering 4, select “Sub-Address”, and |
|
||||
then enter the Sub-address. |
|
||||
Sub-address symbol
3 Press the Start key.
The original(s) are stored into memory with a file number. Then starts dialing the telephone number.
17
Transmission Fax Basic 2 Chapter
18
Using the Address Book
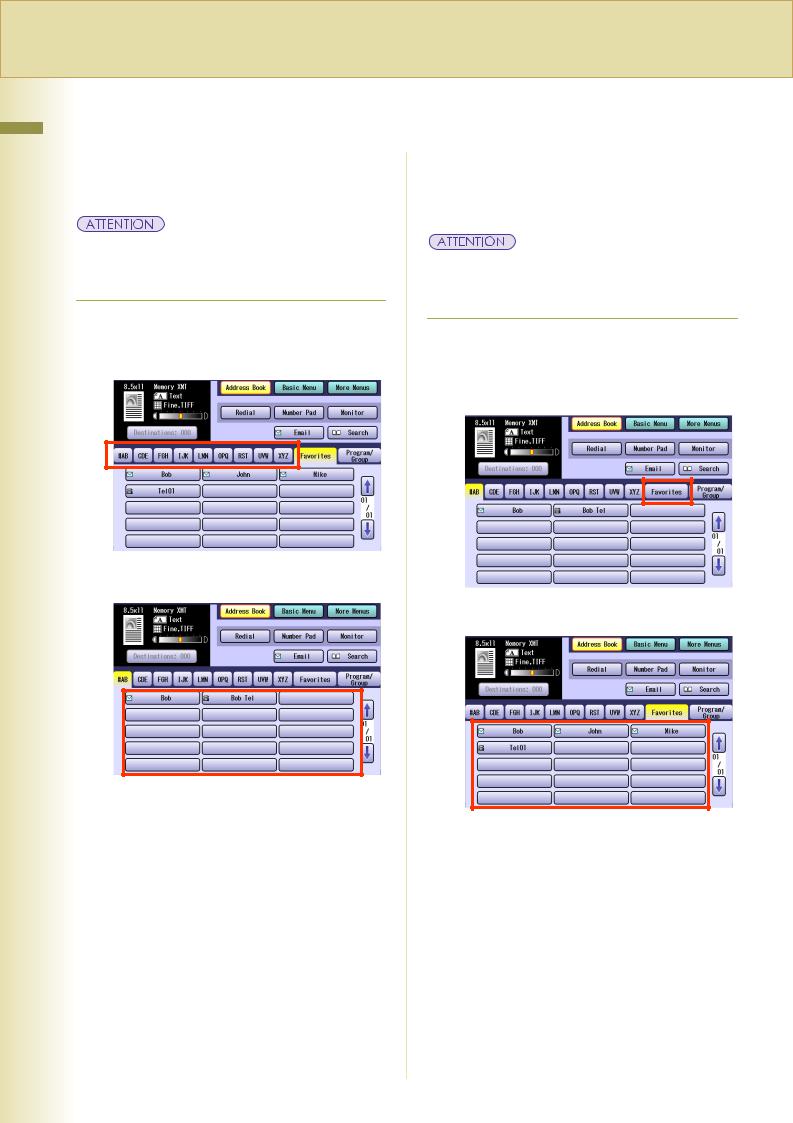
Use a Key Name
If a destination is registered in the Address Book, it can be selected by using a Key Name.
zThe fax numbers must be pre-programmed into the Address Book. Refer to Adding a Fax Number into the Address Book (see page 173).
1 Follow the step 1 and 2 on page 14.
2 Select the Key Name tab.
3 Select the desired destination.
zTo cancel a choice, select the same destination again.
zTo enter additional destinations, repeat steps 2 and 3.
zTo confirm the destinations, select “Destinations: ###” on the upper left corner of the screen.
4 Press the Start key.
The original(s) are stored into memory with a file number. Then starts dialing the telephone number.
Select from “Favorites”
If a destination is registered as a Favorite in the Address Book, it can be selected using the “Favorites” tab.
zThe fax numbers must be pre-programmed into the Address Book. Refer to Adding a Fax Number into the Address Book (see page 173).
1 Follow the step 1 and 2 on page 14.
2 Select “Favorites” to display the
Favorites screen.
3 Select the desired destination.
zTo cancel a choice, select the same destination again.
zFor transmission to additional destinations, press the relevant keys.
zTo confirm the destinations, select “Destinations: ###” on the upper left corner of the screen.
4 Press the Start key.
The original(s) are stored into memory with a file number. Then starts dialing the telephone number.
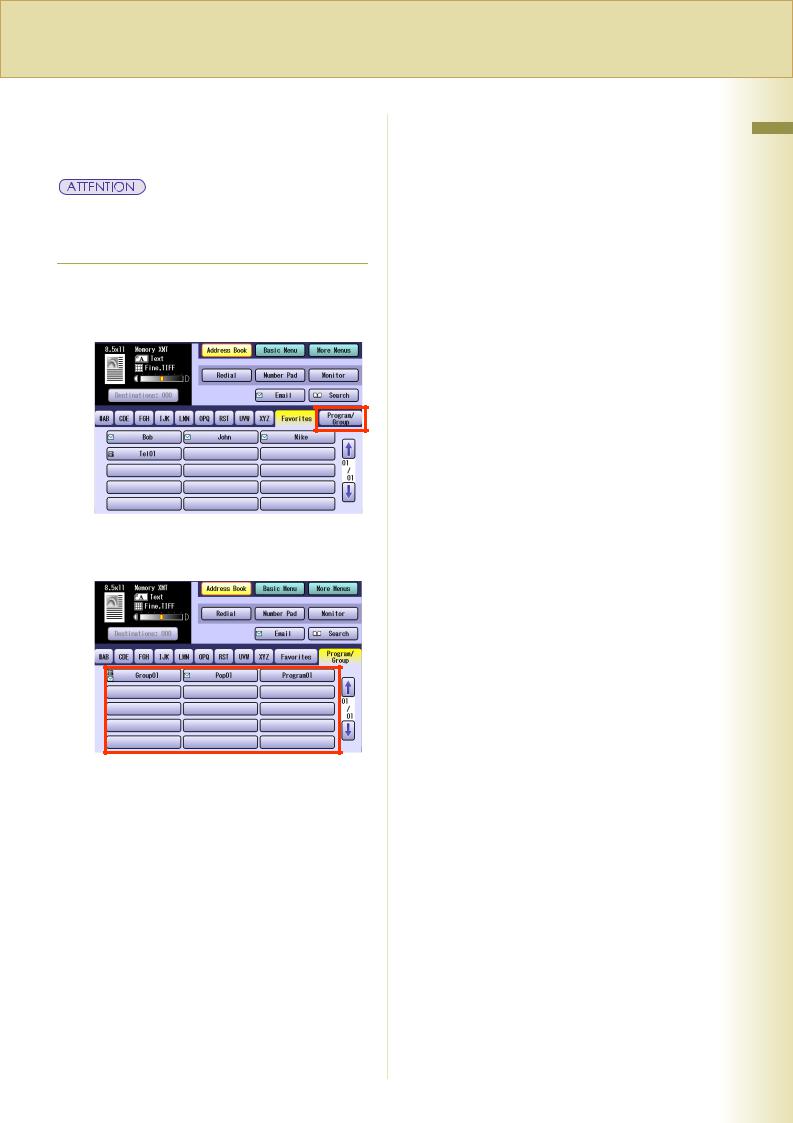
Use Group Dialing
For transmission to multiple destinations using group dialing, follow the steps below.
zThe group dialing button must be pre-programmed. Refer to Setting for Group Dialing (see page 183).
1 Follow the step 1 and 2 on page 14.
2 Select “Program/Group”.
3 Select the button for the desired destination group.
zTo cancel a choice, select the same destination again.
zTo confirm the destinations, select “Destinations: ###” on the upper left corner of the screen.
4 Press the Start key.
The original(s) are stored into memory with a file number. Then starts dialing the telephone number.
Transmission Fax Basic 2 Chapter
19
Transmission Fax Basic 2 Chapter
20
Searching for a Destination
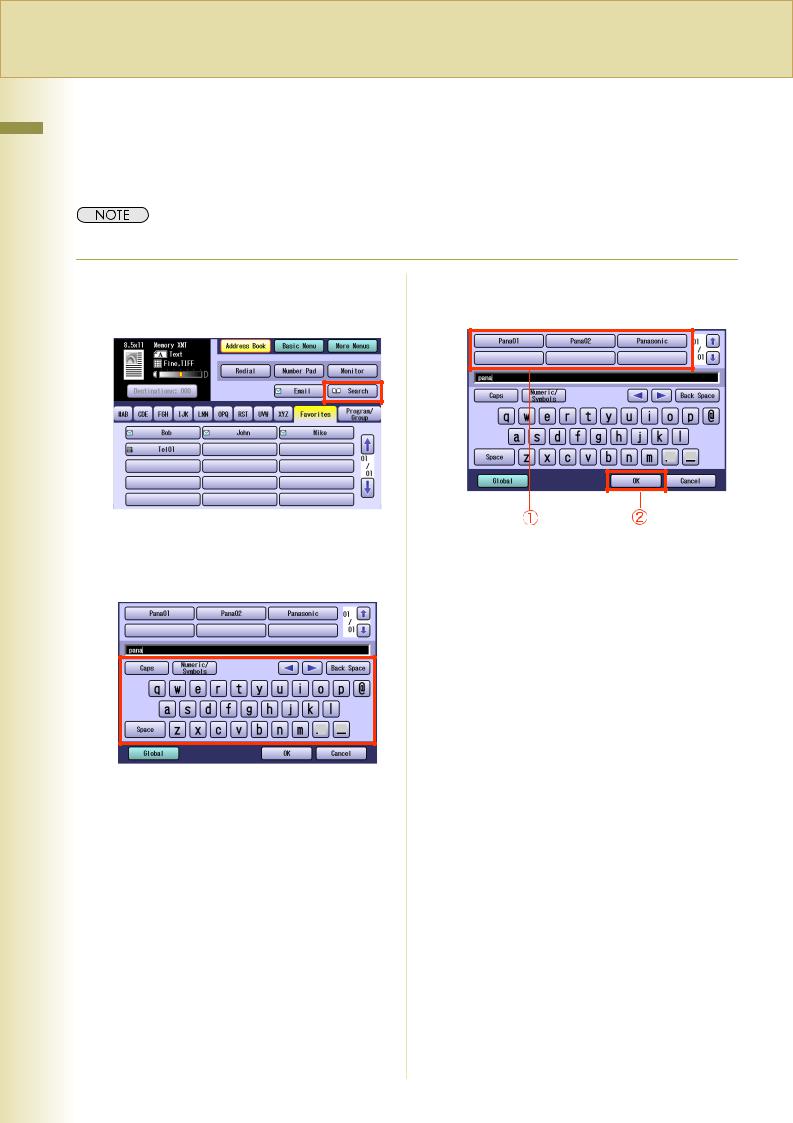
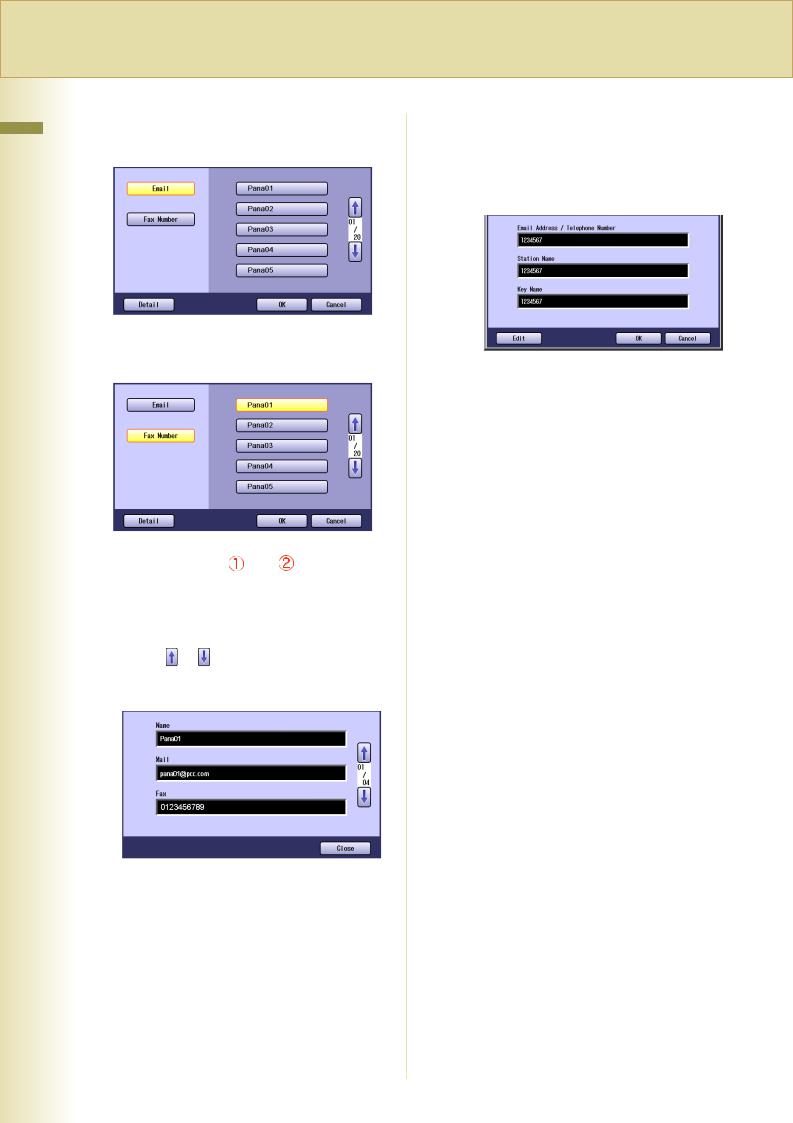
Search through the Address Book (Local Search)
Select “Search” to look through the Address Book for the desired destination by the entry name.
zSelect “Global” to search fax numbers or Email addresses in the LDAP server (see page 21).
1 Follow the step 1 and 2 on page 14.
2 Select “Search”.
3 Enter the first few letters of the Key
Name you are searching for.
The search result appears.
zFor instructions on using the onscreen Keyboard, refer to Before Starting in the Operating Instructions (For Function Parameters) of provided CD-ROM.
4 Select a destination, and then select
“OK”.
zSelect  or
or  to scroll the search results.
zMultiple destinations cannot be selected at a time.
5 Press the Start key.
The original(s) are stored into memory with a file number. Then starts dialing the telephone number.
Search through the LDAP Server (LDAP Search)
LDAP search is a feature that searches through the Address Book of an LDAP server on the network for fax numbers or Email addresses.
Select “Global” on the displayed screen to use the LDAP Search feature.
Contact your network administrator to check whether the LDAP Search feature is available in your particular environment.
zThe LDAP server must be configured before use. For more details, refer to Fax/Email Settings in the Operating Instructions (For Function Parameters) of provided CD-ROM.
1 |
Follow the step 1 and 2 on page 14. |
4 Enter a search letter, and then select |
||
2 |
Select “Search”. |
“Search”. |
||
The search result appears. |
||||
|
|
|
||
|
|
|
|
|
|
|
|
|
|
3 Select “Global”.
zYou can search for station names, Email addresses, and fax numbers.
zFor instructions on using the onscreen Keyboard, refer to Before Starting in the Operating Instructions (For Function Parameters) of provided CD-ROM.
zA message appears if there are more than 100 matches.
Select “Yes” to search by a more detailed keyword.
Select “No” to continue the search.
zSelect “Local” to exit the LDAP search screen.
Continued on the next page...
Transmission Fax Basic 2 Chapter
21
5 Select “Fax Number” to display a list of destinations.
2 Chapter |
|
|
|
|
|
|
|
|
|
|
|
|
|
|
|
|
|
|
|
||
6 Select a destination, and then select |
||||||||||
FaxBasic |
||||||||||
“OK”. |
||||||||||
|
||||||||||
Transmission |
|
|
|
|
|
|
|
|
|
|
|
|
|
|
|
|
|
|
|
||
|
|
|
|
|
|
|
|
|
||
|
|
|
|
|
|
|
|
|
||
|
|
|
|
|
|
|
|
|
||
zOnly one destination can be selected. |
||||||||||
|
||||||||||
|
zYou can change the entry screen by |
|||||||||
|
|
selecting “Email” or “Fax Number”. |
||||||||
|
zSelect or to scroll the search results. |
|||||||||
|
zSelect “Detail” to open the more detailed |
|||||||||
|
|
information screen. |
||||||||
Select “Close” to exit the detailed information screen.
zTo cancel a search operation, select “Cancel”.
zA message appears if an error occurs during the search.
22
zTo add the found destination to the Address Book, select “Add to Local” on the LDAP search screen, enter an entry name, and then select “OK”. (If you are using a PBX, you need to register a telephone number with the dial prefix.)
7 Select “OK”, and then press the Start key.
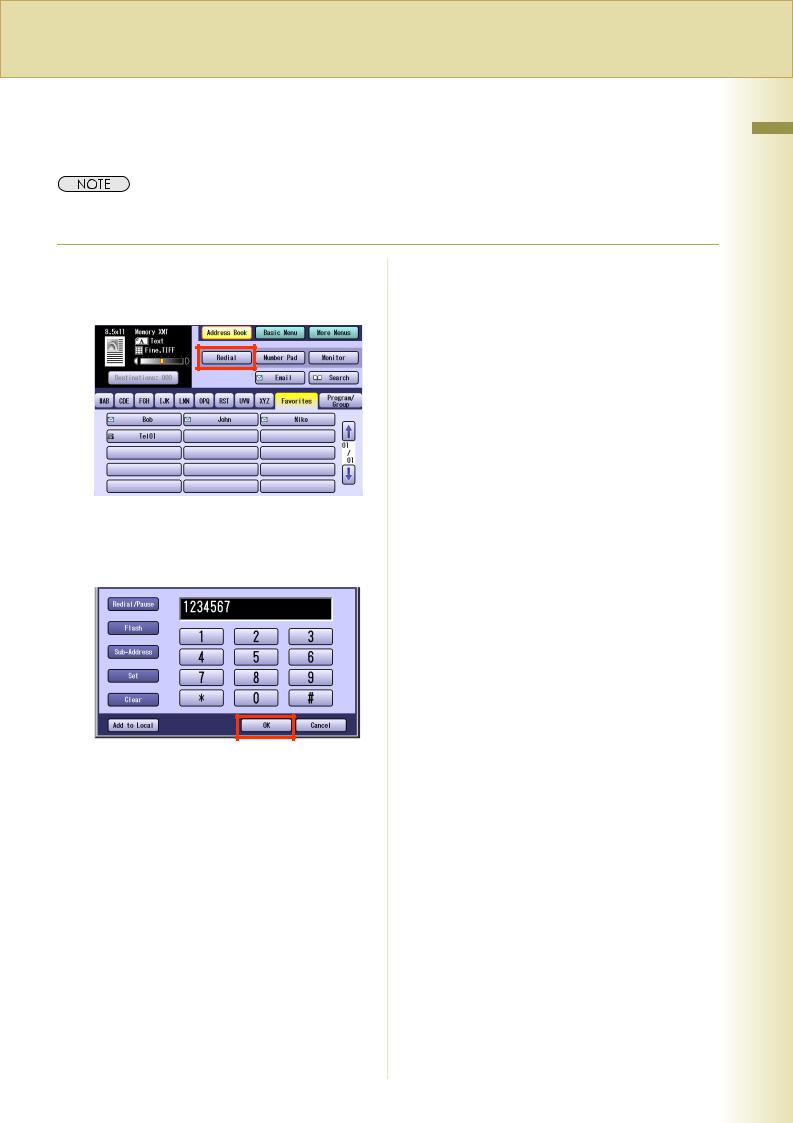
Redialing
To redial the most recently dialed number, follow the steps below.
zThe “Redial” button cannot be used when the Function Parameter “136 Restrict Direct Dial” (Fax/Email Settings > Fax Parameters) is set to “Valid”. 

1 Follow the step 1 and 2 on page 14.
2 Select “Redial”.
3 Confirm that this is the fax number that
you want to send to, and then select
“OK”.
zWhen the Function Parameter “137 Reenter Direct Dial” (Fax/Email Settings > Fax Parameters) is set to “Valid”, a message appears on the Number Pad screen prompting to re-enter the fax number for confirmation.
4 Press the Start key.
The original(s) are stored into memory with a file number. Then starts dialing the telephone number.
Transmission Fax Basic 2 Chapter
23

Transmission Fax Basic 2 Chapter
Preventing Accidental Transmission to Multiple Destinations
This function can prevent accidental transmission of documents to multiple destinations. It is useful when sending documents to a single destination.
Setting the Function Parameter “117 Multi Station (HOME)” (Fax/Email Settings > Fax Parameters) to “Off” or “Invalid” can prevent accidental transmission of documents to multiple destinations.
When “117 Multi Station (HOME)” is set to “Off”, the “Multi Station” button is displayed on the Touch Panel Display.
zFor instructions on how to set the Function Parameter “117 Multi Station (HOME)” to “Off” or “Invalid”, refer to Fax/Email Settings in the Operating Instructions (For Function Parameters) of provided CD-ROM.
zAn error message appears if you select multiple destinations when the “Multi Station” button is displayed in blue or the Function Parameter “117 Multi Station (HOME)” is set to “Invalid”.
Temporarily Enabling Transmission to Multiple Destinations
Even when the Function Parameter “117 Multi Station (HOME)” (Fax/Email Settings > Fax Parameters) is set to “Off”, the transmission to multiple destinations can be enabled temporarily.
1 Select “Multi Station”.
The “Multi Station” button changes to yellow, and the document can be sent to multiple destinations.
24

Confirming the Destination
Confirming the Destination
You can confirm the entered destinations.
1 Select “Destinations: ###”.
(###: Number of selected addresses)
2 Select the desired field button, and confirm destinations.
zTo add a destination, select “OK”, and then select the desired destination.
zTo delete a destination, select a destination, and then select “Delete” and “Yes”.
zOnly Email addresses entered directly as a destination can be edited using the onscreen Keyboard.
3 Select “OK”.
When Confirmation of the |
|
||||
Chapter |
|||||
key is pressed before the destinations are |
|||||
Destinations is Always Required |
|
||||
When the Function Parameter “125 Confirm |
|
||||
Stations” (Fax/Email Settings > Fax |
|
||||
Parameters) is set, a message prompting the |
|
||||
confirmation of destinations appears if the Start |
|
||||
confirmed. |
2 |
||||
|
|
|
|
||
zFor instructions on how to set the Function |
Basic |
||||
Parameter “125 Confirm Stations”, refer to Fax/ |
|||||
|
|||||
Email Settings in the Operating Instructions (For |
|
||||
Function Parameters) of provided CD-ROM. |
|
||||
|
|
|
|
|
|
1 When the message appears, select |
Transmission Fax |
||||
“Close”. |
|||||
|
|
|
|
||
2 Select “Destinations: ###”. |
|
||||
(###: Number of selected addresses) |
|
||||
|
|
|
|
|
|
|
|
|
|
|
|
Continued on the next page... 25

Transmission Fax Basic 2 Chapter
3 Select the desired field button, and confirm destinations.
zTo add a destination, select “OK”, and then select the desired destination. Select “Destinations: ###” to confirm the destinations again.
zTo delete a destination, select a destination, and then select “Delete” and “Yes”.
4 Select “OK”, and then press the Start key.
zThe original(s) are stored into memory with a file number. Then the Fax transmission starts.
26

Memo
Transmission Fax Basic 2 Chapter
27

Transmission Fax Basic 2 Chapter
28
Transmission with Destination Monitoring
Select “Monitor” on the Touch Panel Display to obtain a dial tone. This feature is called “On-hook dialing”. To monitor the status of a remote station, follow the steps below.
zThis function is not available when the Function Parameter “137 Re-enter Direct Dial” (Fax/Email Settings > Fax Parameters) is set to “Valid”.
1 |
Place original(s). |
|
|
|
|
|
|
||||||
|
|
|
|
|
Raises the monitor volume. |
||||||||
|
zIf the Platen Glass is used, only one page |
|
|
|
|
|
|
||||||
|
|
|
|
|
|
|
|||||||
|
|
can be transmitted at a time. |
|
|
|
|
|
|
|||||
|
zRefer to Placing Originals (Facsimile/ |
|
|
|
|
|
Lowers the monitor volume. |
||||||
|
|
|
|
|
|
|
|||||||
|
|
Internet Fax) in the Operating Instructions |
|
|
|
|
|
|
|||||
|
|
(For Basic Operations) of provided booklet. |
|
|
|
|
|
|
|||||
2 Press the Fax key. |
|
|
|
|
|
Select once to recall the |
|||||||
|
|
|
|
|
last dialed fax number. |
||||||||
3 |
Select “Monitor”. |
|
|
|
|
|
Select twice to insert a |
||||||
|
|
|
|
|
|||||||||
|
|
|
|
|
pause (dialing interval). |
||||||||
|
|
|
|
|
|
|
|
5 |
|
|
|
|
|
|
|
|
|
|
|
|
|
When you hear |
a beep, press the |
||||
|
|
|
|
|
|
|
|
|
Start key. |
||||
|
|
|
|
|
|
|
|
|
zFor instructions on how to cancel a |
||||
|
|
|
|
|
|
|
|
|
transmission, refer to Canceling a |
||||
|
|
|
|
|
|
|
|
|
Communication (see page 52). |
||||
|
|
|
|
|
|
|
|
|
zPress the Reset key to return the machine |
||||
|
|
|
|
|
|
|
|
|
to the initial screen of the currently active |
||||
|
|
|
|
|
|
|
|
|
mode. |
||||
|
The Monitor screen appears, and you will hear |
|
|
|
|
|
|
||||||
|
a dialing tone through the monitor speaker. |
|
|
|
|
|
|
||||||
4 Enter the fax number of the |
|
|
|
|
|
|
|||||||
|
destination. |
|
|
|
|
|
|
||||||
|
|
|
|
|
|
|
|
|
|
|
|
|
|
|
|
|
|
|
|
|
|
|
|
|
|
|
|
|
|
|
|
|
|
|
|
|
|
|
|
|
|
|
|
|
|
|
|
|
|
|
|
|
|
|
|
zWhen the Function Parameter “136 Restrict Direct Dial” is set to “Valid”, manual input of fax numbers is not available. Select a destination from the “Address Book”.

Talking to the Remote Party Before Transmission
If an external telephone is connected to your machine, you can send a fax after talking to the remote party on the phone. Follow the steps below.
1 Place original(s).
zIf the Platen Glass is used, only one page can be transmitted at a time.
zRefer to Placing Originals (Facsimile/ Internet Fax) in the Operating Instructions (For Basic Operations) of provided booklet.
2 Press the Fax key.
3 Lift the handset of the external telephone.
4 Dial the telephone number.
5 Talk to the remote party, and then tell
the other party to get ready for receiving fax.
6 When a beep is heard, press the Start
key, and then place the handset back on the cradle.
Transmission starts.
zFor instructions on how to cancel a transmission, refer to Canceling a Communication (see page 52).
Transmission Fax Basic 2 Chapter
29
Transmission Fax Basic 2 Chapter
Setting Original Quality
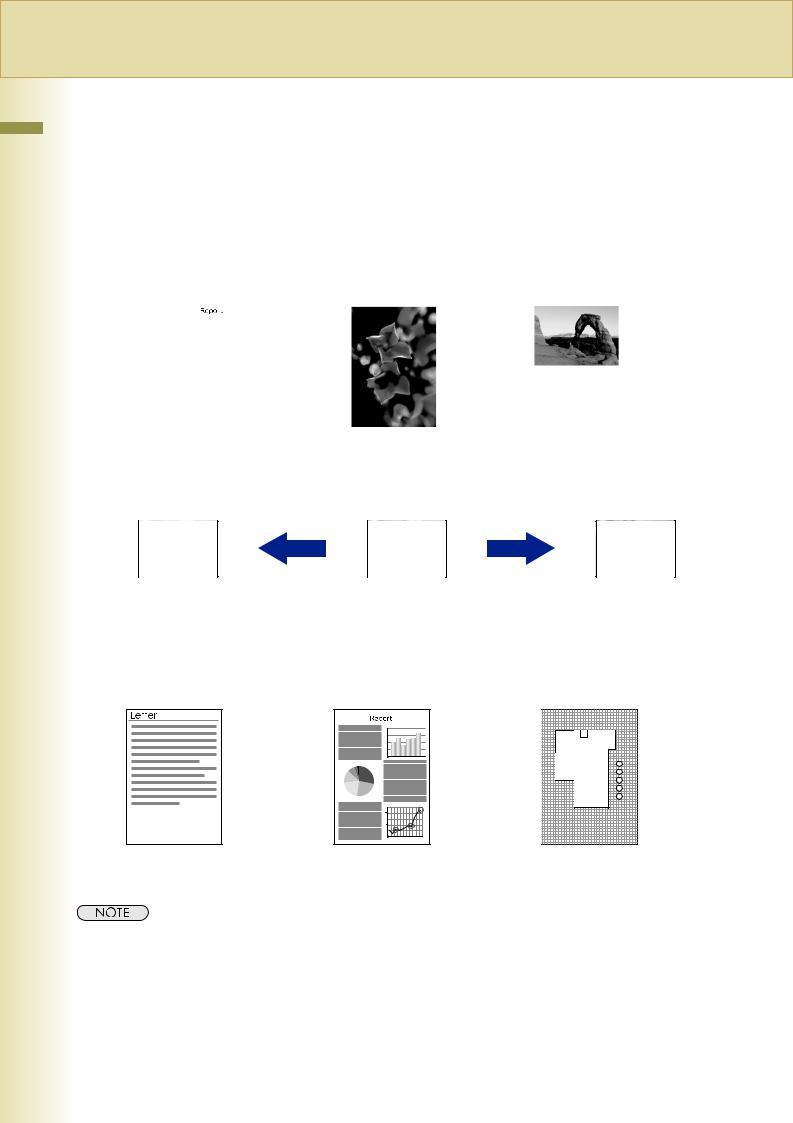
Original Type
Original type can be specified to suit your needs. You can select from text-only original, photo-only original, or original in which text and photos are mixed.
Select “Text/Photo” when text and photos are mixed on a single page or are mixed on multiple pages to be sent.
Text |
|
Photo |
Text/Photo |
||||||
|
|
|
|
|
|
|
|
|
|
|
|
|
|
|
|
|
|
|
|
|
|
|
|
|
|
|
|
|
|
|
|
|
|
|
|
|
|
|
|
|
|
|
|
|
|
|
|
|
|
|
|
|
|
|
|
|
|
|
|
|
|
|
|
|
|
|
|
|
|
|
|
|
|
|
|
|
|
|
|
|
|
|
|
|
|
|
|
|
|
|
|
|
|
|
|
|
|
|
|
|
|
|
|
|
|
|
|
|
|
|
|
|
|
|
|
|
|
|
|
|
|
|
|
|
|
|
|
|
|
|
|
|
|
|
|
|
|
|
|
|
|
|
|
|
|
|
|
|
|
|
|
|
|
|
|
|
|
|
|
|
|
|
|
|
|
|
|
|
|
|
|
|
|
|
|
|
|
|
|
|
|
|
|
|
|
|
|
|
|
Density
Adjust the density according to your requirements.
Lighter |
Darker |
Resolution
Adjust the resolution according to your requirements.
Ordinary original |
Original containing small |
|
characters or graphics |
Std |
Fine |
Original containing detailed drawings or text
Fine, S-Fine, or 600dpi
zThe standard setting can be changed by setting the Function Parameters “03 Original (HOME)”, “01 Density (HOME)”, and “02 Resolution (HOME)” (Fax/Email Settings > Fax Parameters).
For instructions on how to change the setting, refer to Fax/Email Settings in the Operating Instructions (For Function Parameters) of provided CD-ROM.
30
Loading...