Flowserve ISC2 User Manual [en, it, de, fr, es]
ISC2 Series
Innovative Standard Cartridge seal designed for general purpose applications
ISC2 Serie
Innovative Standard-Cartridgedichtung für allgemeine Anwendungen
Gamme ISC2
Garniture cartouche standard innovante et polyvalente
Serie ISC2
Tenuta Innovativa Standard a Cartuccia progettata per applicazioni generali
Serie ISC2
Cierres de cartucho estándar innovadores diseñados para aplicaciones generales
Installation Instructions
-Original Instruction-
Montageanweisungen
-Übersetzung der
Originalanleitung-
Instructions de Montage
-Traduction des instructions originales-
Istruzioni di Montaggio
-Traduzione dell‘istruzione originale-
Instrucciones de Instalación
-Traducción de las instrucciones originales-
Pages 2-21
GB
Seite 22-45
D
Pages 46-69
F
Pagina 70-91
I
Página 92-117
E
Experience In Motion

Description
This ISC2 seal is a versatile cartridge mounted mechanical seal, designed for ease of installation and reliable operation. No seal setting dimensions are required. Removable setting devices
provide proper alignment.
The ISC2 seal family consists of:
ISC2-PX - Single pusher seal with stationary springs ISC2-PP - Dual pusher seal with stationary springs ISC2-BX - Single metal bellows seal with rotating bellows ISC2-BB - Dual metal bellows seal with rotating bellows
ISC2-XP - Single pusher seal with a pumping device for a Plan 23
ISC2-XB - Single metal bellows seal with a pumping device for a Plan 23
1.Drawing, Brief Description, Explosion Protection
This mechanical seal is designed to provide reliable performance under a wide range of operating conditions. The information and specifications presented in this product brochure are believed to be accurate, but are supplied for information purposes only and should not be considered certified or as a guarantee of satisfactory results by reliance thereon. Nothing contained herein is to be construed as a warranty or guarantee, express or implied, with respect to the product.
Although Flowserve Corporation can provide general application guidelines, it cannot provide specific information for all possible
2

flowserve.com
applications.
The purchaser/user must therefore assume the ultimate responsibility for the proper selection, installation, operation and maintenance of Flowserve products. Because Flowserve Corporation is continually improving and upgrading its product design, the specifications, dimensions and information contained herein are subject to change without notice.
1.1Assembly Drawing
The assembly drawing is included in the shipping box with the mechanical seal.
1.2Brief Description
A mechanical seal is a device designed to seal a rotating shaft against a stationary housing, e.g. a pump shaft against a pump casing. The stationary components will consist of a seal ring and (depending on the design) a spring-loaded element. The
spring-loaded element can be a spring or a bellows. The seal ring is sealed against the housing with a secondary gasket, e.g. an O-ring. The rotating components will consist of a seal ring and (depending on the design) a spring-loaded element. The springloaded element can be a spring or a bellows.
The seal ring is sealed against the shaft with a secondary gasket, e.g. an O-ring.
A mechanical seal can be supplied as a pre-assembled cartridge or in separate components. Assembly is done in accordance with the assembly drawing.
A mechanical seal will run in the pumped product or external source fluid.
3

To provide lubrication, a film of liquid must always be present between the seal faces. The sealing surfaces are separated from each other by the seal liquid film during shaft rotation and in principle run without contact and thus minimal wear under these conditions.
1.3Explosion Protection
The ISC2 mechanical seal is a standard cartridge seal and as such regarded as a machine element. Machine elements do not need to comply with Directive 94/9/EC (ATEX 95 product guide) as these are regarded as an integral part of a larger piece of machinery (pump, agitator). This has been confirmed by both the EC ATEX standing committee as well as the European Sealing Association (ESA).Reference is made to following web-sites:
EC ATEX standing committee: http://ec.europa.eu/enterprise/atex/rotating.htm
ESA position statement: http://www.europeansealing.com/statements.html
For applications which require information on expected surface temperatures of the mechanical seal faces, Flowserve document “ATEX 137 information declaration” is available upon request.
This document allows users to determine typical surface temperatures based upon seal design, operating conditions and face materials and may be used by the users to comply with ATEX 1999/92/EC (ATEX 137).
1.4Functional requirements
The proper functioning of a mechanical seal is only achieved once the following conditions have been met:

flowserve.com
•The sealing surfaces are lapped within specification
•Perpendicularity and concentricity between the shaft and the seal chamber face and bore respectively
•Freedom of movement of the spring loaded components in axial direction
•Axial and radial shaft movements within Flowserve or OEM tolerances whichever is the tightest.
•The seal is run under the conditions for which it was selected.
•The equipment in which the seal(s) is (are) installed is operated within normal parameters (no cavitation, excess vibration etc.)
•Prevention of sedimentation on shaft or sleeve surfaces caused by for instance crystallisation or polymerisation
•Permanent seal liquid film between the sealing surfaces.
If these function conditions are not fulfilled, the consumption of product, for example, is increased and parts of the product can escape into the atmosphere. Other effects can include high component temperatures.
See the directive 9 /9/EC, 1999/92/EC and EN 13 63-5.
Failure to meet these requirements will result in excessive leakage and/ or shortened seal life.
2.Safety
DANGER: This means that personal danger or major material damage can occur when no attention is paid to this.
5

 ATTENTION: This means that important information is pointed out that may also be overlooked by skilled personnel. The information can be important to avoid personal injury or material damage.
Please read these instructions carefully. Installation in accordance with the following instructions will contribute to long and trouble free running of the mechanical seal.
For related mechanical seal auxiliary equipment (reservoirs, coolers, etc.), separate instructions will be provided.
The ultimate user must ensure that personnel assigned to handle, install and run the mechanical seal and related equipment is well acquainted with the design and operating requirements of such equipment.
For this personnel it may be required to wear protective clothing as per the plant’s safety regulations.
Damage to any of the seal components and in particular the faces may cause (excessive) leakage in liquid or gas form. The degree of hazard depends on the sealed product and may have an effect on people and/or the environment. Components coming into contact with leakage must be corrosion resistant or suitably protected.
EXPLOSION PROTECTION – This means that failure to observe these instructions will involve the risk of explosion in potentially explosive environments which can cause harm to persons and / or considerable damage to property.
Plant regulations concerning work safety, accident prevention and pollution must be strictly adhered to.
6

flowserve.com
This mechanical seal has been designed and built to seal rotating equipment. Damages resulting from use in other applications are the responsibility of the user.
Failure, recovery or fluctuation in power supply to the machine and/or supply system may not expose persons or environment to dangerous situations or harm the functionality of the mechanical seal.
Guards that are provided by the equipment manufacturer have to be in accordance with plant regulations, but should not create additional danger. These guards have to ensure proper access to
the working area required for maintenance to the mechanical seal.
The electricity supply of the equipment must be in accordance with directive 2006/95/EC. When machinery is powered by a source of energy other than electricity this may not cause dangerous situations for persons and environment.
3.General
All illustrations and details in these installation and operating instructions are subject to changes that are necessary to improve product performance without prior notice.
The copyright of these instructions is the property of Flowserve. These instructions are intended for maintenance, Operating and Supervisory personnel and contain regulations and drawings of a technical character that may not, in full or in part, be copied, distributed, used without authorisation for competitive purposes, or given to others.

It should be understood that Flowserve does not accept any liability for instances of damage and/or malfunctioning incurred through non-adherence to these installation instructions.
4.Transport, Storage
The mechanical seal and related equipment maust be transported and stored in the unopened, original shipping box. The warehouse in which the mechanical seals and related equipment are stored must be dry and free of dust. Avoid exposing equipment to large temperature fluctuations and radiation.
Parts or complete mechanical seals that have been dropped or otherwise have been subjected to heavy impacts during transport must not be installed. An inspection by Flowserve or its appointed representative is strongly advised.
If the machine is to be preserved with integrated mechanical seals the preserving medium must not impair the functions of the mechanical seals by e.g. fouling of the seal faces, hardening, or swelling the secondary seals.
After a storage period of 3 years the mechanical seal must be inspected for its “as new” properties. This applies in particular to the seal faces and secondary sealing elements. An inspection by Flowserve becomes necessary.
The mechanical seal can in principle be transported with suitable means like lifting accessories.
8
flowserve.com
5.Equipment Check
5.1Follow plant safety regulations prior to equipment disassembly:
•lock out motor and valves.
•wear designated personal safety equipment.
•relieve any pressure in the system.
•consult plant MSDS files for hazardous material regulations.
5.2Disassemble pump in accordance with equipment manufacturer’s instructions and remove sealing arrangement.
5.3Check seal documentation for seal design and materials of construction. Verify that the ISC2 seal is designed for the equipment being repaired.
5. Check seal assembly drawing for any modifications required to the equipment before installation and act accordingly.
5.5Check shaft or pump sleeve OD, seal chamber depth, seal chamber bore, distance to the first obstruction, gland pilot and gland bolting to ensure they are dimensionally within the tolerances shown on the seal assembly drawing.
5.6Thoroughly inspect and clean the seal chamber and shaft or pump sleeve. Inspect for corrosion or any defects. Remove all burrs, cuts, dents or defects that might damage gaskets or allow a leak path. Replace worn shaft or pump sleeve. Remove sharp edges from keyways and threads.
5.7Check equipment requirements as described in Figure 1. Any reading greater than what is allowed must be brought within specifications.
9

Seal Chamber Requirements
The mechanical seal may be installed when there are no visible signs of damage to the mechanical seal. This applies in particular to the seats, centrings, and the statically sealing O-rings.
Figure 1
Seal housing bore to have
√125 µ inch (3.2 µm) Ra or better
Shaft or sleeve finish to be 32 µ inch (0.8 µm) Ra or better
• Bearings must be in good condition.
to first obstruction
Face of seal housing to be square to the axis of the shaft to within 0.0005 inch (0.013 mm) FIM and have √63-µ Inch (1.6 µm) Ra finish or better.
Gland pilot can be either of these register locations. Concentric to within 0.005 inch (0.13 mm) FIM of shaft or sleeve OD
Shaft or sleeve OD
+0.000 inch (+ 0.000 mm) -0.002 inch (- 0.050 mm) ANSI
+0.000 inch (+0.000 mm) API 610 -0.001 inch (-0.025 mm) DIN / ISO
•Maximum lateral or axial movement of shaft (end play) = 0.010 inch ( 0.25 mm) FIM
•Maximum shaft runout at face of seal housing = 0.002 inch (0.05 mm) FIM
•Maximum dynamic shaft deflection at seal housing = 0.002 inch (0.05 mm) FIM
5.8Handle the ISC2 seal with care; it is manufactured to precise tolerances. The seal faces are of special importance and should be kept perfectly clean at all times.
5.9Tools needed for installation: An open-end wrench and torque wrench sized for the gland bolt nuts; a torque wrench for the set screws. All other tools are provided.
6.ISC2 Seal Installation
The installation chamber for the mechanical seal must be checked against the corresponding drawing and table of dimensions.
10
flowserve.com
It must be ensured that all dimensions, surface qualities, and tolerances (e.g. concentricity, run-out, fits) are observed. The specifications under e.g. ISO 21049 or API 682, DIN 28161, FLOWSERVE publication FSD 101, FLOWSERVE publication FSD127 must be observed.
NOTE: No seal setting measurements are needed to install the seal. Instructions are for end-suction back pull-out pumps. Modification of these procedures may be required for other style pumps. Consult Flowserve for installation support.
Take care that seal cartridge or components of the seal are handled and carried safely during installation of mechanical seal and that the ergonomic principles are followed. In order to prevent personal injuries the operator should also wear protective clothing as per the plant’s safety regulations.
Precautions must be taken for parts of the mechanical seal that will be used as support to step on during assembly operations. These parts must be protected against slipping, stumbling or falling (for example by using a strut).
6.1Lubricate the shaft or sleeve lightly with silicone lubricant unless otherwise specified.
6.2Tighten the setting device cap screws to ensure they are tight before installation.
6.3Slide the ISC2 seal cartridge onto the shaft or pump sleeve
with the setting devices toward the bearing housing. See Figure 2.
6.4Install the seal chamber and bolt it in place on the bearing frame. See Figure 3.
11
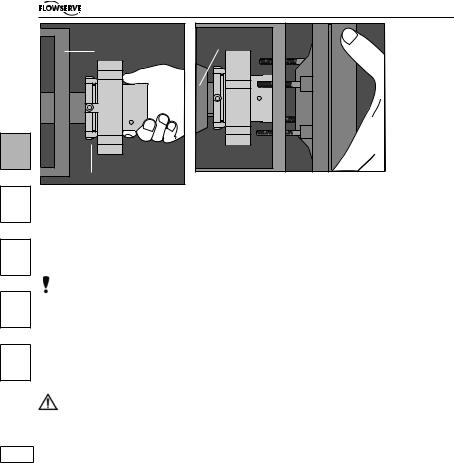
Figure 2 |
Bearing Frame |
Setting Device |
Bearing Housing
Seal
Chamber
Figure 3
6.5Position the ISC2 with the gland tight against the seal chamber face.
6.6Orient the ISC2 seal with the parts aiming as shown on the seal assembly drawing. See Section 7 for Piping Recommendations.
6.7Tighten the gland nuts evenly in a diagonal sequence. Do not over-tighten the gland nuts, as this can warp seal parts and cause leakage.
Recommended ISC2 seal minimum gland nut torque by size range:
Seal inch 1.000 |
- 2.000 2.125 - 2.750 |
2.875 - .000 |
.250 |
- 6.000 |
6.250 |
- 8.000 |
|||
Size (mm) |
(25 |
- 50) |
(5 - 70) |
(75 |
- 102) |
(108 |
- 152) |
(159 |
- 203) |
Torque |
15 ft-lbs |
20 ft-lbs |
30 |
ft-lbs |
35 ft-lbs |
0 ft-lbs |
|||
|
(20 N-m) |
(27 N-m) |
( 0 N-m) |
( 7 N-m) |
(5 N-m) |
||||
Components provided by the customer for installing the mechanical seal, e.g. the pump cover or fastening screws, must exhibit adequate properties and dimensions. It must not be possible to
12

flowserve.com
Figure 4
Figure 5
overstress these components, e.g. the max permitted tightening torque must not be exceeded.
6.8Assemble the equipment per manufacturer specifications. Avoid pipe strain. Align the coupling per manufacturer specifications.
6.9With the impeller, shaft, coupling and bearings in their final operating position, tighten the drive collar set screws. See Figure 4.
Recommended ISC2 seal minimum set screw torque by size range:
Seal |
inch |
1.000 |
- 2.500 |
2.625 |
- 2.750 |
2.875 |
- 8.000 |
2.875 - 8.000 |
Size |
(mm) |
(25 |
- 60) |
(67 |
- 70) |
(75 |
- 203) |
(75 - 203) |
Gland Size |
All |
All |
Standard Bore |
Enlarged Bore |
||||
Torque |
40 in-lbs |
120 in-lbs |
150 in-lbs |
240 in-lbs |
||||
|
|
(4.5 N-m) |
(13.5 N-m) |
(16.9 N-m) |
(27.1 N-m) |
|||
Inaccurate tightening of these screws can lead to unsafe situation as mechanical seal may move out of the seal chamber when pressure is applied.
13

6.10Remove the setting devices from the drive collar by loosening the cap screws. See Figure 5. Save the setting devices and fasteners for future use when the pump impeller is reset or when the seal is removed for repairs.
Vibrations must be prevented from transferring to the installed ISC2 during operation, e.g. through structural measures implemented on the machine.
The machine to take the ISC2 must be earthed in accordance with the applicable regulations for electrical installations (e.g. VDE rules) to conduct away any electrostatic build-up and so prevent spark formation.
6.11Turn the shaft by hand to ensure unobstructed rotation.
6.12See Functional Recommendations before start-up.
Conduct a static pressure test. Do not exceed the max. pressures.
7.Piping Recommendations
7.1Install and maintain an adequate piping plan. Ensure that piping is connected to the correct pipe ports to prevent unsafe situations. The connections on the mechanical seal are properly marked.
The ISC2 seal requires a clean, cool environment for maximum seal life. Typical piping plans are listed below. Contact Flowserve for additional piping plan information or technical support.
Plan 11: default inner seal flush from pump discharge on horizontal pumps (single seals)
14

flowserve.com
Plan 13: default inner seal flush and vent from pump suction on vertical pumps (single seals)
Plan 21: inner seal flush from pump discharge through a cooler for use with hot products (single seals)
Plan 23: inner seal flush from internal pumping device through cooler (ISC2-XP and ISC2-XB designs)
Plan 32: inner seal clean external flush for use with abrasive products or products that are incompatible with the seal (single seals)
Plan 52: dual seal circulation through a low pressure reservoir (dual seals)
Plan 53: dual seal circulation through a pressurized reservoir (53A), finned tube array (53B) or piston accumulator (53C) (dual seals)
Plan 62: external quench on atmospheric side of seal (single seals)
7.2For dual seals, LBI (Liquid Barrier Inlet) and LBO (Liquid Barrier Outlet) are marked on the gland. ISC2 seals are unidirectional and piping the correct inlet and outlet is important to proper circulation. The liquid barrier inlet should draw from the bottom of the support system while the liquid barrier outlet feeds the top of the system.
Forced ventilation of the seal chamber must be ensured when the circulation pipe is connected. Should there be gas or air pockets in the sealing chamber, these can accumulate with the rotation at the outer diameter of the seal gap at machine start-up. This
15

causes the machine to run dry at the seal gap for an indefinite period, and the seal faces can become damaged.
7.3For running a dual pressurized seal (double seal), supply a clean, compatible barrier fluid at a pressure at least 25 psi (1.7 bar) above the seal chamber pressure. See Figure 6. The
pressure of the barrier fluid must not exceed the recommended maximum pressure.
Monitoring the liquid circulation is a recommended measure for ensuring that the mechanical seal runs properly.
Dual pressurized (Plan 53A) ISC2 with Supply Tank
Figure 6
16

flowserve.com
Suitable measures must be implemented to prevent errors in the handling of shut-off and throttling devices installed in the fluid supply.
7.4For dual unpressurized (tandem seal) operation, supply a clean, compatible buffer fluid at a pressure below the seal chamber pressure. The pressure in the seal chamber must not exceed the recommended maximum pressure.
7.5Quench and Drain ports on single seals should be plugged if not used as a good housekeeping practice. Note: the quench and drain ports are smaller than the flush port as a distinguishing feature.
 Escaping leakage must not form an explosive mixture.
7.6Dual seal recommendation: For enhanced seal performance and reduced coking, use DuraClear as a barrier fluid. Refer to
DuraClear brochure FSD123 or contact a Flowserve representative for further details.
8.Functional recommendations
8.1Remove lock outs on equipment and valves.
8.2Do not start up the pump dry dry to check motor rotation or for any other reason. Open valves to flood pump with product fluid. Ensure that the seal flush or support system is operating. Vent air from the casing of the pump and the seal chamber before start-up.
It must be ensured that the machine is protected against penetration by dust and / or that dust deposits are removed at regular
17
intervals so that they cannot exceed a thickness of 5 mm on the surfaces of the faces.
It must be ensured, e.g. in the form of a level monitor, that the sealing chamber is completely vented and filled with fluid in all running states if it is to minimise the heat generated by friction and therefore the surface temperature of the seal elements.
If the application limits for running in accordance with these instructions cannot be observed, the temperature of the supply liquid and / or the installed components must be monitored at all times by a device that shuts down the machine once a critical temperature is reached. This device can consist of resistance thermometers or thermoelements.
The seal chamber must be vented carefully before startup
8.3Observe the start-up. If the seal runs hot or squeals, check the seal flush system. Do not allow the pump to run for any extended time if the seal gets hot or squeals.
8.4Do not exceed corrosion limits. The ISC2 seal is designed to resist corrosion through proper material selection. Do not expose the ISC2 seal materials of construction to products outside of their corrosion limits. Consult Flowserve for chemical resistance recommendations.
8.5Do not exceed pressure and speed limits established for the ISC2 seal.
8.6Do not exceed the temperature limits of the ISC2 seal based on the materials of construction. For dual seals using supply tanks with cooling coils, turn on cooling water to the supply tank before start-up.
18
flowserve.com
8.7Do not start up or run the ISC2 seal dry. The seal chamber, pump and support systems should be thoroughly vented before start-up. Buffer or barrier fluid must flood the seal cavity of dual seals at all times during running. Process fluid must be in the seal chamber at all times during single seal running. Do not exceed the recommended maximum pressure and speed limits shown in the ISC2 brochure.
At all running temperatures the product must not come within 20 K of its evaporating point. Should this not be the case during certain situations (e.g. machine shutdown, start-up) forced circulation or adequate cooling of the supply fluid must be generated to promote heat removal.
 Escaping leakage must not form an explosive mixture.
9.Shut down, disassembly
The equipment can be shut down at any time. Before the mechanical seal can be removed the equipment must be de-pressurized and drained. Barrier pressure (if applicable) must be relieved after the equipment has been de-pressurized.
Operator must persuade himself before starting disassembling of mechanical seal that the external of the equipment is cool enough to be handled without risk.
Product may be released during removal of the mechanical seal. Safety measures and protective clothing may be required as per the plant’s safety regulations.
19

Dismantling of the mechanical seal is only allowed after machine has been stopped.
Further disassembly of the mechanical seal must be done according to the supplier’s specifications.
10. System check
Checking of the system, limits itself to monitoring pressure, temperature, leakage and consumption of barrier (buffer) fluid, when applicable.
Routine maintenance of the mechanical seal extends to the monitoring of the set values for pressure, temperature, and leakage quantity.
Maintenance to the mechanical seal is only allowed after machine has been stopped.
The required area for operating the machine or doing maintenance to the mechanical seal must be easy accessible.
11. Repairs
This product is a precision sealing device. The design and dimension tolerances are critical to seal performance. Only parts supplied by Flowserve should be used to repair a seal. To order replacement parts, refer to the part code and B/M number. A spare backup seal should be stocked to reduce repair time.
20
flowserve.com
TO REORDER REFER TO
B/M # _________________
Order #___________________
When seals are returned to Flowserve for repair, decontaminate the seal assembly and include an order marked "Repair or Replace." A signed certificate of decontamination must be
attached. A Material Safety Data Sheet (MSDS) must be enclosed for any product that came in contact with the seal. The seal assembly will be inspected and, if repairable, it will be rebuilt, tested, and returned.
All Flowserve Corporation, Flow Solutions Group, products must be installed in accordance with Flowserve installation instructions.
Failing to do so or attempting to change or modify Flowserve products will void Flowserve’s limited warranty. Flowserve’s limited warranty
is described fully in Flowserve’s Standard Terms and Conditions of Sale. Flowserve makes no warranty of merchantability or fitness for a particular purpose and in no event shall Flowserve be liable for consequential or incidental damages.
21

Diese ISC2-Dichtung ist eine vielseitig einsetzbare Gleitringdichtung in Cartridgebauweise. Sie wurde für einfache Installation und zuverlässigen Betrieb konstruiert. Dichtungseinstellgrößen sind nicht erforderlich. Die abnehmbaren Montagelaschen sorgen für eine korrekte Ausrichtung.
Die ISC2-Dichtungsfamilie besteht aus:
ISC2-PX - Befederte Einzeldichtung mit stationärer befederten Einheit ISC2-PP - Befederte Doppeldichtung mit stationärer befederten Einheit ISC2-BX - Einzelmetallbalgdichtung mit rotierendem Balg
ISC2-BB - Doppelmetalbalgdichtung mit rotierendem Balg
ISC2-XP - Befederte Einzeldichtung mit stationärer befederten Einheit und dichtungsinterner Pumpvorrichtung nach Plan 23
ISC2-XB - Einzelmetallbalgdichtung mit rotierenden Bälgen und dichtungsinterner Pumpvorrichtung nach Plan 23
1.Zeichnung, Kurzbeschreibung, Explosionsschutz, Funktionsvoraussetzungen
Diese Gleitringdichtung ist für eine zuverlässigen Funktion unter weitreichenden Einsatzbedingungen ausgelegt. Die in dieser Produktbroschüre aufgeführten Angaben und technischen Daten sind unseres Erachtens richtig, werden jedoch lediglich zu Informationszwecken wiedergegeben und sollten daher nicht im Vertrauen auf ihre Richtigkeit als Bestätigung bzw. als Garantie für zufriedenstellende Ergebnisse aufgefasst werden. Die in dieser Broschüre enthaltenen Informationen dürfen weder als Zusicherung noch als vertraglich gewährleistete oder stillschweigend miteingeschlossene Garantie in Bezug auf das Produkt
22

flowserve.com
ausgelegt werden. Flowserve Corporation kann zwar allgemeine Anwendungsrichtlinien aufstellen, nicht aber spezifische Informationen über alle möglichen Anwendungen geben.
Die letzte Verantwortung für die Bestimmungsgemäßheit von Auswahl, Montage, Betrieb und Wartung der Flowserve-Produkte muss daher der Käufer/Anwender übernehmen. Da Flowserve Corporation die Ausführung ihrer Produkte ständig verbes-
sert und auf den neuesten Stand bringt, können die in dieser Broschüre aufgeführten technischen Daten, Maße und Angaben ohne Vorankündigung Änderungen unterworfen werden.
1.1Zeichnung
Zusammen mit der Gleitringdichtung befindet sich die Zeichnung im Versandbehälter.
1.2Kurzbeschreibung
Eine Gleitringdichtung ist ein Dichtungssystem, das zur Abdichtung von rotierenden Wellen gegenüber stationären Gehäusen bestimmt ist, z.B. einer Pumpenwelle gegenüber dem Pumpengehäuse. Die stationären Bauteile umfassen einen Gleitring und (je nach Bauart) ein befedertes Element. Das befederte Element kann eine Feder oder ein Balg sein. Der Gleitring
wird zum Gehäuse durch eine Nebendichtung, z.B. einen O-Ring, abgedichtet. Die rotierenden Bauteile umfassen einen Gleitring und (je nach Bauart) ein befedertes Element. Das befederte Element kann eine Feder oder ein Balg sein. Der Gleitring wird zur Welle durch eine Nebendichtung, z.B. einen O-Ring, abgedichtet.
Eine Gleitringdichtung kann als vormontierte Cartridge oder in einzelnen Komponenten ausgeliefert werden. Die Montage erfolgt
23

gemäß der Zeichnung. Eine Gleitringdichtung kann in Kontakt mit dem zu pumpenden Produkt oder einer externen Versorgungs flüssigkeit eingesetzt werden. Flüssigkeitsgeschmierte Dichtungen brauchen zur Schmierung immer einen Flüssigkeits film zwischen den Dichtflächen. Gasgeschmierte Dichtungen brauchen zur Schmierung immer einen Gasfilm zwischen den Dichtflächen. Die Dichtoberflächen werden bei rotierender Welle durch den Flüssigkeitsoder Gasdichtfilm voneinander getrennt und arbeiten unter diesen Bedingungen nahezu kontaktund verschleißfrei.
1.3 Explosionsschutz
Die Gleitringdichtung ISC2 ist eine Standard-Cartridgedichtung und daher als ein Maschinenelement anzusehen. Maschinenelemente sind von den Bestimmungen der Richtlinie 94/9/EG ausgenommen (Produktleitfaden ATEX 95), da sie
als integrale Bestandteile einer größeren Maschine (Pumpe, Rührwerk) gelten. Das wurde sowohl vom Ständigen ATEXAusschuss der EG als auch von der European Sealing Association (ESA) bestätigt. Auf folgende Websites wird verwiesen:
Ständiger ATEX-Ausschuss der EG: http://ec.europa.eu/enterprise/atex/rotating.htm
ESA-Stellungnahme: http://www.europeansealing.com/statements.html
Für Anwendungen, die Daten über die erwarteten Oberflächen temperaturen der Gleitkörper erfordern, ist auf Anfrage das Flowserve-Dokument “Information / Erklärung zu ATEX 137” erhältlich. Dieses Dokument ermöglicht den Anwendern die Bestimmung typischer Oberflächentemperaturen aufgrund der
24
flowserve.com
Dichtungsauslegung, der Einsatzbedingungen und der GleitkörperWerkstoffe; den Anwendern kann es dabei behilflich sein, die Richtlinie ATEX 1999/92/EG (ATEX 137) einzuhalten.
1. Funktionsvoraussetzungen
Die ordnungsgemäße Funktion der Gleitringdichtung wird nur erreicht, wenn folgende Voraussetzungen erfüllt werden:
•Gemäß Spezifikation geläppte Dichtflächen.
•Rechtwinkligkeit und Konzentrizität der Welle zur Stirnseite des Dichtungsraums bzw. der Bohrung.
•Freie axiale Federbeweglichkeit der befederten Einheit (des Gleitrings).
•Axiale und radiale Arbeitsbewegung der Welle innerhalb der Toleranzen von Flowserve bzw. des Erstausrüsters (je nach dem, welche enger sind).
•Die Dichtung wird für die Einsatzbedingungen verwendet, für die sie ausgewählt wurde.
•Die Anlage mit der/den eingebauten Dichtung/en wird im Rahmen der normalen Parameter betrieben (keine Kavitation, zu starken Schwingungen usw.).
•Belagbildung auf den Oberflächen der Wellen bzw. Wellenhülsen durch z.B. Kristallisation, Polymerisation ist auszuschließen.
•Dauerhafter Flüssigkeitsoder Gasfilm zwischen den Dichtflächen, je nach Dichtungsausführung.
Werden diese Funktionsvoraussetzungen nicht erfüllt, erhöht sich z. B. der Produktverbrauch und Anteile des Produkts kön-
25
nen in die Atmosphäre austreten. Des Weiteren können bei Nichtbeachtung hohe Bauteiltemperaturen entstehen.
Siehe Richtlinie 9 /9/EG, 1999/92/EG und EN 13 63-5.
Werden diese Funktionsvoraussetzungen nicht erfüllt, kann eine stark erhöhte Leckage auftreten und/oder die Lebensdauer der Dichtung verkürzt werden.
2.Sicherheitshinweise
GEFAHR: Bedeutet, dass bei Nichtbeachtung Personengefährdung besteht oder erheblicher Sachschaden auftreten kann.
ACHTUNG: Bedeutet, dass auf wichtige Informationen besonders hingewiesen wird, weil sie möglicherweise auch für Fachkräfte nicht offensichtlich sind. Die Beachtung dieser Hinweise ist jedoch unerlässlich, um Personenoder Sachschäden zu vermeiden.
Lesen Sie diese Anleitung bitte sorgfältig durch. Wenn die Gleitringdichtung gemäß der folgenden Anleitung eingebaut wird, wird sie lange störungsfrei funktionieren.
Für zugehörige Versorgungssysteme (Behälter, Kühler usw.) werden separate Anleitungen zur Verfügung gestellt.
Der Endanwender hat dafür Sorge zu tragen, dass die mit Handhabung, Montage und Einsatz der Gleitringdichtung und zugehörigen Ausrüstungen beauftragten Personen mit dem Aufbau und den Betriebsanforderungen dieser Ausrüstungen vertraut sind.
26
flowserve.com
Diese Personen müssen gegebenenfalls Schutzkleidung gemäß den für die Anlage geltenden Vorschriften tragen.
Bei Beschädigung eines Dichtungsbauteils und insbesondere der Dichtflächen kann (erhöhte) Leckage in flüssiger oder gasförmiger Form auftreten. Die gefährdende Wirkung hängt von dem abgedichteten Produkt ab, und von der Gefährdung können Personen und die Umwelt betroffen sein. Die mit der Leckage in Berührung kommenden Bauteile müssen korrosionsbeständig oder korrosionsgeschützt sein. Die austretende Leckage darf keine zündfähigen Gemische bilden.
EXPLOSIONSSCHUTZ: bedeutet, dass bei Nichtbeachtung in explosionsgefährdeten Bereichen Explosionsgefahr besteht und somit Personengefährdung und / oder erheblicher Sachschaden auftreten kann.
Die Sicherheits-, Unfallund Umweltschutzvorschriften für die Anlage sind unbedingt einzuhalten.
Diese Gleitringdichtung ist für die Abdichtung rotierender Maschinen ausgelegt und konstruiert. Für Schäden, die durch den Einsatz in davon abweichenden Anwendungen verursacht werden, haftet der Anwender.
Ein Ausfall, eine Wiederherstellung oder eine Änderung der Energieversorgung der Maschine und / oder des Versorgungssystems darf Personen und Umwelt nicht gefährden bzw. die Funktion der Gleitringdichtung nicht beeinträchtigen.
Vom Maschinenhersteller eingesetzte Schutzeinrichtungen müssen den Anforderungen der Anlage entsprechen, dürfen aber keine zusätzlichen Gefährdung darstellen. Diese Schutzeinrichtungen müssen sicherstellen, dass der für Wartungsarbeiten
27

an der Gleitringdichtung notwendige Bereich ordnungsgemäß zugänglich ist.
Die elektrische Versorgung der Maschine muss den Schutzzielen der Richtlinie 2006/95/EG entsprechen. Von einer nichtelektrischen Energieversorgung darf keine gefährdende Wirkung für Personen und Umwelt ausgehen.
3.Allgemeine Hinweise
In Bezug auf die Darstellungen und Angaben in dieser Montageund Wartungsanleitung sind technische Änderungen, die zur Verbesserung der Produktleistung notwendig werden, vorbehalten.
Das Urheberrecht an dieser Betriebsanleitung verbleibt bei Flowserve. Diese Betriebsanleitung ist für das Wartungs-, Bedienungsund Überwachungspersonal bestimmt und enthält Vorschriften und Zeichnungen technischer Art, die weder vollständig noch teilweise vervielfältigt, verbreitet oder zu Zwecken des Wettbewerbs unbefugt verwendet oder Dritten mitgeteilt werden dürfen.
Es ist zu beachten, dass Flowserve für Schäden und Betriebsstörungen, die sich aus der Nichtbeachtung der Betriebsanleitung ergeben, keine Haftung übernimmt.
4.Transport, Lagerung
Die Gleitringdichtung und die zugehörigen Versorgungssysteme sind in der ungeöffneten Original-Versandverpackung zu transportieren und
aufzubewahren. Der Lagerort der Gleitringdichtung und der zugehörigen
28
flowserve.com
Versorgungssysteme muss trocken und staubfrei sein. Es muss vermieden werden, die Ausrüstungen starken Temperaturschwankungen und Strahlung auszusetzen.
Teile oder komplette Gleitringdichtungen, die beim Transport gestürzt sind oder einem starken Stoß ausgesetzt waren, dürfen nicht eingebaut werden. Eine Inspektion durch Flowserve oder autorisierte Vertreter wird dringend empfohlen.
Im Falle einer Konservierung der Maschine mit eingebauter Gleitringdichtung darf das Konservierungsmittel die Funktion der Gleitringdichtung nicht beeinträchtigen, z. B. Verkleben der Gleitkörper, Aushärten bzw. Quellen der Nebendichtungen.
Nach einer Lagerzeit von 3 Jahren muss die Gleitringdichtung auf Neuwertigkeit überprüft werden. Dies betrifft besonders die
Dichtflächen und Nebendichtungen. Eine Inspektion durch Flowserve ist dann erforderlich.
Die Gleitringdichtung ist grundsätzlich mit geeigneten Hilfsmitteln wie z.B. Lasthebevorrichtungen zu transportieren.
5.Kontrolle der Anschlußmaße
5.1Befolgen Sie vor der Demontage die Sicherheitsbestimmungen. Dazu gehören unter anderem, aber nicht ausschließlich:
•Vor der Demontage muß die Maschine außer Betrieb und drucklos gefahren werden.
•Tragen Sie die vorgeschriebene Schutzkleidung.
•Die Sicherheits-, Unfallund Umweltvorschriften des
29

Betreibers für diesen Anlagenteil sind unbedingt einzuhalten.
•Schauen Sie in den SDB nach den Gefahrstoffvorschriften nach.
5.2Demontieren Sie die Pumpe gemäß den Anweisungen des Herstellers, und entfernen Sie die Dichtung.
5.3Prüfen Sie die Dichtungsdokumentation auf Konstruktion und Werkstoffe. Vergewissern Sie sich, dass die ISC2-Dichtung für die zu reparierende Maschine konstruiert wurde.
5. Prüfen Sie die Dichtungsmontagezeichnung auf erforderliche Veränderungen an der Anlage, bevor Sie mit der Installation beginnen, und führen Sie diese durch.
5.5Prüfen Sie die Pumpenabmessungen, um sicherzustellen, daß sie von den Abmessungen her innerhalb der in der Dichtungszeichnung angegebenen Toleranzen liegen. Kritische Abmessungen sind unter anderen: Außendurchmesser der Welle/Wellenhülse, Dichtungsraumtiefe, Dichtungsraumbohrung, Entfernung zum nächsten Hindernis, Stopfbuchsenführung und Stopfbuchsenverschraubung.
5.6Inspizieren und reinigen Sie gründlich den Dichtungsraum und die Welle oder die Wellenhülse. Prüfen Sie auf Korrosion oder sonstige Defekte. Entfernen Sie Grate, Einschnitte, Kerben oder sonstige Defekte, die die Dichtungsprofile beschädigen oder eine Undichtigkeit ermöglichen könnten. Ersetzen Sie ausgeschlagene Wellen oder Wellenhülsen. Scharfe Kanten von Nuten und Gewinden entfernen.
5.7Überprüfen Sie die Anforderungen der Anlage wie in
30
 Loading...